1 线程池概念
一种线程使用模式。线程过多会带来调度开销,进而影响缓存局部性和整体性能。而线程池维护着多个线程,等待着监督管理者分配可并发执行的任务。这避免了在处理短时间任务时创建与销毁线程的代价。线程池不仅能够保证内核的充分利用,还能防止过分调度。可用线程数量应该取决于可用的并发处理器、处理器内核、内存、网络sockets等的数量。
线程池的应用场景:
- 1️⃣需要大量的线程来完成任务,且完成任务的时间比较短。 WEB服务器完成网页请求这样的任务,使用线程池技术是非常合适的。因为单个任务小,而任务数量巨大,你可以想象一个热门网站的点击次数。 但对于长时间的任务,比如一个Telnet连接请求,线程池的优点就不明显了。因为Telnet会话时间比线程的创建时间大多了。
- 2️⃣对性能要求苛刻的应用,比如要求服务器迅速响应客户请求。
- 3️⃣接受突发性的大量请求,但不至于使服务器因此产生大量线程的应用。突发性大量客户请求,在没有线程池情况下,将产生大量线程,虽然理论上大部分操作系统线程数目最大值不是问题,短时间内产生大量线程可能使内存到达极限,出现错误。
线程池示例:
-
- 创建固定数量线程池,循环从任务队列中获取任务对象,
-
- 获取到任务对象后,执行任务对象中的任务接口。
2 第一个版本的线程池
在创建线程池之前我们想想线程池的成员变量应该有哪些?首先我们需要一个容器来存放线程,所以不妨使用vector;还要使用一个整形变量来记录线程池中线程的个数;为了保证线程安全问题我们还得需要一把锁,同时为了维护同步关系我们还得需要一个条件变量(这里的同步关系是指当没有任务时线程库中的线程就休眠,当有任务时就执行任务);另外我们还得需要一个任务队列。这里我们再封装一个任务类让等会儿验证时效果更加明显。
Task.hpp:
#pragma once
#include <iostream>
using namespace std;

class Task
{


public:
    Task(int x=0, int y=0, char op='+')
        : _x(x), _y(y), _op(op)
    {


    }
    void run()
    {


        switch (_op)
        {


        case '+':
            _res = _x + _y;
            break;
        case '-':
            _res = _x - _y;
            break;
        case '*':
            _res = _x * _y;
            break;
        case '/':
            if(_y==0)
            {


                _exitCode=1;
                return;
            }
            _res = _x / _y;
            break;
            case '%':
            _res = _x % _y;
            break;
        }
    }

    void formatMsk()
    {


        cout<<"mask:"<<_x<<_op<<_y<<"==?"<<endl;
    }

    void formatRes()
    {


        cout<<"res:"<<_x<<_op<<_y<<"=="<<_res<<endl;
    }

private:
    int _x;
    int _y;
    char _op;
    int _res = 0;
    int _exitCode = 0;
};
现在我们来实现第一个版本:
#pragma once
#include<iostream>
#include<vector>
#include<queue>
using namespace std;

const int N=5;
template<class T>
class threadPool
{


public:
    threadPool(int sz=N)
    :_sz(sz)
    ,_threads(sz)
    {


        pthread_mutex_init(&_mutex,nullptr);
        pthread_cond_init(&_cond,nullptr);
    }


    static void* Routine(void* args)//用内存池的多线程执行任务
    {


        pthread_detach(pthread_self());//先让自己与主线程分离
        threadPool<T> *ptp=static_cast<threadPool<T> *>(args);

        while(true)
        {


            pthread_mutex_lock(&(ptp->_mutex));

            while((ptp->_masks).empty())
            {


                pthread_cond_wait(&(ptp->_cond),&(ptp->_mutex));
            }

            T task=(ptp->_masks).front();
            (ptp->_masks).pop();
            pthread_mutex_unlock(&(ptp->_mutex));

            task.run();//在临界区外执行任务
            task.formatRes();
        }

        return nullptr;
    }

    void Start()
    {


        for(int i=0;i<_sz;++i)
        {


            pthread_create(&_threads[i],nullptr,Routine,this);
        }
    }

    void PushTask(const T& task)
    {


        pthread_mutex_lock(&_mutex);
        _masks.push(task);
        pthread_mutex_unlock(&_mutex);
        pthread_cond_signal(&_cond);//记得唤醒休眠的线程去执行任务
    }

    ~threadPool()
    {


        pthread_mutex_destroy(&_mutex);
        pthread_cond_destroy(&_cond);
    }

    vector<pthread_t> _threads;
    queue<T> _masks;
    int _sz;//线程池中线程的个数
    pthread_mutex_t _mutex;
    pthread_cond_t _cond;
};
这里面有几个特别需要注意的点:
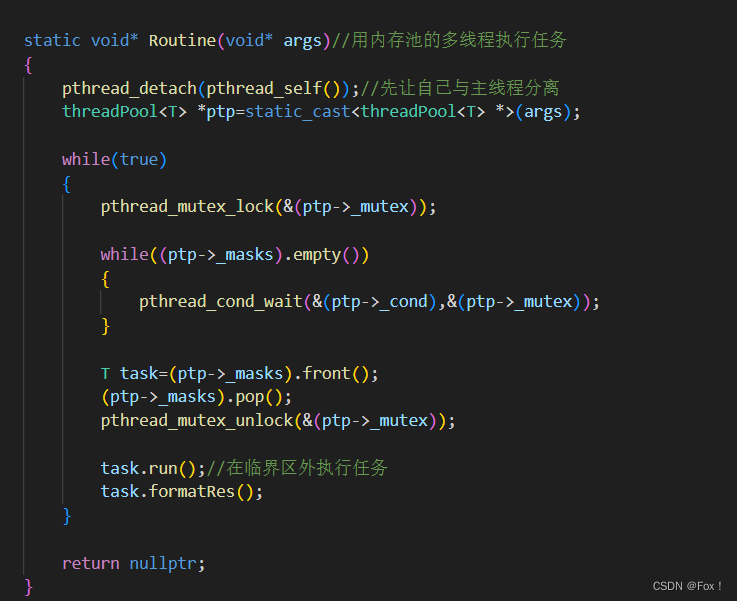
- Routine我们实现的是static版本的,因为创建线程所要求的函数指针与类内成员函数不吻合,类内成员函数有
this指针。 - 创建了线程后让该线程与主线程分离,也就是主线程不管新线程的资源回收了。
- 执行任务时要在临界区外执行,这样并发执行的效率才会更加高效。
- 为了方便使用将类中成员变量都搞成了公有,建议不要这样搞,可以自己写一个get。
至于其他的方面都很简单,相信大家能够很容易理解。
测试程序:
const char *ops = "+-*/%";

int main()
{


    threadPool<Task> *threads = new threadPool<Task>(30);
    threads->Start();
    srand((size_t)time(nullptr));
    while (true)
    {


        int x = rand() % 30 + 1;
        int y = rand() % 30 + 1;
        char op = ops[rand() % strlen(ops)];

        Task t(x, y, op);
        threads->PushTask(t);
        t.formatMsk();
        sleep(1);
    }

    return 0;
}
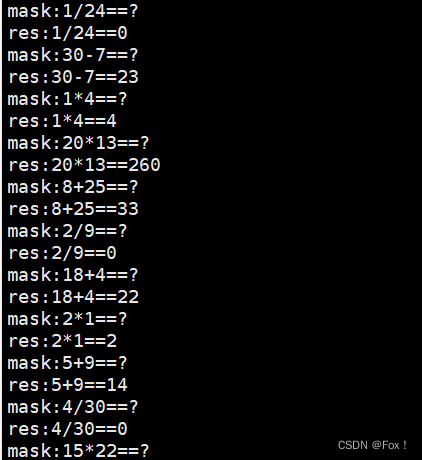
我们来运行下结果:

3 第二个版本的线程池
其实第二个版本的线程池与第一个的核心思路基本一致,主要是第二个版本使用的是我们自己模拟实现的创建线程的类,比如我们之前自己模拟实现(本质是封装了库中的线程库接口)的一份Thread.hpp:
#pragma once
#include <iostream>
#include <functional>
using namespace std;

class threadProcess
{


public:
    enum stu
    {


        NEW,
        RUNNING,
        EXIT
    };

    template<class T>
    threadProcess(int num, T exe, void *args)
        : _tid(0)
        , _status(NEW)
        ,_exe(exe)
        , _args(args)
    {


        char name[26];
        snprintf(name, 26, "thread%d", num);
        _name = name;
    }

    static void* runHelper(void *args)
    {


        threadProcess *ts = (threadProcess *)args;

        (*ts)();
        return nullptr;
    }

    void operator()() // 仿函数
    {


        if (_exe != nullptr)
            _exe(_args);
    }

    void Run()
    {


        int n = pthread_create(&_tid, nullptr, runHelper, this);
        if (n != 0)
            exit(-1);
        _status = RUNNING;
    }

    void Join()
    {


        int n = pthread_join(_tid, nullptr);
        if (n != 0)
            exit(-1);
        _status = EXIT;
    }


    string _name;
    pthread_t _tid;
    stu _status;
    function<void*(void*)> _exe;
    void *_args;
};
这样我们自己就能够用自己的线程库来完成了:
#pragma once
#include"Thread.hpp"
#include<iostream>
#include<vector>
#include<queue>
using namespace std;

const int N=5;
template<class T>
class threadPool
{


public:
    threadPool(int sz=N)
        :_sz(sz)
    {


        pthread_mutex_init(&_mutex,nullptr);
        pthread_cond_init(&_cond,nullptr);
    }


    static void* Routine(void* args)//用内存池的多线程执行任务
    {


        //pthread_detach(pthread_self());调用自己写的线程接口不用在分离了,析构时在join掉就好了
        threadPool<T> *ptp=static_cast<threadPool<T> *>(args);

        while(true)
        {


            pthread_mutex_lock(&(ptp->_mutex));

            while((ptp->_masks).empty())
            {


                pthread_cond_wait(&(ptp->_cond),&(ptp->_mutex));
            }

            T task=(ptp->_masks).front();
            (ptp->_masks).pop();
            pthread_mutex_unlock(&(ptp->_mutex));

            task.run();//在临界区外执行任务
            task.formatRes();

        }

        return nullptr;

    }

    void Init()
    {


        for(int i=0;i<_sz;++i)
        {


           _threads.push_back(threadProcess(i+1,Routine,this));
        }
    }

    void Start()
    {


        for(auto& e:_threads)
        {


            e.Run();
        }
    }

    void PushTask(const T& task)
    {


        pthread_mutex_lock(&_mutex);
        _masks.push(task);
        pthread_mutex_unlock(&_mutex);
        pthread_cond_signal(&_cond);//记得唤醒休眠的线程去执行任务
    }

    ~threadPool()
    {


        for(auto& e:_threads)
        {


            e.Join();
        }
        pthread_mutex_destroy(&_mutex);
        pthread_cond_destroy(&_cond);
    }

    void Check()
    {


        for(auto& e:_threads)
        {


            cout<<"name:"<<e._name<<" id"<<e._tid<<endl;
        }
    }

    vector<threadProcess> _threads;
    queue<T> _masks;
    int _sz;//线程池中线程的个数
    pthread_mutex_t _mutex;
    pthread_cond_t _cond;
};
测试代码:
int main()
{


    threadPool<Task> *threads = new threadPool<Task>(8);
    threads->Init();
    threads->Start();
    srand((size_t)time(nullptr));
    while (true)
    {


        int x = rand() % 30 + 1;
        int y = rand() % 30 + 1;
        char op = ops[rand() % strlen(ops)];

        Task t(x, y, op);
        threads->PushTask(t);
        t.formatMsk();
        sleep(1);
    }
    return 0;
}
运行结果:
4 第三个版本的线程池
这个版本的线程池在前面版本的基础上加了一个单例模式。因为我们发现其实线程池只需要一个就可以了,我们使用懒汉模式来创建单例。
代码实现:
#pragma once
#include "Thread.hpp"
#include <iostream>
#include <vector>
#include <queue>
using namespace std;

const int N = 5;
template <class T>
class threadPool
{


public:

    static threadPool<T>* GetInstance(int sz=N)
    {


        if(_sta_obj==nullptr)
        {


            pthread_mutex_lock(&_mutex);
            if(_sta_obj==nullptr)
            {


                _sta_obj=new threadPool<T>(sz);
            }
            pthread_mutex_unlock(&_mutex);
        }
    }

    static void *Routine(void *args) // 用内存池的多线程执行任务
    {


        // pthread_detach(pthread_self());调用自己写的线程接口不用在分离了,析构时在join掉就好了
        threadPool<T> *ptp = static_cast<threadPool<T> *>(args);

        while (true)
        {


            pthread_mutex_lock(&(ptp->_mutex));

            while ((ptp->_masks).empty())
            {


                pthread_cond_wait(&(ptp->_cond), &(ptp->_mutex));
            }

            T task = (ptp->_masks).front();
            (ptp->_masks).pop();
            pthread_mutex_unlock(&(ptp->_mutex));

            task.run(); // 在临界区外执行任务
            task.formatRes();
        }

        return nullptr;
    }

    void Init()
    {


        for (int i = 0; i < _sz; ++i)
        {


            _threads.push_back(threadProcess(i + 1, Routine, this));
        }
    }

    void Start()
    {


        for (auto &e : _threads)
        {


            e.Run();
        }
    }

    void PushTask(const T &task)
    {


        pthread_mutex_lock(&_mutex);
        _masks.push(task);
        pthread_mutex_unlock(&_mutex);
        pthread_cond_signal(&_cond); // 记得唤醒休眠的线程去执行任务
    }

    ~threadPool()
    {


        for (auto &e : _threads)
        {


            e.Join();
        }
        pthread_mutex_destroy(&_mutex);
        pthread_cond_destroy(&_cond);
    }

    void Check()
    {


        for (auto &e : _threads)
        {


            cout << "name:" << e._name << " id" << e._tid << endl;
        }
    }

    vector<threadProcess> _threads;
    queue<T> _masks;
    int _sz; // 线程池中线程的个数
    pthread_mutex_t _mutex;
    pthread_cond_t _cond;

private:
    threadPool(int sz = N)
        : _sz(sz)
    {


        pthread_mutex_init(&_mutex, nullptr);
        pthread_cond_init(&_cond, nullptr);
    }

    threadPool(const threadPool<T>& th)=delete;
    threadPool<T>& operator=(const threadPool<T>& th)=delete;

    static threadPool<T>* _sta_obj;
};
template<class T>
threadPool<T>* threadPool<T>::_sta_obj=nullptr;
其中注意点:
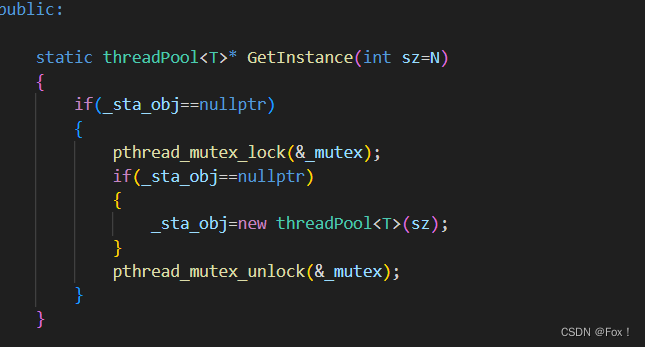
在加锁时为了高效我们是用了双重if条件判断。
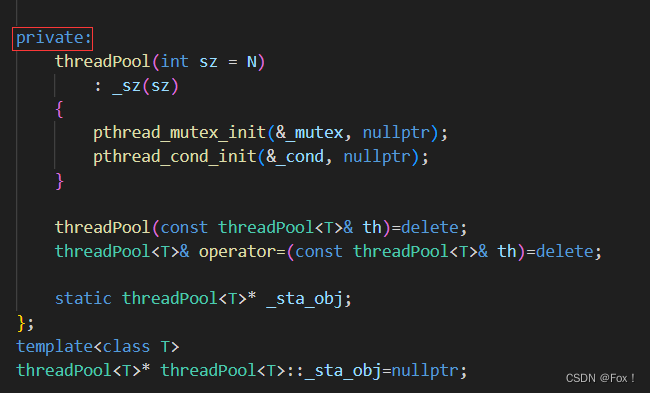
注意将构造函数搞成了私有,拷贝构造和拷贝赋值都删掉了。
5 STL中的容器以及智能指针的线程安全问题
STL中的容器是否是线程安全的?
不是。原因是, STL 的设计初衷是将性能挖掘到极致, 而一旦涉及到加锁保证线程安全, 会对性能造成巨大的影响.而且对于不同的容器, 加锁方式的不同, 性能可能也不同(例如hash表的锁表和锁桶).因此 STL 默认不是线程安全. 如果需要在多线程环境下使用, 往往需要调用者自行保证线程安全。
智能指针是否是线程安全的?
对于 unique_ptr, 由于只是在当前代码块范围内生效, 因此不涉及线程安全问题。
对于 shared_ptr, 多个对象需要共用一个引用计数变量, 所以会存在线程安全问题. 但是标准库实现的时候考虑到了这个问题, 基于原子操作(CAS)的方式保证 shared_ptr 能够高效, 原子的操作引用计数。
6 其他常见的各种锁
- 悲观锁:在每次取数据时,总是担心数据会被其他线程修改,所以会在取数据前先加锁(读锁,写锁,行锁等),当其他线程想要访问数据时,被阻塞挂起。
- 乐观锁:每次取数据时候,总是乐观的认为数据不会被其他线程修改,因此不上锁。但是在更新数据前,会判断其他数据在更新前有没有对数据进行修改。主要采用两种方式:版本号机制和CAS操作。CAS操作:当需要更新数据时,判断当前内存值和之前取得的值是否相等。如果相等则用新值更新。若不等则失败,失败则重试,一般是一个自旋的过程,即不断重试。
- 自旋锁,公平锁,非公平锁。
7 读者写者问题(了解)
读写锁:
在编写多线程的时候,有一种情况是十分常见的。那就是,有些公共数据修改的机会比较少。相比较改写,它们读的机会反而高的多。通常而言,在读的过程中,往往伴随着查找的操作,中间耗时很长。给这种代码段加锁,会极大地降低我们程序的效率。那么有没有一种方法,可以专门处理这种多读少写的情况呢? 有,那就是读写锁。
读写锁的行为:
| 当前锁的状态 | 读锁请求 | 写锁请求 |
|---|---|---|
| 无锁 | 可以 | 可以 |
| 读锁 | 可以 | 阻塞 |
| 写锁 | 阻塞 | 阻塞 |
- 注意:写独占,读共享,读锁优先级高