文章目录
- 序
- DisplayContent初始化
- DisplayAreaPolicy初始化
-
- DisplayAreaPolicy.Provider
- DisplayAreaPolicy.DefaultProvider
-
- 1.初始化TaskDisplayArea
- 2.创建HierarchyBuilder
- 3.1添加ImeContainer到HierarchyBuilder
- 3.2添加TaskDisplayArea到HierarchyBuilder
- 4.为HierarchyBuilder添加Feature
- 5.生成DisplayArea层级结构
序
如何通过dump中的内容找到对应的代码?
我们dump窗口层级发现会有很多信息,adb shell dumpsys activity containers
 这里我们以其中的DefaultTaskDisplayArea为例
 在源码的framework目录下查找该字符串,找到对应的代码就可以通过打印堆栈或者搜索代码跟踪的方式找到其调用逻辑
final TaskDisplayArea defaultTaskDisplayArea =
			new TaskDisplayArea(content, wmService,
			"DefaultTaskDisplayArea", FEATURE_DEFAULT_TASK_CONTAINER);
也就是这一句
当然我们上篇文章也讲到了DisplayContent代表的屏幕的DisplayArea层级结构的根节点,我们可以直接从DisplayContent.java的构造方法出发,追踪其流程
DisplayContent初始化
代码路径:/frameworks/base/services/core/java/com/android/server/wm/DisplayContent.java
/**
     * Create new {@link DisplayContent} instance, add itself to the root window container and
     * initialize direct children.
     * @param display May not be null.
     * @param root {@link RootWindowContainer}
     */
    DisplayContent(Display display, RootWindowContainer root) {


        super(root.mWindowManager, "DisplayContent", FEATURE_ROOT);
        ......
        final Transaction pendingTransaction = getPendingTransaction();
        configureSurfaces(pendingTransaction);
        pendingTransaction.apply();
        ......
    }
创建新的DisplayContent实例,将其自身添加到根窗口容器并初始化直接子级
FEATURE_ROOT,对应DisplayContent,一个屏幕上的根DisplayArea,也就是dump中的Display节点。

这里我们主要关注一下configureSurfaces(pendingTransaction);
 /**
     * Configures the surfaces hierarchy for DisplayContent
     * This method always recreates the main surface control but reparents the children
     * if they are already created.
     * @param transaction as part of which to perform the configuration
     */
    private void configureSurfaces(Transaction transaction) {


        final SurfaceControl.Builder b = mWmService.makeSurfaceBuilder(mSession)
                .setOpaque(true)
                .setContainerLayer()
                .setCallsite("DisplayContent");
        mSurfaceControl = b.setName(getName()).setContainerLayer().build();

        if (mDisplayAreaPolicy == null) {


            // Setup the policy and build the display area hierarchy.
            // Build the hierarchy only after creating the surface so it is reparented correctly
            mDisplayAreaPolicy = mWmService.getDisplayAreaPolicyProvider().instantiate(
                    mWmService, this /* content */, this /* root */,
                    mImeWindowsContainer);
        }
        ......

    }
通过DisplayContent来配置图层结构
DisplayAreaPolicy初始化
代码路径:/frameworks/base/services/core/java/com/android/server/wm/DisplayAreaPolicy.java
mDisplayAreaPolicy = mWmService.getDisplayAreaPolicyProvider().instantiate(
        mWmService, this /* content */, this /* root */,
        mImeWindowsContainer)
调用DisplayAreaPolicy中的Provider接口instantiate方法,去初始化一个DisplayArea层级结构
记住这边传递的参数,后面代码需要结合起来看
DisplayAreaPolicy.Provider
    /**
     * Provider for {@link DisplayAreaPolicy} instances.
     *
     * <p>By implementing this interface and overriding the
     * {@code config_deviceSpecificDisplayAreaPolicyProvider}, a device-specific implementations
     * of {@link DisplayAreaPolicy} can be supplied.
     */
    public interface Provider {


        /**
         * Instantiates a new {@link DisplayAreaPolicy}. It should set up the {@link DisplayArea}
         * hierarchy.
         *
         * @see DisplayAreaPolicy#DisplayAreaPolicy
         */
        DisplayAreaPolicy instantiate(WindowManagerService wmService, DisplayContent content,
                RootDisplayArea root, DisplayArea.Tokens imeContainer);
用来实例化一个DisplayAreaPolicy对象,这个对象应该建立起DisplayArea层级结构,实际走到的则是DisplayAreaPolicy.Provider的实现类DisplayAreaPolicy.DefaultProvider.instantiate方法
DisplayAreaPolicy.DefaultProvider
/** Provider for platform-default display area policy. */
static final class DefaultProvider implements DisplayAreaPolicy.Provider {
@Override
public DisplayAreaPolicy instantiate(WindowManagerService wmService,
DisplayContent content, RootDisplayArea root,
DisplayArea.Tokens imeContainer) {
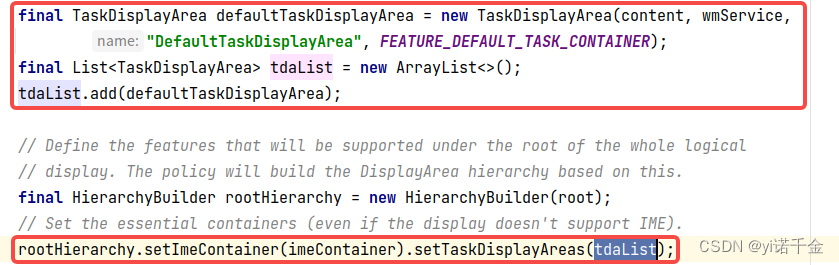
//1.创建一个名为“DefaultTaskDisplayArea”的TaskDisplayArea,并将其添加到List中
final TaskDisplayArea defaultTaskDisplayArea = new TaskDisplayArea(content, wmService,
"DefaultTaskDisplayArea", FEATURE_DEFAULT_TASK_CONTAINER);
final List<TaskDisplayArea> tdaList = new ArrayList<>();
tdaList.add(defaultTaskDisplayArea);
// Define the features that will be supported under the root of the whole logical
// display. The policy will build the DisplayArea hierarchy based on this.
//2.创建HierarchyBuilder
final HierarchyBuilder rootHierarchy = new HierarchyBuilder(root);
// Set the essential containers (even if the display doesn't support IME).
//3.1添加ImeContainer到HierarchyBuilder
//3.2创建并保存默认TaskDisplayArea到HierarchyBuilder
rootHierarchy.setImeContainer(imeContainer).setTaskDisplayAreas(tdaList);
if (content.isTrusted()) {
// Only trusted display can have system decorations.
//4.为HierarchyBuilder添加Feature
configureTrustedHierarchyBuilder(rootHierarchy, wmService, content);
}
// Instantiate the policy with the hierarchy defined above. This will create and attach
// all the necessary DisplayAreas to the root.
//5.生成DisplayArea层级结构
return new DisplayAreaPolicyBuilder().setRootHierarchy(rootHierarchy).build(wmService);
}
我们先了解下DisplayArea.Tokens的构造方法
        Tokens(WindowManagerService wms, Type type, String name) {


            this(wms, type, name, FEATURE_WINDOW_TOKENS);
        }
FEATURE_WINDOW_TOKENS,容纳非activity窗口的DisplayArea,dump中对应着ImeContainer、WindowToken等
这里DefaultProvider实现了这个接口。
这个方法主要干了这几件事情:
1.初始化TaskDisplayArea
final TaskDisplayArea defaultTaskDisplayArea = new TaskDisplayArea(content, wmService,
        "DefaultTaskDisplayArea", FEATURE_DEFAULT_TASK_CONTAINER);
final List<TaskDisplayArea> tdaList = new ArrayList<>();
tdaList.add(defaultTaskDisplayArea);
FEATURE_DEFAULT_TASK_CONTAINER,容纳默认Task容器的DisplayArea,dump中正是以“DefaultTaskDisplayArea”命名
创建一个名为“DefaultTaskDisplayArea”的TaskDisplayArea,并将其添加到List中
2.创建HierarchyBuilder
final HierarchyBuilder rootHierarchy = new HierarchyBuilder(root);
HierarchyBuilder是什么?是用来定义在整个逻辑显示的根里面所需的一些Feature
HierarchyBuilder是在DisplayAreaPolicyBuilder中定义的
代码路径:frameworks/base/services/core/java/com/android/server/wm/DisplayAreaPolicyBuilder.java
    /**
     *  Builder to define {@link Feature} and {@link DisplayArea} hierarchy under a
     * {@link RootDisplayArea}
     */
    static class HierarchyBuilder {


        private static final int LEAF_TYPE_TASK_CONTAINERS = 1;
        private static final int LEAF_TYPE_IME_CONTAINERS = 2;
        private static final int LEAF_TYPE_TOKENS = 0;

        private final RootDisplayArea mRoot;
        private final ArrayList<DisplayAreaPolicyBuilder.Feature> mFeatures = new ArrayList<>();
        private final ArrayList<TaskDisplayArea> mTaskDisplayAreas = new ArrayList<>();
        @Nullable
        private DisplayArea.Tokens mImeContainer;

        HierarchyBuilder(RootDisplayArea root) {


            mRoot = root;
        }
        ......
    }
从代码中我们可以看出,HierarchyBuilder用来构建一个DisplayArea层级结构,该层级结构的根节点
其构造方法HierarchyBuilder(RootDisplayArea root)传入的是RootDisplayArea的对象。
结合前面的configureSurfaces方法中我们可以发现传入的是DisplayContent,即HierarchyBuilder以DisplayContent对象为根节点,生成一个DisplayArea层级结构。
3.1添加ImeContainer到HierarchyBuilder
rootHierarchy.setImeContainer(imeContainer).setTaskDisplayAreas(tdaList);
我们先看setImeContainer(imeContainer)部分。其中参数imeContainer是DisplayArea.Tokens的对象。
在DisplayContent中DisplayAreaPolicy初始化时,传递了一个mImeWindowsContainer对应我们这里的imeContainer形参,其是在DisplayContent中定义并初始化的
代码路径:/frameworks/base/services/core/java/com/android/server/wm/DisplayContent.java
    // Contains all IME window containers. Note that the z-ordering of the IME windows will depend
    // on the IME target. We mainly have this container grouping so we can keep track of all the IME
    // window containers together and move them in-sync if/when needed. We use a subclass of
    // WindowContainer which is omitted from screen magnification, as the IME is never magnified.
    // TODO(display-area): is "no magnification" in the comment still true?
    private final ImeContainer mImeWindowsContainer = new ImeContainer(mWmService);
ImeContainer就是输入法的容器,其继承在DisplayContent中DisplayArea.Tokens
    /**
     * Container for IME windows.
     *
     * This has some special behaviors:
     * - layers assignment is ignored except if setNeedsLayer() has been called before (and no
     *   layer has been assigned since), to facilitate assigning the layer from the IME target, or
     *   fall back if there is no target.
     * - the container doesn't always participate in window traversal, according to
     *   {@link #skipImeWindowsDuringTraversal()}
     */
    private static class ImeContainer extends DisplayArea.Tokens {
HierarchyBuilder的setImeContainer方法
代码路径:frameworks/base/services/core/java/com/android/server/wm/DisplayAreaPolicyBuilder.java
private DisplayArea.Tokens mImeContainer;
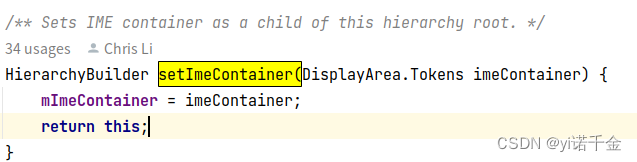
/** Sets IME container as a child of this hierarchy root. */
HierarchyBuilder setImeContainer(DisplayArea.Tokens imeContainer) {
mImeContainer = imeContainer;
return this;
}
从代码中可以看出,就是将DisplayContent的mImeWindowsContainer保存到了HierarchyBuilder的mImeContainer成员变量中,后续创建DisplayArea层级结构时可以直接拿来使用。
3.2添加TaskDisplayArea到HierarchyBuilder
rootHierarchy.setImeContainer(imeContainer).setTaskDisplayAreas(tdaList);
这里我们看setTaskDisplayAreas(tdaList)部分,第一步【1.初始化TaskDisplayArea】的时候,就已经把名为“DefaultTaskDisplayArea”的TaskDisplayArea,并将其添加到tdaList中,
		private final ArrayList<TaskDisplayArea> mTaskDisplayAreas = new ArrayList<>();

       /**
         * Sets {@link TaskDisplayArea} that are children of this hierarchy root.
         * {@link DisplayArea} group must have at least one {@link TaskDisplayArea}.
         */
        HierarchyBuilder setTaskDisplayAreas(List<TaskDisplayArea> taskDisplayAreas) {


            mTaskDisplayAreas.clear();
            mTaskDisplayAreas.addAll(taskDisplayAreas);
            return this;
        }
虽然TaskDisplayArea是支持嵌套的,并且这里也采用了一个ArrayList来管理TaskDisplayArea,但是目前TaskDisplayArea只在这里被创建,即目前一个DisplayContent只有一个名为“DefaultTaskDisplayArea”的TaskDisplayArea。从dumpsys activity containers 中我们也可以看到,整个文件也只有一个“DefaultTaskDisplayArea”
4.为HierarchyBuilder添加Feature
// Only trusted display can have system decorations.
configureTrustedHierarchyBuilder(rootHierarchy, wmService, content);
configureTrustedHierarchyBuilder这个方法就在DisplayAreaPolicy.DefaultProvider内部
private void configureTrustedHierarchyBuilder(HierarchyBuilder rootHierarchy,
                WindowManagerService wmService, DisplayContent content) {


            // WindowedMagnification should be on the top so that there is only one surface
            // to be magnified.
            rootHierarchy.addFeature(new Feature.Builder(wmService.mPolicy, "WindowedMagnification",
                    FEATURE_WINDOWED_MAGNIFICATION)
                    .upTo(TYPE_ACCESSIBILITY_MAGNIFICATION_OVERLAY)
                    .except(TYPE_ACCESSIBILITY_MAGNIFICATION_OVERLAY)
                    // Make the DA dimmable so that the magnify window also mirrors the dim layer.
                    .setNewDisplayAreaSupplier(DisplayArea.Dimmable::new)
                    .build());
            if (content.isDefaultDisplay) {


                // Only default display can have cutout.
                // See LocalDisplayAdapter.LocalDisplayDevice#getDisplayDeviceInfoLocked.
                rootHierarchy.addFeature(new Feature.Builder(wmService.mPolicy, "HideDisplayCutout",
                        FEATURE_HIDE_DISPLAY_CUTOUT)
                        .all()
                        .except(TYPE_NAVIGATION_BAR, TYPE_NAVIGATION_BAR_PANEL, TYPE_STATUS_BAR,
                                TYPE_NOTIFICATION_SHADE)
                        .build())
                        .addFeature(new Feature.Builder(wmService.mPolicy, "OneHanded",
                                FEATURE_ONE_HANDED)
                                .all()
                                .except(TYPE_NAVIGATION_BAR, TYPE_NAVIGATION_BAR_PANEL,
                                        TYPE_SECURE_SYSTEM_OVERLAY)
                                .build());
            }
            rootHierarchy
                    .addFeature(new Feature.Builder(wmService.mPolicy, "FullscreenMagnification",
                            FEATURE_FULLSCREEN_MAGNIFICATION)
                            .all()
                            .except(TYPE_ACCESSIBILITY_MAGNIFICATION_OVERLAY, TYPE_INPUT_METHOD,
                                    TYPE_INPUT_METHOD_DIALOG, TYPE_MAGNIFICATION_OVERLAY,
                                    TYPE_NAVIGATION_BAR, TYPE_NAVIGATION_BAR_PANEL)
                            .build())
                    .addFeature(new Feature.Builder(wmService.mPolicy, "ImePlaceholder",
                            FEATURE_IME_PLACEHOLDER)
                            .and(TYPE_INPUT_METHOD, TYPE_INPUT_METHOD_DIALOG)
                            .build());
        }
    }
从代码中可以看到五大的Feature:WindowedMagnification、HideDisplayCutout、OneHanded、FullscreenMagnification、ImePlaceholder,这些Feature其实也就是我们在dumpsys中看到那些,还有一些关键方法all()、and()、except()、upto()、build()等
在我们正式开始聊这个几个Feature添加之前,我们先来看看,Feature是怎么定义的
4.1 Feature的定义
从HierarchyBuilder的addFeature方法跟踪发现,Feature是在DisplayAreaPolicyBuilder中定义的
        HierarchyBuilder addFeature(DisplayAreaPolicyBuilder.Feature feature) {


            mFeatures.add(feature);
            return this;
        }
Feature的定义
代码路径/frameworks/base/services/core/java/com/android/server/wm/DisplayAreaPolicyBuilder.java
    /**
     * A feature that requires {@link DisplayArea DisplayArea(s)}.
     */
    static class Feature {


        private final String mName;
        private final int mId;
        private final boolean[] mWindowLayers;
        private final NewDisplayAreaSupplier mNewDisplayAreaSupplier;

        private Feature(String name, int id, boolean[] windowLayers,
                NewDisplayAreaSupplier newDisplayAreaSupplier) {


            mName = name;
            mId = id;
            mWindowLayers = windowLayers;
            mNewDisplayAreaSupplier = newDisplayAreaSupplier;
        }
        ......
    }
首先Feature代表的是DisplayArea的一个特征,可以根据Feature来对不同的DisplayArea进行划分。
- mName:这个Feature的名字,如上面的“WindowedMagnification”,“HideDisplayCutout”之类的,后续DisplayArea层级结构建立起来后,每个DisplayArea的名字用的就是当前DisplayArea对应的那个Feature的名字。
- mId:Feature的ID,如上面的FEATURE_WINDOWED_MAGNIFICATION和FEATURE_HIDE_DISPLAY_CUTOUT,虽说是Feature的ID,因为Feature又是DisplayArea的特征
- mWindowLayers:代表了这个DisplayArea可以包含哪些层级对应的窗口
- mNewDisplayAreaSupplier:只是一个接口,内部定义一个create方法。
关键是其Feature内部定义Builder类以及其build()方法
Feature.Builder和Feature.Builder.build()
static class Builder {


            private final WindowManagerPolicy mPolicy;
            private final String mName;
            private final int mId;
            private final boolean[] mLayers;
            private NewDisplayAreaSupplier mNewDisplayAreaSupplier = DisplayArea::new;
            private boolean mExcludeRoundedCorner = true;

            /**
             * Builds a new feature that applies to a set of window types as specified by the
             * builder methods.
             *
             * <p>The set of types is updated iteratively in the order of the method invocations.
             * For example, {@code all().except(TYPE_STATUS_BAR)} expresses that a feature should
             * apply to all types except TYPE_STATUS_BAR.
             *
             * <p>The builder starts out with the feature not applying to any types.
             *
             * @param name the name of the feature.
             * @param id of the feature. {@see Feature#getId}
             */
            Builder(WindowManagerPolicy policy, String name, int id) {


                mPolicy = policy;
                mName = name;
                mId = id;
                mLayers = new boolean[mPolicy.getMaxWindowLayer() + 1];
            }
            ......
            Feature build() {


                if (mExcludeRoundedCorner) {


                    // Always put the rounded corner layer to the top most layer.
                    mLayers[mPolicy.getMaxWindowLayer()] = false;
                }
                return new Feature(mName, mId, mLayers.clone(), mNewDisplayAreaSupplier);
            }
通过一套适用于具体的窗口类型构建方法来构建新Feature
其中mLayers = new boolean[mPolicy.getMaxWindowLayer() + 1]; mPolicy.getMaxWindowLayer()返回的是窗口最大层数。
    /**
     * Returns the max window layer.
     * <p>Note that the max window layer should be higher that the maximum value which reported
     * by {@link #getWindowLayerFromTypeLw(int, boolean)} to contain rounded corner overlay.</p>
     *
     * @see WindowManager.LayoutParams#PRIVATE_FLAG_IS_ROUNDED_CORNERS_OVERLAY
     */
    default int getMaxWindowLayer() {


        return 36;
    }
1.代码中最大层数是36,这里+1,则也就是mLayers = new boolean[37],即窗口层级区间为[0,36]
2.在看看build()方法中的 mLayers[mPolicy.getMaxWindowLayer()] = false;,则表示mLayers[36] = false,即第36层在build时会置为false(注:mExcludeRoundedCorner这个变量的值一直是true,没有改动)
3.return new Feature(mName, mId, mLayers.clone(), mNewDisplayAreaSupplier);
其中mLayers对应的就是Feature中的mWindowLayers,即mLayers.clone()就是把Feature.mWindowLayer的值复制给Feature.Builder.mLayer。
下面我们来说说构建Feature的关键星魂
4.2 构建Feature的核心方法
以下代码均在DisplayAreaPolicyBuilder.Feature.Builder中
Feature.Builder第一星魂:all()
        /**
         * Set that the feature applies to all window types.
         */
        Builder all() {


            Arrays.fill(mLayers, true);
            return this;
        }
将mLayers数组中的所有元素都设置为true,表示当前DisplayArea可以包含所有类型的窗口。
简述,all()就是把所有类型窗口置为true(添加)
Feature.Builder第二星魂:and()
        /**
         * Set that the feature applies to the given window types.
         */
        Builder and(int... types) {


            for (int i = 0; i < types.length; i++) {


                int type = types[i];
                set(type, true);
            }
            return this;
        }
先将传入的窗口类型先转换为对应的层级值,然后将mLayers数组中与该层级值对应的元素设置为true,表示该DisplayArea可以包含传入的窗口类型对应的窗口。
简述,and就是把你传入的所有参数(窗口类型)置为true(添加)
Feature.Builder第三星魂:except()
        /**
         * Set that the feature does not apply to the given window types.
         */
        Builder except(int... types) {


            for (int i = 0; i < types.length; i++) {


                int type = types[i];
                set(type, false);
            }
            return this;
        }
先将传入的窗口类型先转换为对应的层级值,然后将mLayers数组中与该层级值对应的元素设置为false,表示该DisplayArea不再包含传入的窗口类型对应的窗口。
简述,except就是你传入的所有参数(窗口类型)置为false(不添加)
Feature.Builder第四星魂(必点):upTo()
        /**
         * Set that the feature applies window types that are layerd at or below the layer of
         * the given window type.
         */
        Builder upTo(int typeInclusive) {


            final int max = layerFromType(typeInclusive, false);
            for (int i = 0; i < max; i++) {


                mLayers[i] = true;
            }
            set(typeInclusive, true);
            return this;
        }
先将传入的窗口类型先转换为对应的层级值,然后将mLayers数组中与该层级值对应的的元素之前的所有元素(包含该元素)设置为true,表示当前DisplayArea可以包含比传入的窗口类型层级值低的所有窗口。
简述,upTo把就是[0,typeInclusive]区间内的所有类型窗口置为true(添加)。
其中layerFromType方法非常重要,我们一起看看
            private int layerFromType(int type, boolean internalWindows) {


                return mPolicy.getWindowLayerFromTypeLw(type, internalWindows);
            }
调用的了WindowManagerPolicy.getWindowLayerFromTypeLw方法
WindowManagerPolicy.getWindowLayerFromTypeLw
  /**
     * Returns the layer assignment for the window type. Allows you to control how different
     * kinds of windows are ordered on-screen.
     *
     * @param type The type of window being assigned.
     * @param canAddInternalSystemWindow If the owner window associated with the type we are
     *        evaluating can add internal system windows. I.e they have
     *        {@link Manifest.permission#INTERNAL_SYSTEM_WINDOW}. If true, alert window
     *        types {@link android.view.WindowManager.LayoutParams#isSystemAlertWindowType(int)}
     *        can be assigned layers greater than the layer for
     *        {@link android.view.WindowManager.LayoutParams#TYPE_APPLICATION_OVERLAY} Else, their
     *        layers would be lesser.
     * @return int An arbitrary integer used to order windows, with lower numbers below higher ones.
     */
    default int getWindowLayerFromTypeLw(int type, boolean canAddInternalSystemWindow) {


        return getWindowLayerFromTypeLw(type, canAddInternalSystemWindow,
                false /* roundedCornerOverlay */);
    }

    /**
     * Returns the layer assignment for the window type. Allows you to control how different
     * kinds of windows are ordered on-screen.
     *
     * @param type The type of window being assigned.
     * @param canAddInternalSystemWindow If the owner window associated with the type we are
     *        evaluating can add internal system windows. I.e they have
     *        {@link Manifest.permission#INTERNAL_SYSTEM_WINDOW}. If true, alert window
     *        types {@link android.view.WindowManager.LayoutParams#isSystemAlertWindowType(int)}
     *        can be assigned layers greater than the layer for
     *        {@link android.view.WindowManager.LayoutParams#TYPE_APPLICATION_OVERLAY} Else, their
     *        layers would be lesser.
     * @param roundedCornerOverlay {#code true} to indicate that the owner window is rounded corner
     *                             overlay.
     * @return int An arbitrary integer used to order windows, with lower numbers below higher ones.
     */
    default int getWindowLayerFromTypeLw(int type, boolean canAddInternalSystemWindow,
            boolean roundedCornerOverlay) {


        // Always put the rounded corner layer to the top most.
        if (roundedCornerOverlay && canAddInternalSystemWindow) {


            return getMaxWindowLayer();
        }
        if (type >= FIRST_APPLICATION_WINDOW && type <= LAST_APPLICATION_WINDOW) {


            return APPLICATION_LAYER;
        }

        switch (type) {


            case TYPE_WALLPAPER:
                // wallpaper is at the bottom, though the window manager may move it.
                return  1;
            case TYPE_PRESENTATION:
            case TYPE_PRIVATE_PRESENTATION:
            case TYPE_DOCK_DIVIDER:
            case TYPE_QS_DIALOG:
            case TYPE_PHONE:
                return  3;
            case TYPE_SEARCH_BAR:
                return  4;
            case TYPE_INPUT_CONSUMER:
                return  5;
            case TYPE_SYSTEM_DIALOG:
                return  6;
            case TYPE_TOAST:
                // toasts and the plugged-in battery thing
                return  7;
            case TYPE_PRIORITY_PHONE:
                // SIM errors and unlock.  Not sure if this really should be in a high layer.
                return  8;
            case TYPE_SYSTEM_ALERT:
                // like the ANR / app crashed dialogs
                // Type is deprecated for non-system apps. For system apps, this type should be
                // in a higher layer than TYPE_APPLICATION_OVERLAY.
                return  canAddInternalSystemWindow ? 12 : 9;
            case TYPE_APPLICATION_OVERLAY:
                return  11;
            case TYPE_INPUT_METHOD:
                // on-screen keyboards and other such input method user interfaces go here.
                return  13;
            case TYPE_INPUT_METHOD_DIALOG:
                // on-screen keyboards and other such input method user interfaces go here.
                return  14;
            case TYPE_STATUS_BAR:
                return  15;
            case TYPE_STATUS_BAR_ADDITIONAL:
                return  16;
            case TYPE_NOTIFICATION_SHADE:
                return  17;
            case TYPE_STATUS_BAR_SUB_PANEL:
                return  18;
            case TYPE_KEYGUARD_DIALOG:
                return  19;
            case TYPE_VOICE_INTERACTION_STARTING:
                return  20;
            case TYPE_VOICE_INTERACTION:
                // voice interaction layer should show above the lock screen.
                return  21;
            case TYPE_VOLUME_OVERLAY:
                // the on-screen volume indicator and controller shown when the user
                // changes the device volume
                return  22;
            case TYPE_SYSTEM_OVERLAY:
                // the on-screen volume indicator and controller shown when the user
                // changes the device volume
                return  canAddInternalSystemWindow ? 23 : 10;
            case TYPE_NAVIGATION_BAR:
                // the navigation bar, if available, shows atop most things
                return  24;
            case TYPE_NAVIGATION_BAR_PANEL:
                // some panels (e.g. search) need to show on top of the navigation bar
                return  25;
            case TYPE_SCREENSHOT:
                // screenshot selection layer shouldn't go above system error, but it should cover
                // navigation bars at the very least.
                return  26;
            case TYPE_SYSTEM_ERROR:
                // system-level error dialogs
                return  canAddInternalSystemWindow ? 27 : 9;
            case TYPE_MAGNIFICATION_OVERLAY:
                // used to highlight the magnified portion of a display
                return  28;
            case TYPE_DISPLAY_OVERLAY:
                // used to simulate secondary display devices
                return  29;
            case TYPE_DRAG:
                // the drag layer: input for drag-and-drop is associated with this window,
                // which sits above all other focusable windows
                return  30;
            case TYPE_ACCESSIBILITY_OVERLAY:
                // overlay put by accessibility services to intercept user interaction
                return  31;
            case TYPE_ACCESSIBILITY_MAGNIFICATION_OVERLAY:
                return 32;
            case TYPE_SECURE_SYSTEM_OVERLAY:
                return  33;
            case TYPE_BOOT_PROGRESS:
                return  34;
            case TYPE_POINTER:
                // the (mouse) pointer layer
                return  35;
            default:
                Slog.e("WindowManager", "Unknown window type: " + type);
                return 3;
        }
    }
关于各窗口类型的解读可以参考链接: Android 窗口常见参数汇总
方法简述:
这个方法返回给定窗口类型对应的层级值,用于控制不同类型的窗口在屏幕上的显示层次。
-
type:要分配的窗口的类型。
-
canAddInternalSystemWindow:是否可以添加内部系统窗口。
例如,假如我们有一个内部系统窗口,且我们的这个参数canAddInternalSystemWindow为true的情况下,则Alert Window窗口类型所分配的层级大于TYPE_APPLICATION_OVERLAY;为false则小于TYPE_APPLICATION_OVERLAY(可以对照代码验证看看) -
roundedCornerOverlay:{#code true}表示所有者窗口是圆角覆盖。
-
返回值: int一个任意整数,用于对窗口进行排序,较低的数字在高数字的下面。
其中APPLICATION_LAYER的值为2,即表示所有App窗口会被归类到这一个层级
而上述方法中的最后一句default中则表示所有没有分类的窗口层级为3
后面我们只需要查这个代码即可知道每个类型的返回值是多少
4.3 Feature的添加
代码路径:/frameworks/base/services/core/java/com/android/server/wm/DisplayAreaPolicyBuilder.java
        private final ArrayList<DisplayAreaPolicyBuilder.Feature> mFeatures = new ArrayList<>();
        ......
        HierarchyBuilder addFeature(DisplayAreaPolicyBuilder.Feature feature) {


            mFeatures.add(feature);
            return this;
        }
addFeature在DisplayAreaPolicyBuilder的HierarchyBuilder类中,从代码中可以看出这里的添加实际上就是把feature添加到mFeatures的ArrayList集合中
WindowedMagnification
            rootHierarchy.addFeature(new Feature.Builder(wmService.mPolicy, "WindowedMagnification",
                    FEATURE_WINDOWED_MAGNIFICATION)
                    .upTo(TYPE_ACCESSIBILITY_MAGNIFICATION_OVERLAY)
                    .except(TYPE_ACCESSIBILITY_MAGNIFICATION_OVERLAY)
                    // Make the DA dimmable so that the magnify window also mirrors the dim layer.
                    .setNewDisplayAreaSupplier(DisplayArea.Dimmable::new)
                    .build());
1.设置Feature的mName为"WindowedMagnification"。
2.设置Feature的mId为FEATURE_WINDOWED_MAGNIFICATION
3.upTo里面的参数是TYPE_ACCESSIBILITY_MAGNIFICATION_OVERLAY(32),则代表[0,TYPE_ACCESSIBILITY_MAGNIFICATION_OVERLAY]区间内全部添加
4.except里面参数是TYPE_ACCESSIBILITY_MAGNIFICATION_OVERLAY(32),则除去该类型
最终我们可以得到WindowedMagnification的所包含的层级区间在[0,31]
HideDisplayCutout
                rootHierarchy.addFeature(new Feature.Builder(wmService.mPolicy, "HideDisplayCutout",
                        FEATURE_HIDE_DISPLAY_CUTOUT)
                        .all()
                        .except(TYPE_NAVIGATION_BAR, TYPE_NAVIGATION_BAR_PANEL, TYPE_STATUS_BAR,
                                TYPE_NOTIFICATION_SHADE)
                        .build())
1.设置Feature的mName为"HideDisplayCutout"。
2.设置Feature的mId为FEATURE_HIDE_DISPLAY_CUTOUT
3.all()把所有的窗口类型添加进来
4.except里面的类型踢掉TYPE_NAVIGATION_BAR(24),TYPE_NAVIGATION_BAR_PANEL(25),TYPE_STATUS_BAR(15),TYPE_NOTIFICATION_SHADE(17)
5.build()方法会把第36层(从0开始算)踢掉,前面讲该方法时说过
最终我们可以得到HideDisplayCutout所包含的层级为0-14,16,18-23,26-35
OneHanded
                        .addFeature(new Feature.Builder(wmService.mPolicy, "OneHanded",
                                FEATURE_ONE_HANDED)
                                .all()
                                .except(TYPE_NAVIGATION_BAR, TYPE_NAVIGATION_BAR_PANEL,
                                        TYPE_SECURE_SYSTEM_OVERLAY)
                                .build());
1.设置Feature的mName为"OneHanded"。
2.设置Feature的mId为FEATURE_ONE_HANDED
3.all()把所有的窗口类型添加进来
4.except里面的类型踢掉TYPE_NAVIGATION_BAR(24),TYPE_NAVIGATION_BAR_PANEL(25),TYPE_SECURE_SYSTEM_OVERLAY(33)
5.去掉第36层
最终我们可以得到OneHanded所包含的层级为0-23,26-32,34-35
FullscreenMagnification
            rootHierarchy
                    .addFeature(new Feature.Builder(wmService.mPolicy, "FullscreenMagnification",
                            FEATURE_FULLSCREEN_MAGNIFICATION)
                            .all()
                            .except(TYPE_ACCESSIBILITY_MAGNIFICATION_OVERLAY, TYPE_INPUT_METHOD,
                                    TYPE_INPUT_METHOD_DIALOG, TYPE_MAGNIFICATION_OVERLAY,
                                    TYPE_NAVIGATION_BAR, TYPE_NAVIGATION_BAR_PANEL)
                            .build())
1.设置Feature的mName为"FullscreenMagnification"。
2.设置Feature的mId为FEATURE_FULLSCREEN_MAGNIFICATION
3.all()把所有的窗口类型添加进来
4.except里面的类型踢掉TYPE_ACCESSIBILITY_MAGNIFICATION_OVERLAY(32),TYPE_INPUT_METHOD(13),TYPE_INPUT_METHOD_DIALOGERLAY(14),TYPE_MAGNIFICATION_OVERLAY(28),TYPE_NAVIGATION_BAR(24),TYPE_NAVIGATION_BAR_PANEL(25)
5.去掉第36层
最终我们可以得到FullscreenMagnification所包含的层级为0-12,15-23,26-27,29-31,33-35
ImePlaceholder
                    .addFeature(new Feature.Builder(wmService.mPolicy, "ImePlaceholder",
                            FEATURE_IME_PLACEHOLDER)
                            .and(TYPE_INPUT_METHOD, TYPE_INPUT_METHOD_DIALOG)
                            .build());
1.设置Feature的mName为"ImePlaceholder"。
2.设置Feature的mId为FEATURE_IME_PLACEHOLDER
3.and()把TYPE_INPUT_METHOD(13),TYPE_INPUT_METHOD_DIALOGERLAY(14)窗口类型添加进来
最终我们可以得到ImePlaceholder所包含的层级为13-14
4.4 Feature层级表
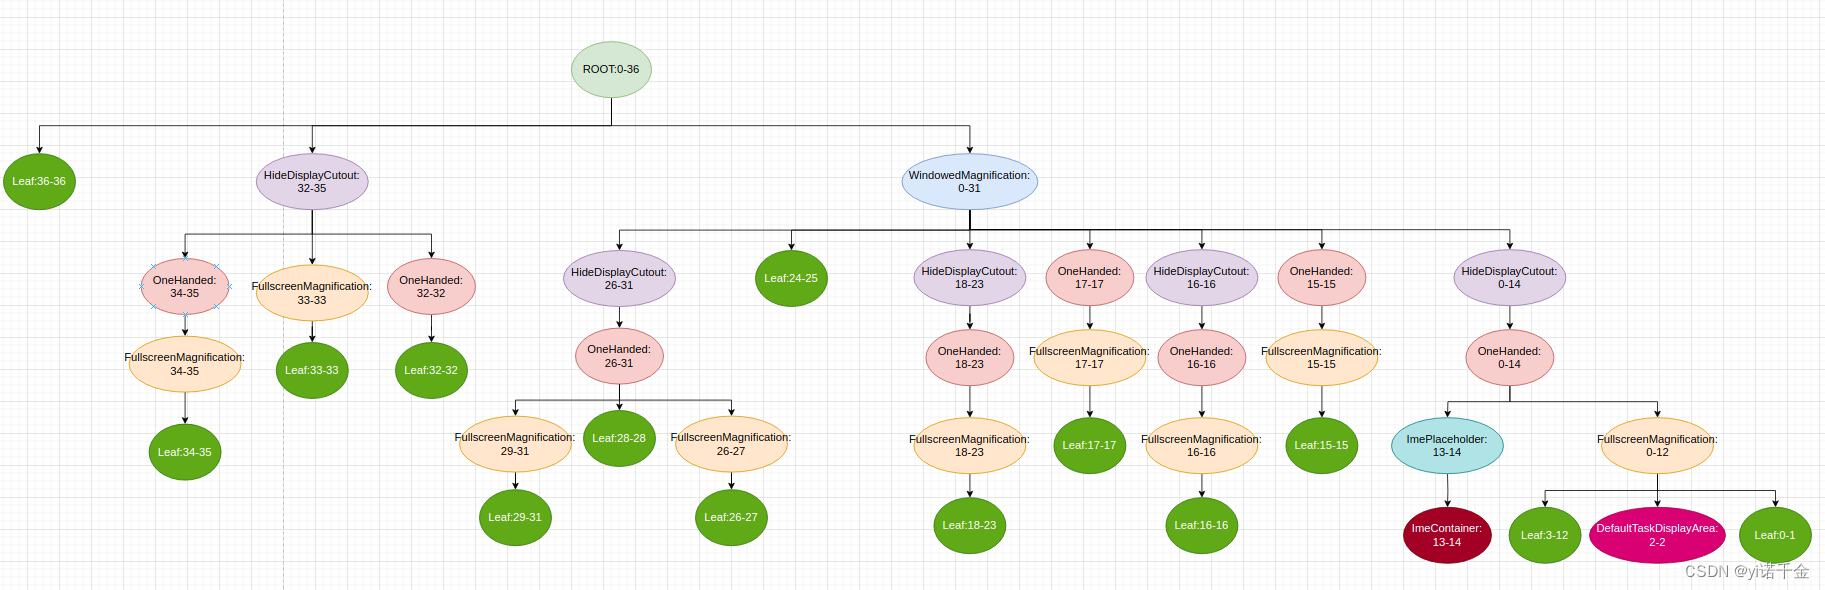
根据上面的添加过程,我们整理为一张表
| 艺名 | 真名 | 影响窗口层级/Feature.mWindowLayer[] |
|---|---|---|
| WindowedMagnification | FEATURE_WINDOWED_MAGNIFICATION | 0-31 |
| HideDisplayCutout | FEATURE_HIDE_DISPLAY_CUTOUT | 0-14,16,18-23,26-35 |
| OneHanded | FEATURE_ONE_HANDED | 0-23,26-32,34-35 |
| FullscreenMagnification | FEATURE_FULLSCREEN_MAGNIFICATION | 0-12,15-23,26-27,29-31,33-35 |
| ImePlaceholder | FEATURE_IME_PLACEHOLDER | 13-14 |
5.生成DisplayArea层级结构
return new DisplayAreaPolicyBuilder().setRootHierarchy(rootHierarchy).build(wmService);
我们分两部分看
1.setRootHierarchy(rootHierarchy)把前面创建的rootHierarchy添加到DisplayArea中
代码路径:/frameworks/base/services/core/java/com/android/server/wm/DisplayAreaPolicyBuilder.java
    /** Defines the root hierarchy for the whole logical display. */
    DisplayAreaPolicyBuilder setRootHierarchy(HierarchyBuilder rootHierarchyBuilder) {


        mRootHierarchyBuilder = rootHierarchyBuilder;
        return this;
    }
把前面创建HierarchyBuilder对象rootHierarchy保存到DisplayAreaPolicyBuilder的mRootHierarchyBuilder
2.build(wmService)构建DisplayArea层级结构
    Result build(WindowManagerService wmService) {


        validate();

        // Attach DA group roots to screen hierarchy before adding windows to group hierarchies.
        mRootHierarchyBuilder.build(mDisplayAreaGroupHierarchyBuilders);
        List<RootDisplayArea> displayAreaGroupRoots = new ArrayList<>(
                mDisplayAreaGroupHierarchyBuilders.size());
        for (int i = 0; i < mDisplayAreaGroupHierarchyBuilders.size(); i++) {


            HierarchyBuilder hierarchyBuilder = mDisplayAreaGroupHierarchyBuilders.get(i);
            hierarchyBuilder.build();
            displayAreaGroupRoots.add(hierarchyBuilder.mRoot);
        }
        // Use the default function if it is not specified otherwise.
        if (mSelectRootForWindowFunc == null) {


            mSelectRootForWindowFunc = new DefaultSelectRootForWindowFunction(
                    mRootHierarchyBuilder.mRoot, displayAreaGroupRoots);
        }
        return new Result(wmService, mRootHierarchyBuilder.mRoot, displayAreaGroupRoots,
                mSelectRootForWindowFunc, mSelectTaskDisplayAreaFunc);
    }
其关键代码是mRootHierarchyBuilder.build(mDisplayAreaGroupHierarchyBuilders);
调用HierarchyBuilder.build去生成DisplayArea层级结构,并且有一个传参mDisplayAreaGroupHierarchyBuilders。
在HierarchyBuilder.build方法中可以看出,该参数传递的实际为空值
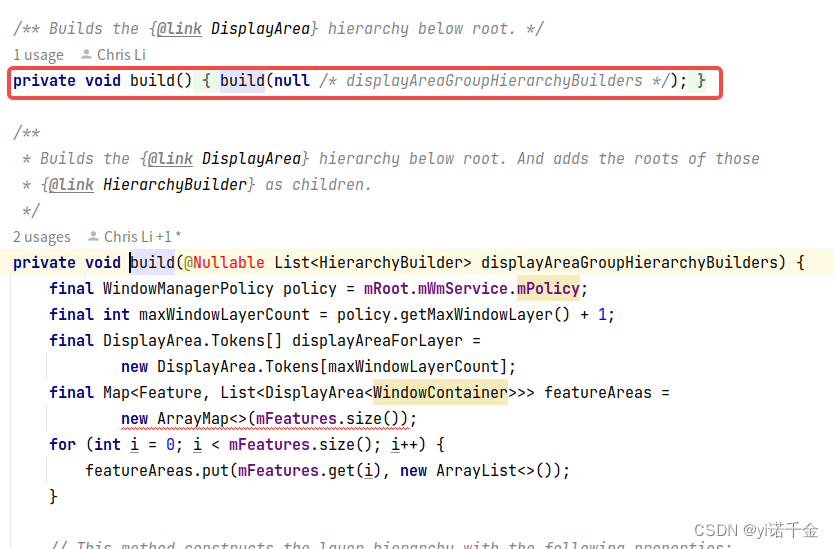
	/** Builds the {@link DisplayArea} hierarchy below root. */
	private void build() {


	    build(null /* displayAreaGroupHierarchyBuilders */);
	}

	/**
	 * Builds the {@link DisplayArea} hierarchy below root. And adds the roots of those
	 * {@link HierarchyBuilder} as children.
	 */
	private void build(@Nullable List<HierarchyBuilder> displayAreaGroupHierarchyBuilders) {


		//1.初始化一些参数
	    final WindowManagerPolicy policy = mRoot.mWmService.mPolicy;
	    final int maxWindowLayerCount = policy.getMaxWindowLayer() + 1;
	    final DisplayArea.Tokens[] displayAreaForLayer =
	            new DisplayArea.Tokens[maxWindowLayerCount];
	    final Map<Feature, List<DisplayArea<WindowContainer>>> featureAreas =
	            new ArrayMap<>(mFeatures.size());
	    for (int i = 0; i < mFeatures.size(); i++) {


	        featureAreas.put(mFeatures.get(i), new ArrayList<>());
	    }

	    // This method constructs the layer hierarchy with the following properties:
	    // (1) Every feature maps to a set of DisplayAreas
	    // (2) After adding a window, for every feature the window's type belongs to,
	    //     it is a descendant of one of the corresponding DisplayAreas of the feature.
	    // (3) Z-order is maintained, i.e. if z-range(area) denotes the set of layers of windows
	    //     within a DisplayArea:
	    //      for every pair of DisplayArea siblings (a,b), where a is below b, it holds that
	    //      max(z-range(a)) <= min(z-range(b))
	    //
	    // The algorithm below iteratively creates such a hierarchy:
	    //  - Initially, all windows are attached to the root.
	    //  - For each feature we create a set of DisplayAreas, by looping over the layers
	    //    - if the feature does apply to the current layer, we need to find a DisplayArea
	    //      for it to satisfy (2)
	    //      - we can re-use the previous layer's area if:
	    //         the current feature also applies to the previous layer, (to satisfy (3))
	    //         and the last feature that applied to the previous layer is the same as
	    //           the last feature that applied to the current layer (to satisfy (2))
	    //      - otherwise we create a new DisplayArea below the last feature that applied
	    //        to the current layer
		//2.初始化PendingArea数组
	    PendingArea[] areaForLayer = new PendingArea[maxWindowLayerCount];
	    final PendingArea root = new PendingArea(null, 0, null);
	    Arrays.fill(areaForLayer, root);

	    // Create DisplayAreas to cover all defined features.
	    //3.根据不同的Features构建显示区域
	    final int size = mFeatures.size();
	    for (int i = 0; i < size; i++) {


	        // Traverse the features with the order they are defined, so that the early defined
	        // feature will be on the top in the hierarchy.
	        final Feature feature = mFeatures.get(i);
	        PendingArea featureArea = null;
	        for (int layer = 0; layer < maxWindowLayerCount; layer++) {


	            if (feature.mWindowLayers[layer]) {


	                // This feature will be applied to this window layer.
	                //
	                // We need to find a DisplayArea for it:
	                // We can reuse the existing one if it was created for this feature for the
	                // previous layer AND the last feature that applied to the previous layer is
	                // the same as the feature that applied to the current layer (so they are ok
	                // to share the same parent DisplayArea).
	                if (featureArea == null || featureArea.mParent != areaForLayer[layer]) {


	                    // No suitable DisplayArea:
	                    // Create a new one under the previous area (as parent) for this layer.
	                    featureArea = new PendingArea(feature, layer, areaForLayer[layer]);
	                    areaForLayer[layer].mChildren.add(featureArea);
	                }
	                areaForLayer[layer] = featureArea;
	            } else {


	                // This feature won't be applied to this window layer. If it needs to be
	                // applied to the next layer, we will need to create a new DisplayArea for
	                // that.
	                featureArea = null;
	            }
	        }
	    }

	    // Create Tokens as leaf for every layer.
	    //4.创建叶子Token节点
	    PendingArea leafArea = null;
	    int leafType = LEAF_TYPE_TOKENS;
	    for (int layer = 0; layer < maxWindowLayerCount; layer++) {


	        int type = typeOfLayer(policy, layer);
	        // Check whether we can reuse the same Tokens with the previous layer. This happens
	        // if the previous layer is the same type as the current layer AND there is no
	        // feature that applies to only one of them.
	        if (leafArea == null || leafArea.mParent != areaForLayer[layer]
	                || type != leafType) {


	            // Create a new Tokens for this layer.
	            leafArea = new PendingArea(null /* feature */, layer, areaForLayer[layer]);
	            areaForLayer[layer].mChildren.add(leafArea);
	            leafType = type;
	            if (leafType == LEAF_TYPE_TASK_CONTAINERS) {


	                // We use the passed in TaskDisplayAreas for task container type of layer.
	                // Skip creating Tokens even if there is no TDA.
	                addTaskDisplayAreasToApplicationLayer(areaForLayer[layer]);
	                addDisplayAreaGroupsToApplicationLayer(areaForLayer[layer],
	                        displayAreaGroupHierarchyBuilders);
	                leafArea.mSkipTokens = true;
	            } else if (leafType == LEAF_TYPE_IME_CONTAINERS) {


	                // We use the passed in ImeContainer for ime container type of layer.
	                // Skip creating Tokens even if there is no ime container.
	                leafArea.mExisting = mImeContainer;
	                leafArea.mSkipTokens = true;
	            }
	        }
	        leafArea.mMaxLayer = layer;
	    }
	    //5.计算MaxLayer
	    root.computeMaxLayer();

	    // We built a tree of PendingAreas above with all the necessary info to represent the
	    // hierarchy, now create and attach real DisplayAreas to the root.
	    //6.生成DisplayArea层级结构
	    root.instantiateChildren(mRoot, displayAreaForLayer, 0, featureAreas);

	    // Notify the root that we have finished attaching all the DisplayAreas. Cache all the
	    // feature related collections there for fast access.
	    //7.保存Leaf数组
	    mRoot.onHierarchyBuilt(mFeatures, displayAreaForLayer, featureAreas);
	}
这个方法主要做了这几件事:
5.1 初始化一些参数
	    final WindowManagerPolicy policy = mRoot.mWmService.mPolicy;
	    final int maxWindowLayerCount = policy.getMaxWindowLayer() + 1;
	    final DisplayArea.Tokens[] displayAreaForLayer =
	            new DisplayArea.Tokens[maxWindowLayerCount];
	    final Map<Feature, List<DisplayArea<WindowContainer>>> featureAreas =
	            new ArrayMap<>(mFeatures.size());
	    for (int i = 0; i < mFeatures.size(); i++) {


	        featureAreas.put(mFeatures.get(i), new ArrayList<>());
	    }
- maxWindowLayerCount:前面说过
getMaxWindowLayer()返回的是36,即初始化maxWindowLayerCount为37 - displayAreaForLayer:实例化一个DisplayArea.Tokens[37]数组
- featureAreas:根据mFeatures(Feature的个数,前面说的5个Feature),创建featureAreas的ArrayMap集合
- featureAreas.put(mFeatures.get(i), new ArrayList<>()):循环的把每个feature创建对应的ArrayList,如下表
| ArrayMap | i | mFeatures.get(i) | ArrayList |
|---|---|---|---|
| featureAreas | 0 | WindowedMagnification/FEATURE_WINDOWED_MAGNIFICATION | new ArrayList<>() |
| 1 | HideDisplayCutout/FEATURE_HIDE_DISPLAY_CUTOUT | new ArrayList<>() | |
| 2 | OneHanded/FEATURE_ONE_HANDED | new ArrayList<>() | |
| 3 | FullscreenMagnification/FEATURE_FULLSCREEN_MAGNIFICATION | new ArrayList<>() | |
| 4 | ImePlaceholder/FEATURE_IME_PLACEHOLDER | new ArrayList<>() | |
- FEATURE_WINDOWED_MAGNIFICATION,在ACCESSIBILITY_MAGNIFICATION_MODE_WINDOW模式下可以对窗口的某些区域进行放大的DisplayArea,对应dump中的WindowedMagnification
- FEATURE_HIDE_DISPLAY_CUTOUT,隐藏DisplayCutout(刘海屏相关)的DisplayArea,对应dump中的DisplayCutout
- FEATURE_ONE_HANDED,用于单手模式的DisplayArea,在dump中对应OneHanded
- FEATURE_FULLSCREEN_MAGNIFICATION,在ACCESSIBILITY_MAGNIFICATION_MODE_FULLSCREEN模式下可以对整个屏幕进行放大的DisplayArea,对应dump中的FullscreenMagnification
- FEATURE_IME_PLACEHOLDER,存放输入法窗口的DisplayArea,对应dump中的ImePlaceholder
5.2 初始化PendingArea数组
我们先来看看PendingArea定义是什么样的
    static class PendingArea {


        final int mMinLayer;
        final ArrayList<PendingArea> mChildren = new ArrayList<>();
        final Feature mFeature;
        final PendingArea mParent;
        int mMaxLayer;
        ......
        PendingArea(Feature feature, int minLayer, PendingArea parent) {


            mMinLayer = minLayer;
            mFeature = feature;
            mParent = parent;
        }
        ......
    }
- mMinLayer:当前PendingArea可以容纳的窗口层级的最小值
- mChildren:当前节点的子节点
- mFeature:代表各个Feature
- mParent:当前节点的父节点
- mMaxLayer:当前PendingArea可以容纳的窗口层级的最大值
从构造方法上看主要传递的参数就是feature、最小层级和父节点
现在我们再来看看PendingArea数组是如何初始化的
	    PendingArea[] areaForLayer = new PendingArea[maxWindowLayerCount];
	    final PendingArea root = new PendingArea(null, 0, null);
	    Arrays.fill(areaForLayer, root);
- PendingArea[] areaForLayer = new PendingArea[37],创建数组
- 调用其构造方法,一个没有任何feature和父节点,最小层级为0的root变量
- 把root填充到所有每个数组中,即
| PendingArea数组(areaForLayer[37]) | 初始化(mFeature.mName: mMinLayer: mMaxLayer) |
|---|---|
| areaForLayer[0] | ROOT:0:0 |
| … | ROOT:0:0 |
| areaForLayer[36] | ROOT:0:0 |
注,后面PendingArea的成员变量以(mFeature.mName: mMinLayer: mMaxLayer)的形式来表示
例如,WindowedMagnification:0:31则表示feature是WindowedMagnification的最小层级是0,最大层级为31。注意:当前代码中mMaxLayer尚未计算,因此为0,所以我们这边表示为WindowedMagnification:0:0
5.3 根据不同的Features构建显示区域
			// Create DisplayAreas to cover all defined features.
            final int size = mFeatures.size();
            for (int i = 0; i < size; i++) {

    //五个feature跑五次循环
                // Traverse the features with the order they are defined, so that the early defined
                // feature will be on the top in the hierarchy.
                //获取mFeatures中取出每个对应的feature
                final Feature feature = mFeatures.get(i);
                //创建一个空的featureArea
                PendingArea featureArea = null;
                //maxWindowLayerCount是37,前面讲过
                for (int layer = 0; layer < maxWindowLayerCount; layer++) {


                	//1.用来筛选出当前feature的layer中为true的层级
                    if (feature.mWindowLayers[layer]) {


                        // This feature will be applied to this window layer.
                        //
                        // We need to find a DisplayArea for it:
                        // We can reuse the existing one if it was created for this feature for the
                        // previous layer AND the last feature that applied to the previous layer is
                        // the same as the feature that applied to the current layer (so they are ok
                        // to share the same parent DisplayArea).
                        //2.判断(是否有资格认义父)当前的PendingArea对象是否为空 或者 PendingArea对象的父节点不等于当前节点
                        if (featureArea == null || featureArea.mParent != areaForLayer[layer]) {


                            // No suitable DisplayArea:
                            // Create a new one under the previous area (as parent) for this layer.
                            //feature认areaForLayer[layer]为父亲
                            featureArea = new PendingArea(feature, layer, areaForLayer[layer]);
                            //areaForLayer[layer]认featureArea为孩子
                            areaForLayer[layer].mChildren.add(featureArea);
                        }
                        //3.areaForLayer[layer]更新为当前的featureArea
                        areaForLayer[layer] = featureArea;
                    } else {


                        // This feature won't be applied to this window layer. If it needs to be
                        // applied to the next layer, we will need to create a new DisplayArea for
                        // that.
                        //PendingArea对象置空
                        featureArea = null;
                    }
                }
            }
首先,获取mFeatures中取出每个对应的feature,并创建一个创建一个空的featureArea。这段代码中最为关键的就是里面的for循环操作,
第一步:if (feature.mWindowLayers[layer]) {...(进入第二步)...} else {featureArea = null;}
这个判断条件是用来筛选出当前feature的layer中为true的层级;如果当前feature的layer中为false,则把featureArea置空。
第二步:
if (featureArea == null || featureArea.mParent != areaForLayer[layer])之后再来判断(featureArea是否有资格认义父)当前的PendingArea对象是否为空 或者 PendingArea对象的父节点不等于当前节点
featureArea = new PendingArea(feature, layer, areaForLayer[layer]);
如果满足条件则当前feature认areaForLayer[layer]为父亲areaForLayer[layer].mChildren.add(featureArea);
且areaForLayer[layer]认featureArea为孩子。
布飘零半生未逢明主,如公不弃,布愿拜为义父~
第三步:areaForLayer[layer] = featureArea;areaForLayer[layer]更新为当前的featureArea。
下面我们以五个feature为例子来看看这段代码的实现
WindowedMagnification
按我们上面说的三个步骤把WindowedMagnification带入到我们的这段代码中
第一次循环时:
第一步:WindowedMagnification的mWindowLayers[0]=true。WindowedMagnification是0-31为true,因此32及其以后得全部置为空
第二步:featureArea为空,进入该条件。
featureArea = new PendingArea(WindowedMagnification, 0, areaForLayer[0]);【这里的参数0对应的是mMinLayer】
实例化featureArea(WindowedMagnification)并且让其认areaForLayer[0] (ROOT:0:0)为父亲【前面初始化时areaForLayer[0]-areaForLayer[36]全部都为ROOT节点】areaForLayer[0].mChildren.add(featureArea);
之后ROOT:0:0认WindowedMagnification:0:0为儿子。【由于mMaxLayer还没有计算,因此为0】
第三步:areaForLayer[0] = featureArea;把areaForLayer[0]更新为WindowedMagnification:0:0
第二次循环时:
第一步:WindowedMagnification的mWindowLayers[1]=true
第二步:featureArea不为空,且 featureArea.mParent为areaForLayer[0]的父亲即WindowedMagnification:0:0,areaForLayer[1]是ROOT:0:0,因此不进入条件。
第三步:把areaForLayer[1]更新为WindowedMagnification:0:0,没有变化。其实还是第一次循环的WindowedMagnification,因为第二步没有创建新的featureArea
后续循环到第31次均和第二次循环相同,因此我们得到下表
| PendingArea数组 | ROOT | WindowedMagnification |
|---|---|---|
| areaForLayer[0] | ROOT:0:0 | WindowedMagnification:0:0 |
| … | ROOT:0:0 | WindowedMagnification:0:0 |
| areaForLayer[31] | ROOT:0:0 | WindowedMagnification:0:0 |
| … | ROOT:0:0 | null |
| areaForLayer[36] | ROOT:0:0 | null |
转换为树形结构图
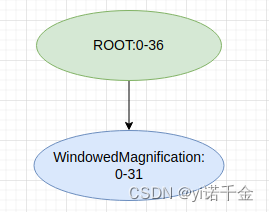
注:其中0-36表示从areaForLayer[0]到areaForLayer[36]
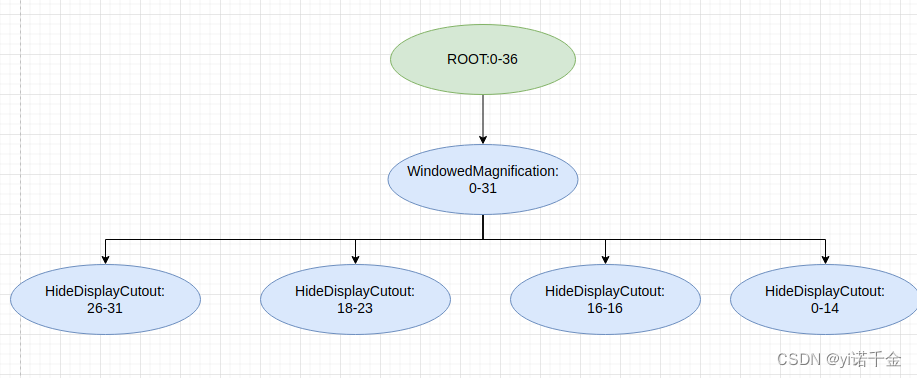
HideDisplayCutout
按我们上面说的三个步骤把HideDisplayCutout带入到代码中
第一次循环时:
第一步:HideDisplayCutout的mWindowLayers[0]=true。HideDisplayCutout是HideDisplayCutout 0-14 16 18-23 26-35为true,其余的部置为空
第二步:featureArea为空,进入该条件。
featureArea = new PendingArea(HideDisplayCutout, 0, areaForLayer[0]);【这里的参数0对应的是mMinLayer】
实例化featureArea(HideDisplayCutout)并且让其认areaForLayer[0] (WindowedMagnification:0:0)为父亲【前面第一个feature循环后更新了areaForLayer[0-31]为WindowedMagnification:0:0】areaForLayer[0].mChildren.add(featureArea);
之后WindowedMagnification:0:0认HideDisplayCutout:0:0为儿子。【由于mMaxLayer还没有计算,因此为0】
第三步:areaForLayer[0] = featureArea;把areaForLayer[0]更新为HideDisplayCutout:0:0
第二次循环时:
第一步:HideDisplayCutout的mWindowLayers[1]=true
第二步:featureArea不为空,且 featureArea.mParent为areaForLayer[0]的父亲即WindowedMagnification:0:0,areaForLayer[1]还是WindowedMagnification:0:0,因此不进入条件。
第三步:把areaForLayer[1]更新为WindowedMagnification:0:0,没有变化。其实还是第一次循环的WindowedMagnification,因为第二步没有创建新的featureArea
一直到第14次循环均是如此,此时表格为
| PendingArea数组 | ROOT | WindowedMagnification | HideDisplayCutout |
|---|---|---|---|
| areaForLayer[0] | ROOT:0:0 | WindowedMagnification:0:0 | HideDisplayCutout:0:0 |
| … | ROOT:0:0 | WindowedMagnification:0:0 | HideDisplayCutout:0:0 |
| areaForLayer[14] | ROOT:0:0 | WindowedMagnification:0:0 | HideDisplayCutout:0:0 |
| … | ROOT:0:0 | WindowedMagnification:0:0 | null |
| areaForLayer[31] | ROOT:0:0 | WindowedMagnification:0:0 | null |
| … | ROOT:0:0 | null | null |
| areaForLayer[36] | ROOT:0:0 | null | null |
树状图

HideDisplayCutout的mWindowLayers[layer]15、17、24和25都为false,因此不会进入第二步的判断,会将featureArea置为空
我们继续看第16次循环
第一步:HideDisplayCutout的mWindowLayers[16]=true
第二步:featureArea为空。
featureArea = new PendingArea(HideDisplayCutout, 16, areaForLayer[16]);【这里的参数16对应的是mMinLayer】
实例化featureArea(HideDisplayCutout)并且让其认areaForLayer[16] (WindowedMagnification:0:0)为父亲【前面第一个feature循环后更新了areaForLayer[0-31]为WindowedMagnification:0:0】areaForLayer[16].mChildren.add(featureArea);
之后WindowedMagnification:0:0认HideDisplayCutout:16:0为儿子。【由于mMaxLayer还没有计算,因此为0】
第三步:areaForLayer[16] = featureArea;把areaForLayer[16]更新为HideDisplayCutout:16:0
第18次循环
与第16次同理,创建了一个PendingArea:”HideDisplayCutout:18:0“并且认areaForLayer[18] (WindowedMagnification:0:0)为父亲,WindowedMagnification:0:0认HideDisplayCutout:18:0为儿子,把areaForLayer[18]更新为HideDisplayCutout:18:0
第19到第23次循环
areaForLayer[19-23]更新为HideDisplayCutout:18:0
第26循环
创建了一个PendingArea:”HideDisplayCutout:26:0“并且认areaForLayer[26] (WindowedMagnification:0:0)为父亲,WindowedMagnification:0:0认HideDisplayCutout:26:0为儿子,把areaForLayer[26]更新为HideDisplayCutout:26:0
第27到第31次循环
areaForLayer[27-31]更新为HideDisplayCutout:26:0
此时表格更新为
| PendingArea数组 | ROOT | WindowedMagnification | HideDisplayCutout |
|---|---|---|---|
| areaForLayer[0] | ROOT:0:0 | WindowedMagnification:0:0 | HideDisplayCutout:0:0 |
| … | ROOT:0:0 | WindowedMagnification:0:0 | HideDisplayCutou:t0:0 |
| areaForLayer[14] | ROOT:0:0 | WindowedMagnification:0:0 | HideDisplayCutout:0:0 |
| areaForLayer[15] | ROOT:0:0 | WindowedMagnification:0:0 | null |
| areaForLayer[16] | ROOT:0:0 | WindowedMagnification:0:0 | HideDisplayCutout:16:0 |
| areaForLayer[17] | ROOT:0:0 | WindowedMagnification:0:0 | null |
| areaForLayer[18] | ROOT:0:0 | WindowedMagnification:0:0 | HideDisplayCutout:18:0 |
| … | ROOT:0:0 | WindowedMagnification:0:0 | HideDisplayCutout:18:0 |
| areaForLayer[23] | ROOT:0:0 | WindowedMagnification:0:0 | HideDisplayCutout:18:0 |
| areaForLayer[24] | ROOT:0:0 | WindowedMagnification:0:0 | null |
| areaForLayer[25] | ROOT:0:0 | WindowedMagnification:0:0 | null |
| areaForLayer[26] | ROOT:0:0 | WindowedMagnification:0:0 | HideDisplayCutout:26:0 |
| … | ROOT:0:0 | WindowedMagnification:0:0 | HideDisplayCutout:26:0 |
| areaForLayer[31] | ROOT:0:0 | WindowedMagnification:0:0 | HideDisplayCutout:26:0 |
| … | ROOT:0:0 | null | null |
| areaForLayer[36] | ROOT:0:0 | null | null |
树状图
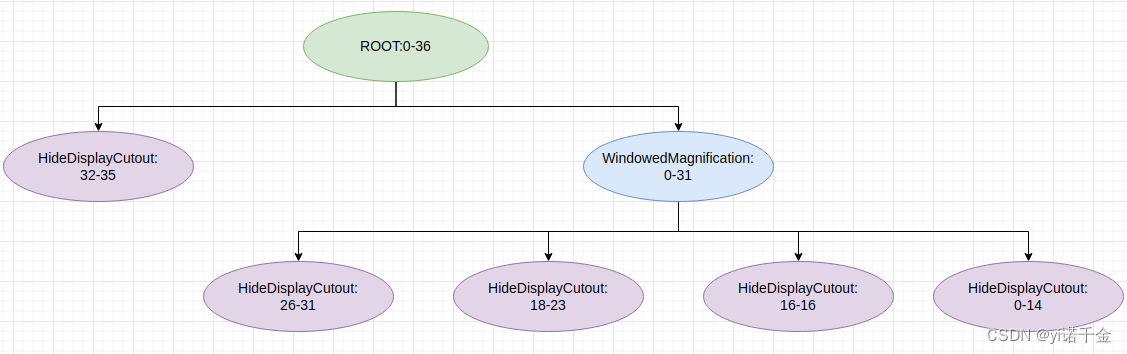
第32到第35次循环
从第32次开始时条件发生变化
第一步:HideDisplayCutout的mWindowLayers[32]=true。
第二步:featureArea不为空,此时featureArea.mParent即HideDisplayCutout26:0的父亲是WindowedMagnification:0:0,但是areaForLayer[32]是ROOT:0:0【前面WindowedMagnification只到了31,后续还是ROOT】,因此featureArea.mParent != areaForLayer[layer]为true,所以是进入该条件。
featureArea = new PendingArea(HideDisplayCutout, 32, areaForLayer[32]);【这里的参数32对应的是mMinLayer】
实例化featureArea(HideDisplayCutout)并且让其认areaForLayer[32] (ROOT:0:0)为父亲areaForLayer[0].mChildren.add(featureArea);
之后ROOT:0:0认HideDisplayCutout:26:0为儿子。【由于mMaxLayer还没有计算,因此为0】
第三步:areaForLayer[32] = featureArea;把areaForLayer[32]更新为HideDisplayCutout:32:0
从33次到第35次循环后,更新areaForLayer[32-35]为HideDisplayCutout:26:0
此时表格更新为
| PendingArea数组 | ROOT | WindowedMagnification | HideDisplayCutout |
|---|---|---|---|
| areaForLayer[0] | ROOT:0:0 | WindowedMagnification:0:0 | HideDisplayCutout:0:0 |
| … | ROOT:0:0 | WindowedMagnification:0:0 | HideDisplayCutout:0:0 |
| areaForLayer[14] | ROOT:0:0 | WindowedMagnification:0:0 | HideDisplayCutout:0:0 |
| areaForLayer[15] | ROOT:0:0 | WindowedMagnification:0:0 | null |
| areaForLayer[16] | ROOT:0:0 | WindowedMagnification:0:0 | HideDisplayCutout:16:0 |
| areaForLayer[17] | ROOT:0:0 | WindowedMagnification:0:0 | null |
| areaForLayer[18] | ROOT:0:0 | WindowedMagnification:0:0 | HideDisplayCutout:18:0 |
| … | ROOT:0:0 | WindowedMagnification:0:0 | HideDisplayCutout18:0 |
| areaForLayer[23] | ROOT:0:0 | WindowedMagnification:0:0 | HideDisplayCutout:18:0 |
| areaForLayer[24] | ROOT:0:0 | WindowedMagnification:0:0 | null |
| areaForLayer[25] | ROOT:0:0 | WindowedMagnification:0:0 | null |
| areaForLayer[26] | ROOT:0:0 | WindowedMagnification:0:0 | HideDisplayCutout:26:0 |
| … | ROOT:0:0 | WindowedMagnification:0:0 | HideDisplayCutout:26:0 |
| areaForLayer[31] | ROOT:0:0 | WindowedMagnification:0:0 | HideDisplayCutout:26:0 |
| areaForLayer[32] | ROOT:0:0 | null | HideDisplayCutout:32:0 |
| … | ROOT:0:0 | null | HideDisplayCutout:32:0 |
| areaForLayer[35] | ROOT:0:0 | null | HideDisplayCutout:32:0 |
| areaForLayer[36] | ROOT:0:0 | null | null |
树状图
OneHanded
同样按照三步法分析其构建过程
第一次循环时:
第一步:OneHanded的mWindowLayers[0]=true。OneHanded是0-23,26-32,34-35为true,其余全部置为空
第二步:featureArea为空,进入该条件。
featureArea = new PendingArea(OneHanded, 0, areaForLayer[0]);【这里的参数0对应的是mMinLayer】
实例化featureArea(OneHanded)并且让其认areaForLayer[0] (HideDisplayCutout:0:0)为父亲【上feature即HideDisplayCutout更新后的节点,可以对照表格】areaForLayer[0].mChildren.add(featureArea);
之后HideDisplayCutout:0:0认OneHanded:0:0为儿子。【由于mMaxLayer还没有计算,因此为0】
第三步:areaForLayer[0] = featureArea;把areaForLayer[0]更新为OneHanded:0:0
第二次循环时:
第一步:OneHanded的mWindowLayers[1]=true
第二步:featureArea不为空,且 featureArea.mParent为areaForLayer[0]的父亲即HideDisplayCutout:0:0,areaForLayer[1]是HideDisplayCutout:0:0,因此不进入条件。
第三步:把areaForLayer[1]更新为OneHanded:0:0
到第14次循环时,其父节点一直都是HideDisplayCutout:0:0
第15次循环,OneHanded.mWindowLayers[15]仍然为true,但HideDisplayCutout为空,因此其父节点WindowedMagnification:0:0,areaForLayer[15]更新为OneHanded:15:0
第16次循环,HideDisplayCutout为不空,因此当前节点的为父节点HideDisplayCutout:16:0,areaForLayer[16]更新为OneHanded:16:0
第17次循环与第15次循环同理,父节点WindowedMagnification:0:0,areaForLayer[17]更新为OneHanded:17:0
第18到第23次循环与第16次同理,父节点HideDisplayCutout:18:0,areaForLayer[18]更新为OneHanded:18:0
第26到第31次循环与第16次同理,HideDisplayCutout为不空,因此其父节点HideDisplayCutout:26:0,areaForLayer[26]更新为OneHanded:26:0
第32次循环,HideDisplayCutout为不空,此时areaForLayer[32]的父节点(root:0:0)与areaForLayer[31]的父节点(WindowedMagnification:0:0),因此当前节点的为父节点HideDisplayCutout:32:0,areaForLayer[32]更新为OneHanded:32:0
第34、35次循环,与第16次同理,父节点HideDisplayCutout:34:0,areaForLayer[34]更新为OneHanded:34:0
最终我的表格更新为
| PendingArea数组 | ROOT | WindowedMagnification | HideDisplayCutout | OneHanded |
|---|---|---|---|---|
| areaForLayer[0] | ROOT:0:0 | WindowedMagnification:0:0 | HideDisplayCutout:0:0 | OneHanded:0:0 |
| … | ROOT:0:0 | WindowedMagnification:0:0 | HideDisplayCutout:0:0 | OneHanded:0:0 |
| areaForLayer[14] | ROOT:0:0 | WindowedMagnification:0:0 | HideDisplayCutout:0:0 | OneHanded:0:0 |
| areaForLayer[15] | ROOT:0:0 | WindowedMagnification:0:0 | null | OneHanded:15:0 |
| areaForLayer[16] | ROOT:0:0 | WindowedMagnification:0:0 | HideDisplayCutout:16:0 | OneHanded:16:0 |
| areaForLayer[17] | ROOT:0:0 | WindowedMagnification:0:0 | null | OneHanded:17:0 |
| areaForLayer[18] | ROOT:0:0 | WindowedMagnification:0:0 | HideDisplayCutout:18:0 | OneHanded:18:0 |
| … | ROOT:0:0 | WindowedMagnification:0:0 | HideDisplayCutout18:0 | OneHanded:18:0 |
| areaForLayer[23] | ROOT:0:0 | WindowedMagnification:0:0 | HideDisplayCutout:18:0 | OneHanded:18:0 |
| areaForLayer[24] | ROOT:0:0 | WindowedMagnification:0:0 | null | null |
| areaForLayer[25] | ROOT:0:0 | WindowedMagnification:0:0 | null | null |
| areaForLayer[26] | ROOT:0:0 | WindowedMagnification:0:0 | HideDisplayCutout:26:0 | OneHanded:26:0 |
| … | ROOT:0:0 | WindowedMagnification:0:0 | HideDisplayCutout:26:0 | OneHanded:26:0 |
| areaForLayer[31] | ROOT:0:0 | WindowedMagnification:0:0 | HideDisplayCutout:26:0 | OneHanded:26:0 |
| areaForLayer[32] | ROOT:0:0 | null | HideDisplayCutout:32:0 | OneHanded:32:0 |
| areaForLayer[33] | ROOT:0:0 | null | HideDisplayCutout:32:0 | null |
| areaForLayer[34] | ROOT:0:0 | null | HideDisplayCutout:32:0 | OneHanded:34:0 |
| areaForLayer[35] | ROOT:0:0 | null | HideDisplayCutout:32:0 | OneHanded:34:0 |
| areaForLayer[36] | ROOT:0:0 | null | null | null |
树状图
FullscreenMagnification
FullscreenMagnification是0-12 15-23 26-27 29-31 33-35为true,根据上面的规律不在赘述我们可以填写出表格内容
| PendingArea数组 | ROOT | WindowedMagnification | HideDisplayCutout | OneHanded | FullscreenMagnification |
|---|---|---|---|---|---|
| areaForLayer[0] | ROOT:0:0 | WindowedMagnification:0:0 | HideDisplayCutout:0:0 | OneHanded:0:0 | FullscreenMagnification:0:0 |
| … | ROOT:0:0 | WindowedMagnification:0:0 | HideDisplayCutout:0:0 | OneHanded:0:0 | FullscreenMagnification:0:0 |
| areaForLayer[12] | ROOT:0:0 | WindowedMagnification:0:0 | HideDisplayCutout:0:0 | OneHanded:0:0 | FullscreenMagnification:0:0 |
| areaForLayer[13] | ROOT:0:0 | WindowedMagnification:0:0 | HideDisplayCutout:0:0 | OneHanded:0:0 | null |
| areaForLayer[14] | ROOT:0:0 | WindowedMagnification:0:0 | HideDisplayCutout:0:0 | OneHanded:0:0 | null |
| areaForLayer[15] | ROOT:0:0 | WindowedMagnification:0:0 | null | OneHanded:15:0 | FullscreenMagnification:15:0 |
| areaForLayer[16] | ROOT:0:0 | WindowedMagnification:0:0 | HideDisplayCutout:16:0 | OneHanded:16:0 | FullscreenMagnification:16:0 |
| areaForLayer[17] | ROOT:0:0 | WindowedMagnification:0:0 | null | OneHanded:17:0 | FullscreenMagnification:17:0 |
| areaForLayer[18] | ROOT:0:0 | WindowedMagnification:0:0 | HideDisplayCutout:18:0 | OneHanded:18:0 | FullscreenMagnification:18:0 |
| … | ROOT:0:0 | WindowedMagnification:0:0 | HideDisplayCutout18:0 | OneHanded:18:0 | FullscreenMagnification:18:0 |
| areaForLayer[23] | ROOT:0:0 | WindowedMagnification:0:0 | HideDisplayCutout:18:0 | OneHanded:18:0 | FullscreenMagnification:18:0 |
| areaForLayer[24] | ROOT:0:0 | WindowedMagnification:0:0 | null | null | null |
| areaForLayer[25] | ROOT:0:0 | WindowedMagnification:0:0 | null | null | null |
| areaForLayer[26] | ROOT:0:0 | WindowedMagnification:0:0 | HideDisplayCutout:26:0 | OneHanded:26:0 | FullscreenMagnification:26:0 |
| areaForLayer[27] | ROOT:0:0 | WindowedMagnification:0:0 | HideDisplayCutout:26:0 | OneHanded:26:0 | FullscreenMagnification:26:0 |
| areaForLayer[28] | ROOT:0:0 | WindowedMagnification:0:0 | HideDisplayCutout:26:0 | OneHanded:26:0 | null |
| areaForLayer[29] | ROOT:0:0 | WindowedMagnification:0:0 | HideDisplayCutout:26:0 | OneHanded:26:0 | FullscreenMagnification:29:0 |
| areaForLayer[30] | ROOT:0:0 | WindowedMagnification:0:0 | HideDisplayCutout:26:0 | OneHanded:26:0 | FullscreenMagnification:29:0 |
| areaForLayer[31] | ROOT:0:0 | WindowedMagnification:0:0 | HideDisplayCutout:26:0 | OneHanded:26:0 | FullscreenMagnification:29:0 |
| areaForLayer[32] | ROOT:0:0 | null | HideDisplayCutout:32:0 | OneHanded:32:0 | null |
| areaForLayer[33] | ROOT:0:0 | null | HideDisplayCutout:32:0 | null | FullscreenMagnification:33:0 |
| areaForLayer[34] | ROOT:0:0 | null | HideDisplayCutout:32:0 | OneHanded:34:0 | FullscreenMagnification:34:0 |
| areaForLayer[35] | ROOT:0:0 | null | HideDisplayCutout:32:0 | OneHanded:34:0 | FullscreenMagnification:34:0 |
| areaForLayer[36] | ROOT:0:0 | null | null | null | null |
树状图
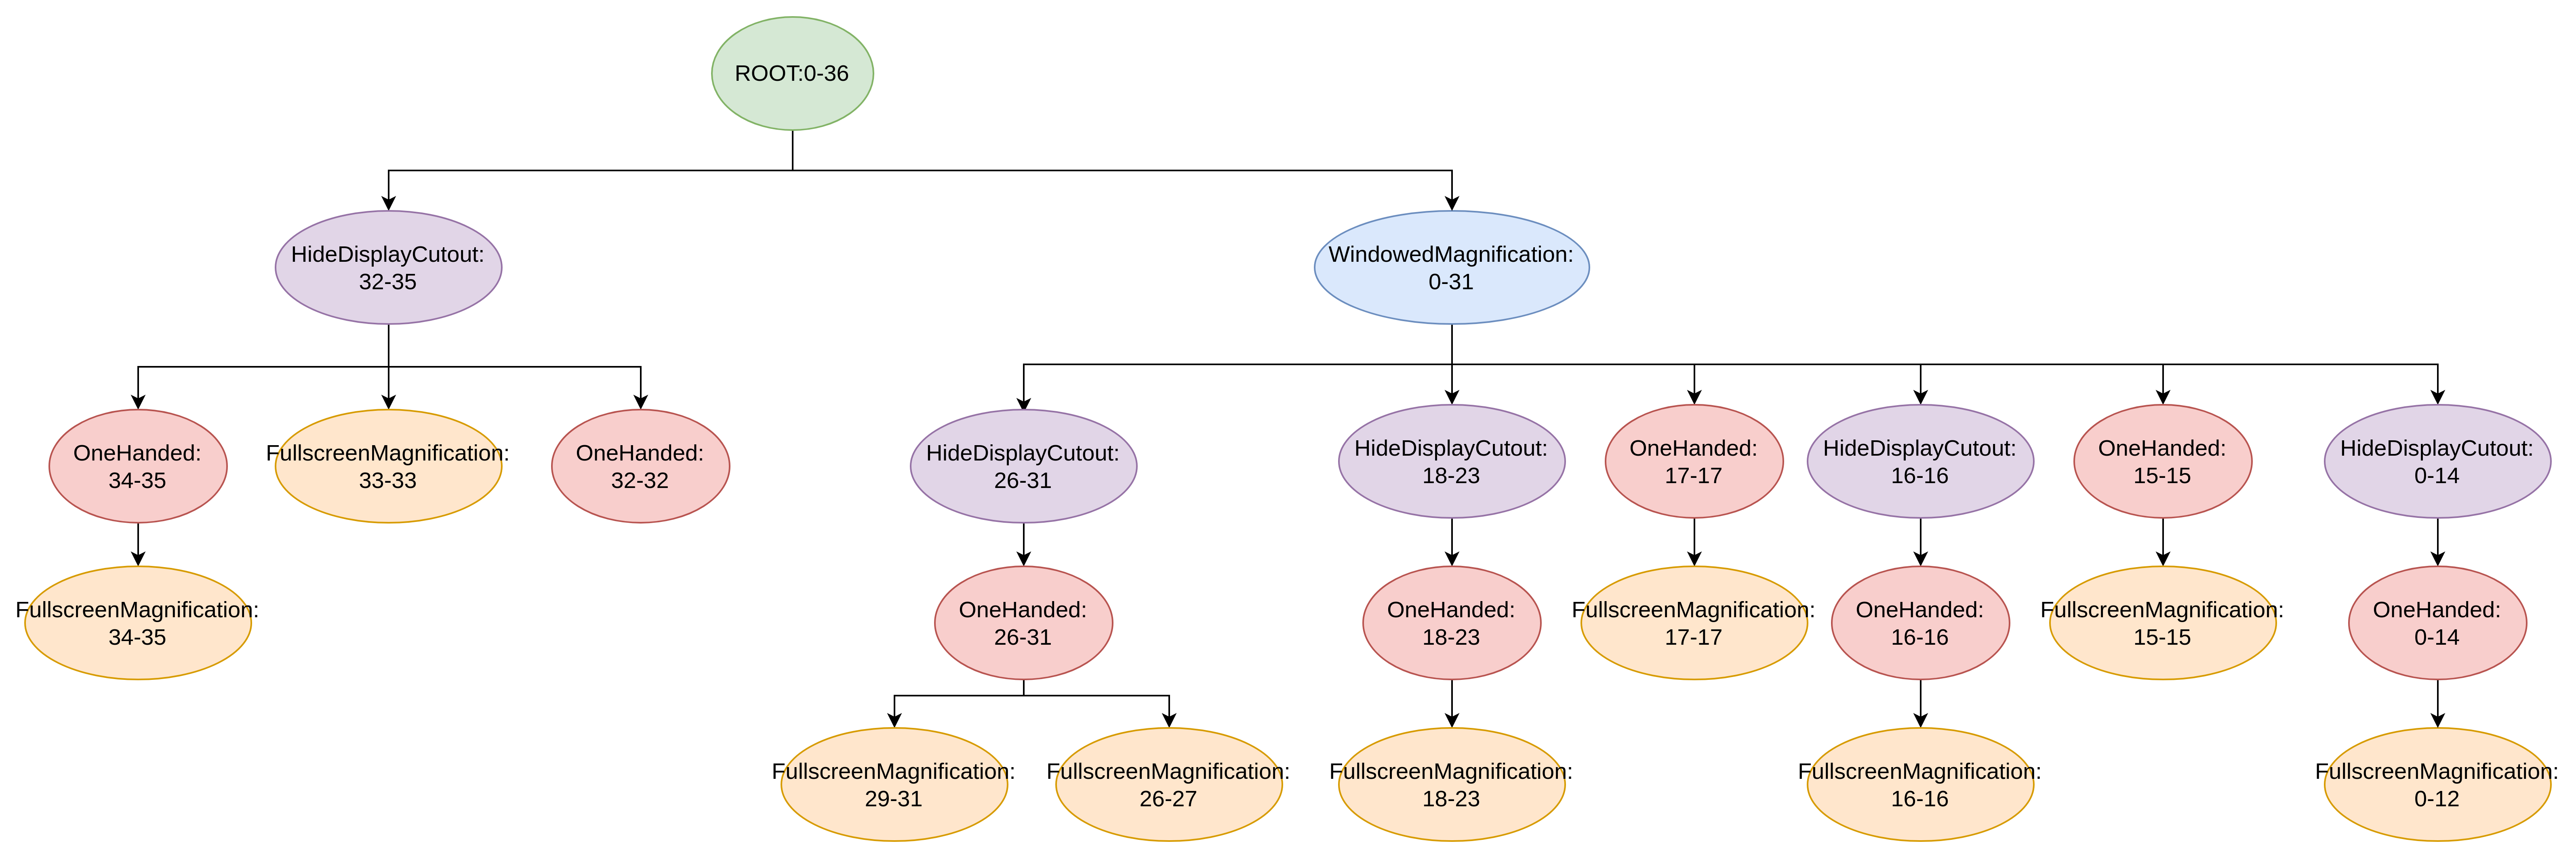
ImePlaceholder
ImePlaceholder是13-14为true,我们最后可以得到一个完整的表格
| PendingArea数组 | ROOT | WindowedMagnification | HideDisplayCutout | OneHanded | FullscreenMagnification | ImePlaceholder |
|---|---|---|---|---|---|---|
| areaForLayer[0] | ROOT:0:0 | WindowedMagnification:0:0 | HideDisplayCutout:0:0 | OneHanded:0:0 | FullscreenMagnification:0:0 | null |
| … | ROOT:0:0 | WindowedMagnification:0:0 | HideDisplayCutout:0:0 | OneHanded:0:0 | FullscreenMagnification:0:0 | null |
| areaForLayer[12] | ROOT:0:0 | WindowedMagnification:0:0 | HideDisplayCutout:0:0 | OneHanded:0:0 | FullscreenMagnification:0:0 | null |
| areaForLayer[13] | ROOT:0:0 | WindowedMagnification:0:0 | HideDisplayCutout:0:0 | OneHanded:0:0 | null | ImePlaceholder:13:0 |
| areaForLayer[14] | ROOT:0:0 | WindowedMagnification:0:0 | HideDisplayCutout:0:0 | OneHanded:0:0 | null | ImePlaceholder:13:0 |
| areaForLayer[15] | ROOT:0:0 | WindowedMagnification:0:0 | null | OneHanded:15:0 | FullscreenMagnification:15:0 | null |
| areaForLayer[16] | ROOT:0:0 | WindowedMagnification:0:0 | HideDisplayCutout:16:0 | OneHanded:16:0 | FullscreenMagnification:16:0 | null |
| areaForLayer[17] | ROOT:0:0 | WindowedMagnification:0:0 | null | OneHanded:17:0 | FullscreenMagnification:17:0 | null |
| areaForLayer[18] | ROOT:0:0 | WindowedMagnification:0:0 | HideDisplayCutout:18:0 | OneHanded:18:0 | FullscreenMagnification:18:0 | null |
| … | ROOT:0:0 | WindowedMagnification:0:0 | HideDisplayCutout18:0 | OneHanded:18:0 | FullscreenMagnification:18:0 | null |
| areaForLayer[23] | ROOT:0:0 | WindowedMagnification:0:0 | HideDisplayCutout:18:0 | OneHanded:18:0 | FullscreenMagnification:18:0 | null |
| areaForLayer[24] | ROOT:0:0 | WindowedMagnification:0:0 | null | null | null | null |
| areaForLayer[25] | ROOT:0:0 | WindowedMagnification:0:0 | null | null | null | null |
| areaForLayer[26] | ROOT:0:0 | WindowedMagnification:0:0 | HideDisplayCutout:26:0 | OneHanded:26:0 | FullscreenMagnification:26:0 | null |
| areaForLayer[27] | ROOT:0:0 | WindowedMagnification:0:0 | HideDisplayCutout:26:0 | OneHanded:26:0 | FullscreenMagnification:26:0 | null |
| areaForLayer[28] | ROOT:0:0 | WindowedMagnification:0:0 | HideDisplayCutout:26:0 | OneHanded:26:0 | null | null |
| areaForLayer[29] | ROOT:0:0 | WindowedMagnification:0:0 | HideDisplayCutout:26:0 | OneHanded:26:0 | FullscreenMagnification:29:0 | null |
| areaForLayer[30] | ROOT:0:0 | WindowedMagnification:0:0 | HideDisplayCutout:26:0 | OneHanded:26:0 | FullscreenMagnification:29:0 | null |
| areaForLayer[31] | ROOT:0:0 | WindowedMagnification:0:0 | HideDisplayCutout:26:0 | OneHanded:26:0 | FullscreenMagnification:29:0 | null |
| areaForLayer[32] | ROOT:0:0 | null | HideDisplayCutout:32:0 | OneHanded:32:0 | nullnull | |
| areaForLayer[33] | ROOT:0:0 | null | HideDisplayCutout:32:0 | null | FullscreenMagnification:33:0 | null |
| areaForLayer[34] | ROOT:0:0 | null | HideDisplayCutout:32:0 | OneHanded:34:0 | FullscreenMagnification:34:0 | null |
| areaForLayer[35] | ROOT:0:0 | null | HideDisplayCutout:32:0 | OneHanded:34:0 | FullscreenMagnification:34:0 | null |
| areaForLayer[36] | ROOT:0:0 | null | null | null | null | null |
树状图
小结
实际上表格中的每一行很清晰的描述了PendingArea的数据结构
    static class PendingArea {


        final int mMinLayer;
        final ArrayList<PendingArea> mChildren = new ArrayList<>();
        final Feature mFeature;
        final PendingArea mParent;
        int mMaxLayer;

        PendingArea(Feature feature, int minLayer, PendingArea parent) {


            mMinLayer = minLayer;
            mFeature = feature;
            mParent = parent;
        }
这里的mMaxLayer尚未计算,后面创建叶子节点后才会计算,我们统一先按算作0
WindowedMagnification:0:0则表示mFeature:mMinLayer:mMaxLayer
例如:第一行
| PendingArea数组 | ROOT | WindowedMagnification | HideDisplayCutout | OneHanded | FullscreenMagnification | ImePlaceholder |
|---|---|---|---|---|---|---|
| areaForLayer[0] | ROOT:0:0 | WindowedMagnification:0:0 | HideDisplayCutout:0:0 | OneHanded:0:0 | FullscreenMagnification:0:0 | null |
当Feature为ROOT时,mChildren是WindowedMagnification:0:0 ,parent为空;
当Feature为WindowedMagnification是,mChildren是HideDisplayCutout:0:0
mMinLayer、mMaxLayer为0,parent为ROOT0:0;
当Feature为HideDisplayCutout是,mChildren是OneHanded:0:0
mMinLayer、mMaxLayer为0,parent为WindowedMagnification:0:0
其他行同理
从整体来看ROOT的直系孩子,实际就是WindowedMagnification:0:0和HideDisplayCutout:32:0
也可通过树形图让我们更加清晰的了解各个层级的关系
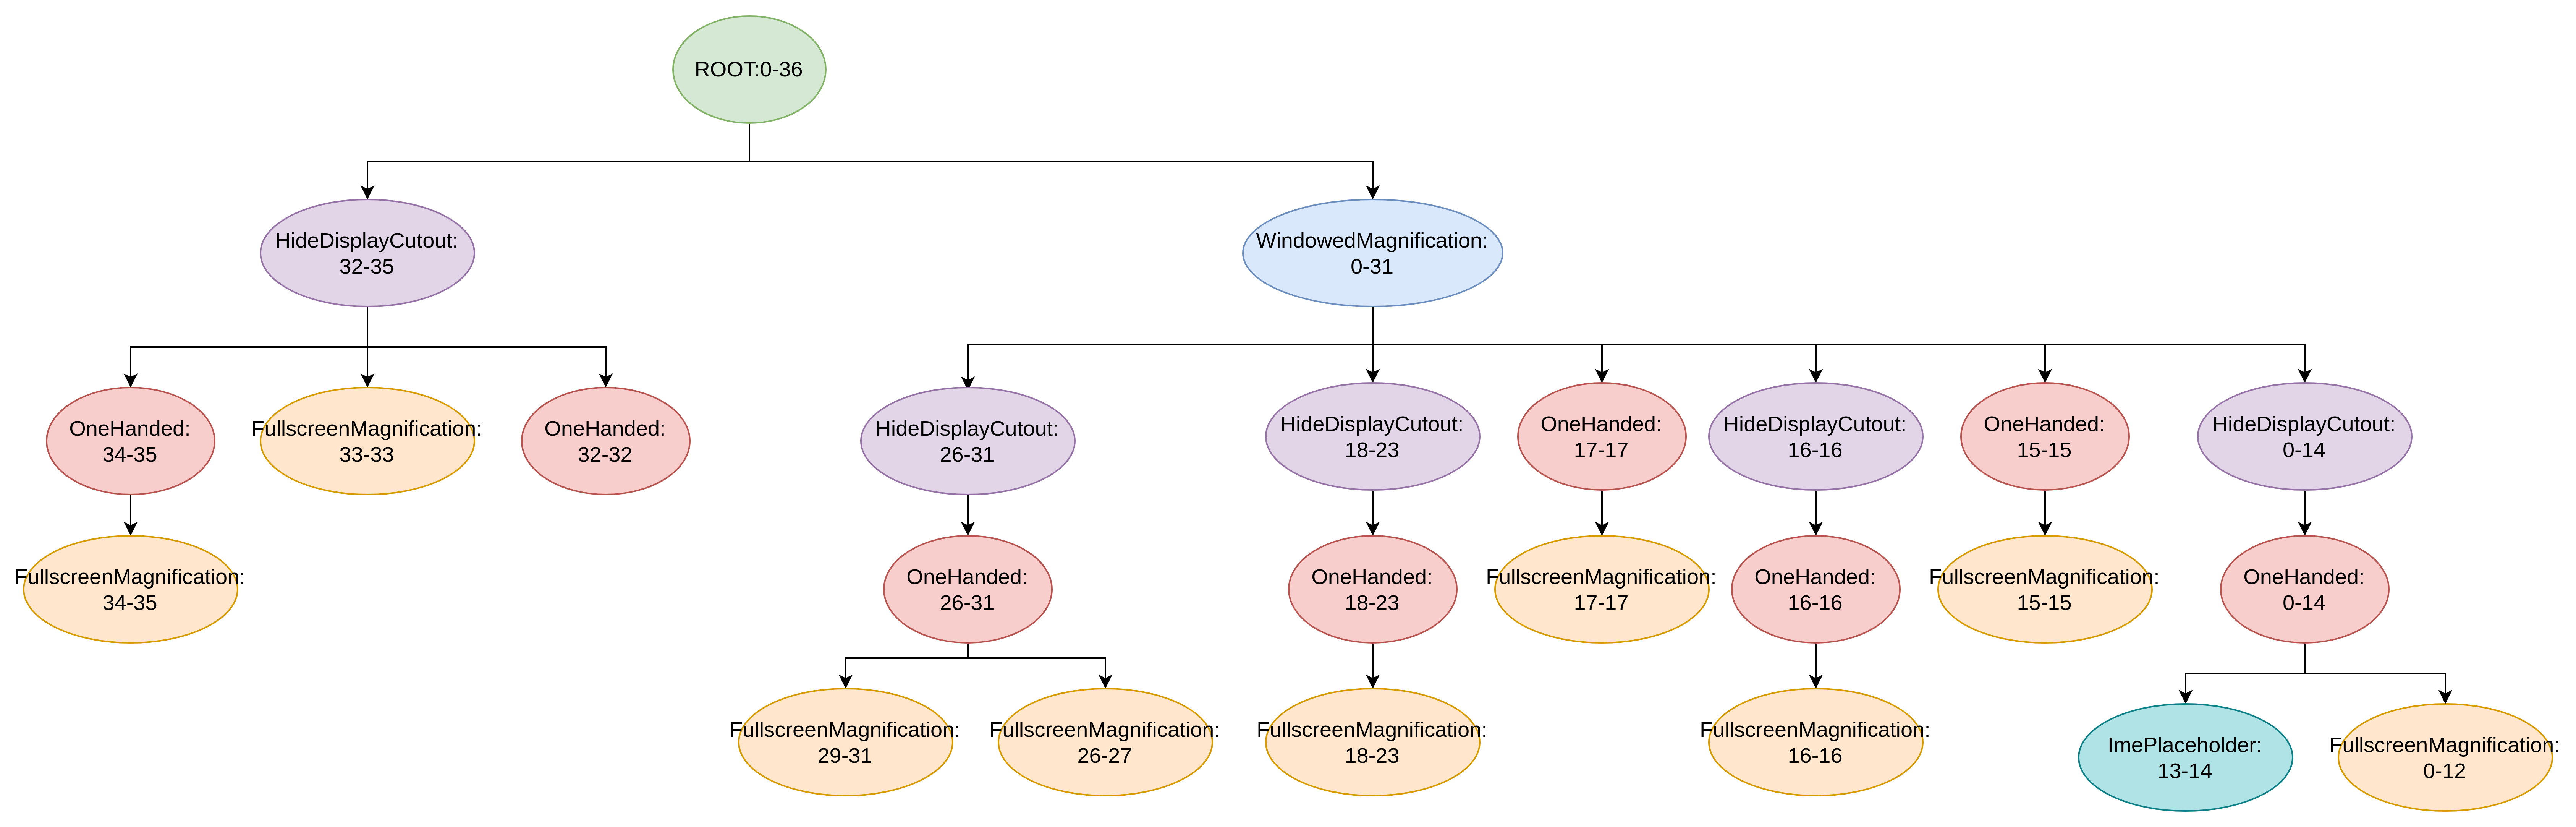
5.4 创建叶子Token节点
	    // Create Tokens as leaf for every layer.
	    PendingArea leafArea = null;
	    int leafType = LEAF_TYPE_TOKENS;
	    //循环遍历每层
	    for (int layer = 0; layer < maxWindowLayerCount; layer++) {


	    	//根据层级获取type类型
	        int type = typeOfLayer(policy, layer);
	        // Check whether we can reuse the same Tokens with the previous layer. This happens
	        // if the previous layer is the same type as the current layer AND there is no
	        // feature that applies to only one of them.
	        //判断PendingArea对象是否为空 或者 PendingArea对象的父亲不等于当前areaForLayer中的节点 或者 新获取的type和叶子的type不相等
	        if (leafArea == null || leafArea.mParent != areaForLayer[layer]
	                || type != leafType) {


	            // Create a new Tokens for this layer.
	            //创建新的叶子节点,互认关系结为父子
	            leafArea = new PendingArea(null /* feature */, layer, areaForLayer[layer]);
	            areaForLayer[layer].mChildren.add(leafArea);
	            leafType = type;
	            //叶子类型为LEAF_TYPE_TASK_CONTAINERS做处理
	            if (leafType == LEAF_TYPE_TASK_CONTAINERS) {


	                // We use the passed in TaskDisplayAreas for task container type of layer.
	                // Skip creating Tokens even if there is no TDA.
	                addTaskDisplayAreasToApplicationLayer(areaForLayer[layer]);
	                addDisplayAreaGroupsToApplicationLayer(areaForLayer[layer],
	                        displayAreaGroupHierarchyBuilders);
	                leafArea.mSkipTokens = true;
	            //叶子类型为LEAF_TYPE_IME_CONTAINERS做处理
	            } else if (leafType == LEAF_TYPE_IME_CONTAINERS) {


	                // We use the passed in ImeContainer for ime container type of layer.
	                // Skip creating Tokens even if there is no ime container.
	                leafArea.mExisting = mImeContainer;
	                leafArea.mSkipTokens = true;
	            }
	        }
	        //更新叶子最大层级
	        leafArea.mMaxLayer = layer;
	    }
首先我们看下int type = typeOfLayer(policy, layer);
        private static int typeOfLayer(WindowManagerPolicy policy, int layer) {


            if (layer == APPLICATION_LAYER) {


                return LEAF_TYPE_TASK_CONTAINERS;
            } else if (layer == policy.getWindowLayerFromTypeLw(TYPE_INPUT_METHOD)
                    || layer == policy.getWindowLayerFromTypeLw(TYPE_INPUT_METHOD_DIALOG)) {


                return LEAF_TYPE_IME_CONTAINERS;
            } else {


                return LEAF_TYPE_TOKENS;
            }
        }
对三种层级做了特殊处理
- 应用层级(APPLICATION_LAYER):其值为2,Leaf的类型为LEAF_TYPE_TASK_CONTAINERS。
- 输入法层级(TYPE_INPUT_METHOD、TYPE_INPUT_METHOD_DIALOG):其值为13,14,Leaf的类型为LEAF_TYPE_IME_CONTAINERS。
- 其他层级值对应的Leaf类型为LEAF_TYPE_TOKENS。
这里我们先总结一下整体流程步骤
第一步
int type = typeOfLayer(policy, layer);
判断type类型是三种中的哪一种
第二步
leafArea == null || leafArea.mParent != areaForLayer[layer] || type != leafType
判断PendingArea对象是否为空 或者 PendingArea对象的父亲不等于当前areaForLayer中的节点 或者 新获取的type和叶子的type不相等
leafArea = new PendingArea(null /* feature */, layer, areaForLayer[layer]);
leafArea认areaForLayer[layer]为父亲areaForLayer[layer].mChildren.add(leafArea);
areaForLayer[layer]认leafArea为孩子leafType = type;
更新leafType为type
注: 这里的areaForLayer[layer] 是上面构建Features更新后的结果,也就是我们的表格
这里我们以第一行为例
| PendingArea数组 | ROOT | WindowedMagnification | HideDisplayCutout | OneHanded | FullscreenMagnification | ImePlaceholder |
|---|---|---|---|---|---|---|
| areaForLayer[0] | ROOT:0:0 | WindowedMagnification:0:0 | HideDisplayCutout:0:0 | OneHanded:0:0 | FullscreenMagnification:0:0 | null |
这里我们看areaForLayer[0] 其最后一次的更新结果,现在对应的实际上就是FullscreenMagnification:0:0
后续通过查表来看areaForLayer数组对应的是哪个节点
第2.5步
对leafType == LEAF_TYPE_TASK_CONTAINERS和leafType == LEAF_TYPE_IME_CONTAINERS分别做特殊处理
第三步
leafArea.mMaxLayer = layer;
更新叶子最大层级
这里我们可以发现叶子节点的添加和其他Features的构建逻辑上类似,我们把第一步的三种类型分别来讨论代码流程。
type = LEAF_TYPE_TOKENS
对应层级0-1,3-14,17-36,这里就先不讨论第3次(层级2:APPLICATION_LAYER)、第14(层级13:TYPE_INPUT_METHOD)和第15次(层级14:TYPE_INPUT_METHOD_DIALOG)循环
第一次循环
第一步:
int type = typeOfLayer(policy, 0);
type = LEAF_TYPE_TOKENS
第二步: leafArea为null,进入条件
leafArea = new PendingArea(null /* feature */, 0, areaForLayer[0]);
leafArea认areaForLayer[0] (FullscreenMagnification:0:0)为父亲areaForLayer[layer].mChildren.add(leafArea);
areaForLayer[0] (FullscreenMagnification:0:0)认leafArea为孩子leafType = type;
更新leafType为LEAF_TYPE_TOKENS
第三步:
leafArea.mMaxLayer = 0;
更新叶子最大层级为0
第二次循环
第一步:
int type = typeOfLayer(policy, 1);
type = LEAF_TYPE_TOKENS
第二步: leafArea不为null;上次循环后leafArea.mParent是 FullscreenMagnification:0:0 , areaForLayer[1] 查表得出同样是 FullscreenMagnification:0:0 ;上次循环后type和leafType都是LEAF_TYPE_TOKENS。因此不进入条件
第三步:
leafArea.mMaxLayer = 1;
更新叶子最大层级为1
到这里我们可以通过规律发现,实际上这段代码就是在不同的feature底部上添加叶子节点
第四次循环:同理第一次循环,leafArea认areaForLayer[3] (FullscreenMagnification:0:0)为父亲,areaForLayer[3] (FullscreenMagnification:0:0)认leafArea为孩子,更新叶子最大层级为3
第5到第12次循环:同理第二次循环,最后更新叶子最大层级为12
后续不在赘述,见下表
| PendingArea数组 | ROOT | WindowedMagnification | HideDisplayCutout | OneHanded | FullscreenMagnification | ImePlaceholder | leaf |
|---|---|---|---|---|---|---|---|
| areaForLayer[0] | ROOT:0:0 | WindowedMagnification:0:0 | HideDisplayCutout:0:0 | OneHanded:0:0 | FullscreenMagnification:0:0 | null | leaf:0:1 |
| areaForLayer[1] | ROOT:0:0 | WindowedMagnification:0:0 | HideDisplayCutout:0:0 | OneHanded:0:0 | FullscreenMagnification:0:0 | null | leaf:0:1 |
| areaForLayer[2] | ROOT:0:0 | WindowedMagnification:0:0 | HideDisplayCutout:0:0 | OneHanded:0:0 | FullscreenMagnification:0:0 | null | 尚未讨论 |
| areaForLayer[3] | ROOT:0:0 | WindowedMagnification:0:0 | HideDisplayCutout:0:0 | OneHanded:0:0 | FullscreenMagnification:0:0 | null | leaf:3:12 |
| … | ROOT:0:0 | WindowedMagnification:0:0 | HideDisplayCutout:0:0 | OneHanded:0:0 | FullscreenMagnification:0:0 | null | leaf:3:12 |
| areaForLayer[12] | ROOT:0:0 | WindowedMagnification:0:0 | HideDisplayCutout:0:0 | OneHanded:0:0 | FullscreenMagnification:0:0 | null | leaf:3:12 |
| areaForLayer[13] | ROOT:0:0 | WindowedMagnification:0:0 | HideDisplayCutout:0:0 | OneHanded:0:0 | null | ImePlaceholder:13:0 | 尚未讨论 |
| areaForLayer[14] | ROOT:0:0 | WindowedMagnification:0:0 | HideDisplayCutout:0:0 | OneHanded:0:0 | null | ImePlaceholder:13:0 | 尚未讨论 |
| areaForLayer[15] | ROOT:0:0 | WindowedMagnification:0:0 | null | OneHanded:15:0 | FullscreenMagnification:15:0 | null | leaf:15:15 |
| areaForLayer[16] | ROOT:0:0 | WindowedMagnification:0:0 | HideDisplayCutout:16:0 | OneHanded:16:0 | FullscreenMagnification:16:0 | null | leaf:16:16 |
| areaForLayer[17] | ROOT:0:0 | WindowedMagnification:0:0 | null | OneHanded:17:0 | FullscreenMagnification:17:0 | null | leaf:17:17 |
| areaForLayer[18] | ROOT:0:0 | WindowedMagnification:0:0 | HideDisplayCutout:18:0 | OneHanded:18:0 | FullscreenMagnification:18:0 | null | leaf:18:23 |
| … | ROOT:0:0 | WindowedMagnification:0:0 | HideDisplayCutout18:0 | OneHanded:18:0 | FullscreenMagnification:18:0 | null | leaf:18:23 |
| areaForLayer[23] | ROOT:0:0 | WindowedMagnification:0:0 | HideDisplayCutout:18:0 | OneHanded:18:0 | FullscreenMagnification:18:0 | null | leaf:18:23 |
| areaForLayer[24] | ROOT:0:0 | WindowedMagnification:0:0 | null | null | null | null | leaf:24:25 |
| areaForLayer[25] | ROOT:0:0 | WindowedMagnification:0:0 | null | null | null | null | leaf:24:25 |
| areaForLayer[26] | ROOT:0:0 | WindowedMagnification:0:0 | HideDisplayCutout:26:0 | OneHanded:26:0 | FullscreenMagnification:26:0 | null | leaf:26:27 |
| areaForLayer[27] | ROOT:0:0 | WindowedMagnification:0:0 | HideDisplayCutout:26:0 | OneHanded:26:0 | FullscreenMagnification:26:0 | null | leaf:26:27 |
| areaForLayer[28] | ROOT:0:0 | WindowedMagnification:0:0 | HideDisplayCutout:26:0 | OneHanded:26:0 | null | null | leaf:28:28 |
| areaForLayer[29] | ROOT:0:0 | WindowedMagnification:0:0 | HideDisplayCutout:26:0 | OneHanded:26:0 | FullscreenMagnification:29:0 | null | leaf:29:31 |
| areaForLayer[30] | ROOT:0:0 | WindowedMagnification:0:0 | HideDisplayCutout:26:0 | OneHanded:26:0 | FullscreenMagnification:29:0 | null | leaf:29:31 |
| areaForLayer[31] | ROOT:0:0 | WindowedMagnification:0:0 | HideDisplayCutout:26:0 | OneHanded:26:0 | FullscreenMagnification:29:0 | null | leaf:29:31 |
| areaForLayer[32] | ROOT:0:0 | null | HideDisplayCutout:32:0 | OneHanded:32:0 | null | null | leaf:32:32 |
| areaForLayer[33] | ROOT:0:0 | null | HideDisplayCutout:32:0 | null | FullscreenMagnification:33:0 | null | leaf:33:33 |
| areaForLayer[34] | ROOT:0:0 | null | HideDisplayCutout:32:0 | OneHanded:34:0 | FullscreenMagnification:34:0 | null | leaf:34:35 |
| areaForLayer[35] | ROOT:0:0 | null | HideDisplayCutout:32:0 | OneHanded:34:0 | FullscreenMagnification:34:0 | null | leaf:34:35 |
| areaForLayer[36] | ROOT:0:0 | null | null | null | null | null | leaf:36:36 |
type = LEAF_TYPE_TASK_CONTAINERS
对应层级为第2层,即layer为2
// We use the passed in TaskDisplayAreas for task container type of layer.
// Skip creating Tokens even if there is no TDA.
addTaskDisplayAreasToApplicationLayer(areaForLayer[layer]);
addDisplayAreaGroupsToApplicationLayer(areaForLayer[layer],
        displayAreaGroupHierarchyBuilders);
leafArea.mSkipTokens = true;
addTaskDisplayAreasToApplicationLayer(areaForLayer[2]);
对应代码为
        /** Adds all {@link TaskDisplayArea} to the application layer. */
        private void addTaskDisplayAreasToApplicationLayer(PendingArea parentPendingArea) {


            final int count = mTaskDisplayAreas.size();
            for (int i = 0; i < count; i++) {


                PendingArea leafArea =
                        new PendingArea(null /* feature */, APPLICATION_LAYER, parentPendingArea);
                leafArea.mExisting = mTaskDisplayAreas.get(i);
                leafArea.mMaxLayer = APPLICATION_LAYER;
                parentPendingArea.mChildren.add(leafArea);
            }
        }
【DisplayAreaPolicy.DefaultProvider】中的第1步,我们可以知道,实际上mTaskDisplayAreas.size()为1
 其中
其中leafArea.mExisting = mTaskDisplayAreas.get(i);
        /** If not {@code null}, use this instead of creating a {@link DisplayArea.Tokens}. */
        @Nullable DisplayArea mExisting;
mExisting是PendingArea成员变量,为DisplayArea类型对象,后面调用createArea()方法【后面会讲到这个方法】时会判断mExisting的值做处理,如果mExisting不为空,那么直接用mExisting,而不会再重新创建一个DisplayArea.Tokens对象。
在第二层添加的就是DefaultTaskDisplayArea
addDisplayAreaGroupsToApplicationLayer(areaForLayer[2],displayAreaGroupHierarchyBuilders);
对应代码为
        /** Adds roots of the DisplayAreaGroups to the application layer. */
        private void addDisplayAreaGroupsToApplicationLayer(
                DisplayAreaPolicyBuilder.PendingArea parentPendingArea,
                @Nullable List<HierarchyBuilder> displayAreaGroupHierarchyBuilders) {


            if (displayAreaGroupHierarchyBuilders == null) {


                return;
            }
            final int count = displayAreaGroupHierarchyBuilders.size();
            for (int i = 0; i < count; i++) {


                DisplayAreaPolicyBuilder.PendingArea
                        leafArea = new DisplayAreaPolicyBuilder.PendingArea(
                        null /* feature */, APPLICATION_LAYER, parentPendingArea);
                leafArea.mExisting = displayAreaGroupHierarchyBuilders.get(i).mRoot;
                leafArea.mMaxLayer = APPLICATION_LAYER;
                parentPendingArea.mChildren.add(leafArea);
            }
        }
【DisplayAreaPolicy.DefaultProvider】中的第5步(5.生成DisplayArea层级结构)开头说过displayAreaGroupHierarchyBuilders实际为null,因此不需要关注
leafArea.mSkipTokens = true;
        /**
         * Whether to skip creating a {@link DisplayArea.Tokens} if {@link #mExisting} is
         * {@code null}.
         *
         * <p>This will be set for {@link HierarchyBuilder#LEAF_TYPE_IME_CONTAINERS} and
         * {@link HierarchyBuilder#LEAF_TYPE_TASK_CONTAINERS}, because we don't want to create
         * {@link DisplayArea.Tokens} for them even if they are not set.
         */
        boolean mSkipTokens = false;
mSkipTokens是PendingArea成员变量,为DisplayArea类型对象,将为当前节点创建的leafArea的mSkipTokens设置为true,后面调用createArea()方法【后面会讲到这个方法】时会判断mSkipTokens的值,为true就返回null
也就是说后续在根据PendingArea数组生成DisplayArea层级结构的时候,就不会为这个PendingArea对象生成一个DisplayArea对象了。
相当于是用TaskDisplayArea对象替换了为当前节点生成的Leaf。
type = LEAF_TYPE_IME_CONTAINERS
对应层级为第13、14层
 // We use the passed in ImeContainer for ime container type of layer.
 // Skip creating Tokens even if there is no ime container.
 leafArea.mExisting = mImeContainer;
 leafArea.mSkipTokens = true;
leafArea.mExisting = mImeContainer;
【DisplayAreaPolicy.DefaultProvider】中的第3.1步有在HierarchyBuilder.mImeContainer的ImeContainer
和 type = LEAF_TYPE_TASK_CONTAINERS的部分同理
即不再为当前节点生成DisplayArea.Tokens,而是用之前保存在HierarchyBuilder.mImeContainer的ImeContainer。
leafArea.mSkipTokens = true;
和前面 type = LEAF_TYPE_TASK_CONTAINERS的部分同理
小结
这里我们更新一下表格
| PendingArea数组 | ROOT | WindowedMagnification | HideDisplayCutout | OneHanded | FullscreenMagnification | ImePlaceholder | leaf |
|---|---|---|---|---|---|---|---|
| areaForLayer[0] | ROOT:0:0 | WindowedMagnification:0:0 | HideDisplayCutout:0:0 | OneHanded:0:0 | FullscreenMagnification:0:0 | null | leaf:0:1 |
| areaForLayer[1] | ROOT:0:0 | WindowedMagnification:0:0 | HideDisplayCutout:0:0 | OneHanded:0:0 | FullscreenMagnification:0:0 | null | leaf:0:1 |
| areaForLayer[2] | ROOT:0:0 | WindowedMagnification:0:0 | HideDisplayCutout:0:0 | OneHanded:0:0 | FullscreenMagnification:0:0 | null | DefaultTaskDisplayArea:2:2 |
| areaForLayer[3] | ROOT:0:0 | WindowedMagnification:0:0 | HideDisplayCutout:0:0 | OneHanded:0:0 | FullscreenMagnification:0:0 | null | leaf:3:12 |
| … | ROOT:0:0 | WindowedMagnification:0:0 | HideDisplayCutout:0:0 | OneHanded:0:0 | FullscreenMagnification:0:0 | null | leaf:3:12 |
| areaForLayer[12] | ROOT:0:0 | WindowedMagnification:0:0 | HideDisplayCutout:0:0 | OneHanded:0:0 | FullscreenMagnification:0:0 | null | leaf:3:12 |
| areaForLayer[13] | ROOT:0:0 | WindowedMagnification:0:0 | HideDisplayCutout:0:0 | OneHanded:0:0 | null | ImePlaceholder:13:0 | mImeContainer:13:14 |
| areaForLayer[14] | ROOT:0:0 | WindowedMagnification:0:0 | HideDisplayCutout:0:0 | OneHanded:0:0 | null | ImePlaceholder:13:0 | mImeContainer:13:14 |
| areaForLayer[15] | ROOT:0:0 | WindowedMagnification:0:0 | null | OneHanded:15:0 | FullscreenMagnification:15:0 | null | leaf:15:15 |
| areaForLayer[16] | ROOT:0:0 | WindowedMagnification:0:0 | HideDisplayCutout:16:0 | OneHanded:16:0 | FullscreenMagnification:16:0 | null | leaf:16:16 |
| areaForLayer[17] | ROOT:0:0 | WindowedMagnification:0:0 | null | OneHanded:17:0 | FullscreenMagnification:17:0 | null | leaf:17:17 |
| areaForLayer[18] | ROOT:0:0 | WindowedMagnification:0:0 | HideDisplayCutout:18:0 | OneHanded:18:0 | FullscreenMagnification:18:0 | null | leaf:18:23 |
| … | ROOT:0:0 | WindowedMagnification:0:0 | HideDisplayCutout18:0 | OneHanded:18:0 | FullscreenMagnification:18:0 | null | leaf:18:23 |
| areaForLayer[23] | ROOT:0:0 | WindowedMagnification:0:0 | HideDisplayCutout:18:0 | OneHanded:18:0 | FullscreenMagnification:18:0 | null | leaf:18:23 |
| areaForLayer[24] | ROOT:0:0 | WindowedMagnification:0:0 | null | null | null | null | leaf:24:25 |
| areaForLayer[25] | ROOT:0:0 | WindowedMagnification:0:0 | null | null | null | null | leaf:24:25 |
| areaForLayer[26] | ROOT:0:0 | WindowedMagnification:0:0 | HideDisplayCutout:26:0 | OneHanded:26:0 | FullscreenMagnification:26:0 | null | leaf:26:27 |
| areaForLayer[27] | ROOT:0:0 | WindowedMagnification:0:0 | HideDisplayCutout:26:0 | OneHanded:26:0 | FullscreenMagnification:26:0 | null | leaf:26:27 |
| areaForLayer[28] | ROOT:0:0 | WindowedMagnification:0:0 | HideDisplayCutout:26:0 | OneHanded:26:0 | null | null | leaf:28:28 |
| areaForLayer[29] | ROOT:0:0 | WindowedMagnification:0:0 | HideDisplayCutout:26:0 | OneHanded:26:0 | FullscreenMagnification:29:0 | null | leaf:29:31 |
| areaForLayer[30] | ROOT:0:0 | WindowedMagnification:0:0 | HideDisplayCutout:26:0 | OneHanded:26:0 | FullscreenMagnification:29:0 | null | leaf:29:31 |
| areaForLayer[31] | ROOT:0:0 | WindowedMagnification:0:0 | HideDisplayCutout:26:0 | OneHanded:26:0 | FullscreenMagnification:29:0 | null | leaf:29:31 |
| areaForLayer[32] | ROOT:0:0 | null | HideDisplayCutout:32:0 | OneHanded:32:0 | null | null | leaf:32:32 |
| areaForLayer[33] | ROOT:0:0 | null | HideDisplayCutout:32:0 | null | FullscreenMagnification:33:0 | null | leaf:33:33 |
| areaForLayer[34] | ROOT:0:0 | null | HideDisplayCutout:32:0 | OneHanded:34:0 | FullscreenMagnification:34:0 | null | leaf:34:35 |
| areaForLayer[35] | ROOT:0:0 | null | HideDisplayCutout:32:0 | OneHanded:34:0 | FullscreenMagnification:34:0 | null | leaf:34:35 |
| areaForLayer[36] | ROOT:0:0 | null | null | null | null | null | leaf:36:36 |
转换为树状图
5.5 计算MaxLayer
root.computeMaxLayer();
代码讲解
调用的是PendingArea的方法
		int computeMaxLayer() {


            for (int i = 0; i < mChildren.size(); i++) {


                mMaxLayer = Math.max(mMaxLayer, mChildren.get(i).computeMaxLayer());
            }
            return mMaxLayer;
        }
如何理解各个层级最大值是如何计算的呢?
我们需要理清思路,大家可以先思考三个问题:
1.代码中mChildren是谁的?
2.mChildren.size()究竟是多大?
3.mChildren.get(i)是谁?
下面我们一起来看看这三个问题
- 代码中mChildren是谁的?
我们知道mChildren是PendingArea中的一个ArrayList< PendingArea >类型对象,这里是调用的是root.computeMaxLayer();,显然是root的 - mChildren.size()究竟是多大?
我们既然知道了mChildren属于root这个变量,但是从代码中并未找到root.mChildren相关的操作, mChildren.size()是多大呢?
我们先回顾一下前面之前创建的root
            final PendingArea root = new PendingArea(null, 0, null);
            Arrays.fill(areaForLayer, root);
我们可以看到实际上这里areaForLayer, root两者已经关联了起来,还记得前面添加feature结构时的流程吗?里面有对areaForLayer数组进行更新,也就是说当前mChildren.size()就是root有几个孩子
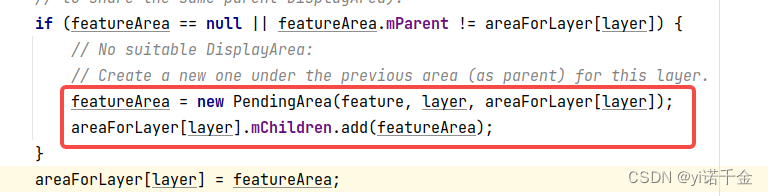
root的直系孩子就是WindowedMagnification:0:0和HideDisplayCutout:32:0,还有Leaf:36:36
我们直接从层级树来看,更容易理解

即root的mChildren.size()=3
- mChildren.get(i)是谁?
知道了mChildren对应的是哪个几个Feature,也就知道mChildren.get(i)实际上就是各个Feature
循环案例
第一次循环时,从root出发,其mChildren.size()=3,对应代码实际上是这样:
		int computeMaxLayer() {


            for (int i = 0; i < 3; i++) {


                mMaxLayer = Math.max(mMaxLayer, mChildren.get(0).computeMaxLayer());
            }
            return mMaxLayer;
        }
mChildren.get(0).computeMaxLayer()在进入递归循环,套娃开始
root的mChildren.get(0)是WindowedMagnification,其有7个孩子

WindowedMagnification的mChildren.get(0)是HideDisplayCutout:0-14
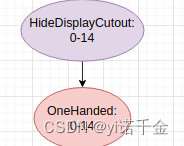
HideDisplayCutout的mChildren.get(0)是OneHanded:0-14

OneHanded的mChildren.get(0)是FullscreenMagnification:0-12
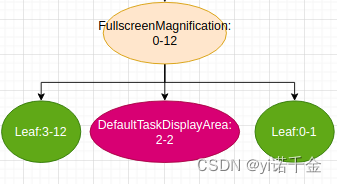
FullscreenMagnification的mChildren.size是3,i = 0,对应代码
		int computeMaxLayer() {


            for (int i = 0; i < 3; i++) {


                mMaxLayer = Math.max(mMaxLayer, mChildren.get(0).computeMaxLayer());
            }
            return mMaxLayer;
        }
一直往下走,递归到没有孩子的叶子节点,这里我们可以看到FullscreenMagnification的mChildren.get(0)是Leaf:0-1
叶子节点没有孩子,不在进入递归(套娃停止 ),之前更新过每个叶子节点的mMaxLayer
简单来说,就是
FullscreenMagnification的mChildren.get(0).computeMaxLayer()为Leaf:0-1,return 1 ,此时mMaxLayer = 1
FullscreenMagnification的mChildren.get(1).computeMaxLayer()为DefaultTaskDisplayArea:2-2,return 2,此时mMaxLayer = 2
FullscreenMagnification的mChildren.get(2).computeMaxLayer()为Leaf:3-12,return 12,此时mMaxLayer = 12
三者比较完大小后再次return mMaxLayer,即FullscreenMagnification的mMaxLayer为12
这个递归的规律实际上就是,每个拥有孩子的节点(ROOT除外)的mMaxLayer,就是其孩子节点中最大的mMaxLayer
最后我们补充完整表格
| PendingArea数组 | ROOT | WindowedMagnification | HideDisplayCutout | OneHanded | FullscreenMagnification | ImePlaceholder | leaf |
|---|---|---|---|---|---|---|---|
| areaForLayer[0] | ROOT:0:0 | WindowedMagnification:0:31 | HideDisplayCutout:0:14 | OneHanded:0:14 | FullscreenMagnification:0:12 | null | leaf:0:1 |
| areaForLayer[1] | ROOT:0:0 | WindowedMagnification:0:31 | HideDisplayCutout:0:14 | OneHanded:0:14 | FullscreenMagnification:0:12 | null | leaf:0:1 |
| areaForLayer[2] | ROOT:0:0 | WindowedMagnification:0:31 | HideDisplayCutout:0:14 | OneHanded:0:14 | FullscreenMagnification:0:12 | null | DefaultTaskDisplayArea:2:2 |
| areaForLayer[3] | ROOT:0:0 | WindowedMagnification:0:31 | HideDisplayCutout:0:14 | OneHanded:0:14 | FullscreenMagnification:0:12 | null | leaf:3:12 |
| … | ROOT:0:0 | WindowedMagnification:0:31 | HideDisplayCutout:0:14 | OneHanded:0:14 | FullscreenMagnification:0:12 | null | leaf:3:12 |
| areaForLayer[12] | ROOT:0:0 | WindowedMagnification:0:31 | HideDisplayCutout:0:14 | OneHanded:0:14 | FullscreenMagnification:0:12 | null | leaf:3:12 |
| areaForLayer[13] | ROOT:0:0 | WindowedMagnification:0:31 | HideDisplayCutout:0:14 | OneHanded:0:14 | null | ImePlaceholder:13:14 | mImeContainer:13:14 |
| areaForLayer[14] | ROOT:0:0 | WindowedMagnification:0:31 | HideDisplayCutout:0:14 | OneHanded:0:14 | null | ImePlaceholder:13:14 | mImeContainer:13:14 |
| areaForLayer[15] | ROOT:0:0 | WindowedMagnification:0:31 | null | OneHanded:15:15 | FullscreenMagnification:15:15 | null | leaf:15:15 |
| areaForLayer[16] | ROOT:0:0 | WindowedMagnification:0:31 | HideDisplayCutout:16:16 | OneHanded:16:16 | FullscreenMagnification:16:16 | null | leaf:16:16 |
| areaForLayer[17] | ROOT:0:0 | WWindowedMagnification:0:31 | null | OneHanded:17:17 | FullscreenMagnification:17:17 | null | leaf:17:17 |
| areaForLayer[18] | ROOT:0:0 | WindowedMagnification:0:31 | HideDisplayCutout:18:23 | OneHanded:18:23 | FullscreenMagnification:18:23 | null | leaf:18:23 |
| … | ROOT:0:0 | WindowedMagnification:0:31 | HideDisplayCutout18:23 | OneHanded:18:23 | FullscreenMagnification:18:23 | null | leaf:18:23 |
| areaForLayer[23] | ROOT:0:0 | WindowedMagnification:0:31 | HideDisplayCutout:18:23 | OneHanded:18:23 | FullscreenMagnification:18:23 | null | leaf:18:23 |
| areaForLayer[24] | ROOT:0:0 | WindowedMagnification:0:31 | null | null | null | null | leaf:24:25 |
| areaForLayer[25] | ROOT:0:0 | WindowedMagnification:0:31 | null | null | null | null | leaf:24:25 |
| areaForLayer[26] | ROOT:0:0 | WindowedMagnification:0:31 | HideDisplayCutout:26:27 | OneHanded:26:27 | FullscreenMagnification:26:27 | null | leaf:26:27 |
| areaForLayer[27] | ROOT:0:0 | WindowedMagnification:0:31 | HideDisplayCutout:26:27 | OneHanded:26:27 | FullscreenMagnification:26:27 | null | leaf:26:27 |
| areaForLayer[28] | ROOT:0:0 | WindowedMagnification:0:31 | HideDisplayCutout:26:31 | OneHanded:26:31 | null | null | leaf:28:28 |
| areaForLayer[29] | ROOT:0:0 | WindowedMagnification:0:31 | HideDisplayCutout:26:31 | OneHanded:26:31 | FullscreenMagnification:29:31 | null | leaf:29:31 |
| areaForLayer[30] | ROOT:0:0 | WindowedMagnification:0:31 | HideDisplayCutout:26:31 | OneHanded:26:31 | FullscreenMagnification:29:31 | null | leaf:29:31 |
| areaForLayer[31] | ROOT:0:0 | WindowedMagnification:0:31 | HideDisplayCutout:26:31 | OneHanded:26:31 | FullscreenMagnification:29:31 | null | leaf:29:31 |
| areaForLayer[32] | ROOT:0:0 | null | HideDisplayCutout:32:32 | OneHanded:32:32 | null | null | leaf:32:32 |
| areaForLayer[33] | ROOT:0:0 | null | HideDisplayCutout:32:35 | null | FullscreenMagnification:33:33 | null | leaf:33:33 |
| areaForLayer[34] | ROOT:0:0 | null | HideDisplayCutout:32:35 | OneHanded:34:35 | FullscreenMagnification:34:35 | null | leaf:34:35 |
| areaForLayer[35] | ROOT:0:0 | null | HideDisplayCutout:32:35 | OneHanded:34:35 | FullscreenMagnification:34:35 | null | leaf:34:35 |
| areaForLayer[36] | ROOT:0:0 | null | null | null | null | null | leaf:36:36 |
5.6 生成DisplayArea层级结构
// We built a tree of PendingAreas above with all the necessary info to represent the
// hierarchy, now create and attach real DisplayAreas to the root.
root.instantiateChildren(mRoot, displayAreaForLayer, 0, featureAreas);
调用的是DisplayAreaPolicyBuilder.PendingArea.instantiateChildren方法
在看这个方法之前我们先看看传递的参数分别代表什么
参数解析
-
mRoot
在DisplayAreaPolicyBuilder.HierarchyBuilder中private final RootDisplayArea mRoot; HierarchyBuilder(RootDisplayArea root) { mRoot = root; }在HierarchyBuilder构造方法中初始化,该构造方法(前面我们讲过,文章回顾开头)是在DisplayAreaPolicy.DefaultProvider的instantiate方法中调用的
public DisplayAreaPolicy instantiate(WindowManagerService wmService,
                DisplayContent content, RootDisplayArea root,
                DisplayArea.Tokens imeContainer) {
DisplayAreaPolicy在DisplayContent中初始化时会调用instantiate,传递参数为
thismDisplayAreaPolicy = mWmService.getDisplayAreaPolicyProvider().instantiate( mWmService, this /* content */, this /* root */, mImeWindowsContainer)实际上mRoot就是DisplayContent
-
displayAreaForLayer
对应的就是我们在【5.1节】中讲到的初始化
final DisplayArea.Tokens[] displayAreaForLayer = new DisplayArea.Tokens[maxWindowLayerCount];
maxWindowLayerCount为37,即displayAreaForLayer是一个DisplayArea.Tokens[37]空数组 -
featureAreas
同样对应我们在【5.1节】中讲到的初始化final Map<Feature, List<DisplayArea<WindowContainer>>> featureAreas = new ArrayMap<>(mFeatures.size()); for (int i = 0; i < mFeatures.size(); i++) { featureAreas.put(mFeatures.get(i), new ArrayList<>()); }featureAreas对应的就是我们的五个Feature
代码解读
void instantiateChildren(DisplayArea<DisplayArea> parent, DisplayArea.Tokens[] areaForLayer,
                         int level, Map<Feature, List<DisplayArea<WindowContainer>>> areas) {


    //1.先根据当前节点的mChildren的mMinLayer(最小层级)进行排序
    mChildren.sort(Comparator.comparingInt(pendingArea -> pendingArea.mMinLayer));
    //2.循环依次把之前所构建的PendingArea转换为DisplayArea
    for (int i = 0; i < mChildren.size(); i++) {

    //循环遍历当前节点的mChildren
    	//获取当前mChildren
        final PendingArea child = mChildren.get(i);
        //PendingArea转换为DisplayArea
        final DisplayArea area = child.createArea(parent, areaForLayer);
        //PendingArea对象为空,则跳过该次循环
        if (area == null) {


            // TaskDisplayArea and ImeContainer can be set at different hierarchy, so it can
            // be null.
            continue;
        }
        //把转换后的DisplayArea加入到其父节点,第一次入参是mRoot对应我们这里的parent,就是添加到DisplayContent
        parent.addChild(area, WindowContainer.POSITION_TOP);
        if (child.mFeature != null) {


            areas.get(child.mFeature).add(area);
        }
        //3.最后在递归遍历到每个节点,从而使转换完成
        child.instantiateChildren(area, areaForLayer, level + 1, areas);
    }
}
整体逻辑
入参对应
mRoot(根节点DisplayContent)对应的是parent
displayAreaForLayer(空数组)对应的是areaForLayer
featureAreas(五个Feature)对应的是areas
该方法简单来说,其作用就是把我们之前所构建的PendingArea树转换为DisplayArea。
结合对应参数我们看看大体流程,总结下来就是三步
第一步.先根据当前节点的mChildren的mMinLayer(最小层级)进行排序
mChildren.sort(Comparator.comparingInt(pendingArea -> pendingArea.mMinLayer));
第二步.循环依次把之前所构建的PendingArea转换为DisplayArea。之前构建PendingArea是临时的替身,而DisplayArea是我们现在需要构建的真身。我们曾经以ROOT:0:0的方式表现为临时根节点,这里正式变成了DisplayContent。
final PendingArea child = mChildren.get(i);
获取当前节点的第i个mChildrenfinal DisplayArea area = child.createArea(parent, areaForLayer);
之前所构建的PendingArea转换为DisplayArea,后面会细讲createArea方法if (area == null) { continue; }
目前area为null的情况对应的就是createArea方法中mSkipTokens为true的情况,而当前只有TaskDisplayArea和ImeContainer的mSkipTokens为trueparent.addChild(area, WindowContainer.POSITION_TOP);
把转换后的DisplayArea加入到其父节点,第一次入参是mRoot对应我们这里的parent,也就是说添加到DisplayContent。addChild为各个节点添加的核心方法,后面会有讲到if (child.mFeature != null) { areas.get(child.mFeature).add(area); }
当前节点的mFeature不为空(不为空的就是五个Feature类型的节点),就把该DisplayArea对象加入到当前Feature的List中。
第三步.最后在递归遍历到每个节点,从而使转换完成
child.instantiateChildren(area, areaForLayer, level + 1, areas);,其递归过程与前面计算mMaxLayer的过程相似
这里我们重点讲下第二步的转换
我们先看这句final DisplayArea area = child.createArea(parent, areaForLayer);中的createArea方法
createArea
private DisplayArea createArea(DisplayArea<DisplayArea> parent,
                                       DisplayArea.Tokens[] areaForLayer) {


            //1
            if (mExisting != null) {


                if (mExisting.asTokens() != null) {


                    // Store the WindowToken container for layers
                    fillAreaForLayers(mExisting.asTokens(), areaForLayer);
                }
                return mExisting;
            }
            //2
            if (mSkipTokens) {


                return null;
            }
            //3
            DisplayArea.Type type;
            if (mMinLayer > APPLICATION_LAYER) {


                type = DisplayArea.Type.ABOVE_TASKS;
            } else if (mMaxLayer < APPLICATION_LAYER) {


                type = DisplayArea.Type.BELOW_TASKS;
            } else {


                type = DisplayArea.Type.ANY;
            }
            //4
            if (mFeature == null) {


                final DisplayArea.Tokens leaf = new DisplayArea.Tokens(parent.mWmService, type,
                        "Leaf:" + mMinLayer + ":" + mMaxLayer);
                fillAreaForLayers(leaf, areaForLayer);
                return leaf;
            } else {


                return mFeature.mNewDisplayAreaSupplier.create(parent.mWmService, type,
                        mFeature.mName + ":" + mMinLayer + ":" + mMaxLayer, mFeature.mId);
            }
        }
这个方法我们每个if为一个部分来看
part 1
            if (mExisting != null) {


                if (mExisting.asTokens() != null) {


                    // Store the WindowToken container for layers
                    fillAreaForLayers(mExisting.asTokens(), areaForLayer);
                }
                return mExisting;
            }
当mExisting不为null,即【5.4 创建叶子Token节点】中分析的
type = LEAF_TYPE_TASK_CONTAINERS(应用leafArea.mExisting = mTaskDisplayAreas.get(i);)
和type = LEAF_TYPE_IME_CONTAINERS(输入法leafArea.mExisting = mImeContainer;)的情况,此时不需要再创建DisplayArea对象,直接用mExisting。
-
mExisting为mTaskDisplayAreas.get(i)
mTaskDisplayAreas.get(i)为TaskDisplayArea类型
private final ArrayList<TaskDisplayArea> mTaskDisplayAreas = new ArrayList<>();
并不是以token的形式保存,因此mExisting.asTokens()为null
TaskDisplayArea继承DisplayArea,其中返回的也是null,直接使用mExisting/** Cheap way of doing cast and instanceof. */ DisplayArea.Tokens asTokens() { return null; } -
mExisting为mImeContainer
mImeContainer本身就是Token的形式保存
private DisplayArea.Tokens mImeContainer;
在DisplayArea.Tokens中
final DisplayArea.Tokens asTokens() { return this; }
因此mExisting.asTokens()为true,调用fillAreaForLayers(mExisting.asTokens(), areaForLayer);private void fillAreaForLayers(DisplayArea.Tokens leaf, DisplayArea.Tokens[] areaForLayer) { for (int i = mMinLayer; i <= mMaxLayer; i++) { areaForLayer[i] = leaf; } }输入法的mMinLayer是13,mMaxLayer是14,
areaForLayer[i] = leaf也就是将mImeContainer设置给了areaForLayer数组
part 2
           if (mSkipTokens) {


                return null;
            }
mSkipTokens同样只有在【5.4 创建叶子Token节点】中TaskDisplayArea(应用层级)和ImeContainer(输入法层级)设置过,和mExisting在同一逻辑下设置
part 3
            DisplayArea.Type type;
            if (mMinLayer > APPLICATION_LAYER) {


                type = DisplayArea.Type.ABOVE_TASKS;
            } else if (mMaxLayer < APPLICATION_LAYER) {


                type = DisplayArea.Type.BELOW_TASKS;
            } else {


                type = DisplayArea.Type.ANY;
            }
这里根据mMinLayer和mMaxLayer的值与APPLICATION_LAYER(其值为2)的比较关系,将DisplayArea分为三种:
- mMaxLayer小于APPLICATION_LAYER,这类DisplayArea类型为ABOVE_TASKS。
- mMinLayer大于APPLICATION_LAYER,这类DisplayArea类型为BELOW_TASKS。
- 其他情况下的DisplayArea类型为ANY。
part 4
            if (mFeature == null) {


                final DisplayArea.Tokens leaf = new DisplayArea.Tokens(parent.mWmService, type,
                        "Leaf:" + mMinLayer + ":" + mMaxLayer);
                fillAreaForLayers(leaf, areaForLayer);
                return leaf;
            } else {


                return mFeature.mNewDisplayAreaSupplier.create(parent.mWmService, type,
                        mFeature.mName + ":" + mMinLayer + ":" + mMaxLayer, mFeature.mId);
            }
mFeature是我们前面讲过的DisplayAreaPolicyBuilder.PendingArea的成员变量,代表着各个Feature
-
mFeature为null
直接创建一个DisplayArea.Tokens对象,然后把其填充到areaForLayer数组中。
一般来说叶子节点是没有mFeature的,所以这里事实上就是把当前如果是叶子节点,那么创建新的DisplayArea.Tokens对象,并把该叶子的其mMinLayer和mMaxLayer一并给新对象 -
mFeature不为null
调用mFeature.mNewDisplayAreaSupplier.create创建DisplayAreainterface NewDisplayAreaSupplier { DisplayArea create(WindowManagerService wms, DisplayArea.Type type, String name, int featureId); }前面构建Feature时讲过(见4.1),Feature中的mNewDisplayAreaSupplier是通过在Feature.Builder中传递的,其中定义为
static class Feature {


    	......
        private final NewDisplayAreaSupplier mNewDisplayAreaSupplier;
		......
        private Feature(String name, int id, boolean[] windowLayers,
                        NewDisplayAreaSupplier newDisplayAreaSupplier) {


            mName = name;
            mId = id;
            mWindowLayers = windowLayers;
            mNewDisplayAreaSupplier = newDisplayAreaSupplier;
        }
		static class Builder {


			......
			private NewDisplayAreaSupplier mNewDisplayAreaSupplier = DisplayArea::new;
			......
            Feature build() {


                if (mExcludeRoundedCorner) {


                    // Always put the rounded corner layer to the top most layer.
                    mLayers[mPolicy.getMaxWindowLayer()] = false;
                }
                return new Feature(mName, mId, mLayers.clone(), mNewDisplayAreaSupplier);
            }
我们发现Builder中定义为
private NewDisplayAreaSupplier mNewDisplayAreaSupplier = DisplayArea::new;,实际上这里mFeature.mNewDisplayAreaSupplier.create()方法调用就是DisplayArea构造方法
补充说明一下:这里的写法用到的是Java 8 的新特性,即方法引用和函数式接口。mNewDisplayAreaSupplier是一个函数式接口的实例,通过使用DisplayArea::new方法引用,使得它的create方法实际上是调用了DisplayArea类的构造函数,并返回一个新的DisplayArea对象。DisplayArea(WindowManagerService wms, Type type, String name, int featureId) { super(wms); // TODO(display-area): move this up to ConfigurationContainer mOrientation = SCREEN_ORIENTATION_UNSET; mType = type; mName = name; mFeatureId = featureId; mRemoteToken = new RemoteToken(this); mOrganizerController = wms.mAtmService.mWindowOrganizerController.mDisplayAreaOrganizerController; }把当前节点的Feature的mName、mMinLayer、mMaxLayer和mId给新的DisplayArea
createArea方法到此分析完毕,我们再来看看parent.addChild(area, WindowContainer.POSITION_TOP);中的addChild方法
addChild
代码路径:/frameworks/base/services/core/java/com/android/server/wm/WindowContainer.java
	protected final WindowList<E> mChildren = new WindowList<E>();
    /** Adds the input window container has a child of this container at the input index. */
    @CallSuper
    void addChild(E child, int index) {


        ......
		//设置index
        if (index == POSITION_TOP) {


            index = mChildren.size();
        } else if (index == POSITION_BOTTOM) {


            index = 0;
        }
		//添加当前节点到mChildren
        mChildren.add(index, child);

        // Set the parent after we've actually added a child in case a subclass depends on this.
        //设置当前节点的父亲
        child.setParent(this);
    }
mChildren为WindowList对象,而WindowList继承ArrayList。从当前代码来看,index传递的一直是POSITION_TOP,因此index = mChildren.size();。然后再index处插入传递的DisplayArea对象,设置该对象的父亲。
至此,这里就是添加各个节点的核心方法,我们也可以直接在这个方法中加入堆栈来看其详细的添加过程
void addChild(E child, int index) {


	android.util.Log.i("test1:", this + "addChild child = " + child + ", index = " + index, new Exception());
	......
}
案例
通过实际的例子带入代码讲解流程
 三步法走起,把参数带入到实际代码中
root.instantiateChildren(mRoot, displayAreaForLayer, 0, featureAreas);
第一次运行的节点是ROOT,其孩子mChildren是WindowedMagnification:0-31、HideDisplayCutout:32-35、Leaf:36-36
第一步.先根据当前节点的mChildren的mMinLayer(最小层级)进行排序
因此循环顺序为WindowedMagnification:0-31、HideDisplayCutout:32-35、Leaf:36-36,第一次循环的mChildren.get(0)就是WindowedMagnification
第二步.转换,第一次循环
-
final PendingArea child = mChildren.get(0);
获取WindowedMagnification:0-31,child就是WindowedMagnification:0-31 -
final DisplayArea area = child.createArea(mRoot, areaForLayer);
WindowedMagnification:0-31进入createArea后,符合其第四个条件中mFeature不为null的情况,因此创建新的DisplayArea对象,并把自己的mName、mMinLayer、mMaxLayer和mId给新的DisplayArea -
if (area == null) { continue; }
area不为null -
mRoot.addChild(area, WindowContainer.POSITION_TOP);
把转换后的DisplayArea加入到其父节点,我们曾经以ROOT的方式表现为临时根节点,这里正式变成了DisplayContent。
addChild方法中,其中当前index = mChildren.size();里面mChildren是mRoot的,且尚未添加任何内容,因此其size()为0,即index = 0,把WindowedMagnification:0-31插入到第0个位置,这其实也对应了我们dumpsys containers中的编号

-
if (child.mFeature != null) { featureAreas.get(child.mFeature).add(area); }
WindowedMagnification:0-31的mFeature就是WindowedMagnification,把新的DisplayArea对象加入到featureAreas这个Map中key为WindowedMagnification的List中
第三步.最后在递归遍历到每个节点,从而使转换完成
child.instantiateChildren(area, areaForLayer, level + 1, areas);,开始找WindowedMagnification:0-31的孩子。
其递归过程与前面计算mMaxLayer的过程相似,不在赘述
最终生成的结构为
	DisplayContent
		#2 Leaf:36:36
		#1 HideDisplayCutout:32:35
			#2 OneHanded:34:35
				#1 FullscreenMagnification:34:35
					#0 Leaf:34:35
			#1 FullscreenMagnification:33:33
					#0 Leaf:33:33
			#0 OneHanded:32:32
				# 0 Leaf:32:32
		#0 WindowedMagnification:0:31
			#6 HideDisplayCutout:26:31
				#0 OneHanded:26:31
					#2 FullscreenMagnification:29:31
						#0 Leaf:29:31
					#1 Leaf:28:28
					#0 FullscreenMagnification:26:27
						#0 Leaf:26:27
			#5 Leaf:24:25
			#4 HideDisplayCutout:18:23
				#0 OneHanded:18:23
					#0 FullscreenMagnification:18:23
						#0 Leaf:18:23
			#2 HideDisplayCutout:16:16
				#0 OneHanded:16:16
					#0 FullscreenMagnification:16:16
						#0 Leaf:16:16
			#1 OneHanded:15:15
				#0 FullscreenMagnification:15:15
					#0 Leaf:15:15
			#0 HideDisplayCutout:0:14
				#0 OneHanded:0:14
					#1 ImePlaceholder:13:14
						#0 ImeContainer
					#0 FullscreenMagnification:0:12
						#2 Leaf:3:12
						#1 DefaultTaskDisplayArea
						#0 Leaf:0:1
也对应这dump中的信息,大家可以自行对比adb shell dumpsys activity containers,其中DisplayContent对应着Display。
5.7 回调onHierarchyBuilt
	// Notify the root that we have finished attaching all the DisplayAreas. Cache all the
	// feature related collections there for fast access.
	mRoot.onHierarchyBuilt(mFeatures, displayAreaForLayer, featureAreas);
通知显示区域的构建完成,把上一步【5.6生成DisplayArea层级结构】中构建好的参数传递给onHierarchyBuilt
代码路径:/frameworks/base/services/core/java/com/android/server/wm/RootDisplayArea.java
    /** Callback after {@link DisplayArea} hierarchy has been built. */
    void onHierarchyBuilt(ArrayList<Feature> features, DisplayArea.Tokens[] areaForLayer,
            Map<Feature, List<DisplayArea<WindowContainer>>> featureToDisplayAreas) {


        if (mHasBuiltHierarchy) {


            throw new IllegalStateException("Root should only build the hierarchy once");
        }
        mHasBuiltHierarchy = true;
        mFeatures = Collections.unmodifiableList(features);
        mAreaForLayer = areaForLayer;
        mFeatureToDisplayAreas = featureToDisplayAreas;
    }
把传递的参数赋值给RootDisplayArea的成员变量。
至此 层级结构树的构建 完毕。