【开源项目--稻草】Day04
1. 续 VUE
1.1 完善VUE+AJAX完成注册功能
我们现在注册用户只能在浏览器控制台看到结果
怎么能再注册页面上看到注册结果呢?
实际上,register.html页面已经准备好了一个显示注册信息的div
改写它代码如下
<div id="error" class="alert alert-danger"
       style="display: none"
       v-bind:class="{'d-block':hasError}">
       <i class="fa fa-exclamation-triangle"></i>
       <span v-text="message">邀请码错误!</span>
</div>
其中v-bind:class="{‘d-block’:hasError}"的含义为
根据Vue代码中绑定的hasError变量来决定是否将class="d-block"加入到当前div中
如果将这个class加入得到当前div的样式中,则这个div会显示出来
页面修改后,register.js文件也要随之修改
代码如下
let app = new Vue({


    el:'#app',
    data:{


        inviteCode:'',
        phone:'',
        nickname:'',
        password:'',
        confirm:'',
        message:'',
        hasError:false
    },
    methods:{


        register:function () {


            console.log('Submit');
            let data = {


                inviteCode: this.inviteCode,
                phone: this.phone,
                nickname: this.nickname,
                password: this.password,
                confirm: this.confirm
            }
            console.log(data);
            if(data.password !== data.confirm){


                this.message="两次密码输入不一致";
                this.hasError=true;
                return;
            }
            $.ajax({


                url:"/register",
                method: "POST",
                data: data,
                success: function (r) {


                    console.log(r);
                    if(r.code == CREATED){


                        console.log("注册成功");
                        console.log(r.message);
                        //注册成功,可以直接跳转到登录页
                        location.href="/login.html?register";
                    }else{


                        console.log(r.message);
                        //如果注册失败将信息显示在信息Div中
                        app.message=r.message;
                        app.hasError=true;
                    }
                }
            });
        }
    }
});
新增两个属性:hasError和message
这两个属性控制页面上是否显示错误div以及错误div中出现的提示信息是什么
Spring验证框架
什么是Spring验证框架
Spring提供的对用户输入信息进行验证的框架组件
是服务器端验证技术
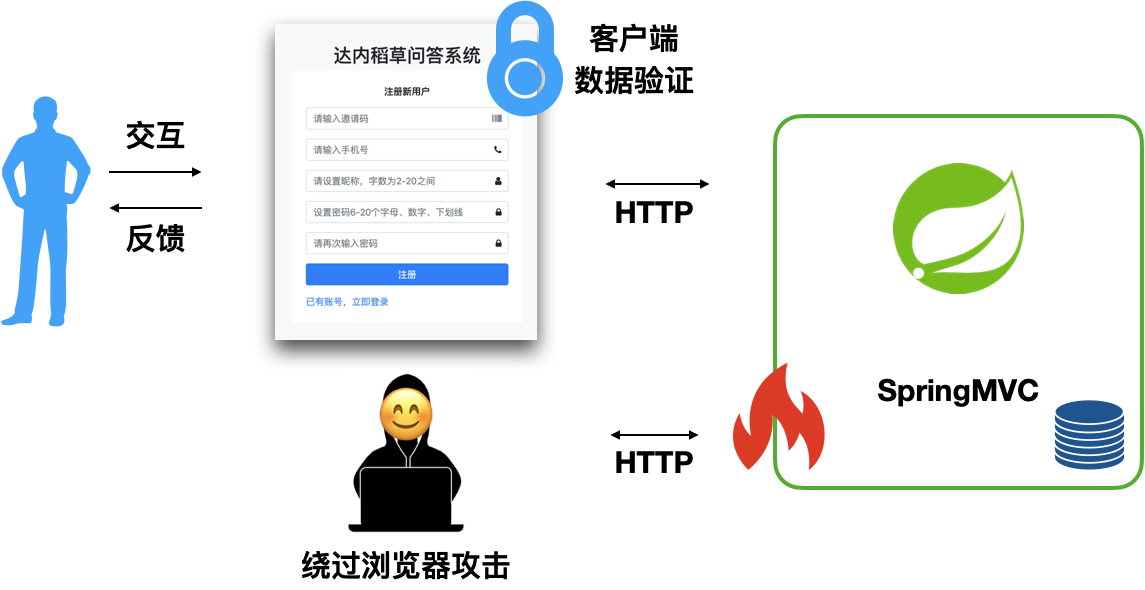
使用Spring验证框架验证发送到服务器的内容的合法性!
Spring-validation(验证)
使用Spring-Validation
步骤1:
导入依赖
子项目pom.xml文件添加:
<!-- 验证框架 -->
<dependency>
    <groupId>org.springframework.boot</groupId>
    <artifactId>spring-boot-starter-validation</artifactId>
</dependency>
步骤2:
定位到要验证信息的实体类
将验证规则按照给定注解来标记即可
要验证注册业务,就找RegisterVo类即可
@Data
public class RegisterVo implements Serializable {


    //只能作用在String上,不能为null,去掉空格之后也不能为""
    @NotBlank(message = "邀请码不能为空")
    private String inviteCode;
    @NotBlank(message = "用户名不能为空")
    //@Pattern()表示下面的属性需要通过指定正则表达式的判断
    @Pattern(regexp="^1\\d{10}$",message ="手机号格式不正确")
    private String phone;
    @NotBlank(message = "昵称不能为空")
    @Pattern(regexp="^.{2,20}$",message ="昵称在2到20位之间")
    private String nickname;
    @NotBlank(message = "密码不能为空")
    @Pattern(regexp="^\\w{6,20}$",message ="密码在6~20位之间")
    private String password;
    @NotBlank(message = "确认密码不能为空")
    private String confirm;

}
步骤3:
在控制器从表单或ajax获得实体类对象参数时就可以对这个实体类属性的值进行上面设置的验证了
验证方法非常简单,只需要加一个注解即可!
SystemController注册方法代码修改如下
@PostMapping("/register")
    public R registerStudent(
            //控制器接收的参数前加@Validated
            //表示要按这个类规定的验证规则,验证这个对象属性的值
            @Validated RegisterVo registerVo,
            //固定用法,在验证参数后再跟一个参数:BindingResult
            //这个参数中记录保存上面验证过程中的验证信息和结果
            BindingResult validaResult){


        //在控制器调用业务逻辑前,先判断BindingResult对象中是否有错误
        if(validaResult.hasErrors()){


            //如果验证结果中包含任何错误信息,进入这个if
            //获得其中的一个错误信息显示,一般是按顺序的第一个错误信息
            String error=validaResult.getFieldError()
                        .getDefaultMessage();
            return R.unproecsableEntity(error);
        }
        System.out.println(registerVo);
        log.debug("得到信息为:{}",registerVo);
        try{


            userService.registerStudent(registerVo);
            return R.created("注册成功!");
        }catch (ServiceException e){


            log.error("注册失败",e);
            return R.failed(e);
        }
    }
就可以测试验证的效果了
稻草问答-学生首页
显示首页
步骤1:
将static文件中的index.html复制到templates文件夹中
步骤2:
创建HomeController类,显示index.html
代码如下
@RestController
@Slf4j
public class HomeController {


    //显示首页
    @GetMapping("/index.html")
    public ModelAndView index(){


        return  new ModelAndView("index");
    }
}
步骤3:
撤销在SecurityConfig类中对index.html的放行
达到必须登录才能访问主页的效果
http.csrf().disable()
                .authorizeRequests()//对当前全部请求进行授权
                .antMatchers(
                        "/img/*",
                        "/js/*",
                        "/css/*",
                        "/bower_components/**",
                        "/login.html",
                        "/register.html",
                        "/register"
                )//设置路径
                .permitAll()//允许全部请求访问上面定义的路径
                //其它路径需要全部进行表单登录验证
                .anyRequest().authenticated().and()
                .formLogin()
                .loginPage("/login.html")
                .loginProcessingUrl("/login")
                .failureUrl("/login.html?error")
                .defaultSuccessUrl("/index.html")
                .and().logout()
                .logoutUrl("/logout")
                .logoutSuccessUrl("/login.html?logout");
制作首页的流程
1.制作首页导航栏的tag列表
2.制作学生问题的显示和分页
3.制作学生信息面板
开发标签列表
标签列表显示原理
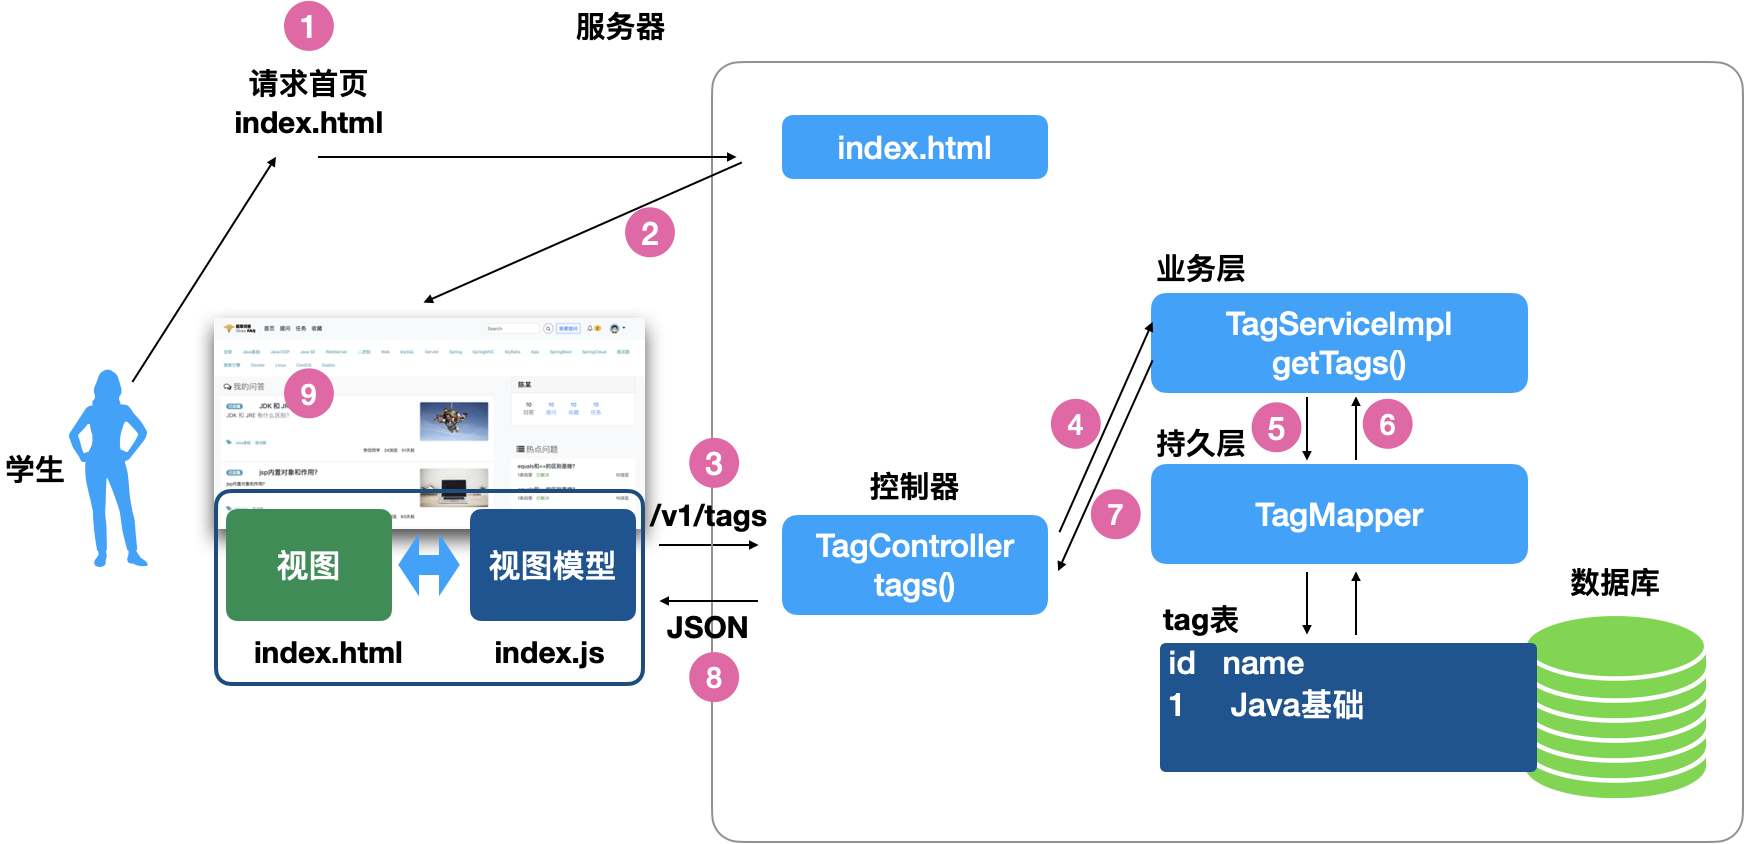
在用户已经能够登录显示主页的前提下
- 主页页面中编写ajax向控制器发送请求所有标签
- 控制接到请求后调用业务逻辑层
- 业务逻辑层从tagMapper接口查询所有标签
- 业务逻辑层将查询到的信息返回给控制器
- 控制器获得所以标签返回JSON格式
- ajax中获得JSON对象,利用VUE绑定显示在页面上
从业务逻辑层开始
我们可以选择先编写业务逻辑层
步骤1:
ITagService接口中添加方法
public interface ITagService extends IService<Tag> {


    List<Tag> getTags();
}
步骤2:
实现这个接口
TagServiceImpl类中代码如下
@Service
public class TagServiceImpl extends ServiceImpl<TagMapper, Tag> implements ITagService {


    //CopyOnWriteArrayList<>是线程安全的集合,适合在高并发的环境下使用
    private final List<Tag> tags=new CopyOnWriteArrayList<>();

    @Override
    public List<Tag> getTags() {


        //这个if主要是为了保证tags被顺利赋值之后的高效运行
        if(tags.isEmpty()) {


            synchronized (tags) {


                //这个if主要是为了保证不会有两条以上线程为tags重复添加内容
                if (tags.isEmpty()) {


                    //super.list()是父类提供的查询当前指定实体类全部行的代码
                    tags.addAll(super.list());
                }
            }
        }
        return tags;
    }
}
步骤3:
测试
@SpringBootTest
public class TagTest {


    @Autowired
    ITagService tagService;
    @Test
    public void test() {


        List<Tag> list = tagService.getTags();
        for (Tag tag : list)
            System.out.println(tag);
    }

}
编写控制层代码
步骤1:
TagController类中编写代码如下
@RestController
//下面的注解表示想访问本控制器中的任何方法需要前缀/v1/tags
//这个v1开头的格式是后期微服务的标准名为RESTful
@RequestMapping("/v1/tags")
public class TagController {


    @Autowired
    private ITagService tagService;

    //查询所有标签@GetMapping("")表示使用类上声明的前缀就可以访问这个方法
    @GetMapping("")
    public R<List<Tag>> tags(){


        List<Tag> list=tagService.getTags();
        return R.ok(list);
    }
}
步骤2:
到页面中(index.html)绑定vue需要的变量
页面代码如下
	<div class="nav font-weight-light" id="tagsApp">
    <a href="tag/tag_question.html" class="nav-item nav-link text-info">	<small>全部</small></a>
    <!-- v-for 循环中in左侧是随意起的变量名,会在循环体中使用
            in右侧的变量名,绑定这VUE代码中的变量-->
    <a href="tag/tag_question.html"
       class="nav-item nav-link text-info"
       v-for="tag in tags">
       <small v-text="tag.name">Java基础</small>
    </a>
  </div>
步骤3:
index.html网页的结束位置要引入两个js文件
</body>
<script src="js/utils.js"></script>
<script src="js/index.js"></script>
<script src="js/tags_nav.js"></script>
</html>
步骤4:
编写js/tags_nav.js代码如下
let tagsApp = new Vue({


    el:'#tagsApp',
    data:{


        tags:[]
    },
    methods:{


        loadTags:function () {


            console.log('执行了 loadTags');
            $.ajax({


                url:'/v1/tags',
                method:'GET',
                success:function (r) {


                    console.log(r);
                    if (r.code === OK){


                        console.log('成功获取tags');
                        //将从控制器获得的所有标签赋值给vue定义的
                        //tags数组,由于双向绑定,赋值同时页面就开始循环了
                        tagsApp.tags = r.data;
                    }
                }
            });
        }
    },
    //这个方法会在页面加载完毕之后运行
    created:function () {


        //页面加载完毕,立即调用loadTags
        this.loadTags();
    }
});
开发问题列表
了解开发流程
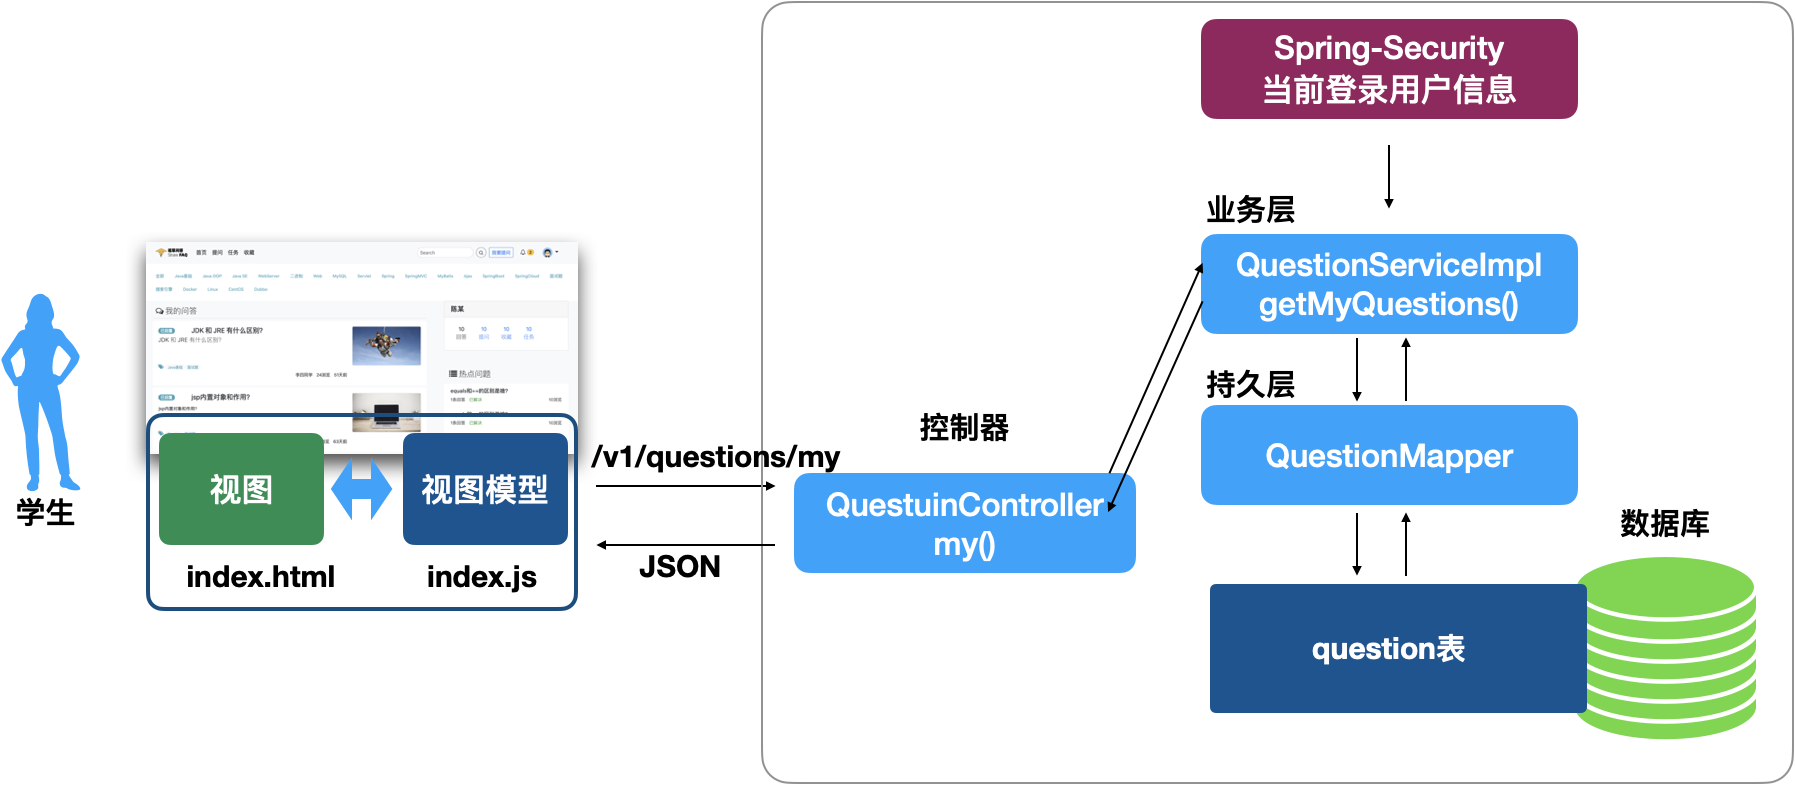
开发业务逻辑层
步骤1:
在业务逻辑层的接口中声明方法
IQuestionService接口给中声明方法
public interface IQuestionService extends IService<Question> {


    //按登录用户查询当前用户问题的方法
    List<Question> getMyQuestions();
}
步骤2:
要想实现查询当前登录的用户信息,必须使用Spring-Security提供的指定方法
调用这个方法的代码可能在项目后面的业务中也需要
这样写字QuestionService中就不合适了,所以我们先在IUserService中添加一个获得当前登录用户名的方法
IUserService添加代码
 //从Spring-Security中获得当前登录用户的用户名的方法
    String currentUsername();
步骤3:
在UserServiceImpl类中实现获得当前登录用户名并返回
@Override
    public String currentUsername() {


        //利用Spring-Security框架获得当前登录用户信息
        Authentication authentication=
                SecurityContextHolder.getContext()
                        .getAuthentication();
        //判断当前用户有没有登录,如果没有登录抛出异常
        if(!(authentication instanceof AnonymousAuthenticationToken)){


            //上面代码是判断当前用的抽象权限类型是不是匿名用户
            //如果不是匿名用户,就是登录的用户,只有登录的用户才能返回用户名
            String username=authentication.getName();
            return username;
        }
        //没运行上面的if证明用户没有登录,抛出异常即可
        throw ServiceException.notFound("没有登录");

    }
步骤4:
现在就可以在QuestionServiceImpl类中调用上面编写的方法来获得当前登录用户了
在根据这个用户信息(id)查询这个用户的问题
代码如下
@Service
@Slf4j
public class QuestionServiceImpl extends ServiceImpl<QuestionMapper, Question> implements IQuestionService {


    @Autowired
    IUserService userService;
    @Autowired
    UserMapper userMapper;
    @Autowired
    QuestionMapper questionMapper;
    //按登录用户查询当前用户问题的方法
    @Override
    public List<Question> getMyQuestions() {


        //获得当前登录用户的用户名
        String username=userService.currentUsername();
        log.debug("当前登录用户为:{}",username);
        //如果已经登录,使用之前编写好的findUserByUsername方法
        //查询出当前用户的详细信息(实际上主要需要用户的id)
        User user=userMapper.findUserByUsername(username);
        if(user == null){


            throw ServiceException.gone("登录用户不存在");
        }
        log.debug("开始查询{}用户的问题",user.getId());
        QueryWrapper<Question> queryWrapper=new QueryWrapper<>();
        queryWrapper.eq("user_id",user.getId());
        queryWrapper.eq("delete_status",0);
        queryWrapper.orderByDesc("createtime");
        List<Question> list=questionMapper.selectList(queryWrapper);
        log.debug("当前用户的问题数量为:{}",list.size());

        return list;
    }
}
步骤5:
编写完QuestionServiceImpl类中的代码
就可以在控制器中调用了,
控制器调用无需任何参数直接调用即可
第一次打开QuestionController类编写代码如下
@RestController
@RequestMapping("/v1/questions")
@Slf4j
public class QuestionController {


    @Autowired
    IQuestionService questionService;

    //查询返回当前登录用户发布的问题
    @GetMapping("/my")
    public R<List<Question>> my(){


        log.debug("开始查询当前用户的问题");
        //这里要处理个异常,因为用户可能没有登录
        try{


            List<Question> questions=
                    questionService.getMyQuestions();
            return R.ok(questions);
        }catch (ServiceException e){


            log.error("用户查询问题失败!",e);
            return R.failed(e);
        }
    }
}
编写到这里,我们就可以向浏览器编写路径
http://localhost:8080/v1/questions/my来看到控制返回的JSON格式信息
开发页面和JS代码显示问题
步骤1:
先在index.html页面中编写VUE代码准备绑定JSON格式信息
<div class="container-fluid" id="questionsApp">
<h4 class="border-bottom m-2 p-2 font-weight-light"><i class="fa fa-comments-o" aria-hidden="true"></i> 我的问答</h4>
<div class="row" style="display: none">
<div class="alert alert-warning w-100" role="alert">
抱歉您还没有提问内容, <a href="question/create.html" class="alert-link">您可以点击此处提问</a>,或者点击标签查看其它问答
</div>
</div>
<div class="media bg-white m-2 p-3" v-for="question in questions" >
<div class="media-body w-50">
<div class="row">
<div class="col-md-12 col-lg-2">
<span class="badge badge-pill badge-warning" style="display: none">未回复</span>
<span class="badge badge-pill badge-info" style="display: none">已回复</span>
<span class="badge badge-pill badge-success">已解决</span>
</div>
<div class="col-md-12 col-lg-10">
<h5 class="mt-0 mb-1 text-truncate">
<a class="text-dark" href="question/detail.html"
v-text="question.title">
eclipse 如何导入项目?
</a>
</h5>
</div>
</div>
<div class="font-weight-light text-truncate text-wrap text-justify mb-2" style="height: 70px;">
<p v-html="question.content">
eclipse 如何导入项目?
</p>
</div>
<div class="row">
<div class="col-12 mt-1 text-info">
<i class="fa fa-tags" aria-hidden="true"></i>
<a class="text-info badge badge-pill bg-light" href="tag/tag_question.html"><small >Java基础 </small></a>
</div>
</div>
<div class="row">
<div class="col-12 text-right">
<div class="list-inline mb-1 ">
<small class="list-inline-item"
v-text="question.nickname">风继续吹</small>
<small class="list-inline-item">
<span v-text="question.pageViews">12</span>浏览</small>
<small class="list-inline-item" >13分钟前</small>
</div>
</div>
</div>
</div>
<!-- / class="media-body"-->
<img src="img/tags/example0.jpg" class="ml-3 border img-fluid rounded" alt="" width="208" height="116">
</div>
<div class="row mt-2">
<div class="col-6 offset-3">
<nav aria-label="Page navigation example">
<div class="pagination">
<a class="page-item page-link" href="#" >上一页</a>
<a class="page-item page-link " href="#" >1</a>
<a class="page-item page-link" href="#" >下一页</a>
</div>
</nav>
</div>
</div>
</div>
步骤2:
js/index.js文件修改为
/*
显示当前用户的问题
 */
let questionsApp = new Vue({


    el:'#questionsApp',
    data: {


        questions:[]
    },
    methods: {


        loadQuestions:function () {


            $.ajax({


                url: '/v1/questions/my',
                method: "GET",
                success: function (r) {


                    console.log("成功加载数据");
                    console.log(r);
                    if(r.code === OK){


                        questionsApp.questions = r.data;
                    }
                }
            });
        }
    },
    created:function () {


        console.log("执行了方法");
        this.loadQuestions(1);
    }
});
随笔
内存操作是纳秒级别
硬盘操作是毫秒级别
1毫秒=1000微妙
1微秒=1000纳秒
内存和硬盘操作差着百万倍级别