8 nginx平滑升级
8.1 Nginx-master信号
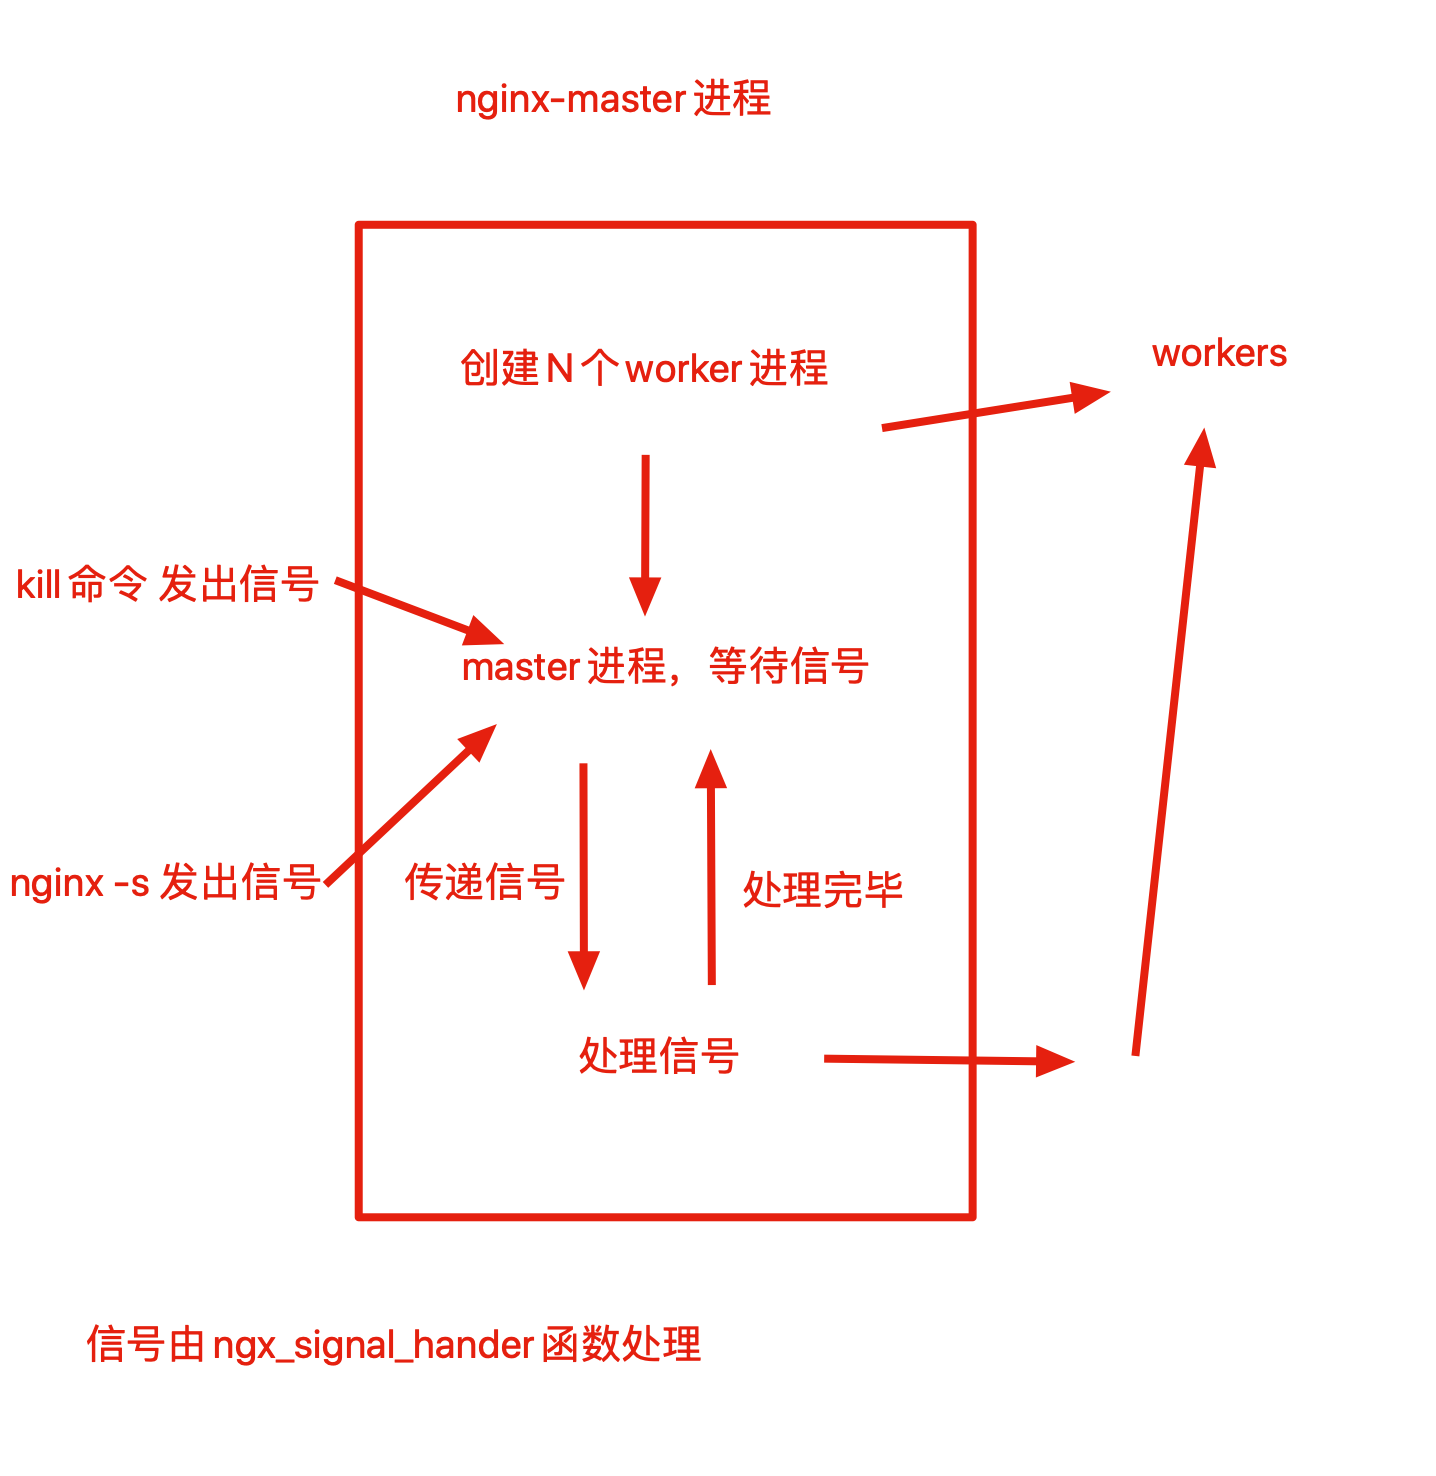
1.master不处理请求,而是分配worker进程,负责重启,热部署,重载等功能。
2.master根据worker_processes 定义开始的workers数量
3.worker运行后,master处于挂起状态,等待信号
4.可以发送kill,或者nginx -s 参数发出信号
信号集
| nginx -s 对应参数 |
信号 |
含义 |
| stop
扫描二维码关注公众号,回复:
16849702 查看本文章

|
TERM |
强制关闭整个服务 |
| null |
INT |
强制关闭整个服务 |
| quit |
QUIT |
优雅地关闭整个服务 |
| reopen |
USR1 |
重新打开日志记录 |
| reload |
HUP |
重新读取配置文件,并且优雅地退出老的worker |
| null |
USR2 |
平滑升级到新版本 |
| null |
WINCH |
优雅地关闭worker(在热更新的时候必用) |
8.2 平滑升级(热部署)
热部署指的是在不重启或关闭进程情况下,新应用直接替换掉旧的应用
热部署大致流程
1.备份旧的二进制文件
2.编译安装新的二进制文件,覆盖旧的二进制文件
3.发送USR2信号给旧master进程
4.发送WINCH信号给旧master进程
5.发送QUIT信号给旧master进程
8.3 热部署的坑
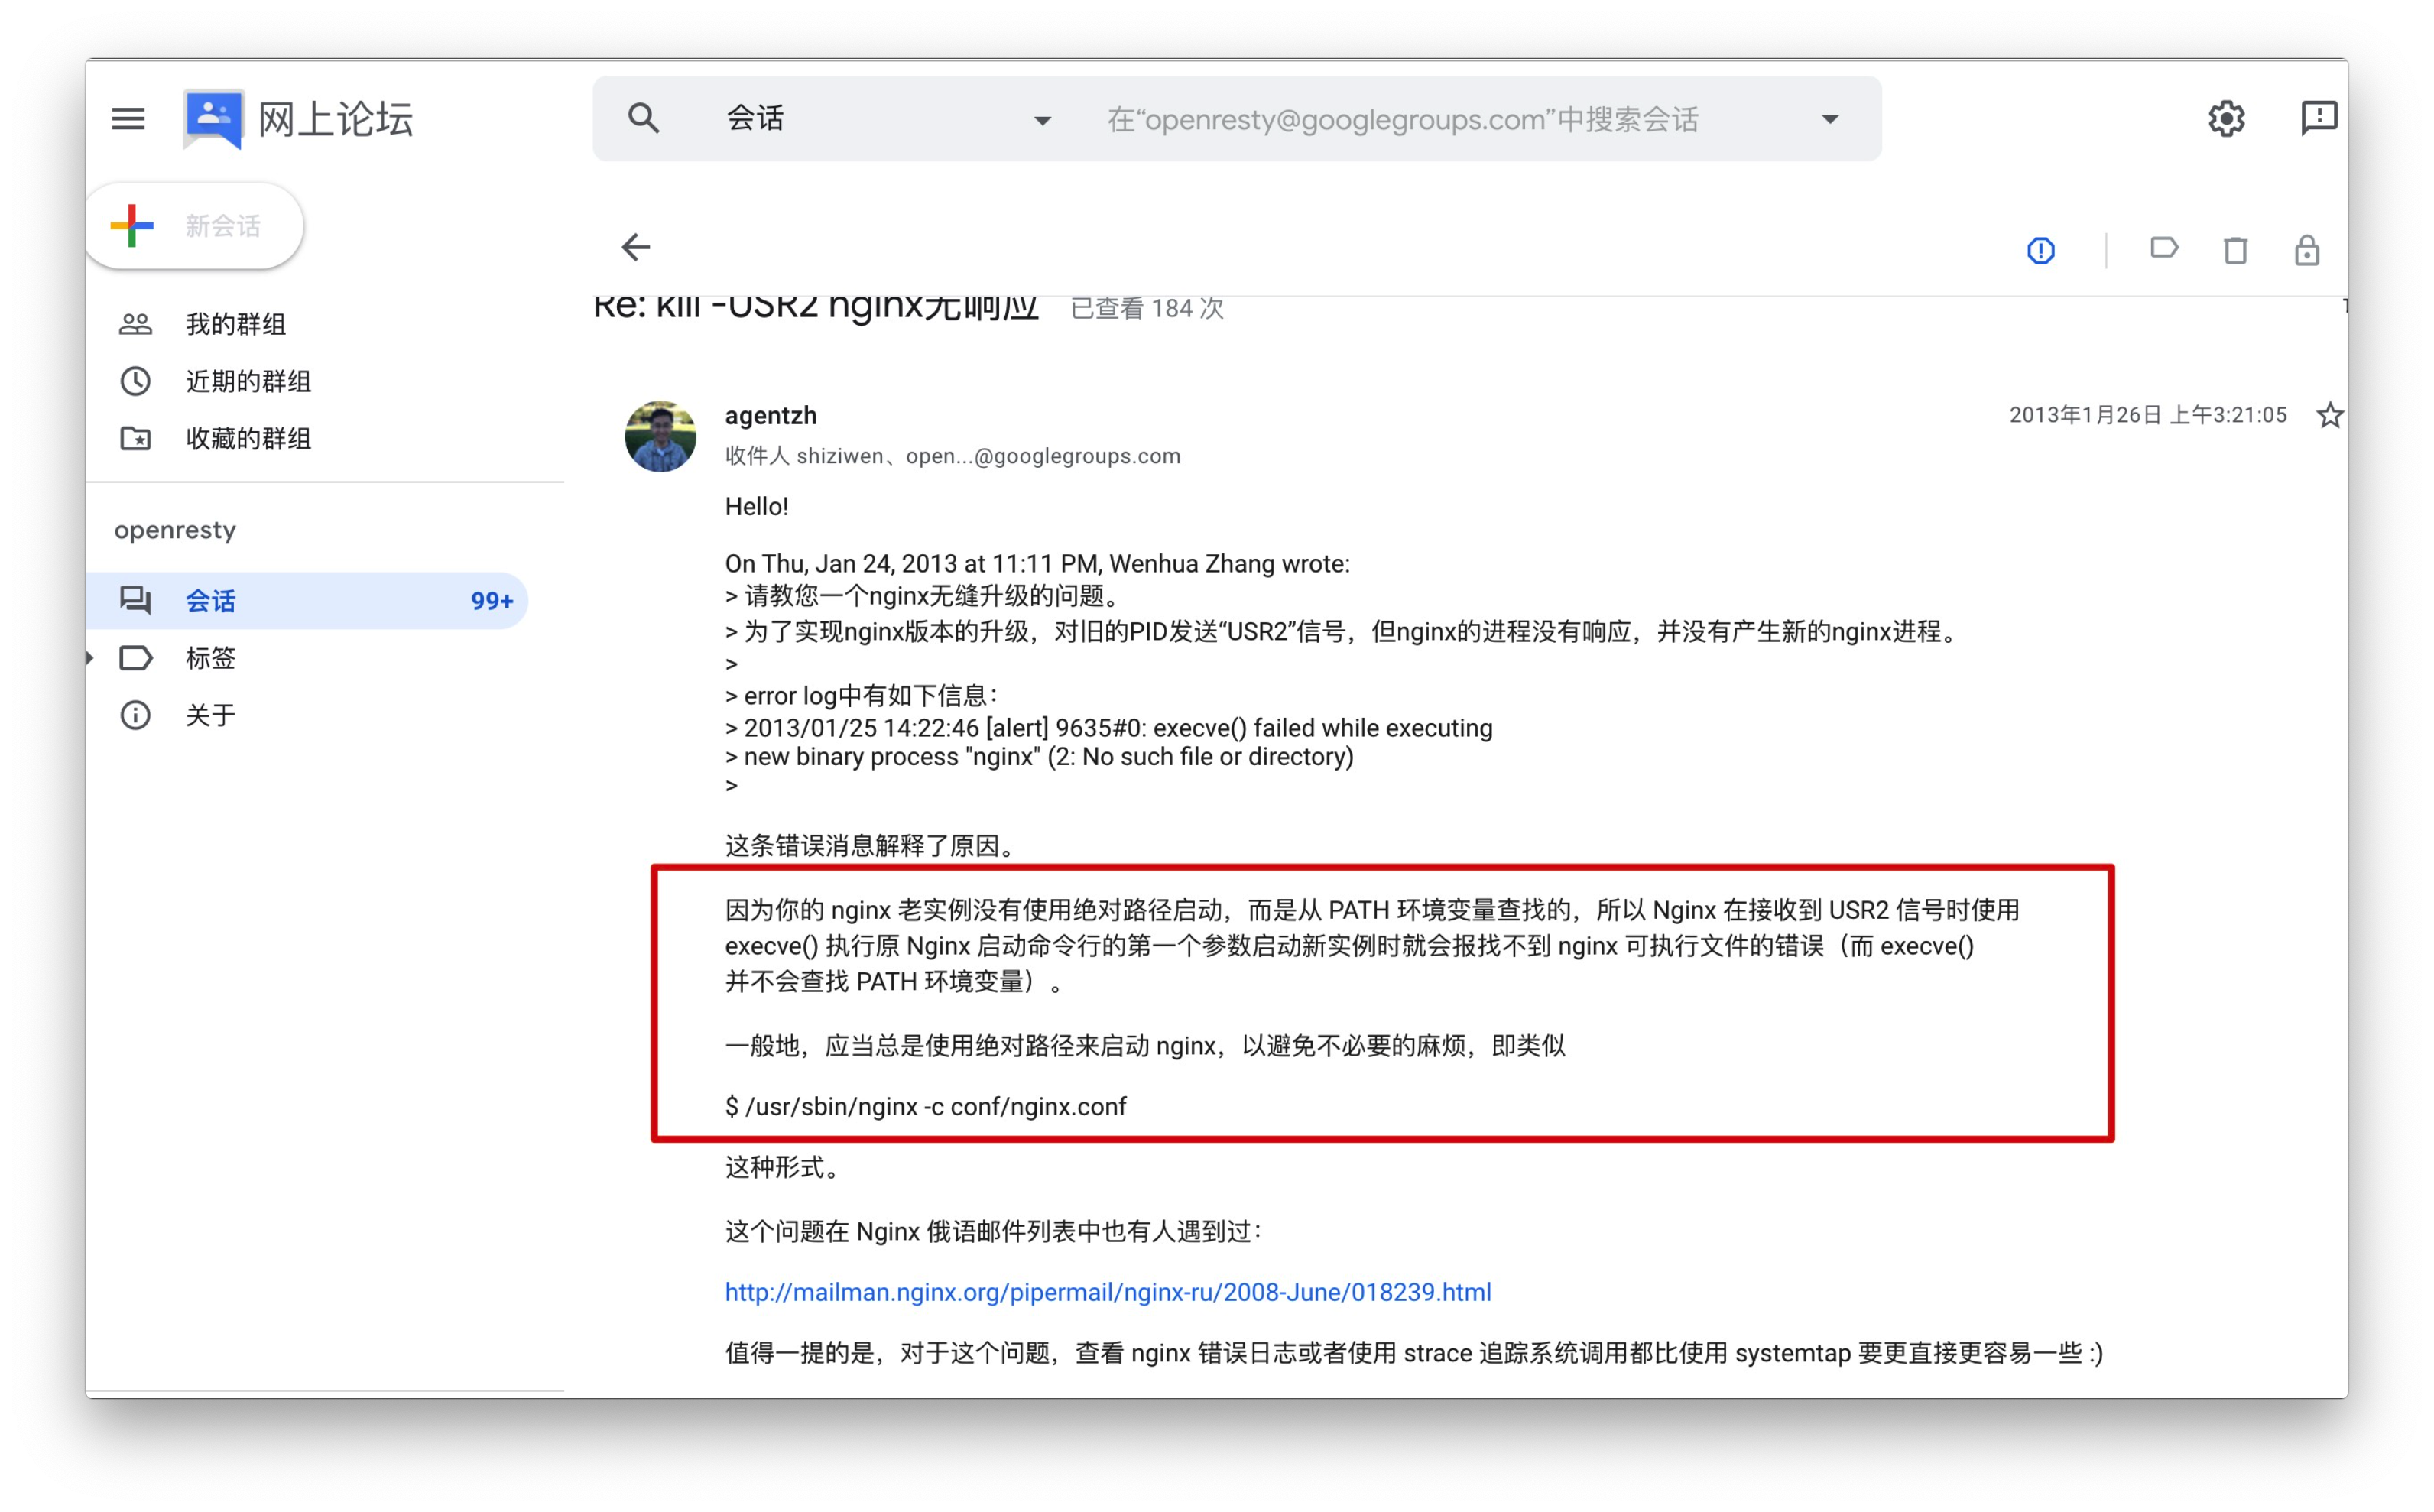
如果出现发送 kill -USR2信号后,未出现新的master进程
是因为:旧的nginx必须用绝对路径启动,然后再发送kill -USR2信号
具体解释看图
8.4 热部署具体操作
1.备份旧版本的nginx二进制文件
[root@test1 sbin]# mv nginx nginx.old
[root@test1 sbin]# ls
nginx.old

2.检查旧版本nginx的编译参数
[root@test1 sbin]# nginx.old -V
nginx version: nginx/1.14.0

3.编译安装新版本nginx
#下载新nginx源码
[root@test1 Learn_Nginx]# wget http://nginx.org/download/nginx-1.17.8.tar.gz
#编译安装新版本nginx
[root@test1 Learn_Nginx]# tar -zxf nginx-1.17.8.tar.gz
#开始编译
[root@test1 Learn_Nginx]# cd nginx-1.17.8/
[root@test1 nginx-1.17.8]# ./configure --prefix=/home/Learn_Nginx/nginx/ --with-http_ssl_module --with-http_flv_module --with-http_gzip_static_module --with-http_stub_status_module --with-threads --with-file-aio
#编译安装
[root@test1 nginx-1.17.8]# make && make install

4.此时发现已存在2个版本nginx程序
[root@test1 sbin]# ls
nginx  nginx.old

5.替换旧的nginx可执行文件
[root@test1 sbin]# cp -a /home/Learn_Nginx/nginx-1.17.8/objs/nginx /home/Learn_Nginx/nginx/sbin/
cp:是否覆盖"/home/Learn_Nginx/nginx/sbin/nginx"? y

5.1检查旧的nginx进程,请注意,这里用绝对路径启动nginx
请注意,这里用绝对路径启动nginx
请注意,这里用绝对路径启动nginx
例如
/home/Learn_Nginx/nginx/sbin/nginx


注意这里的PID和PPID(pid是当前进程的id号,ppid是启动该进程的pid,也就是父ID,可知该pid由谁启动)
[root@test1 sbin]# ps -ef|grep nginx
root     20311     1  0 15:12 ?        00:00:00 nginx: master process nginx
nobody   20312 20311  0 15:12 ?        00:00:00 nginx: worker process
root     20314 13589  0 15:12 pts/0    00:00:00 grep --color=auto nginx

6.发送USR2信号给旧版本主进程,使得nginx旧版本停止接收请求,切换为新nginx版本
[root@test1 sbin]# kill -USR2 `cat ../logs/nginx.pid `

7.检查此时的nginx进程
nginx-master首先会重命名pid文件,在文件后面添加.oldbin后缀
然后会再启动一个新的master进程以及worker,且使用的是新版Nginx
nginx能够自动将新来的请求,过度到新版master进程下,实现平滑过度

#可以发现新的master进程由旧master启动,由PPID可看出
[root@test1 sbin]# ps -ef|grep nginx
root     20311     1  0 15:12 ?        00:00:00 nginx: master process nginx
nobody   20312 20311  0 15:12 ?        00:00:00 nginx: worker process
root     20335 20311  0 15:13 ?        00:00:00 nginx: master process nginx
nobody   20336 20335  0 15:13 ?        00:00:00 nginx: worker process
root     20338 13589  0 15:13 pts/0    00:00:00 grep --color=auto nginx

[root@test1 sbin]# ls ../logs/
access.log        error.log         nginx.pid         nginx.pid.oldbin

8.发送WINCH信号给旧master进程,优雅的关闭旧worker进程
[root@test1 sbin]# kill -WINCH `cat ../logs/nginx.pid.oldbin`

#再次检查进程情况,旧master的worker已经关闭了,旧master不会自己退出,用作版本回退
[root@test1 sbin]# ps -ef|grep nginx
root     20311     1  0 15:12 ?        00:00:00 nginx: master process nginx
root     20335 20311  0 15:13 ?        00:00:00 nginx: master process nginx
nobody   20336 20335  0 15:13 ?        00:00:00 nginx: worker process
root     20607 13589  0 15:25 pts/0    00:00:00 grep --color=auto nginx

9.如果你觉得没问题了,可以关闭旧master进程
[root@test1 sbin]# ps -ef|grep nginx
root     20335     1  0 15:13 ?        00:00:00 nginx: master process nginx
nobody   20336 20335  0 15:13 ?        00:00:00 nginx: worker process
root     20665 13589  0 15:28 pts/0    00:00:00 grep --color=auto nginx