
Jetpack Compose中的Constraint Layout
引言
我将向您展示如何使用Constraint Layout以更少的代码构建复杂UI。
在Jetpack Compose中,ConstraintLayout确实是一个强大的布局系统,允许您使用组合件的相对位置创建复杂且响应式的布局。
以下是使用Jetpack Compose中的ConstraintLayout有利的一些情况:
-
复杂布局:
当您需要创建复杂和自定义布局时,无法轻松地使用简单的行和列来实现,这时ConstraintLayout是理想的选择。通过使用ConstraintLayout精确定位组合件,而不是嵌套多个行和列,可以实现这种复杂的布局。 -
相对定位:
您可以使用约束条件相对放置组合件。当您希望一个组合件与另一个组合件相邻或对齐时,这非常有用。这种相对放置可以帮助您实现更复杂的UI设计。 -
性能考虑:
尽管在View系统中,嵌套视图层次结构中的性能问题更为重要,但Jetpack Compose旨在有效地处理深度布局层次结构。因此,ConstraintLayout在Compose中的主要优势不在于性能优化,而在于提高代码可读性并在布局中维护清晰的结构。
开始使用ConstraintLayout
将依赖项添加到build.gradle(:app)中:
implementation "androidx.constraintlayout:constraintlayout-compose:1.0.1"
使用ConstraintLayout:
-
创建引用:为要在ConstraintLayout中定位的每个组合件创建引用。您可以使用
createRefs()函数或通过单独的组合件使用createRefFor()创建引用。 -
指定约束条件:在要定位的每个组合件上使用
constrainAs()修饰符。将相应的引用作为参数传递给constrainAs()。 -
在lambda中,使用
linkTo()等方法为该组合件指定约束条件。 -
使用“parent”引用:您还可以使用 parent 引用来相对于ConstraintLayout本身指定约束条件。这样可以将组合件相对于布局边界进行定位。
-
ConstraintSet:
ConstraintSet使您可以创建和保存约束,将其应用于现有的ConstraintLayout。
对于这些情况,您可以以不同的方式使用ConstraintLayout:
-
将
ConstraintSet作为参数传递给ConstraintLayout。 -
使用
layoutId修饰符将在ConstraintSet中创建的引用分配给组合件。
例如:
- 使用
createRefs、constrainAs和linkTo修饰符。
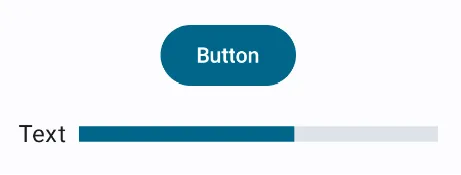
@Composable
fun ConstraintLayoutContent() {


     ConstraintLayout(Modifier.padding(16.dp)) {


        // Create references for the composables to constrain
        val (button, text, progressbar) = createRefs()

        Button(
            onClick = {

     /* Do something */ },
            // Assign reference "button" to the Button composable
            // and constrain it to the top of the ConstraintLayout
            modifier = Modifier.constrainAs(button) {


                top.linkTo(parent.top)
                start.linkTo(parent.start)
                end.linkTo(parent.end)
            }
        ) {


            Text("Button")
        }

        // Assign reference "text" to the Text composable
        // and constrain it to the bottom of the Button composable
        Text(
            "Text",
            Modifier.constrainAs(text) {


                top.linkTo(button.bottom, margin = 16.dp)
            }
        )
        LinearProgressIndicator(
            progress = 0.60f,
            modifier = Modifier.height(10.dp).constrainAs(progressbar) {


                start.linkTo(text.end, margin = 8.dp)
                top.linkTo(text.top)
                end.linkTo(parent.end)
                bottom.linkTo(text.bottom)
            }
        )
    }
}
- 使用
createRefFor、linkTo和ConstraintSet来构建动态布局。
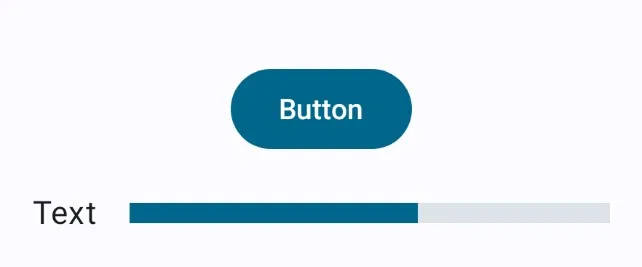
@Composable
fun DecoupledConstraintLayout() {


     BoxWithConstraints {


        val constraints = if (minWidth < 600.dp) {


            decoupledConstraints(margin = 16.dp) // Portrait constraints
        } else {


            decoupledConstraints(margin = 32.dp) // Landscape constraints
        }

        ConstraintLayout(constraints, modifier = Modifier.padding(16.dp)) {


            Button(
                onClick = {

     /* Do something */ },
                modifier = Modifier.layoutId("button")
            ) {


                Text("Button")
            }

            Text("Text", Modifier.layoutId("text"))

            LinearProgressIndicator(
                progress = 0.60f,
                modifier = Modifier.height(10.dp).layoutId("progress_bar")
            )
        }
    }
}

private fun decoupledConstraints(margin: Dp): ConstraintSet {


    return ConstraintSet {


        val button = createRefFor("button")
        val text = createRefFor("text")

         val progressBar = createRefFor("progress_bar")

        constrain(button) {


            top.linkTo(parent.top, margin = margin)
            start.linkTo(parent.start)
            end.linkTo(parent.end)
        }
        constrain(text) {


            top.linkTo(button.bottom, margin = margin)
        }
        constrain(progressBar){


            start.linkTo(text.end, margin = margin)
            top.linkTo(text.top)
            end.linkTo(parent.end)
            bottom.linkTo(text.bottom)
        }
    }
}
ConstraintLayout概念
Guideline:
guideline是用于设计布局的小视觉辅助工具。组合件可以被限制在参考线上。参考线对于将元素定位在父组合件内的特定dp或百分比位置非常有用。
ConstraintLayout允许您定义水平和垂直参考线,这些参考线是用于对齐或间距的参考线。参考线在创建适应不同屏幕尺寸和方向的响应式布局时特别有帮助。
两个水平的参考线是顶部和底部,两个垂直的参考线是开始和结束。
ConstraintLayout {


    // Create guideline from the start of the parent at 10% the width of the Composable
    val startGuideline = createGuidelineFromStart(0.1f)
    // Create guideline from the end of the parent at 10% the width of the Composable
    val endGuideline = createGuidelineFromEnd(0.1f)
    //  Create guideline from 16 dp from the top of the parent
    val topGuideline = createGuidelineFromTop(16.dp)
    //  Create guideline from 16 dp from the bottom of the parent
    val bottomGuideline = createGuidelineFromBottom(16.dp)
}
要创建参考线,请使用createGuidelineFrom*和所需的参考线类型。这将创建一个引用,可以在Modifier.constrainAs()块中使用。
注意:考虑使用Spacer组合件来在行和列中实现类似的效果。
Barrier:
障碍物参考多个组合件,以根据指定侧面上最极端的部件创建虚拟指导线。它们允许您创建动态障碍,根据某些组合件的可见性调整其位置。这对于处理一个组合件的可见性影响其他组合件布局的情况非常有用。
要创建一个障碍物,请使用createTopBarrier()(或:createBottomBarrier()、createEndBarrier()、createStartBarrier()),并提供应该构成障碍物的引用。
ConstraintLayout {


    val constraintSet = ConstraintSet {


        val button = createRefFor("button")
        val text = createRefFor("text")

        val topBarrier = createTopBarrier(button, text)
    }
}
Barrier可以在Modifier.constrainAs()块中使用。
注意:考虑使用内在测量方法在行和列中实现类似的效果。
链条(Chains):
链条(Chains)在单个轴(水平或垂直)上提供类似于组的行为。另一个轴可以独立地进行约束。
链条用于在行或列中对齐和分布组合件。您可以创建线性链条,其中组合件彼此连接,并且链条可以根据需要均匀分布或对齐。
要创建链条,请使用createVerticalChain或createHorizontalChain:
ConstraintLayout {


    val constraintSet = ConstraintSet {


        val button = createRefFor("button")
        val text = createRefFor("text")

        val verticalChain = createVerticalChain(button, text, chainStyle = ChainStyle.Spread)
        val horizontalChain = createHorizontalChain(button, text)
    }
}
链条可以在Modifier.constrainAs()块中使用。
链条可以使用不同的ChainStyles进行配置,它们决定如何处理组合件周围的空间,例如:
ChainStyle.Spread:空间均匀分布在所有组合件之间,包括第一个组合件之前和最后一个组合件之后的空闲空间。ChainStyle.SpreadInside:空间在所有组合件之间均匀分布,没有任何第一个组合件之前或最后一个组合件之后的空闲空间。ChainStyle.Packed:空间在第一个组合件之前和最后一个组合件之后分布,组合件紧密排列在一起,彼此之间没有空间。
注意:考虑使用传统的
Rows和Columns以及不同的Arrangements来实现与ConstraintLayout中的链条类似的效果。
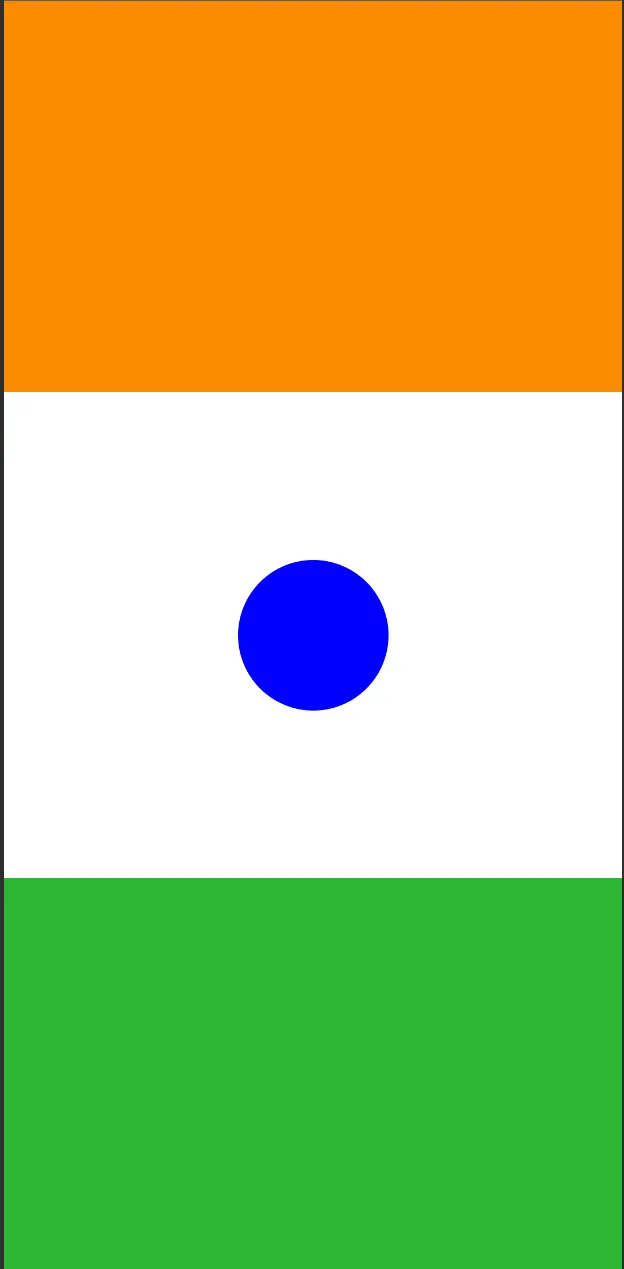
示例:
@Composable
fun IndianFlagScreen() {


    val constraints = ConstraintSet {


        val orangeBox = createRefFor("orangebox")
        val greenBox = createRefFor("greenbox")
        val circle = createRefFor("circle")

        constrain(orangeBox) {


            top.linkTo(parent.top)
            start.linkTo(parent.start)
            end.linkTo(parent.end)
            bottom.linkTo(circle.top)
            width = Dimension.fillToConstraints
            height = Dimension.value(260.dp)
        }
        constrain(circle) {


            top.linkTo(parent.top)
            bottom.linkTo(parent.bottom)
            start.linkTo(parent.start)
            end.linkTo(parent.end)
            width = Dimension.value(100.dp)
            height = Dimension.value(100.dp)
        }
        constrain(greenBox) {


            top.linkTo(circle.bottom)
            bottom.linkTo(parent.bottom)
            start.linkTo(parent.start)
            end.linkTo(parent.end)
            width = Dimension.fillToConstraints
            height = Dimension.value(260.dp)
        }
        createVerticalChain(orangeBox, circle, greenBox, chainStyle = ChainStyle.SpreadInside)
    }
    ConstraintLayout(constraints, modifier = Modifier.background(Color.White).fillMaxSize()) {


        Box(
            modifier = Modifier
                .background(Color(0xFFFB8C00))
                .layoutId("orangebox")
        )
        Box(
            modifier = Modifier
                .clip(CircleShape)
                .background(Color.Blue)
                .layoutId("circle")
        )
        Box(
            modifier = Modifier
                .background(Color(0xFF2EB734))
                .layoutId("greenbox")
        )
    }
}

结论
Jetpack Compose中的ConstraintLayout是一个多功能的工具,用于创建复杂和响应式的布局。当您需要对组合件相对位置进行精确控制或希望通过避免过多嵌套Rows和Columns来提高代码的可读性以及减少代码行数时,它特别有用。