 Jenkins +svn +maven +tomcat+ ansible 自动化批量部署
一.部署svn
yum install subversion
先创建目录
mkdir /home/svn
创建版本库
1 cd /home/svn //先进入svn目录

2svnadmin create /home/svn/test //用svn管理员创建proname库
3 cd /home/svn/test //进入库
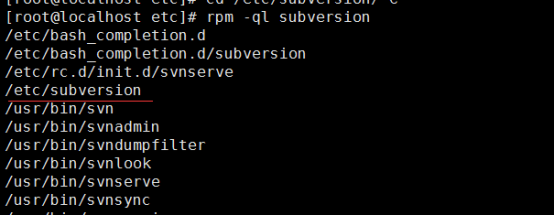
4.subversion目录说明
db目录:就是所有版本控制的数据存放文件。
hooks目录:放置hook脚本文件的目录。
locks目录:用来放置subversion见艰苦锁定数据的目录,用来追踪存取文件库的客户端。
format文件:是一个文本文件,里面只放了一个整数,表示当前文件库配置的版本号。
conf目录:是这个仓库的配置文件(仓库的用户访问账号、权限等)。
进入conf目录(该svn版本库配置文件)cd conf/
authz文件是权限控制文件
passwd是帐号密码文件
svnserve.conf SVN服务配置文件

5.svn配置文件
[root@localhost conf]# vi svnserve.conf
[general]
anon-access = read
auth-access = write
authz-db = /home/svn/test/conf/authz
realm = /home/svn/test
权限配置
[root@localhost conf]# cat authz
########用户组############
manager = boss
server = server1,server2
clinet = client1,clinet2
art = art1,art2
design = design1,design2
##########权限##############
# [repository:/baz/fuz]
# @harry_and_sally = rw
# * = r
[/]
test=rw
配置密码
[root@localhost conf]# cat passwd
[users]
# harry = harryssecret
# sally = sallyssecret
test=test123
Svn启动命令
svnserve -d -r /home/svn/test
Svn链接工具使用小乌龟
二.下载jenkins安装包
首先去jenkins官网下载jenkins,官网有两个下载的选择:
如果是公司使用,建议选择左边的。
如果是个人使用,可以使用右边的
http://archives.jenkins-ci.org/war/2.121/jenkins.war
将该包直接放到tomcat /webapps下面即可,启动tomcat
部署tomcat
JAVA_HOME=/usr/local/java/jdk1.8.0_161
CLASSPATH=$JAVA_HOME/lib/
PATH=$PATH:$JAVA_HOME/bin
export PATH JAVA_HOME CLASSPATH
###########################################
直接写入到 tomcat 的catalina.sh 文件中。
JAVA_HOME=/usr/local/java/jdk1.8.0_161
CLASSPATH=$JAVA_HOME/lib/
CATALINA_BASE=/home/usr/local/tomcat
CATALINA_HOME=/home/usr/local/tomcat
JAVA_OPTS="-server -Xms3200m -Xmx3200m -XX:PermSize=256M -XX:MaxNewSize=1024m -XX:MaxPermSize=512m -Djava.awt.headless=true "
tar xf apache-tomcat-7.0.62.tar.gz
安装git
yum install curl-devel expat-devel gettext-devel openssl-devel zlib-devel gcc perl-ExtUtils-MakeMaker
tar xf git-2.8.3.tar.gz
cd git-2.8.3/
make prefix=/usr/local/git all
make prefix=/usr/local/git install
三.部署maven
apache-maven-3.5.3-bin.tar.gz
tar xf apache-maven-3.5.3-bin.tar.gz
[root@localhost local]# cat /etc/profile
export PATH="$PATH:$MYSQL_HOME/bin"
export MAVEN_HOME=/usr/local/apache-maven-3.5.3
export PATH=$MAVEN_HOME/bin:$PATH:/usr/local/nexus/bin
export PATH=$PATH:/usr/local/git/bin
source
/etc/profile
[root@localhost local]# mvn -V

配置maven 文件

[root@localhost conf]# vi settings.xml
<mirrors>
<!-- mirror
| Specifies a repository mirror site to use instead of a given repository. The repository that
| this mirror serves has an ID that matches the mirrorOf element of this mirror. IDs are used
| for inheritance and direct lookup purposes, and must be unique across the set of mirrors.
|
<mirror>
<id>mirrorId</id>
<mirrorOf>repositoryId</mirrorOf>
<name>Human Readable Name for this Mirror.</name>
<url>http://my.repository.com/repo/path</url>
</mirror>
-->
<mirror>
<id>nexus</id>
<name>internal nexus repository</name>
<url>http://192.168.10.148:8081/repository/maven-public/</url>
<mirrorOf>*</mirrorOf>
</mirror>
</mirrors>
<profile>
<id>env-dev</id>
<activation>
<property>
<name>target-env</name>
<value>dev</value>
</property>
</activation>
<properties>
<tomcatPath>/path/to/tomcat/instance</tomcatPath>
</properties>
</profile>
-->
<distributionManagement>
<repository>
<id>releases</id>
<name>Nexus Release Repository</name>
<url>http://192.168.10.148:8081/repository/maven-public/</url>
</repository>
<snapshotRepository>
<id>snapshots</id>
<name>Nexus Snapshot Repository</name>
<url>http://192.168.10.148:8081/repository/maven-public/</url>
</snapshotRepository>
</distributionManagement>
</profiles>
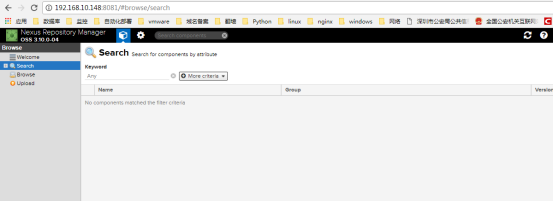
四:部署nexus 私有库
1.部署nexus
下载地址
https://www.sonatype.com/download-oss-sonatype
nexus-3.10.0-04-unix.tar.gz
tar xf nexus-3.10.0-04-unix.tar.gz
建立软连接 ln -s nexus-3.10.0-04 nexus
## 进入nexus的配置文件目录
cd nexus
## 拷贝一份配置文件,不要直接修改default文件
## nexus管理程序运行在jetty上,默认端口为8081
## 可以编辑nexus.properties修改
cp nexus-default.properties nexus.properties
## 配置运行时用户
cd nexus
## 编辑nexus.rc文件
vi nexus.rc
run_as_user=root
nexus start
初始帐号与密码:admin,admin123
五.配置安全信息
- 系统设置
- 安装插件
Maven Repository Server Plugin
Pipeline Maven Integration Plugin


- 可以点击test configure 成功会出提示

- 第二台主机ssh

- 添加保存

- 配置系统安全


六.新建项目
- 构建名字


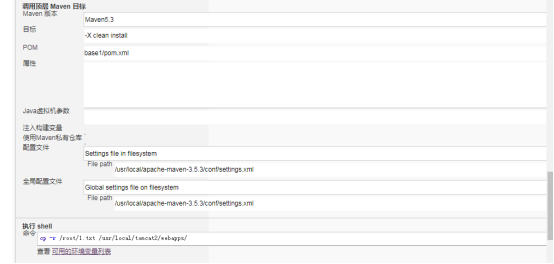
七.项目构建配置
- 构建任务

- 源码管理

- 构建触发器

- 构建环境

- 构建
- 构建后操作

最后点击 ->应用—>保存
7立即构建, 成功会显示蓝色
.点击
- 成功。
八.配置ansible 使用自动批量分发部署。