汉明窗(Hamming window)
原理
汉明(Hanning)窗可以看成是升余弦窗的一个特例,汉宁窗可以看作是3个矩形时间窗的频谱之和,或者说是 3个 sinc(t)型函数之和,而括号中的两项相对于第一个谱窗向左、右各移动了π/T,从而使旁瓣互相抵消,消去高频干扰和漏能。
作用
引入余弦窗就是为了解决边界效应,而解决的方法就是在目标原始像素上乘一个余弦窗使接近边缘的像素值接近于零。
代码实例
import math
import plotly.express as px
import numpy as np
import torch
from matplotlib import pyplot as plt
def hann1d(sz: int, centered = True) -> torch.Tensor:
"""1D cosine window."""
if centered:
return 0.5 * (1 - torch.cos((2 * math.pi / (sz + 1)) * torch.arange(1, sz + 1).float()))
w = 0.5 * (1 + torch.cos((2 * math.pi / (sz + 2)) * torch.arange(0, sz//2 + 1).float()))
return torch.cat([w, w[1:sz-sz//2].flip((0,))])
def hann2d(sz: torch.Tensor, centered = True) -> torch.Tensor:
"""2D cosine window."""
# return hann1d(sz[0].item(), centered).reshape(1, 1, -1, 1) * hann1d(sz[1].item(), centered).reshape(1, 1, 1, -1)
return hann1d(sz[0].item(), centered).reshape(-1, 1) * hann1d(sz[1].item(), centered).reshape(1, -1)
# Press the green button in the gutter to run the script.
if __name__ == '__main__':
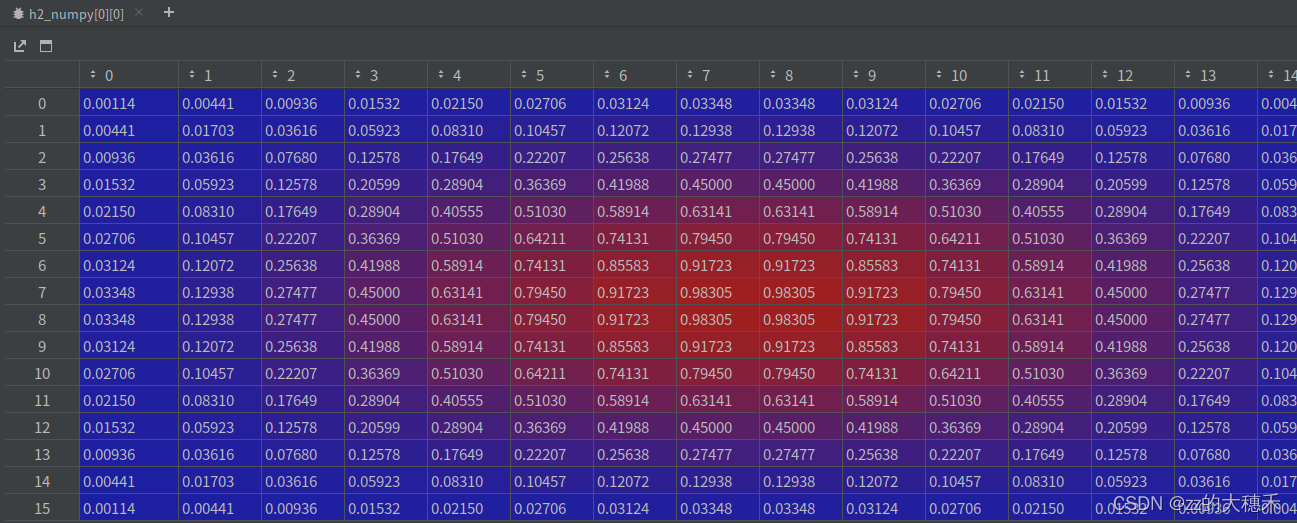
h1 = hann1d(16)
h1_numpy = h1.numpy()
h2 = hann2d(torch.tensor([16, 16]))
h2_numpy = h2.numpy()
# 1D Hamming
# plt.figure(figsize=(16, 16), dpi=80)
# plt.show()
# 2D Hamming
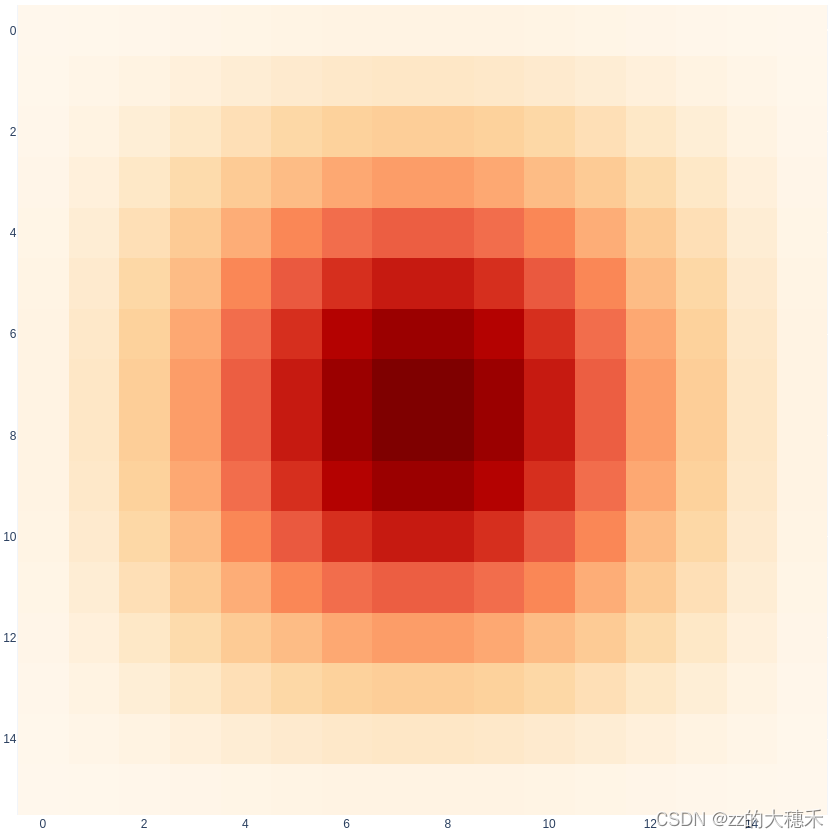
fig = px.imshow(h2_numpy, color_continuous_scale='OrRd')
fig.show()
可视化
总结
由上图可知,颜色越偏红的像素权重值越大。