第一次使用WebSocket,所以最需要一个及其简单的例子,跑通之后,增加自己对该技术的理解。(技术基础介绍就免掉了,后面再补)
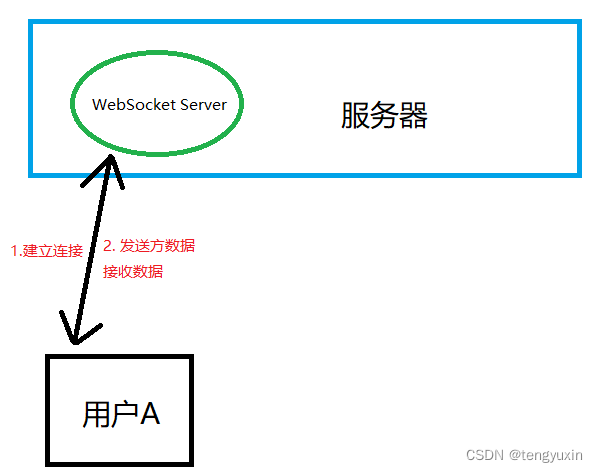
案例逻辑:目前只有一个用户,而且是一个用户给服务器发送数据,服务给该用户返回数据
一、SpringBoot 整合 WebSocket
此处的逻辑一共三步
第一步,添加依赖项
第二步,添加配置
第三,写基础服务类
1. 添加websocket依赖
  <dependency>
            <groupId>org.springframework.boot</groupId>
            <artifactId>spring-boot-starter-websocket</artifactId>
            <!--需要版本的自己加-->
  </dependency>
2. 添加配置
@Configuration
public class WebSocketConfig {
    /**
     * ServerEndpointExporter 作用
     *
     * 这个Bean会自动注册使用@ServerEndpoint注解声明的websocket endpoint
     *
     * @return
     */
    @Bean
    public ServerEndpointExporter serverEndpointExporter() {
        return new ServerEndpointExporter();
    }
}
3. 基础服务工具类
@ServerEndpoint(value = "/ws/{userId}")
@Component
@Slf4j
public class WebSocketServer {
    private String userId;
    /**
     * @param session 是webSocket的会话对象,不是浏览器那个session
     * @param userId  用户Id
     * @description 当连接建立成功调用
     **/
    @OnOpen
    public void onOpen(Session session, @PathParam("userId") String userId) {
        this.userId = userId;
        System.out.println("建立连接");
    }
    /**
     * @param session 会话对象
     * @description 当连接关闭调用
     **/
    @OnClose
    public void onClose(Session session) throws IOException {
        System.out.println("关闭连接");
    }

    /**
     * @param message 客户端发送的消息
     * @param session 会话对象
     * @description 当客户端发送消息时调用
     **/
    @OnMessage
    public void onMessage(String message, Session session) throws IOException {
        try{
            System.out.println(message);
           //给客户端发送消息
            session.getBasicRemote().sendText("服务端定义的消息");
        }catch(Exception e){
            e.printStackTrace();
        }
    }

}
二、uniapp 构建webSocket与服务器通信
前端逻辑
第一步:跟服务器建立连接
第二步:监听WebSocket连接打开事件,并在这个监听事件中,主动给服务端发送数据
第三步:监听WebSocket接受到服务器的消息事件(你给服务器发送消息时,它也会及时给前端返回数据)
1. 具体代码
function webSocketFun(Integer userId){
    //1. 通过用户唯一id 与 服务端webSocket建立连接
    uni.connectSocket({
	    url: `http://192.168.2.18:8080/ws/${userId}`
    });


    //2. 监听WebSocket连接打开事件,并给服务端发送消息
    var socketOpen = false;
	var socketMsgQueue = ["滕","禹","鑫"];
    uni.onSocketOpen(function (res) {
		console.log('WebSocket连接已打开');
		socketOpen = true;
		for (var i = 0; i < socketMsgQueue.length; i++) {
			sendSocketMessage(socketMsgQueue[i]);
		}
		socketMsgQueue = [];
	});

	function sendSocketMessage(msg) {
	  if (socketOpen) {
	    uni.sendSocketMessage({
	      data: msg
	    });
	  } else {
	    socketMsgQueue.push(msg);
	  }
	}


    //3. 监听WebSocket接受到服务器的消息事件
    uni.onSocketMessage(function (res) {
	  console.log('收到服务器返回的内容为 ======' + res.data);
	});
}