1、 简介
1.1、网站中的消息功能如何实现?
解决方案,采用轮询的方式。即:通过js不断的请求服务器,查看是否有新数据,如果有,就获取到新数据。这种解决方法是否存在问题呢?
当然是有的,如果服务端一直没有新的数据,那么js也是需要一直的轮询查询数据,这就是一种资源的浪费。那么,有没有更好的解决方案? 有!那就是采用WebSocket技术来解决。
1.2、什么是WebSocket?
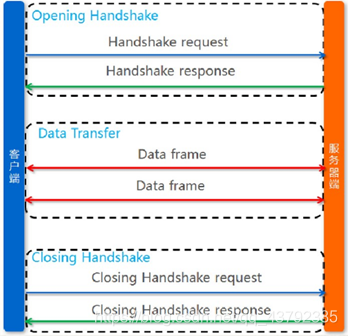
WebSocket 是HTML5一种新的协议。它实现了浏览器与服务器全双工通信(full-duplex)。一开始的握手需要借助HTTP请求完成。 WebSocket是真正实现了全双工通信的服务器向客户端推的互联网技术。 它是一种在单个TCP连接上进行全双工通讯协议Websocket通信协议与2011年倍IETF定为标准RFC 6455,Websocket API被W3C定为标准。
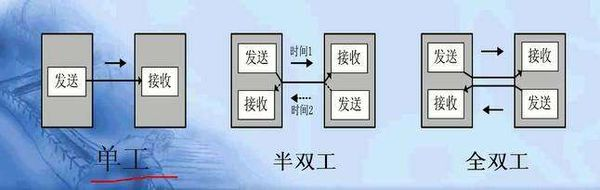
1.3、单工,半双工和全双工有何区别和联系?
单工数据传输只支持数据在一个方向上传输;在同一时间只有一方能接受或发送信息,不能实现双向通信,举例:电视,广播。
半双工数据传输允许数据在两个方向上传输,但是,在某一时刻,只允许数据在一个方向上传输,它实际上是一种切换方向的单工通信;在同一时间只可以有一方接受或发送信息,可以实现双向通信。举例:对讲机。

全双工数据通信允许数据同时在两个方向上传输,因此,全双工通信是两个单工通信方式的结合,它要求发送设备和接收设备都有独立的接收和发送能力;在同一时间可以同时接受和发送信息,实现双向通信,举例:电话通信。
2、http与websocket的区别
2.1、http
http协议是短连接,因为请求之后,都会关闭连接,下次重新请求数据,需要再次打开链接。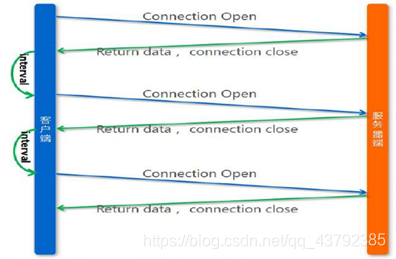
2.2、websocket
WebSocket协议是一种长链接,只需要通过一次请求来初始化链接,然后所有的请求和响应都是通过这个TCP链接进行通讯。
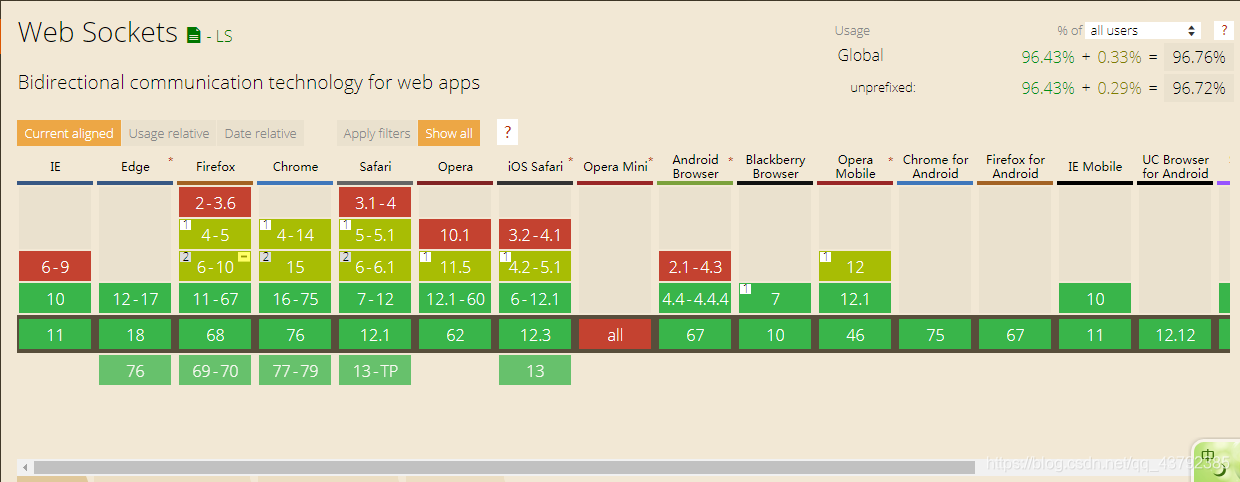
3、浏览器支持情况
地址:https://caniuse.com/#search=websocket
4、快速入门
4.1、创建websocket Maven工程
<dependencies>
    <dependency>
      <groupId>javax</groupId>
      <artifactId>javaee-api</artifactId>
      <version>7.0</version>
      <scope>provided</scope>
    </dependency>
  </dependencies>
  <build>
    <plugins>
      <!-- java编译插件 -->
      <plugin>
        <groupId>org.apache.maven.plugins</groupId>
        <artifactId>maven-compiler-plugin</artifactId>
        <version>3.2</version>
        <configuration>
          <source>1.8</source>
          <target>1.8</target>
          <encoding>UTF-8</encoding>
        </configuration>
      </plugin>
      <!-- 配置Tomcat插件 -->
      <plugin>
        <groupId>org.apache.tomcat.maven</groupId>
        <artifactId>tomcat7-maven-plugin</artifactId>
        <version>2.2</version>
        <configuration>
          <port>8082</port>
          <path>/</path>
        </configuration>
      </plugin>
    </plugins>
  </build>
4.2、websocket的相关注解说明
- @ServerEndpoint("/websocket/{uid}")
申明这是一个websocket服务,需要指定访问该服务的地址,在地址中可以指定参数,需要通过{}进行占位 - @OnOpen
用法:public void onOpen(Session session, @PathParam(“uid”) String uid) throws IOException{}
该方法将在建立连接后执行,会传入session对象,就是客户端与服务端建立的长连接通道通过@PathParam获取url申明中的参数 - @OnClose
用法:public void onClose() {} ,该方法是在连接关闭后执行 - @OnMessage
用法:public void onMessage(String message, Session session) throws IOException {},该方法用于接收客户端发来的消息
message:发来的消息数据
session:会话对象(也是通道) - 发送消息到客户端
用法:session.getBasicRemote().sendText(“你好”); 通过session进行发送。
4.3、实现websocket服务
import javax.websocket.*;
import javax.websocket.server.PathParam;
import javax.websocket.server.ServerEndpoint;
import java.io.IOException;
@ServerEndpoint("/websocket/{uid}")
public class MyWebSocket {
  @OnOpen
  public void onOpen(Session session, @PathParam("uid") String uid) throws
IOException {
    // 连接成功
    session.getBasicRemote().sendText(uid + ",你好,欢迎连接WebSocket!");
 }
  @OnClose
  public void onClose() {
    System.out.println(this + "关闭连接");
 }
  @OnMessage
  public void onMessage(String message, Session session) throws IOException {
    System.out.println("接收到消息:" + message);
    session.getBasicRemote().sendText("消息已收到.");
 }
  @OnError
  public void onError(Session session, Throwable error) {
    System.out.println("发生错误");
    error.printStackTrace();
 }
}
4.4、测试
启动Tomcat服务,通过安装chrome插件或者通过在线工具进行测试: chrome插件,Simple WebSocket Client: https://chrome.google.com/webstore/detail/simple-websocket-client/pfdhoblngboilpfeibdedpjgfnlcodoo(有墙)
在线工具:https://easyswoole.com/wstool.html
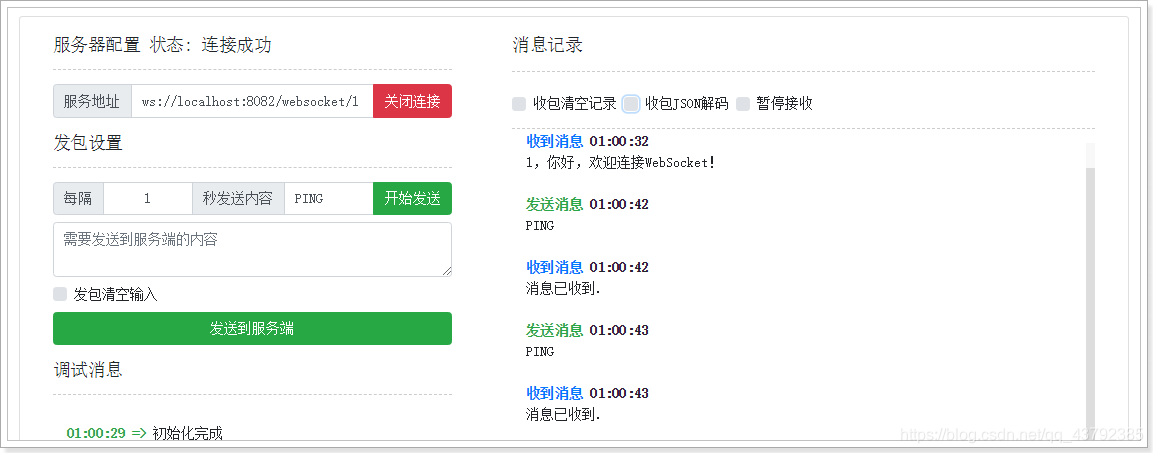
编写js客户端测试
<!DOCTYPE html>
<html lang="en">
<head>
  <meta charset="UTF-8">
  <title>Title</title>
</head>
<body>
<script>
  const socket = new WebSocket("ws://localhost:8082/websocket/1");
  socket.onopen = (ws) =>{
    console.log("建立连接!", ws);
 }
  socket.onmessage = (ws) =>{
    console.log("接收到消息 >> ",ws.data);
 }
 socket.onclose = (ws) =>{
    console.log("连接已断开!", ws);
 }
  socket.onerror = (ws) => {
    console.log("发送错误!", ws);
 }
  // 2秒后向服务端发送消息
  setTimeout(()=>{
    socket.send("发送一条消息试试");
 },2000);
  // 5秒后断开连接
  setTimeout(()=>{
    socket.close();
 },5000);
</script>
</body>
</html>

5、SpringBoot整合WebSocket
5.1、导入依赖
<dependency>
      <groupId>org.springframework.boot</groupId>
      <artifactId>spring-boot-starter-websocket</artifactId>
    </dependency>
5.2、编写WebSocketHandler
在Spring中,处理消息的具体业务逻辑需要实现WebSocketHandler接口。

import org.springframework.web.socket.CloseStatus;
import org.springframework.web.socket.TextMessage;
import org.springframework.web.socket.WebSocketSession;
import org.springframework.web.socket.handler.TextWebSocketHandler;
import java.io.IOException;
public class MyHandler extends TextWebSocketHandler {
@Override
public void handleTextMessage(WebSocketSession session, TextMessage message)
throws IOException {
System.out.println("获取到消息 >> " + message.getPayload());
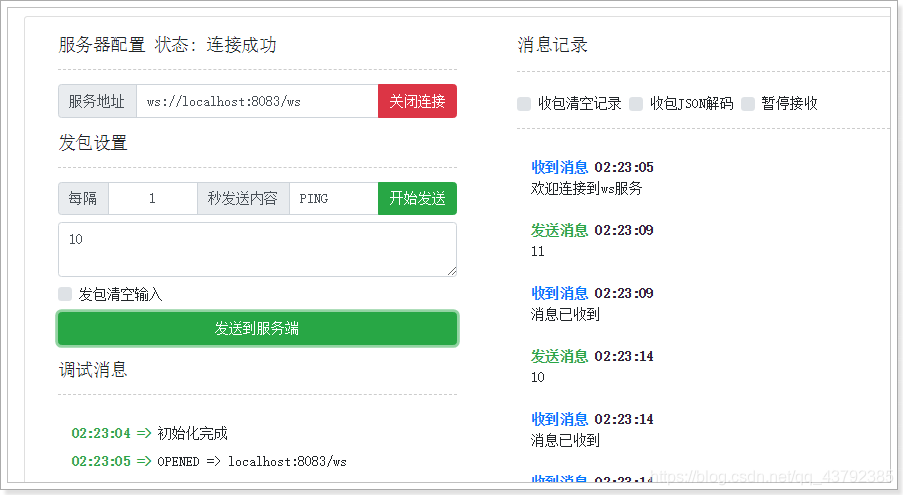
session.sendMessage(new TextMessage("消息已收到"));
if(message.getPayload().equals("10")){
for (int i = 0; i < 10; i++) {
session.sendMessage(new TextMessage("消息 -> " + i));
try {
Thread.sleep(100);
} catch (InterruptedException e) {
e.printStackTrace();
}
}
}
}
@Override
public void afterConnectionEstablished(WebSocketSession session) throws
Exception {
session.sendMessage(new TextMessage("欢迎连接到ws服务"));
}
@Override
public void afterConnectionClosed(WebSocketSession session, CloseStatus status)
throws Exception {
System.out.println("断开连接!");
}
}
5.3、编写配置类
import org.springframework.context.annotation.Bean;
import org.springframework.context.annotation.Configuration;
import org.springframework.web.socket.WebSocketHandler;
import org.springframework.web.socket.config.annotation.EnableWebSocket;
import org.springframework.web.socket.config.annotation.WebSocketConfigurer;
import org.springframework.web.socket.config.annotation.WebSocketHandlerRegistry;
@Configuration
@EnableWebSocket
public class WebSocketConfig implements WebSocketConfigurer {
  @Override
  public void registerWebSocketHandlers(WebSocketHandlerRegistry registry) {
    registry.addHandler(myHandler(), "/ws").setAllowedOrigins("*");
 }
  @Bean
  public WebSocketHandler myHandler() {
    return new MyHandler();
 }
}
5.4、测试
5.5、websocket拦截器
在Spring中提供了websocket拦截器,可以在建立连接之前写些业务逻辑,比如校验登录等。
import org.springframework.http.server.ServerHttpRequest;
import org.springframework.http.server.ServerHttpResponse;
import org.springframework.stereotype.Component;
import org.springframework.web.socket.WebSocketHandler;
import org.springframework.web.socket.server.HandshakeInterceptor;
import java.util.Map;
@Component
public class MyHandshakeInterceptor implements HandshakeInterceptor {
  /**
  * 握手之前,若返回false,则不建立链接
  *
  * @param request
  * @param response
  * @param wsHandler
  * @param attributes
  * @return
  * @throws Exception
  */
  @Override
  public boolean beforeHandshake(ServerHttpRequest request, ServerHttpResponse
response, WebSocketHandler wsHandler, Map<String, Object> attributes) throws
Exception {
    //将用户id放入socket处理器的会话(WebSocketSession)中
    attributes.put("uid", 1001);
    System.out.println("开始握手。。。。。。。");
    return true;
 }
  @Override
  public void afterHandshake(ServerHttpRequest request, ServerHttpResponse
response, WebSocketHandler wsHandler, Exception exception) {
    System.out.println("握手成功啦。。。。。。");
 }
}
将拦截器添加到websocket服务中:
import org.springframework.beans.factory.annotation.Autowired;
import org.springframework.context.annotation.Bean;
import org.springframework.context.annotation.Configuration;
import org.springframework.web.socket.WebSocketHandler;
import org.springframework.web.socket.config.annotation.EnableWebSocket;
import org.springframework.web.socket.config.annotation.WebSocketConfigurer;
import org.springframework.web.socket.config.annotation.WebSocketHandlerRegistry;
@Configuration
@EnableWebSocket
public class WebSocketConfig implements WebSocketConfigurer {
  @Autowired
  private MyHandshakeInterceptor myHandshakeInterceptor;
  @Override
  public void registerWebSocketHandlers(WebSocketHandlerRegistry registry) {
    registry.addHandler(myHandler(), "/ws")

.setAllowedOrigins("*").addInterceptors(this.myHandshakeInterceptor);
 }
  @Bean
  public WebSocketHandler myHandler() {
    return new MyHandler();
 }
}
获取设置的属性值
 @Override
    public void afterConnectionEstablished(WebSocketSession session) throws
            Exception {
        Integer uid = (Integer) session.getAttributes().get("uid");
        session.sendMessage(new TextMessage(uid+", 你好!欢迎连接到ws服务"));
    }
