明月几时有?把酒问青天。不知天上宫阙,今夕是何年。我欲乘风归去,又恐琼楼玉宇,高处不胜寒。起舞弄清影,何似在人间。
转朱阁,低绮户,照无眠。不应有恨,何事长向别时圆?人有悲欢离合,月有阴晴圆缺,此事古难全。但愿人长久,千里共婵娟。
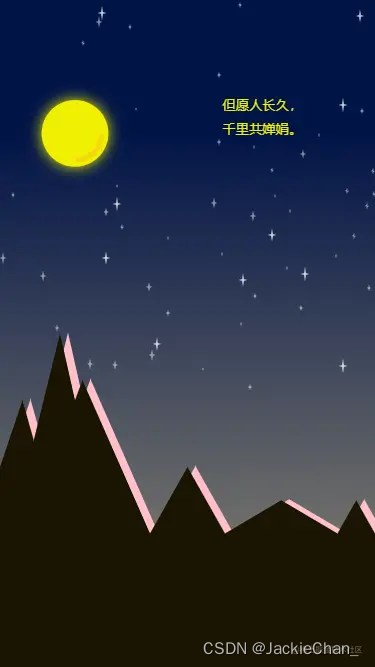
值此中秋佳节来临之际,只做了一个星空背景,在此做个分享。效果图如下:
PC端效果:

移动端效果:
技能点
html 及 canvasApi用来操作canvas进行作画。
es6 中 class 关键字将关键的块进行简单封装提高复用性。
需求分析
最终效果图如上面的图片所示:
前景为山、月亮以及文字,中景为星空,背景为渐变色作为天空。
星星至右向左移动,并且有一闪一闪的效果增加用户体验。
**PS:**这里的文字本该加载个其他字体,或者初次加载时应该是一个字一个字的浮现出来。一个是因为懒,另一个是因为UI水平实在差,觉得这样也挺好看。就懒得弄了,有兴趣可以自行优化。[手动憨笑]
思路分析
需求并不麻烦,接触canvas一段时间就可以完成它。因为是demo性质的作品,所以尽可能的会使用一些花里胡哨的东西,常言道“此时不装,更待何时?”
其实也没有多花里胡哨啦!
首先我在默认的html里面呢,使用module的方式,引入es6规范的包,使用new关键字直接画出整个项目,这里主要是考虑在 webpack 的环境下,可以把项目进行微调,使用webpack进行打包成一个独立的js包进行分享。
然后对于需求中提到的几个核心元素:canvas、moon(月亮)、star(星星)以及整个项目 moon-night 都独立封装成 class ,提高代码的复用性,而且都可以单独提出去到其他地方直接使用,当然这是后话了。
最后对所有的类型class 做了一个简单的约束,每个 class 都有各一个 init 、draw、update 的私有方法,分别对应 初始化、绘画、更新三个状态,或者被我吹做三个生命周期函数,对标 vue 的声明周期函数。 [嚣张]
综上所述是整个项目的思路了,下面是代码分析和实现过程。
实现
0. 项目结构
shell复制代码moon-night
|–index.html
|–index.js
|–canvas.class.js
|–star.class.js
|–moon.class.js
1. index.html
index.html 中很简单,几乎声明都不用做,只是把 canvas 默认的 margin 和 padding 给清掉,不然会有个白边。
可以看到 script 中的 type = “module” ,在这对script标签里面,可以使用 import 导入es6语法导出的包。
html复制代码
– 上面这个页面,是用 vscode 一键生成的,里面的 viewport 配置和http-equiv有没有对这个项目没有关系。
2. canvas.class.js
canvas.class.js,看到我的命名,应该知道这是个什么样的文件了。
对,就是你想的那样。
声明了一个 class ,名字为Canvas。Canvas这个类可以作为以后所有相关canvas项目的基础类,内部声明一下canvas和canvas.getContext(‘2d’),用以后续真实的绘图类中继承,保证所有的子类都在一个 canvas 上进行操作。
同时,绑定了一个监听函数,用来处理浏览器窗口改变后重新初始化canvas的宽、高。这也是在canvas中经常使用的一个方法。
代码很简单,如下:
js复制代码export default class Canvas {
// 接收 两个 参数,id 和 config
// 目前 config 只接收 一个属性 screen ,用来控制是否跟随窗口变化
constructor(id, config) {
if (id !== 0 && !id) {
  throw new Error('id 不能为空!')
}

this.cv = document.getElementById(id)
this.ctx = this.cv.getContext('2d')

this.config = Object.assign({
  isScreen: true
}, config)

this.initSize()
}
initSize() {
this.cv.style.display = “block”
// 读传入的isScreen的值,根据值判断是否挂载 resize 方法
if (this.config.isScreen) {
this.cv.width = window.innerWidth
this.cv.height = window.innerHeight
window.addEventListener(“resize”, this.resizeCanvas.bind(this), false)
} else {
this.cv.width = this.cv.parentNode.offsetWidth
this.cv.height = this.cv.parentNode.offsetHeight
}
}
resizeCanvas() {
// 重新声明canvas的宽高
this.cv.width = window.innerWidth
this.cv.height = window.innerHeight
// 子类中的 draw 方法
this.draw()
}
}
关键聊一下resizeCanvas中的 this.draw() 方法,这里的this的指向在canvas被继承之后会发生变化,即和子类中的this指向一致。所以,init方法被写为initSize,避免在继承后init被重写。
3. index.js (moonNight.class.js)
index.js 其实也就是 moonNight.class.js。结合上面 canvas 文件,这个文件最后导出一个默认的类:MoonNight。
MoonNight 继承自 Canvas ,所以可以直接使用 cv 和 ctx,而且项目中所有的项目都是在这个类中实现的。
MoonNight 除了一开始说的三个基础方法之外,还声明了两个方法,画文字、画天空、画山。而且方法都在draw中执行。
这里有一个小知识点,就是在canvas中,后面画的东西,在canvas中重叠的时候,后面画的会自动覆盖在前面画的元素中,同理和 css 的 z-index 属性相似。所以要注意在 draw 中,各个方法的执行顺序,应该是结合效果图,从最下面往上画。
js复制代码"use script"
// 引入 各个包
import Canvas from “./canvas.class.js”
import Star from ‘./star.class.js’
import Moon from “./moon.class.js”
// 默认导出 MoonNight 类,并继承自 Canvas
export default class MoonNight extends Canvas {
constructor(id, config) {
// super 继承父类
super(id, config)
// config 为传入的参数,这里还没有什么用,只有传入 canvas 的 isScreen
this.baseConf = Object.assign({ isScreen: true }, config)

// 声明 moon 成员
this.moon = null

// 填充一个随机数组成的 星星 列表
// 星星的数量为 宽度的五分之一
this.starPoints = Array(parseInt(this.cv.width / 5)).fill({}).map(item => {
  return {
    x: parseInt(Math.random() * this.cv.width), // 星星的坐标 x
    y: parseInt(Math.random() * this.cv.height * .6), // 星星的坐标 y
    size: parseInt(Math.random() * 10 + 5), // 星星的大小
    big: Math.random() > .5 ? true : false // 一个Boolean值,表示星星下一次变大还是变小
  }
})

// 初始化 MoonNight,并开始绑定 动画
this.init()
this.t = setInterval(this.update.bind(this), 1000 / 30)
}
// init 方法
init() {
console.log(‘MoonNight::: init!’);
this.draw()
}
// 绘画 方法
draw() {
// 挨个画各个元素
this.drawSky()
// 画星星,将每个坐标转化为 实例化后的 星星
this.stars = this.starPoints.map(item => new Star(this.ctx, item))
this.drawMountain()
// 复制 moon 为 Moon 对象
this.moon = new Moon(this.cv, this.ctx)
this.drawText()
}
// 画 文字
drawText() {
let fontSize = this.cv.width > this.cv.height ? this.cv.width * .02 : this.cv.height * .02
console.log(‘MoonNight::: drawText!’);
this.ctx.beginPath()
this.ctx.font = ${fontSize}px bold 楷体;
this.ctx.fillStyle = “#F0F003”;
this.ctx.textAlign = “center”;
this.ctx.textBaseline = “middle”;
// 绘制文字(参数:要写的字,x坐标,y坐标)
this.ctx.fillText(“但愿人长久,”, this.cv.width * .7, this.cv.height * .16);
this.ctx.fillText(“千里共婵娟。”, this.cv.width * .7, this.cv.height * .16 + fontSize + 10);
this.ctx.closePath()
}
// 画 天空
drawSky() {
console.log(‘MoonNight::: drawSky!’);
let grad = this.ctx.createLinearGradient(0, 0, 0, this.cv.height)
grad.addColorStop(0, “#011447”);
grad.addColorStop(.2, “#011447”);
grad.addColorStop(1, “#958E78”);
this.ctx.fillStyle = grad;
this.ctx.fillRect(0, 0, this.cv.width, this.cv.height);
this.ctx.fill()
}
// 画 山
drawMountain() {
// 山 各个点
let points = [
[0, this.cv.height * (.7)],
[this.cv.width * .06, this.cv.height * .6],
[this.cv.width * .09, this.cv.height * .66],
[this.cv.width * .16, this.cv.height * .5],
[this.cv.width * .2, this.cv.height * .6],
[this.cv.width * .22, this.cv.height * .57],
[this.cv.width * .4, this.cv.height * .8],
[this.cv.width * .5, this.cv.height * .7],
[this.cv.width * .6, this.cv.height * .8],
[this.cv.width * .75, this.cv.height * .75],
[this.cv.width * .9, this.cv.height * .8],
[this.cv.width * .95, this.cv.height * .75],
[this.cv.width, this.cv.height * .8],
[this.cv.width, this.cv.height]
]
// 山 阴影
// 阴影 为山的点进行转换
let yy = points.map(item => {
  return [
    item[0] + 8, item[1] - 1
  ]
})

// 先画 阴影,使用画布默认机制
this.ctx.beginPath()
this.ctx.fillStyle = 'pink'
this.ctx.moveTo(0, this.cv.height)
for (let item of yy) {
  this.ctx.lineTo(item[0], item[1])
}
this.ctx.fill()
this.ctx.closePath()

// 画山
this.ctx.beginPath()
this.ctx.fillStyle = '#1A1401'
this.ctx.moveTo(0, this.cv.height)
for (let item of points) {
  this.ctx.lineTo(item[0], item[1])
}
this.ctx.fill()
this.ctx.closePath()
}
// 更新 方法
update() {
console.log(‘MoonNight::: update!’);
// 清空画布
this.ctx.clearRect(0, 0, this.cv.width, this.cv.height)
this.starPoints = this.starPoints.map(item => {
return {
// 更新 x 位置,如果到最左边则直接变最右边去,如果转换为随机数,后续坐标会像左半边聚集
x: item.x - 1 < 0 ? this.cv.width : item.x - 1,
y: item.y,
// 更新 size,步值为 .5
size: item.big ? item.size + .5 : item.size - .5,
// 如果星星大小超过最大值,则开始变小,否则开始变大
big: item.size > 15 && item.big === true ? false : item.size < 1 && item.big === false ? true : item.big
}
})
// 数据更新后,重新画图
this.draw()
}
}
4. star.class.js
因为五角星坐标计算比较复杂,为了迅速把星星画出来,所以选用的为四角星。
从上面可以看出来,画星星需要三个关键值:x,y,size,还有一个 big 属性作为 update 的依据。
星星的坐标是这样的:
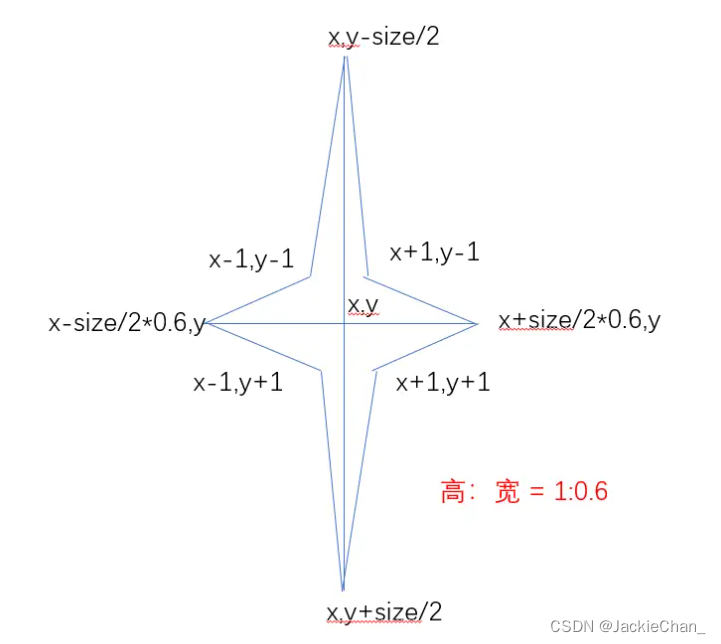
灵魂画手上线,如上图所示,通过传入的 x,y,size,可以整理出来8个顶点,通过8个顶点连线并填充就能得到一个 布灵布灵 的小星星,同时修改 size 的大小,达到星星闪烁的效果。
代码如下:
js复制代码export default class Star {
constructor(ctx, config) {
this.ctx = ctx
this.config = Object.assign({ x: 100, y: 100, size: 10 }, config)
this.init()
}
init() {
this.draw()
}
draw() {
this.x = this.config.x
this.y = this.config.y
	// 0.6 为星星的宽高比酸楚,计算得出宽高
this.w = this.config.size * .6
this.h = this.config.size

// 0.05 为中心点到最近的四个点的坐标差值百分比
this.i = this.config.size * .05

// 导出 八个点
this.points = [
  [this.x - this.w / 2, this.y],
  [this.x - this.i, this.y - this.i],

  [this.x, this.y - this.h / 2],
  [this.x + this.i, this.y - this.i],

  [this.x + this.w / 2, this.y],
  [this.x + this.i, this.y + this.i],

  [this.x, this.y + this.h / 2],
  [this.x - this.i, this.y + this.i]
]

// 白色的小星星就是这么画出来的
this.ctx.beginPath()
this.ctx.fillStyle = '#fff'
this.ctx.moveTo(this.points[0][0], this.points[0][1])
for (let point of this.points) {
  this.ctx.lineTo(point[0], point[1])
}
this.ctx.fill()
this.ctx.closePath()
}
// 更新方法,其实没用上,下面解释一下
update() {
this.config = {
x: this.config.x–,
y: this.config.y,
size: this.config.size
}
this.draw()
}
}
解释:
在本项目中,星星的更新,其实应该是在 star 的 update中声明,但是这个项目中卸载了 MoonNight 的 update 方法中。
为什么呢?
因为我个人认为在 MoonNight中直接对数组进行操作,可能比 遍历 每个 star 对象要快,纯直觉,并没有做测试。感兴趣的可以操作一下。
哈哈哈~~~
5. moon.class.js
月亮很简单,因为月亮在这个项目中没有做动作,有的话估计也就是光晕会闪一下。
所以这个类中没有做 update方法,只有 draw。
看过上面的代码后这个几乎没有难度:
js复制代码export default class Moon {
constructor(cv, ctx) {
this.cv = cv
this.ctx = ctx
this.init()
}
init() {
this.draw()
}
draw() {
let r = this.cv.width > this.cv.height ? this.cv.width * .05 : this.cv.height * .05
this.ctx.beginPath()
this.ctx.fillStyle = ‘#F0F003’
this.ctx.shadowOffsetX = 0; // 阴影Y轴偏移
this.ctx.shadowOffsetY = 0; // 阴影X轴偏移
this.ctx.shadowBlur = 14; // 模糊尺寸
this.ctx.shadowColor = ‘#F0F003’; // 颜色
this.ctx.arc(this.cv.width * .2, this.cv.height * .2, r, 0, 2 * Math.PI)
this.ctx.fill()
// 把 阴影设为0,避免影响到其他地方
this.ctx.shadowOffsetX = 0; // 阴影Y轴偏移
this.ctx.shadowOffsetY = 0; // 阴影X轴偏移
this.ctx.shadowBlur = 0;
this.ctx.closePath()

this.ctx.beginPath()
this.ctx.strokeStyle = '#F2D90B'
this.ctx.lineWidth = r * .15
this.ctx.lineCap = 'round'

this.ctx.arc(
  this.cv.width * .2,
  this.cv.height * .2,
  r * .8,
  15 / 360 * Math.PI,
  170 / 360 * Math.PI);
this.ctx.stroke()
this.ctx.closePath()
}
}
总结一下
看到这里,是不是觉得很简单?
这个 demo 本来就很简单,主要是想用一下 使用 class 封装在使用 canvas 过程中的一些实例,所以将一个 js 文件 拆分成了4个,并互相引用,很明显,完全也可以把山、文字、天空都提出去,再进行组装。同理,可以封装一下房子、树、云等元素,并在元素上绑定一些交互方法(点击、按键),用来实现一些其他的需求。
canvas 对刚接触的可能会觉得很绕,其实研究一下很有意思的,尤其是对象钻研算法的时候,可以通过很巧妙的方法将算法实现的过程中每一步都完成展现,下面会粘一下那个很棒的设计!叹为观止!