软waf简介
要了解软waf(ngx_lua_waf),就要从其组件入手
nginx,是基于C的,可以高效处理请求,负载等等
lua,脚本处理,更快捷
就有了openresty = nginx + lua,这就厉害了,lua高效有逻辑的处理请求,并且我们不用先装nginx再装lua,直接装个openresty齐活
再后来有了waf1.0,即nginx + lua + waf,也就是openresty + waf(lua配置),其实说白了就是openresty里面加入一下有waf功能的lua脚本,用于对请求的高效判断处理
waf1.0版本
https://github.com/loveshell/ngx_lua_waf
waf2.0版本
https://github.com/heartshare/ngx_lua_waf-2
openresty官网
http://openresty.org/cn/
openresty中常用API
https://www.kancloud.cn/qq13867685/openresty-api-cn/159009
openresty最佳实践
https://www.lanqiao.cn/library/openresty-best-practices/base/web_evolution
其实现在已经有很多开源的waf,包括verynginx、httpwaf、AIHTTPS,各有利弊,经过使用,我个人比较喜欢nginx + lua + waf特别适合二开定制功能的,掌控权在自己手里心里有数
当然,从另一个层面讲,也非常方便我们了解waf的原理
初识openresty
我们都知道,所谓WAF、IPS等都是拿到用户的请求,对用户的输入进行校验的,那么首先了解openresty,应该说是nginx的常用函数是非常有必要的,如果不知道nginx用哪些函数来获取请求中的哪些字段,我们根本无法进行下一步的判断
既然是学习openresty,我们可以先安装一个openresty,在windows下很简单,安装一个包,直接解压就可以双击nginx.exe运行
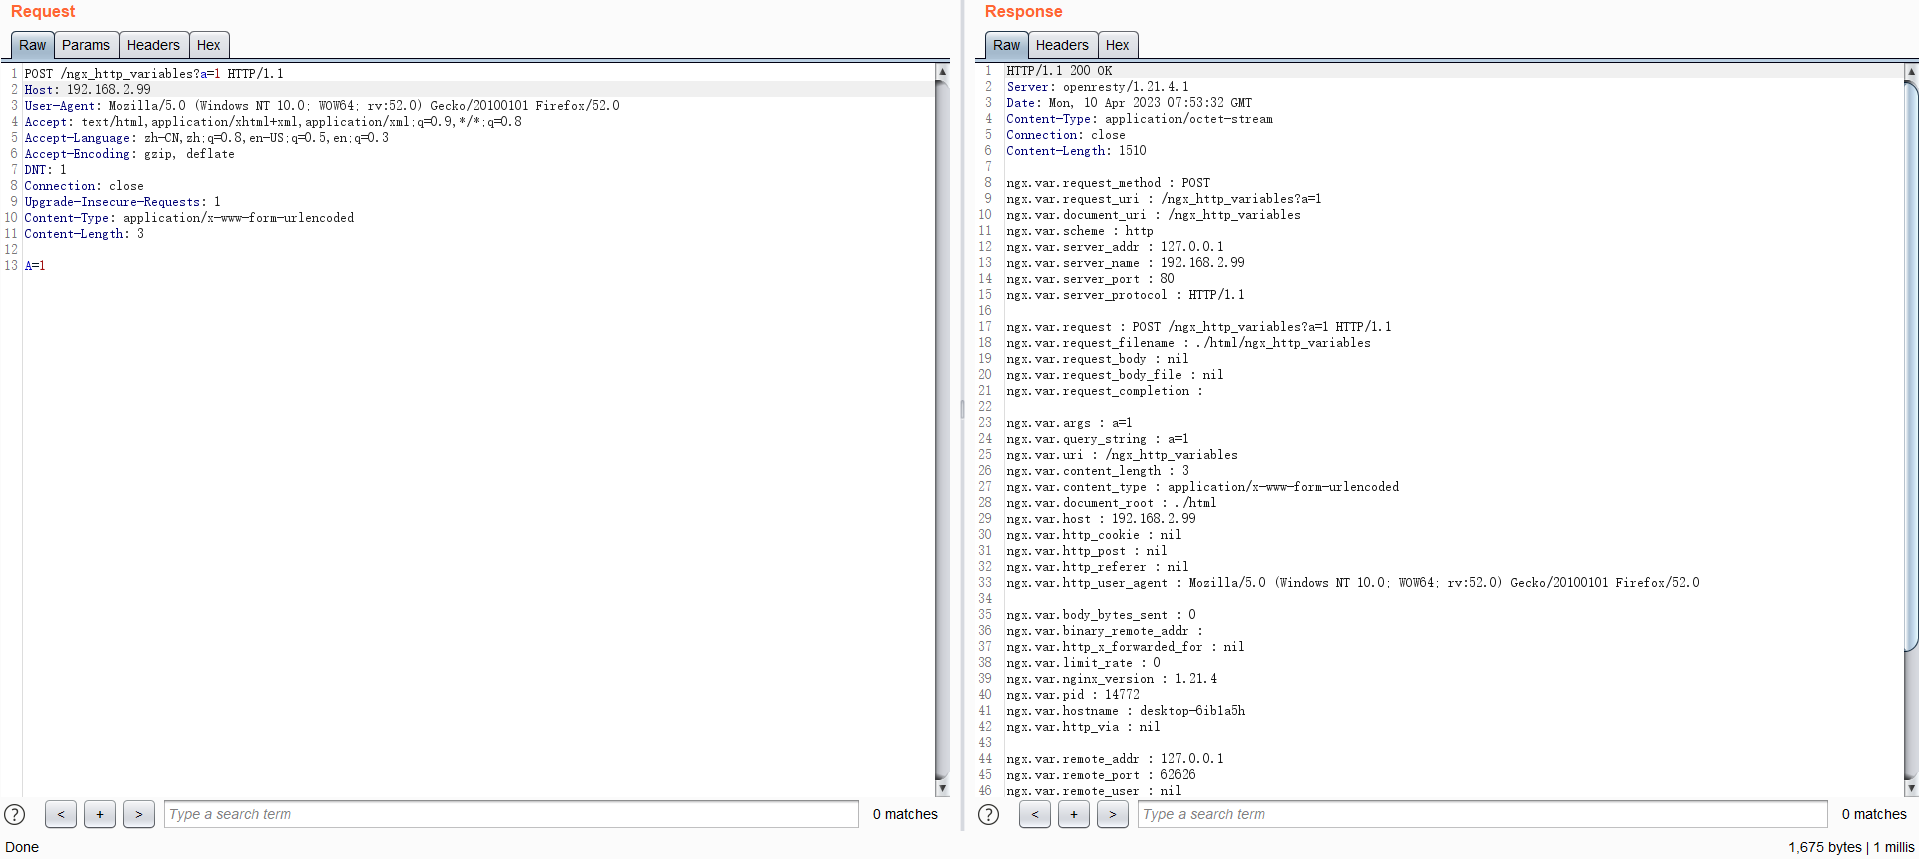
ngx_http_variables
这些变量是在nginx中可以直接使用的,使用的方式就是ngx.var.args、ngx.var.uri等
| 变量 | 作用 |
|---|---|
| $request_method | 请求的方法,比如"GET"、"POST"等 |
| $request_uri | 请求的URI,带参数; 比如http://localhost:88/test1/test2/test.php |
| $document_uri | 与$uri相同; 比如 /test1/test2/test.php |
| $scheme | 所用的协议,比如http或者是https,比如rewrite^(.+)$$scheme://example.com$1redirect |
| $server_addr | 服务器地址,如果没有用listen指明服务器地址,使用这个变量将发起一次系统调用以取得地址(造成资源浪费) |
| $server_name | 请求到达的服务器名 |
| $server_port | 请求到达的服务器端口号 |
| $server_protocol | 请求的协议版本,“HTTP/1.0"或"HTTP/1.1” |
| $request | 用户请求 |
| $request_body | |
| $request_body_file | 发往后端的本地文件名称 |
| $request_completion | 当前请求的文件路径名,比如$request_filename:D:\nginx/html/test1/test2/test.php |
| $request_filename | |
| $args | 请求中的参数 |
| $query_string | 与$args相同 |
| $uri | 请求的URI,可能和最初的值有不同,比如经过重定向之类的 |
| $content_length | HTTP请求信息里的"Content-Length" |
| $content_type | 请求信息里的"Content-Type" |
| $document_root | 针对当前请求的根路径设置值 |
| $host | 请求信息中的"Host",如果请求中没有Host行,则等于设置的服务器名 |
| $http_cookie | cookie 信息 |
| $http_post | |
| $http_referer | 引用地址 |
| $http_user_agent | 客户端代理信息 |
| $body_bytes_sent | 已发送的消息体字节数 |
| $binary_remote_addr | 远程地址的二进制表示 |
| $http_x_forwarded_for | 相当于网络访问路径 |
| $limit_rate | 对连接速率的限制 |
| $nginx_version | nginx版本 |
| $pid | nginx主进程ID |
| $hostname | |
| $is_args | |
| $http_via | 最后一个访问服务器的Ip地址 |
| $remote_addr | 客户端地址 |
| $remote_port | 客户端端口号 |
| $remote_user | 客户端用户名,认证用 |
| $realpath_root | |
| $sent_http_cache_control | |
| $sent_http_connection | |
| $sent_http_content_length | |
| $sent_http_content_type | |
| $sent_http_keep_alive | |
| $sent_http_last_modified | |
| $sent_http_location | |
| $sent_http_transfer_encoding |
修改nginx.conf,重载nginx配置之后对比一下这些参数吧
worker_processes  1;

#error_log  logs/error.log;
#pid        logs/nginx.pid;

events {
    worker_connections  1024;
}

http {
    include       mime.types;
    default_type  application/octet-stream;

    sendfile        on;
    keepalive_timeout  65;

	server {
	   listen    80;
	   server_name  192.168.2.99;

	    location /ngx_http_variables {
			content_by_lua_block {
				ngx.say("ngx.var.request_method : ", ngx.var.request_method)
				ngx.say("ngx.var.request_uri : ", ngx.var.request_uri)
				ngx.say("ngx.var.document_uri : ", ngx.var.document_uri)
				ngx.say("ngx.var.scheme : ", ngx.var.scheme)
				ngx.say("ngx.var.server_addr : ", ngx.var.server_addr)
				ngx.say("ngx.var.server_name : ", ngx.var.server_name)
				ngx.say("ngx.var.server_port : ", ngx.var.server_port)
				ngx.say("ngx.var.server_protocol : ", ngx.var.server_protocol)
				ngx.say("")

				ngx.say("ngx.var.request : ", ngx.var.request)
				ngx.say("ngx.var.request_filename : ", ngx.var.request_filename)
				ngx.say("ngx.var.request_body : ", ngx.var.request_body)
				ngx.say("ngx.var.request_body_file : ", ngx.var.request_body_file)
				ngx.say("ngx.var.request_completion : ", ngx.var.request_completion)
				ngx.say("")

				ngx.say("ngx.var.args : ", ngx.var.args)
				ngx.say("ngx.var.query_string : ", ngx.var.query_string)
				ngx.say("ngx.var.uri : ", ngx.var.uri)
				ngx.say("ngx.var.content_length : ", ngx.var.content_length)
				ngx.say("ngx.var.content_type : ", ngx.var.content_type)
				ngx.say("ngx.var.document_root : ", ngx.var.document_root)
				ngx.say("ngx.var.host : ", ngx.var.host)
				ngx.say("ngx.var.http_cookie : ", ngx.var.http_cookie)
				ngx.say("ngx.var.http_post : ", ngx.var.http_post)
				ngx.say("ngx.var.http_referer : ", ngx.var.http_referer)
				ngx.say("ngx.var.http_user_agent : ", ngx.var.http_user_agent)
				ngx.say("")

				ngx.say("ngx.var.body_bytes_sent : ", ngx.var.body_bytes_sent)
				ngx.say("ngx.var.binary_remote_addr : ", ngx.var.binary_remote_addr)
				ngx.say("ngx.var.http_x_forwarded_for : ", ngx.var.http_x_forwarded_for)
				ngx.say("ngx.var.limit_rate : ", ngx.var.limit_rate)
				ngx.say("ngx.var.nginx_version : ", ngx.var.nginx_version)
				ngx.say("ngx.var.pid : ", ngx.var.pid)
				ngx.say("ngx.var.hostname : ", ngx.var.hostname)
				ngx.say("ngx.var.http_via : ", ngx.var.http_via)
				ngx.say("")

				ngx.say("ngx.var.remote_addr : ", ngx.var.remote_addr)
				ngx.say("ngx.var.remote_port : ", ngx.var.remote_port)
				ngx.say("ngx.var.remote_user : ", ngx.var.remote_user)
				ngx.say("")

				ngx.say("ngx.var.sent_http_cache_control : ", ngx.var.sent_http_cache_control)
				ngx.say("ngx.var.sent_http_connection : ", ngx.var.sent_http_connection)
				ngx.say("ngx.var.sent_http_content_length : ", ngx.var.sent_http_content_length)
				ngx.say("ngx.var.sent_http_content_type : ", ngx.var.sent_http_content_type)
				ngx.say("ngx.var.sent_http_keep_alive : ", ngx.var.sent_http_keep_alive)
				ngx.say("ngx.var.sent_http_last_modified : ", ngx.var.sent_http_last_modified)
				ngx.say("ngx.var.sent_http_location : ", ngx.var.sent_http_location)
				ngx.say("ngx.var.sent_http_transfer_encoding : ", ngx.var.sent_http_transfer_encoding)
			}
	    }
	}
}
openresty(ngx)-api
https://www.kancloud.cn/qq13867685/openresty-api-cn/159009
我们也可以用openresty的api来调用一些常用的nginx函数
| 函数/变量 | 作用 |
|---|---|
| ngx.exit() | 当 status >= 200 (即 ngx.HTTP_OK 及以上) 时,本函数中断当前请求执行并返回状态值给 nginx。当 status == 0 (即 ngx.OK) 时,本函数退出当前的“处理阶段句柄” (或当使用content_by_lua指令时的“内容句柄”) ,继续执行当前请求的下一个阶段 (如果有)。既然是跳出请求,那不就是我们WAF经常拦截到了就直接exit了 |
| ngx.status | 读写当前请求的响应状态码。这个方法需要在发送响应头前调用 |
| ngx.req.get_headers() | 返回一个 Lua table,包含当前请求的所有请求头信息。 |
| ngx.unescape_uri(“b%20r56+7”) | 将转义过的 URI 内容 str 解码。 |
| ngx.today() | 从nginx的时间缓存(不像Lua的日期库,该时间不涉及系统调用)返回当前的日期(格式:yyyy-mm-dd) |
| ngx.HTTP_FORBIDDEN | 403状态码 |
| ngx.req.get_uri_args() | 返回一个 Lua table,包含当前请求的所有 URL 查询参数 |
| ngx.req.get_post_args() | 1、返回一个 Lua table,包含当前请求的所有 POST 查询参数 (MIME type 是application/x-www-form-urlencoded)。使用前需要调用 ngx.req.read_body读取完整请求体,或通过设置lua_need_request_body指令为 on 以避免报错 2、多次出现同一个参数 key 时,将生成一个 Lua table,按顺序保存其所有 value 3、不包含 =<value> 部分的参数被视为布尔值参数4、没有 key 的参数将被忽略。例如 POST /test 的请求体是=hello&=world时将没有任何输出 5、请注意,为防止拒绝服务式攻击 (denial of service attacks),默认最多解析前 100 个请求参数 (包括同名的),更多的参数将直接忽略,例如local args = ngx.req.get_post_args(10)接受10个参数,被设置为 0 以移除此限制,此时将解析所有接收到的请求参数。强烈不推荐移除max_args限制 |
| ngx.say(string) | 可选的 max_args 函数参数可以用来修改这个限制:key 和 value 将根据 URI 编码规则进行解码。say中需要跟字符串,直接打印到了屏幕上,类似php的echo这种,特别方便我们调试 |
修改nginx.conf,重载nginx配置之后对比一下这些参数吧
worker_processes  1;

error_log  logs/error.log;
pid        logs/nginx.pid;

events {
    worker_connections  1024;
}

http {
    include       mime.types;
    default_type  application/octet-stream;

    sendfile        on;
    keepalive_timeout  65;

	server_tokens off;
    autoindex off;

	server {
	   listen    80;
	   server_name  192.168.2.99;

	    location /ngx_http_variables {
			content_by_lua_block {
				ngx.say("ngx.var.request_method : ", ngx.var.request_method)
				ngx.say("ngx.var.request_uri : ", ngx.var.request_uri)
				ngx.say("ngx.var.document_uri : ", ngx.var.document_uri)
				ngx.say("ngx.var.scheme : ", ngx.var.scheme)
				ngx.say("ngx.var.server_addr : ", ngx.var.server_addr)
				ngx.say("ngx.var.server_name : ", ngx.var.server_name)
				ngx.say("ngx.var.server_port : ", ngx.var.server_port)
				ngx.say("ngx.var.server_protocol : ", ngx.var.server_protocol)
				ngx.say("")

				ngx.say("ngx.var.request : ", ngx.var.request)
				ngx.say("ngx.var.request_filename : ", ngx.var.request_filename)
				ngx.say("ngx.var.request_body : ", ngx.var.request_body)
				ngx.say("ngx.var.request_body_file : ", ngx.var.request_body_file)
				ngx.say("ngx.var.request_completion : ", ngx.var.request_completion)
				ngx.say("")

				ngx.say("ngx.var.args : ", ngx.var.args)
				ngx.say("ngx.var.query_string : ", ngx.var.query_string)
				ngx.say("ngx.var.uri : ", ngx.var.uri)
				ngx.say("ngx.var.content_length : ", ngx.var.content_length)
				ngx.say("ngx.var.content_type : ", ngx.var.content_type)
				ngx.say("ngx.var.document_root : ", ngx.var.document_root)
				ngx.say("ngx.var.host : ", ngx.var.host)
				ngx.say("ngx.var.http_cookie : ", ngx.var.http_cookie)
				ngx.say("ngx.var.http_post : ", ngx.var.http_post)
				ngx.say("ngx.var.http_referer : ", ngx.var.http_referer)
				ngx.say("ngx.var.http_user_agent : ", ngx.var.http_user_agent)
				ngx.say("")

				ngx.say("ngx.var.body_bytes_sent : ", ngx.var.body_bytes_sent)
				ngx.say("ngx.var.binary_remote_addr : ", ngx.var.binary_remote_addr)
				ngx.say("ngx.var.http_x_forwarded_for : ", ngx.var.http_x_forwarded_for)
				ngx.say("ngx.var.limit_rate : ", ngx.var.limit_rate)
				ngx.say("ngx.var.nginx_version : ", ngx.var.nginx_version)
				ngx.say("ngx.var.pid : ", ngx.var.pid)
				ngx.say("ngx.var.hostname : ", ngx.var.hostname)
				ngx.say("ngx.var.http_via : ", ngx.var.http_via)
				ngx.say("")

				ngx.say("ngx.var.remote_addr : ", ngx.var.remote_addr)
				ngx.say("ngx.var.remote_port : ", ngx.var.remote_port)
				ngx.say("ngx.var.remote_user : ", ngx.var.remote_user)
				ngx.say("")

				ngx.say("ngx.var.sent_http_cache_control : ", ngx.var.sent_http_cache_control)
				ngx.say("ngx.var.sent_http_connection : ", ngx.var.sent_http_connection)
				ngx.say("ngx.var.sent_http_content_length : ", ngx.var.sent_http_content_length)
				ngx.say("ngx.var.sent_http_content_type : ", ngx.var.sent_http_content_type)
				ngx.say("ngx.var.sent_http_keep_alive : ", ngx.var.sent_http_keep_alive)
				ngx.say("ngx.var.sent_http_last_modified : ", ngx.var.sent_http_last_modified)
				ngx.say("ngx.var.sent_http_location : ", ngx.var.sent_http_location)
				ngx.say("ngx.var.sent_http_transfer_encoding : ", ngx.var.sent_http_transfer_encoding)
			}
	    }
		location /openresty_api_exit {
			content_by_lua_block {
				ngx.exit(404)
			}
	    }
		location /openresty_api_ngx_status {
			content_by_lua_block {
				ngx.status = ngx.HTTP_GONE
				ngx.say(ngx.status)
			}
	    }
	   	location /openresty_api_get {
			content_by_lua_block {
				ngx.say("ngx.unescape_uri(b%20r56+7) : ", ngx.unescape_uri("b%20r56+7"))
				ngx.say("ngx.today() : ", ngx.today())

				ngx.say("")
				local headers = ngx.req.get_headers()
				ngx.say("******ngx.req.get_headers()******")
				ngx.say("type(headers) : ", type(headers))
				for key, val in pairs(headers) do
					ngx.say(key, " : ", val)
				end

				ngx.say("")
				ngx.say("******ngx.req.get_uri_args()******")
				local uri_args = ngx.req.get_uri_args()
				ngx.say("type(uri_args) : ", type(uri_args))
				for key, val in pairs(uri_args) do
					ngx.say("type(key) : ", type(key))
					ngx.say("type(val) : ", type(val))
					ngx.say("key : ", key)
					ngx.say("val : ", val)
				end

				ngx.say("")
				ngx.say("******ngx.req.get_post_args()******")
				ngx.req.read_body()
				local post_args, err = ngx.req.get_post_args()
				if not post_args then
					ngx.say("failed to get post args: ", err)
					return
				end
				ngx.say("type(post_args) : ", type(post_args))
				for key, val in pairs(post_args) do
					ngx.say("type(key) : ", type(key))
					ngx.say("type(val) : ", type(val))
					if type(val) == "table" then
						ngx.say("key : ", key)
						--ngx.say("val : ", table.concat(val, ", "))
						ngx.say("val : ", val)
					else
						ngx.say("key : ", key)
						ngx.say("val : ", val)
					end
				end
			}
	    }
	}
}
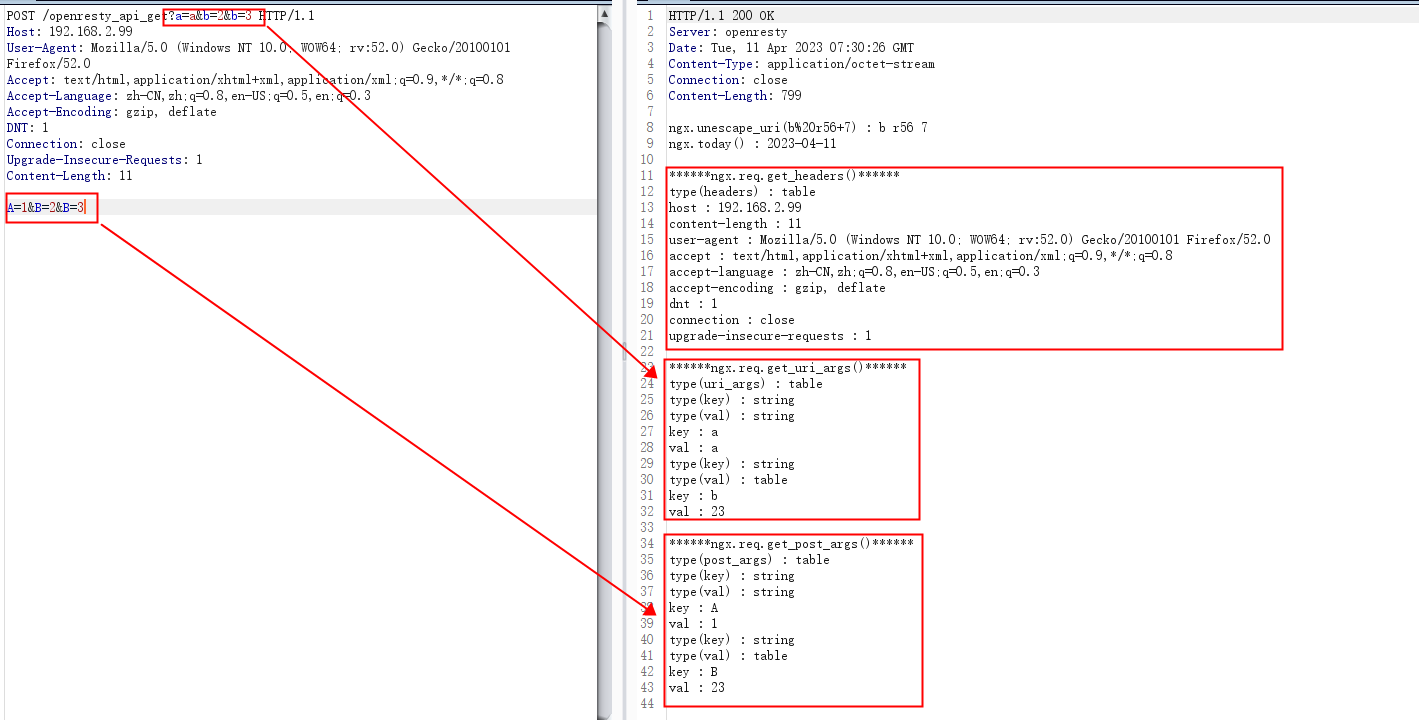
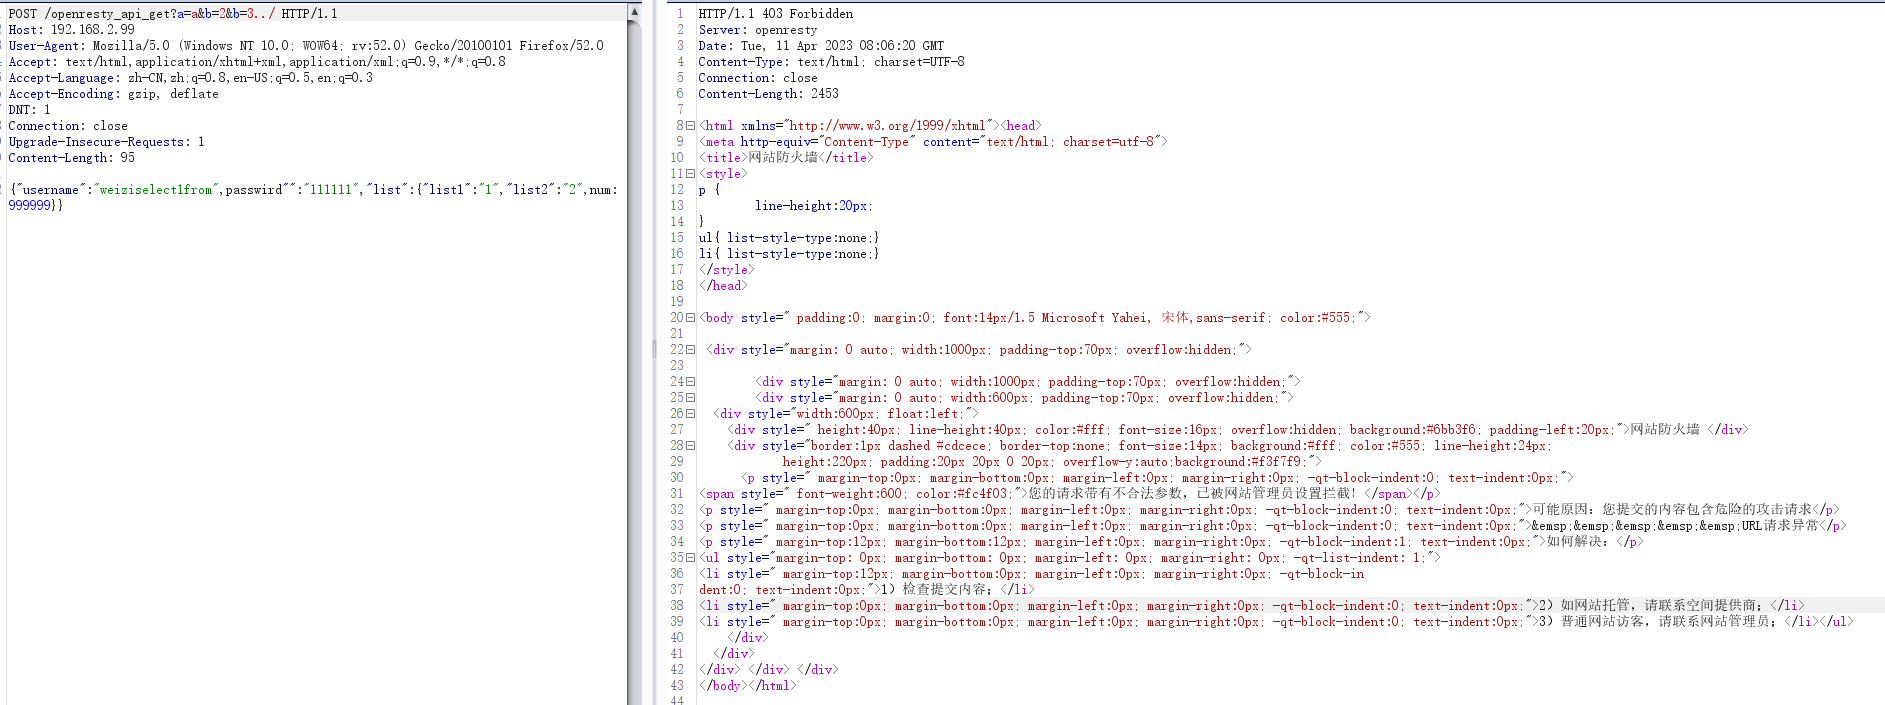
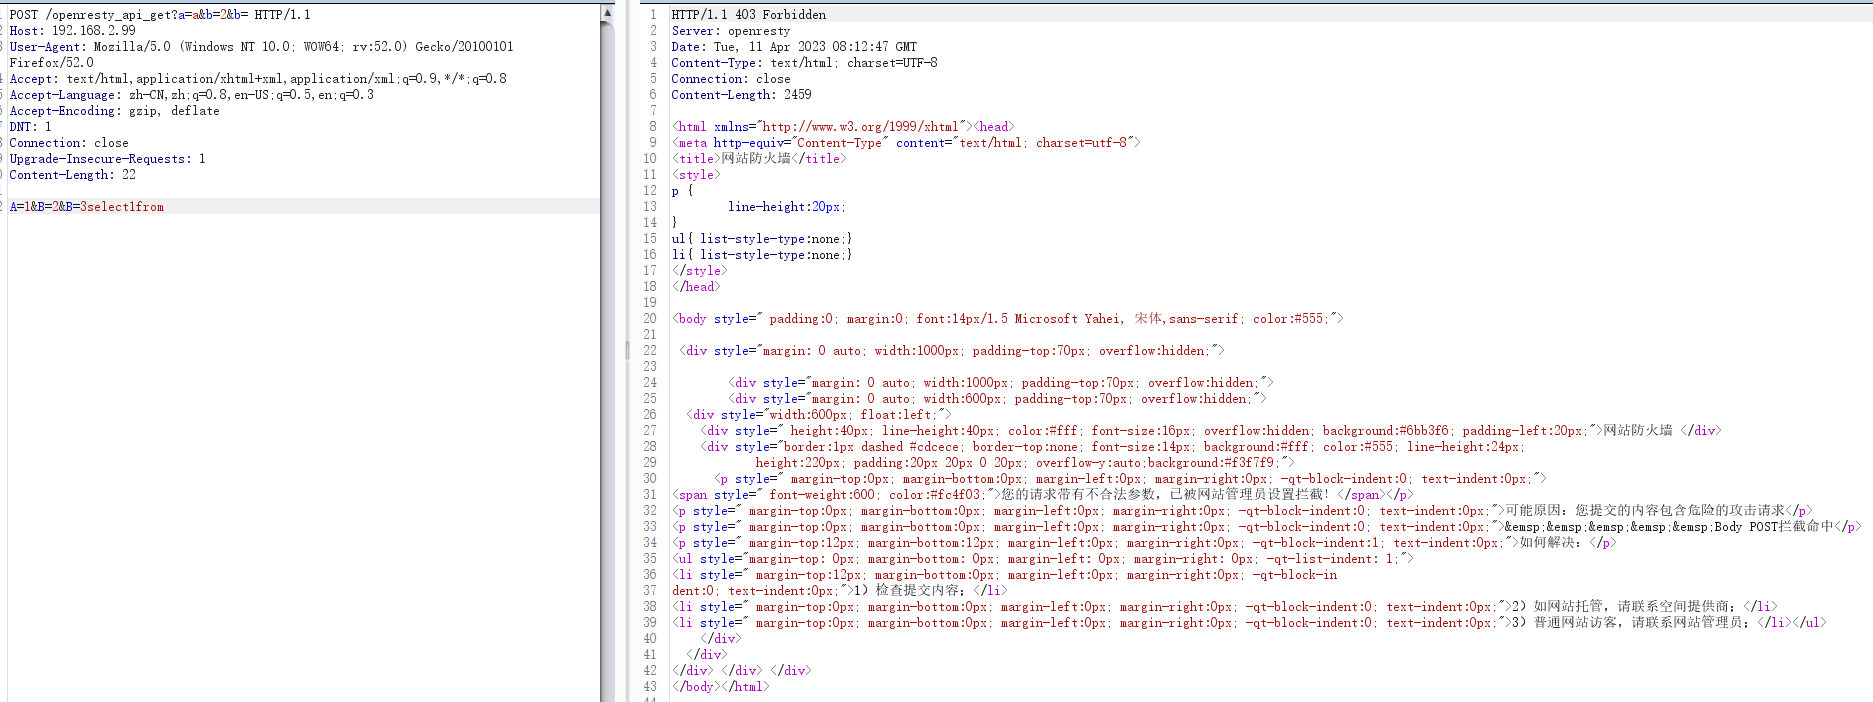
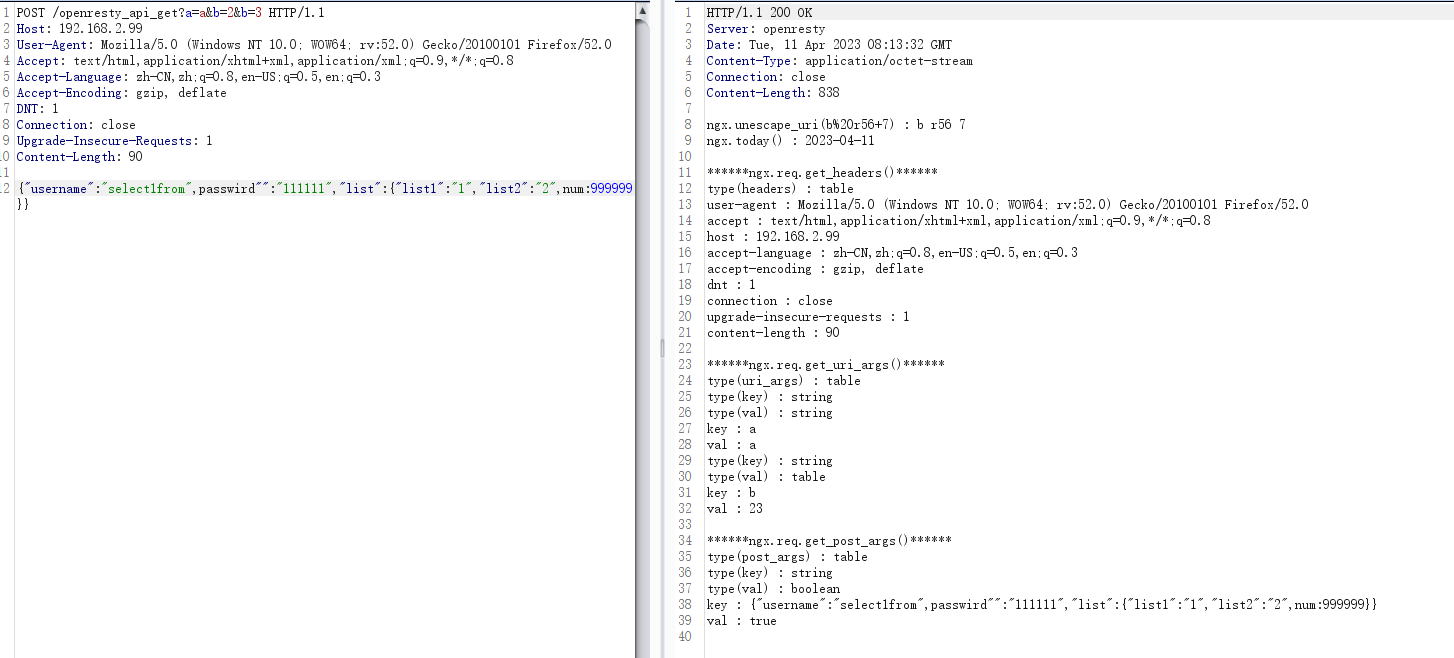
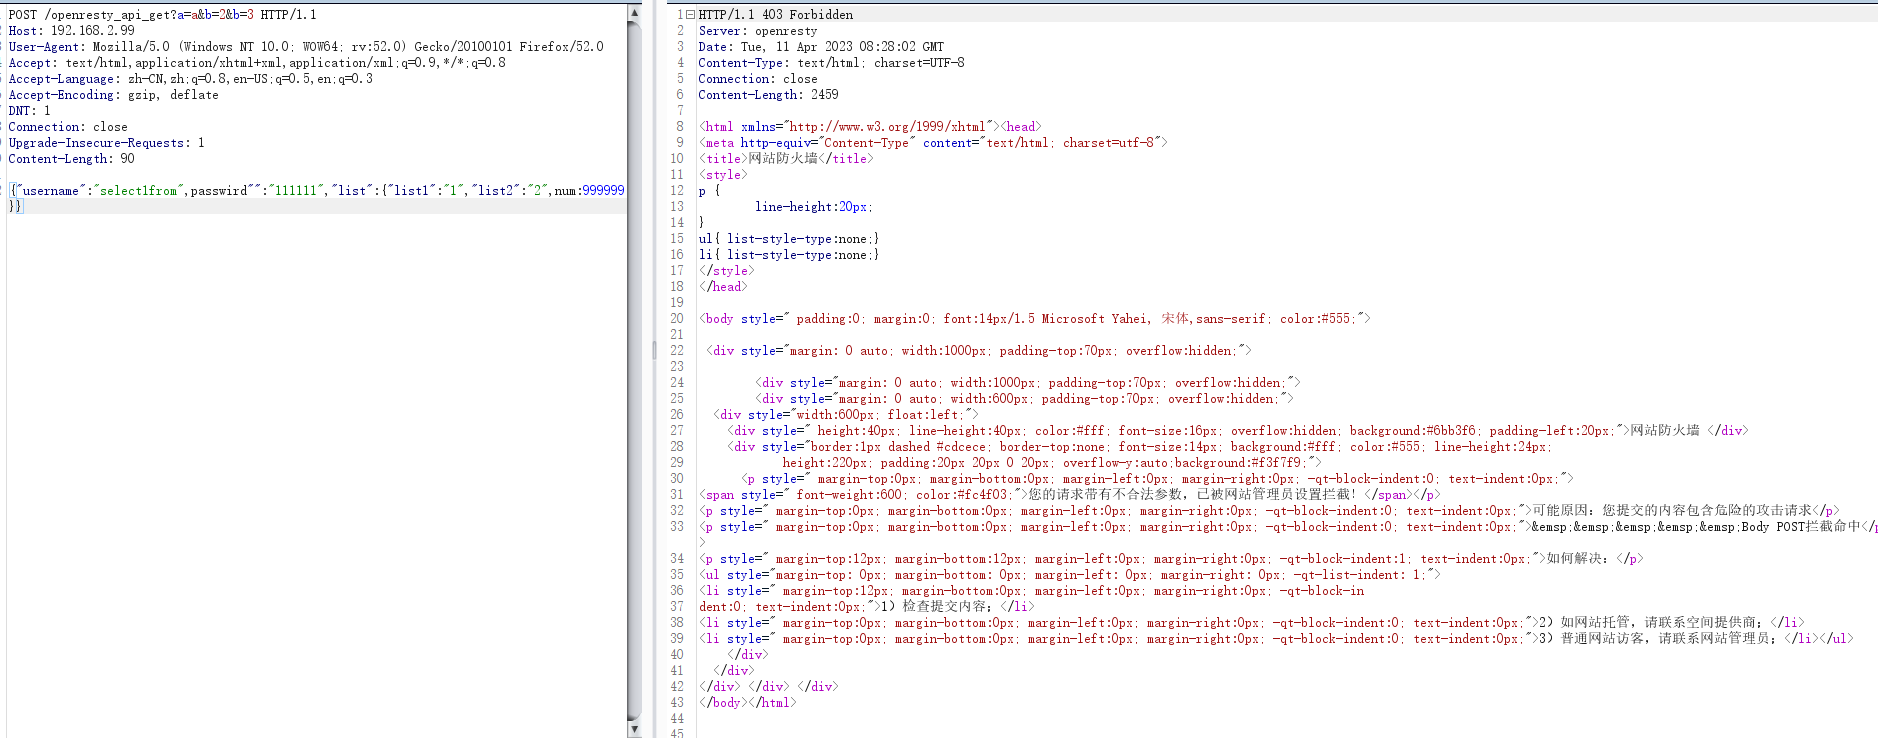
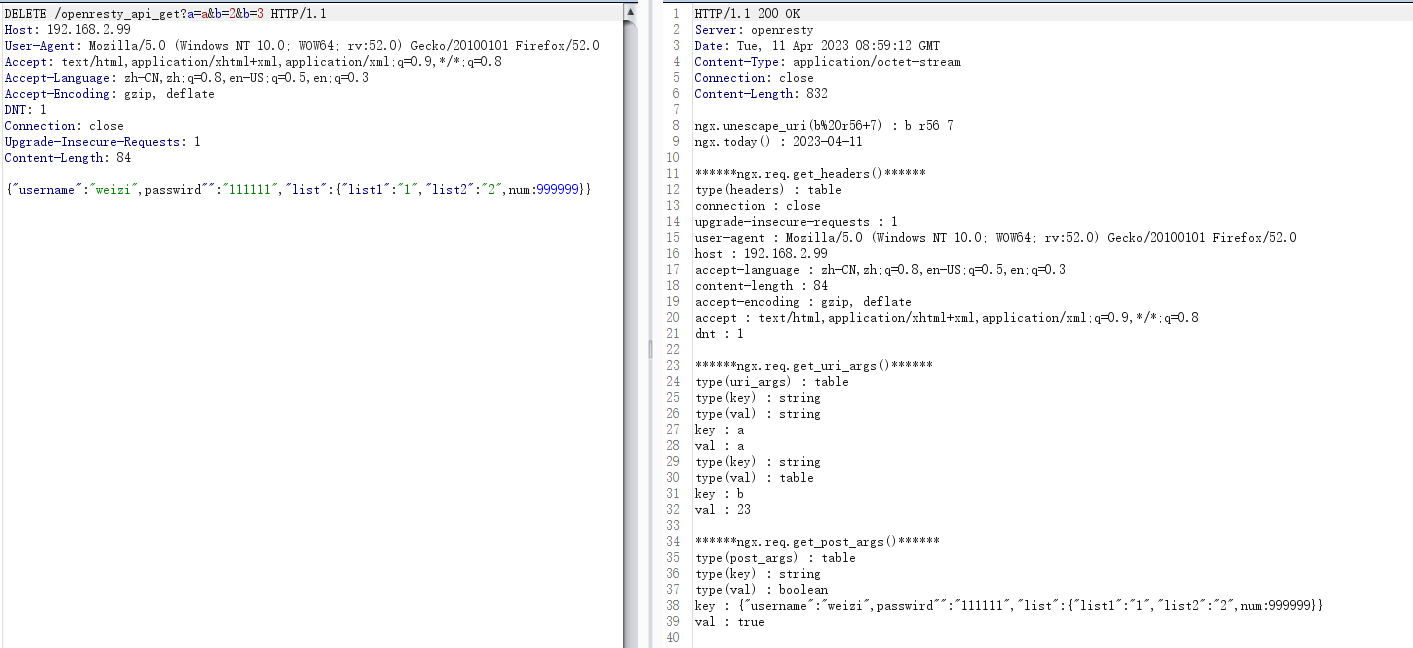
从这个POST请求可以看到
1.ngx.req.get_headers()、ngx.req.get_uri_args()、ngx.req.get_post_args()得到的结果都是lua的table,说白了就是python的字典,我们只需要按照键值对遍历结果即可
2.ngx.req.get_headers()和左边的请求信息基本一致
3.ngx.req.get_uri_args()、ngx.req.get_post_args()中是为了获取参数
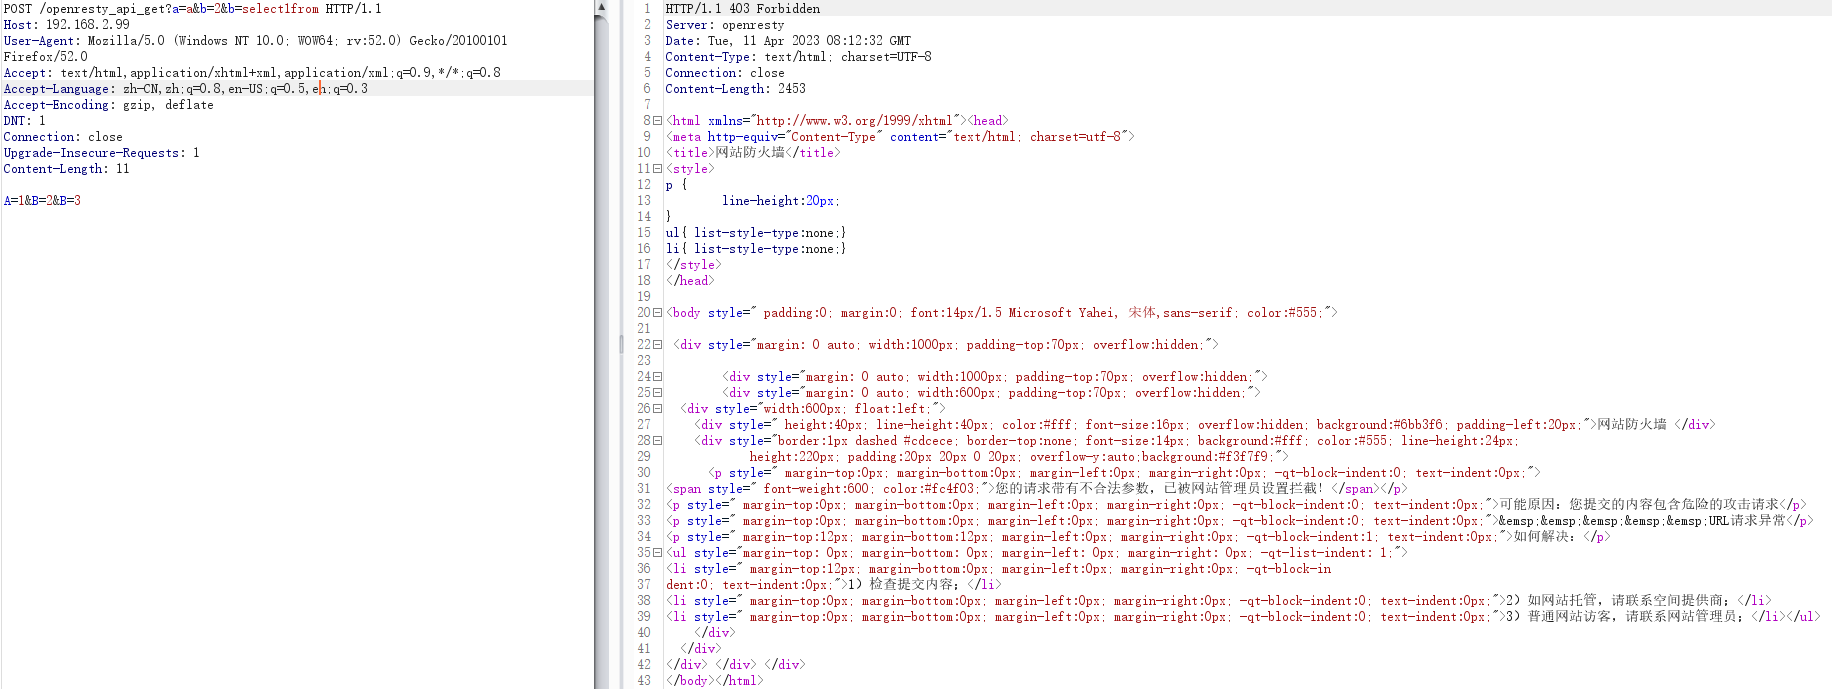
如果参数的键有一个,那么值就是string类型的,就像uri的参数a和POST请求体的参数A
如果参数的键有多个,那么值就是table类型的,并且值是直接进行字符串拼接了,就像uri的参数b和POST请求体的参数B,我们可以自己写拼接的符号
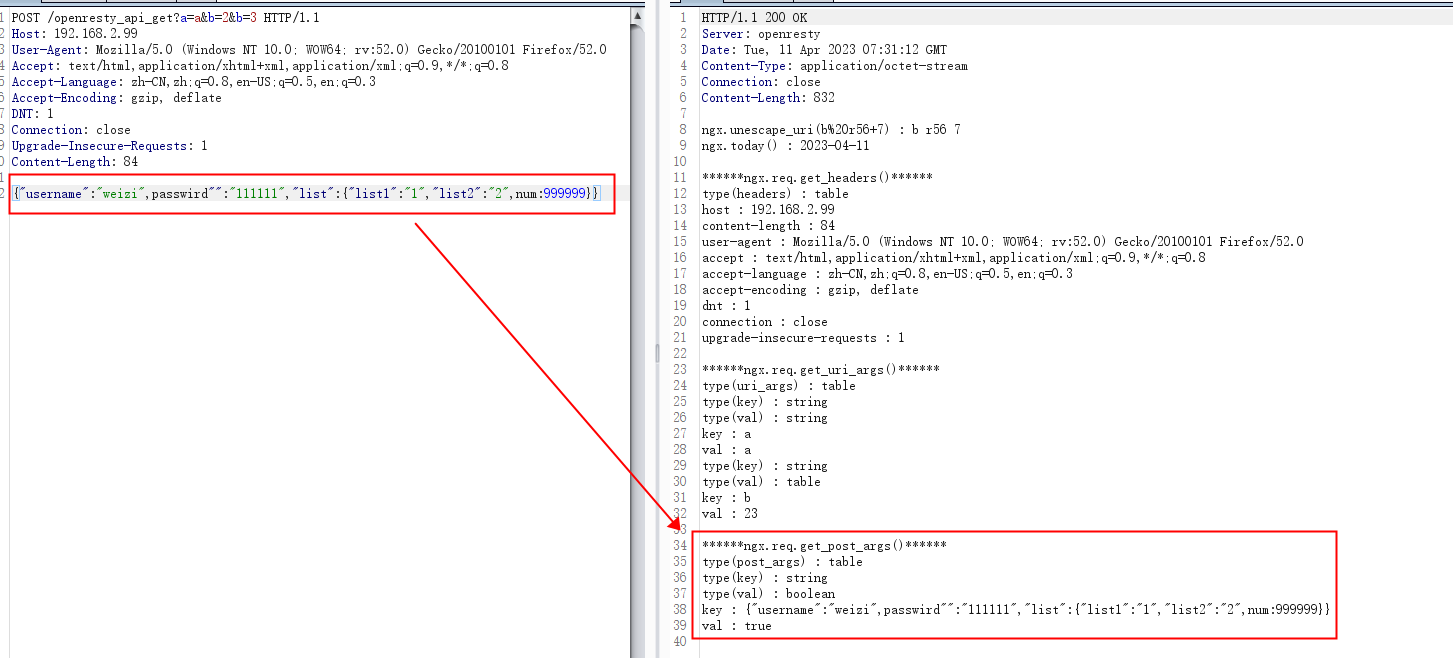
4.也是比较重要的一点,如果POST请求体是JSON格式的参数,如下图的2,那么key是string类型的,并且是整个POST的JSON参数,而value是boolean的为true,这就意味着,如果判断出了POST参数是JSON格式的,那么目标主要就要检验key了
waf1.0版本源码分析
config.lua
config.lua是waf的核心配置,比如:是否开启ip白名单,waf的规则存在在哪个路径,允许哪些文件名上传等,所以这里会有很多的定义
注意这个文件是config.lua,是以.lua结尾的,说明这也是个可执行的lua脚本,只是这里面只用来定义了变量,这就意味着,后面的lua文件,只要包含了这个config.lua,就可以直接用这个文件里面的变量
可以看到都是下面的源码都是变量的定义
--RulePath为waf的规则库目录,wafconf放在哪,这里就写哪即可
RulePath = "/usr/local/nginx/conf/waf/wafconf/"
--是否开启waf日志,开启了,下面就得指定一个地方存放logdir,并且logdir得有可写权限(最好实现创建好这个目录),只要waf拦截,就会调用日志函数写到这个路径
attacklog = "on"
logdir = "/usr/local/nginx/logs/hack/"
--是否拦截uri访问,开启了,会读取wafconf下的uri和ngx.var.request_uri进行比较
UrlDeny="on"
--是否拦截后重定向,也就是waf拦截后是否跳转到本类里面的html变量中写好的拦截页面
Redirect="on"
--是否拦截cookie攻击,也就是对cookie里的关键字进行拦截。ngx.var.http_cookie,万物皆可注入,只要是http头或者体,后台用了,不都可能被注入吗
CookieMatch="on"
--是否拦截post攻击,这里对POST的检查主要分为通过POST进行文件上传的内容,以及POST请求参数的检查
postMatch="on"
--是否开启uri白名单,注意这里的白名单意味着,ngx.var.uri获取的uri只要配置到了wafconf下的whiteurl中,那么这个uri将不会进行别的校验了,一路亮绿灯
--比如whiteurl中有^/123/$,那就是说http://IP/123/的cookie、post、get参数校验都会被“短路”,具体会在waf.lua中细说
whiteModule="on"
--填写不允许上传文件后缀类型,在waf.lua中细说
black_fileExt={"php","jsp"}
--ip白名单,多个ip用逗号分隔,lua的table数据类型,只要在ip白名单里面的,其余校验都会被“短路”
ipWhitelist={"127.0.0.1"}
--ip黑名单,多个ip用逗号分隔
ipBlocklist={"1.0.0.1"}
--是否开启拦截cc攻击(需要nginx.conf的http段增加lua_shared_dict limit 10m;),防DOS的
--设置cc攻击频率,单位为秒.
--默认1分钟同一个IP只能请求同一个地址100次
CCDeny="off"
CCrate="100/60"
--定义一个多行字符串,用于被拦截后的返回页面,前提是UrlDeny开启,作者默认给的是安全狗的拦截页面
html=[[
<html xmlns="http://www.w3.org/1999/xhtml"><head>
<meta http-equiv="Content-Type" content="text/html; charset=utf-8">
<title>网站防火墙</title>
<style>
p {
	line-height:20px;
}
ul{ list-style-type:none;}
li{ list-style-type:none;}
</style>
</head>
<body style=" padding:0; margin:0; font:14px/1.5 Microsoft Yahei, 宋体,sans-serif; color:#555;">
 <div style="margin: 0 auto; width:1000px; padding-top:70px; overflow:hidden;">


  <div style="width:600px; float:left;">
    <div style=" height:40px; line-height:40px; color:#fff; font-size:16px; overflow:hidden; background:#6bb3f6; padding-left:20px;">网站防火墙 </div>
    <div style="border:1px dashed #cdcece; border-top:none; font-size:14px; background:#fff; color:#555; line-height:24px; height:220px; padding:20px 20px 0 20px; overflow-y:auto;background:#f3f7f9;">
      <p style=" margin-top:0px; margin-bottom:0px; margin-left:0px; margin-right:0px; -qt-block-indent:0; text-indent:0px;"><span style=" font-weight:600; color:#fc4f03;">您的请求带有不合法参数,已被网站管理员设置拦截!</span></p>
<p style=" margin-top:0px; margin-bottom:0px; margin-left:0px; margin-right:0px; -qt-block-indent:0; text-indent:0px;">可能原因:您提交的内容包含危险的攻击请求</p>
<p style=" margin-top:12px; margin-bottom:12px; margin-left:0px; margin-right:0px; -qt-block-indent:1; text-indent:0px;">如何解决:</p>
<ul style="margin-top: 0px; margin-bottom: 0px; margin-left: 0px; margin-right: 0px; -qt-list-indent: 1;"><li style=" margin-top:12px; margin-bottom:0px; margin-left:0px; margin-right:0px; -qt-block-indent:0; text-indent:0px;">1)检查提交内容;</li>
<li style=" margin-top:0px; margin-bottom:0px; margin-left:0px; margin-right:0px; -qt-block-indent:0; text-indent:0px;">2)如网站托管,请联系空间提供商;</li>
<li style=" margin-top:0px; margin-bottom:0px; margin-left:0px; margin-right:0px; -qt-block-indent:0; text-indent:0px;">3)普通网站访客,请联系网站管理员;</li></ul>
    </div>
  </div>
</div>
</body></html>
]]
init.lua
该文件中,主要是读取config.lua,并在此基础上定义了更多的函数,用于获取并判断用户的种种输入
--包含config.lua文件,顺理成章的引用config.lua中定义的变量,所以该文件最好和config.lua对照的着看
require 'config'
--定义字符串匹配,后面直接用match就行
local match = string.match
--定义正则匹配,后面直接用ngxmatch就行
local ngxmatch=ngx.re.match
--将转义过的 URI 内容 str 解码
local unescape=ngx.unescape_uri
--ngx.req.get_headers()返回table当前请求的请求头信息
local get_headers = ngx.req.get_headers
--定义了一个函数,传入一个参数,参数为on就返回true,否则返回false,用于判断config.lua中是否开启了选项
local optionIsOn = function (options) return options == "on" and true or false end
--config.lua中打日志的目录
logpath = logdir
--config.lua中wafconf的规则目录
rulepath = RulePath
--下面这一串变量,凡是config.lua中为on的都会返回true,否则就是没开启,返回false
UrlDeny = optionIsOn(UrlDeny)
PostCheck = optionIsOn(postMatch)
CookieCheck = optionIsOn(cookieMatch)
WhiteCheck = optionIsOn(whiteModule)
PathInfoFix = optionIsOn(PathInfoFix)
attacklog = optionIsOn(attacklog)
CCDeny = optionIsOn(CCDeny)
Redirect=optionIsOn(Redirect)
--获取客户端ip,,如果IP为空nil就返回unknown,不为空返回这个ip
function getClientIp()
IP = ngx.var.remote_addr
if IP == nil then
IP = "unknown"
end
return IP
end
--写日志函数,传一个日志路径和要写的信息
function write(logfile,msg)
--二进制追加方式打开文件
local fd = io.open(logfile,"ab")
--如果文件流为nil也就是打开日志失败直接return啥都不写
if fd == nil then return end
--写日志
fd:write(msg)
fd:flush()
fd:close()
end
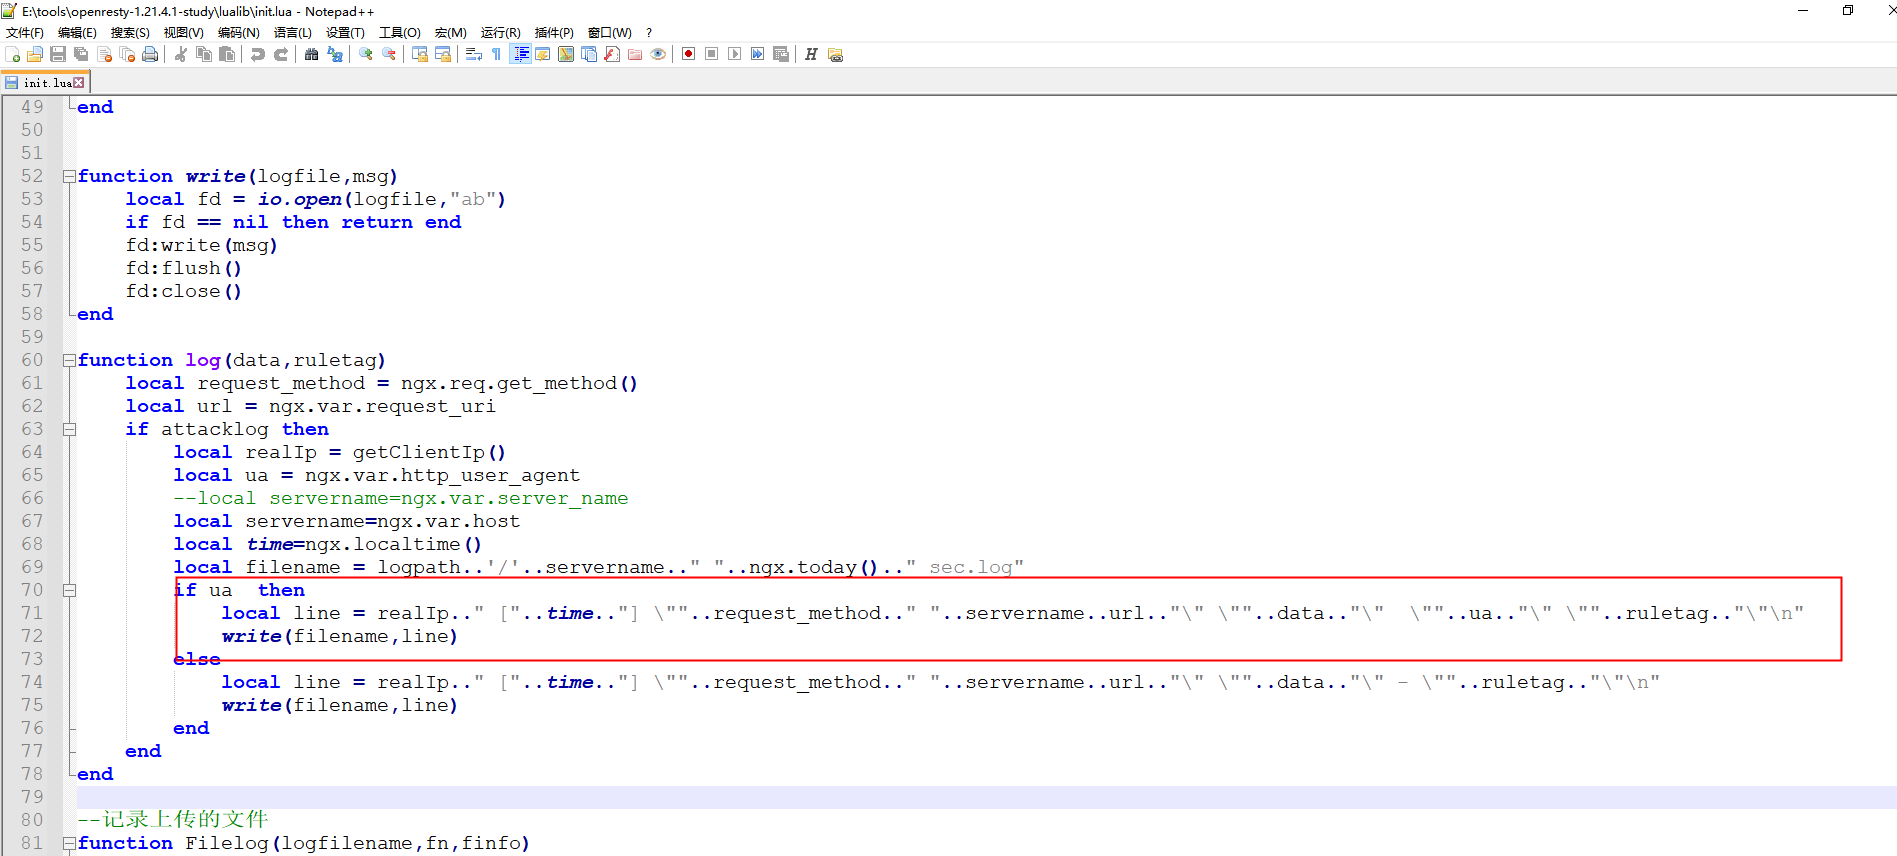
--日志函数,这里会调用上面的write
function log(method,url,data,ruletag)
--config.lua里面开启了攻击日志记录再写,注意后面很多函数都会先判断是不是on,开启了才回往下进行,思路如此
if attacklog then
local realIp = getClientIp()
local ua = ngx.var.http_user_agent
local servername=ngx.var.server_name
local time=ngx.localtime()
if ua then
--..为字符串拼接
line = realIp.." ["..time.."] \""..method.." "..servername..url.."\" \""..data.."\" \""..ua.."\" \""..ruletag.."\"\n"
else
line = realIp.." ["..time.."] \""..method.." "..servername..url.."\" \""..data.."\" - \""..ruletag.."\"\n"
end
local filename = logpath..'/'..servername.."_"..ngx.today().."_sec.log"
write(filename,line)
end
end
------------------------------------规则读取函数-------------------------------------------------------------------
--读取规则,为读取wafconf下面每个文件的内容做准备,按行读取最后存成一个table返回这个table
function read_rule(var)
file = io.open(rulepath..'/'..var,"r")
if file==nil then
return
end
t = {}
for line in file:lines() do
table.insert(t,line)
end
file:close()
return(t)
end
--拿到6个table
urlrules=read_rule('url')
argsrules=read_rule('args')
uarules=read_rule('user-agent')
wturlrules=read_rule('whiteurl')
postrules=read_rule('post')
ckrules=read_rule('cookie')
--waf的响应页面,用于所有被waf拦截后响应的页面
--ngx.exit 立即中断当前http请求,后续lua代码将不会再执行,底层socket通道还存在,只要没超过保活时间,如果用了proxypass做子请求,不影响。
--所以凡是调用了say_html()这个函数的地方,请求将不会再往后进行,返回个页面就结束咧
function say_html()
if Redirect then
ngx.header.content_type = "text/html"
ngx.status = ngx.HTTP_FORBIDDEN
ngx.say(html)
ngx.exit(ngx.status)
end
end
--判断uri白名单
function whiteurl()
if WhiteCheck then
--规则文件table中不为空再往下判断,规则为空就不判断了
if wturlrules ~=nil then
--遍历规则文件table,用正则和拿到的uri进行匹配,访问的uri在白名单中就返回true
for _,rule in pairs(wturlrules) do
if ngxmatch(ngx.var.uri,rule,"isjo") then
return true
end
end
end
end
return false
end
--文件后缀检查
function fileExtCheck(ext)
--拿到config.lua里面的文件后缀黑名单black_fileExt
local items = Set(black_fileExt)
--将该函数传过来的参数转成小写
ext=string.lower(ext)
--如果参数存在
if ext then
--遍历黑名单
for rule in pairs(items) do
--如果和传过来的参数匹配上了直接打日志并且直接调用say_html()请求结束,所以传过来的参数应该就是从请求中拿到的文件后缀
if ngx.re.match(ext,rule,"isjo") then
log('POST',ngx.var.request_uri,"-","file attack with ext "..ext)
say_html()
end
end
end
return false
end
--这里作者自定义了一个集合的结构
function Set (list)
local set = {}
for _, l in ipairs(list) do set[l] = true end
return set
end
--过滤url中的参数,因为调用的是ngx.req.get_uri_args()获取参数,所以只要是url上的参数不管是post还是get都会在这里校验
function args()
--遍历wafconf中的规则
for _,rule in pairs(argsrules) do
--获取参数
local args = ngx.req.get_uri_args()
for key, val in pairs(args) do
if type(val)=='table' then
local t={}
for k,v in pairs(val) do
if v == true then
v=""
end
table.insert(t,v)
end
data=table.concat(t, " ")
else
data=val
end
--参数校验,匹配上了直接打日志并且直接调用say_html()请求结束,为什么都执行say_html()了还要return true呢,后面我再waf.lua中补充
if data and type(data) ~= "boolean" and rule ~="" and ngxmatch(unescape(data),rule,"isjo") then
log('GET',ngx.var.request_uri,"-",rule)
say_html()
return true
end
end
end
return false
end
--这个函数和whiteurl()注意区别,whiteurl()是只要在白名单里面,后面的校验就一路绿灯,url()只要匹配上了规则的黑名单打日志并且直接调用say_html()请求结束
function url()
if UrlDeny then
for _,rule in pairs(urlrules) do
if rule ~="" and ngxmatch(ngx.var.request_uri,rule,"isjo") then
log('GET',ngx.var.request_uri,"-",rule)
say_html()
return true
end
end
end
return false
end
--和url()基本类似,只不过检查的是user-agent
function ua()
local ua = ngx.var.http_user_agent
if ua ~= nil then
for _,rule in pairs(uarules) do
if rule ~="" and ngxmatch(ua,rule,"isjo") then
log('UA',ngx.var.request_uri,"-",rule)
say_html()
return true
end
end
end
return false
end
--这里的逻辑和url()差不多,只不过用处是校验POST请求体的数据,函数的参数data就是从waf.lua中获取的POST请求体的参数
function body(data)
for _,rule in pairs(postrules) do
if rule ~="" and data~="" and ngxmatch(unescape(data),rule,"isjo") then
log('POST',ngx.var.request_uri,data,rule)
say_html()
return true
end
end
return false
end
--通url()
function cookie()
local ck = ngx.var.http_cookie
if CookieCheck and ck then
for _,rule in pairs(ckrules) do
if rule ~="" and ngxmatch(ck,rule,"isjo") then
log('Cookie',ngx.var.request_uri,"-",rule)
say_html()
return true
end
end
end
return false
end
--拦截CC攻击
function denycc()
--CC拦截开了往下进行
if CCDeny then
--拿到uri
local uri=ngx.var.uri
--config.lua中定义了CCrate="100/60",根据正则CCcount拿到的是/前面的100,CCseconds为60,其实就是限制60s内只能访问100次
CCcount=tonumber(string.match(CCrate,'(.*)/'))
CCseconds=tonumber(string.match(CCrate,'/(.*)'))
--定义个token方便记录,为客户端IP+uri的字符串拼接
local token = getClientIp()..uri
--拿到nginx.conf中lua_shared_dict limit 10m; 共享的内存区域,大小为10m
local limit = ngx.shared.limit
--把token当成客户端访问标识,这个标识对应一个访问的频率,每次访问先用访问频率和CCcount比较,超过我们的配置直接就跳出请求了,否则就把访问频率+1
local req,_=limit:get(token)
if req then
if req > CCcount then
ngx.exit(503)
return true
else
limit:incr(token,1)
end
else
limit:set(token,1,CCseconds)
end
end
return false
end
--获取HTTP请求的boundary,这个boundary我只在POST上传文件的时候见过,大家可以上传文件BP抓个包看看,所以这个大概率是防止上传webshell的
function get_boundary()
--先拿到content-type
local header = get_headers()["content-type"]
if not header then
return nil
end
if type(header) == "table" then
header = header[1]
end
--再拿到content-type里面boundary=后面的内容
local m = match(header, ";%s*boundary=\"([^\"]+)\"")
if m then
return m
end
return match(header, ";%s*boundary=([^\",;]+)")
end
--IP白名单,这里和whiteurl()类似,只要客户端IP在config.lua白名单里面,一路亮绿灯
function whiteip()
if next(ipWhitelist) ~= nil then
for _,ip in pairs(ipWhitelist) do
if getClientIp()==ip then
return true
end
end
end
return false
end
--IP黑名单,这只要客户端IP在config.lua黑名单里面,直接跳出请求
function blockip()
if next(ipBlocklist) ~= nil then
for _,ip in pairs(ipBlocklist) do
if getClientIp()==ip then
ngx.exit(403)
return true
end
end
end
return false
end
waf.lua
waf.lua的主要作用就是调用init.lua,但是waf这里判断的逻辑结构有必要说一下,waf用的是并列的if
--就以第一个if为例,如果whiteip()为true,按理来说会会执行then里面的内容,但是这里then跟的是空行,所以如果whiteip()为true执行的逻辑为:
if whiteip() then
--whiteip()为true应该执行这里,但这里是空行,神马都不执行,然后就会跳过下面的判断直接到end
elseif blockip() then
elseif denycc() then
elseif ngx.var.http_Acunetix_Aspect then
	ngx.exit(444)
elseif ngx.var.http_X_Scan_Memo then
	ngx.exit(444)
elseif whiteurl() then
elseif ua() then
elseif url() then
elseif args() then
elseif cookie() then
elseif PostCheck then

else
    return
--直接到这里哦
end
类似于这个判断,a为100,a>20成立,但是啥也没干,就算elseif( a > 30 )成立,也不会执行print("a > 30 "),因为在elseif( a > 20 )成立的那一刻就直接end了,最后只会执行print(“a 的值为 :”, a)
a = 100;

if( a < 20 ) then
elseif( a > 20 ) then
elseif( a > 30 ) then
	print("a > 30 ")
else
	return
end

print("a 的值为 :", a)
类比到waf.lua中,但凡返回true的导致这些if成立的,后面的都不用进行判断了,这里在二次开发中会有两个重点需要清晰
1.但凡后面我们自己加白名单的,你肯定是把用户传的参数和config.lua配置好的进行比较,如果相同就返回true,所以这里的白名单言外之意就是:你只要觉得他的某项操作是白名单内的,那么就短路了其他的if了,即不受waf的其他任何拦截控制了,例如:在config.lua中配置了ipWhitelist={“127.0.0.1”},你用127.0.0.1访问waf,whiteip()为true,执行then的空行也就是啥都不执行,下一行就到了waf.lua最末尾的end,所以在自己二开做白名单的时候一定要慎重!!
2.由于nginx访问是异步的,init.lua中有很多匹配上了黑名单,先调用say_html(),再调用return true,那是因为请求是异步的,一旦匹配上了我们的黑名单,后面的校验还有必要吗?没必要了吧,返回个true就行,但是还是要say_html()跳出请求的,也就是说跳出请求和后面的不必要执行的判断可以同时进行啊
--ngx.req.get_headers()返回table当前请求的所有请求头信息。拿到请求头content-length,GET中ngx.req.get_headers()['content-length']为nil
local content_length=tonumber(ngx.req.get_headers()['content-length'])
--拿到当前的请求方法
local method=ngx.req.get_method()
--定义正则,从这里可以看出,后面针对关键字的匹配大都用正则
local ngxmatch=ngx.re.match
--这里的每一个then后面啥都不执行
if whiteip() then
elseif blockip() then
elseif denycc() then
elseif ngx.var.http_Acunetix_Aspect then
	ngx.exit(444)
elseif ngx.var.http_X_Scan_Memo then
	ngx.exit(444)
elseif whiteurl() then
elseif ua() then
elseif url() then
elseif args() then
elseif cookie() then
--从这里开始是针对POST独有的待遇,如果config.lua开启了PostCheck再检查,否则倒数第二行+倒数第三行直接return
elseif PostCheck then
--由于1.0作者这里的if缩格问题,不方便看,我用2.0版本的代码
--请求方法是POST再往下接进行
    if method=="POST" then
--通过init.lua拿到请求的boundary
        local boundary = get_boundary()
--如果boundary存在再往下进行,在init.lua中说到,boundary是为了检测webshell的,所以如果boundary存在,下一步就是检测POST请求体内容
--如果boundary不存在,注意找到和这个if对应的else
--这里主要是拿到POST请求体内容
        if boundary then
            local len = string.len
            local sock, err = ngx.req.socket()
            if not sock then
                return
            end
            ngx.req.init_body(128 * 1024)
            sock:settimeout(0)
            local content_length = nil
            content_length=tonumber(ngx.req.get_headers()['content-length'])
            local content_type = nil
            content_type = ngx.req.get_headers()['content-type']
            local chunk_size = 4096
            if content_length < chunk_size then
                chunk_size = content_length
            end
            local size = 0
            while size < content_length do
                local data, err, partial = sock:receive(chunk_size)
                local data = data or partial
                if not data then
                    return
                end
--将POST请求体内容放到nginx的body中
                ngx.req.append_body(data)
--文件的内容校验,调用的是init.lua中的body(),所以body()这个函数不仅承担着POST请求体参数的校验,还有POST文件上传内容的校验
--也就是说,postrules里面还要完善webshell的常见函数
                if body(data) then
                    return true
                end
                size = size + len(data)
--这里开始,拿到单文件上传和多文件上传的文件名后缀做检查
                --local m = ngxmatch(data,[[Content-Disposition: form-data;(.+)filename="(.+)\\.(.*)"]],'ijo')
                --单文件上传
                --local _,flname,lname = string.match(data,[[Content%-Disposition: form%-data;(.-)filename="([^\"]+)%.([^\"]-)".*]])
                --多文件上传i
                for  _,flname,lname in string.gmatch(data,[[Content%-Disposition: form%-data;(.-)filename="([^\"]+)%.([^\"]-)"]],'ijo') do
                    --文件后缀检查
                    if lname then
                        local fn = 'UploadFile: '..tostring(flname)..'.'..tostring(lname)
                        fileExtCheck(lname,fn,'content-type: '..content_type)
                        filetranslate = true
                    end
                end
                if ngxmatch(data,"Content%-Disposition:",'isjo') then
                    filetranslate = false
                end
                --文件内容检查
                if filetranslate==false then
                    if body(data) then
                        return true
                    end
                end
                local less = content_length - size
                if less < chunk_size then
                	chunk_size = less
                end
    	    end
    	    ngx.req.finish_body()
--如果boundary不存在,这里是对POST请求体参数校验
        else
            ngx.req.read_body()
--拿到参数
            local args = ngx.req.get_post_args()
            if not args then
                return
            end
--遍历参数
            for key, val in pairs(args) do
                if type(val) == "table" then
                    if type(val[1]) == "boolean" then
                        return
                    end
                    data=table.concat(val, ", ")
                else
                    data=val
                end
--调用init.lua对参数进行校验
--这里有个问题,2.0的作者也没注意,我们后面再说
                if data and type(data) ~= "boolean" and body(data) then
                    --文件内容检查
                    body(key)
                end
            end
        end
    end
else
    return
end
wafconf
args:URL上的参数校验
cookie:Cookie内容校验
post:POST请求体校验,也就是参数+文件内容
url:URI校验
user-agent:UA校验
whiteurl:亮绿灯的URI
args规则,其他的规则同理
#\为转义,匹配../,例如http://x/?id=../
\.\./
#应该是过滤js中的特殊符号,匹配:$,例如http://x/?id=123:$123
\:\$
#应该是过滤js中的特殊符号,匹配${,例如http://x/?id=123${123}
\$\{
#SQL注入部分,.+任意字符一次或多次,匹配select11from或者select9limit
select.+(from|limit)
#匹配union select,例如http://x/?id=union+select+username
(?:(union(.*?)select))
#匹配having或者rongjitest,例如http://x/?id=having
having|rongjitest
#匹配sleep( 2 )
sleep\((\s*)(\d*)(\s*)\)
#匹配benchmark(3000, (select database()))
benchmark\((.*)\,(.*)\)
#base64_decode(...)
base64_decode\(
#匹配select...from information_schema where...
(?:from\W+information_schema\W)
#匹配current_use(等函数
(?:(?:current_)user|database|schema|connection_id)\s*\(
#匹配etc/../../passwd
(?:etc\/\W*passwd)
#匹配select '<?php ... ?>' into outfile 'C:/windows...'
into(\s+)+(?:dump|out)file\s*
#匹配select ... group by username(
group\s+by.+\(
#匹配structs漏洞的xwork.MethodAccessor
xwork.MethodAccessor
#匹配php马中的各种文件包含
(?:define|eval|file_get_contents|include|require|require_once|shell_exec|phpinfo|system|passthru|preg_\w+|execute|echo|print|print_r|var_dump|(fp)open|alert|showmodaldialog)\(
#匹配structs漏洞的xwork.MethodAccessor
xwork\.MethodAccessor
#匹配SSRF中的各种伪协议以及其他常见不该出现在参数中的协议
(gopher|doc|php|glob|file|phar|zlib|ftp|ldap|dict|ogg|data)\:\/
#匹配java.lang
java\.lang
#匹配php马中的各种函数
\$_(GET|post|cookie|files|session|env|phplib|GLOBALS|SERVER)\[
#匹配一些js中的标签
\<(iframe|script|body|img|layer|div|meta|style|base|object|input)
#匹配XSS中的一些函数
(onmouseover|onerror|onload)\=
总结与构想
源码中,作者定义的策略要么是在白名单(IP、URI)中,直接return true,后面不用再检测,要么是在黑名单,say_html()后return true,不往后进行
如果我们想做一个方法的白名单,只允许GET/POST/OPTIONS方法,客户端请求的方法只允许这三个,但是又要进行后面的参数、cookie等校验,你不能因为设置了方法白名单后,客户端发来一个GET请求,就不做后面的校验吧?
waf1.0部署
https://github.com/loveshell/ngx_lua_waf
从源码可以看到,其实我们只要把openresty搭建起来,然后把waf的代码config.lua、init.lua、waf.lua以及waf的配置wafconf引入openresty即可
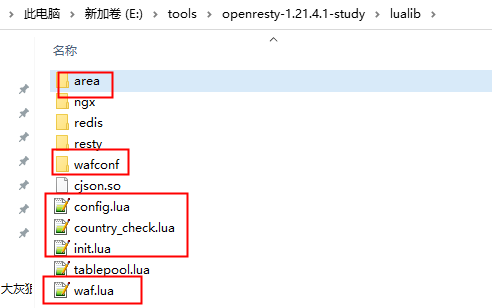
安装好openresty后,我们把config.lua、init.lua、waf.lua和wafconfig直接放到openresty目录下的lualib中,其实放哪里都行,只是lualib方便一丢丢而已
记住比较关键的一点就是:引入这些配置或者目录的时候,如果是windows中,写相对路径,如果是linux中,写绝对路径
我的是windows环境就写相对路径了
熟悉了源码以后,需要改的就是两个地方,nginx.conf引入这些,config.lua引入wafconf
我的openresty安装在E:/tools/openresty-1.21.4.1-study/
nginx.conf
nginx.conf中的http块里面加就好了(如果是linux这里面写绝对路径就行)
    lua_package_path "lualib/?.lua";
    lua_shared_dict limit 10m;
    init_by_lua_file lualib/init.lua;
    access_by_lua_file lualib/waf.lua;
配置全文
worker_processes  1;

error_log  logs/error.log;
pid        logs/nginx.pid;

events {
    worker_connections  1024;
}

http {
    include       mime.types;
    default_type  application/octet-stream;

    sendfile        on;
    keepalive_timeout  65;

    lua_package_path "lualib/?.lua";
    lua_shared_dict limit 10m;
    init_by_lua_file lualib/init.lua;
    access_by_lua_file lualib/waf.lua;

	server_tokens off;
    autoindex off;

	server {
	   listen    80;
	   server_name  192.168.2.99;

	    location /ngx_http_variables {
			content_by_lua_block {
				ngx.say("ngx.var.request_method : ", ngx.var.request_method)
				ngx.say("ngx.var.request_uri : ", ngx.var.request_uri)
				ngx.say("ngx.var.document_uri : ", ngx.var.document_uri)
				ngx.say("ngx.var.scheme : ", ngx.var.scheme)
				ngx.say("ngx.var.server_addr : ", ngx.var.server_addr)
				ngx.say("ngx.var.server_name : ", ngx.var.server_name)
				ngx.say("ngx.var.server_port : ", ngx.var.server_port)
				ngx.say("ngx.var.server_protocol : ", ngx.var.server_protocol)
				ngx.say("")

				ngx.say("ngx.var.request : ", ngx.var.request)
				ngx.say("ngx.var.request_filename : ", ngx.var.request_filename)
				ngx.say("ngx.var.request_body : ", ngx.var.request_body)
				ngx.say("ngx.var.request_body_file : ", ngx.var.request_body_file)
				ngx.say("ngx.var.request_completion : ", ngx.var.request_completion)
				ngx.say("")

				ngx.say("ngx.var.args : ", ngx.var.args)
				ngx.say("ngx.var.query_string : ", ngx.var.query_string)
				ngx.say("ngx.var.uri : ", ngx.var.uri)
				ngx.say("ngx.var.content_length : ", ngx.var.content_length)
				ngx.say("ngx.var.content_type : ", ngx.var.content_type)
				ngx.say("ngx.var.document_root : ", ngx.var.document_root)
				ngx.say("ngx.var.host : ", ngx.var.host)
				ngx.say("ngx.var.http_cookie : ", ngx.var.http_cookie)
				ngx.say("ngx.var.http_post : ", ngx.var.http_post)
				ngx.say("ngx.var.http_referer : ", ngx.var.http_referer)
				ngx.say("ngx.var.http_user_agent : ", ngx.var.http_user_agent)
				ngx.say("")

				ngx.say("ngx.var.body_bytes_sent : ", ngx.var.body_bytes_sent)
				ngx.say("ngx.var.binary_remote_addr : ", ngx.var.binary_remote_addr)
				ngx.say("ngx.var.http_x_forwarded_for : ", ngx.var.http_x_forwarded_for)
				ngx.say("ngx.var.limit_rate : ", ngx.var.limit_rate)
				ngx.say("ngx.var.nginx_version : ", ngx.var.nginx_version)
				ngx.say("ngx.var.pid : ", ngx.var.pid)
				ngx.say("ngx.var.hostname : ", ngx.var.hostname)
				ngx.say("ngx.var.http_via : ", ngx.var.http_via)
				ngx.say("")

				ngx.say("ngx.var.remote_addr : ", ngx.var.remote_addr)
				ngx.say("ngx.var.remote_port : ", ngx.var.remote_port)
				ngx.say("ngx.var.remote_user : ", ngx.var.remote_user)
				ngx.say("")

				ngx.say("ngx.var.sent_http_cache_control : ", ngx.var.sent_http_cache_control)
				ngx.say("ngx.var.sent_http_connection : ", ngx.var.sent_http_connection)
				ngx.say("ngx.var.sent_http_content_length : ", ngx.var.sent_http_content_length)
				ngx.say("ngx.var.sent_http_content_type : ", ngx.var.sent_http_content_type)
				ngx.say("ngx.var.sent_http_keep_alive : ", ngx.var.sent_http_keep_alive)
				ngx.say("ngx.var.sent_http_last_modified : ", ngx.var.sent_http_last_modified)
				ngx.say("ngx.var.sent_http_location : ", ngx.var.sent_http_location)
				ngx.say("ngx.var.sent_http_transfer_encoding : ", ngx.var.sent_http_transfer_encoding)
			}
	    }
		location /openresty_api_exit {
			content_by_lua_block {
				ngx.exit(404)
			}
	    }
		location /openresty_api_ngx_status {
			content_by_lua_block {
				ngx.status = ngx.HTTP_GONE
				ngx.say(ngx.status)
			}
	    }
	   	location /openresty_api_get {
			content_by_lua_block {
				ngx.say("ngx.unescape_uri(b%20r56+7) : ", ngx.unescape_uri("b%20r56+7"))
				ngx.say("ngx.today() : ", ngx.today())

				ngx.say("")
				local headers = ngx.req.get_headers()
				ngx.say("******ngx.req.get_headers()******")
				ngx.say("type(headers) : ", type(headers))
				for key, val in pairs(headers) do
					ngx.say(key, " : ", val)
				end

				ngx.say("")
				ngx.say("******ngx.req.get_uri_args()******")
				local uri_args = ngx.req.get_uri_args()
				ngx.say("type(uri_args) : ", type(uri_args))
				for key, val in pairs(uri_args) do
					ngx.say("type(key) : ", type(key))
					ngx.say("type(val) : ", type(val))
					ngx.say("key : ", key)
					ngx.say("val : ", val)
				end

				ngx.say("")
				ngx.say("******ngx.req.get_post_args()******")
				ngx.req.read_body()
				local post_args, err = ngx.req.get_post_args()
				if not args then
					ngx.say("failed to get post args: ", err)
					return
				end
				ngx.say("type(post_args) : ", type(post_args))
				for key, val in pairs(post_args) do
					ngx.say("type(key) : ", type(key))
					ngx.say("type(val) : ", type(val))
					if type(val) == "table" then
						ngx.say("key : ", key)
						--ngx.say("val : ", table.concat(val, ", "))
						ngx.say("val : ", val)
					else
						ngx.say("key : ", key)
						ngx.say("val : ", val)
					end
				end
			}
	    }
	}
}
| 配置项 | 作用 |
|---|---|
| lua_package_path | lua包的目录 |
| lua_shared_dict | 多进程共享空间 |
| init_by_lua_file | 当 nginx master 进程在加载 nginx 配置文件时运行指定的 lua 脚本,通常用来注册 lua 的全局变量或在服务器启动时预加载 lua 模块。即nginx每次启动的时候执行的lua脚本,每次启动执行一下init.lua |
| access_by_lua_file | nginx每次访问的时候执行的lua脚本,每次访问的时候都会执行waf.lua |
config.lua
这里主要是引入wafconf,所以windows中直接配成wafconf的绝对路径就行
还有就是waf的日志,也就是所有碰上waf策略的日志都会记录在一个地方,attacklog为on开启的话,我们就要配好这个路径,一般就配nginx的默认日志下就行,记得手动创建一下这个hack目录,并且注意一下权限
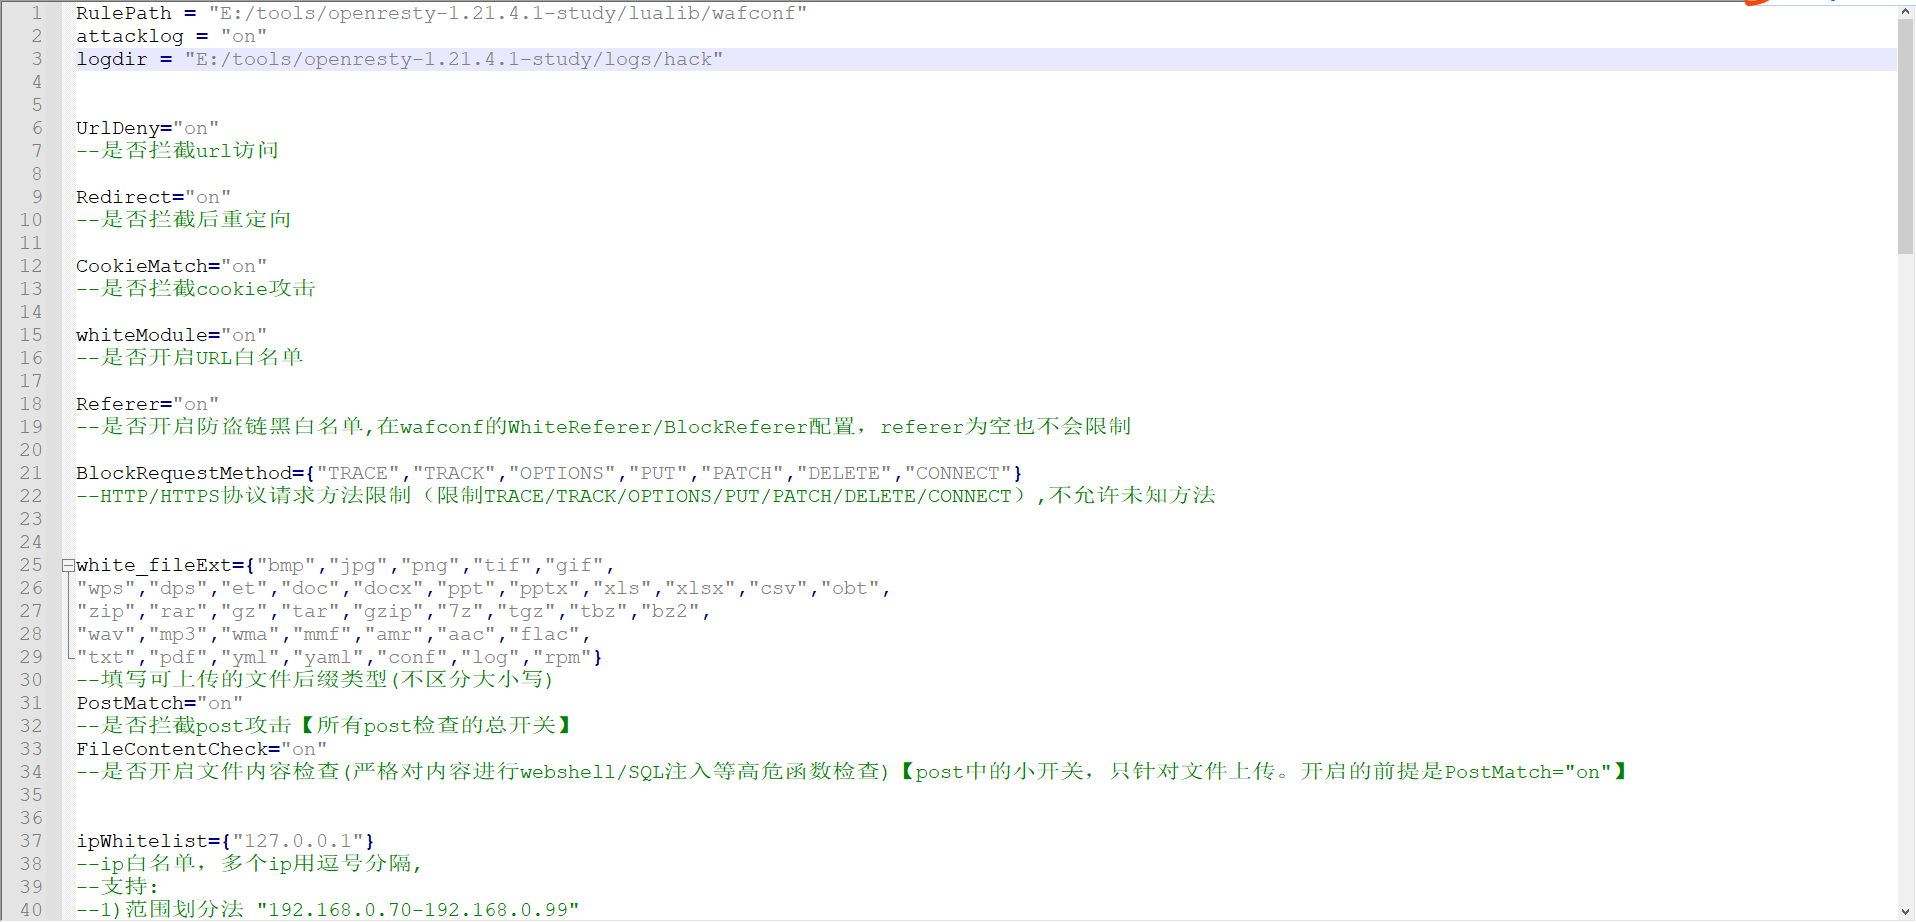
RulePath = "E:/tools/openresty-1.21.4.1-study/lualib/wafconf"
attacklog = "on"
logdir = "E:/tools/openresty-1.21.4.1-study/logs/hack"
验证
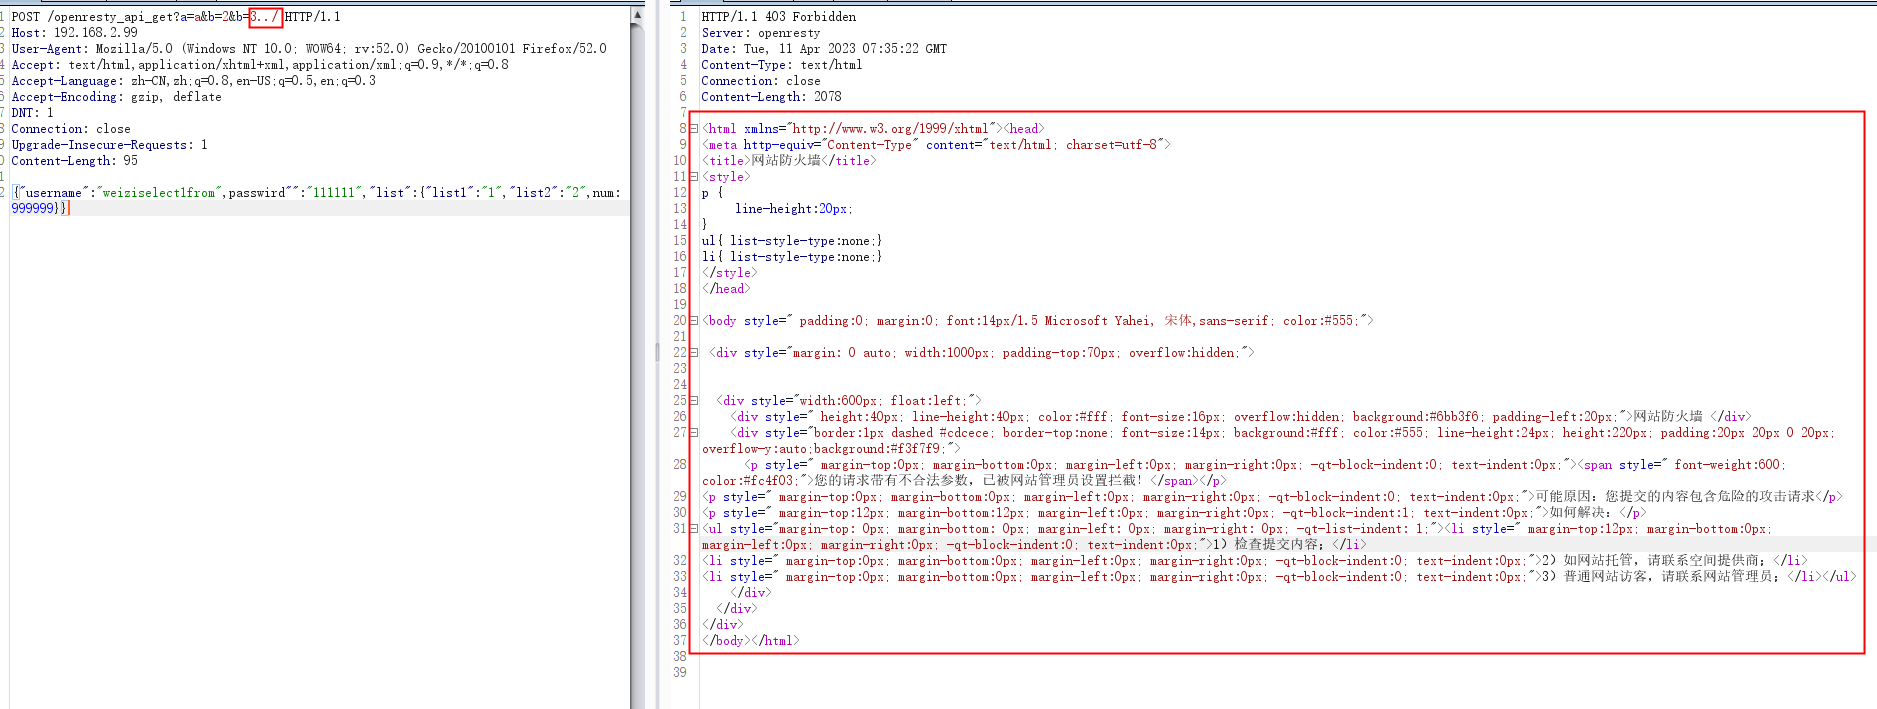
前面我们也分析了args规则,规则第一条,只要url中的参数里面有…/就会拦截
waf2.0部署
https://github.com/heartshare/ngx_lua_waf-2
部署方式和1.0基本大差不差,作者完善并加入了几个lua文件,引入了一些新功能
注意一点就行,作者加入了IP地理位置识别,安装lua 库依赖 libmaxminddb 实现对 mmdb 的高效访问 (使用yum安装的,版本较低。yum install libmaxminddb-devel -y),不安装好像也能运行,看意思是效率会低点,我们在测试环境就不装了
windows安装libmaxminddb
https://github.com/maxmind/libmaxminddb#using-cmake
linux安装libmaxminddb
wget https://github.com/maxmind/libmaxminddb/releases/download/1.4.2/libmaxminddb-1.4.2.tar.gz
tar -zxvf libmaxminddb-1.4.2.tar.gz
cd libmaxminddb-1.4.2
./configure
make
make check
sudo make install
echo /usr/local/lib  >> /etc/ld.so.conf.d/local.conf
sudo ldconfig
还是老样子,把作者git上的area文件夹、wafconf文件夹、几个lua文件(waf.lua、init.lua、config.lua以及新加的contry_check.lua)通通放到lualib下,同时也要确保lualib下有cjson.so,一般新版本的openresty都自带的吧
nginx.conf
nginx.conf中的http块里面加就好了(如果是linux这里面写绝对路径就行)
	lua_package_path  "lualib/?.lua;;";
	lua_package_cpath  "lualib/?.so;;";
	lua_shared_dict urllimit 10m;
	lua_shared_dict iplimit 10m;
	init_by_lua_file   lualib/init.lua;
	access_by_lua_file lualib/waf.lua;
配置全文,跟1.0差不多
worker_processes  1;

error_log  logs/error.log;
pid        logs/nginx.pid;

events {
    worker_connections  1024;
}

http {
    include       mime.types;
    default_type  application/octet-stream;

    sendfile        on;
    keepalive_timeout  65;

	lua_package_path  "lualib/?.lua;;";
	lua_package_cpath  "lualib/?.so;;";
	lua_shared_dict urllimit 10m;
	lua_shared_dict iplimit 10m;
	init_by_lua_file   lualib/init.lua;
	access_by_lua_file lualib/waf.lua;

	server_tokens off;
    autoindex off;

	server {
	   listen    80;
	   server_name  192.168.2.99;

	    location /ngx_http_variables {
			content_by_lua_block {
				ngx.say("ngx.var.request_method : ", ngx.var.request_method)
				ngx.say("ngx.var.request_uri : ", ngx.var.request_uri)
				ngx.say("ngx.var.document_uri : ", ngx.var.document_uri)
				ngx.say("ngx.var.scheme : ", ngx.var.scheme)
				ngx.say("ngx.var.server_addr : ", ngx.var.server_addr)
				ngx.say("ngx.var.server_name : ", ngx.var.server_name)
				ngx.say("ngx.var.server_port : ", ngx.var.server_port)
				ngx.say("ngx.var.server_protocol : ", ngx.var.server_protocol)
				ngx.say("")

				ngx.say("ngx.var.request : ", ngx.var.request)
				ngx.say("ngx.var.request_filename : ", ngx.var.request_filename)
				ngx.say("ngx.var.request_body : ", ngx.var.request_body)
				ngx.say("ngx.var.request_body_file : ", ngx.var.request_body_file)
				ngx.say("ngx.var.request_completion : ", ngx.var.request_completion)
				ngx.say("")

				ngx.say("ngx.var.args : ", ngx.var.args)
				ngx.say("ngx.var.query_string : ", ngx.var.query_string)
				ngx.say("ngx.var.uri : ", ngx.var.uri)
				ngx.say("ngx.var.content_length : ", ngx.var.content_length)
				ngx.say("ngx.var.content_type : ", ngx.var.content_type)
				ngx.say("ngx.var.document_root : ", ngx.var.document_root)
				ngx.say("ngx.var.host : ", ngx.var.host)
				ngx.say("ngx.var.http_cookie : ", ngx.var.http_cookie)
				ngx.say("ngx.var.http_post : ", ngx.var.http_post)
				ngx.say("ngx.var.http_referer : ", ngx.var.http_referer)
				ngx.say("ngx.var.http_user_agent : ", ngx.var.http_user_agent)
				ngx.say("")

				ngx.say("ngx.var.body_bytes_sent : ", ngx.var.body_bytes_sent)
				ngx.say("ngx.var.binary_remote_addr : ", ngx.var.binary_remote_addr)
				ngx.say("ngx.var.http_x_forwarded_for : ", ngx.var.http_x_forwarded_for)
				ngx.say("ngx.var.limit_rate : ", ngx.var.limit_rate)
				ngx.say("ngx.var.nginx_version : ", ngx.var.nginx_version)
				ngx.say("ngx.var.pid : ", ngx.var.pid)
				ngx.say("ngx.var.hostname : ", ngx.var.hostname)
				ngx.say("ngx.var.http_via : ", ngx.var.http_via)
				ngx.say("")

				ngx.say("ngx.var.remote_addr : ", ngx.var.remote_addr)
				ngx.say("ngx.var.remote_port : ", ngx.var.remote_port)
				ngx.say("ngx.var.remote_user : ", ngx.var.remote_user)
				ngx.say("")

				ngx.say("ngx.var.sent_http_cache_control : ", ngx.var.sent_http_cache_control)
				ngx.say("ngx.var.sent_http_connection : ", ngx.var.sent_http_connection)
				ngx.say("ngx.var.sent_http_content_length : ", ngx.var.sent_http_content_length)
				ngx.say("ngx.var.sent_http_content_type : ", ngx.var.sent_http_content_type)
				ngx.say("ngx.var.sent_http_keep_alive : ", ngx.var.sent_http_keep_alive)
				ngx.say("ngx.var.sent_http_last_modified : ", ngx.var.sent_http_last_modified)
				ngx.say("ngx.var.sent_http_location : ", ngx.var.sent_http_location)
				ngx.say("ngx.var.sent_http_transfer_encoding : ", ngx.var.sent_http_transfer_encoding)
			}
	    }
		location /openresty_api_exit {
			content_by_lua_block {
				ngx.exit(404)
			}
	    }
		location /openresty_api_ngx_status {
			content_by_lua_block {
				ngx.status = ngx.HTTP_GONE
				ngx.say(ngx.status)
			}
	    }
	   	location /openresty_api_get {
			content_by_lua_block {
				ngx.say("ngx.unescape_uri(b%20r56+7) : ", ngx.unescape_uri("b%20r56+7"))
				ngx.say("ngx.today() : ", ngx.today())

				ngx.say("")
				local headers = ngx.req.get_headers()
				ngx.say("******ngx.req.get_headers()******")
				ngx.say("type(headers) : ", type(headers))
				for key, val in pairs(headers) do
					ngx.say(key, " : ", val)
				end

				ngx.say("")
				ngx.say("******ngx.req.get_uri_args()******")
				local uri_args = ngx.req.get_uri_args()
				ngx.say("type(uri_args) : ", type(uri_args))
				for key, val in pairs(uri_args) do
					ngx.say("type(key) : ", type(key))
					ngx.say("type(val) : ", type(val))
					ngx.say("key : ", key)
					ngx.say("val : ", val)
				end

				ngx.say("")
				ngx.say("******ngx.req.get_post_args()******")
				ngx.req.read_body()
				local post_args, err = ngx.req.get_post_args()
				if not args then
					ngx.say("failed to get post args: ", err)
					return
				end
				ngx.say("type(post_args) : ", type(post_args))
				for key, val in pairs(post_args) do
					ngx.say("type(key) : ", type(key))
					ngx.say("type(val) : ", type(val))
					if type(val) == "table" then
						ngx.say("key : ", key)
						--ngx.say("val : ", table.concat(val, ", "))
						ngx.say("val : ", val)
					else
						ngx.say("key : ", key)
						ngx.say("val : ", val)
					end
				end
			}
	    }
	}
}
config.lua
RulePath = "E:/tools/openresty-1.21.4.1-study/lualib/wafconf"
attacklog = "on"
logdir = "E:/tools/openresty-1.21.4.1-study/logs/hack"
补充
然后自然我们可以进行访问,但是报了500的错误
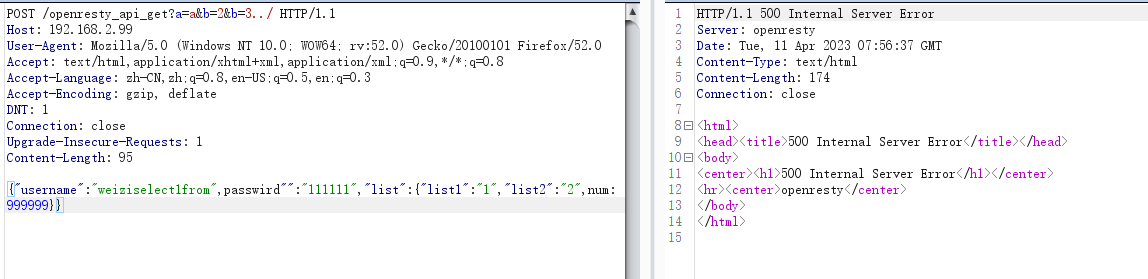
没关系,500是服务器的错误,我们查nginx的error日志就行,可以看到waf.lua的第四行Block_RequestMethod为nil

看了下waf.lua源码,作者在第四行和第七行的Block_RequestMethod()函数和RefererLimit()函数,在其他的*.lua里面都没有,可能是作者忘记拷贝过来了
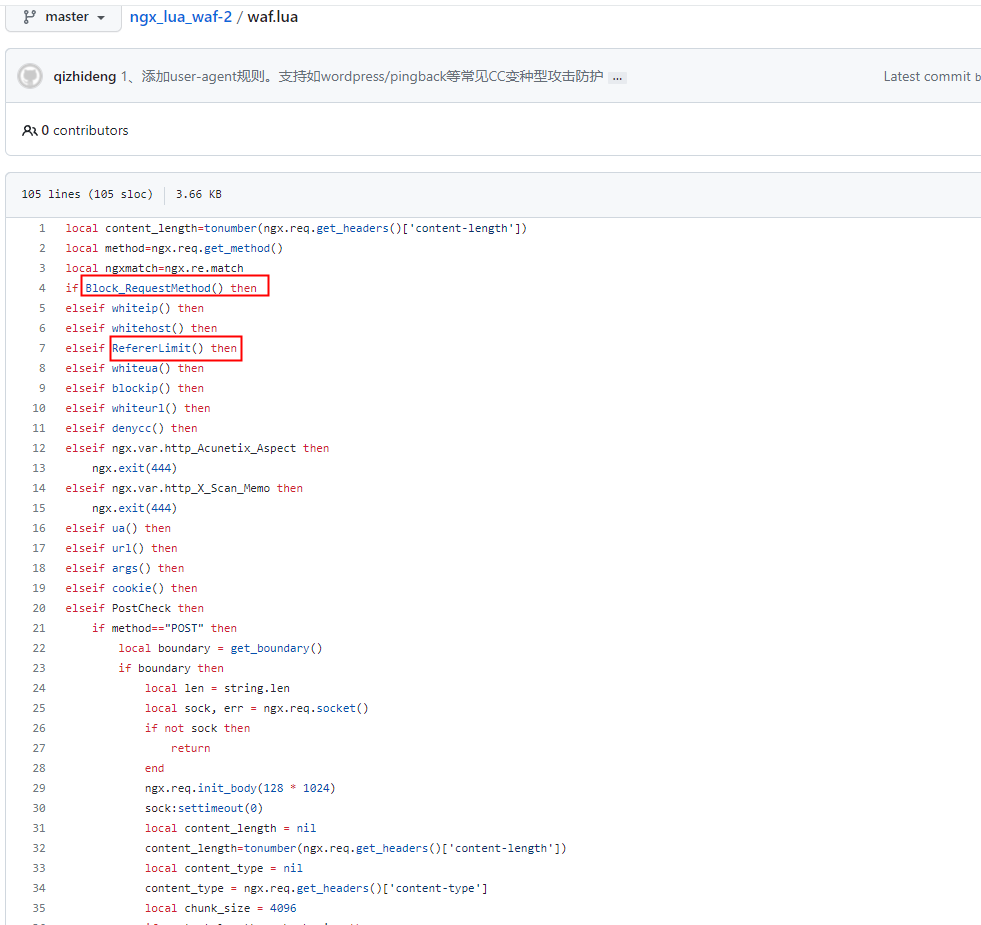
没关系,看函数名是请求方法的黑名单和请求的referer限制,其实没这两个功能也不影响我们使用这一版的waf,我们打开lualib下的waf.lua,把这两行注释掉不就好了,已经有了前面那么多知识的积累,说不定大家现在趁我打字的时间久把这俩功能写完了,我们不多说先注释掉
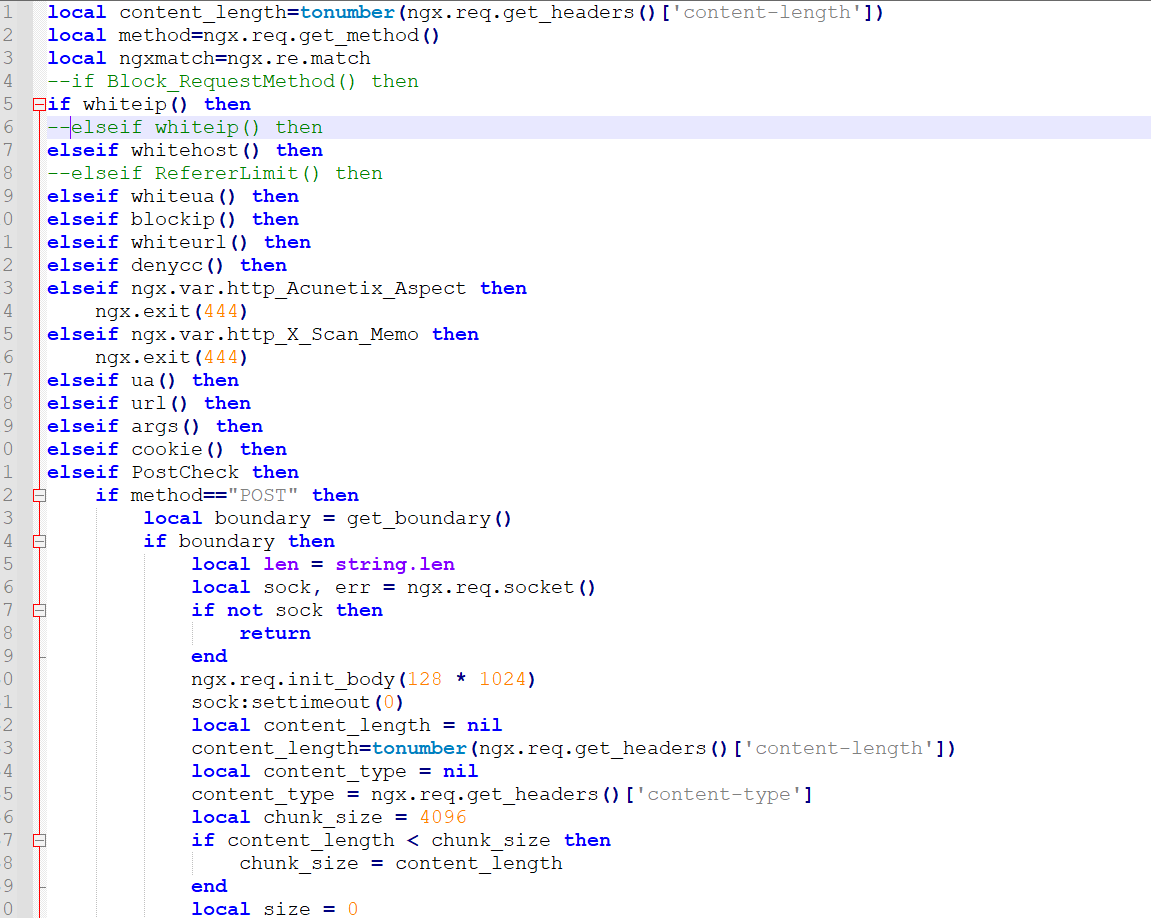
重载nginx配置,就能正常运行了
优化
无法拦截JSON格式的POST请求
众所知周,在传统uri或者POST请求体中的key1=value&key1=value中waf是可以拦截的
我发现,如果是JSON格式的POST请求,waf不会拦截,这个问题2.0的作者好像也没有修复,因为现在时代,JSON格式的POST请求也很多,所以我们要考虑到这一点,但是之前的waf.lua我们有印象把参数体都做了校验,为什么这里会没有检测到呢?
仔细看响应,当请求是JSON格式,没有=value这种特时,ngx.req.get_post_args()只有一对键值对,key是string类型整个JSON的请求内容,value是boolean类型的true
我们回到waf.lua源码
当我们输入参数{"username":"select1from",passwird"":"111111","list":{"list1":"1","list2":"2",num:999999}}后
81行,args为一个table,里面只有一个元素,key是string类型的{"username":"select1from",passwird"":"111111","list":{"list1":"1","list2":"2",num:999999}},值value是boolean类型的true
85行,遍历这个table,拿到key和val,由于val的类型是boolean,所以不会进入86行的if,会进入91行的else,令data的值为true
94行,三个条件,第一个条件data为true没问题,第二个条件data的类型不为boolean,问题就出在这里了,我们现在要检查的是key,但是如果我们提交了JSON,这个if的条件永远也不满足,永远也不会走到96行用body()函数去校验key,所以JSON数据畅通无阻
关键点就在第94行,当我们传入,在85行会遍历args
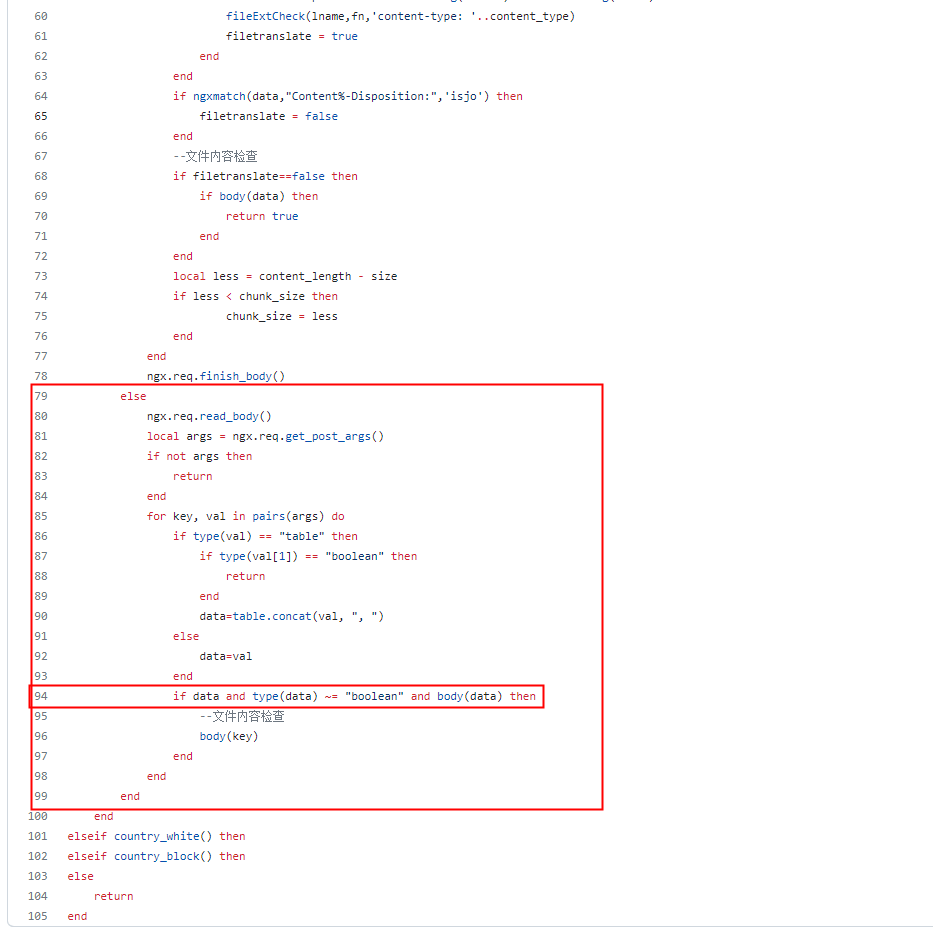
怎么做呢,只要但凡让86行到99行之间任意一个地方插入body(key),让key被校验一次不就好了,我们这里尊重原作者逻辑,我们在最后加一个校验,使其不论如何都要对key检查不就完了,其实这个检验逻辑还可以继续优化,我们根本没必要遍历args,直接整个POST请求体进行body()的校验不也可以吗
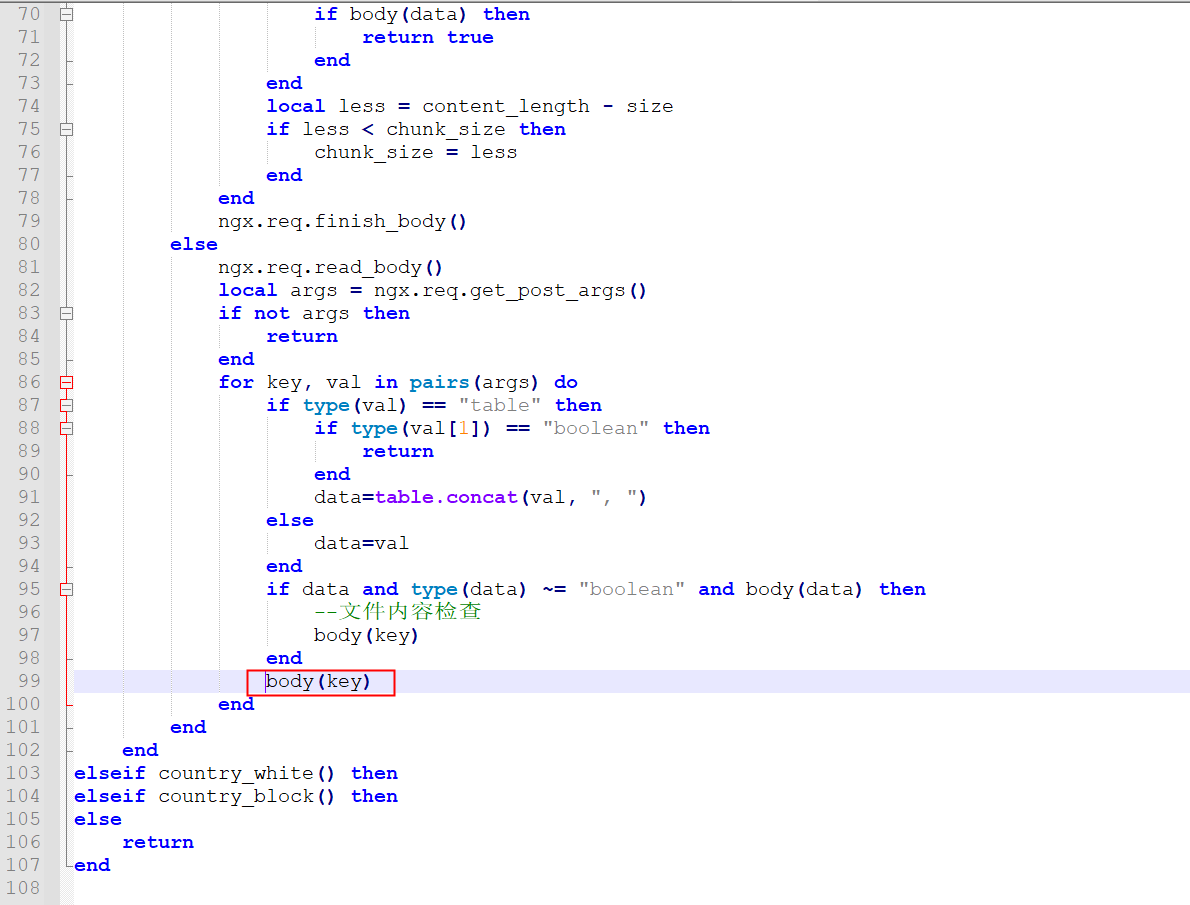
修改完后,JSON不能为所欲为了
POST /openresty_api_cjson HTTP/1.1
Host: 192.168.2.99
User-Agent: Mozilla/5.0 (Windows NT 10.0; WOW64; rv:52.0) Gecko/20100101 Firefox/52.0
Accept: text/html,application/xhtml+xml,application/xml;q=0.9,*/*;q=0.8
Accept-Language: zh-CN,zh;q=0.8,en-US;q=0.5,en;q=0.3
Accept-Encoding: gzip, deflate
DNT: 1
Connection: close
Upgrade-Insecure-Requests: 1
Content-Type: application/x-www-form-urlencoded
Content-Length: 391

{"username":"select1from",passwird"":"111111","list":{"list1":"1","list2":"2",num:999999}}
lua递归解析json数据
function printJson(jsonTable)
    for k, v in pairs(jsonTable) do
        if(type(v) == "table") then

            printJson(v)
        else
            print(k..":"..v)
        end
    end
end

local args = '{"username":"select1from",passwird"":"111111","list":{"list1":"1","list2":"2",num:999999}}'
local cjson = require("cjson");

-- 将body  json格式内容转为json格式   注意:转成json后,为table类型
local json = cjson.decode(args);

-- 通过递归,完成多层级tableJson的打印
printJson(json)
nginx.conf
	   	location /openresty_api_get {
			content_by_lua_block {
				function printJson(jsonTable)
					for k, v in pairs(jsonTable) do
						if(type(v) == "table") then

							printJson(v)
						else
							ngx.say(k..":"..v)
						end
					end
				end

				ngx.say("******ngx.req.get_post_args()【json】******")
				ngx.req.read_body()
				local args = ngx.req.get_body_data()
				local cjson = require("cjson");

				-- 将body  json格式内容转为json格式   注意:转成json后,为table类型
				local json = cjson.decode(args);

				--  打印  json的key,value
				printJson(json)
				ngx.say(type(json))
			}
二次开发之请求方法限制
方法黑名单
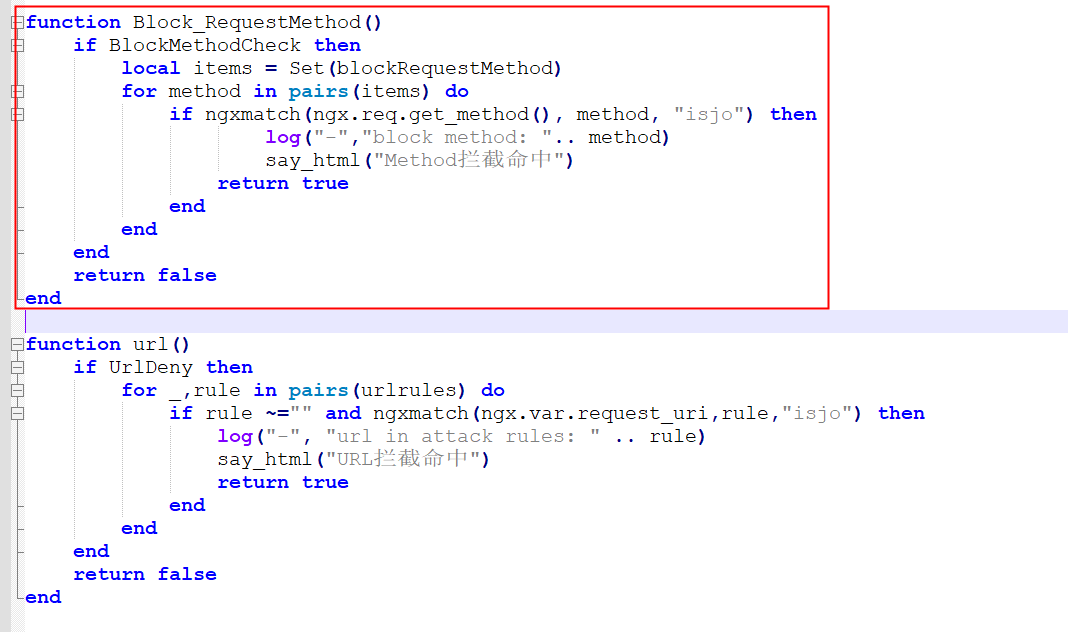
之前我们在部署waf2.0的时候,一上来就发现Block_RequestMethod为空,那到了现在这个程度,我们是不是自己就能完善这个函数了?
打开init.lua,模仿url()函数,写一个Block_RequestMethod(),并且添加开关
function Block_RequestMethod()
	if BlockMethodCheck then
	    local items = Set(blockRequestMethod)
	    for method in pairs(items) do
	    	if ngxmatch(ngx.req.get_method(), method, "isjo") then
                    log("-","block method: ".. method)
					say_html("Method拦截命中")
	            return true
	    	end
	    end
	end
	return false
end
不要忘了这个
BlockMethodCheck = optionIsOn(blockMethodModule)
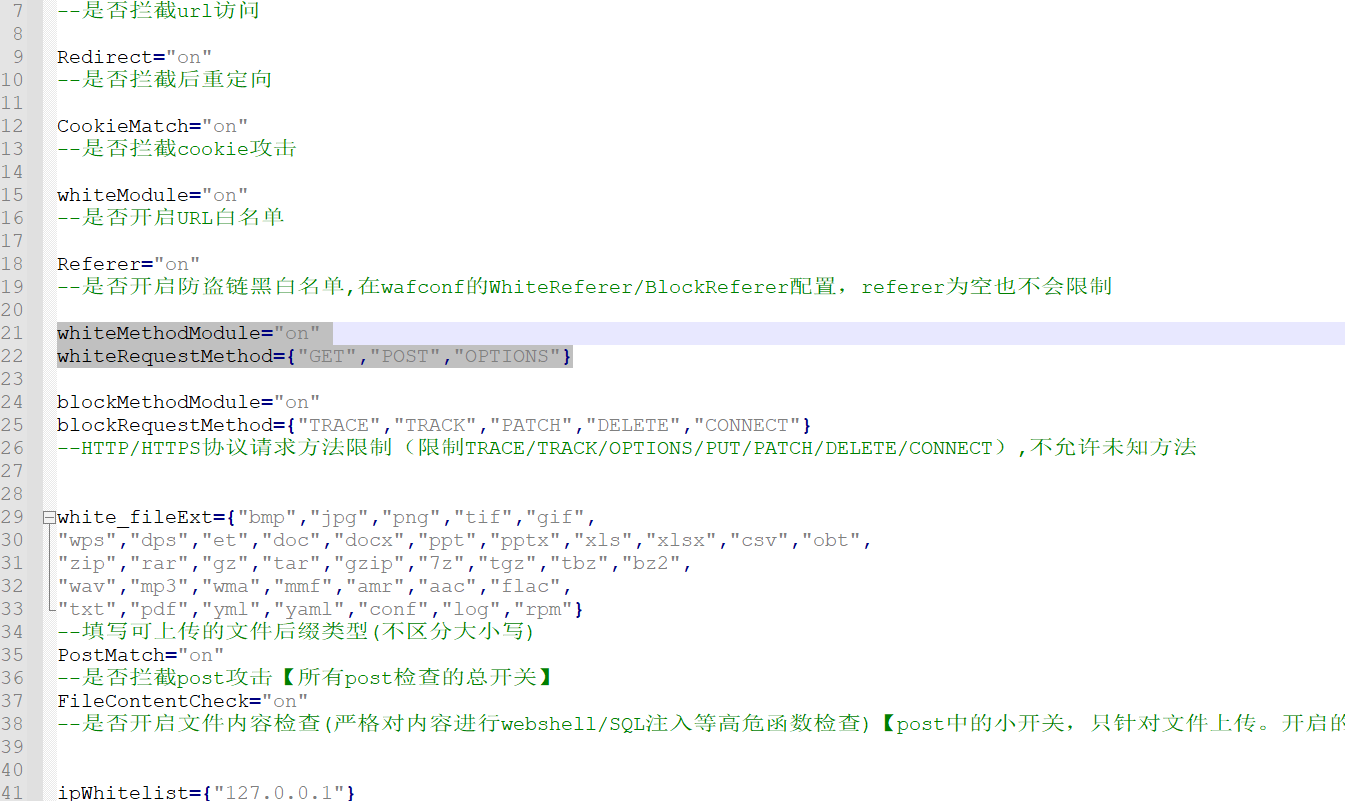
当然模仿要模仿到底,config.lua里面我们也改一下原作者的配置
blockMethodModule="on"
blockRequestMethod={"TRACE","TRACK","PATCH","DELETE","CONNECT"}

最后一步也是最重要的,在waf.lua中调用
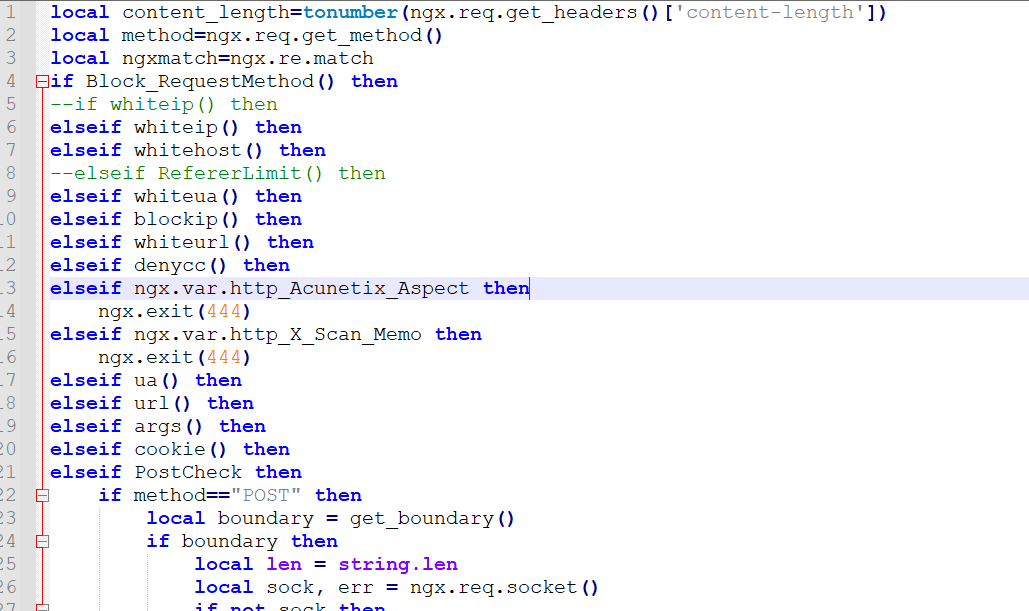
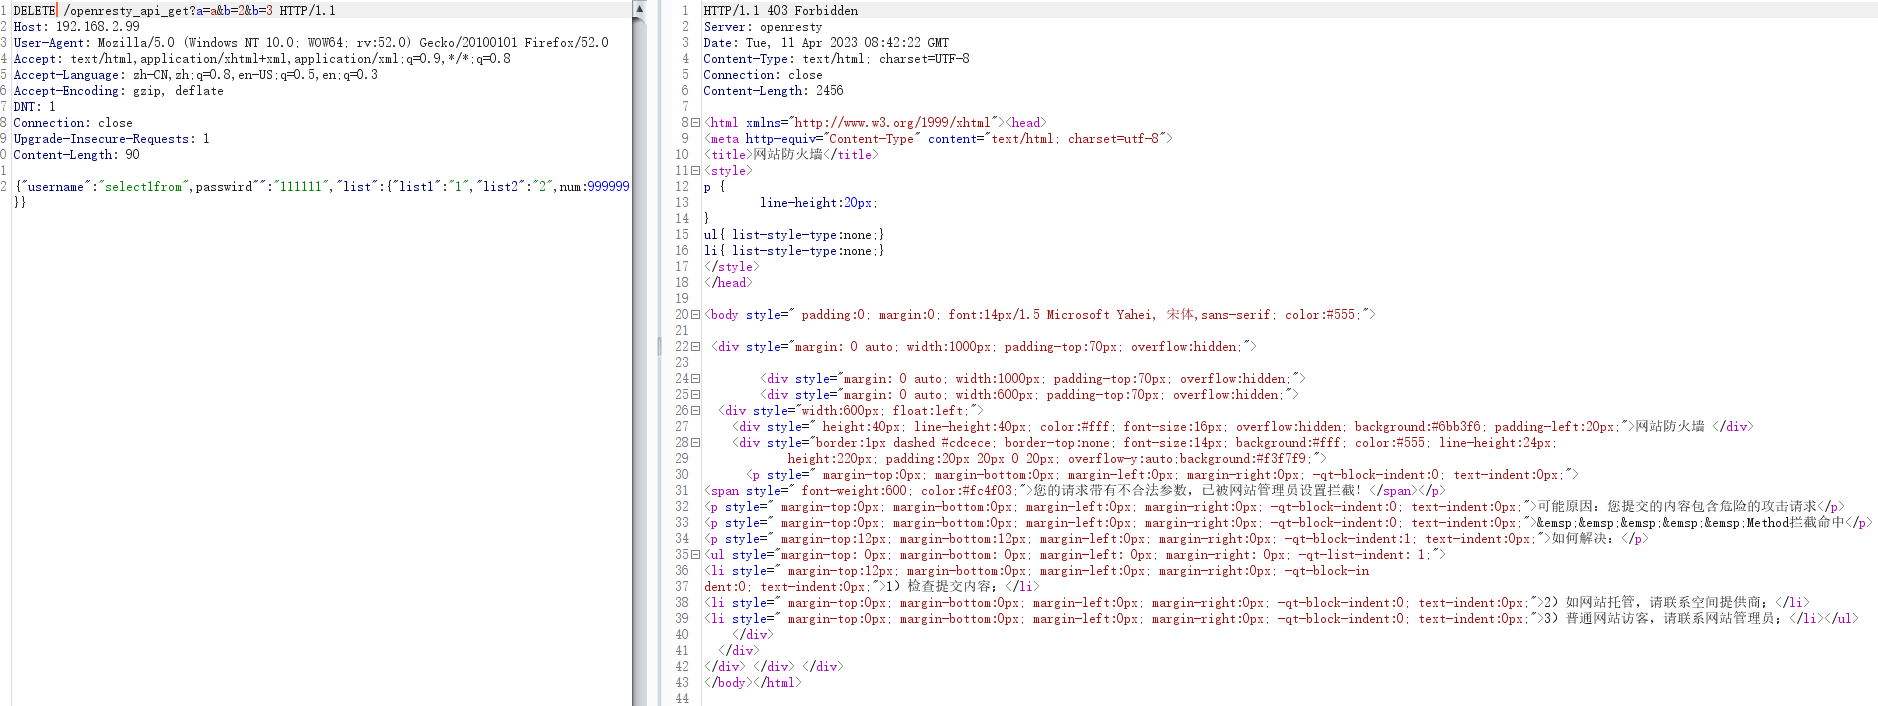
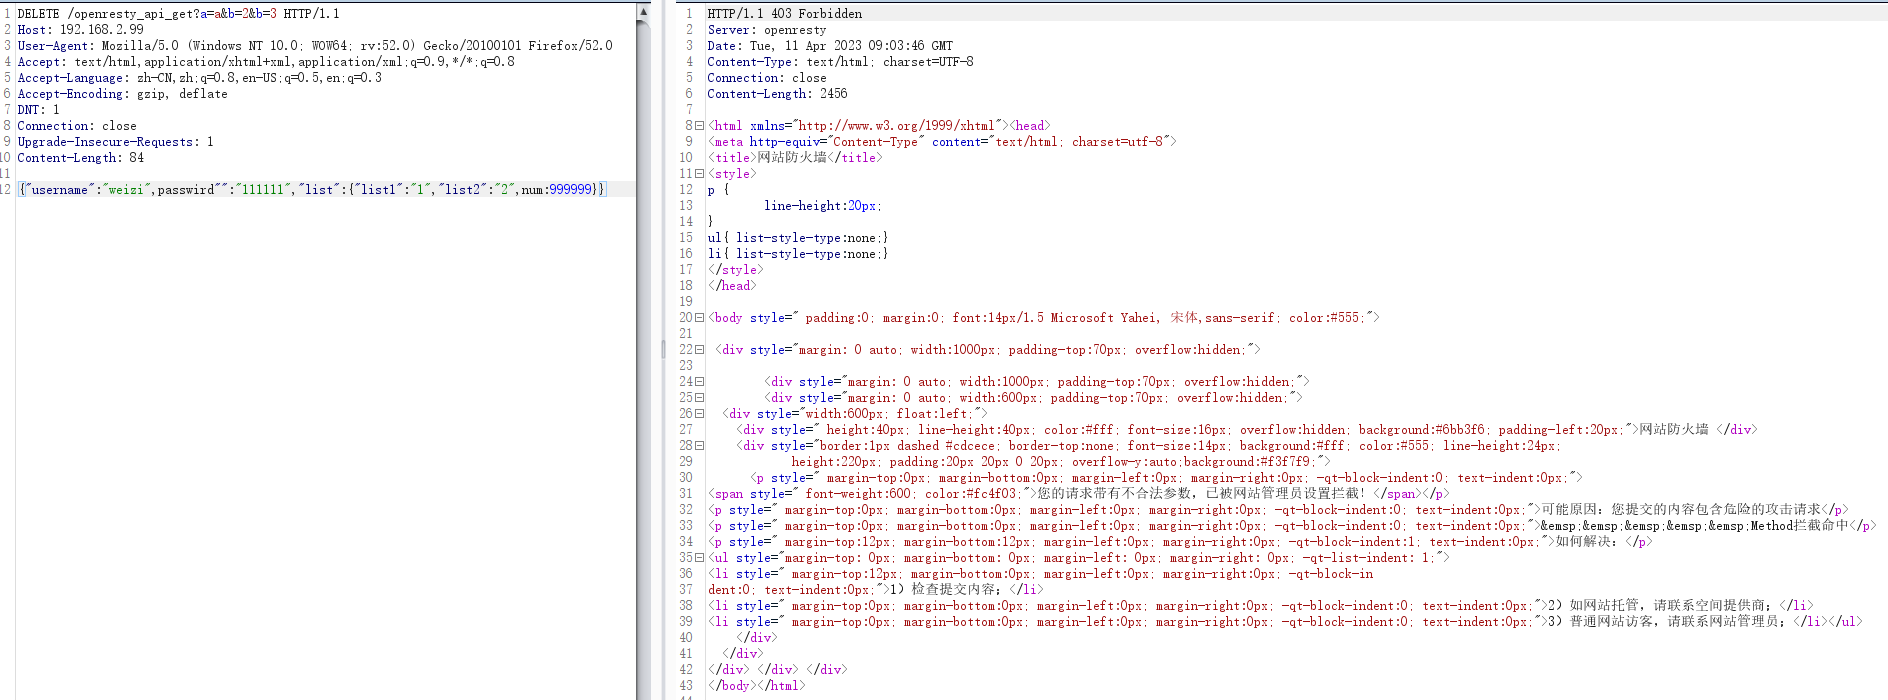
重载nginx配置,DELETE方法被禁用
方法白名单
既然能允许哪些方法不能访问,那么就应该允许哪些方法能访问
我们还按照老步骤走
在config.lua中定义方法白名单
whiteMethodModule="on"
whiteRequestMethod={"GET","POST","OPTIONS"}
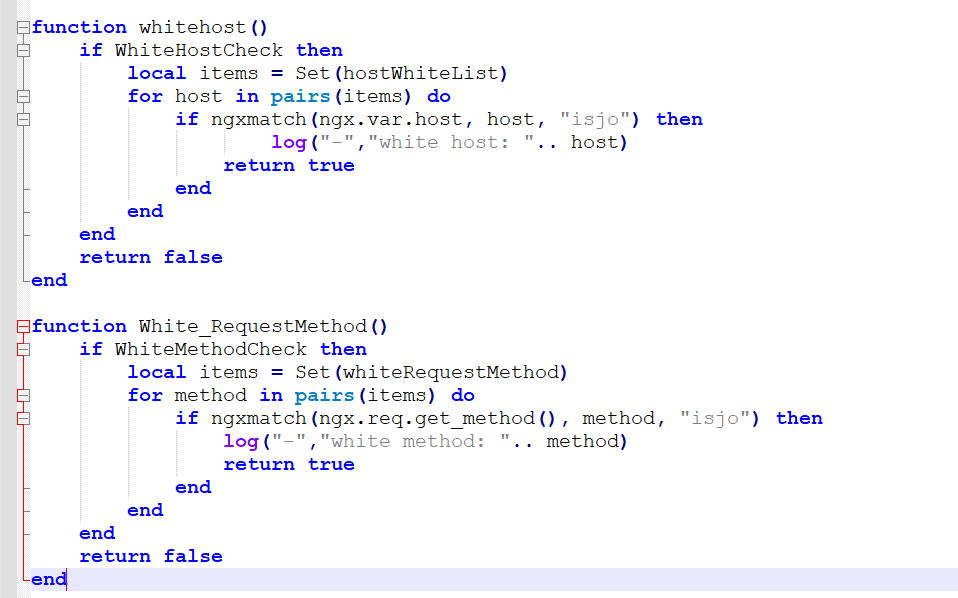
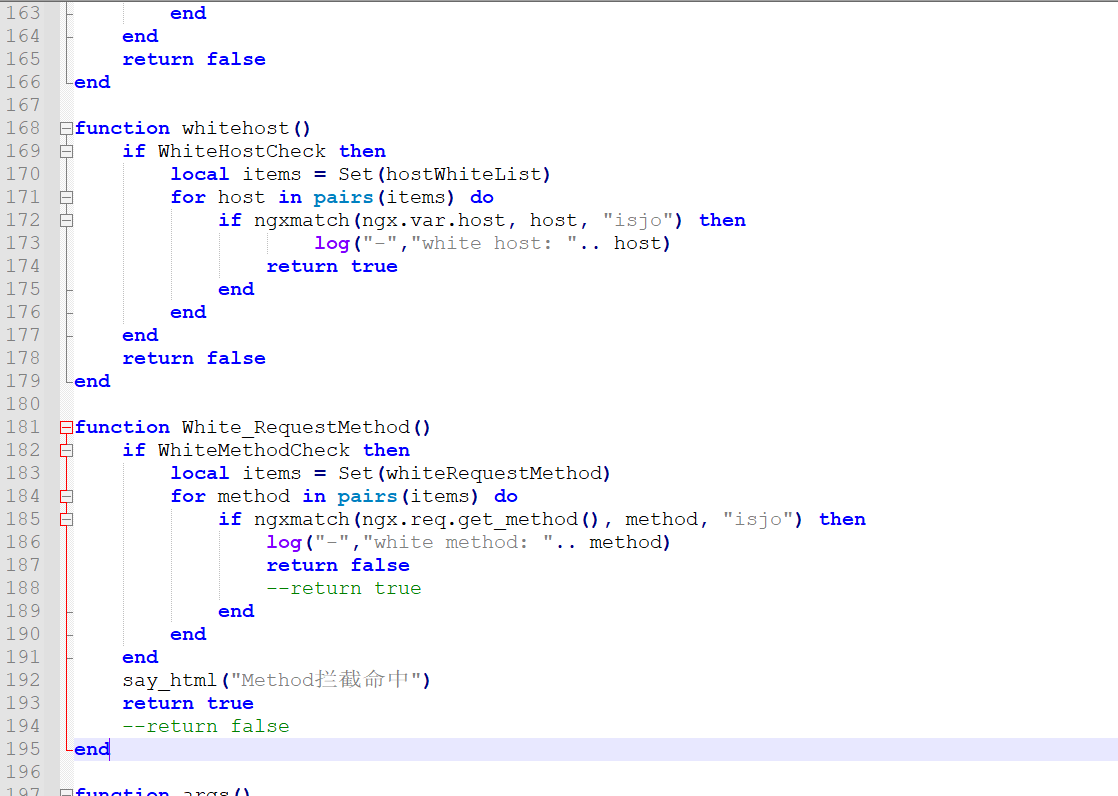
在init.lua中写函数,模仿whitehost()写一个
function White_RequestMethod()
	if WhiteMethodCheck then
	    local items = Set(whiteRequestMethod)
	    for method in pairs(items) do
	    	if ngxmatch(ngx.req.get_method(), method, "isjo") then
                log("-","white method: ".. method)
				return true
	    	end
	    end
	end
	return false
end
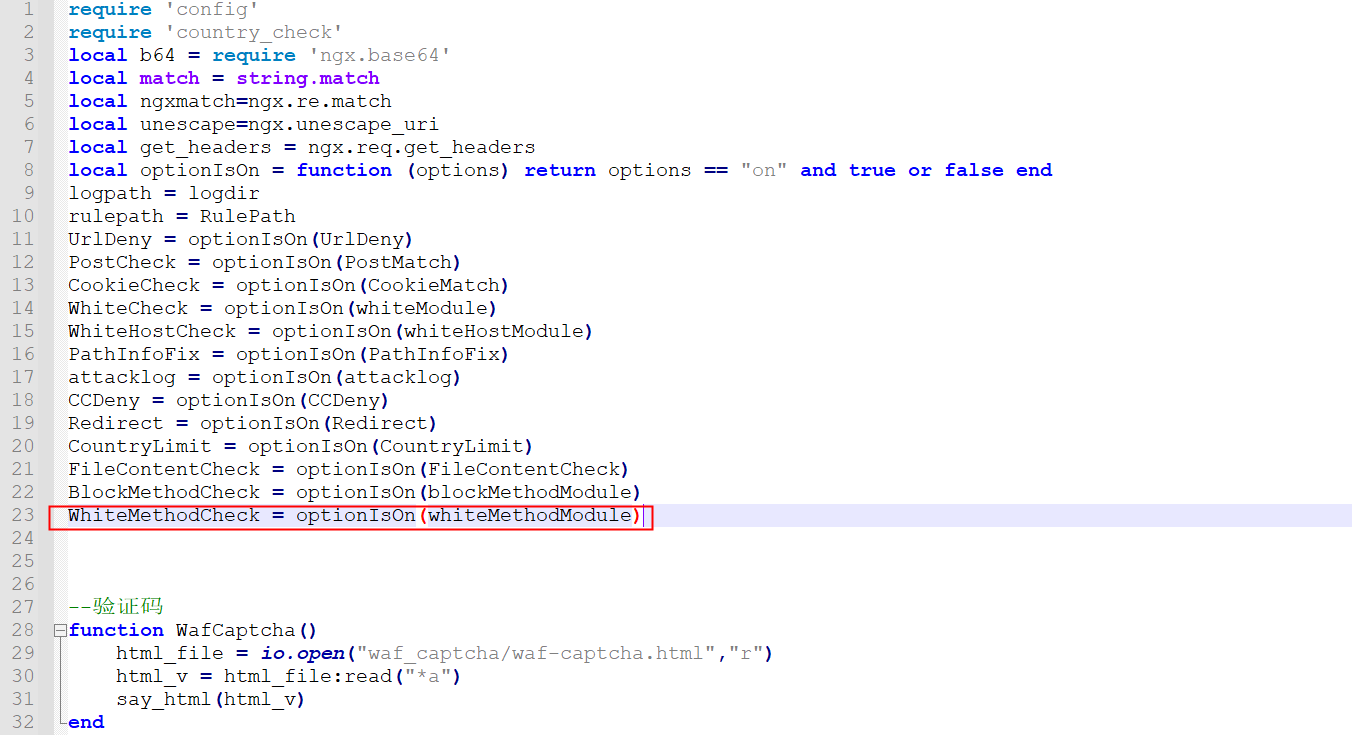
当然选项开关的读取也得加上
WhiteMethodCheck = optionIsOn(whiteMethodModule)
在waf.lua中调用这个函数
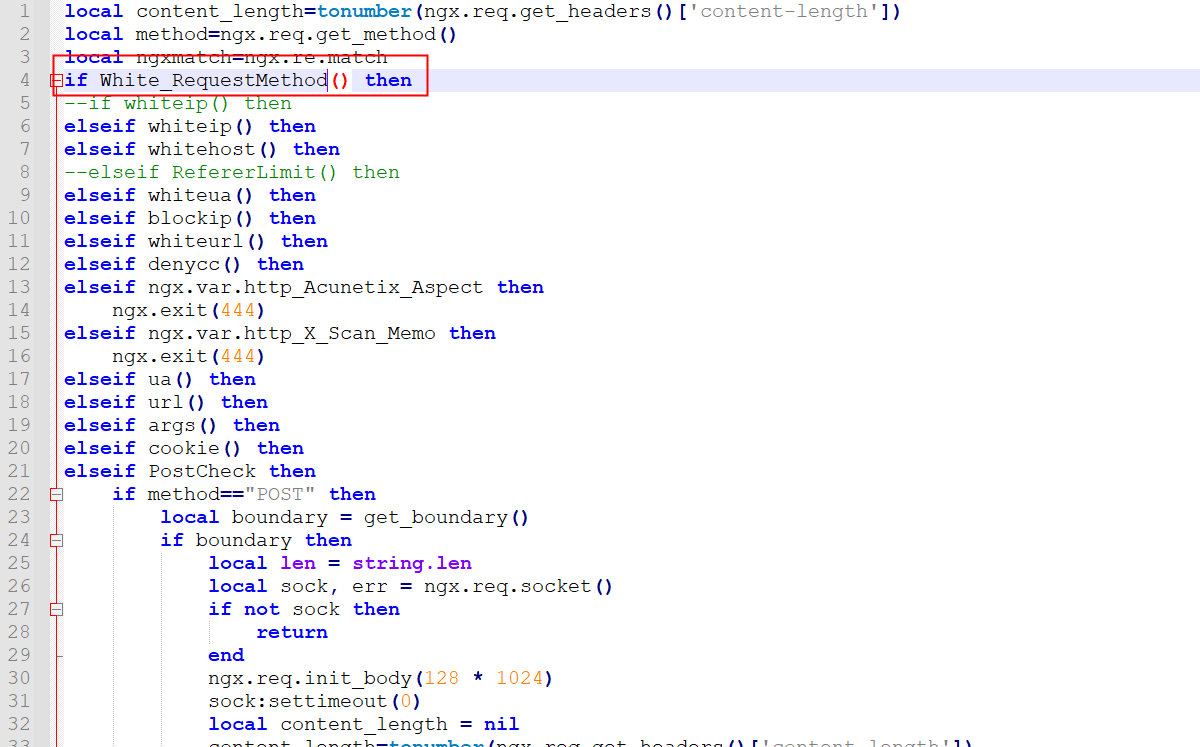
重载nginx配置,发现写了依托答辩
第一点,别的方法还能访问
第二点,当请求方法在白名单内时,其他校验也不做了,这不符合我们的预期啊!总不能我们允许了POST,就能随便提交吧

所以这里的白名单还和原作者的IP白名单不太一样,前面分析源码我们也说了,只要return true就会出现短路,所以return true的逻辑一定要重中之重,但是我们又需要方法在白名单后,还做其他校验,所以这里的逻辑应该是:在白名单的return false,不在白名单里的,say_html(“Method拦截命中”)外加return true
function White_RequestMethod()
	if WhiteMethodCheck then
	    local items = Set(whiteRequestMethod)
	    for method in pairs(items) do
	    	if ngxmatch(ngx.req.get_method(), method, "isjo") then
                --log("-","white method: ".. method)
	            return false
				--return true
	    	end
	    end
	end
	say_html("Method拦截命中")
	return true
	--return false
end
首先别的方法都不允许了
然后,白名单内的方法也不能为所欲为了

wafconf规则
SQL注入
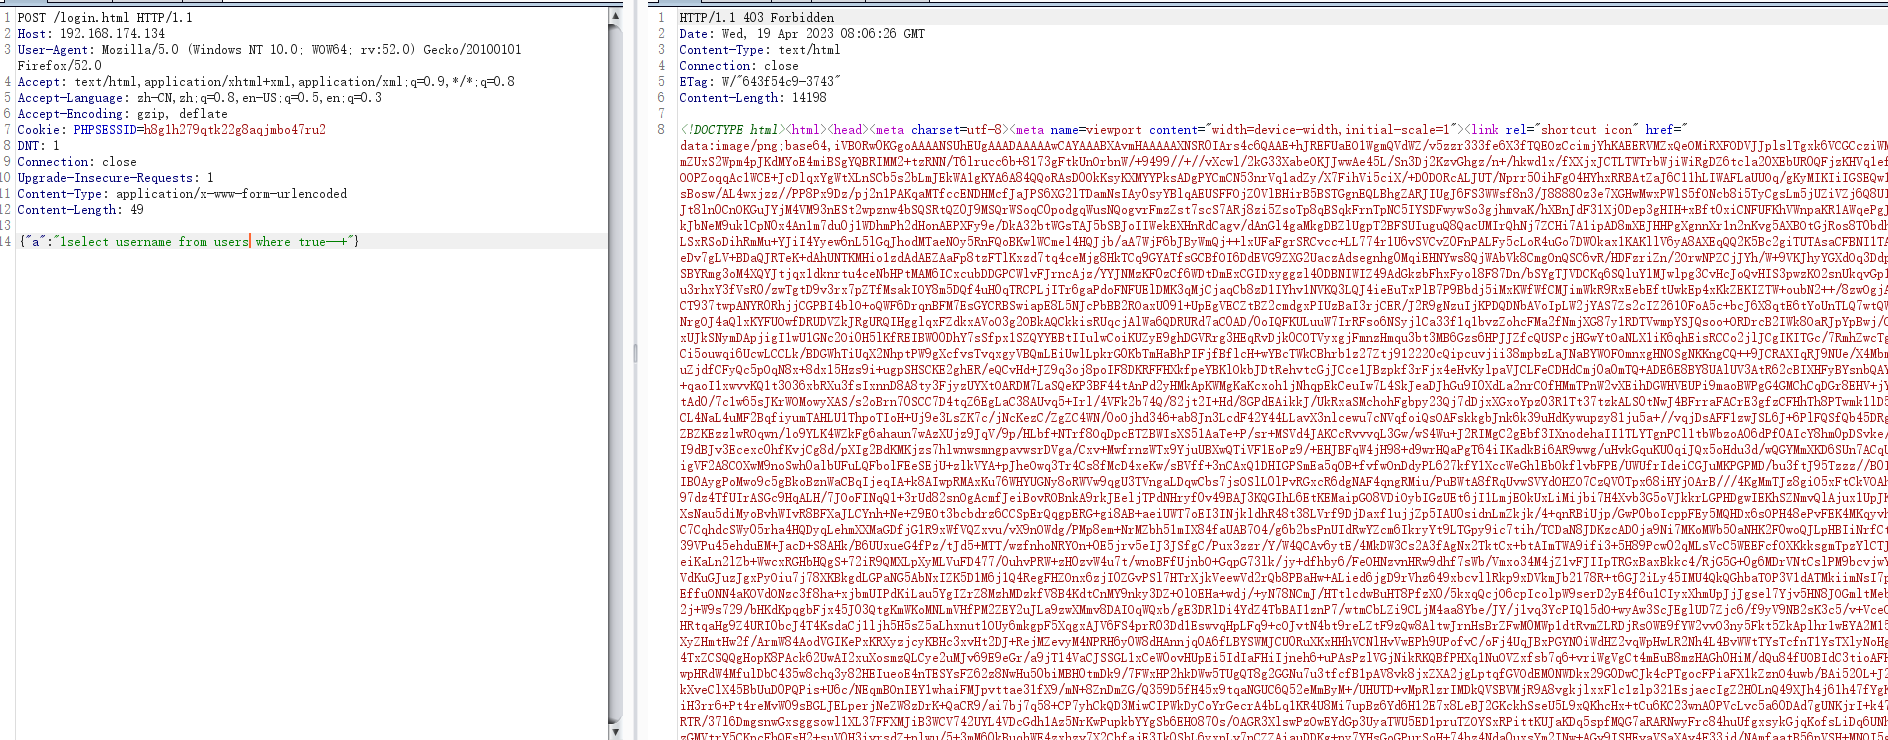
用waf代理到sqli_libs
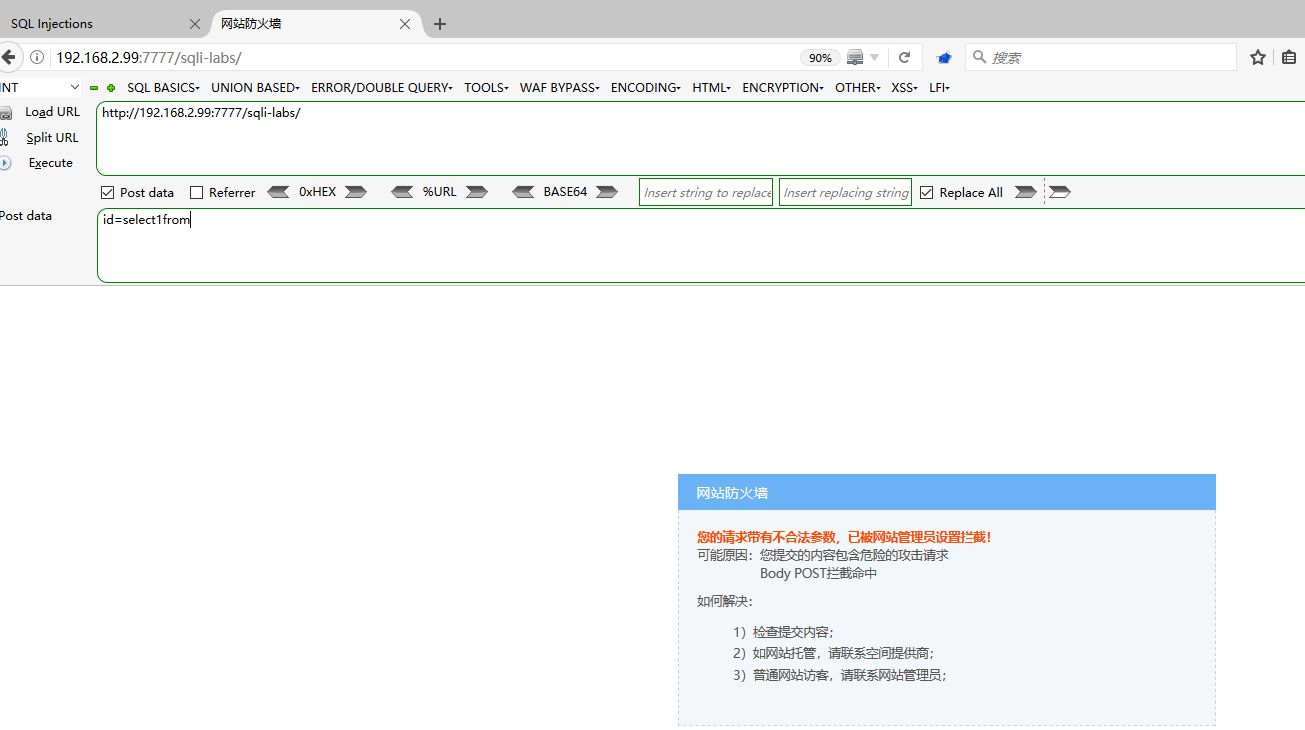
使用APPScan发现还是有些关键字没拦截,虽然这样已经无法注入了,但是还是应该再严格一点
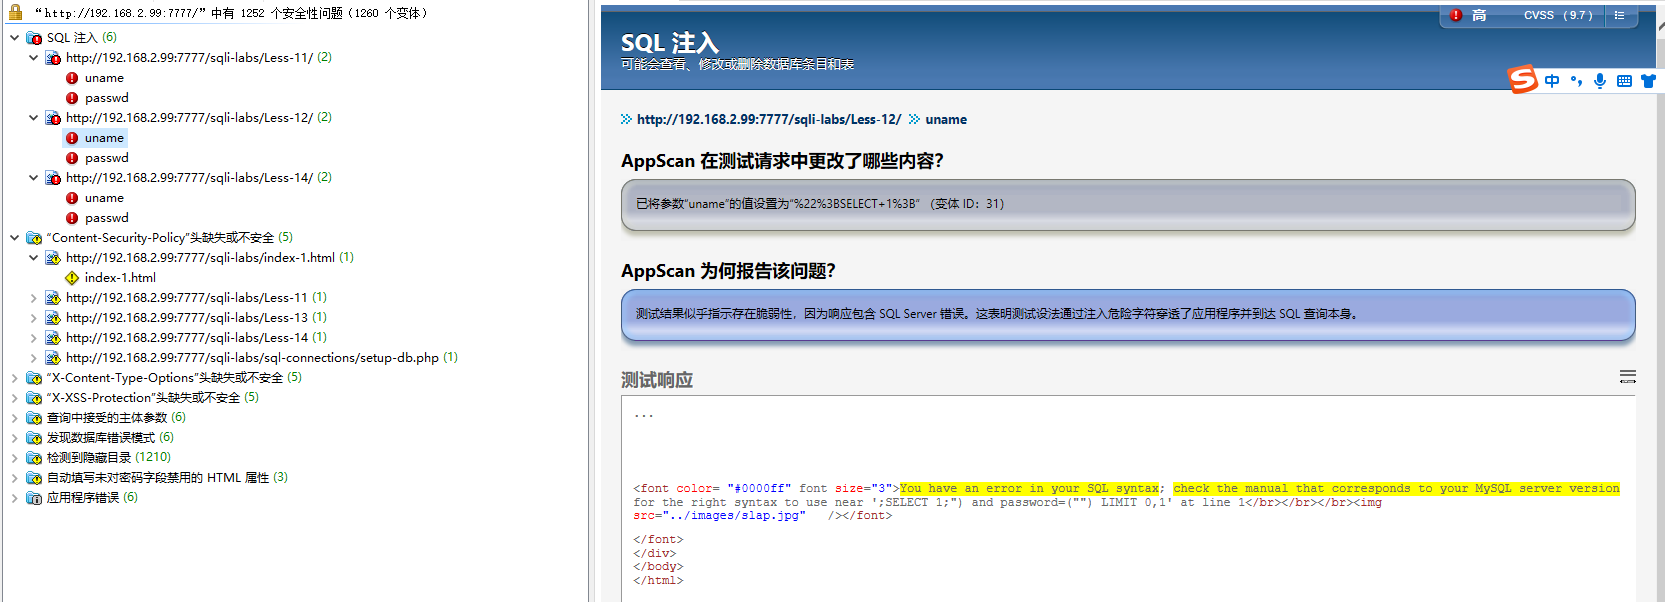
我们先梳理一下,用户通过页面访问,总不会有DDL、DCL、DML和DQL吧?所以我们要把这四类过滤掉,我们也别整花里胡哨的那么一堆正则,就搞关键字
#DDL
(CREATE|DROP|ALTER)
#DCL
(GRANT|COMMIT|ROLLBACK)
#DML
(INSERT|UPDATE|DELETE)
#DQL
SELECT
#TCL
(COMMIT|ROLLBACK)

合并到一行
(CREATE|DROP|ALTER|GRANT|COMMIT|ROLLBACK|INSERT|UPDATE|DELETE|SELECT|COMMIT|ROLLBACK)
再加上数据库常用的关键字
(show|database|table|column|information_schema|replace into|truncate|distinct|where|and|order|group|having|rongjitest|top|limit|like|between|join|union|exists|mid|substring|regexp|over|convert|cast|concat)
常用函数
(concat|concat_ws|group_concat|length|left|right|substr|mid|ascii|ord|sleep|floor|exp|updatexml|extractvalue|load_file|into|outfile|dumpfile|addslashes|stripslashes|get_magic_quotes_gpc|mysql_real_escape_string|user|version|)
特殊符号,其实第一行是匹配圆括号(…),我理解这一行可以代替常用函数,就感觉效率会高很多
(\(*.\)|\'|\"|\-\-|\#|\`|\+|\@)
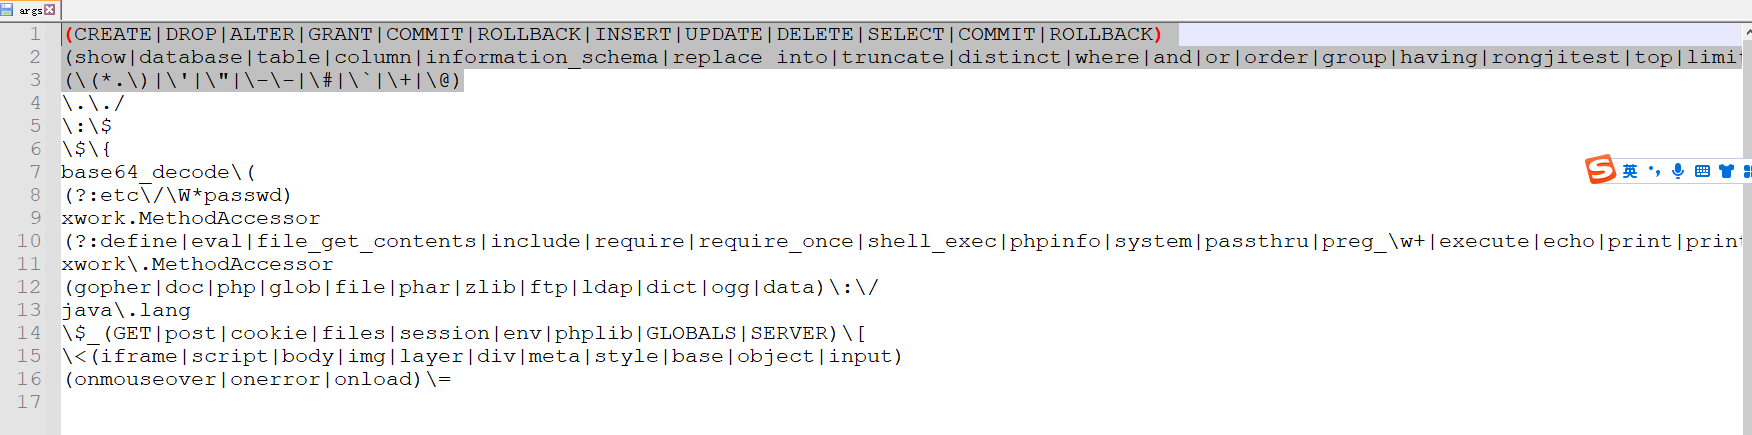
把这三行加入到args和post的规则里面,然后把以前的sql注入相关的规则都删掉
(CREATE|DROP|ALTER|GRANT|COMMIT|ROLLBACK|INSERT|UPDATE|DELETE|SELECT|COMMIT|ROLLBACK)
(show|database|table|column|information_schema|replace into|truncate|distinct|where|and|order|group|having|rongjitest|top|limit|like|between|join|union|exists|mid|substring|regexp|over|convert|cast|concat)
(\(*.\)|\'|\"|\-\-|\#|\`|\+|\@)
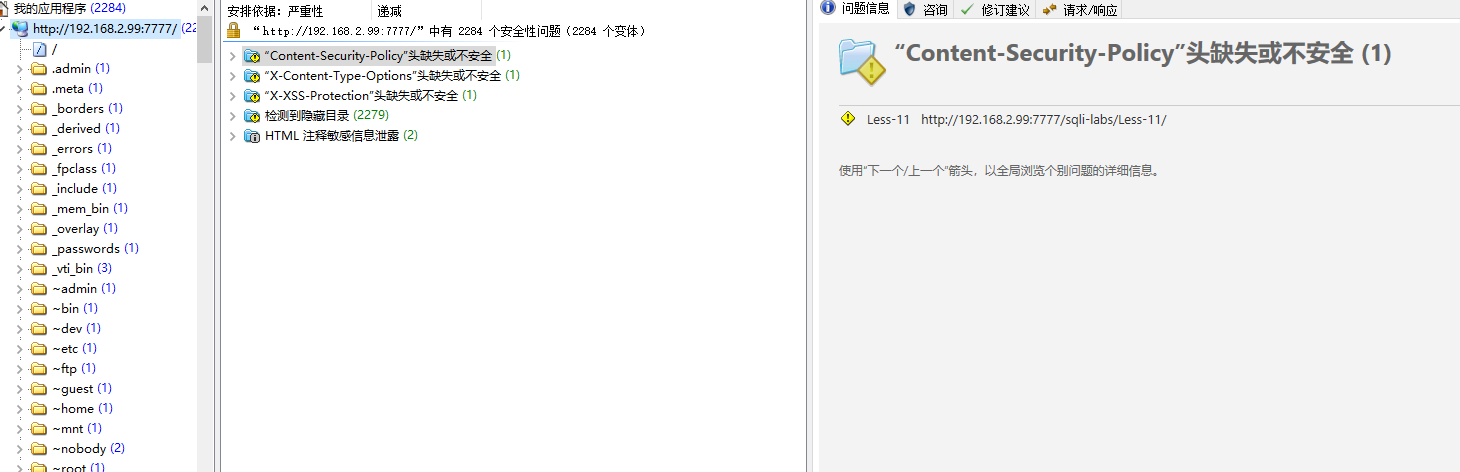
重载nginx配置,awvs和APPScan都扫不出来

XSS
常用符号
(\<|\>|\'|\"|\(.*\))
常用html标签
\<.*(a|img|iframe|audio|script|video|svg|button|div|object|p|input|details|select|form|body|html)
常用js函数
(alert|javascript|eval|base64).*\(
常用html属性
(href|onfocus|onclick|onmouseover|onmouseout|onerror|onclick|src|onload|).*\=
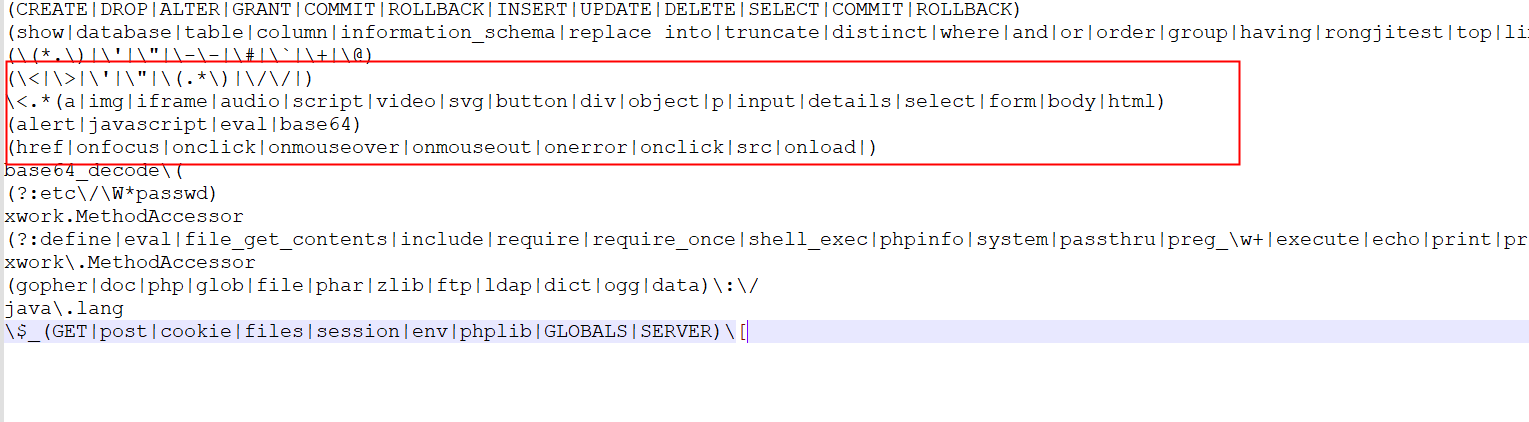
把这四行代替args和post中所有跟XSS有关的规则
(\<|\>|\'|\"|\(.*\)|\/\/|)
\<.*(a|img|iframe|audio|script|video|svg|button|div|object|p|input|details|select|form|body)
(alert|javascript|eval|base64)
(href|onfocus|onclick|onmouseover|onmouseout|onerror|onclick|src|onload|)
规则
当然,我们测试可以这样搞,如果是生产环境一定要和业务+研发人员确定好这些关键字是不是用户正常输入的,做一做回归测试,其实我们写的已经很严格了,哪怕里面删几个正常用户使用的关键字也无所谓,其实离真正使用还有很远的路程,最起码要根据自己真实的业务,不断完善规则。
如何让waf拥有机器学习的能力?我理解的机器学习,也就是基于异常行为的检测,nginx有访问日志access.log,会记录大量的正常访问行为日志,url、参数等等,当收集了一定量的访问日志,动态的修改自己的规则就好了,加入一些白名单,包括基于第三代防火墙的思想,有些IP用户对服务器的url访问顺序,先访问哪个页面,再到哪个页面等等一系列
waf界面
这里用一个算是体检比较好的,这个原理就是实时读取和修改nginx的配置,注意,是只改了nginx的配置。有很多nginx的管理界面都是和nginx打包到一块的,个人感觉这种会解耦合一些,只需要配好nginx的目录和nginx.conf就行,有好处也有坏处,这个好像在配置里和ngx的一些用法不是很兼容
https://github.com/onlyGuo/nginx-gui/releases
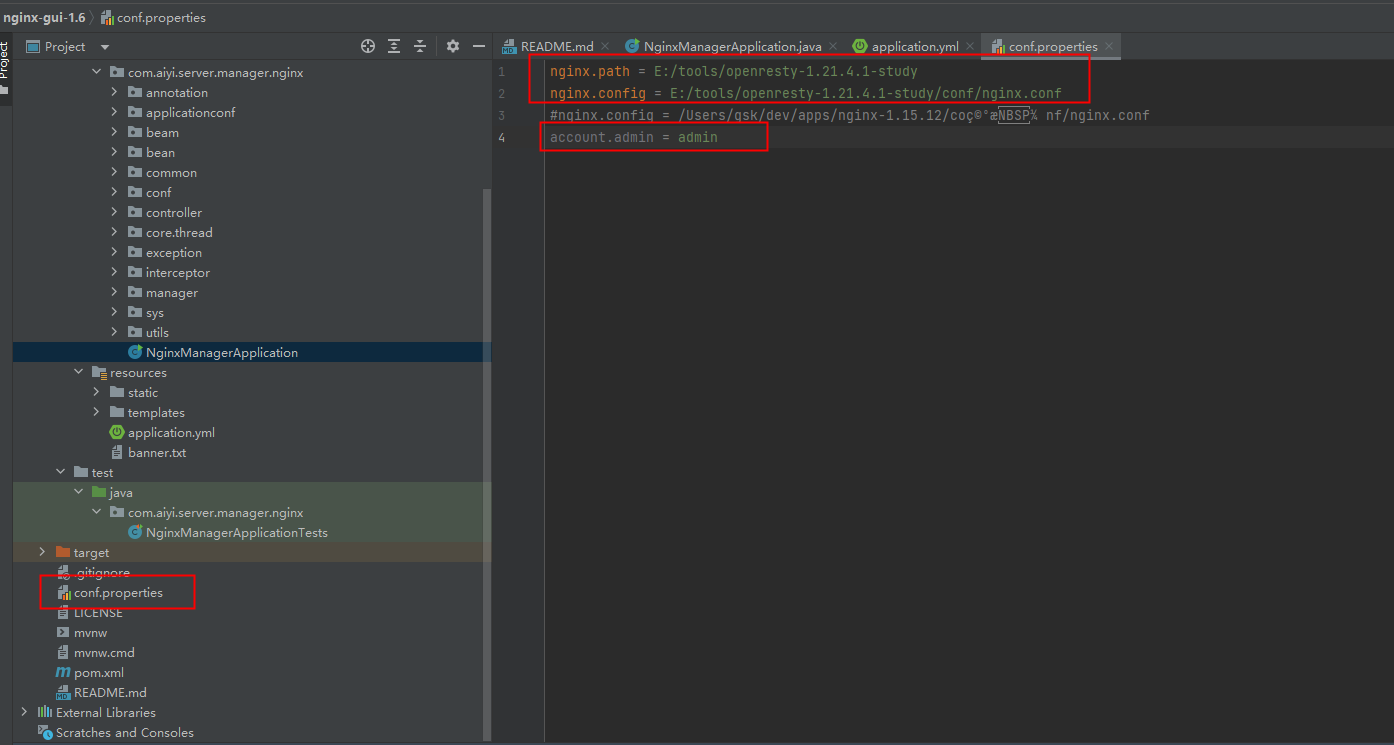
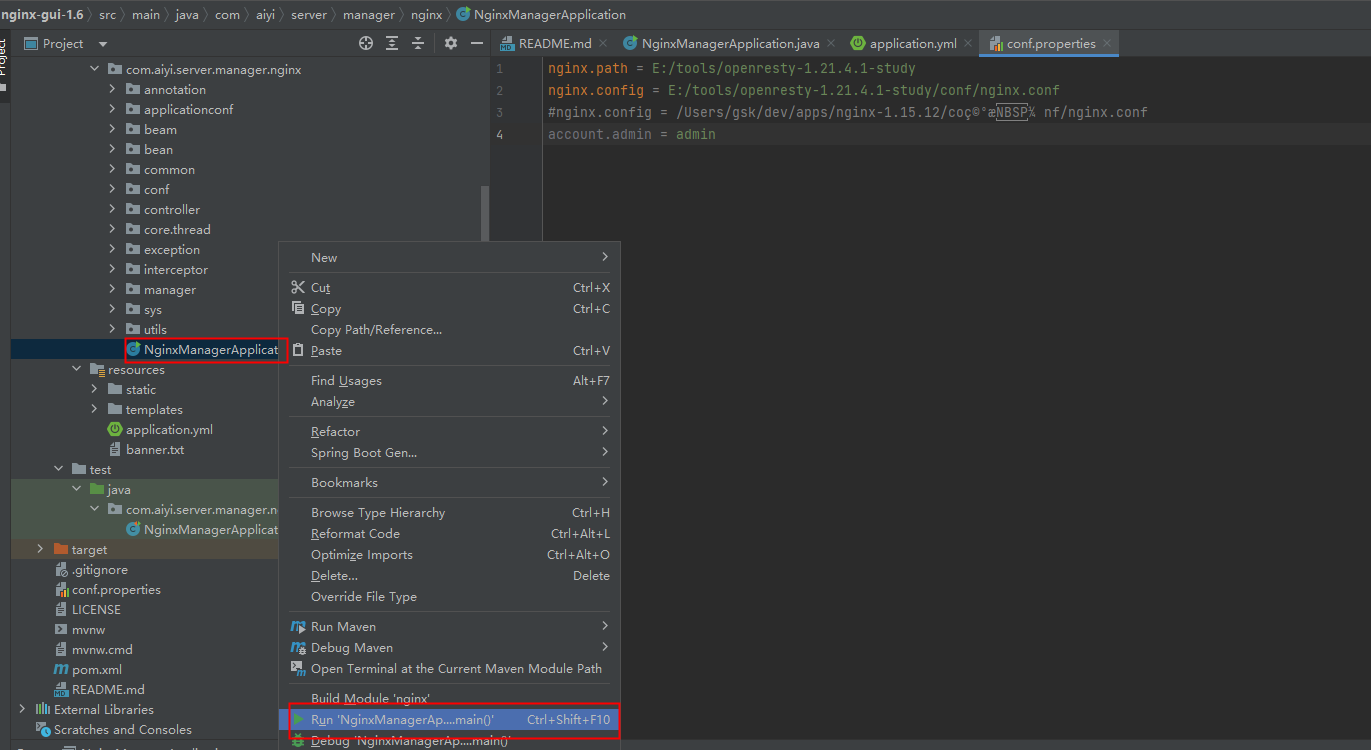
git上面除了源码部署外,linux/windows都需要梯子,我这里就用源码部署,下载了源码,导入IDEA,修改conf.propreties中nginx的路径及配置路径,以及GUI的登录密码,让maven下载一会,下载完后,就可以运行NginxManagerApplication这个类了
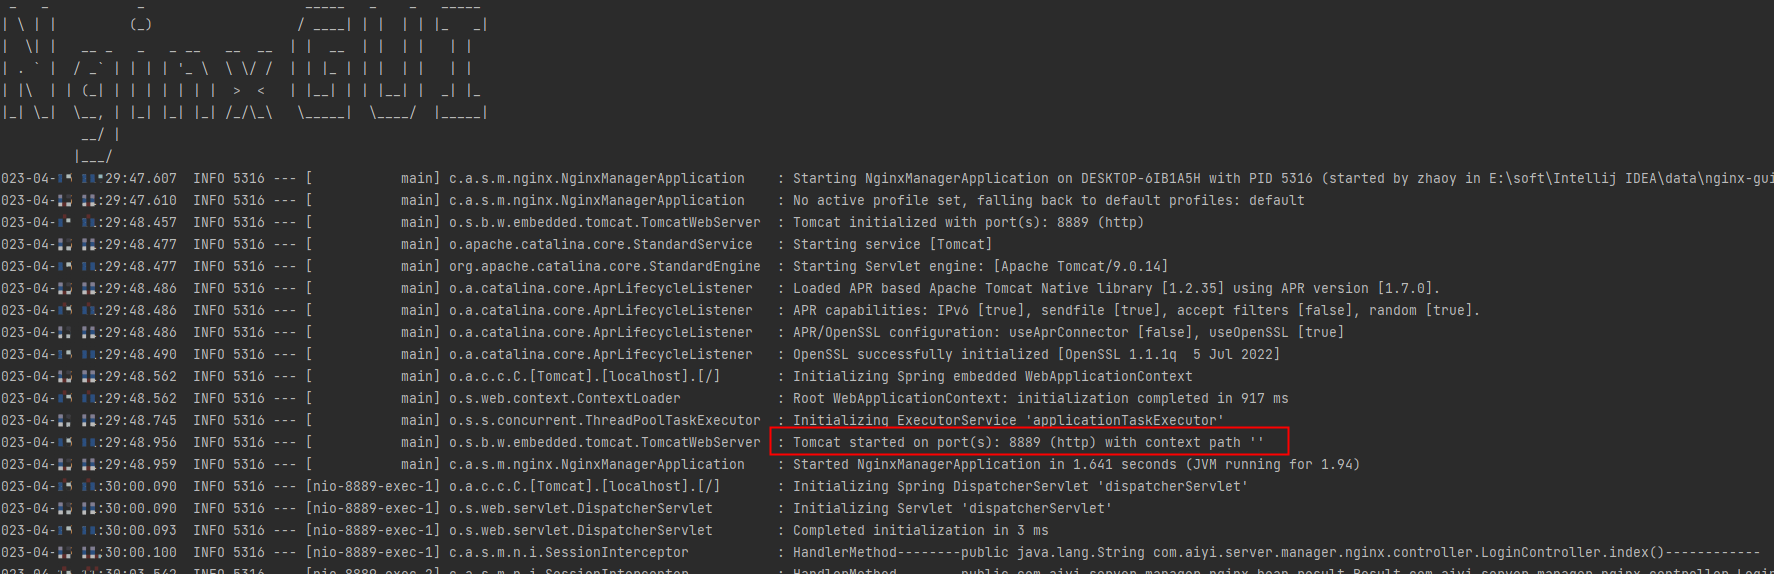
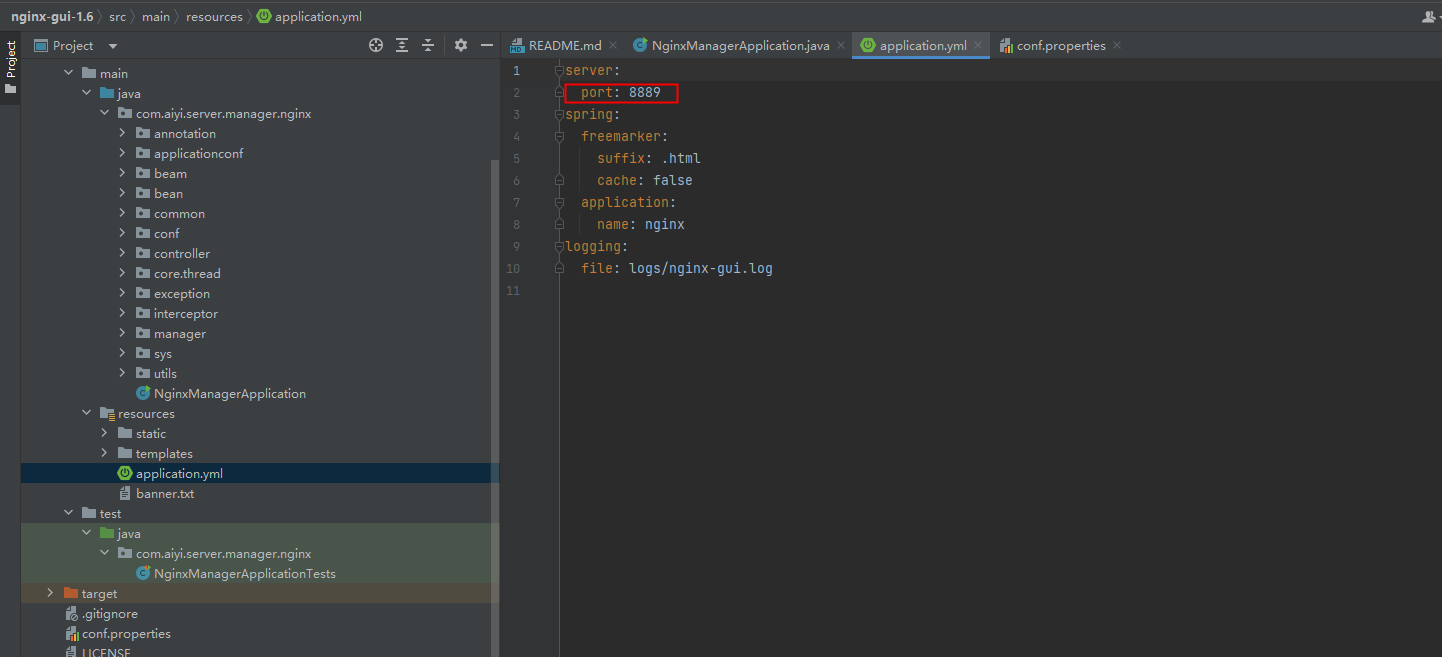
启动成功后,会提示你访问8889,这个8889在application.yml里配置
登录界面
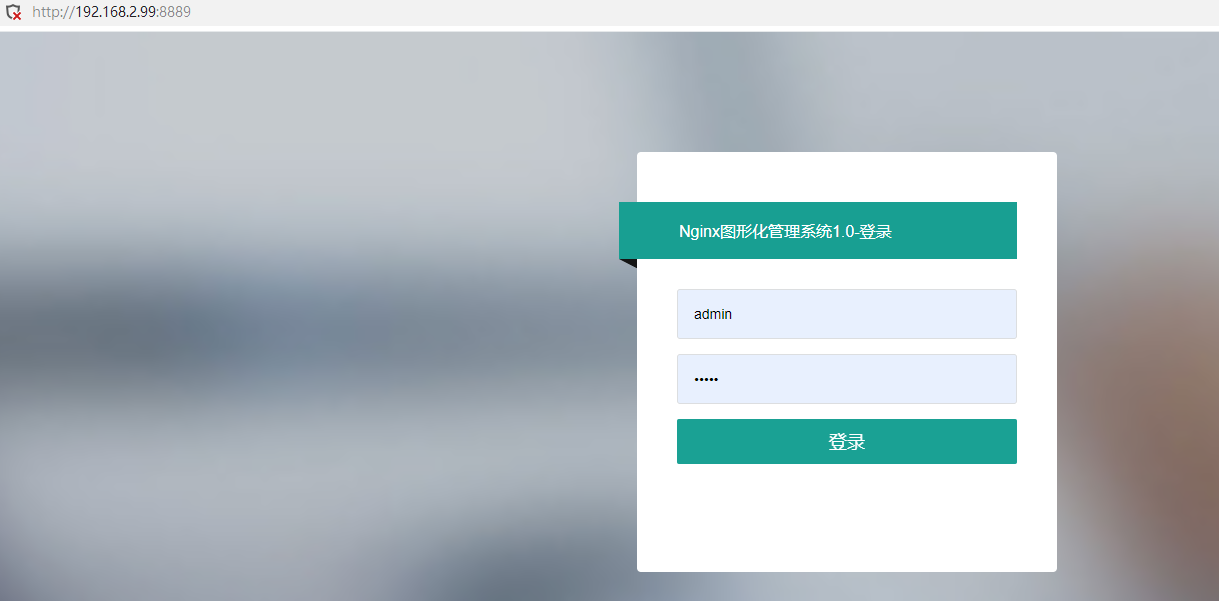
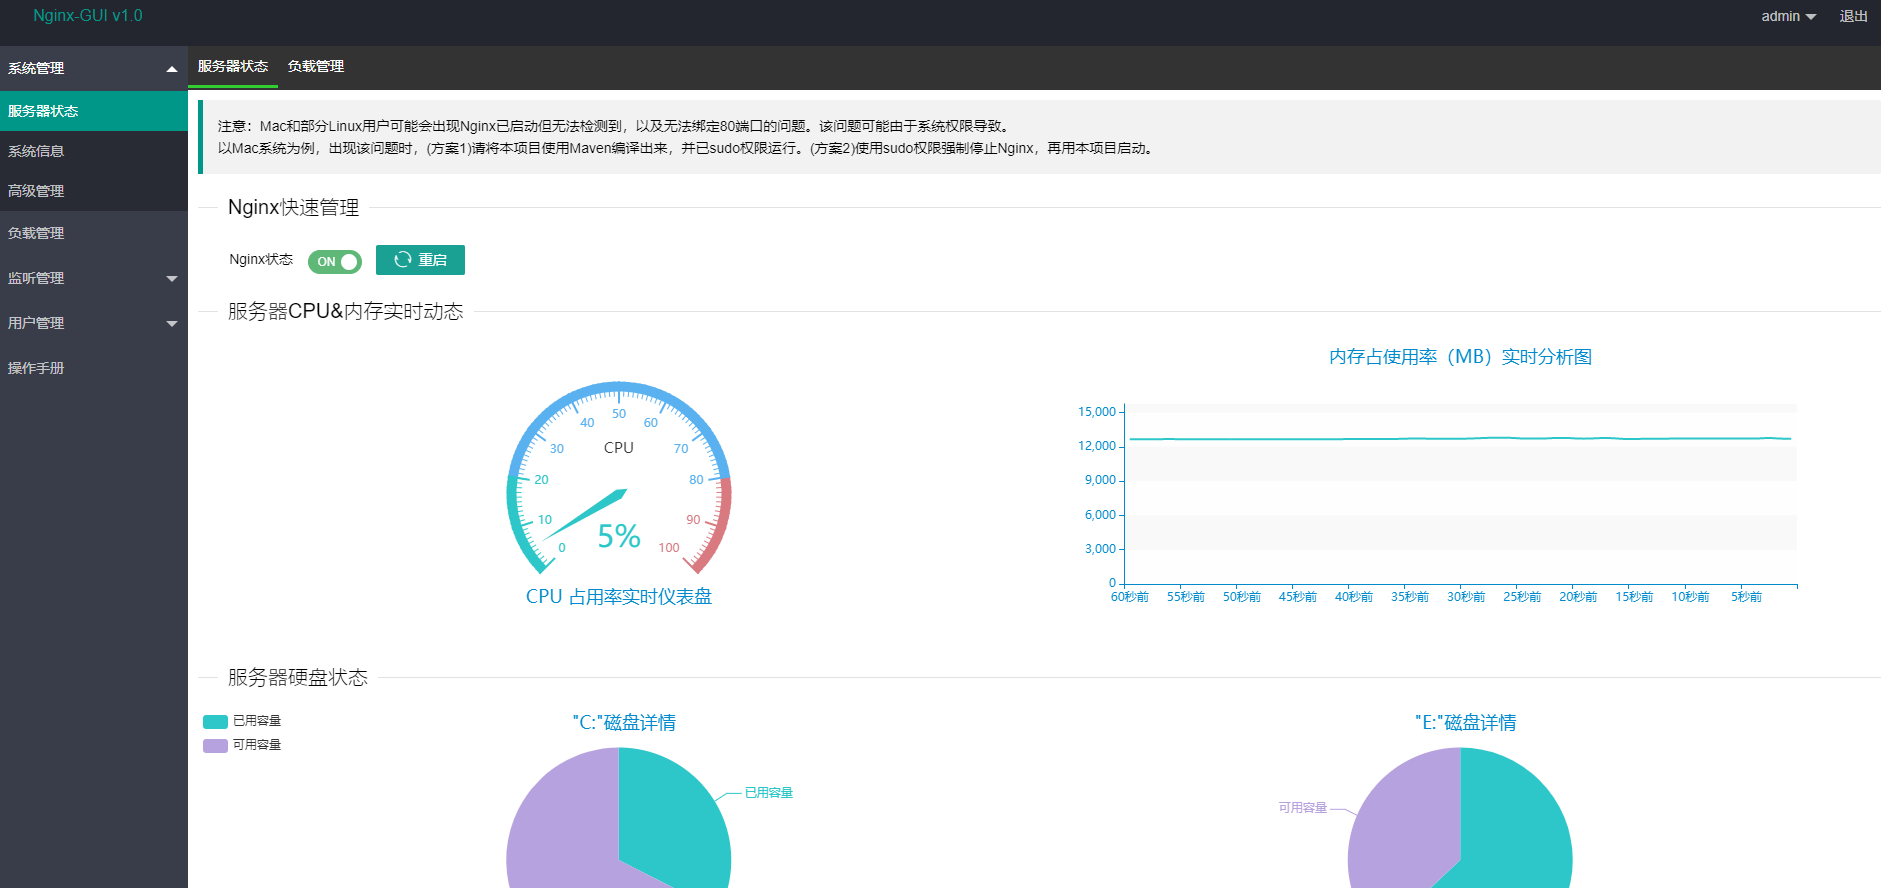
这个是可以在线改配置的,但是貌似也没显示我们之前写的很多ngx.say的lua脚本
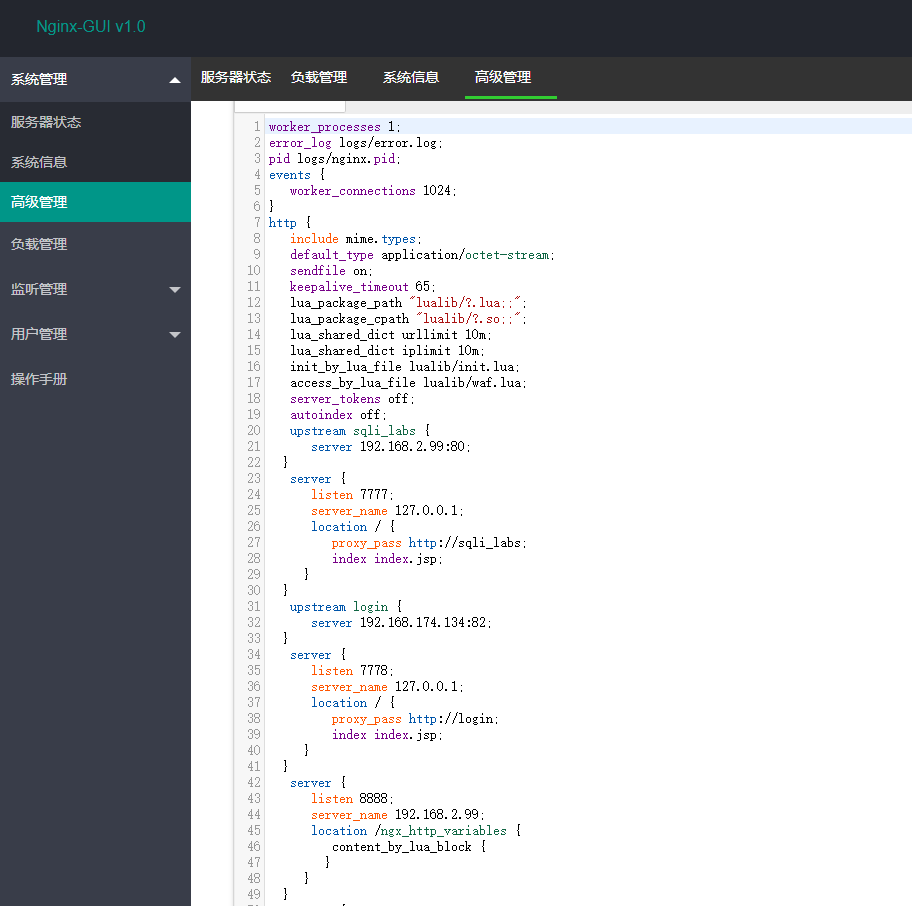
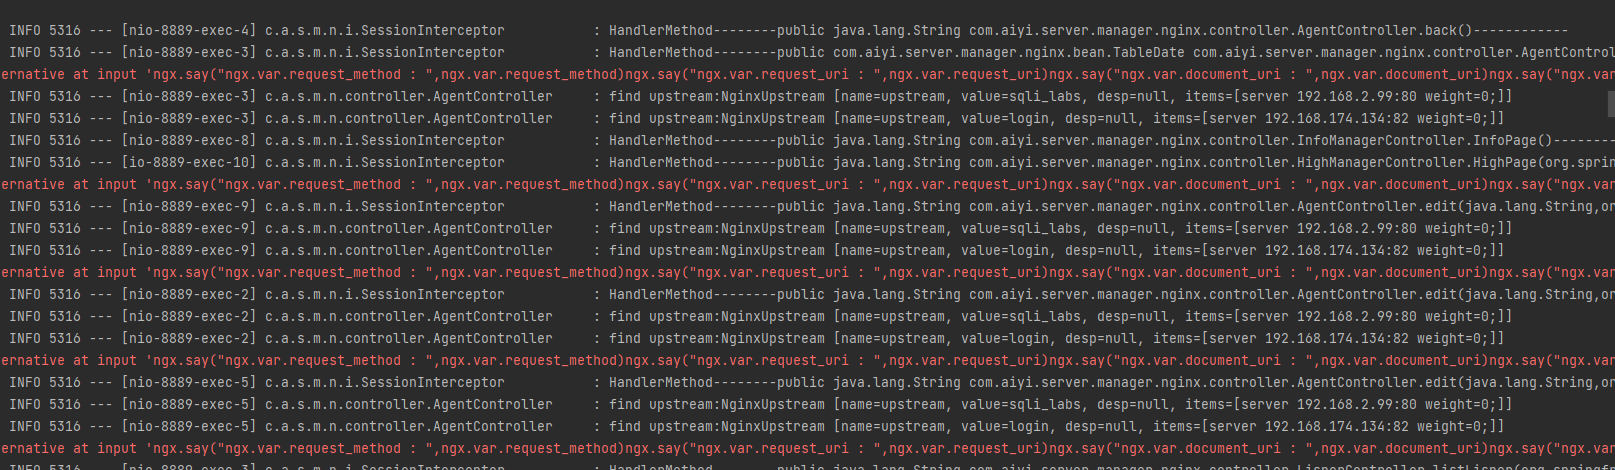
由于我们之前加了很多ngx.say("ngx.var.request_method : ", ngx.var.request_method)这种,所以每次访问监听相关的就会出现一些错误,不过我们的waf都是封装在lua里面的,我们只要不在nginx.conf里面写脚本就行
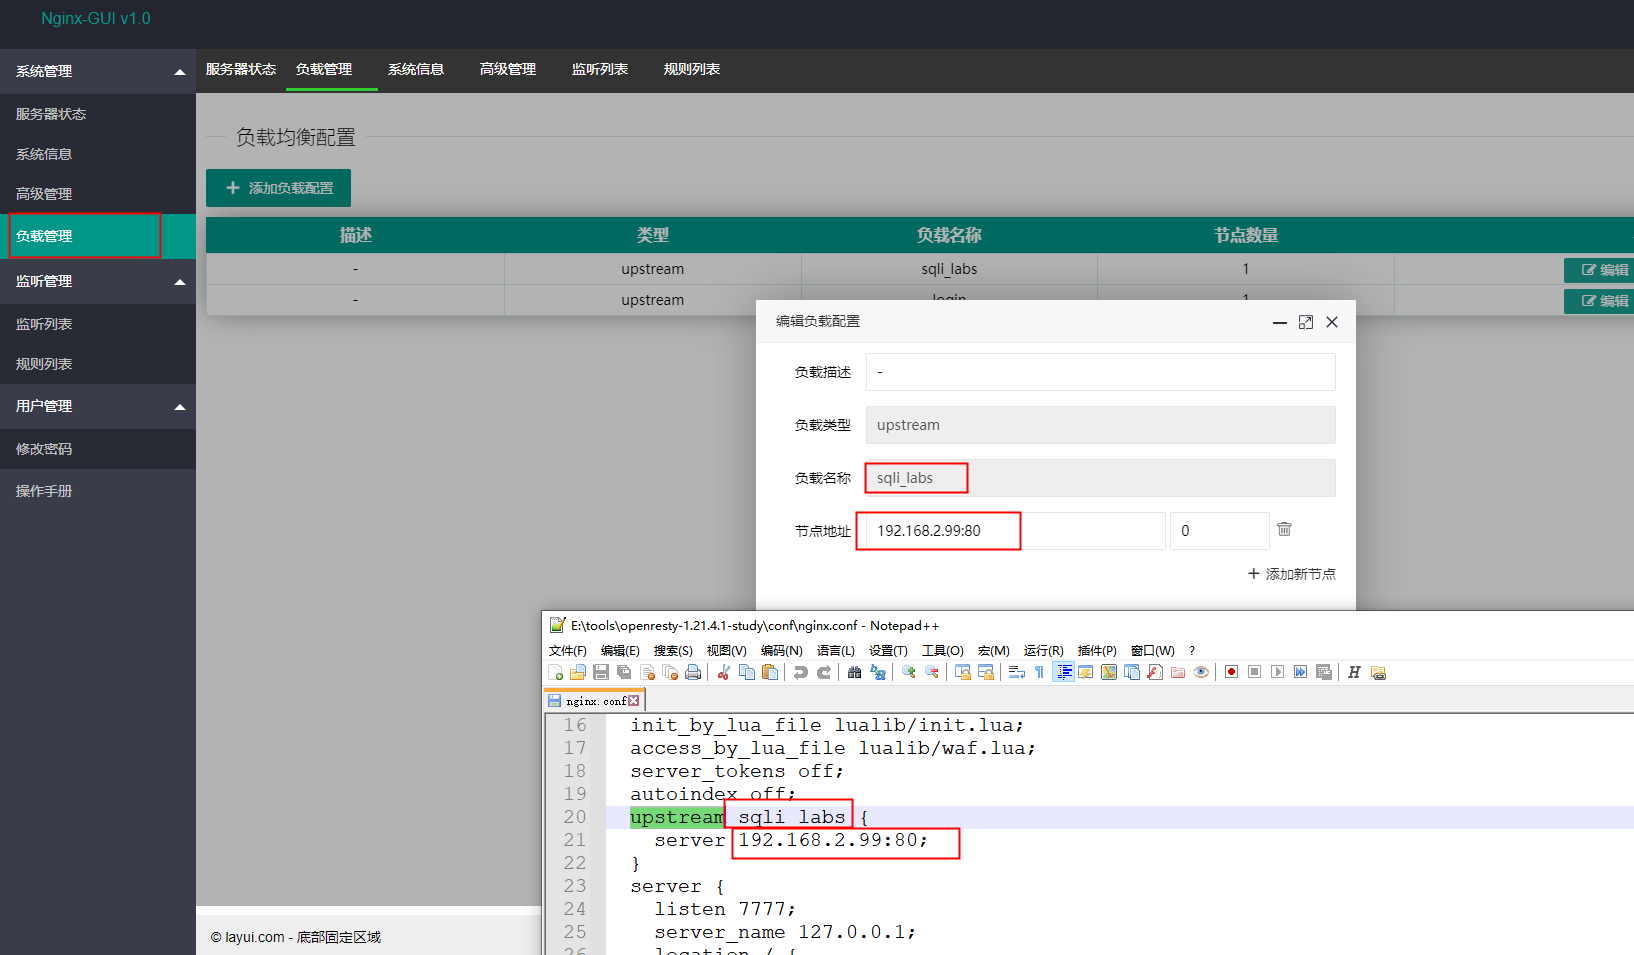
当我在监听里面加了一个123监听的时候,nginx.conf文件改了,而且把我们之前在nginx.conf里面写的各种ngx.say都删掉了,所以如果你在这个配置里写了很多脚本,用这个GUI的时候就要提前备份,我们封装到lua脚本文件,通过nginx.conf引入就行
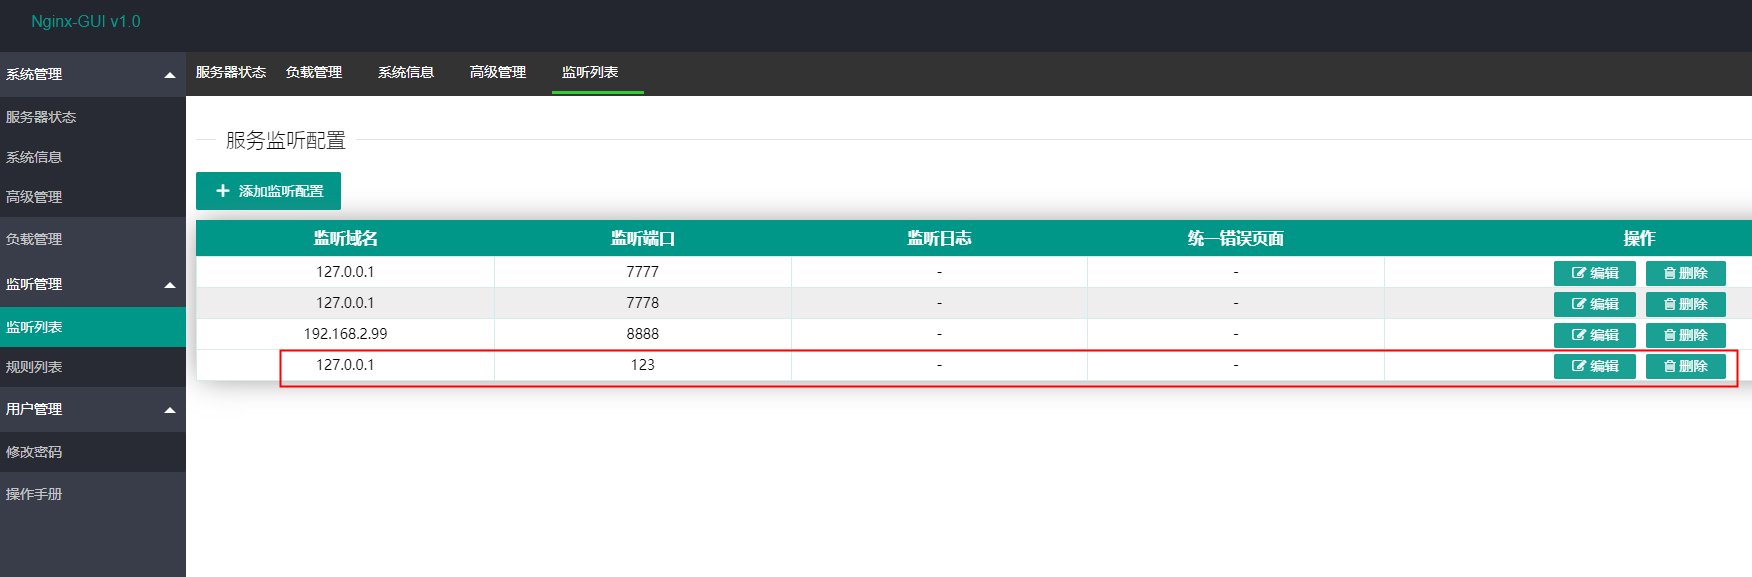
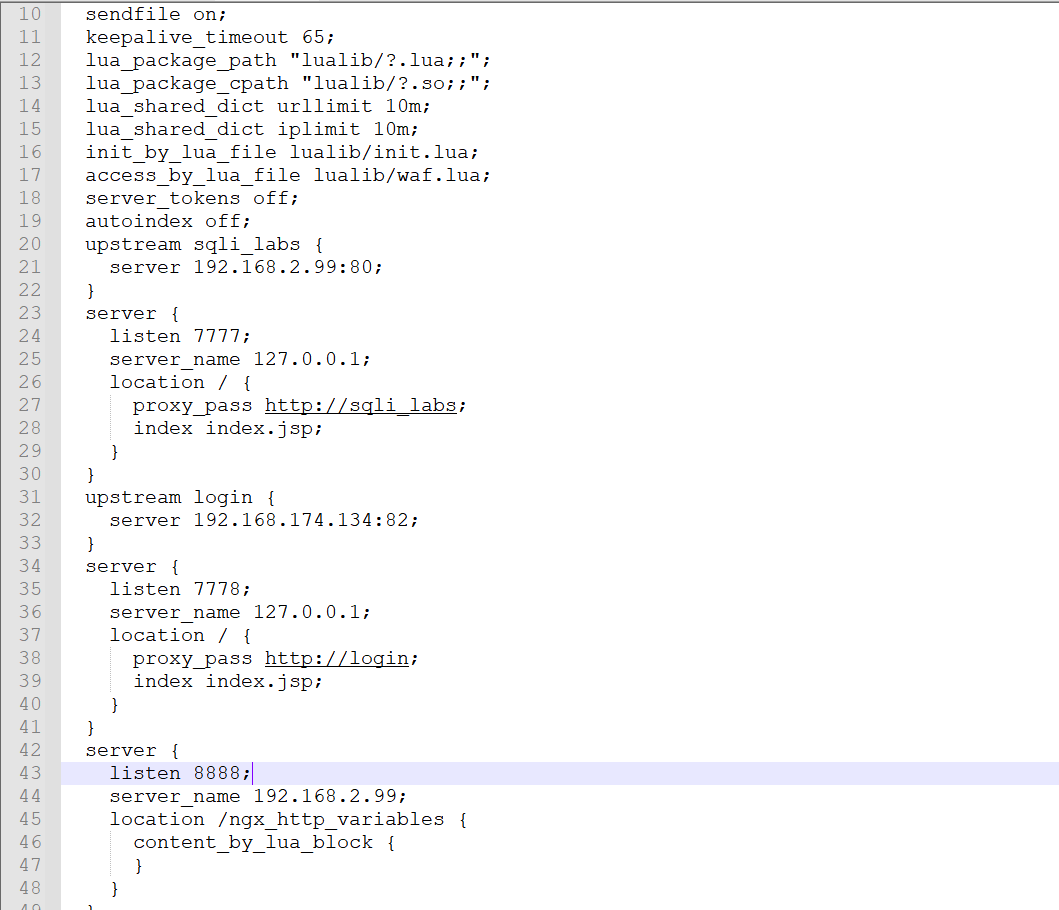
然后监听是对应conf里面的server块的listen和server_name
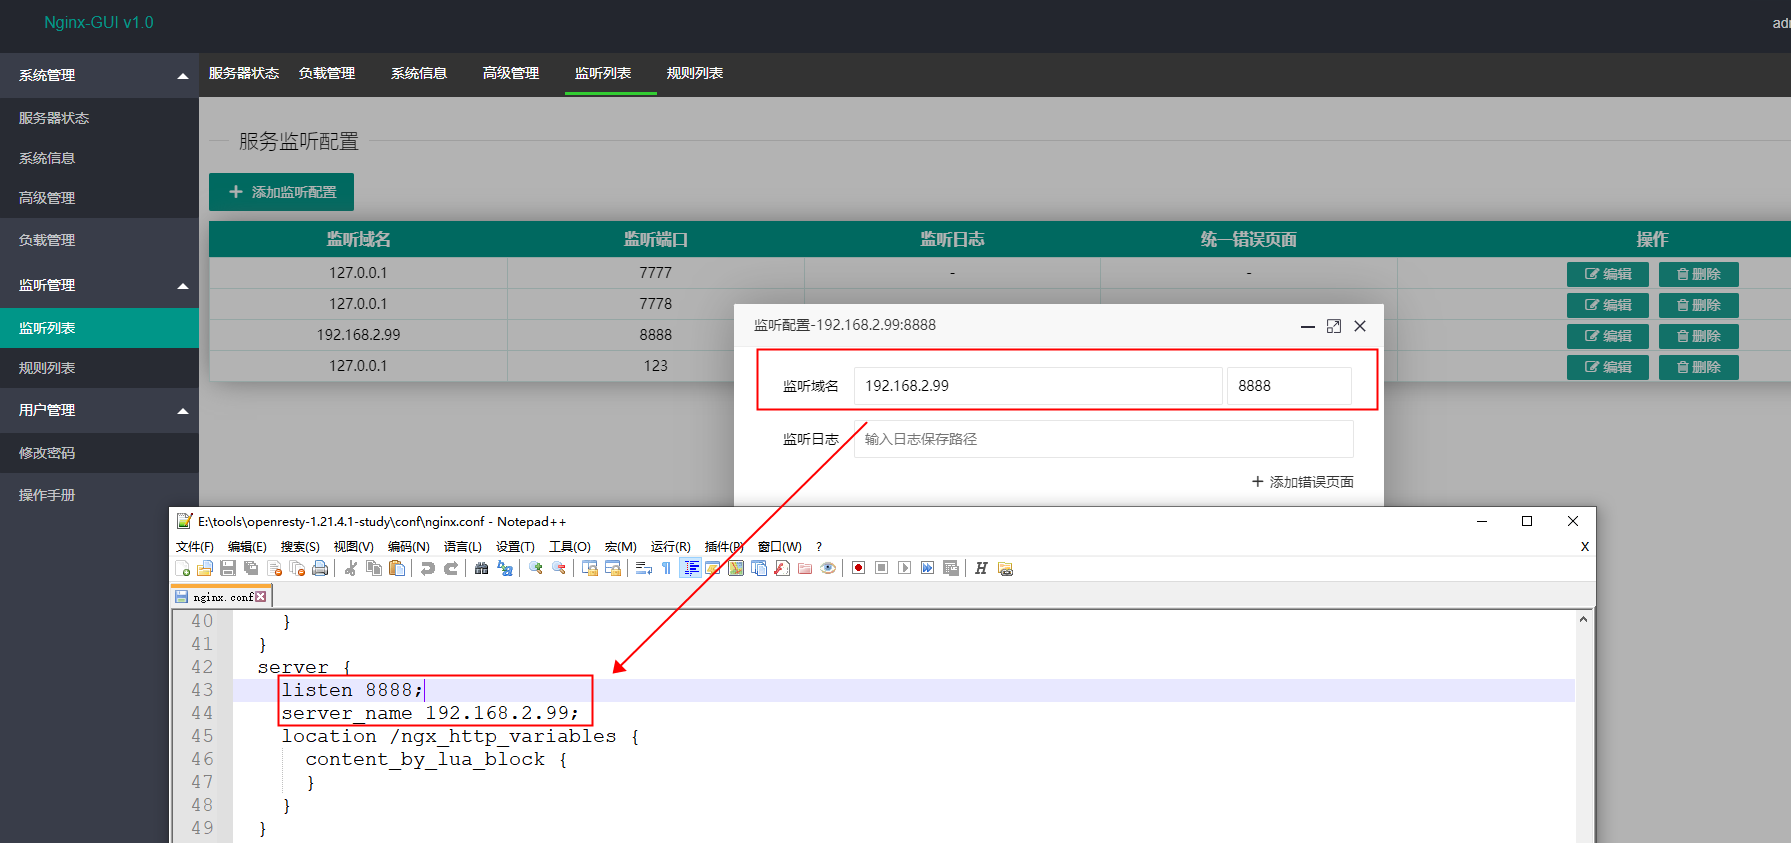
负载域就相当于upstream
规则域将监听域和负载域绑定到一起,就相当于proxy_pass
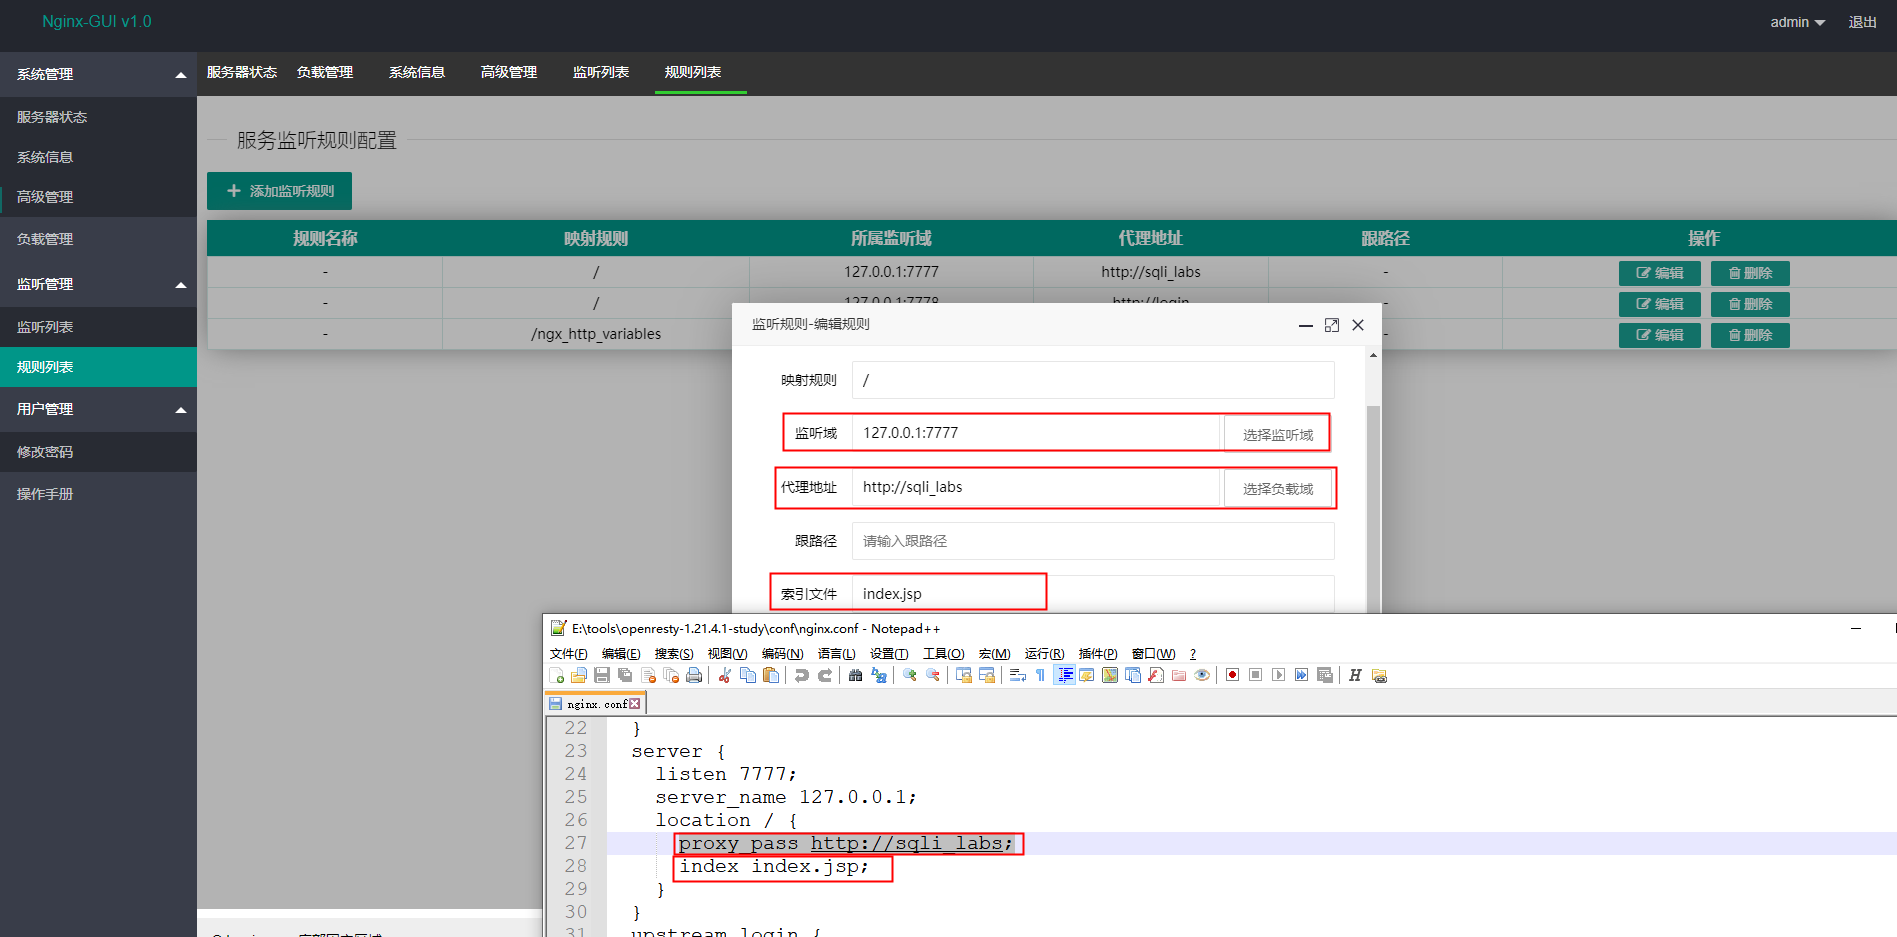
对于我们日常使用nginx,做一些简单的代理和负载功能是没问题的,又能和nginx本身解耦合,就会方便我们搞waf
集成ELK
waf的成果观赏还是很有必要的,这里只举两个例子,第一个是waf访问日志,说白了不就是nginx的访问日志吗也就是logs/access.log,所有的web访问日志都会在这个里面,还有一个叫就是waf拦截日志,也就是logs/hack/下面的日志,这两块可视化了以后,其他的都大同小异,当然我们采用的方案也就是ELK,把filebeat部署到waf的服务器上,采集这两个路径的日志,传给logstash做解析,存入elasticsearch里面进行持久化,最后用kibana或者grafana进行展示
waf访问日志
查看access.log看到,目前的访问日志格式解析起来不是很方便
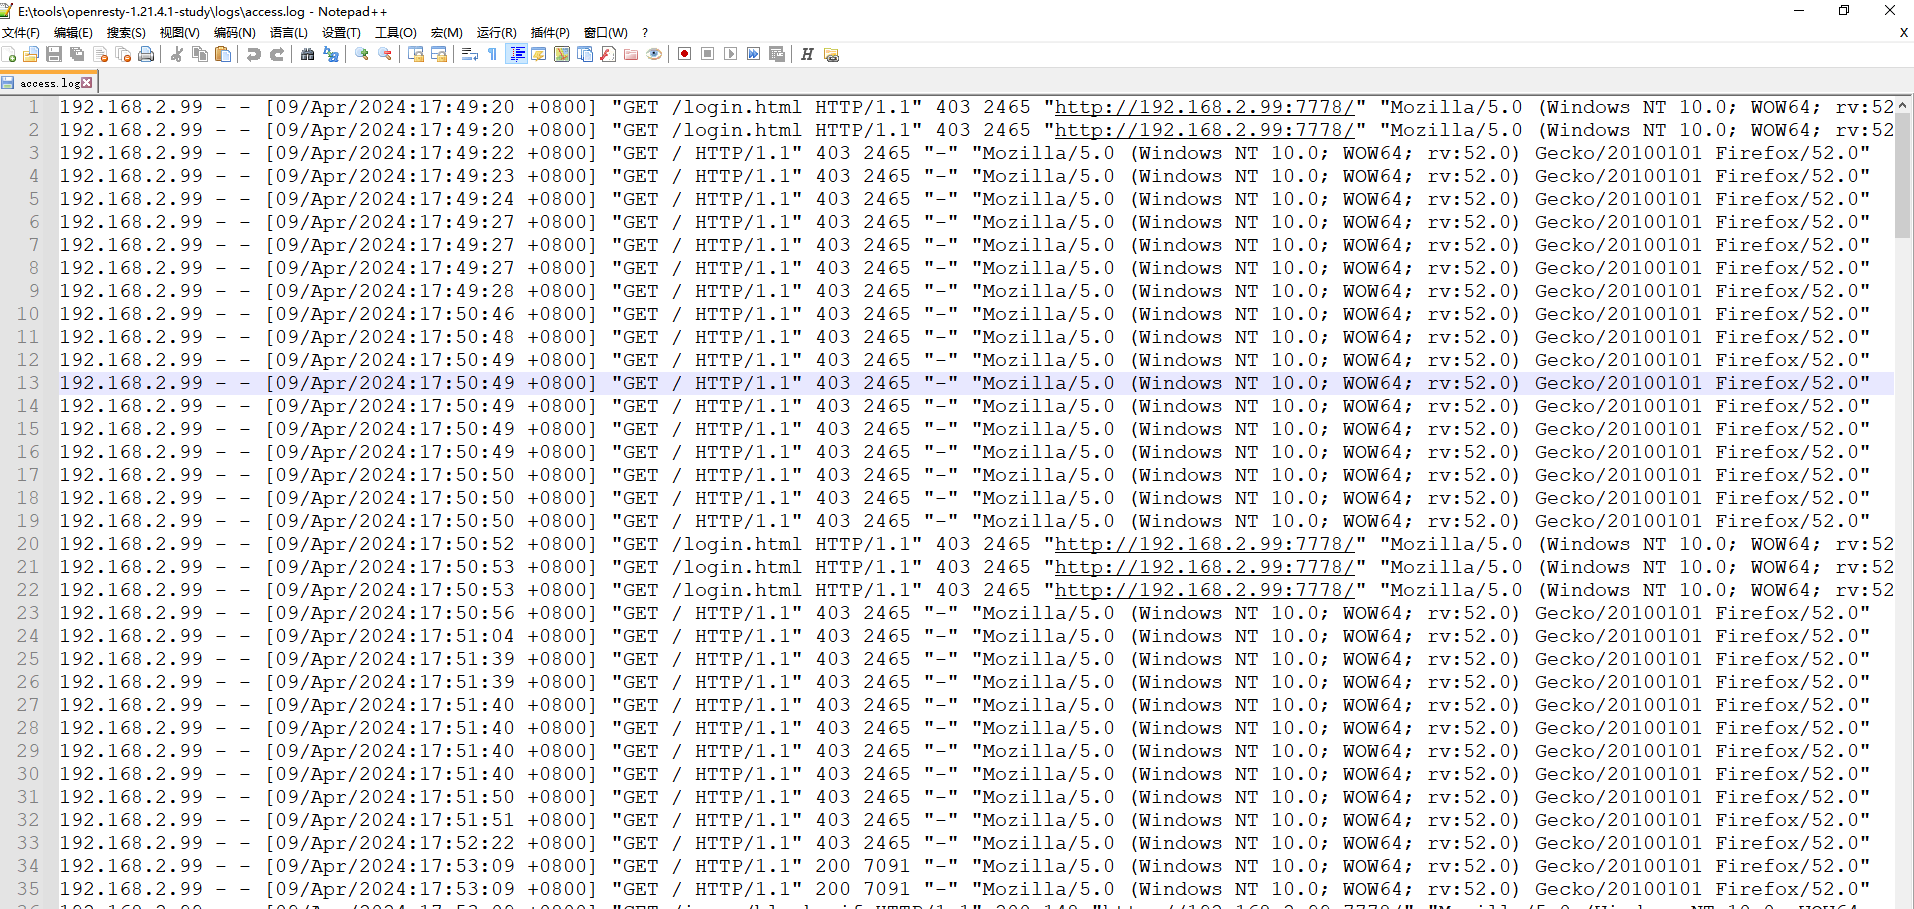
nginx的默认日志格式就是这样,没办法,我们给手动改成json格式的,方便logstash兄弟干活嘛
在nginx.conf的http块里面修改日志格式
    log_format log_json
      '{"@ngx_timestamp":"$time_iso8601",'
      '"domain":"$host",'
      '"server_ip":"$server_addr",'
      '"client_ip":"$remote_addr",'
      '"size":"$body_bytes_sent",'
      '"responsetime":"$request_time",'
      '"upstreamtime":"$upstream_response_time",'
      '"request_method":"$request_method",'
      '"url":"$uri",'
      '"http_user_agent":"$http_user_agent",'
      '"status":"$status",'
      '"referer":"$http_referer"'
    '}';
    access_log  logs/access.log log_json;
我这里是因为用了nginx-GUI缩格问题,看着有点别扭,不过不影响使用,正儿八经使用了,我肯定要统一缩格的,其实这里的变量不就是ngx_http_variables章节里面的变量嘛,想加哪个加哪个就好了
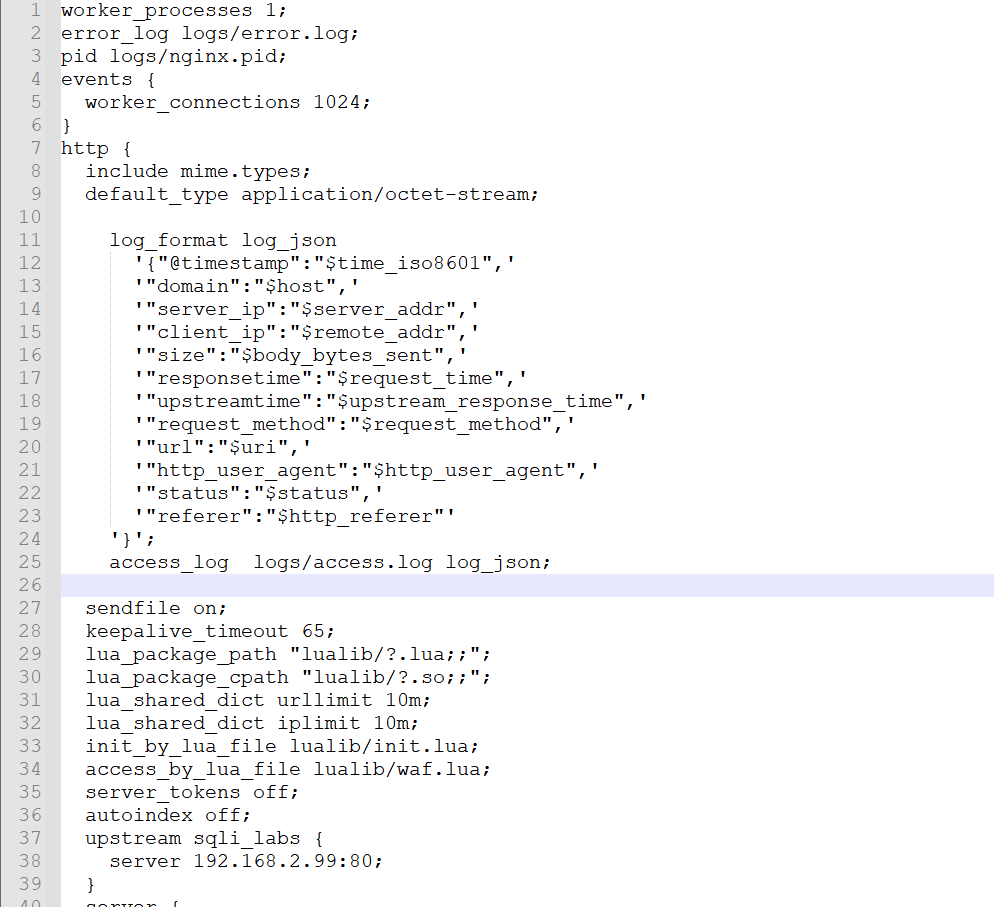
再次访问,就变成了容易解析的JSON格式了

懒得启动虚机了,ELK+grafana都直接在我windows上部署好了,ELK的安全包括TLS或者xpack不是我们考虑的主要问题,所以我们用一台机器直接最小化的配置安装
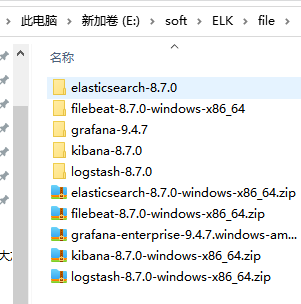
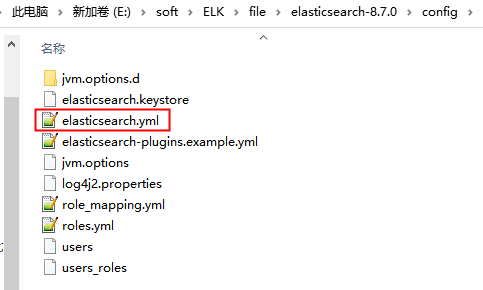
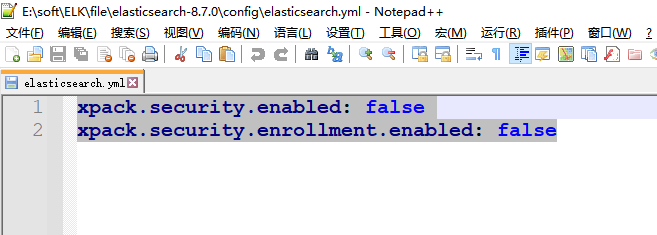
先搞ES,解压后修改ES的内存和yml配置即可启动bat
xpack.security.enabled: false
xpack.security.enrollment.enabled: false
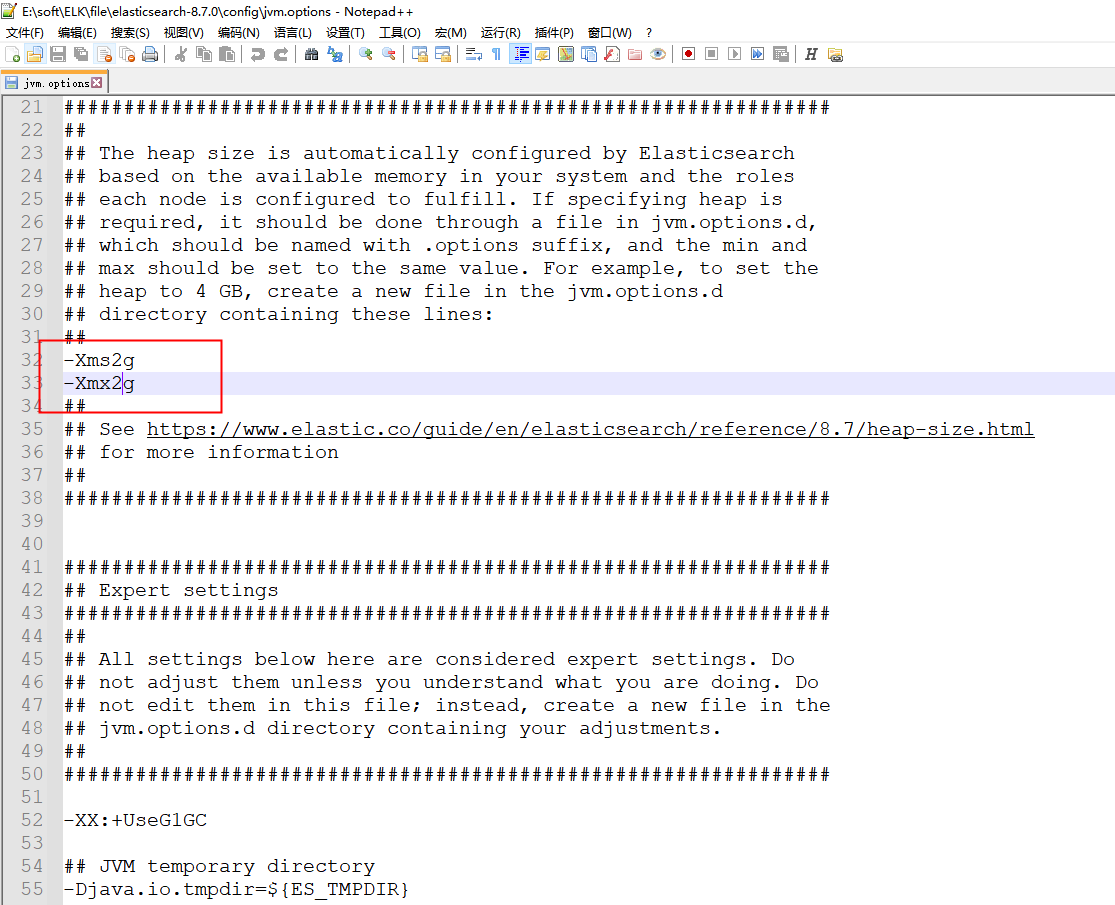
内存也改一下吧
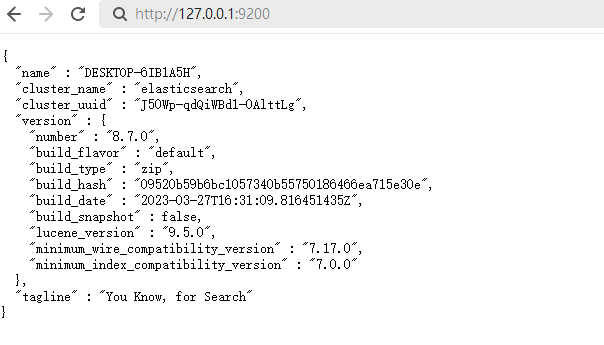
双击运行bin下面的elasticsearch.bat,访问
http://127.0.0.1:9200/
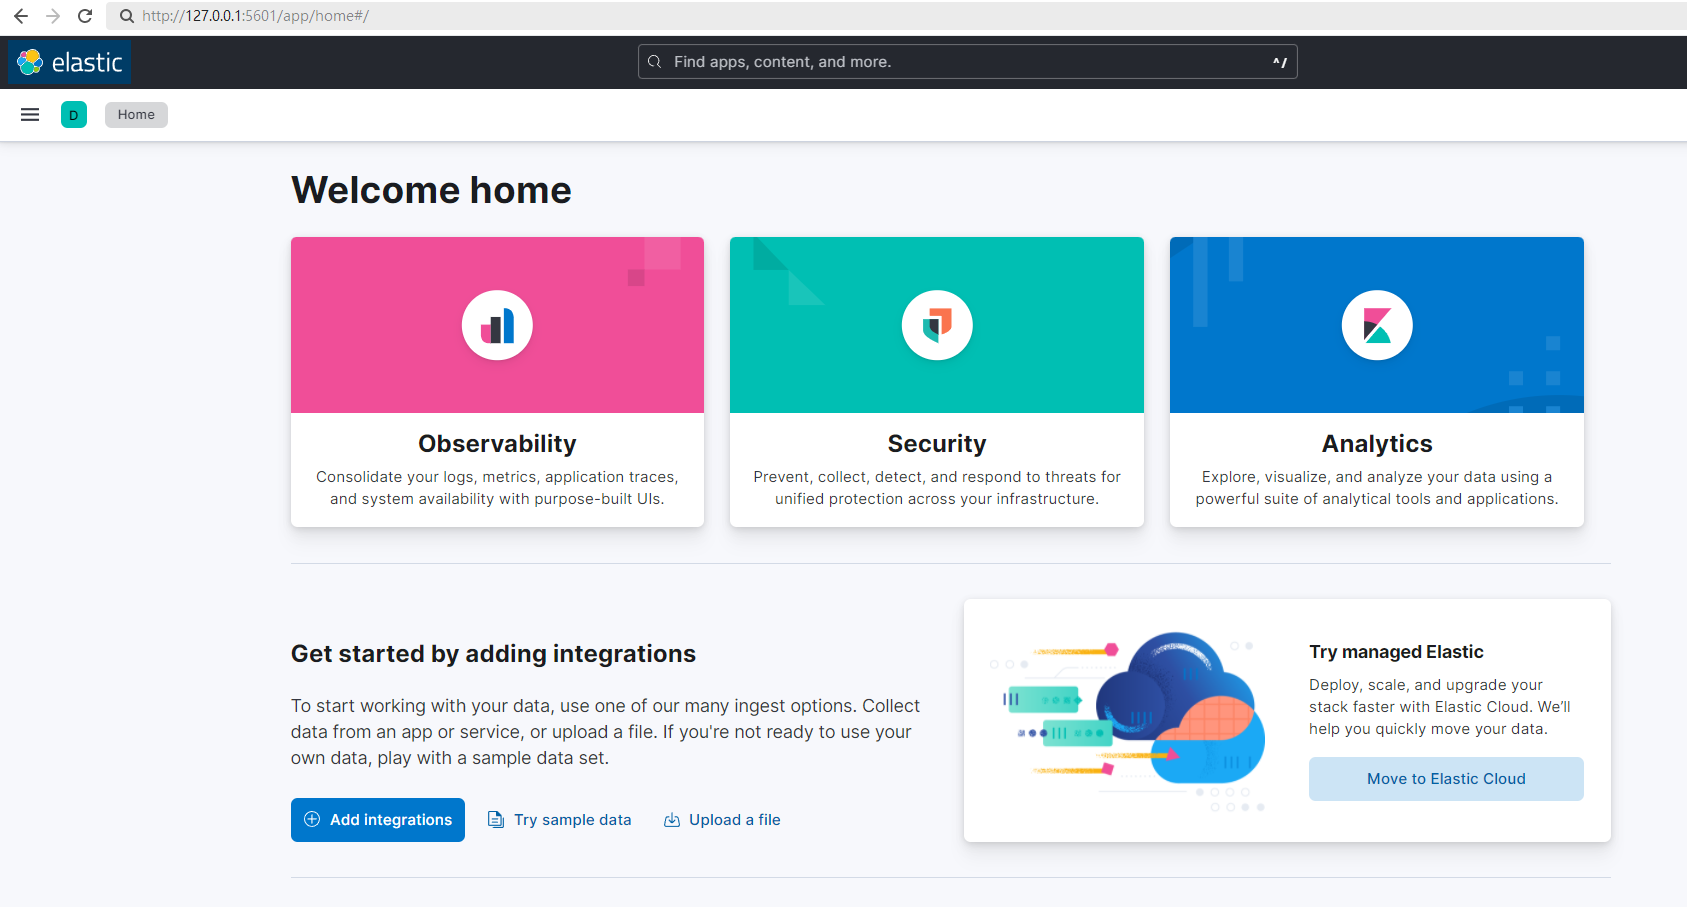
windows下,下载了kibana后的包啥都不用改,直接运行bin下的kibana.bat就好,访问
http://127.0.0.1:5601/app/home#/
grafana啥也不用改,直接运行bin下面的grafana-server.exe即可
访问,默认用户名密码都是admin
http://127.0.0.1:3000/login

创建logstash配置,在bin下,启动logstash,监听filebeat传过来的日志
logstash在config文件里面加一个access.conf
input {
	beats {
		port => 10001
	}
}

filter{
    ruby {
        code => "event.set('timestamp', event.get('@timestamp').time.localtime + 8*60*60)"
    }
    ruby {
        code => "event.set('date_type_time', event.get('@timestamp').time.localtime + 8*60*60)"
    }
    mutate{
        remove_field => ["host"]
        remove_field => ["agent"]
        remove_field => ["ecs"]
        remove_field => ["tags"]
        remove_field => ["@version"]
        remove_field => ["containerized"]
        remove_field => ["input"]
        remove_field => ["log"]

        remove_field => "[log][flags]"
        remove_field => "[log][offset]"
        remove_field => "[_source][ecs]"
        remove_field => "[_source][agent]"
        remove_field => "[_source][event]"
    }
    if "waf_access_log" in [fields][from]{

		json {
			source => "[message]"
		}
	}
}

output {
    if "waf_access_log" in [fields][from]{
		elasticsearch {
			hosts => ["http://localhost:9200"]
			index => "access-%{+YYYY.MM.dd}"
		}
    }
}
启动logstash
logstash -f config/access.conf
访问
http://127.0.0.1:9600/

filebeat运行
修改filebeat.yml
filebeat.inputs:
- type: log
  enabled: true
  paths:
    - E:\tools\openresty-1.21.4.1-study\logs\access.log
  fields:
    from: 'waf_access_log'


output.logstash:
  hosts: ["127.0.0.1:10001"]
filebeat启动
filebeat.exe -e -c filebeat.yml
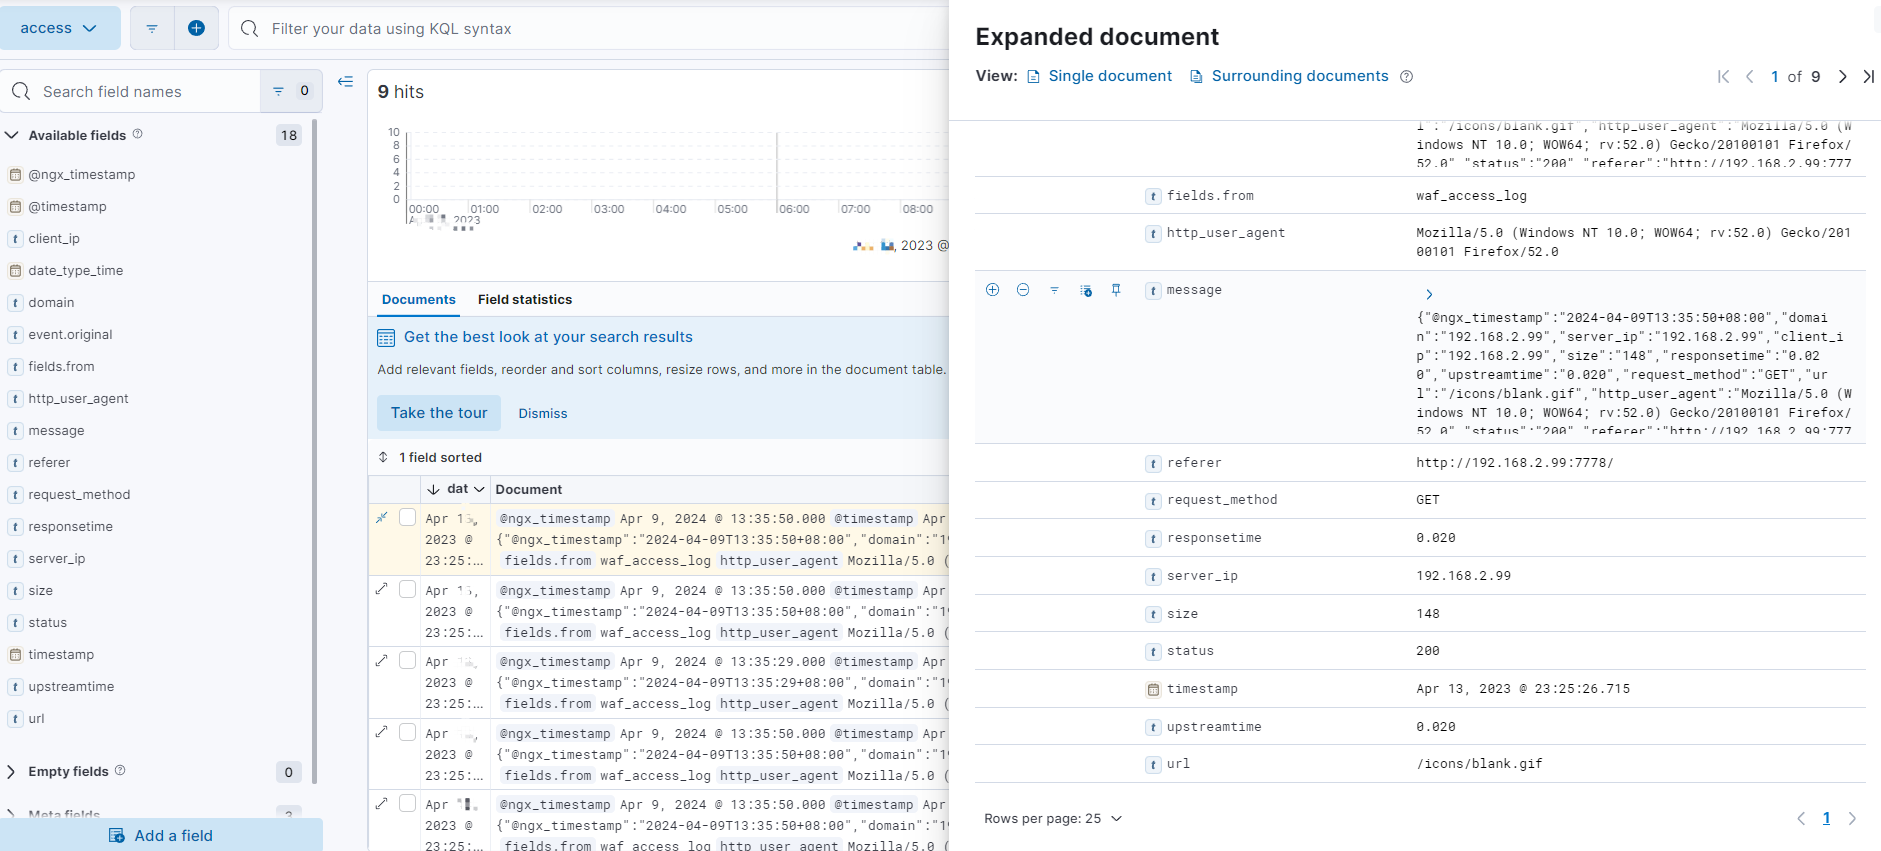
可以在kibana里面看到访问日志
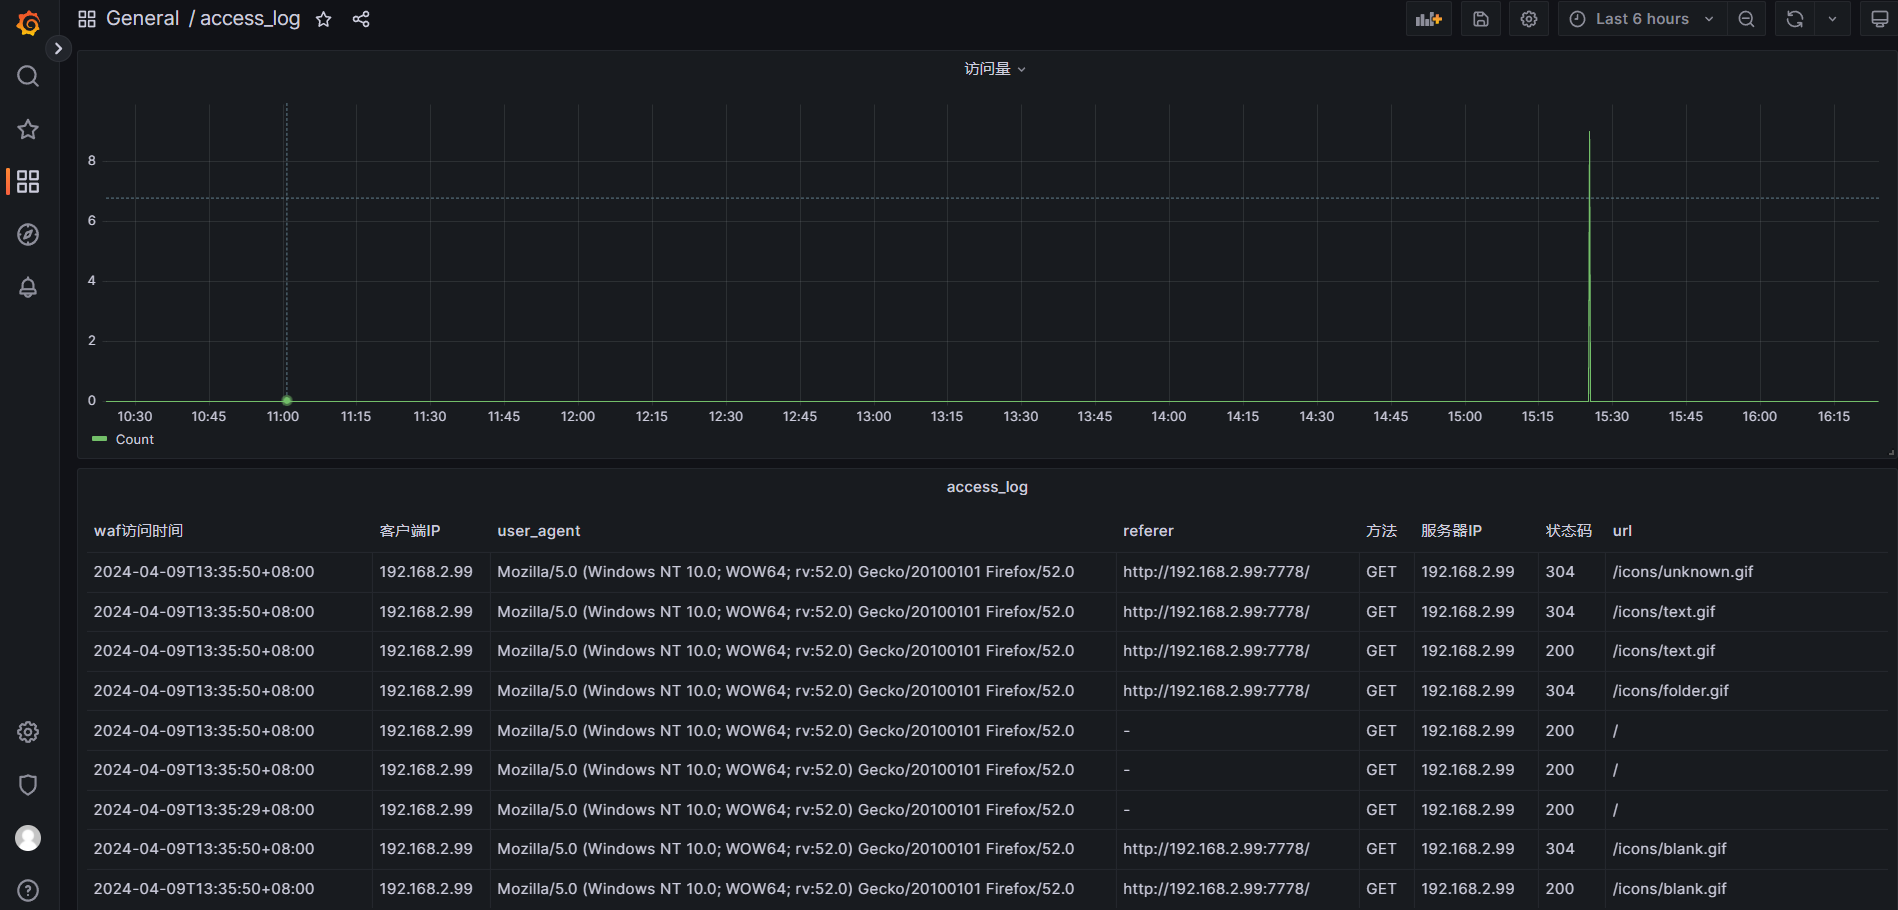
接下来就是grafana的表演了,弄了一个简陋的图表,grafana展示nginx的高大上的图标有很多种,网上一搜一大把
waf拦截日志
waf的日志格式是在init.lua里面自定义个,当然想改自己也可以改成JSON格式的,我们这里就用作者的日志格式吧,也假设ua存在
借助logstash的正则匹配
%{IP:client_ip} \[%{DATA:time}\] "%{DATA:method} %{DATA:server_ip}" "%{DATA:uri}" "%{DATA:user_agent}" "%{DATA:waf_rule}"
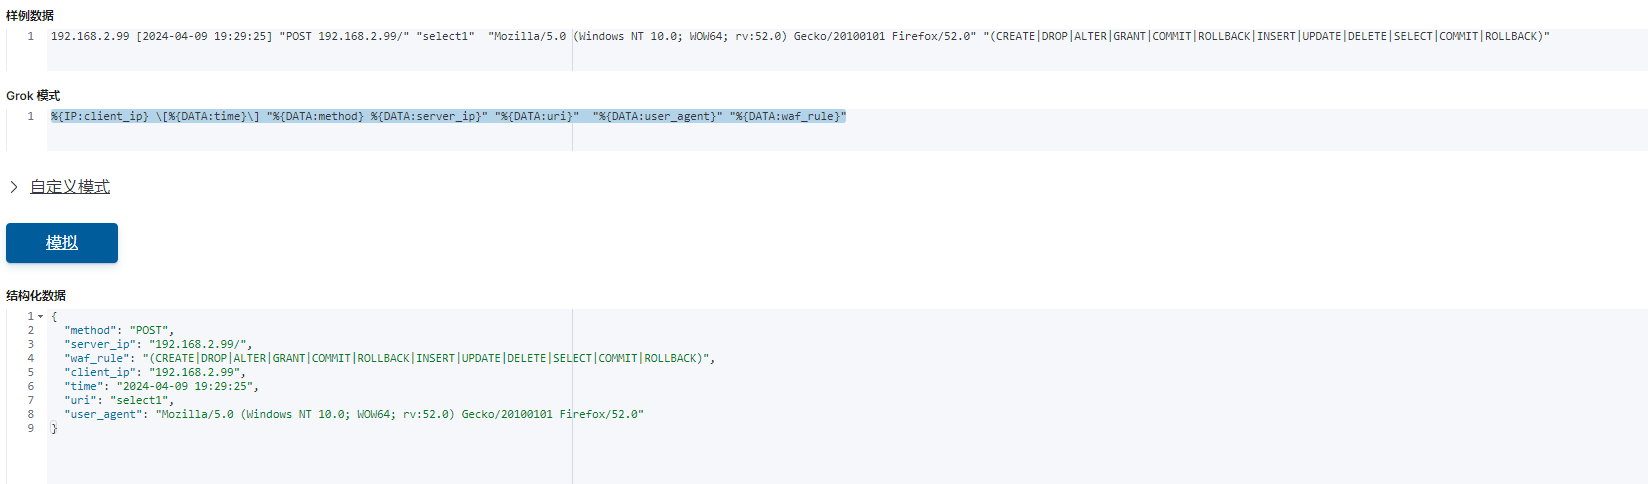
修改logstash配置
input {
	beats {
		port => 10001
	}
}

filter{
    ruby {
        code => "event.set('timestamp', event.get('@timestamp').time.localtime + 8*60*60)"
    }
    ruby {
        code => "event.set('date_type_time', event.get('@timestamp').time.localtime + 8*60*60)"
    }
    mutate{
        remove_field => ["host"]
        remove_field => ["agent"]
        remove_field => ["ecs"]
        remove_field => ["tags"]
        remove_field => ["@version"]
        remove_field => ["containerized"]
        remove_field => ["input"]
        remove_field => ["log"]

        remove_field => "[log][flags]"
        remove_field => "[log][offset]"
        remove_field => "[_source][ecs]"
        remove_field => "[_source][agent]"
        remove_field => "[_source][event]"
    }
    if "waf_access_log" in [fields][from]{
		json {
			source => "[message]"
		}
	}
    if "waf_rule_log" in [fields][from]{
		grok {
			match => { "message" => "%{IP:client_ip} \[%{DATA:time}\] \"%{DATA:method} %{DATA:server_ip}\" \"%{DATA:uri}\"  \"%{DATA:user_agent}\" \"%{DATA:waf_rule}\"" }
		}
	}
}

output {
    if "waf_access_log" in [fields][from]{
		elasticsearch {
			hosts => ["http://localhost:9200"]
			index => "access-%{+YYYY.MM.dd}"
		}
    }
    if "waf_rule_log" in [fields][from]{
		elasticsearch {
			hosts => ["http://localhost:9200"]
			index => "waf-%{+YYYY.MM.dd}"
		}
    }
}
修改filebeat.yml的配置
filebeat.inputs:
- type: log
  enabled: true
  paths:
    - E:\tools\openresty-1.21.4.1-study\logs\access.log
  fields:
    from: 'waf_access_log'

- type: log
  enabled: true
  paths:
    - E:\tools\openresty-1.21.4.1-study\logs\hack\*.log
  fields:
    from: 'waf_rule_log'

output.logstash:
  hosts: ["127.0.0.1:10001"]
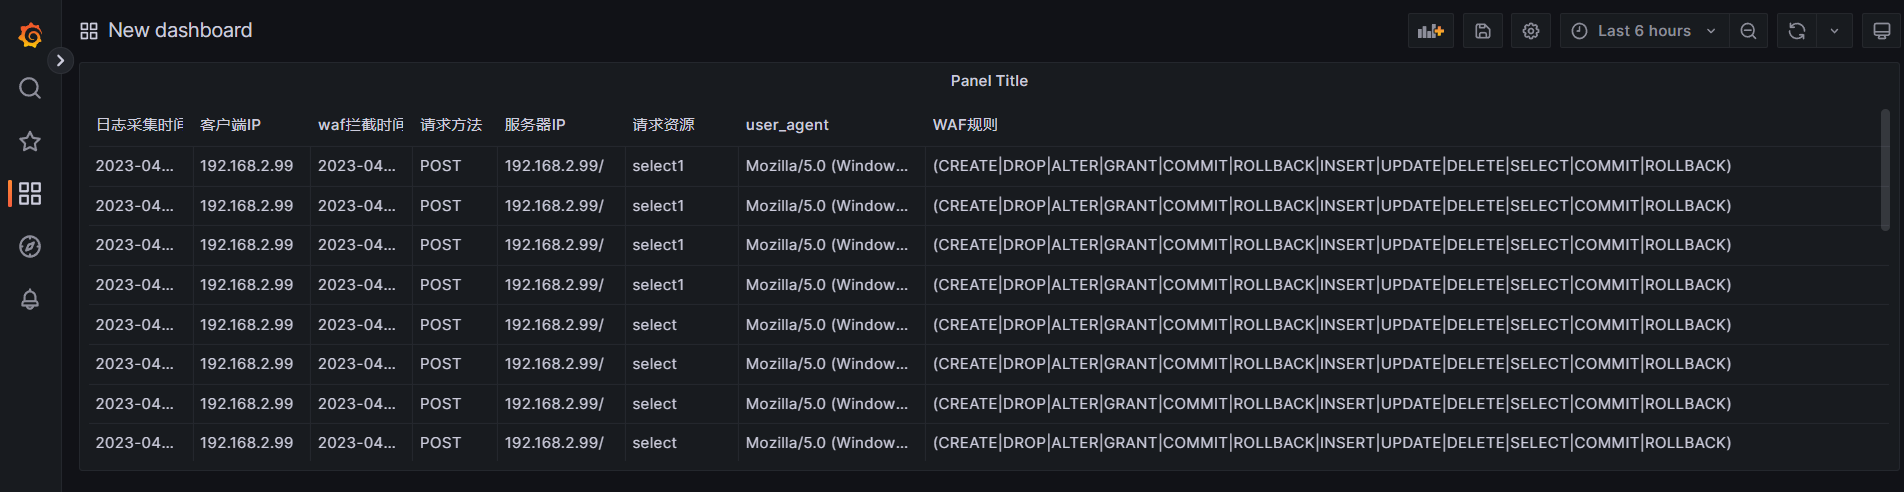
开始grafana的表演
长亭-雷池
这个waf是我两个舍友极力推荐的,个人用下来的最大感受就是,十分简洁,没有那么多花里胡哨的态势感知界面,就是多后端代理+waf拦截两个功能
https://mp.weixin.qq.com/s/FUbYRl7sxaY_oTp0O0h8gg
https://github.com/chaitin/safeline/blob/main/README_CN.md
安装docker compose的V2版本,V1的话是python已经不维护了,V2是go
https://blog.csdn.net/hanxiaotongtong/article/details/125477514
这条命令运行通了,再往下进行
docker compose version
mkdir -p safeline && cd safeline
# 下载并执行 setup
curl -kfLsS https://waf-ce.chaitin.cn/release/latest/setup.sh | bash

# 运行
sudo docker compose up -d
完全是基于docker的,可以看到nginx的影子,一整篇文章都是nginx,我们并不陌生了
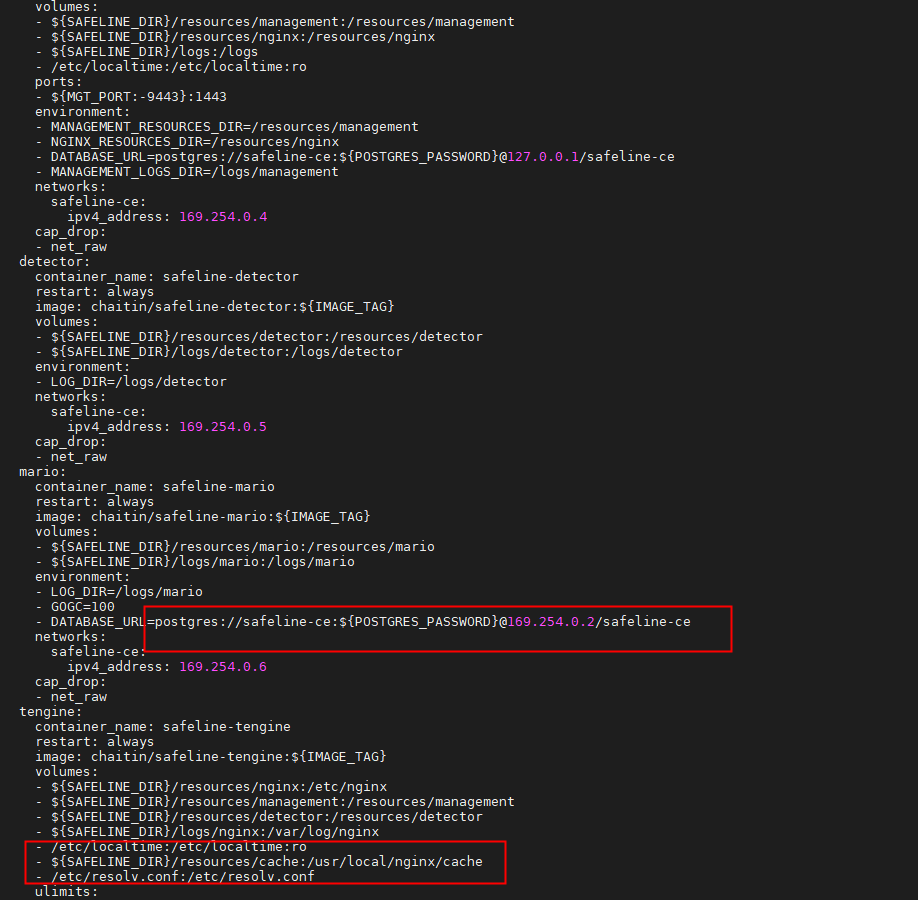
跑了5个容器,用的是9443端口

访问web管理界面,出现了二维码,作者挺用心的,也挺有意思的,这个waf已经集成了动态密码进行认证,也就是双因素中的其中一种,不过这里只能算是单因素,因为还没加入用户体系,所以只需要输入验证码就能验证通过
https://192.168.174.134:9443/
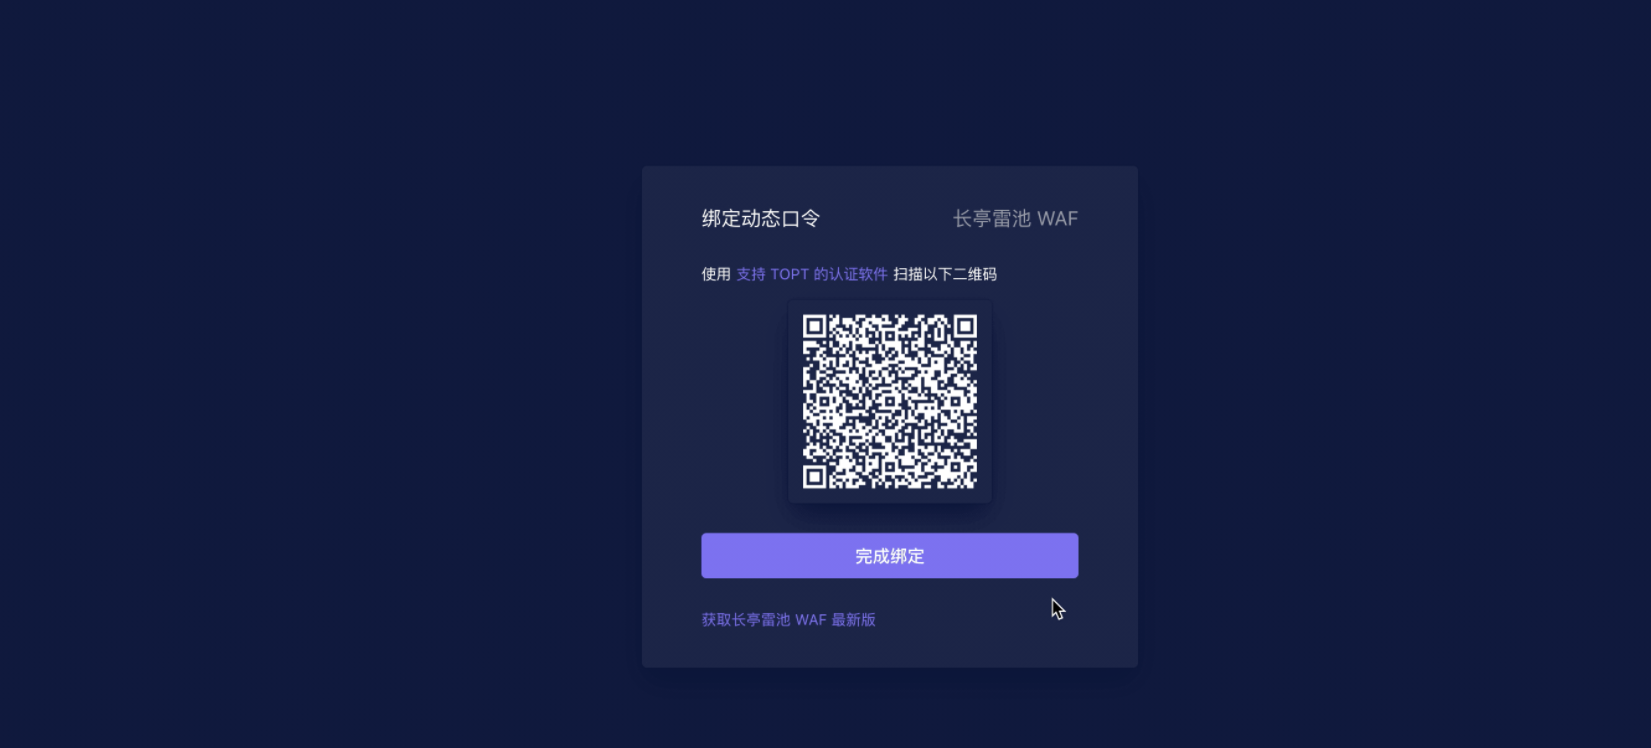
我们需要的是下载一个用于接收验证码的APP,我是用手机的腾讯应用宝下载了一个腾讯身份验证,用APP扫描上面这个二维码就可以完成绑定,然后APP上会出现验证码,输入即可登录,所以这个waf还是很依赖外网的
登录进去映入眼帘的就是两个核心功能,一个是检测日志,也就是waf的拦截日志,一个是防护站点,也就是nginx配置的后端
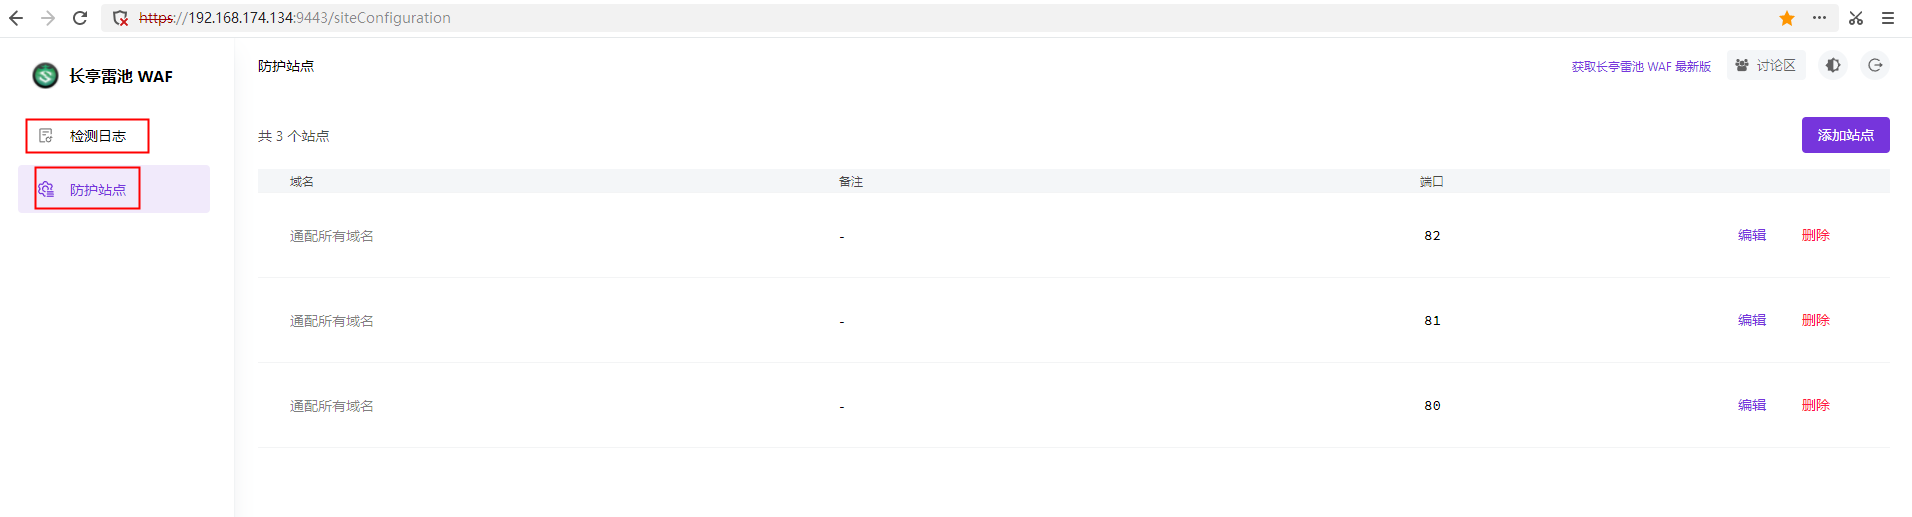
规则是不需要我们写的,作者都写好了,所以我们只需要加站点即可
域名的话根据实际情况填写,我这里用IP访问,是可以不写的
端口就是waf开启的端口,SSL看需不需要看启
上游服务器也就是后端的代理服务器
我这里这么写就意味着,waf开启了80端口,代理到了192.168.174.5的82,所以我得在192.168.174.5上面启动一个82的服务
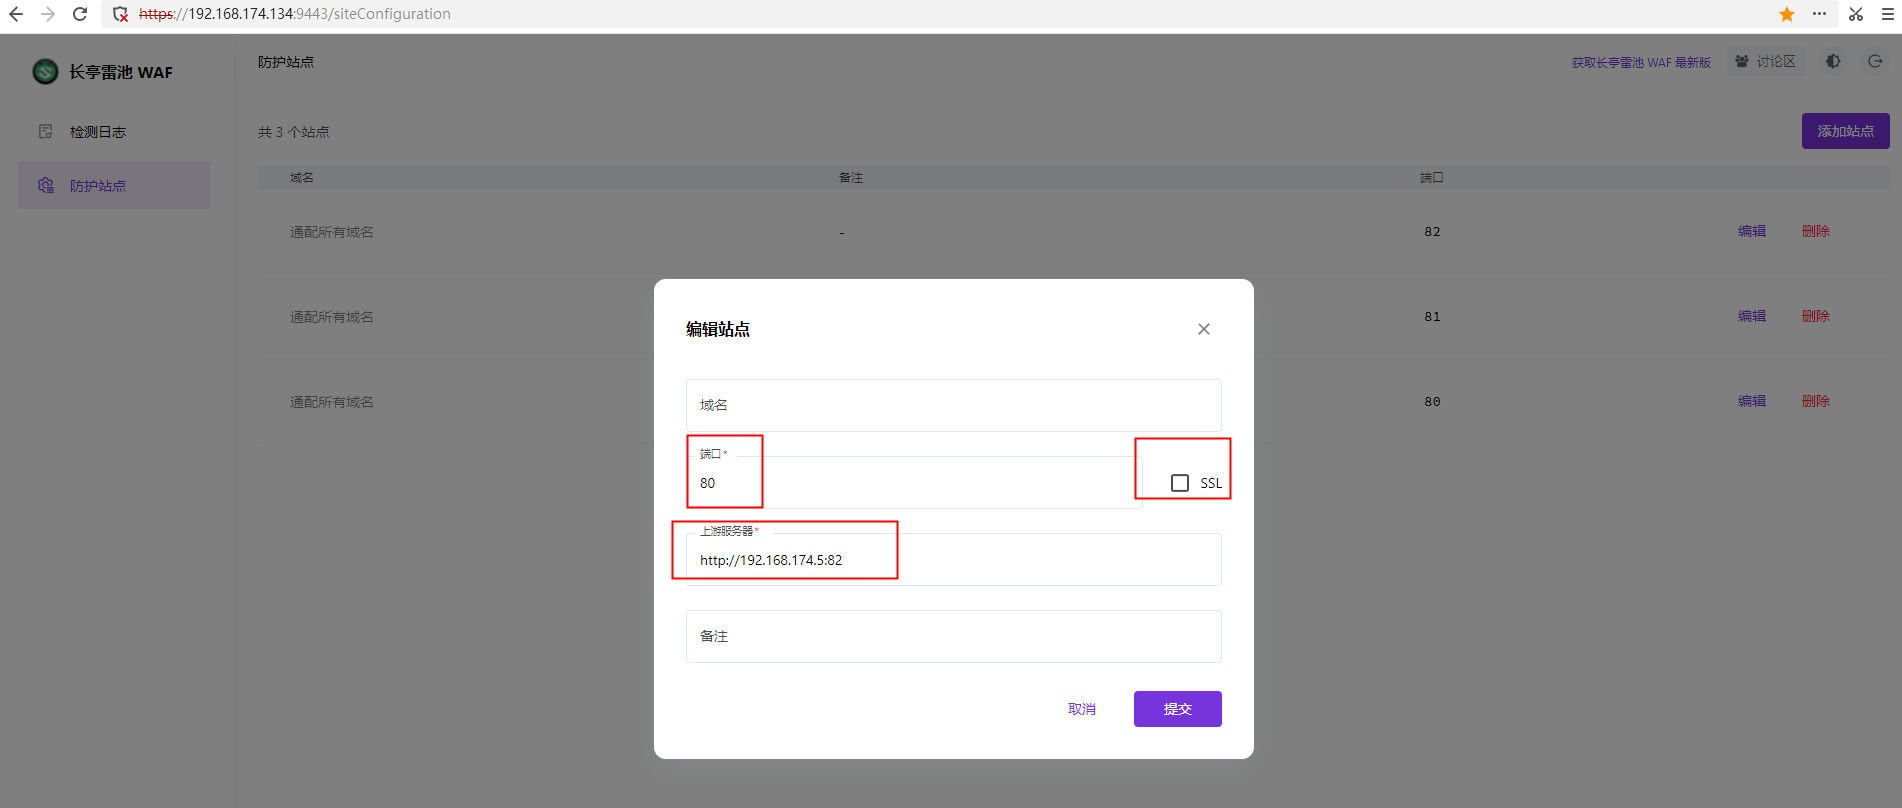
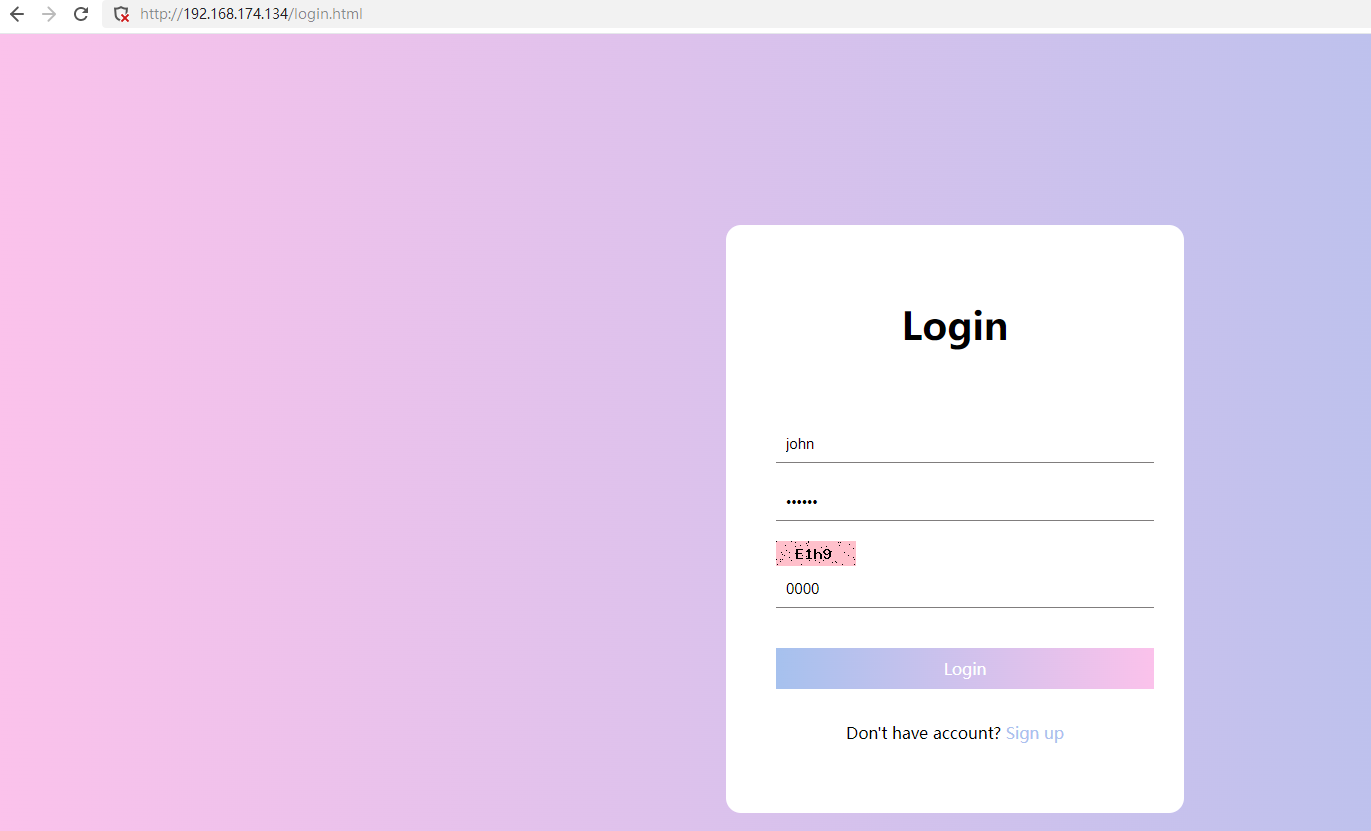
直接访问这个80就行
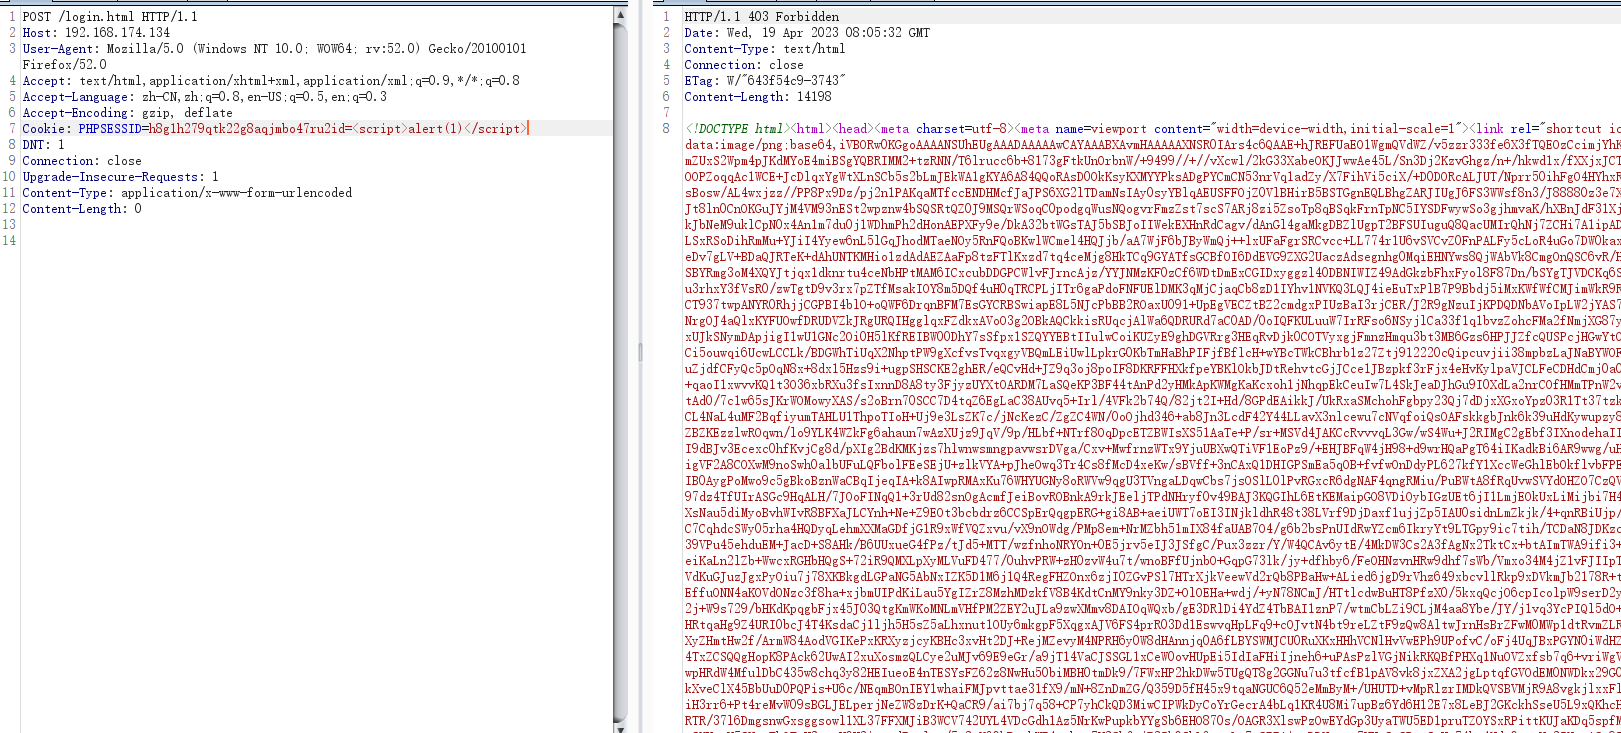
关键字拦截会返回403
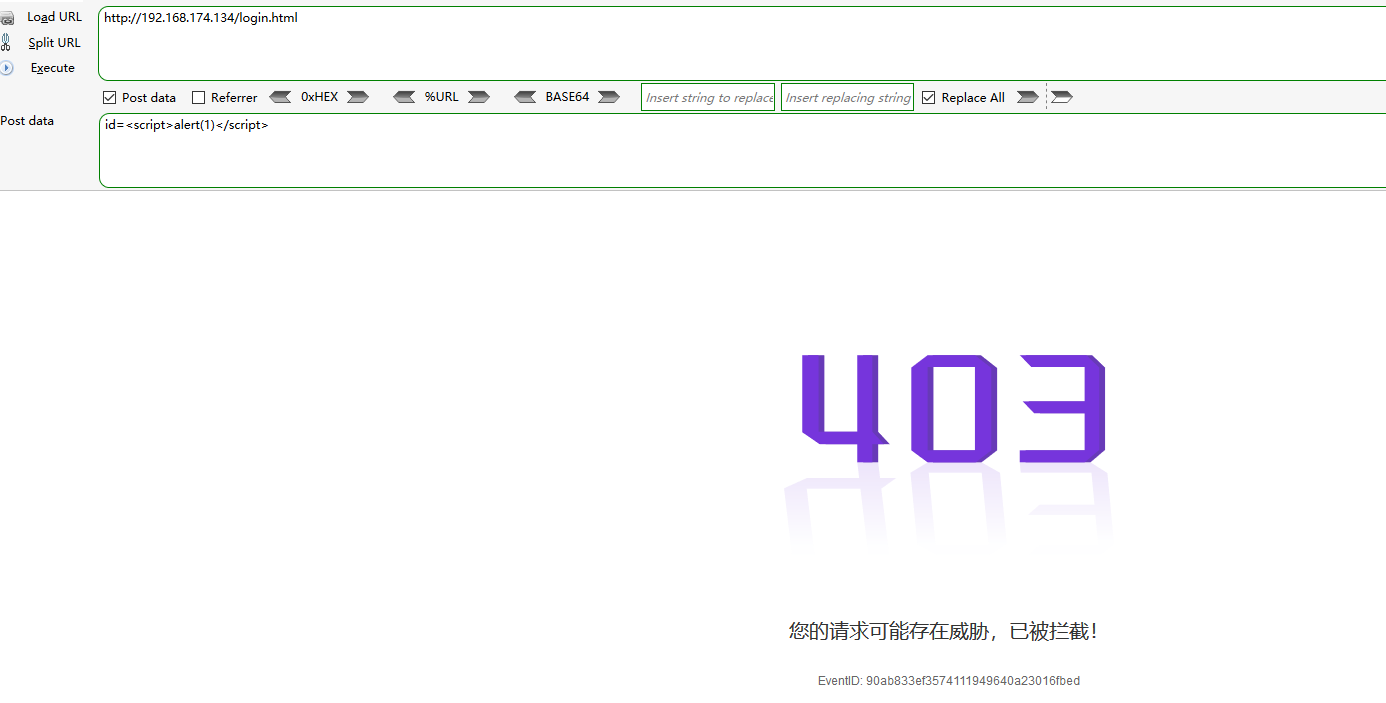
日志也会记录
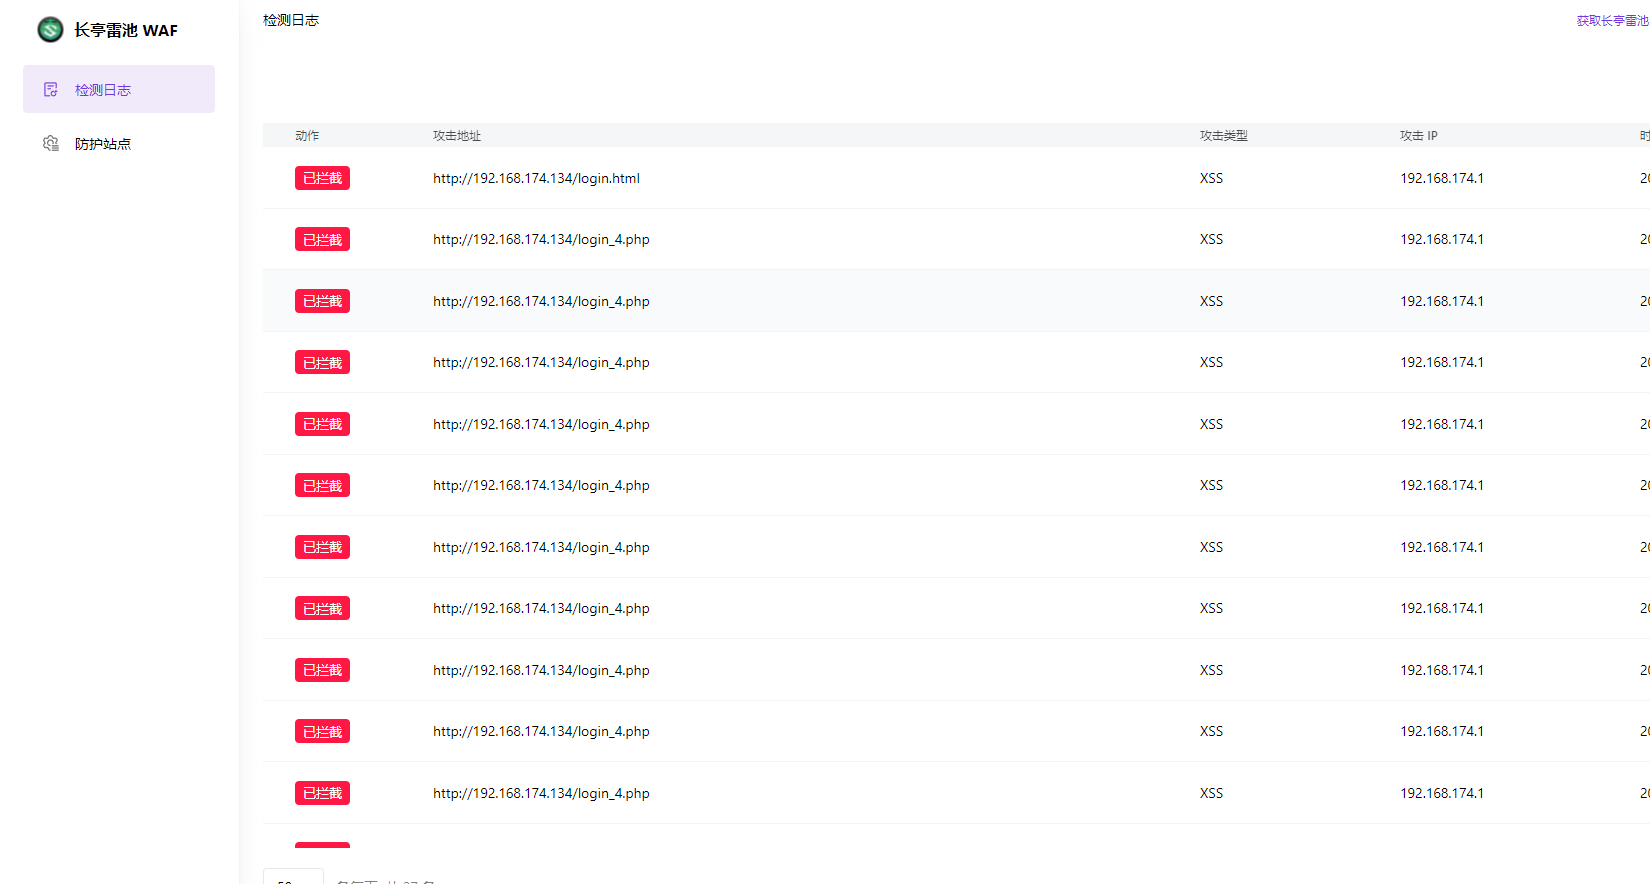
可以点击详情查看
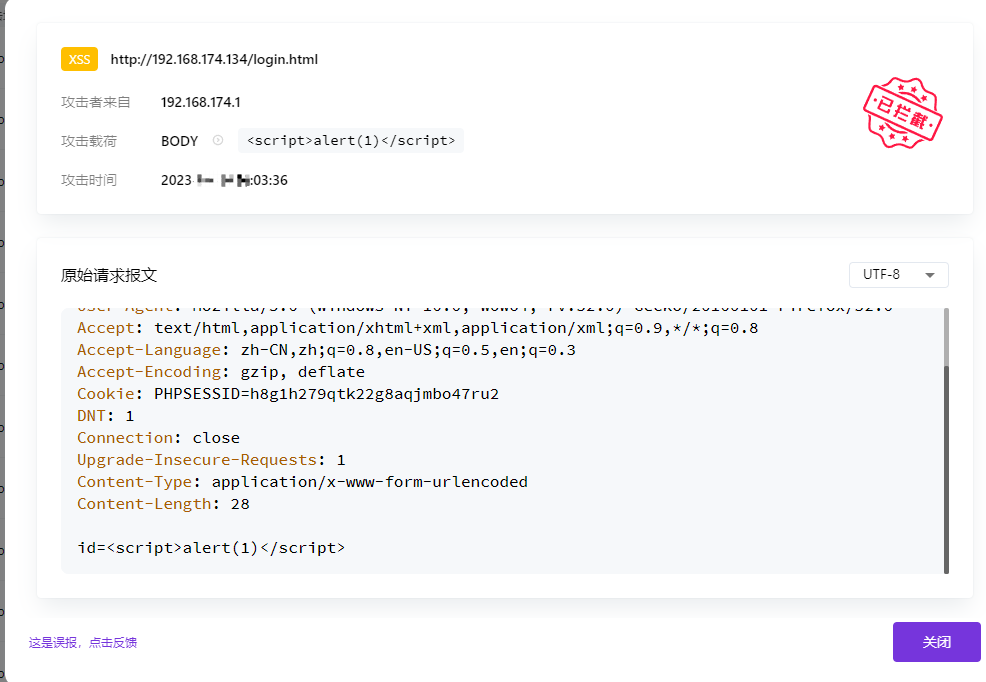
其他的字段像是cookie也会拦截
我最心心念念的JSON格式也随意拦截,并且规则很智能,正则写的应该非常不错的,我试了几个payload,到关键的时刻才会检测到