提示:文章写完后,目录可以自动生成,如何生成可参考右边的帮助文档
一、CSS是什么?
层叠样式表(英文全称:Cascading Style Sheets)不仅可以静态地修饰网页,还可以配合各种脚本语言动态地对网页各元素进行格式化。
二、使用步骤
2.1.css的存放位置
css样式可以写
1.直接在标签上
<img style="height:100px;width:100px;" src="/static/img.jpg"/>
2.在head标签中写style标签
<style>
      .c1{


        color:red;
      }
</style>
3.文件中
<!DOCTYPE html>
<html lang="en">
<head>
<meta charset="UTF-8">
<title>Title</title>
</head>
<style>
.c1 {
color: red;
}
</style>
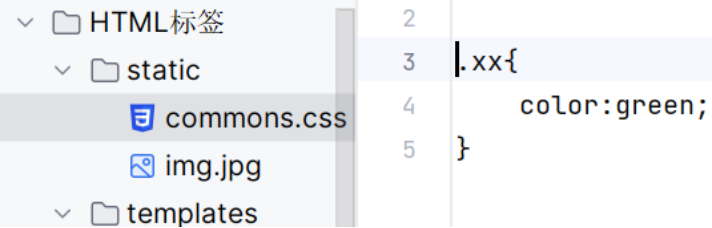
<link rel="stylesheet" href="common.css"/>
static目录下Common.css 文件名称
2.2.选择器
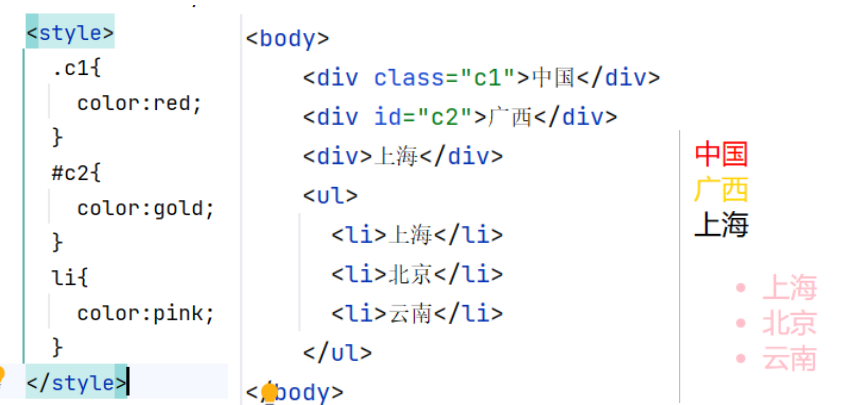
1.类选择器、id选择器(只能一个)、标签选择器
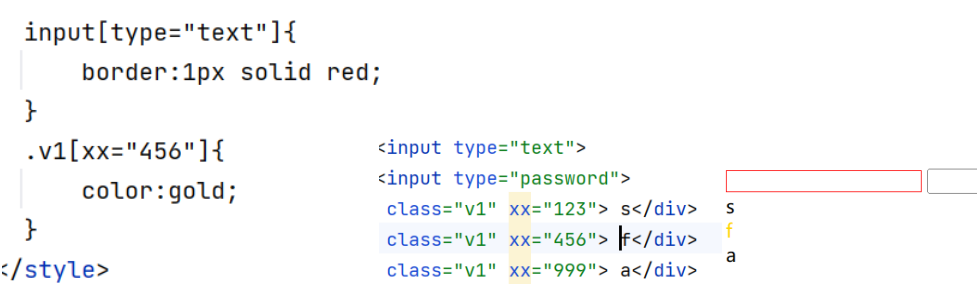
2.属性选择器
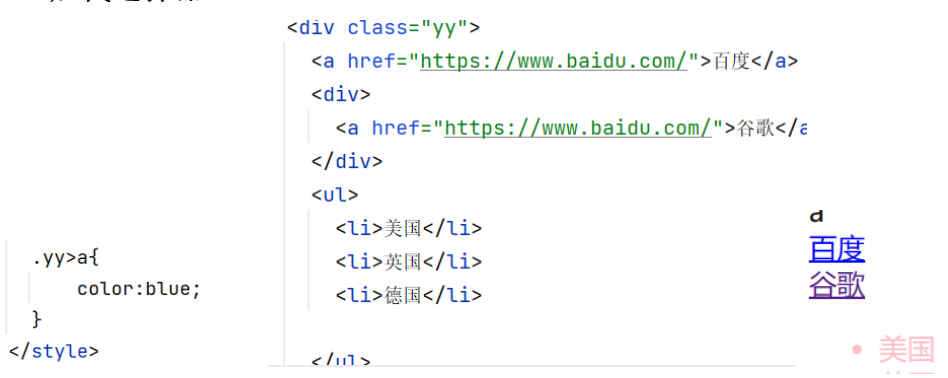
3.后代选择器
总代码:
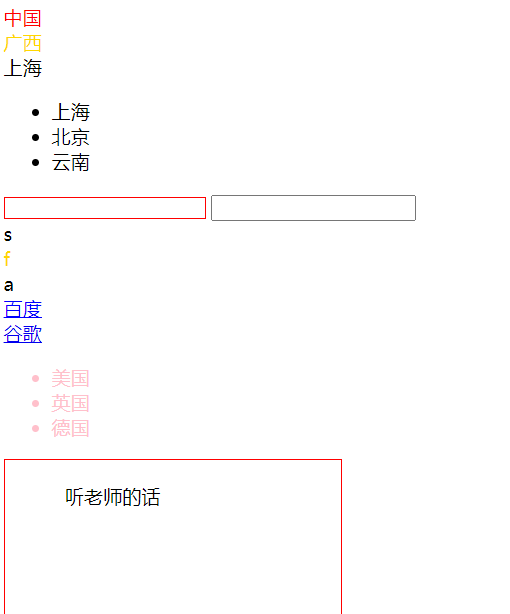
<!DOCTYPE html>
<html lang="en">
<head>
    <meta charset="UTF-8">
    <title>Title</title>
    <style>
      .c1{


        color:red;
      }
      #c2{


        color:gold;
      }
      .yy li{


        color:pink;
      }
      input[type="text"]{


          border:1px solid red;
      }
      .v1[xx="456"]{


          color:gold;
      }
      .yy>a{


          color:blue;
      }
      .outer{


          border:1px solid red;
          height:400px;
          width:200px;


          padding:20px 30px 45px 50px;
      }

    </style>
</head>
<body>
    <div class="c1">中国</div>
    <div id="c2">广西</div>
    <div>上海</div>
    <ul>
      <li>上海</li>
      <li>北京</li>
      <li>云南</li>
    </ul>
    <input type="text">
    <input type="password">
    <div class="v1" xx="123"> s</div>
    <div class="v1" xx="456"> f</div>
    <div class="v1" xx="999"> a</div>
    <div class="yy">
      <a href="https://www.baidu.com/">百度</a>
      <div>
        <a href="https://www.baidu.com/">谷歌</a>
      </div>
      <ul>
        <li>美国</li>
        <li>英国</li>
        <li>德国</li>
      </ul>
      <div class="outer">
        <div>听老师的话</div>
      </div>
</div>

</body>
</html>
当存在多个样式和覆盖的问题时,重名会覆盖,定义时以下方为准,!Important 不会被覆盖
2.3.常用CSS样式介绍与示例
1.宽度、高度
宽度支持百分比
行内标签默认无效;
块级标签默认有效(霸道,右侧区域空白也不给占用)
<div style="width: 200px;height: 400px;"></div>
<div style="width: 100%;height: 400px;"></div>
2.块级标签和行内标签
Css样式:->display:inline-block(style包含) 使行内标签对 height 和 width 生效
两标签的转化:
<div style="display: inline;">移动</div>
<span style="display: block;">联通</span>
3.字体和颜色
<div style="color:#000;">颜色支持RGB</div>
<div style="color:red;">颜色</div>
<div style="font-weight:800;">字体加粗</div>
<div style="font-family:rainbow-2;">下载的字体样式</div>
4.文字对齐方式
<div style="text-align: center">水平方向居中</div>
<div style="line-height: 5px;">垂直方向居中 </div>
<div style="border: 1px solid red;">边框颜色及大小 </div>
5.浮动
如果在块级标签中,加入了float属性,那么这个块级标签奖不会再占用一整行,而是自己有多大就占用多大。防止浮动字符被遮挡,其解决办法:在同级子标签的最下面添加 style=“clear: both;”
<div class="container">
    <div style="background-color: pink; height: 200px;width: 50px;float: right">
        <div class="content">111</div>
        <div class="content">222</div>
        <div class="content">333</div>
        <div style="clear: both;"></div>
    </div>

</div>

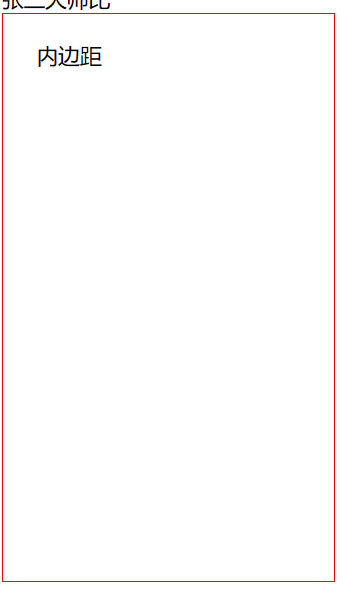
6.内边距
padding:20px 30px 45px 50px; (上右下左、顺时针)
    <style>
        .outer{


            border:1px solid red;
            height:400px;
            width: 200px;
            padding-top:20px;
            padding-left:25px;
        }
    </style>
7.外边距
margin-top/right /left/ bottom
margin:0 auto 居中
<!DOCTYPE html>
<html lang="en">
<head>
    <meta charset="UTF-8">
    <title>Title</title>
    <style>
      body{


        margin: 0;
      }
      .c1{


        background-color: pink;
        width:988px;
        height:900px;
        margin : 0 auto;
      /*    居中margin*/
      }
    </style>
</head>
<body>
    <div class="c1"></div>
</body>
</html>

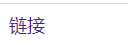
8.消除链接下的下划线 text-decoration:none
<!DOCTYPE html>
<html lang="en">
<head>
    <meta charset="UTF-8">
    <title>Document</title>
    <style>
        .sub_header a{


        text-decoration:none
        }
    </style>
</head>
<body>
    <div class="sub_header" >
         <a href="">链接</a>
    </div>
</body>
</html>
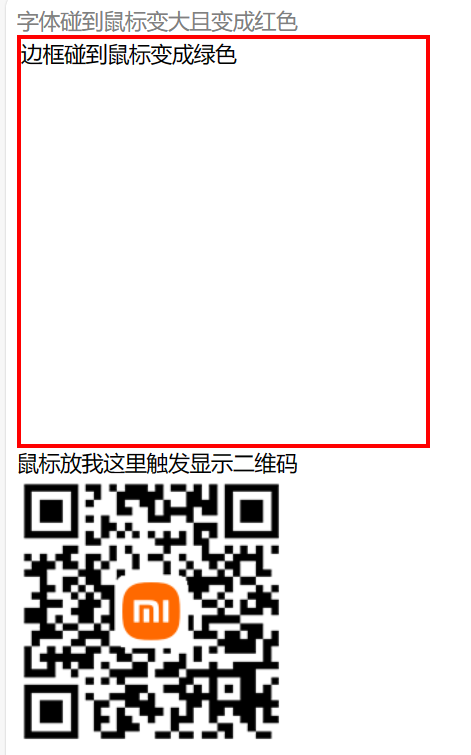
9.随鼠标变化 hover 与download
<!DOCTYPE html>
<html lang="en">
<head>
    <meta charset="UTF-8">
    <title>Document</title>
    <style>
        .c1 {


            color:grey;
        /*    原始的样式*/
        }
        .c1:hover {


            color: red;
            font-size: 20px;
        /*    有hover,表示鼠标触碰后的样式*/
        }
        .c2 {


            width: 300px;
            height: 300px;
            border: 3px solid red;
            /*    原始的样式*/
        }
        .c2:hover {


            border: 3px solid green;
            /*    有hover,表示鼠标触碰后的样式*/
        }
        .download {


            display: none;
        /*    隐藏*/
        }
        .app:hover .download {


            display: block;
        /*    鼠标碰到后显示*/
        }
    </style>
</head>
<body>
    <div class="c1">灰色字体碰到鼠标变大且变成红色</div>
    <div class="c2">红色边框碰到鼠标变成绿色</div>
    <div class="app">
        <div>鼠标放我这里触发显示二维码</div>
        <div class="download">
            <img src="https://cdn.cnbj1.fds.api.mi-img.com/mi-mall/78c30d4f259ed43ab20e810a522a6249.png" alt="">
        </div>
    </div>
</body>
</html>
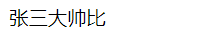
10.after
<!DOCTYPE html>
<html lang="en">
<head>
    <meta charset="UTF-8">
    <title>Document</title>
    <style>
        .c1:after {


            content: "大帅比"
        }
    </style>
</head>
<body>
    <div class="c1">张三</div>
</body>
</html>
11.透明度
opacity:0.7;
<!DOCTYPE html>
<html lang="en">
<head>
    <meta charset="UTF-8">
    <title>Document</title>
    <style>
        .c2{


            opacity:0.7;
        }
    </style>
</head>
<body>
    <div class="c2">李四</div>
</body>
</html>

注意:
a标签是行内标签,行内标签的高度、内外边距,默认无效,需转化display:block
垂直方向居中:
文本:line-height
图片:边距