官网文档连接
DataHub Quickstart Guide | DataHub (datahubproject.io)
本文所选择的Python的版本为3.8.16,Docker版本为20.10.0,Datahub为0.10.5版本
python必须为3.7以上的版本。0.10.5不支持以下的版本
如果要使用web上的 添加数据源 直接调用的python和pip命令 需要把环境变量设置过去。不能用python3
安装python3
需要注意的一点是datahub需要openssl1.11以上。所以在安装python3的时候就提前配置好,可以看下这个文档
python报错:ImportError: urllib3 v2.0 only supports OpenSSL 1.1.1_Mumunu-的博客-CSDN博客
下载,并解压Python3安装包
wget https://www.python.org/ftp/python/3.8.16/Python-3.8.16.tgz
tar -zxvf Python-3.8.11.tgz
下载一堆依赖
yum install -y zlib-devel bzip2-devel \
openssl-devel ncurses-devel epel-release gcc gcc-c++ xz-devel readline-devel \
gdbm-devel sqlite-devel tk-devel db4-devel libpcap-devel libffi-devel
进行Python3的编译
mkdir /usr/local/python3
cd Python-3.8.16
./configure --prefix=/usr/local/python3
make && make install
然后部署docker
#下载docker-20.10.0包
https://download.docker.com/linux/static/stable/x86_64/docker-20.10.0.tgz
#下载docker-compose对应系统的包
curl -SL https://github.com/docker/compose/releases/download/v2.20.3/docker-compose-linux-x86_64 -o /usr/local/bin/docker-compose

chmod +x /usr/local/bin/docker-compose
tar -zxvf docker-20.10.0.tgz
#将解压出来的docker文件内容移动到 /usr/bin/ 目录下
cp docker/* /usr/bin/
#查看docker版本
docker version
#查看docker信息
docker info配置docker
配置Docker开机自启动服务
#添加docker.service文件
vi /etc/systemd/system/docker.service
#按i插入模式,复制如下内容:
[Unit]
Description=Docker Application Container Engine
Documentation=https://docs.docker.com
After=network-online.target firewalld.service
Wants=network-online.target
[Service]
Type=notify
# the default is not to use systemd for cgroups because the delegate issues still
# exists and systemd currently does not support the cgroup feature set required
# for containers run by docker
ExecStart=/usr/bin/dockerd
ExecReload=/bin/kill -s HUP $MAINPID
# Having non-zero Limit*s causes performance problems due to accounting overhead
# in the kernel. We recommend using cgroups to do container-local accounting.
LimitNOFILE=infinity
LimitNPROC=infinity
LimitCORE=infinity
# Uncomment TasksMax if your systemd version supports it.
# Only systemd 226 and above support this version.
#TasksMax=infinity
TimeoutStartSec=0
# set delegate yes so that systemd does not reset the cgroups of docker containers
Delegate=yes
# kill only the docker process, not all processes in the cgroup
KillMode=process
# restart the docker process if it exits prematurely
Restart=on-failure
StartLimitBurst=3
StartLimitInterval=60s
[Install]
WantedBy=multi-user.target
#添加文件可执行权限
chmod +x /etc/systemd/system/docker.service
#重新加载配置文件
systemctl daemon-reload
#启动Docker
systemctl start docker
#查看docker启动状态
systemctl status docker
#查看启动容器
docker ps
#设置开机自启动
systemctl enable docker.service
#查看docker开机启动状态 enabled:开启, disabled:关闭
systemctl is-enabled docker.service
安装Datahub
pip3 install acryl-datahub==0.10.5查看版本情况。
python3 -m datahub version接下来是下载镜像,镜像较大,一共十几个GB,需要耐心下载
我们选择本地读配置文件启动
python3 -m datahub docker quickstart --quickstart-compose-file ./docker-compose.consumers-without-neo4j.quickstart.yml
docker-compose -p datahub -f ./docker-compose.consumers-without-neo4j.quickstart.yml up -

这个文件从https://github.com/datahub-project/datahub/tree/master/docker/quickstart
下载
执行命令后,如果没有报错证明没有问题。

确认一下有没有启动这么多容器。没有就重启一次
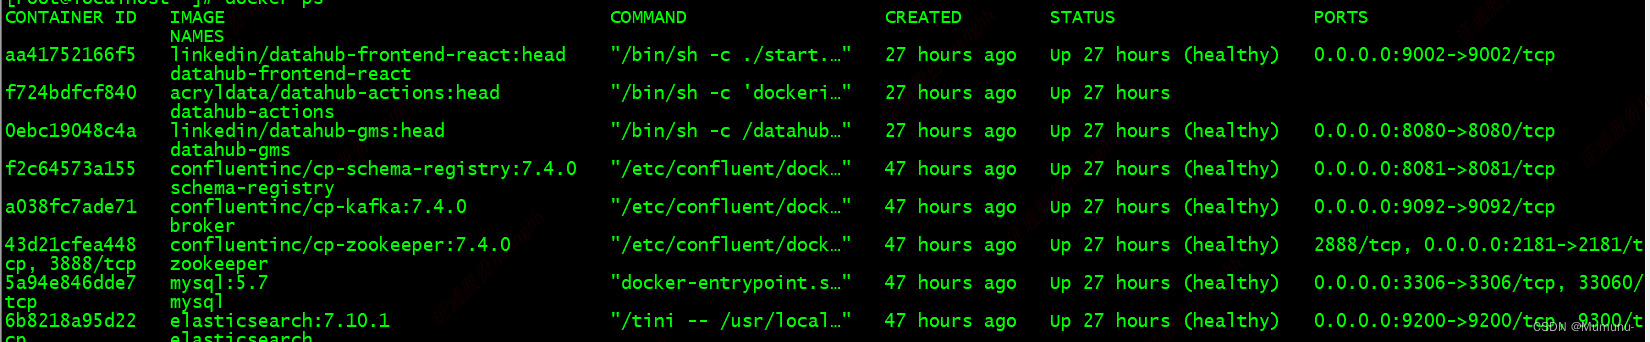
访问IP:9002,启动成功
一些基本命令
#启动
docker-compose -p datahub -f ./docker-compose.consumers-without-neo4j.quickstart.yml up -
#停止
docker-compose -p datahub -f ./docker-compose.consumers-without-neo4j.quickstart.yml stop

查看有哪些插件
python3 -m datahub check plugins --verbose

缺少插件的时候安装对应插件
pip3 install 'acryl-datahub[数据源]'
例如
pip3 install 'acryl-datahub[mysql]'
导入hive元数据
首先把部署datahub的机器上添加keyberos客户端环境
安装kerberos客户端
yum -y install krb5-libs krb5-workstation

同步KDC配置
scp hadoop102:/etc/krb5.conf /etc/krb5.conf
scp hadoop102:/etc/security/keytab/ranger_all_publc.keytab /etc/security/keytab/

验证能否连接到服务
kinit -kt /etc/security/keytab/ranger_all_publc.keytab hadoop/[email protected]配置hive数据源就不使用web界面配置了,不然会报错在kerberos数据库没有相应的授权,猜测应该是在datahub的docker环境中没有相应的授权
安装sasl 不然后边会报错少这个包
yum install cyrus-sasl  cyrus-sasl-lib  cyrus-sasl-plain cyrus-sasl-devel cyrus-sasl-gssapi  cyrus-sasl-md5

pip install sasl

安装hive插件
pip install 'acryl-datahub[hive]'


配置hive相应的yml 并保存成 hive.yml


source:
  type: hive
  config:
    host_port: xxxx:10000
    database: test
    username: hive
    options:
      connect_args:
        auth: KERBEROS
        kerberos_service_name: hive
        scheme: 'hive+https'
sink:
  type: "datahub-rest"
  config:
    server: 'http://IP:8080'
    token: 如果有就写


之后导入python -m  datahub --debug ingest -c hive.yml
也可以把debug去掉 。不然日志太多
脚本定时导入hive数据


import os
import subprocess

yml_files = [f for f in os.listdir('/root/datalineage') if f.endswith('.yml')]


for file in yml_files:
    cmd = f"python3 -m datahub ingest -c {file}"
    subprocess.run(cmd, shell=True, check=True)
导入mysql元数据
安装hive插件
pip install 'acryl-datahub[mysql]'


配置相应的yml 并保存成 mysql.yml

source:
  type: mysql
  config:
    # Coordinates
    host_port: master:3306
    database: dolphinscheduler
    # Credentials
    username: root
    password: lovol
    # If you need to use SSL with MySQL:
    # options:
    #   connect_args:
    #     ssl_ca: "path_to/server-ca.pem"
    #     ssl_cert: "path_to/client-cert.pem"
    #     ssl_key: "path_to/client-key.pem"
sink:
  # sink configs
  type: datahub-rest
  config:
    server: http://slave1:8080


之后导入python -m  datahub --debug ingest -c mysql.yml
不过我用这个没导入成功。我用的web 界面


选择mysql 填入基本信息。都是字面意思。无坑 next 就好了。开始执行的时候可以看看日志。查一下是不是有什么问题。注意web直接调用的python和pip命令 需要把环境变量设置过去。不能用python3