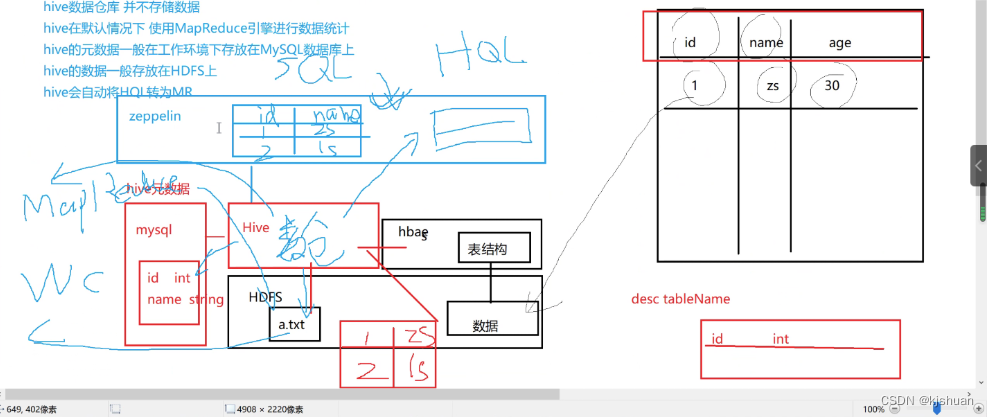
hive 原理
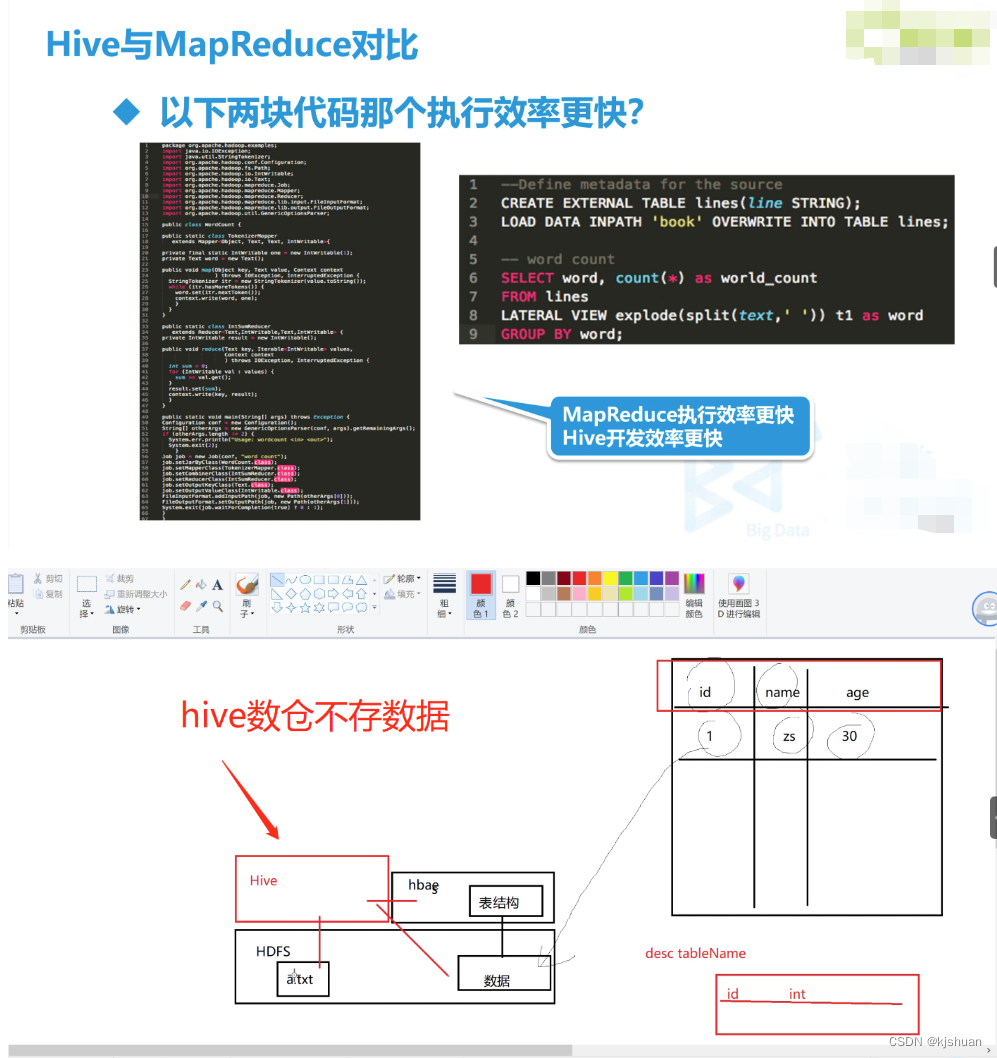
Hive是基于Hadoop的一个数据仓库工具,可以将结构化的数据文件映射为一张数据库表,并提供完整的sql查询功能,可以将sql语句转换为MapReduce任务进行运行。其优点是学习成本低,可以通过类SQL语句快速实现简单的MapReduce统计,不必开发专门的MapReduce应用,十分适合数据仓库的统计分析。
    Hvie是建立在Hadoop上的数据仓库基础架构。它提供了一系列的工具,可以用来进行数据提取转化加载(ETL),这是一种可以存储、查询和分析存储在Hadoop中的大规模数据的机制。Hive定义了简单的类SQL查询语句,称为HQL,它允许熟悉SQL的用户查询数据。同时,这个语言也允许熟悉MapReduce开发者的开发自定义的mapper和reducer来处理内建的mapper和reducer无法完成的复杂的分析工作。
    由于Hive采用了SQL的查询语言HQL,因此很容易将Hive理解为数据库。其实从结构上来看,Hive和数据库除了拥有类似的查询语言,再无类似之处。本文将从多个方面来阐述Hive和数据库的差异。数据库可以用在Online的应用中,但是Hive是为数据仓库而设计的,清楚这一点,有助于从应用角度理解Hive的特性。

beeline配置
beeline配置 cd /opt/soft/hive110/conf/ vim hive-site.xml hive的hive-site.xml 配置文件 <property> <name>hive.server2.authentication</name> <value>NONE</value> <description> Expects one of [nosasl, none, ldap, kerberos, pam, custom]. Client authentication types. NONE: no authentication check LDAP: LDAP/AD based authentication KERBEROS: Kerberos/GSSAPI authentication CUSTOM: Custom authentication provider (Use with property hive.server2.custom.authentication.class) PAM: Pluggable authentication module NOSASL: Raw transport </description> </property> <property> <name>hive.server2.thrift.client.user</name> <value>root</value> <description>Username to use against thrift client</description> </property> <property> <name>hive.server2.thrift.client.password</name> <value>root</value> <description>Password to use against thrift client</description> </property> hadoop 的core-site.xml 配置 <configuration> <!--指定namenode的地址--> <property> <name>fs.defaultFS</name> <value>hdfs://192.168.11.207:9000</value> </property> <!--用来指定使用hadoop时产生文件的存放目录--> <property> <name>hadoop.tmp.dir</name> <!--<value>file:/usr/local/kafka/hadoop-2.7.6/tmp</value>--> <value>file:/home/hadoop/temp</value> </property> <!--用来设置检查点备份日志的最长时间--> <!-- <name>fs.checkpoint.period</name> <value>3600</value> --> <!-- 表示设置 hadoop 的代理用户--> <property> <!--表示代理用户的组所属--> <name>hadoop.proxyuser.root.groups</name> <value>*</value> </property> <property> <!--表示任意节点使用 hadoop 集群的代理用户 hadoop 都能访问 hdfs 集群--> <name>hadoop.proxyuser.root.hosts</name> <value>*</value> </property> </configuration>

sql去重
1 distinct
select distinct name,age from test
2 group by
select name,age from test
group by name,age;
3 伪列去重
select id,name,age from test t1
where t1.rowid in (select min(rowid) from test t2 where t1.name=t2.name and t1.age=t2.age);
4 窗口函数 over(partition by)
select t.id ,t.name,t.age from
(select row_number() over(partition by name,age order by age) rank,test.* from test)t
where t.rank = 1;
注意点
以上就是Oracle中常见的四种去重方式,其中不推荐第一种方式,因为在数据量非常大的时候效率很低,在Mysql中8.0以前的版本是不支持窗口函数的,所以推荐使用group by 进行去重,8.0 以后就可以开开心心的使用窗口函数了。 窗口函数适用场景: 对分组统计结果中的每一条记录进行计算的场景下, 使用窗口函数更好, 注意, 是每一条!! 因为MySQL的普通聚合函数的结果(如 group by)是每一组只有一条记录!!!
扫描二维码关注公众号,回复:
16701411 查看本文章


hive安装
cd /opt/jar
tar -zxf hive-1.1.0-cdh5.14.2.tar.gz
mv hive-1.1.0-cdh5.14.2 /opt/soft/hive110
cd /opt/soft/hive110/conf
vim hive-site.xml #添加下面代码
====================================
<?xml version="1.0" encoding="UTF-8" standalone="no"?>
<?xml-stylesheet type="text/xsl" href="configuration.xsl"?>
<configuration>
<property>
<name>hive.metastore.warehouse.dir</name>
<value>/hive/warehouse</value>
</property>
<property>
<name>hive.metastore.local</name>
<value>false</value>
</property>
<property>
<name>javax.jdo.option.ConnectionURL</name>
<value>jdbc:mysql://192.168.64.210:3306/hive?createDatabaseIfNotExist=true</value>
</property>
<property>
<name>javax.jdo.option.ConnectionDriverName</name>
<value>com.mysql.jdbc.Driver</value>
</property>
<property>
<name>javax.jdo.option.ConnectionUserName</name>
<value>root</value>
</property>
<property>
<name>javax.jdo.option.ConnectionPassword</name>
<value>3090_Cmok</value>
</property>
<property>
<name>hive.server2.authentication</name>
<value>NONE</value>
</property>
<property>
<name>hive.server2.thrift.client.user</name>
<value>root</value>
</property>
<property>
<name>hive.server2.thrift.client.password</name>
<value>root</value>
</property>
</configuration>
<!-- mysql 数据库密码<value>3090_Cmok</value> 用自己的3090_Cmok>
<!-- password=root等于无密码登录 方便连接>
<!-- 如果是远程mysql数据库的话需要在这里写入远程的IP或hosts -->
====================================
2 hadoop配置core-site.xml(注意一共5个 不要多也不要少!!!)
cd /opt/soft/hadoop260/etc/hadoop/
vim core-site.xml
<property>
<name>fs.defaultFS</name>
<value>hdfs://192.168.64.210:9000</value>
</property>
<property>
<name>hadoop.tmp.dir</name>
<value>file:/home/hadoop/temp</value>
</property>
<property>
<name>hadoop.proxyuser.root.groups</name>
<value>*</value>
</property>
<property>
<name>hadoop.proxyuser.root.hosts</name>
<value>*</value>
</property>
<property>
<name>hadoop.proxyuser.root.users</name>
<value>*</value>
</property>
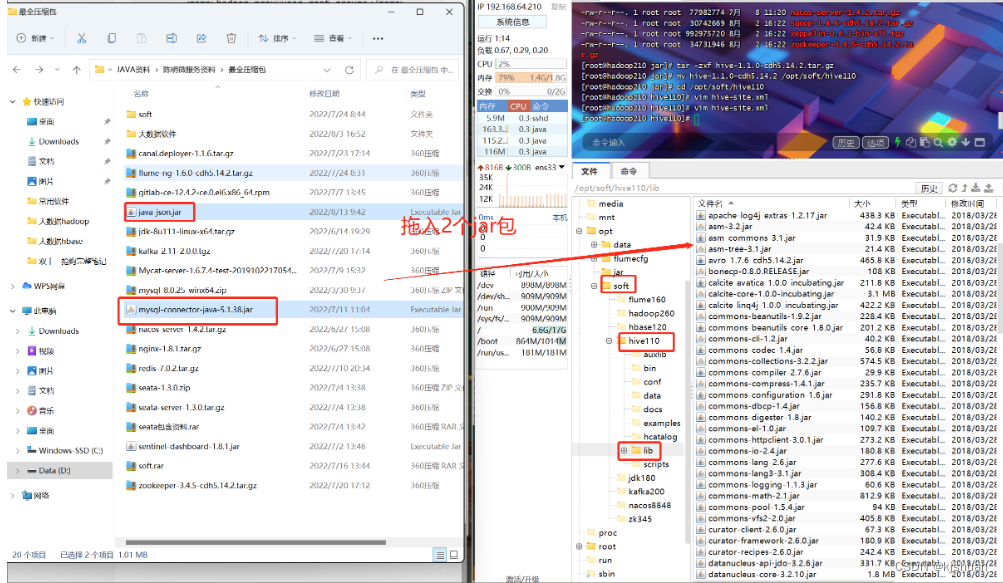
3.拖入mysql驱动
4.配置环境变量
vim /etc/profile
#Hive
export HIVE_HOME=/opt/soft/hive110
export PATH=$PATH:$HIVE_HOME/bin
:wq
source /etc/profile
5初始化数据库
schematool -dbType mysql -initSchema
6.启动
zkServer.sh start start-all.sh hive --service metastore hive --service hiveserver2 hive
7.hql
show databases;
create database mydemo;
use mydemo;
create table userinfos(userid int,username string,birthday string);
insert into userinfos values(1,'zs',30);
select * from userinfos;
Zeppelin安装
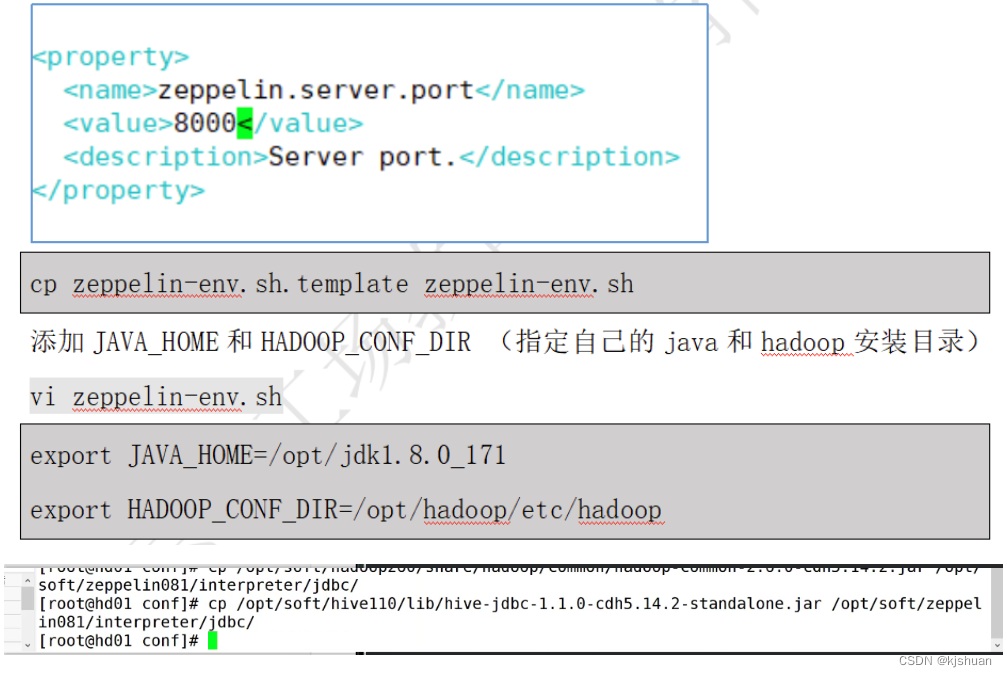
tar -zxf zeppelin-0.8.1-bin-all.tgz -C /opt/soft/ hdfs dfs -cat /hive/warehouse/mydemo.db/userinfos/000000_0 cd /opt/soft/ ls mv zeppelin-0.8.1-bin-all/ zeppelin081 ls cd /opt/soft/zeppelin081/conf/ ls cp zeppelin-site.xml.template zeppelin-site.xml vim zeppelin-site.xml ============================== <property> <name>zeppelin.helium.registry</name> <value>helium</value> </property> ============================== cp zeppelin-env.sh.template zeppelin-env.sh vim zeppelin-env.sh ============================== export JAVA_HOME=/opt/soft/jdk180 export HADOOP_CONF_DIR=/opt/soft/hadoop260/etc/hadoop ============================== cp /opt/soft/hive110/conf/hive-site.xml /opt/soft/zeppelin081/conf/
1.拷贝文件
cp /opt/soft/hadoop260/share/hadoop/common/hadoop-common-2.6.0-cdh5.14.2.jar /opt/soft/zeppelin081/interpreter/jdbc/ cp /opt/soft/hive110/lib/hive-jdbc-1.1.0-cdh55.14.2-standalone.jar /opt/soft/zepplin081/interpreter/jdbc/
2.配置环境变量
vim /etc/profile
#Zeppelin
export ZEPPLIN_HOME=/opt/soft/zeppelin081
export PATH=$PATH:$ZEPPELIN_HOME/bin
:wq
source /etc/profile
3.启动
cd /opt/soft/zeppelin081/bin/ ./zeppelin-daemon.sh start http://192.168.64.210:8080/ #浏览器输入地址 进入zeppelin#http://192.168.64.210:50070/ #hadoop查看


cd /opt/ mkdir dir rm -rf dir mkdir data
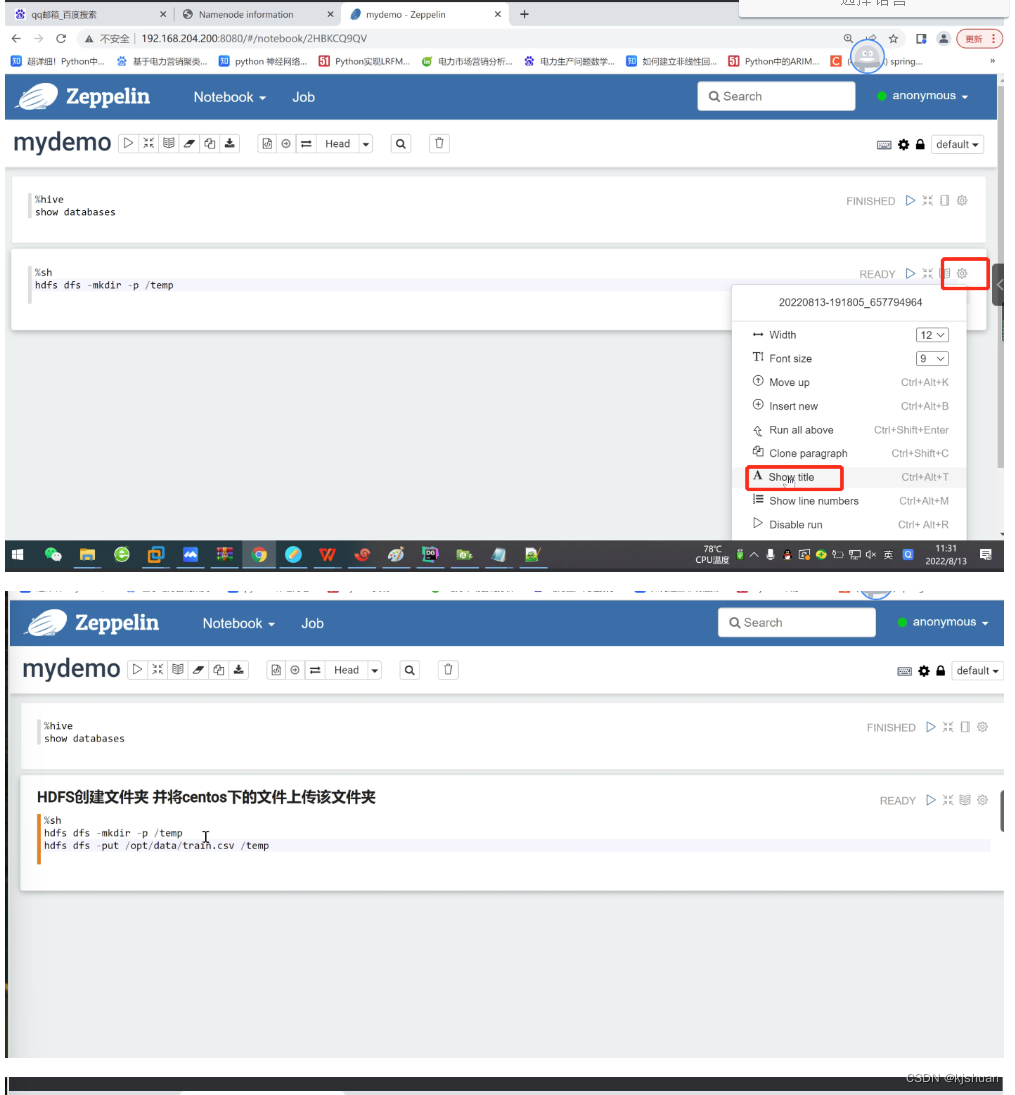


%hive
create external table mydemo.train(
userid string,
eventid string,
invited string,
partytime string,
interested string,
not_interested string
)
row format delimited fields terminated by ','
location '/temp'
TBLPROPERTIES("skip.header.line.count"="1")
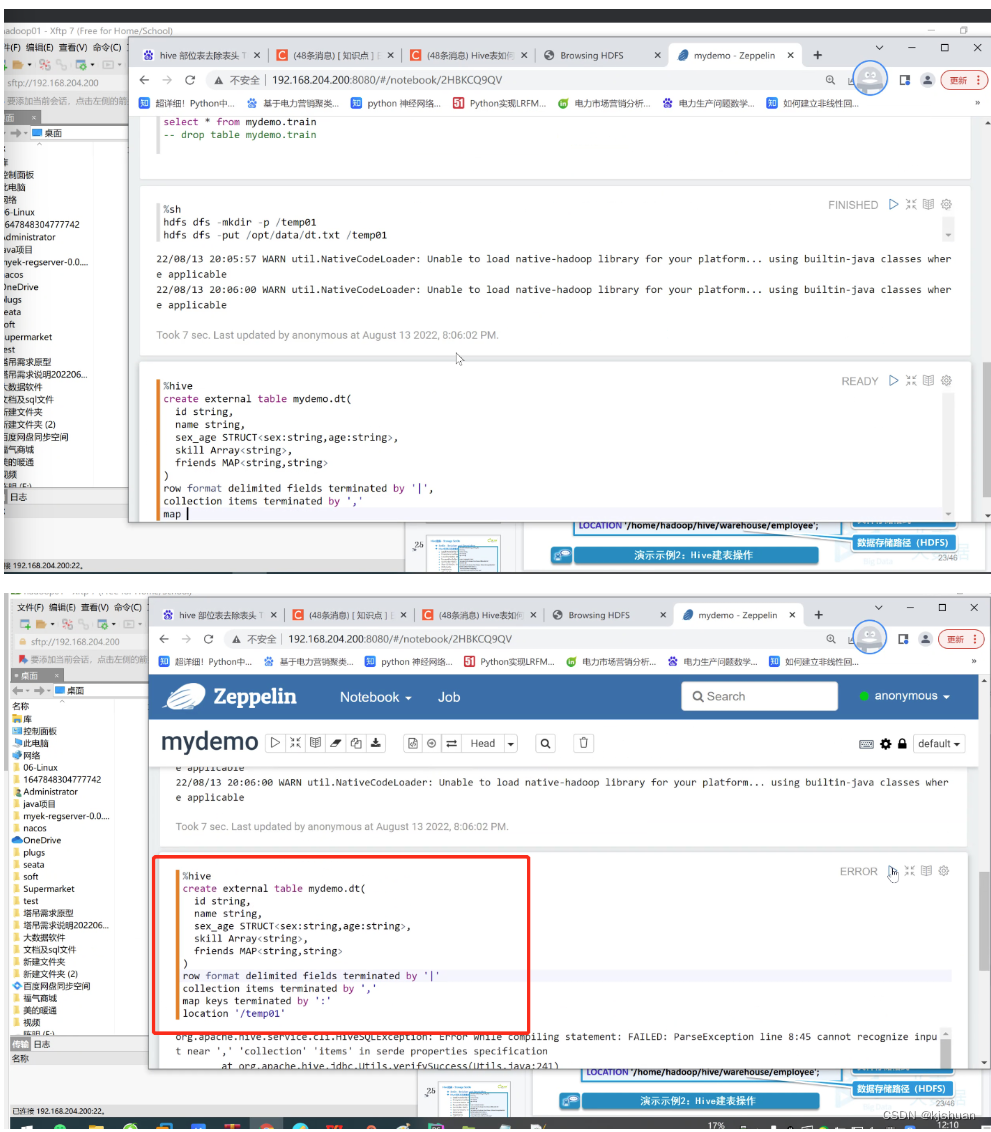
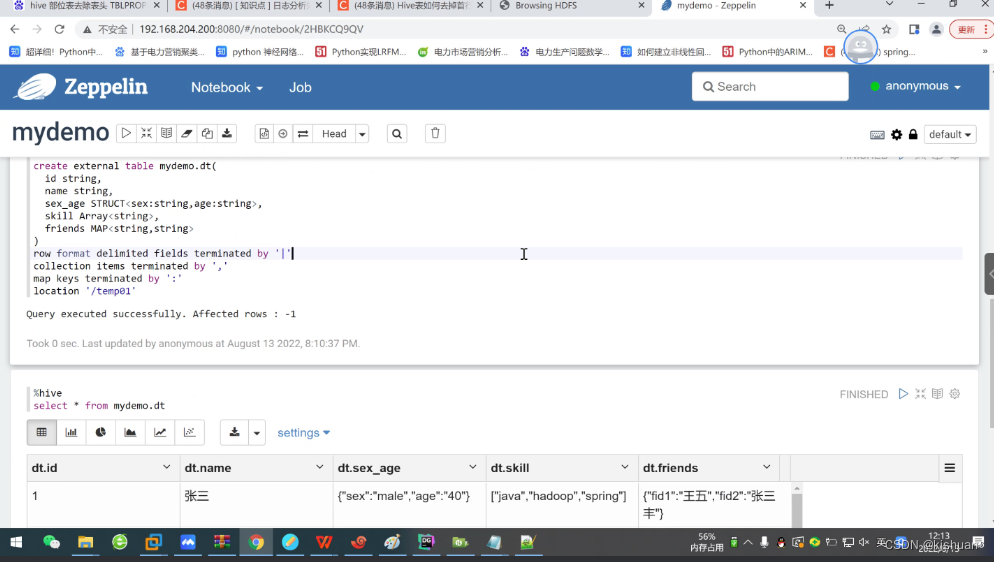
1 | zhangsan | male,40 | java,hadoop,spring | fid1:wangwu,fid2:zhangsanfeng
2 | lisi | female,30 | linux,centos | fid1:xiaolifeidao
%hive
create external table mydemo.train(
userid string,
eventid string,
invited string,
partytime string,
interested string,
not_interested string
)
row format delimited fields terminated by ','
location '/temp'
TBLPROPERTIES("skip.header.line.count"="1")

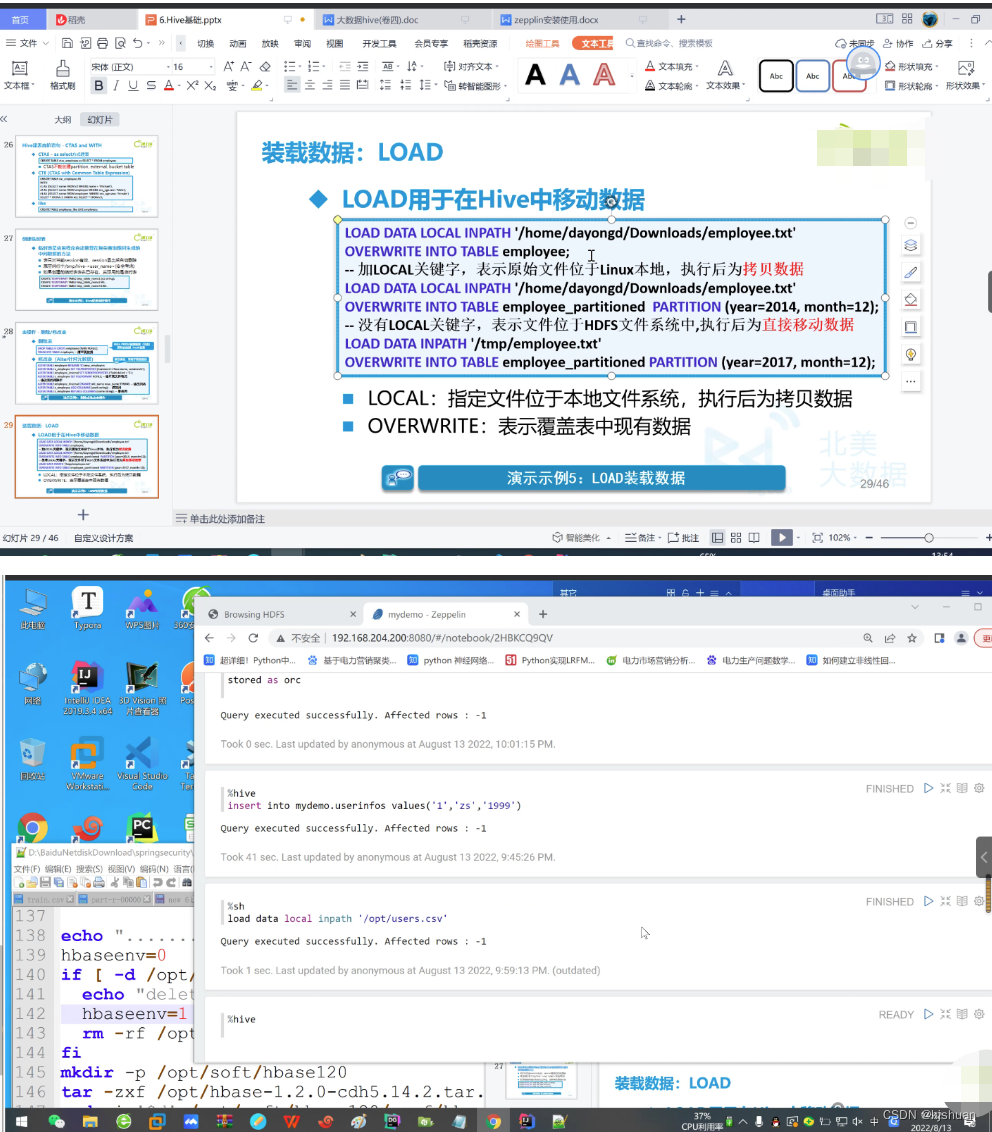


#静态分期加载数据需要用户自己指定分区
#hive
load data local inpath