supervisor的安装部署
supervisor官网:http://www.supervisord.org/
参考链接:
http://blog.csdn.net/xyang81/article/details/51555473
https://www.cnblogs.com/smail-bao/p/5673434.html
1,介绍
Supervisor是一个进程管理工具,就是有一个进程需要每时每刻不断的运行,但是这个进程又有可能由于各种原因有可能停止运行。当进程停止运行的时候我们希望能自动重新启动,Supervisor就可以帮我们实现。Supervisor是用Python开发的,能将一个普通的命令行进程变为后台daemon,并监控进程状态,异常退出时能自动重启。它是通过fork/exec的方式把这些被管理的进程当作supervisor的子进程来启动,这样只要在supervisor的配置文件中,把要管理的进程的可执行文件的路径写进去即可。也实现当子进程挂掉的时候,父进程可以准确获取子进程挂掉的信息的,可以选择是否自己启动和报警。supervisor还提供了一个功能,可以为supervisord或者每个子进程,设置一个非root的user,这个user就可以管理它对应的进程。
supervisor的命令主要有:
supervisord : supervisor的服务器端部分,启动supervisor就是运行这个命令
supervisorctl:启动supervisor的命令行窗口。
2.安装
第一种方法:
pip install supervisor
pip的安装
cat  pip_an.sh
#!/bin/bash
wget http://pypi.python.org/packages/source/s/setuptools/setuptools-0.6c11.tar.gz
tar zxvf setuptools-0.6c11.tar.gz
cd setuptools-0.6c11
python setup.py build
python setup.py install
wget "https://pypi.python.org/packages/source/p/pip/pip-1.5.4.tar.gz#md5=834b2904f92d46aaa33326"
tar -xzvf pip-1.5.4.tar.gz
cd pip-1.5.4
python setup.py install
第二种
yum install python-setuptools
easy_install supervisor
第三种
wget https://pypi.python.org/packages/source/s/supervisor/supervisor-3.1.3.tar.gz
tar zxvf supervisor-3.1.3.tar.gz
cd supervisor
python setup.py install
第四种
yum install -y epel-release
yum install -y supervisor
3.测试
#测试是否安装成功
echo_supervisord_conf
#创建配置文件
echo_supervisord_conf > /etc/supervisord.conf
4.配置文件讲解
  1 [root@centos-011 ~ 07:50:00]#cat /etc/supervisord.conf.bak
  2 ; Sample supervisor config file.
  3
  4 [unix_http_server]
  5 file=/var/run/supervisor/supervisor.sock   ; socket 路径
  6
  7 ;chmod=0700                 ; socket 文件的权限
  8 ;chown=nobody:nogroup       ; socket 所属用户及组
  9 ;username=user              ; 用户名
 10 ;password=123               ; 密码
 11
 12 ;[inet_http_server]         ; 是否启用服务,默认是关闭的(启用的话可以看到supervisor 管理的服务状态)
 13 ;port=127.0.0.1:9001        ; 监听的IP及端口
 14 ;username=user              ; 用户名
 15 ;password=123               ; 密码
 16
 17 [supervisord]               ; supervisord 全局配置
 18 logfile=/var/log/supervisor/supervisord.log  ; supervisor 日志路径
 19 logfile_maxbytes=50MB       ; 单个日志文件最大数
 20 logfile_backups=10          ; 保留多少个日志文件(默认10个)
 21 loglevel=info               ; (log level;default info; others: debug,warn,trace)
 22 pidfile=/var/run/supervisord.pid ; pid 文件路径
 23 nodaemon=false              ; 启动是否丢到前台,设置为false ,表示以daemon 的方式启动
 24 minfds=1024                 ; 最小文件打开数,对应系统limit.conf 中的nofile ,默认最小为1024,最大为4096
 25 minprocs=200                ; 最小的进程打开数,对应系统的limit.conf 中的nproc,默认为200
 26 ;umask=022                  ; (process file creation umask;default 022)
 27 ;user=chrism                 ; 启动supervisord 服务的用户,默认为root
 28 ;identifier=supervisor       ; (supervisord identifier, default is 'supervisor')
 29 ;directory=/tmp              ; 这里的目录指的是服务的工作目录
 30 ;nocleanup=true              ; (don't clean up tempfiles at start;default false)
 31 ;childlogdir=/tmp            ; ('AUTO' child log dir, default $TEMP)
 32 ;environment=KEY=value       ; (key value pairs to add to environment)
 33 ;strip_ansi=false            ; (strip ansi escape codes in logs; def. false)
 34
 35 ; the below section must remain in the config file for RPC
 36 ; (supervisorctl/web interface) to work, additional interfaces may be
 37 ; added by defining them in separate rpcinterface: sections
 38 [rpcinterface:supervisor]
 39 supervisor.rpcinterface_factory = supervisor.rpcinterface:make_main_rpcinterface
 40
 41 [supervisorctl]
 42 serverurl=unix:///var/run/supervisor/supervisor.sock ; use a unix:// URL  for a unix socket
 43 ;serverurl=http://127.0.0.1:9001 ; use an http:// url to specify an inet socket
 44 ;username=chris              ; should be same as http_username if set
 45 ;password=123                ; should be same as http_password if set
 46 ;prompt=mysupervisor         ; cmd line prompt (default "supervisor")
 47 ;history_file=~/.sc_history  ; use readline history if available
 48
 49 ; The below sample program section shows all possible program subsection values,
 50 ; create one or more 'real' program: sections to be able to control them under
 51 ; supervisor.
 52
 53 ;[program:theprogramname]      ; 定义一个守护进程 ,比如下面的elasticsearch
 54 ;command=/bin/cat              ; 启动程序使用的命令,可以是绝对路径或者相对路径
 55 ;process_name=%(program_name)s ; 一个python字符串表达式,用来表示supervisor进程启动的这个的名称,默认值是%(program_name)s
 56 ;numprocs=1                    ; Supervisor启动这个程序的多个实例,如果numprocs>1,则process_name的表达式必须包含%(process_num)s,默认是1
 57 ;directory=/tmp                ; supervisord在生成子进程的时候会切换到该目录
 58 ;umask=022                     ; umask for process (default None)
 59 ;priority=999                  ; 权重,可以控制程序启动和关闭时的顺序,权重越低:越早启动,越晚关闭。默认值是999
 60 ;autostart=true                ; 如果设置为true,当supervisord启动的时候,进程会自动启动
 61 ;autorestart=true              ; 设置为随 supervisord 重启而重启,值可以是false、true、unexpected。false:进程不会自动重启
 62 ;startsecs=10                  ; 程序启动后等待多长时间后才认为程序启动成功,默认是10秒
 63 ;startretries=3                ; supervisord尝试启动一个程序时尝试的次数。默认是3
 64 ;exitcodes=0,2                 ; 一个预期的退出返回码,默认是0,2。
 65 ;stopsignal=QUIT               ; 当收到stop请求的时候,发送信号给程序,默认是TERM信号,也可以是 HUP, INT, QUIT, KILL, USR1, or USR2
 66 ;stopwaitsecs=10               ; 在操作系统给supervisord发送SIGCHILD信号时等待的时间
 67 ;user=chrism                   ; 如果supervisord以root运行,则会使用这个设置用户启动子程序
 68 ;redirect_stderr=true          ; 如果设置为true,进程则会把标准错误输出到supervisord后台的标准输出文件描述符
 69 ;stdout_logfile=/a/path        ; 把进程的标准输出写入文件中,如果stdout_logfile没有设置或者设置为AUTO,则supervisor会自动选择一个文件位置
 70 ;stdout_logfile_maxbytes=1MB   ; 标准输出log文件达到多少后自动进行轮转,单位是KB、MB、GB。如果设置为0则表示不限制日志文件大小
 71 ;stdout_logfile_backups=10     ; 标准输出日志轮转备份的数量,默认是10,如果设置为0,则不备份
 72 ;stdout_capture_maxbytes=1MB   ; 当进程处于stderr capture mode模式的时候,写入FIFO队列的最大bytes值,单位可以是KB、MB、GB
 73 ;stdout_events_enabled=false   ; 如果设置为true,当进程在写它的stderr
 74 ;stderr_logfile=/a/path        ; 把进程的错误日志输出一个文件中,除非redirect_stderr参数被设置为true
 75 ;stderr_logfile_maxbytes=1MB   ; 错误log文件达到多少后自动进行轮转,单位是KB、MB、GB。如果设置为0则表示不限制日志文件大小
 76 ;stderr_logfile_backups=10     ; 错误日志轮转备份的数量,默认是10,如果设置为0,则不备份
 77 ;stderr_capture_maxbytes=1MB   ; 当进程处于stderr capture mode模式的时候,写入FIFO队列的最大bytes值,单位可以是KB、MB、GB
 78 ;stderr_events_enabled=false   ; 如果设置为true,当进程在写它的stderr到文件描述符的时候,PROCESS_LOG_STDERR事件会被触发
 79 ;environment=A=1,B=2           ; 一个k/v对的list列表
 80 ;serverurl=AUTO                ; 是否允许子进程和内部的HTTP服务通讯,如果设置为AUTO,supervisor会自动的构造一个url
 81
 82 ; The below sample eventlistener section shows all possible
 83 ; eventlistener subsection values, create one or more 'real'
 84 ; eventlistener: sections to be able to handle event notifications
 85 ; sent by supervisor.
 86  #这个地方是自定义一个守护进程
 87 [program:elasticsearch]                       ; 定义一个守护进程 elasticsearch
 88 environment=ES_HOME=/usr/local/elasticsearch  ; 设置ES_HOME 环境变量
 89 user=elk                                      ; 启动elasticsearch 的用户
 90 directory=/usr/local/elasticsearch            ; 进入到这个目录中
 91 command=/usr/local/elasticsearch/bin/elasticsearch ; 执行启动命令
 92 numprocs=1                                    ; Supervisor启动这个程序的多个实例,如果numprocs>1,则process_name的表达式必须包含%(process_num)s,默认是1
 93 autostart=true                                ; 设置为随 supervisord 启动而启动
 94 autorestart=true                              ; 设置为随 supervisord 重启而重启
 95 startretries=3                                ; 设置elasticsearch 重启的重试次数
 96 priority=1                                    ; 权重,可以控制程序启动和关闭时的顺序,权重越低:越早启动,越晚关闭。默认值是999
 97
 98 ;[eventlistener:theeventlistenername]
 99 ;command=/bin/eventlistener    ; the program (relative uses PATH, can take args)
100 ;process_name=%(program_name)s ; process_name expr (default %(program_name)s)
101 ;numprocs=1                    ; number of processes copies to start (def 1)
102 ;events=EVENT                  ; event notif. types to subscribe to (req'd)
103 ;buffer_size=10                ; event buffer queue size (default 10)
104 ;directory=/tmp                ; directory to cwd to before exec (def no cwd)
105 ;umask=022                     ; umask for process (default None)
106 ;priority=-1                   ; the relative start priority (default -1)
107 ;autostart=true                ; start at supervisord start (default: true)
108 ;autorestart=unexpected        ; restart at unexpected quit (default: unexpected)
109 ;startsecs=10                  ; number of secs prog must stay running (def. 1)
110 ;startretries=3                ; max # of serial start failures (default 3)
111 ;exitcodes=0,2                 ; 'expected' exit codes for process (default 0,2)
112 ;stopsignal=QUIT               ; signal used to kill process (default TERM)
113 ;stopwaitsecs=10               ; max num secs to wait b4 SIGKILL (default 10)
114 ;user=chrism                   ; setuid to this UNIX account to run the program
115 ;redirect_stderr=true          ; redirect proc stderr to stdout (default false)
116 ;stdout_logfile=/a/path        ; stdout log path, NONE for none; default AUTO
117 ;stdout_logfile_maxbytes=1MB   ; max # logfile bytes b4 rotation (default 50MB)
118 ;stdout_logfile_backups=10     ; # of stdout logfile backups (default 10)
119 ;stdout_events_enabled=false   ; emit events on stdout writes (default false)
120 ;stderr_logfile=/a/path        ; stderr log path, NONE for none; default AUTO
121 ;stderr_logfile_maxbytes=1MB   ; max # logfile bytes b4 rotation (default 50MB)
122 ;stderr_logfile_backups        ; # of stderr logfile backups (default 10)
123 ;stderr_events_enabled=false   ; emit events on stderr writes (default false)
124 ;environment=A=1,B=2           ; process environment additions
125 ;serverurl=AUTO                ; override serverurl computation (childutils)
126
127 ; The below sample group section shows all possible group values,
128 ; create one or more 'real' group: sections to create "heterogeneous"
129 ; process groups.
130
131 ;[group:thegroupname]          ; 服务组管理,可以将多个服务名写到这里管理(组名自定义)
132 ;programs=progname1,progname2  ; 上面配置好的服务名,比如elasticsearch,kibana,logstash
133 ;priority=999                  ; the relative start priority (default 999)
134
135 ; The [include] section can just contain the "files" setting.  This
136 ; setting can list multiple files (separated by whitespace or
137 ; newlines).  It can also contain wildcards.  The filenames are
138 ; interpreted as relative to this file.  Included files *cannot*
139 ; include files themselves.
140
141 [include]
142 files = supervisord.d/*.ini
5.web界面配置
需要在supervisor的配置文件里添加[inet_http_server]选项组:之后可以通过http://ip:9001来访问控制子线程的管理。
[inet_http_server]
port=159.45.67.89:9001
username=user
password=123
6.配置管理进程
进程管理配置参数,不建议全都写在supervisord.conf文件中,应该每个进程写一个配置文件放在include指定的目录下包含进supervisord.conf文件中。
1> 创建/etc/supervisor/config.d目录,用于存放进程管理的配置文件
2> 修改/etc/supervisor/supervisord.conf中的include参数,将/etc/supervisor/conf.d目录添加到include中
[include]
files = /etc/supervisor/config.d/*.ini
下面是配置Tomcat进程的一个例子:
[program:tomcat]
command=/opt/apache-tomcat-8.0.35/bin/catalina.sh run
stdout_logfile=/opt/apache-tomcat-8.0.35/logs/catalina.out
autostart=true
autorestart=true
startsecs=5
priority=1
stopasgroup=true
killasgroup=true
7.启动Supervisor服务
supervisord -c /etc/supervisor/supervisord.conf
8.控制进程
8.1 交互终端
supervisord启动成功后,可以通过supervisorctl客户端控制进程,启动、停止、重启。运行supervisorctl命令,不加参数,会进入supervisor客户端的交互终端,并会列出当前所管理的所有进程。
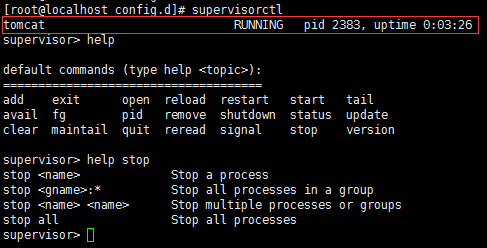
上图中的tomcat就是我们在配置文件中[program:tomcat]指定的名字。
stop tomcat // 表示停止tomcat进程
stop all // 表示停止所有进程
// ...
8.2 bash终端
supervisorctl status
supervisorctl stop tomcat
supervisorctl start tomcat
supervisorctl restart tomcat
supervisorctl reread
supervisorctl update
8.3 Web管理界面
1.浏览器输入http://ip:9001访问

2.supervisor的最终界面如下

9.开机启动Supervisor服务
9.1 配置systemctl服务
1> 进入/lib/systemd/system目录,并创建supervisor.service文件
[Unit]
Description=supervisor
After=network.target

[Service]
Type=forking
ExecStart=/usr/bin/supervisord -c /etc/supervisor/supervisord.conf
ExecStop=/usr/bin/supervisorctl $OPTIONS shutdown
ExecReload=/usr/bin/supervisorctl $OPTIONS reload
KillMode=process
Restart=on-failure
RestartSec=42s

[Install]
WantedBy=multi-user.target
2> 设置开机启动
systemctl enable supervisor.service
systemctl daemon-reload
3> 修改文件权限为766
chmod 766 supervisor.service
9.2 配置service类型服务
#!/bin/bash
#
# supervisord   This scripts turns supervisord on
#
# Author:       Mike McGrath <[email protected]> (based off yumupdatesd)
#
# chkconfig:    - 95 04
#
# description:  supervisor is a process control utility.  It has a web based
#               xmlrpc interface as well as a few other nifty features.
# processname:  supervisord
# config: /etc/supervisor/supervisord.conf
# pidfile: /var/run/supervisord.pid
#

# source function library
. /etc/rc.d/init.d/functions

RETVAL=0

start() {
    echo -n $"Starting supervisord: "
    daemon "supervisord -c /etc/supervisor/supervisord.conf "
    RETVAL=$?
    echo
    [ $RETVAL -eq 0 ] && touch /var/lock/subsys/supervisord
}

stop() {
    echo -n $"Stopping supervisord: "
    killproc supervisord
    echo
    [ $RETVAL -eq 0 ] && rm -f /var/lock/subsys/supervisord
}

restart() {
    stop
    start
}

case "$1" in
  start)
    start
    ;;
  stop)
    stop
    ;;
  restart|force-reload|reload)
    restart
    ;;
  condrestart)
    [ -f /var/lock/subsys/supervisord ] && restart
    ;;
  status)
    status supervisord
    RETVAL=$?
    ;;
  *)
    echo $"Usage: $0 {start|stop|status|restart|reload|force-reload|condrestart}"
    exit 1
esac

exit $RETVAL
将上述脚本内容保存到/etc/rc.d/init.d/supervisor文件中,修改文件权限为755,并设置开机启动
chmod 755 /etc/rc.d/init.d/supervisor
chkconfig supervisor on
注意:
Supervisor只能管理非daemon的进程,也就是说Supervisor不能管理守护进程。否则提示Exited too quickly (process log may have details)异常。例子中的Tomcat默认是以守护进程启动的,所以我们改成了catalina.sh run,以前台进程的方式运行。
10. 集群管理
supervisor不支持跨机器的进程监控,一个supervisord只能监控本机上的程序,大大限制了supervisor的使用。
不过由于supervisor本身支持xml-rpc,因此也有一些基于supervisor二次开发的多机器进程管理工具。比如:
- Django-Dashvisor
Web-based dashboard written in Python. Requires Django 1.3 or 1.4. - Nodervisor
Web-based dashboard written in Node.js. - Supervisord-Monitor
Web-based dashboard written in PHP. - SupervisorUI
Another Web-based dashboard written in PHP. - cesi
cesi is a web interface provides manage supervizors from same interface.
10.1使用cesi管理
原文:https://github.com/Gamegos/cesi/blob/master/README.md
(1)安装依赖
yum install -y sqlite3 python python-flask
(2)从github中clone
git clone https://github.com/Gamegos/cesi
(3)安装
python setup.py build
python setup.py install
(4)导入数据库
mkdir path/to -p
sqlite3 path/to/userinfo.db < userinfo.sql
(5)复制配置文件
cp cesi.conf /etc/cesi.conf
(6)修改配置文件
vim /etc/cesi.conf
[node:local]
username = user
password = 123
host = xxxx.xxxx.xxxx.xxx
port = 9001

;[node:<node_name2>]
;username = <username>
;password = <password>
;host = <hostname>
;port = <port>

;[environment:<environment_name>]
;members = <node_name>, <node_name2>

[cesi]
database = /cesi/path/to/userinfo.db
activity_log = /cesi/cesi.log
host = xxxx.xxxx.xxxx.xxxx
(8)启动并访问
cd /cesi/cesi
python web.py
地址:http://ip:5000
Username : admin
Password : admin
2.最后的界面展示
cesi主界面

cesi repo上的示例效果:
