简介
JupyterLab是 Jupyter的下一代基于Web的应用项目,主要用于交互开发和展示数据科学项目,写python的算法开发者、数据科学家用的较多。根据观察,使用这个技术的公司并不少。
一个 notebook 就是把代码及其输出集成到单个文档中,并且结合了可视化、叙述性文本、数学公式和其他富媒体,其实就是使用了开源的codemirror并在其基础之上进行了增强,可以在在其中运行代码、显示输出,还可以添加解释、公式、图表,并使您的工作更加透明、可理解、可重复和可共享,可简单理解为一个功能增强的代码编辑器。
首先声明,本人是前端开发,下边的内容是基于前端开发者的视角去整理的笔记,如果问题,请各位大佬多指教。下面以最新的JupyterLab为例,其内含notebook的功能,单独的notebook只是一个单独的编辑页面,JupyterLab有资源管理,并且可以自定义插件等增强的功能,对开发者来说,是一个前后端不分离的项目,后端语言是python,使用 python 写一些接口给前端通过ajax的方式调用,本人使用了axios库。
前提条件
- 编程基础,前端开发者 或 python开发者 上手会更快
- nodejs开发环境(版本不要太低)
- python开发环境(本文使用python3)
- anaconda (新手推荐,安装了这个就内置安装了好几百个python库,包括
Jupyter Notebook和JupyterLab,此文是用这个的,安装包就几百M,安装比较慢,静静等待安装好即可) - 前端界面 typescript(可选,一般是使用ts写的,也可以使用js)
开发注意事项
开发插件很容易出问题,在此列举几个常见的问题。
- 写python后端的时候,需要注意 windows 和 linux 的路径是不一样的,很容易出问题。
- 还有如果写了python代码之后,要生效,最好是现在插件开发的目录
pip install .,然后重新运行 jupyterlab。 - 如果
pip install .失败了, 把项目package.json的version字段改一下,代表插件版本更新了,然后再重新npm run build然后执行第2步,基本就好。 - 在windows开发环境下,如果删除css样式,开发环境不会删除,只能覆盖。
- 如果开发的时间长了,可能开发环境就有问题,可考虑新建conda环境,重新安装包,或者删除所有conda环境和python环境,全部重新安装,亲测有效。
- jupyterlab的版本主要注意,不同的版本开发插件的api可能不一样,有时间需要指定哪个版本进行安装
conda install jupyterlab=3.5 - 虽然支持React的开发组件的方式,但是要注意的是,只是类似React的开发,只是把React组件变成html而已,相关的生命周期并不会有逻辑的执行。
知识基础
Widget
Widget 可以理解为所有组件的父类,如果要自定义一个视图或者按钮,包括项目中的一些视图按钮等,都是继承这个类,有一些公用的方法。比如可以通过 widget.children()返回子节点、 widget.show()来显示、 widget.hide()来隐藏等,一般都是 Widget 的子类型。
import {

     Widget } from '@lumino/widgets';
Widget trackers
通常扩展需要与其他扩展创建的文档和活动交互。例如,扩展可能想要将一些文本注入到笔记本单元格中,或设置自定义快捷键映射,或关闭特定类型的所有文档。这样的操作通常是由 widget trackers 完成的。扩展模块在WidgetTracker中跟踪其活动的实例,然后将其作为token提供,以便其他扩展模块可以请求它们。比如INotebookTracker ,就可以跟踪notebook的操作,增删等。
Layout 布局
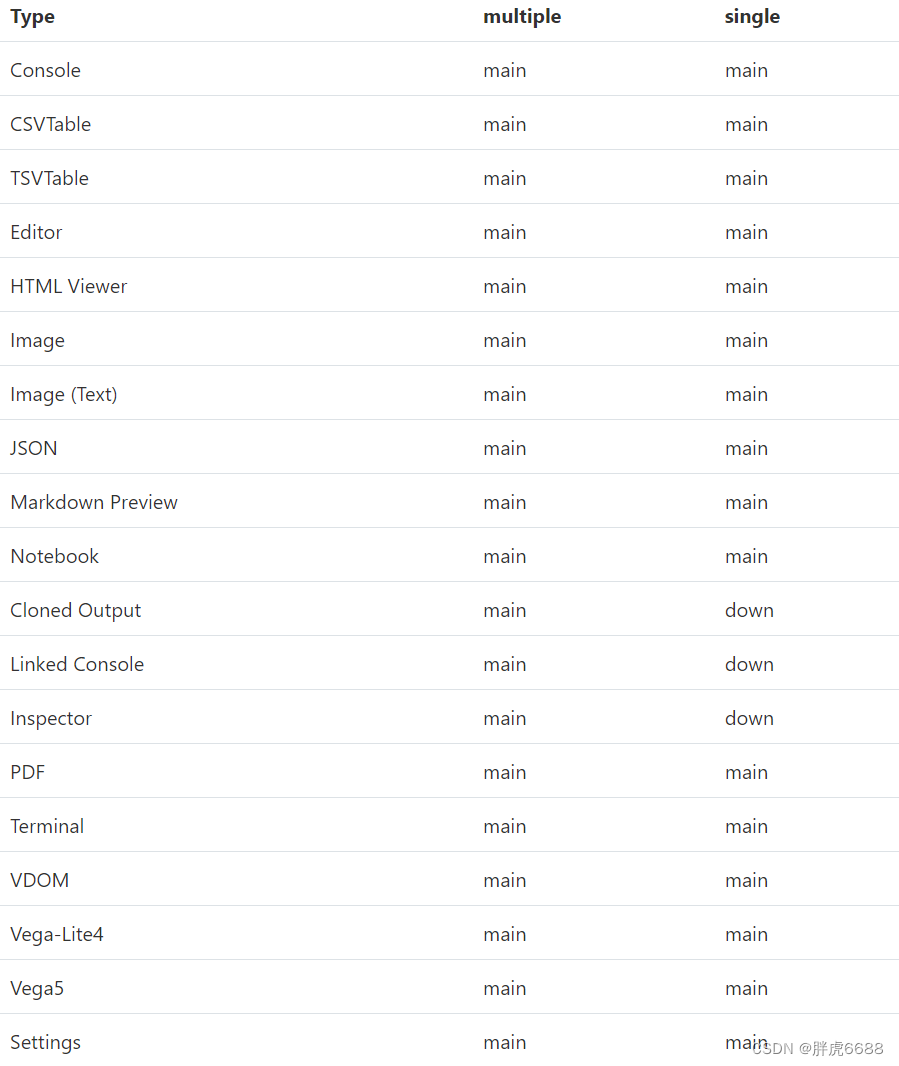
JupyterLab 有两种模式,单文档模式(single)和多文档(multiple)模式,所有的widgets被放到4个区域,就是 left(左边侧边栏)、right(右边侧边栏)、main(主工作区)、down区域,可以通过基于widgets类型的设置来覆盖widgets的默认位置,在JupyterLab Shell设置。下边是所有的功能(widgets)所在的区域。
commands
可以理解为命令,就是一些封装好的功能,在某个场景触发,然后执行某些操作,例如右键执行某个操作,或者在菜单点击,实现某个操作。比如新建一个 tab 页,新建一个文本文件,打开terminal等。比如使用代码app.commands.execute("filebrowser:refresh") 来执行刷新本地文件浏览器的功能,全部的commands可以通过打印 app.commmands来找到全部的列表。
commands palette
可使用快捷键盘 ctrl + shift + c 打开,或者菜单 view => active command palette 打开,就是一堆commands的集合。

setting 界面和功能的设置
jupyterlab的 widget 的设置,包含菜单、toolbar等,都可以使用三种方式来设置。
方法1 :菜单-> setting-> Advanced Settings Editor,点击右上角的JSON Settings Editor,可以用户直接修改json的方式来配置界面项目的新增、修改、删除等。
方法2 :开发者定义,定义schema,在插件项目里,新增 schema/plugin.json,在json文件里定义,可以在代码中的 settingRegistry.schema 拿到配置。
方法3 : 开发者定义,在代码里定义。
kernel(内核)
在Jupyter体系结构中,内核是由服务器启动的单独进程,这些进程在不同的编程语言和环境中运行代码。JupyterLab能够将任何打开的文本文件连接到代码控制台和内核,可以轻松地在内核中交互地运行文本文件中的代码。了解更多。
toolbars(重要)
同样可使用3种方式来设置,第一种比较简单。可以定制toolbar的地方有,具体设置字段可以在setting菜单中查看详细字段
Cell: Cell Toolbar -> toolbar
CSV Viewer: CSV Viewer -> toolbar
File Browser: File Browser Widget -> toolbar
HTML Viewer: HTML Viewer -> toolbar
Notebook panel: Notebook Panel -> toolbar
Text Editor: Text Editor -> toolbar
TSV Viewer: TSV Viewer -> toolbar
下边为在插件中定位的json数据/schema/plugin.json, 设置 disabled 是 true 就是隐藏
  "jupyter.lab.toolbars": {


    "Notebook": [
      {

     "name": "save", "rank": 10},
      {

     "name": "insert", "command": "notebook:insert-cell-below", "rank": 20, "disabled": true},
      {

     "name": "cut", "command": "notebook:cut-cell", "rank": 21, "disabled": true },
      {

     "name": "copy", "command": "notebook:copy-cell", "rank": 22,"disabled": true  },
      {

     "name": "paste", "command": "notebook:paste-cell-below", "rank": 23,"disabled": true  },
      {

     "name": "run", "command": "runmenu:run", "rank": 30 },
      {

     "name": "interrupt", "command": "kernelmenu:interrupt", "rank": 31 },
      {

     "name": "restart", "command": "kernelmenu:restart", "rank": 32 },
      {

     "name": "restart-and-run", "command": "notebook:restart-run-all", "rank": 33},
      {

     "name": "cellType", "rank": 40 },
      {

     "name": "spacer", "type": "spacer", "rank": 100 },
      {

     "name": "kernelName", "rank": 1000 },
      {

     "name": "kernelStatus", "rank": 1001 }
    ]
  },
右键 Context Menu
JupyterLab有一个应用程序范围的右键菜单,可作为app.contextMenu使用。当用户右击时,将显示应用程序右键菜单,并填充与用户单击的内容最相关的菜单项。右键菜单系统根据css选择器确定要显示哪些项目。它向上冒泡DOM树,并测试给定的HTML元素是否与给定命令提供的CSS选择器匹配。可以使用配置文件的方式,或者使用代码的方式来添加自定义的菜单项。官方文档地址
比如使用配置文件
{


  "jupyter.lab.menus": {


  "context": [
    {


      "command": "my-command",
      "selector": ".jp-Notebook",
      "rank": 500
    }
  ]
}
使用代码
app.contextMenu.addItem({


  command: commandID,
  selector: '.jp-Notebook'
})
数据存储路径
应用程序目录:JupyterLab存储JupyterLab的主构建以及相关数据,包括构建到JupyterLab中的扩展。
用户设置目录:JupyterLab存储JupyterLab扩展的用户级别设置的目录。
工作区目录:JupyterLab存储工作区的位置
通过 jupyter lab path 命令可以得到3个路径的值。

JupyterLab还支持来自Jupyter路径层次结构中Jupyter配置目录的LabConfig子目录中的配置数据的LabConfig目录。
此外,JupyterLab可以从Jupyter数据目录的LabExtensions子目录加载动态联合(预构建)扩展,即绑定其依赖项的扩展。
插件入口 JupyterFrontEnd
import {
JupyterFrontEnd,
JupyterFrontEndPlugin
} from '@jupyterlab/application';
const plugin: JupyterFrontEndPlugin<void> = {
id: 'demo:plugin',
autoStart: true,
activate: (
app: JupyterFrontEnd,
) => {
console.log(app)
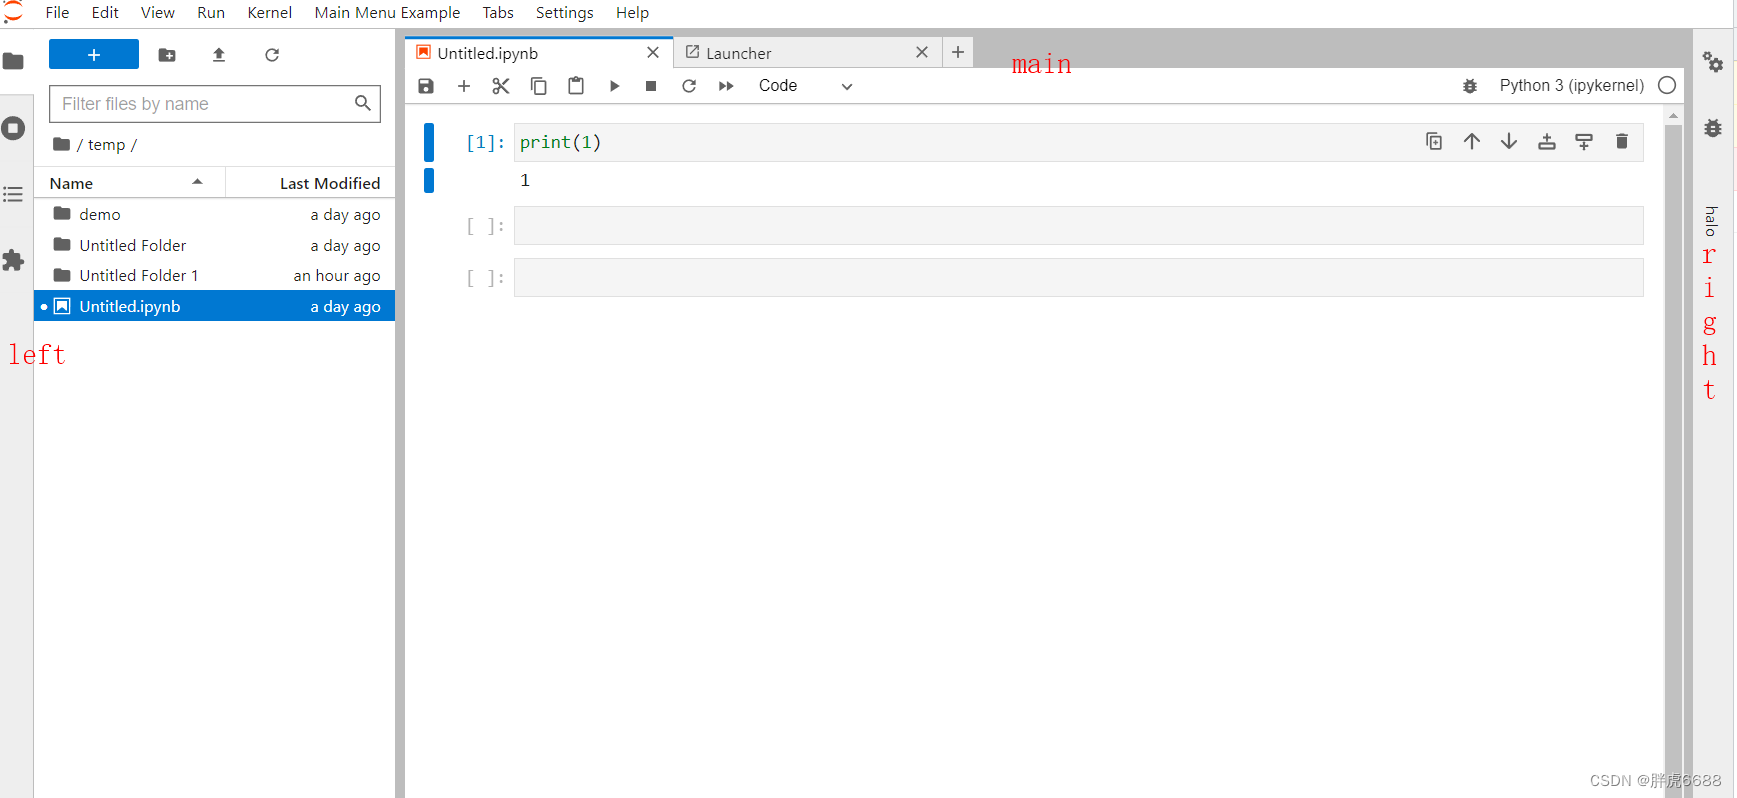
// 禁止系统右键
app.contextMenu.dispose()
}
};
export default plugin;
通过控制台打印,可以看到下面的图
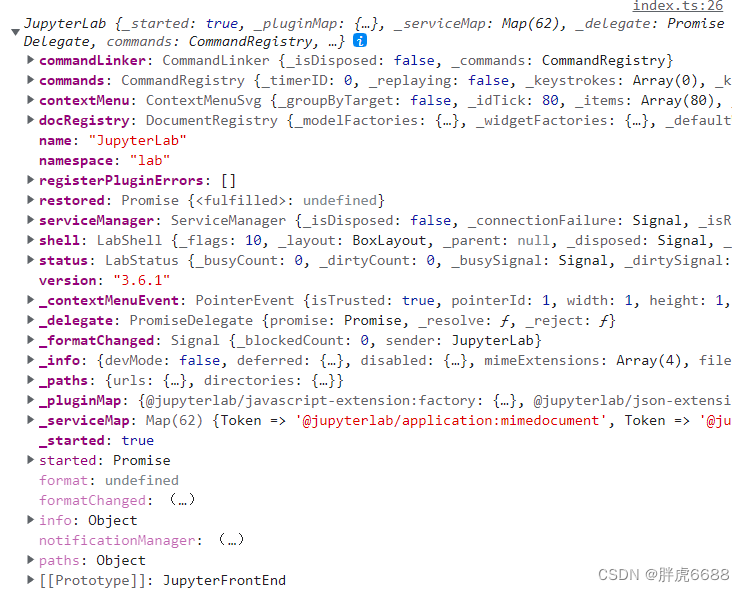
这个对象几乎包含常见的使用的东西,举例,比如commands就包含所有的command的数据都在里边比如保存文件、运行文件、粘贴复制等,conextMenu包含所有的右键操作的数据在里边,shell模块 这个就很重要了,常见的界面操作在里边。
插件开发分类
JupyterLab插件是JupyterLab中可扩展性的基本单位。JupyterLab支持几种类型的插件:
应用程序插件:应用程序插件是JupyterLab功能的基本构建块。应用程序插件通过需要由其他插件提供的服务来与JupyterLab和其他插件交互,并可选地向系统提供它们自己的服务。核心JupyterLab中的应用程序插件包括主菜单系统、文件浏览器以及笔记本、控制台和文件编辑器组件。
MIME渲染器插件:MIME呈现器插件是扩展JupyterLab以在笔记本和文件中定制渲染MIME数据的简化、受限的方式。这些插件在加载时会被JupyterLab自动转换为等价的应用程序插件。核心JupyterLab中的MIME渲染器插件的例子有pdf查看器、JSON查看器和Vega查看器。
主题插件:主题插件提供了一种定制JupyterLab外观的方法,方法是更改可主题值(即,css变量值),并向JupyterLab提供额外的字体和图形。JupyterLab带有明暗主题插件。
插件开发简单流程
-
创建环境
conda create -n dev --override-channels --strict-channel-priority -c conda-forge -c nodefaults jupyterlab=3 cookiecutter nodejs jupyter-packaging git -
激活环境
conda activate dev -
生成项目
cookiecutter https://github.com/jupyterlab/extension-cookiecutter-ts -
安装依赖 前端安装好之后
pip install -ve . // 运行以下命令来安装初始项目依赖项,并将扩展安装到JupyterLab环境中。 // 上面的命令将扩展的前端部分复制到JupyterLab中。我们可以在每次进行更改时再次运行此pip安装命令,以将更改复制到JupyterLab中。 // 或者直接链接过去 jupyter labextension develop --overwrite . -
运行JupyterLab
jupyter lab // 注意,在哪个目录运行,就会加载哪个目录的文件

jupyter lab --notebook-dir=D:/myapp // 指定目录启动


jupyter lab --ServerApp.disable_check_xsrf=True --watch // 添加更多参数
对前端来说,jlpm 是JupyterLab内置的类似yarn的东西。写完代码后,要生效,就立马运行
npm run build,当然可以运行 watch 命令。 -
发布开发的插件
-
也可以直接跟着 原文链接 来
插件开发常用demo合集
功能1 - 新建command添加一个页面
import {


  JupyterFrontEnd,
  JupyterFrontEndPlugin,
} from '@jupyterlab/application';
import {

     ICommandPalette } from '@jupyterlab/apputils';
import {

     Widget } from '@lumino/widgets';

const extension: JupyterFrontEndPlugin<void> = {


  id: 'widgets-example',
  autoStart: true,
  requires: [ICommandPalette],
  activate: (app: JupyterFrontEnd, palette: ICommandPalette) => {


    const {

     commands, shell } = app;
    const command = 'widgets:open-tab';
    // 使用command打开一个tab页
    commands.addCommand(command, {


      label: 'Open a Tab Widget',
      caption: 'Open the Widgets Example Tab',
      execute: () => {


        const widget = new ExampleWidget();
        shell.add(widget, 'main');
      },
    });
    palette.addItem({

     command, category: 'Extension Examples' });
  },
};

export default extension;

class ExampleWidget extends Widget {


  constructor() {


    super();
    this.addClass('jp-example-view');
    this.id = 'simple-widget-example';
    // tab页的标题
    this.title.label = 'Widget Example View';
    this.title.closable = true;
  }
}
功能2 - 增加菜单
- 在package.json里,增加 schemaDir字段,指向我们定义的设置目录
  "jupyterlab": {


    "extension": true,
    "outputDir": "jupyterlab_examples_main_menu/labextension",
    "schemaDir": "schema"
  }
- 项目新建schema目录(如果没有),新建 plugin.json,增加如下内容,通过id识别是新建菜单,还是用原来的菜单,如果是在 文件下 增加 id 就是
jp-mainmenu-file,详情内容看官网
{


  "title": "Main Menu Example",
  "description": "Main Menu Example settings.",
  "jupyter.lab.menus": {


    "main": [
      {


        "id": "jp-mainmenu-example-menu",
        "label": "Main Menu Example",
        "rank": 80,
        "items": [
          {


            "command": "jlab-examples:main-menu",
            "args": {


              "origin": "from the menu"
            }
          }
        ]
      }
    ]
  },
  "additionalProperties": false,
  "type": "object"
}
- 配置 command
import {


  JupyterFrontEnd,
  JupyterFrontEndPlugin,
} from '@jupyterlab/application';

import {

     ICommandPalette } from '@jupyterlab/apputils';

const extension: JupyterFrontEndPlugin<void> = {


  id: 'main-menu',
  autoStart: true,
  requires: [ICommandPalette],
  activate: (app: JupyterFrontEnd, palette: ICommandPalette) => {


    const {

     commands } = app;

    const command = 'jlab-examples:main-menu';
    commands.addCommand(command, {


      label: 'Execute jlab-examples:main-menu Command',
      caption: 'Execute jlab-examples:main-menu Command',
      execute: (args: any) => {


        console.log(
          `jlab-examples:main-menu has been called ${

      args['origin']}.`
        );
        window.alert(
          `jlab-examples:main-menu has been called ${

      args['origin']}.`
        );
      },
    });

    const category = 'Extension Examples';
    palette.addItem({


      command,
      category,
      args: {

     origin: 'from the palette' },
    });
  },
};

export default extension;
功能3 - 增加tab,左右中间
import {

     Widget} from '@lumino/widgets';

class ExampleWidget extends Widget {


  constructor() {


    super();
    this.addClass('jp-example-view');
    this.id = 'simple-widget-example';
    this.title.label = 'halo';
    this.title.closable = true;
  }
}

// 往右边增加内容
const widget = new ExampleWidget();
app.shell.add(widget, 'right');
功能4 - 使用 React
首先,自行安装好 react ,如下然后就可以当做正常widget使用了
import React from "react"
import {

     ReactWidget} from '@jupyterlab/apputils';
class MyComponent extends React.Component {


  click = (): void => {


    console.log(1111)
  }

  render(): React.ReactNode {


    return (
      <div>
        <button onClick={

    this.click}>hello</button>
      </div>
    )
  }
}

// 简单创建使用
const myWidget: Widget = ReactWidget.create(<MyComponent />);

// 或者是
class DatasetWidget extends ReactWidget {


  constructor() {


    super();
    this.addClass("jp-dataset-widget-view");
    this.id = "widget-dataset";
    this.title.label = ""
    this.title.icon = dataIcon
    this.title.caption = "数据集"
    this.title.closable = false;
  }

  private child: DatasetComponent | undefined;

  // 插件显示,要重新请求数据
  protected onAfterShow() {


    this.child?.loadData();
  }

  setChild = (v:DatasetComponent) => {


    this.child = v;
  }

  render() {


    return (
      <DatasetComponent setChild={

    this.setChild} />
    )
  }
}
功能5 - 添加一个类似插件的效果,左边增加tab和内容
import {

     LabIcon } from "@jupyterlab/ui-components";
// 某段svg的代码
const pySvg =""
const pyIcon = new LabIcon({


  name: "py",
  svgstr: pySvg
});

// 定义这个要添加的组件
class ExampleWidget extends Widget {


  constructor() {


    super();
    this.addClass('jp-example-view');
    this.id = 'simple-widget-example';
    this.title.label = '';
    // 定义图标
    this.title.icon = pyIcon;
    this.title.caption = 'Python';
    this.title.closable = true;
    this.node.textContent = "this is tab content"
  }
}

const plugin: JupyterFrontEndPlugin<void> = {


  id: 'cybercube:plugin',
  autoStart: true,
  activate: (app: JupyterFrontEnd) => {


    console.log('JupyterLab extension cybercube is activated!');
    const widget: any = new ExampleWidget();
    app.shell.add(widget, 'left');
  }
};
功能6 - 在widget中使用基于svg的icon
可以在iconfont中,找到合适的svg并复制代码
import {

     LabIcon } from "@jupyterlab/ui-components";

const pySvg =
  `<svg t="1679991149151"
        class="icon"
        viewBox="0 0 1024 1024"
        version="1.1"
        xmlns="http://www.w3.org/2000/svg"
        xmlns:xlink="http://www.w3.org/1999/xlink"
        width="64"
        height="64">
    <path d="M943.58718 401c-15.4-61.8-44.6-108.4-106.8-108.4h-80.2v94.8c0 73.6-62.4 135.6-133.6 135.6H409.38718c-58.4 0-106.8 50-106.8 108.6v203.6c0 58 50.4 92 106.8 108.6 67.6 19.8 132.6 23.4 213.6 0 53.8-15.6 106.8-47 106.8-108.6v-81.4H516.38718v-27.2h320.4c62.2 0 85.2-43.4 106.8-108.4 22.4-67 21.4-131.4 0-217.2zM636.38718 808c22.2 0 40.2 18.2 40.2 40.6 0 22.6-18 40.8-40.2 40.8-22 0-40.2-18.4-40.2-40.8 0.2-22.6 18.2-40.6 40.2-40.6zM399.58718 496.2h213.6c59.4 0 106.8-49 106.8-108.6V183.8c0-58-48.8-101.4-106.8-111.2-71.6-11.8-149.4-11.2-213.6 0.2-90.4 16-106.8 49.4-106.8 111.2v81.4h213.8v27.2h-294c-62.2 0-116.6 37.4-133.6 108.4-19.6 81.4-20.4 132.2 0 217.2 15.2 63.2 51.4 108.4 113.6 108.4H265.98718v-97.6c0-70.6 61-132.8 133.6-132.8z m-13.4-285.2c-22.2 0-40.2-18.2-40.2-40.6 0.2-22.6 18-40.8 40.2-40.8 22 0 40.2 18.4 40.2 40.8s-18 40.6-40.2 40.6z">
    </path>
</svg>`;

function iconFactory(name: string, svgstr: string): LabIcon{


  return new LabIcon({


    name,
    svgstr
  });
}

export const pyIcon = iconFactory("py", pySvg)
功能7 - 在notebook上边的头部,就是一排操作按钮下,增加一个自定义的header
import {

     IDisposable, DisposableDelegate } from '@lumino/disposable';

import {

     Widget } from '@lumino/widgets';

import {


  JupyterFrontEnd,
  JupyterFrontEndPlugin
} from '@jupyterlab/application';

import {


  DocumentRegistry
} from '@jupyterlab/docregistry';

import {

     NotebookPanel, INotebookModel } from '@jupyterlab/notebook';

const plugin: JupyterFrontEndPlugin<void> = {


  activate,
  id: 'my-extension-name:widgetPlugin',
  autoStart: true
};

export class WidgetExtension  implements DocumentRegistry.IWidgetExtension<NotebookPanel, INotebookModel>{


  createNew(
    panel: NotebookPanel,
    context: DocumentRegistry.IContext<INotebookModel>
  ): IDisposable {


    const widget = new Widget({

     node: Private.createNode() });
    widget.addClass('jp-myextension-myheader');
    panel.contentHeader.insertWidget(0, widget);
    return new DisposableDelegate(() => {


      widget.dispose();
    });
  }
}

function activate(app: JupyterFrontEnd): void {


  app.docRegistry.addWidgetExtension('Notebook', new WidgetExtension());
}
export default plugin;

namespace Private {


  export function createNode(): HTMLElement {


    const span = document.createElement('span');
    span.textContent = 'My custom header';
    return span;
  }
}
css的样式
.jp-myextension-myheader {
  min-height: 20px;
  background-color: lightsalmon;
}
功能8 - 在启动页(Launcher),增加一个入口功能
import {

    JupyterFrontEnd,JupyterFrontEndPlugin,} from '@jupyterlab/application';
import {

     MainAreaWidget } from '@jupyterlab/apputils';
import {

     ILauncher } from '@jupyterlab/launcher';
import {

     reactIcon } from '@jupyterlab/ui-components';
import {

     ReactWidget } from "@jupyterlab/apputils";
import React, {

     useState } from "react";
namespace CommandIDs {


  export const create = 'create-react-widget';
}
const CounterComponent = (): JSX.Element => {


  const [counter, setCounter] = useState(0);

  return (
    <div>
      <p>You clicked {

    counter} times!</p>
      <button
        onClick={

    (): void => {


          setCounter(counter + 1);
        }}
      >
        Increment
      </button>
    </div>
  );
};

class CounterWidget extends ReactWidget {


  constructor() {


    super();
    this.addClass("jp-ReactWidget");
  }
  render(): JSX.Element {


    return <CounterComponent />;
  }
}


const extension: JupyterFrontEndPlugin<void> = {


  id: 'react-widget',
  autoStart: true,
  optional: [ILauncher],
  activate: (app: JupyterFrontEnd, launcher: ILauncher) => {


    const {

     commands } = app;
    const command = CommandIDs.create;
    commands.addCommand(command, {


      caption: 'Create a new React Widget',
      label: 'React Widget',
      // @ts-ignore
      icon: (args) => (args['isPalette'] ? null : reactIcon),
      execute: () => {


        const content = new CounterWidget();
        const widget = new MainAreaWidget<CounterWidget>({

     content });
        widget.title.label = 'React Widget';
        widget.title.icon = reactIcon;
        app.shell.add(widget, 'main');
      },
    });
    if (launcher) {


      launcher.add({


        command,
      });
    }
  },
};
export default extension;
功能9 - 激活某个功能(比如左边栏或者右边栏的功能)
// 通过组件功能的id来启动即可
const plugin: JupyterFrontEndPlugin<void> = {


  id: 'demo:plugin',
  autoStart: true,
  requires: [ILayoutRestorer],
  activate: (
    app: JupyterFrontEnd,
    restorer: ILayoutRestorer,
  ) => {


    app.shell.activateById("widget-model-info-libs");
  }
};
功能10 - 监听编辑路径变化、文件内容变化、当前编辑文件变化
import {

     FileBrowserModel, IFileBrowserFactory } from '@jupyterlab/filebrowser';
import {

     IChangedArgs } from '@jupyterlab/coreutils';

const plugin: JupyterFrontEndPlugin<void> = {


  id: 'demo:plugin',
  autoStart: true,
  requires: [
    ILayoutRestorer,
    IFileBrowserFactory
  ],
  activate: (
    app: JupyterFrontEnd,
    restorer: ILayoutRestorer,
    fileBrowserFactory: IFileBrowserFactory,
  ) => {


       // 监听路径改变
    const onPathChanged = (
      model: FileBrowserModel,
      change: IChangedArgs<string>
    ) => {


      console.log(model)
      console.log(change)
    };
    fileBrowserFactory.defaultBrowser.model.pathChanged.connect(onPathChanged);

    // 监听文件内容改变
    const fileChange = (model: FileBrowserModel, b: any) => {


      console.log(model,b)
    }
    fileBrowserFactory.defaultBrowser.model.fileChanged.connect(fileChange);

    // 监听当前编辑文件变化
    const handler = (shell: JupyterFrontEnd.IShell, data: {

    newValue: string, oldValue: string}) => {


      console.log(shell,data)
    }

    // @ts-ignore
    app.shell.currentPathChanged.connect(handler)
  }
}
扩展入口代码片段
各个组件库、基本的使用方法、注释
import React from "react"
import {


  ILayoutRestorer,
  JupyterFrontEnd,
  JupyterFrontEndPlugin,
  ILabStatus
  // IConnectionLost,
  // IInfo
  // IRouter
} from '@jupyterlab/application';
import {

     Widget} from '@lumino/widgets';

// import { requestAPI } from './handler';
import {


  ICommandPalette,
  ISplashScreen,
  IThemeManager,
  IToolbarWidgetRegistry,
  MainAreaWidget,
  WidgetTracker,
  ReactWidget
} from '@jupyterlab/apputils';

import {

    IDocumentManager} from "@jupyterlab/docmanager"
import {

    IFileBrowserFactory} from "@jupyterlab/filebrowser"
import {

    IEditorTracker} from "@jupyterlab/fileeditor"
import {

    IHTMLViewerTracker} from "@jupyterlab/htmlviewer"
import {

    ILauncher} from "@jupyterlab/launcher"
import {

    IMainMenu} from "@jupyterlab/mainmenu"
import {

    ISettingEditorTracker} from "@jupyterlab/settingeditor"
import {

    ISettingRegistry} from "@jupyterlab/settingregistry"
import {

    IStateDB} from "@jupyterlab/statedb"
import {

    IStatusBar} from "@jupyterlab/statusbar"
import {

    ITerminalTracker} from "@jupyterlab/terminal"
import {

    ITooltipManager} from "@jupyterlab/tooltip"
import {

    INotebookTools, INotebookTracker, INotebookWidgetFactory} from "@jupyterlab/notebook"

interface APODResponse {


  copyright: string;
  date: string;
  explanation: string;
  media_type: 'video' | 'image';
  title: string;
  url: string;
}

/**
 * Initialization data for the cybercube extension.
 */
const plugin: JupyterFrontEndPlugin<void> = {


  id: 'cybercube:plugin',
  autoStart: true,
  requires: [
    ICommandPalette,
    ISplashScreen,
    IThemeManager,
    IToolbarWidgetRegistry,
    IDocumentManager,
    IFileBrowserFactory,
    IEditorTracker,
    IHTMLViewerTracker,
    ILauncher,
    IMainMenu,
    INotebookTools,
    INotebookTracker,
    INotebookWidgetFactory,
    ISettingEditorTracker,
    ISettingRegistry,
    IStateDB,
    IStatusBar,
    ITerminalTracker,
    ITooltipManager,
    ILabStatus
  ],
  optional: [ILayoutRestorer],
  activate
};

export default plugin;

// @ts-ignore
// @ts-ignore
function activate(
  app: JupyterFrontEnd,
  palette: ICommandPalette,
  splashScreen: ISplashScreen,
  themeManager: IThemeManager,
  // 工具栏小部件的注册表,如果要从数据定义(例如存储在设置中)动态生成工具栏,则需要此选项
  toolbarWidgetRegistry: IToolbarWidgetRegistry,
  // 操作文件系统,文件增删
  documentManager: IDocumentManager,
  // 可以自定义文件浏览器
  fileBrowserFactory: IFileBrowserFactory,
  // 如果希望能够循环访问由应用程序创建的文件编辑器并与之交互,请使用此选项
  editorTracker: IEditorTracker,
  // 处理HTML documents的交互
  htmlViewerTracker: IHTMLViewerTracker,
  // 添加东西到launcher
  launcher: ILauncher,
  mainMenu: IMainMenu,
  // 在右侧边栏中notebook工具面板的服务。使用此选项可将您自己的功能添加到面板。
  notebookTools: INotebookTools,
  // 一种用于notebook的部件跟踪器。如果您希望能够循环访问应用程序创建的notebook并与之交互,请使用此选项。
  notebookTracker: INotebookTracker,
  // @ts-ignore 可以自行创建notebook
  notebookWidgetFactory: INotebookWidgetFactory,
  // 处理编辑器设置
  settingEditorTracker:ISettingEditorTracker,
  // jupyterlab 设置系统,可以存储应用的存储设置
  settingRegistry: ISettingRegistry,
  // jupyterlab的状态数据库
  stateDB: IStateDB,
  // 状态栏的操作
  statusBar: IStatusBar,
  // 控制台的操作
  terminalTracker: ITerminalTracker,
  tooltipManager: ITooltipManager,
  labStatus: ILabStatus,
  restorer: ILayoutRestorer | null
) {


  console.log('JupyterLab extension jupyterlab_apod is activated!');

  // Declare a widget variable
  let widget: any;
  // console.log(app);
  // console.log(splashScreen);
  // console.log(themeManager);
  // splashScreen.show(true)
  // toolbarWidgetRegistry.createWidget
  // console.log(documentManager)


  /**
   * @title 添加普通节点到 文件浏览器 toolbar
   */
  // const t = fileBrowserFactory.defaultBrowser.toolbar;
  // const w: any = new Widget();
  // w.node.textContent = "haha"
  // t.addItem("haha", w);

  /**
   * @title 添加react节点到 文件浏览器 toolbar
   */
  // const t = fileBrowserFactory.defaultBrowser.toolbar;


  // class MyComponent extends React.Component {


  //   click = (): void => {


  //     console.log(1111)
  //   }

  //   render(): React.ReactNode {


  //     return (
  //       <div>
  //         <button onClick={this.click}>hello</button>
  //       </div>
  //     )
  //   }
  // }

  // // @ts-ignore
  // const myWidget: Widget = ReactWidget.create(<MyComponent />);
  // // @ts-ignore
  // t.addItem("ff", myWidget);

  /**
   * @title fileBrowserFactory
   */
  // const fb = fileBrowserFactory.createFileBrowser("custom-browser")
  // console.log(fb)
  // ----- fileBrowserFactory ------
    // 默认文件浏览器的dom
    // console.log(fileBrowserFactory.defaultBrowser.node)
    // 默认文件浏览器上边那三个按钮
    // console.log(fileBrowserFactory.defaultBrowser.toolbar.node)
    // 文件列表的dom
    // console.log(fileBrowserFactory.defaultBrowser.listing.node)
    // 文件列表上边的path的dom
    // console.log(fileBrowserFactory.defaultBrowser.crumbs.node)
  // ----- fileBrowserFactory ------

  // console.log(editorTracker);
  // console.log(htmlViewerTracker);
  // console.log(launcher);
  // console.log(notebookTools);
  // console.log(notebookTracker);
  // console.log(notebookWidgetFactory);
  // console.log(settingEditorTracker);
  // console.log(settingEditorTracker.currentWidget);
  // console.log(stateDB);
  // stateDB.save("myid", "cube").then(r => {


  //   console.log(r);
  // }).catch(e => {


  //   console.log(e);
  // })
  // stateDB.fetch("myid").then(r => {


  //   console.log(r);
  // })

  // console.log(terminalTracker);
  // terminalTracker.forEach(e => {


  //   console.log(e);
  // })

  // console.log(tooltipManager.invoke());

  // 自定义添加右键菜单,根据css选择器匹配在什么地方出现,甚至可以自定义右键菜单
  // console.log(app.contextMenu)
  // console.log(app)

  // 可以添加widgets到应用中
  // A top area for things like top-level toolbars and information.
  //  A menu area for top-level menus, which is collapsed into the top area in multiple-document mode and put below it in single-document mode.
  //  left and right sidebar areas for collapsible content.
  //  A main work area for user activity.
  //  A down area for information content; like log console, contextual help.
  //  A bottom area for things like status bars.
  //  A header area for custom elements.
  // console.log(app.shell.add());


  // 添加快捷键
  // Accel 就是 ctrl
  // app.commands.addKeyBinding({


  //   command: commandID,
  //   args: {},
  //   keys: ['Accel T'],
  //   selector: '.jp-Notebook'
  // });

  // launcher.add({


  //   command: 'apod:open',
  //   category: 'Tutorial',
  //   rank: 0
  // });

  // setTimeout(() => {


  //   app.commands
  //     .execute('terminal:create-new')
  //     .then((terminal: any) => {


  //       app.shell.add(terminal, 'right');
  //     });
  // }, 2000)

  const command: string = 'open-picture';

  /**
   * @title 菜单操作,暂没作用
   */
  // console.log(mainMenu.addMenu);
  /// @ts-ignore
  // const menu = new Menu({ "commands": app.commands });
  // menu.addItem({


  //   command,
  //   args: {},
  // });
  // mainMenu.addMenu(menu as any, { rank: 40 });

  // 成功了,可以跑,在文件菜单下增加子项
  mainMenu.fileMenu.addGroup([ {

    command}], 40);

  /**
   * @title 状态栏的操作
   */
  // console.log(statusBar);
  const statusWidget = new Widget();
  labStatus.busySignal.connect(() => {


    statusWidget.node.textContent = labStatus.isBusy ? 'Busy' : 'Idle';
  });
  statusBar.registerStatusItem('lab-status', {


    align: 'middle',
    // @ts-ignore
    item: statusWidget
  });


  // console.log(notebookTracker)

  app.commands.addCommand(command, {


    // command 的标题
    label: 'Astronomy Picture',
    execute: () => {


      if (!widget || widget.isDisposed) {


        const content: any = new APODWidget();
        widget = new MainAreaWidget({

    content});
        widget.id = 'apod-jupyterlab';
        // 页面tab的标题
        widget.title.label = '太空图片';
        widget.title.closable = true;
      }
      if (!tracker.has(widget)) {


        // Track the state of the widget for later restoration
        tracker.add(widget);
      }
      if (!widget.isAttached) {


        // Attach the widget to the main work area if it's not there
        app.shell.add(widget, 'main');
      }
      widget.content.updateAPODImage();

      // Activate the widget
      app.shell.activateById(widget.id);
    }
  });

  // Add the command to the palette.
  palette.addItem({

     command, category: 'Tutorial' });

  // Track and restore the widget state
  let tracker: any = new WidgetTracker({


    namespace: 'apod'
  });
  if (restorer) {


    restorer.restore(tracker, {


      command,
      name: () => 'apod'
    });
  }
}


class APODWidget extends Widget {


  /**
   * Construct a new APOD widget.
   */
  constructor() {


    super();

    this.addClass('my-apodWidget');

    // Add an image element to the panel
    this.img = document.createElement('img');
    this.node.appendChild(this.img);

    // Add a summary element to the panel
    this.summary = document.createElement('p');
    this.node.appendChild(this.summary);
  }

  /**
   * The image element associated with the widget.
   */
  readonly img: HTMLImageElement;

  /**
   * The summary text element associated with the widget.
   */
  readonly summary: HTMLParagraphElement;

  /**
   * Handle update requests for the widget.
   */
  async updateAPODImage(): Promise<void> {


    const response = await fetch(`https://api.nasa.gov/planetary/apod?api_key=DEMO_KEY&date=${

      this.randomDate()}`);

    if (!response.ok) {


      const data = await response.json();
      if (data.error) {


        this.summary.innerText = data.error.message;
      } else {


        this.summary.innerText = response.statusText;
      }
      return;
    }

    const data = await response.json() as APODResponse;

    if (data.media_type === 'image') {


      // Populate the image
      this.img.src = data.url;
      this.img.title = data.title;
      this.summary.innerText = data.title;
      if (data.copyright) {


        this.summary.innerText += ` (Copyright ${

      data.copyright})`;
      }
    } else {


      this.summary.innerText = 'Random APOD fetched was not an image.';
    }
  }

  /**
   * Get a random date string in YYYY-MM-DD format.
   */
  randomDate(): string {


    const start = new Date(2010, 1, 1);
    const end = new Date();
    const randomDate = new Date(start.getTime() + Math.random()*(end.getTime() - start.getTime()));
    return randomDate.toISOString().slice(0, 10);
  }
}
相关链接
- 在线试用jupyter
- Jupyter Notebook介绍、安装及使用教程
- Anaconda介绍、安装及使用教程、Anaconda官网
- anaconda的卸载与重装、深度学习相关配置
- python最详细的安装与完全卸载
- 开发插件文档入口、 扩展开发接口列表
- jupyter-notebook 官方文档
- 插件生成 extension-cookiecutter-ts
- JupyterLab API Documentation
- 扩展demo合集-新手必看
- jupyterlab-git – jupyterlab的git插件,很好的学习作用
- lumino、 conda-forge
- codemirror (开源代码编辑器)
- conda创建环境报错,CondaSSLError: OpenSSL appears to be unavailable on this machine. OpenSS…