1.点亮RGB灯
from modules import ybrgb
RGB = ybrgb()
#设置RGB颜色:RGB.set(r, g, b)
#参数r控制红灯开关,
#参数g控制绿灯开关,
#参数b控制蓝灯开关,
#输入0表示关闭,输入1表示开启。
RGB.set(1, 0, 0)
2.按键功能
from modules import ybkey
from modules import ybrgb
import time


KEY = ybkey()
RGB = ybrgb()

while True:
#读取按键K1是否被按下,返回0表示释放状态,返回1表示按下状态。
    state = KEY.is_press()
    if state == 1 : RGB.set(1,0,0)
    else :RGB.set(0,0,0)
    print("key press:", state)
    time.sleep_ms(100)
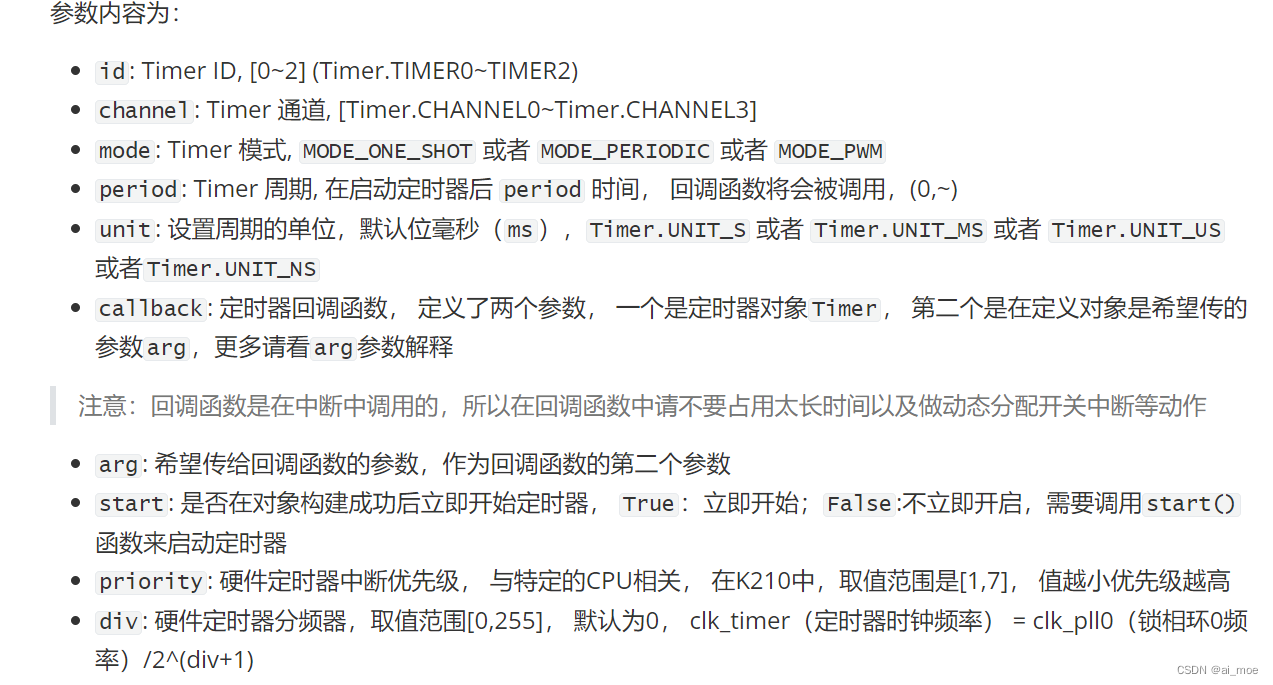
3.定时器
timer = machine.Timer(id, channel,
mode=Timer.MODE_ONE_SHOT,
period=1000,
unit=Timer.UNIT_MS,
callback=None,
arg=None,
start=True,
priority=1,
div=0)
from modules import ybkey
from modules import ybrgb
from machine import Timer
import time


KEY = ybkey()
RGB = ybrgb()

def on_timer(timer):
    print("This is on_timer callback")

timer = Timer(Timer.TIMER0, Timer.CHANNEL0,
            mode=Timer.MODE_PERIODIC, period=100,
            unit=Timer.UNIT_MS, callback=on_timer, arg=None)


last_time = time.ticks_ms()

try:
    while True:
        if time.ticks_ms() - last_time >= 200:
            last_time = time.ticks_ms()
            print(time.ticks_ms())
except:
    timer.deinit()
    del timer
4.PWM呼吸灯实验
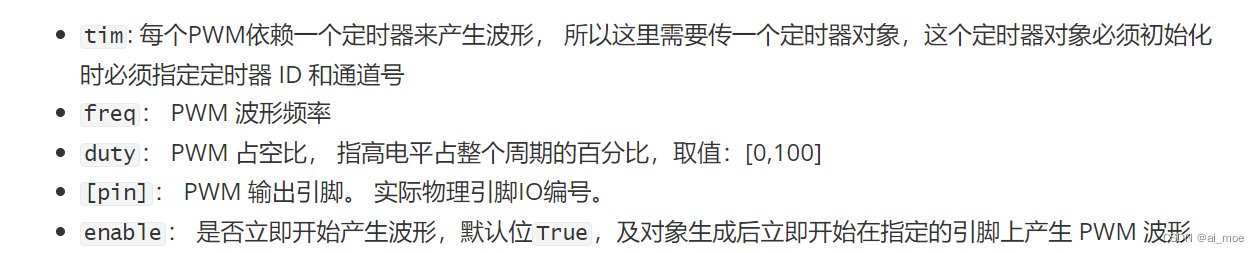
由于PWM信号需要来源自定时器,所以新建一个定时器对象,设置参数为定时器0,通道0,PWM模式。PWM输出依赖于定时器,目前K210总共有3个定时器,每个定时器有4个通道,所以最多可以输出12个PWM信号。PWM占空比为输出高电平时间与周期的比值。
tim = Timer(Timer.TIMER0, Timer.CHANNEL0, mode=Timer.MODE_PWM)
通过指定的参数新建一个 PWM 对象
pwm = machine.PWM(tim, freq, duty, pin, enable=True)
RGB灯对应的引脚
红色RED=27
绿色GREEN=26
蓝色BLUE=29
from machine import Timer, PWM
import time
tim = Timer(Timer.TIMER0, Timer.CHANNEL0, mode=Timer.MODE_PWM)
pwm = PWM(tim, 1000, 0, 27, enable=True)
duty=0
add = True
while True:
if add:
duty += 5
else:
duty -= 5
if duty > 100:
duty = 100
add = False
elif duty < 0:
duty = 0
add = True
time.sleep(0.05)
pwm.duty(duty)
LCD显示
import lcd
import time
# 初始化lcd显示屏。
lcd.init()
#把屏幕设置为蓝色背景,在屏幕左上角显示“Hello Yahboom”。
lcd.clear(lcd.PURPLE)
time.sleep(1)
lcd.rotation(0)
lcd.draw_string(30, 30, "Hello Yahboom", lcd.WHITE, lcd.BLUE)
其中,lcd.clear(color)的参数color为设置颜色,可选BLACK(黑色)
NAVY(藏青色)
DARKGREEN(墨绿色)
DARKCYAN(深青色)
MAROON(褐红色)
PURPLE(紫色)
OLIVE(橄榄色)
LIGHTGREY(浅灰色)
DARKGREY(深灰色)
BLUE(蓝色)
GREEN(绿色)
CYAN(青色)
RED(红色)
MAGENTA(品红色)
YELLOW(黄色)
WHITE(白色)
ORANGE(橘黄色)
GREENYELLOW(黄绿色)
PINK(粉红色)。
lcd.rotation(dir)的参数dir为设置旋转方向
dir=0为正面显示
dir=1表示屏幕顺时针旋转90度
dir=2表示屏幕顺时针旋转180度
dir=3表示屏幕顺时针旋转270度。
lcd.draw_string(x, y, "contents", color_text, color_background)的参数
x,y表示文字的开始坐标
“contents”表示显示的字符
,color_text表示字符串的显示颜色
color_background表示字符串背景颜色
time.sleep(1)表示延迟1秒,保证有足够时间显示内容。
6. 触摸板读取坐标
image.draw_string(x, y, text[, color[, scale=1[, x_spacing=0[, y_spacing=0[, mono_space=True]]]]])
表示添加字符串
x, y:表示字符串开始点的坐标
text:表示显示的字符串内容
color:表示颜色RGB值
scale:表示字符串大小
x_spacing:表示字间距,允许在字符之间添加(如果是正数)或减去(如果是负数)x像素
y_spacing:表示行间距,允许在字符之间添加(如果是正数)或减去(如果是负数)y像素
mono_space:强制文本间距固定,默认为True。对于大文本,可设置False以获得非固定宽度的字符间距,会有更好的显示效果
(status, x, y) = ts.read()表示读取当前屏幕的状态以及触摸的点的坐标值;返回值是一个由3个整型值组成的元组,status: 状态, 取值有 STATUS_RELEASE=1,STATUS_PRESS=2, STATUS_MOVE=3 ,x: 触摸点X轴坐标,y: 触摸点Y 轴坐标;
img.draw_line(x0, y0, x1, y1[, color[, thickness=1]])表示在img图像上画一条线,x0,y0表示起点坐标,x1,y1表示终点坐标,color表示颜色,默认为白色,thickness表示线的粗细像素;
lcd.display(img)表示LCD显示img图像。
import touchscreen as ts
import lcd, image
import time

lcd.init()
#初始化触摸屏幕
ts.init()
#通过image库新建一个空白图像
img = image.Image()
img.draw_string(100, 0, "Please touch the screen", color=(0, 0, 255), scale=1)
#初始化相关变量
status_last = ts.STATUS_IDLE
x_last = 0
y_last = 0


lcd.display(img)
while True:
    #读取屏幕的状态
    (status, x, y) = ts.read()
    #如果状态改变
    if status_last != status:
        print(status, x, y)
        status_last = status
    #如果状态为移动状态
    if status == ts.STATUS_MOVE:
        在图片上(x_last,y_last)到(x, y)画一条线
        img.draw_line(x_last, y_last, x, y)
    #如果是按下状态
    elif status == ts.STATUS_PRESS:
        img.draw_line(x, y, x, y)
    #显示img图片
    lcd.display(img)
    x_last = x
    y_last = y
7. 内存卡读写文件
import sensor, lcd
import time

#初始化LCD显示屏和摄像头,初始化完成后打印“init ok”。
lcd.init()
sensor.reset()
sensor.set_pixformat(sensor.RGB565)
sensor.set_framesize(sensor.QVGA)
sensor.run(1)
sensor.skip_frames(10)
print("init ok")

#创建图片保存路径img_path
img_path = "/sd/image-1.jpg"

#打开摄像头捕获一帧图像,保存为img,并把img保存到内存卡中,名称为image-1.jpg。
img = sensor.snapshot()
print("save image")
img.save(img_path)

#将image-1.jpg从内存卡读取出来,并在LCD上显示。
#print("read image")
#img_read = image.Image(img_path)
#lcd.display(img_read)
#print("ok")