Dlib是较流行的人脸识别的开源库,使用c++编写,里面包含了许多的机器学习算法,在python中也可以使用。Dlib保持着很好的更新节奏,文档也写得相当清晰,涉及到的资源都有标明在哪里下载,是一个优秀的人脸识别开源库。
在ubuntu下安装Dlib的python库
python是机器学习重要的语言,使用也较为方便,虽然Dlib是用c++编写,同样编译成python一样能很好的应用。
安装的过程也较为简单:
Dlib的开发中使用到boost库,编译时使用cmake,在安装之前要先安装这两样,如果没有安装的话,会报错误:
Command "/usr/bin/python -u -c "import setuptools, tokenize;__file__='/tmp/pip-build-FnblaA/dlib/setup.py';f=getattr(tokenize, 'open', open)(__file__);code=f.read().replace('\r\n', '\n');f.close();exec(compile(code, __file__, 'exec'))" install --record /tmp/pip-BoT1jf-record/install-record.txt --single-version-externally-managed --compile" failed with error code 1 in /tmp/pip-build-FnblaA/dlib/
安装 boost和cmake如下:
apt-get install libboost-python-dev cmake
先安装 Dlib涉及到的库scikit-image,cv2
pip install scikit-image
pip install opencv-python
下面就能够安装Dlib:
pip install dlib
在识别中最重要的是提取物件的特征,同样的在人脸识别上也是一样,需要提取人脸的特征,有了特征以后就能够用来识别。
代码如下:
#!/usr/bin/python
#coding=utf-8

# 先检测人脸,提取关键点向量
# 人脸关键点检测器 shape_predictor_5_face_landmarks.dat 在 http://dlib.net/files/shape_predictor_5_face_landmarks.dat.bz2 下载
# 人脸识别模 dlib_face_recognition_resnet_model_v1.dat 在 http://dlib.net/files/dlib_face_recognition_resnet_model_v1.dat.bz2 下载

import sys,os,dlib,glob,numpy
from skimage import io

# 模型
predictor_path = 'shape_predictor_5_face_landmarks.dat'
face_rec_model_path = 'dlib_face_recognition_resnet_model_v1.dat'
# 需要检测的文件
faces_folder_path = 'faceto'

detector = dlib.get_frontal_face_detector()
sp = dlib.shape_predictor(predictor_path)
facerec = dlib.face_recognition_model_v1(face_rec_model_path)

descriptors = []

for f in glob.glob(os.path.join(faces_folder_path, "*.jpg")):
    print("Processing file: {}".format(f))
    img = io.imread(f)
    # 先检测人脸
    dets = detector(img, 1)
    print("Number of faces detected: {}".format(len(dets)))
    for k, d in enumerate(dets):

        shape = sp(img, d)
        # 在人脸区域中,提取关键点向量,128D向量
        face_descriptor = facerec.compute_face_descriptor(img, shape)
        # 转换为numpy array
        v = numpy.array(face_descriptor)
        print 'face_descriptor',v.shape
        print v
在windows下安装Dlib的python库
在windows下,也是要解决两个依赖,cmake和boost库,当然本机已经安装过python了。
cmake较简单,到https://cmake.org/download/ 下安装相应的版本就可以。
boost库需要编译
在 http://www.boost.org/users/history/ 下载需要的版本,
我使用的是 vs2015,进入开发命令行:
C:\Program Files (x86)\Microsoft Visual Studio 14.0>
把下载的boost解压,放到一个特定的目录,进入Boost目录,执行bootstrap.bat,没有报错,会让你执行./b2命令,就能编译完成boost,会生成stage目录,设置环境变量BOOST_ROOT = D:\boost_1_59_0 和 BOOST_LIBRARYDIR = D:\boost_1_59_0\stage\lib
再进行python library的编译
b2 -a --with-python address-model=32 toolset=msvc runtime-link=static
到这里cmake和boost库都已经安装好,接下来跟ubuntu一样,安装scikit-image,cv2和dlib,
pip install scikit-image
pip install opencv-python
pip install dlib
在安装scikit-image如果出现错误的话,
Command "c:\python27\python.exe -u -c "import setuptools, tokenize;__file__='c:\\users\\\xc1\xd6\xc7\xe5\xc6\xaf\\appdata\\local\\temp\\pip-build-v_gl7g\\scikit-image\\setup.py';f=getattr(tokenize, 'open', open)(__file__);code=f.read().replace('\r\n', '\n');f.close();exec(compile(code, __file__, 'exec'))" install --record c:\users\\appdata\local\temp\pip-juqjlo-record\install-record.txt --single-version-externally-managed --compile" failed with error code 1 in c:\users\appdata\local\temp\pip-build-v_gl7g\scikit-image\
解决方式
把stdint.h保存至C:\Users\userName\AppData\Local\Programs\Common\Microsoft\Visual C++ for Python\9.0\VC\include\
再次安装
在github上下载Dlib的源代码,在python_examples下的face_detector.py是用来标注人脸,代码的注解也非常的详细,运行如下:
./face_detector.py ../examples/faces/*.jpg

vs2015编译Dlib代码
需要研究Dlib的代码,有时需要对Dlib进行编译,Dlib是用c++编写,官网下编译代码如下:
进入Dlib的路径
mkdir build
cd build
cmake -G "Visual Studio 14 2015 Win64" ..
cmake --build . --config Release
Dlib就编译完成,这里编译的是Release 版本,在使用的过程中也要用Release 版本,Dlib的例子很多使用opencv,需要把路径和链接库在加进去。
引用路径下添加:
D:\work\dlib-master
D:\work\opencv\build\include
添加c++预处理器:
DLIB_JPEG_SUPPORT
加入库链接:
D:\work\dlib-master\build\dlib\Release\dlib.lib
D:\work\opencv\build\x64\vc14\lib\opencv_world331.lib
在examples中找face_detection_ex.cpp加入到工程中,可以看到和刚才python一样的结果。
![[外链图片转存失败,源站可能有防盗链机制,建议将图片保存下来直接上传(img-fyWarfXv-1649464455336)(/images/kuxue/machine_learning/face/face_dec1.png)]](https://img-blog.csdnimg.cn/c9fdb5d6b12d4cdaa41724a4beca0d3f.png)
非cmake下编译Dlib
需要进一步的了解Dlib源码时,需要边调试边看代码,在编译成lib时是做不了这件事情的,所以我们需要把dlib的加入到工程中。
在http://dlib.net/compile.html 下载 dlib代码,解压到某一个路径下,等下工程需要引用到。
新建一个vs2015的win32控制台应用程序空工程,命名为Dlib_test。
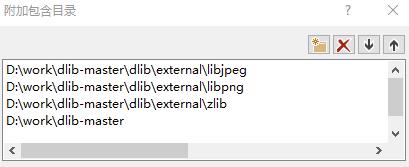
1.右键项目工程->属性->C/C+±>常规->附加包含目录
添加四个目录如下:
D:\work\dlib-master\dlib\external\libjpeg
D:\work\dlib-master\dlib\external\libpng
D:\work\dlib-master\dlib\external\zlib
D:\work\dlib-master
2.设置库目录
工程->属性->链接器->常规->附加库目录
D:\work\dlib-master\dlib D:\work\dlib-master\dlib\external
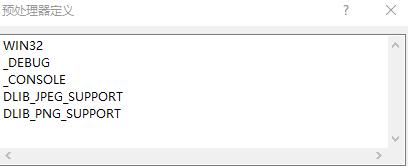
3.添加对JPG和PNG图片的支持:
属性->C/C+±>预处理器->预处理器定义
DLIB_JPEG_SUPPORT
DLIB_PNG_SUPPORT
4.关闭SDL检查
当SDL检查启用时,编译器会严格检测缓冲区的溢出,这将导致一些函数编译失败。
项目属性->配置属性->C/C+±>SDL检查,选测否。
5.添加资源文件
将下面三个文件夹下的所有文件添加到资源文件中
dlib\external\libjpeg
dlib\external\libpng
dlib\external\zlib
6.添加源文件
添加两个源文件到工程中:
dlib\all\source.cpp
examples\face_landmark_detection_ex.cpp
这个工程如下:

main()函数在face_landmark_detection_ex.cpp下,调试的时候从这个主工程进入,可以看到人脸识别两个最重要的算法,人脸探测detect和特征提取 shape_predictor。