1. pcl中的矩阵变换是什么
通过激光传感器等设备获得的3d点云在拼接成更大场景时,需要对点云数据进行旋转和平移操作。而旋转和平移操作,就可以通过矩阵变换来实现。
- 点的表示
对于点云中的一个点 p p p,其表示为
p = [ x y z 1 ] p=\begin{bmatrix} x \\ y \\ z \\ 1 \\ \end{bmatrix} p=
xyz1
这里, ( x , y , z ) (x, y, z) (x,y,z)为点的空间坐标,第4维的1是什么?其实第4维是人为设置的,方便后面用矩阵乘法表示平移操作。
- 点的平移
如将上面的 p p p点沿着x轴远离原点平移8个单位,直观上就可以得到平移后的结果 p ′ p^{\prime} p′
p ′ = [ x + 8 y z 1 ] p^{\prime}=\begin{bmatrix} x+8 \\ y \\ z \\ 1 \\ \end{bmatrix} p′=
x+8yz1
其实等价于下面的矩阵乘法
p ′ = A ⋅ p = [ 1 0 0 a 0 1 0 b 0 0 1 c 0 0 0 1 ] ⋅ [ x y z 1 ] = [ x + a y + b z + c 1 ] p^{\prime}=A\cdot p= \begin{bmatrix} 1 & 0& 0& a \\ 0 & 1& 0& b\\ 0& 0& 1& c \\ 0& 0& 0& 1 \\ \end{bmatrix}\cdot \begin{bmatrix} x \\ y \\ z \\ 1 \\ \end{bmatrix}= \begin{bmatrix} x+a \\ y+b \\ z+c \\ 1 \\ \end{bmatrix} p′=A⋅p=
100001000010abc1
⋅
xyz1
=
x+ay+bz+c1
可以看到,通过给三维点坐标增加一维,可以非常方便的通过矩阵乘法实现点的平移操作。注意到,这里的矩阵 A A A总是 4 × 4 4\times4 4×4方阵。
- 点的旋转
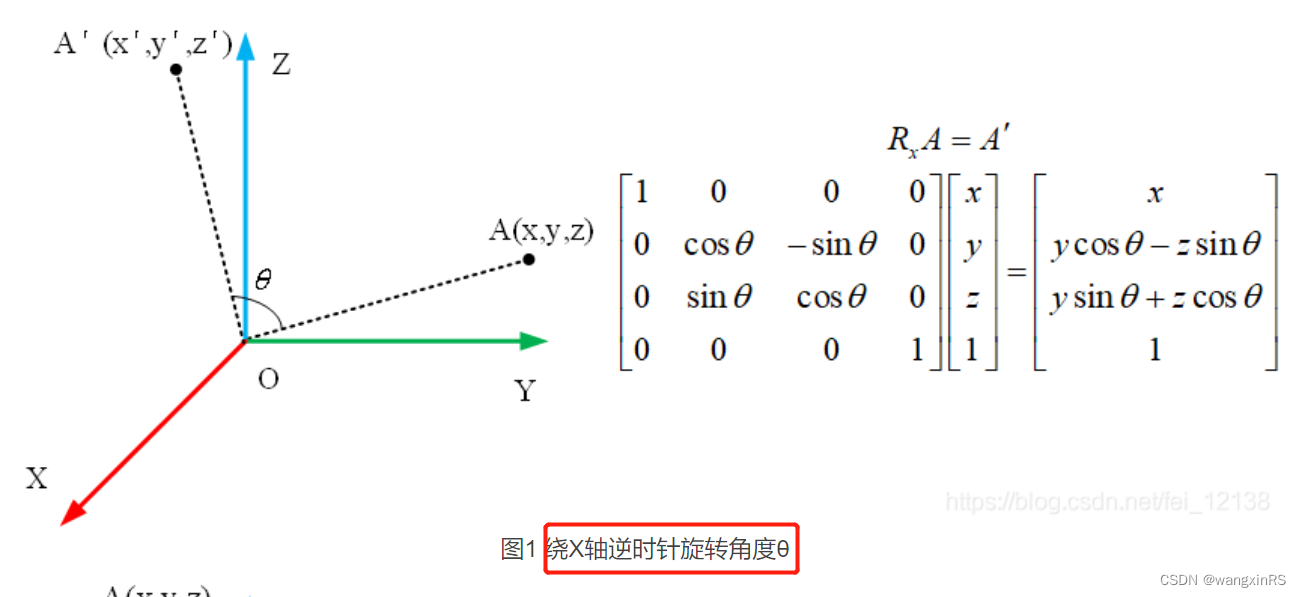
这里指的是点按照某个方向围绕原点旋转 θ \theta θ角度。比如,三维坐标系里绕着x轴逆时针旋转,如下所示(可参考博客《PCL点云库——旋转平移矩阵》)
任意方向旋转任意角度,可通过绕着x轴旋转、绕着y轴旋转、绕着z轴旋转等三个基本旋转操作组合而成。而绕着x轴旋转、绕着y轴旋转、绕着z轴旋转可分别通过矩阵表示。
记绕着x轴逆时针旋转 θ \theta θ角度的操作为 R x ( θ ) R_x(\theta) Rx(θ),则该操作对应的矩阵为
p ′ = R x ( θ ) ⋅ p = [ 1 0 0 0 0 c o s θ − s i n θ 0 0 s i n θ c o s θ 0 0 0 0 1 ] ⋅ [ x y z 1 ] = [ x y ⋅ c o s θ − z ⋅ s i n θ y ⋅ s i n θ + z ⋅ c o s θ 1 ] p^{\prime}=R_x(\theta)\cdot p= \begin{bmatrix} 1 & 0& 0& 0 \\ 0 & cos\theta& -sin\theta& 0\\ 0& sin\theta& cos\theta& 0 \\ 0& 0& 0& 1 \\ \end{bmatrix}\cdot \begin{bmatrix} x \\ y \\ z \\ 1 \\ \end{bmatrix}= \begin{bmatrix} x \\ y \cdot cos\theta-z\cdot sin\theta \\ y \cdot sin\theta+z\cdot cos\theta \\ 1 \\ \end{bmatrix} p′=Rx(θ)⋅p=
10000cosθsinθ00−sinθcosθ00001
⋅
xyz1
=
xy⋅cosθ−z⋅sinθy⋅sinθ+z⋅cosθ1
记绕着y轴逆时针旋转 θ \theta θ角度的操作为 R y ( θ ) R_y(\theta) Ry(θ),则该操作对应的矩阵为
p ′ = R y ( θ ) ⋅ p = [ c o s θ 0 s i n θ 0 0 1 0 0 − s i n θ 0 c o s θ 0 0 0 0 1 ] ⋅ [ x y z 1 ] = [ x ⋅ c o s θ + z ⋅ s i n θ y − x ⋅ s i n θ + z ⋅ c o s θ 1 ] p^{\prime}=R_y(\theta)\cdot p= \begin{bmatrix} cos\theta & 0& sin\theta& 0 \\ 0 & 1&0 & 0\\ -sin\theta&0 & cos\theta& 0 \\ 0& 0& 0& 1 \\ \end{bmatrix}\cdot \begin{bmatrix} x \\ y \\ z \\ 1 \\ \end{bmatrix}= \begin{bmatrix} x \cdot cos\theta+z\cdot sin\theta \\ y \\ -x \cdot sin\theta+z\cdot cos\theta \\ 1 \\ \end{bmatrix} p′=Ry(θ)⋅p=
cosθ0−sinθ00100sinθ0cosθ00001
⋅
xyz1
=
x⋅cosθ+z⋅sinθy−x⋅sinθ+z⋅cosθ1
记绕着z轴逆时针旋转 θ \theta θ角度的操作为 R z ( θ ) R_z(\theta) Rz(θ),则该操作对应的矩阵为
p ′ = R z ( θ ) ⋅ p = [ c o s θ − s i n θ 0 0 s i n θ c o s θ 0 0 0 0 1 0 0 0 0 1 ] ⋅ [ x y z 1 ] = [ x ⋅ c o s θ − y ⋅ s i n θ x ⋅ s i n θ + y ⋅ c o s θ z 1 ] p^{\prime}=R_z(\theta)\cdot p= \begin{bmatrix} cos\theta & -sin\theta& 0& 0 \\ sin\theta & cos\theta&0& 0\\ 0& 0& 1& 0 \\ 0& 0& 0& 1 \\ \end{bmatrix}\cdot \begin{bmatrix} x \\ y \\ z \\ 1 \\ \end{bmatrix}= \begin{bmatrix} x \cdot cos\theta-y\cdot sin\theta \\ x \cdot sin\theta+y\cdot cos\theta \\ z \\ 1 \\ \end{bmatrix} p′=Rz(θ)⋅p=
cosθsinθ00−sinθcosθ0000100001
⋅
xyz1
=
x⋅cosθ−y⋅sinθx⋅sinθ+y⋅cosθz1
2. 举例:如何做矩阵变换
只要实现矩阵变换,就可以做点云的旋转和平移。PCL库中做矩阵变换有两种方法,分别为Eigen::Matrix4f和Eigen::Affine3f。Eigen::Matrix4f需要手动构建旋转和平移矩阵,较易出错;Eigen::Affine3f则接近于人类操作步骤,将平移操作和旋转操作做成函数,调用即可。
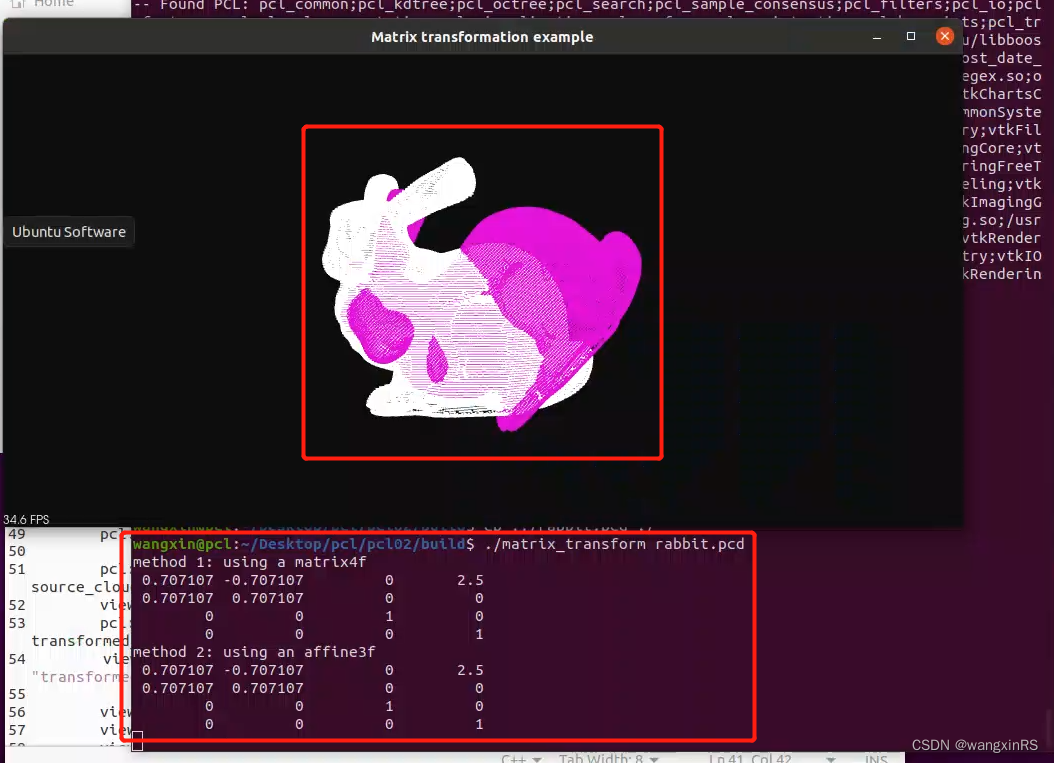
举例:将点云数据先沿着x轴平移2.5,然后绕着z轴逆时针旋转 π 4 \frac{\pi}{4} 4π的角度。
实现主要参考双愚的代码;兔子pcd数据从博客《PCL读取PCD文件的数据》中获取
链接:https://pan.baidu.com/s/1v6mjPjwd7fIqUSjlIGTIGQ
提取码:zspx
- matrix_transform.cpp
#include <iostream>
#include <pcl/io/pcd_io.h>
#include <pcl/io/ply_io.h>
#include <pcl/point_cloud.h>
#include <pcl/console/parse.h>
#include <pcl/common/transforms.h>
#include <pcl/visualization/pcl_visualizer.h>

int main(int argc, char** argv)
{


	pcl::PointCloud<pcl::PointXYZ>::Ptr source_cloud(new pcl::PointCloud<pcl::PointXYZ>());

	if (pcl::io::loadPCDFile(argv[1], *source_cloud) < 0)
	{


		std::cout << "Error loading point cloud " << argv[1] << std::endl;
		return -1;
	}

	float theta = M_PI / 4; // 旋转角度

	//方法一: Matrix4f
	Eigen::Matrix4f transform_1 = Eigen::Matrix4f::Identity();

	transform_1(0, 0) = std::cos(theta);
	transform_1(0, 1) = -std::sin(theta);
	transform_1(1, 0) = std::sin(theta);
	transform_1(1, 1) = std::cos(theta);

	transform_1(0, 3) = 2.5;

	printf("method 1: using a matrix4f\n");
	std::cout << transform_1 << std::endl;

	//方法二: Affine3f
	Eigen::Affine3f transform_2 = Eigen::Affine3f::Identity();

	transform_2.translation() << 2.5, 0.0, 0.0;
	transform_2.rotate(Eigen::AngleAxisf(theta, Eigen::Vector3f::UnitZ()));

	printf("method 2: using an affine3f\n");
	std::cout << transform_2.matrix() << std::endl;


	// excuting the transformation(执行平移和旋转操作)
	pcl::PointCloud<pcl::PointXYZ>::Ptr transformed_cloud(new pcl::PointCloud<pcl::PointXYZ>());
	pcl::transformPointCloud(*source_cloud, *transformed_cloud, transform_2);

	// visualization(可视化)
	pcl::visualization::PCLVisualizer viewer("Matrix transformation example");

	pcl::visualization::PointCloudColorHandlerCustom<pcl::PointXYZ> source_cloud_color_handler(source_cloud, 255, 255, 255);
	viewer.addPointCloud(source_cloud, source_cloud_color_handler, "original_cloud");
	pcl::visualization::PointCloudColorHandlerCustom<pcl::PointXYZ> transformed_cloud_color_handler(transformed_cloud, 230, 20, 220);
        viewer.addPointCloud(transformed_cloud, transformed_cloud_color_handler, "transformed_cloud");

	viewer.addCoordinateSystem(1.0, "cloud", 0);
	viewer.setBackgroundColor(0.05, 0.05, 0.05, 0);
	viewer.setPointCloudRenderingProperties(pcl::visualization::PCL_VISUALIZER_POINT_SIZE, 2, "original_cloud");
        viewer.setPointCloudRenderingProperties(pcl::visualization::PCL_VISUALIZER_POINT_SIZE, 2, "transformed_cloud");

	while (!viewer.wasStopped())
	{


		viewer.spinOnce();
	}

	return 0;

}
- CMakeLists.txt
cmake_minimum_required(VERSION 2.6 FATAL_ERROR)

project(pcl-matrix_transform)

find_package(PCL 1.7 REQUIRED)

add_executable (matrix_transform matrix_transform.cpp)
target_link_libraries (matrix_transform ${

    PCL_LIBRARIES})
- 运行
./matrix_transform rabbit.pcd