文章目录
一.前言
1.principal和credential的区别
-
principal:能唯一标识用户身份的属性,一个用户可以有多个principal
- 如登录的唯一标识,
用户可以使用用户名或手机或邮箱进行登录,这些principal是让别人知道的
- 如登录的唯一标识,
-
credential:凭证,用户才知道的,简单的说就是
密码-
如:手机开锁,可以使用
屏幕密码也可以使用人脸识别,屏幕密码和人脸是你个人(用户)才拥有的; -
principals 和 credentials 组合就是用户名 / 密码了。
-
2.生成私钥公钥
- 使用命令生成密钥证书,采用
RSA算法,每个证书包含公钥和私钥- Keytool 是一个java提供的证书管理工具
keytool -genkeypair -alias oyjp -keyalg RSA -keypass ouyangjianpeng -keystore ouyangjianpeng.jks -storepass ouyangjianpeng -alias:密钥的别名 -keyalg:使用的hash算法 -keypass:密钥的访问密码 -keystore:密钥库文件名,changgou.jks保存了生成的证书 -storepass:密钥库的访问密码 - 成功后会在当前目录生成一个
ouyangjianpeng.jks文件
- Keytool 是一个java提供的证书管理工具
- 查询证书信息:
keytool -list -keystore ouyangjianpeng.jks
3.导出公钥
-
openssl是一个加解密工具包,这里使用openssl来导出公钥信息。
-
安装 openssl:http://slproweb.com/products/Win32OpenSSL.html
- 安装资料目录下的
Win64OpenSSL-1_1_1b.exe
- 安装资料目录下的
-
cmd进入
ouyangjianpeng.jks文件所在目录执行如下命令:keytool -list -rfc --keystore ouyangjianpeng.jks | openssl x509 -inform pem -pubkey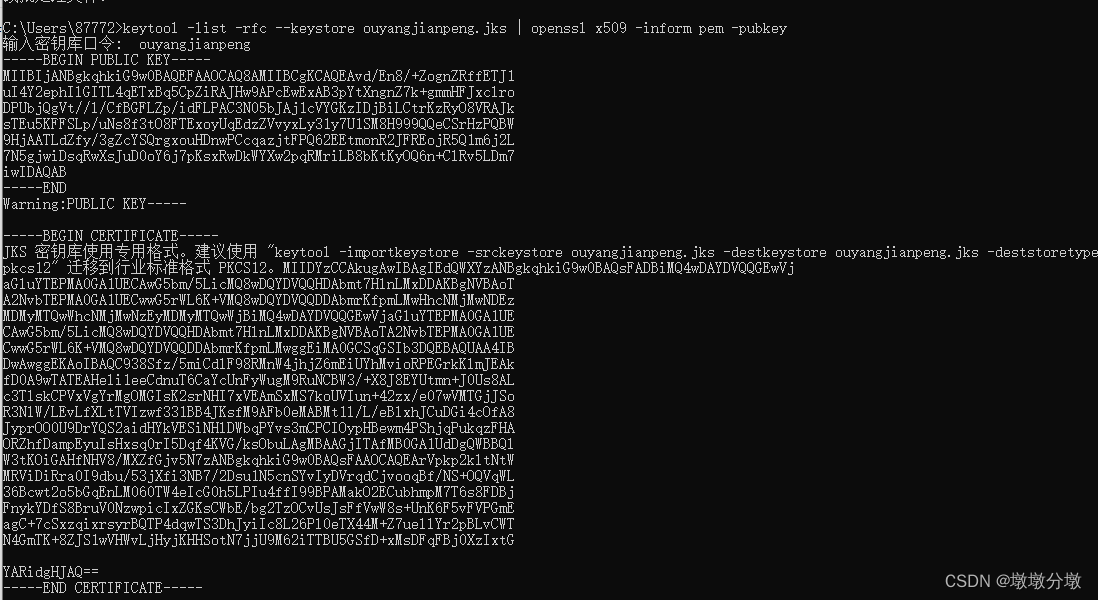
-
3.用户认证分析
4.认证解决方案
4.1.单点登录
单点登录(Single Sign On),简称为 SSO,是目前比较流行的企业业务整合的解决方案之一。 SSO的定义是在多个应用系统中,用户只需要登录一次就可以访问所有相互信任的应用系统
-
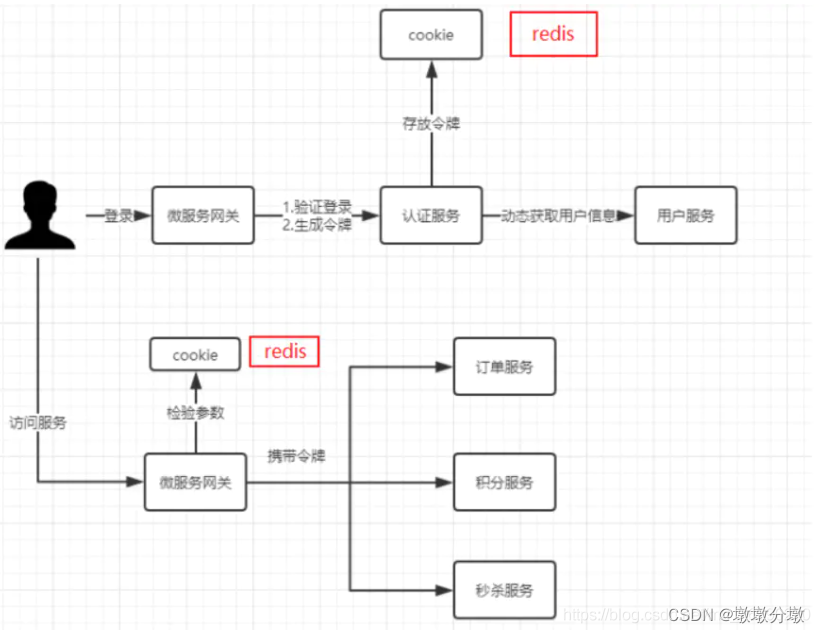
分布式系统要实现单点登录,通常将认证系统
独立抽取出来,并且将用户信息存储在单独数据库中,比如MySQL、Redis,考虑性能要求,通常存储在Redis中,如下图:
Java中有很多用户认证的框架都可以实现单点登录:Apache Shiro. CAS Spring security
4.2.第三方账号登录
所谓的第三方登录,是说基于用户在第三方平台上已有的账号和密码来实现应用的登录或者注册的功能。而第三方平台一般是已拥有大量用户的平台,国外的比如Facebook,Twitter等,国内的比如微博、微信、QQ等。

第三方认证技术方案最主要是 解决认证协议的通用标准问题,因为要实现跨系统认证,各系统之间要遵循一定的
接口协议。
-
Oauth协议为用户资源的授权提供了一个安全的、开放而又简易的标准。同时,任何第三方都可以使用Oauth认
证服务,任何服务提供商都可以实现自身的OAUTH认证服务,因而Oauth是开放的。 -
Oauth协议目前发展到
2.0版本,1.0版本过于复杂,2.0版本已得到广泛应用。
使用QQ认证的过程:
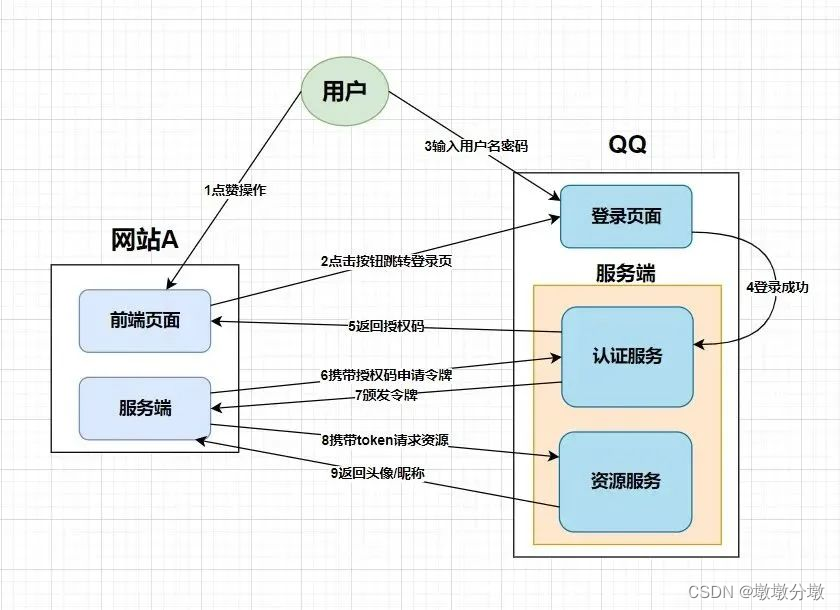
- 用户访问网站A,网站A请求QQ授权服务器发送授权请求给用户
- 用户确认授权后,返回授权码给第三方
- 第三方拿到授权码后,携带授权码向QQ授权服务器申请令牌
- 第三方拿到令牌后,携带令牌向QQ请求用户的基本信息
- QQ资源服务器根据访问令牌,返回给第三方用户的基本信息
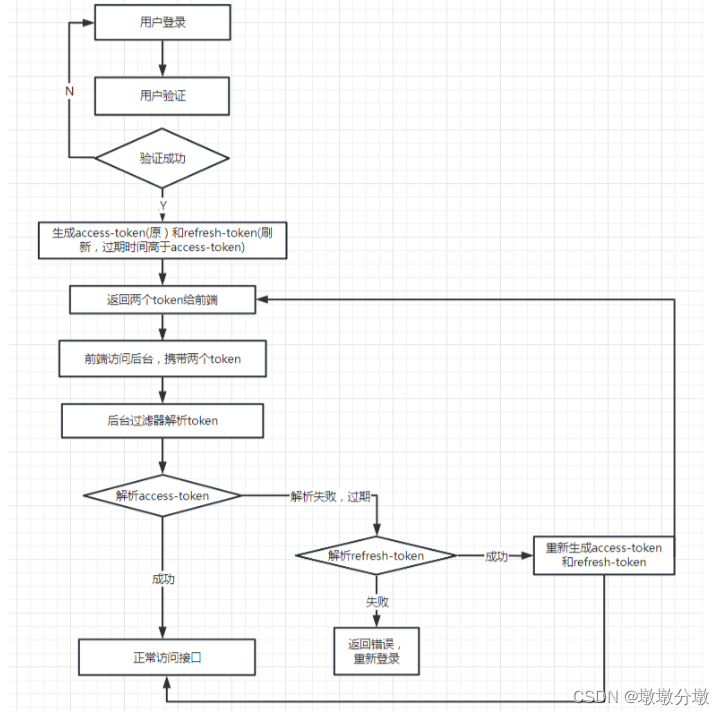
4.3.单token系统和双token系统业务逻辑
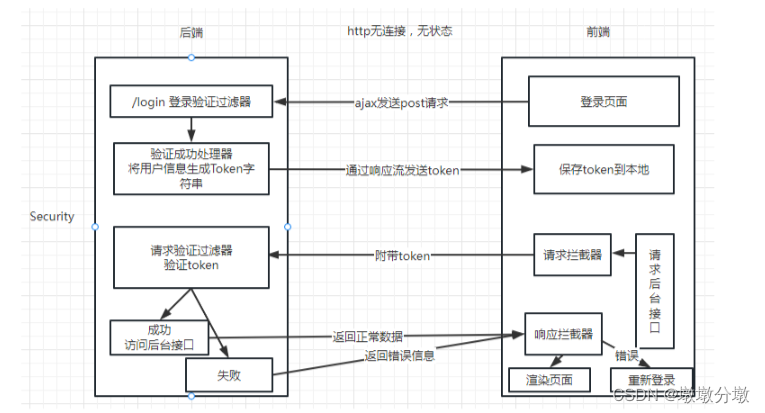
二.Spring Security
Spring Security是一个用于快速实现认证/授权的安全框架。
-
认证(Authentication) :即校验用户的身份信息是否合法的过程,合法方可继续访问,不合法则拒绝访问。常见的认证方式有:
用户名密码登录,二维码登录,手机短信登录,指纹认证等方式。 -
授权(Authorization): 即是
Authentication认证通过后根据用户的权限来控制用户是否能访问指定资源,拥有该资源的访问权限则正常访问,没有权限则拒绝访问。
1.快速入门
引入依赖
		<dependency>
            <groupId>org.springframework.boot</groupId>
            <artifactId>spring-boot-starter-security</artifactId>
        </dependency>
        <dependency>
            <groupId>org.springframework.boot</groupId>
            <artifactId>spring-boot-starter-web</artifactId>
        </dependency>

        <dependency>
            <groupId>org.springframework.boot</groupId>
            <artifactId>spring-boot-starter-test</artifactId>
            <scope>test</scope>
        </dependency>
        <dependency>
            <groupId>org.springframework.security</groupId>
            <artifactId>spring-security-test</artifactId>
            <scope>test</scope>
        </dependency>
编写controller
@RestController
@RequestMapping("/test")
public class TestController {


    @GetMapping("/hello")
    public String add(){


        return "hello security";
    }
}
访问页面时出现了默认的安全认证窗口,密码在控制台处进行显示。默认的用户名为user

2.基本原理
SpringSecurity本质上是一个过滤器链。常用过滤器如下
FilterSecurityInterceptor
- 位于
最底端的,是一个方法级的权限过滤器
public class FilterSecurityInterceptor extends AbstractSecurityInterceptor implements Filter {


    private static final String FILTER_APPLIED = "__spring_security_filterSecurityInterceptor_filterApplied";
    private FilterInvocationSecurityMetadataSource securityMetadataSource;
    private boolean observeOncePerRequest = true;
}
ExceptionTranslationFilter
- 异常处理过滤器,用来处理在
认证授权的过程中抛出的异常信息。
public class ExceptionTranslationFilter extends GenericFilterBean implements MessageSourceAware {


    private void doFilter(HttpServletRequest request, HttpServletResponse response, FilterChain chain) throws IOException, ServletException {


        try {


            chain.doFilter(request, response);
        } catch (IOException var7) {


            throw var7;
        } catch (Exception var8) {


            Throwable[] causeChain = this.throwableAnalyzer.determineCauseChain(var8);
            RuntimeException securityException = (AuthenticationException)this.throwableAnalyzer.getFirstThrowableOfType(AuthenticationException.class, causeChain);
            if (securityException == null) {


                securityException = (AccessDeniedException)this.throwableAnalyzer.getFirstThrowableOfType(AccessDeniedException.class, causeChain);
            }

            if (securityException == null) {


                this.rethrow(var8);
            }

            if (response.isCommitted()) {


                throw new ServletException("Unable to handle the Spring Security Exception because the response is already committed.", var8);
            }

            this.handleSpringSecurityException(request, response, chain, (RuntimeException)securityException);
        }
    }
UsernamePasswordAuthenticationFilter
- 对
/login的POST请求做拦截,校验表单中用户名密码
核心的业务逻辑如下
public Authentication attemptAuthentication(HttpServletRequest request, HttpServletResponse response) throws AuthenticationException {


        if (this.postOnly && !request.getMethod().equals("POST")) {


            throw new AuthenticationServiceException("Authentication method not supported: " + request.getMethod());
        } else {


            String username = this.obtainUsername(request);
            username = username != null ? username.trim() : "";
            String password = this.obtainPassword(request);
            password = password != null ? password : "";
            UsernamePasswordAuthenticationToken authRequest = UsernamePasswordAuthenticationToken.unauthenticated(username, password);
            this.setDetails(request, authRequest);
            return this.getAuthenticationManager().authenticate(authRequest);
        }
    }
3.基于数据库中实现用户认证/授权
WebSecurityConfigurerAdapter类
- 引入springSecurity的依赖并做相关的配置,对资源进行保护。通常需要重写以下方法:
//可以配置忽略某些请求。
public void configure(WebSecurity web) throws Exception {

    }

//配置安全拦截机制控制资源的访问,可配置匹配哪些请求、哪些可以直接访问、哪些需要授权后访问。
protected void configure(HttpSecurity http) throws Exception {

    }

//配置验证的用户信息源和密码加密策略,并向容器注入AuthenticationManager对象,这需要在OAuth2中配置(授权服务器),配置了AuthenticationManager密码验证才会生效。
public void configure(AuthenticationManagerBuilder auth) throws Exception {

    }

//配置验证管理的Bean
public AuthenticationManager authenticationManagerBean() throws Exception {

    }
新增依赖
        <dependency>
            <groupId>com.baomidou</groupId>
            <artifactId>mybatis-plus-boot-starter</artifactId>
            <version>3.5.2</version>
        </dependency>

        <dependency>
            <groupId>mysql</groupId>
            <artifactId>mysql-connector-java</artifactId>
            <scope>runtime</scope>
       </dependency>
自定义UserDetail类(伪代码)
import com.baomidou.mybatisplus.core.conditions.query.QueryWrapper;
import com.blb.java11springsecurity.entity.User;
import com.blb.java11springsecurity.service.IUserService;
import org.springframework.beans.factory.annotation.Autowired;
import org.springframework.security.core.authority.AuthorityUtils;
import org.springframework.security.core.userdetails.UserDetails;
import org.springframework.security.core.userdetails.UserDetailsService;
import org.springframework.security.core.userdetails.UsernameNotFoundException;
import org.springframework.stereotype.Service;

import java.util.List;

/**
 * 实现自定义用户登录逻辑
 */
@Service
public class UserDetailsServiceImpl implements UserDetailsService {


    @Autowired
    private IUserService userService;//用户表实现类

    @Override
    public UserDetails loadUserByUsername(String s) throws UsernameNotFoundException {


        //按用户名查询用户信息
        User user = userService.getOne(new QueryWrapper<User>().lambda().eq(User::getUsername, s));
        if(user == null){


            throw new UsernameNotFoundException("用户名不存在");
        }
        //查询所有用户权限 List<String> --> xx,xxx,xxx,xx --> List<Authory>
        List<String> authList = userService.getAuthoritiesByUsername(s);
        String auths = String.join(",", authList);
        //把用户信息包装到UserDetails的实现类User中
        return new org.springframework.security.core.userdetails.User(user.getUsername(),user.getPassword(),
                AuthorityUtils.commaSeparatedStringToAuthorityList(auths));
    }
}
SpringSecurity的核心配置(伪代码)
import org.springframework.beans.factory.annotation.Autowired;
import org.springframework.context.annotation.Bean;
import org.springframework.security.config.annotation.authentication.builders.AuthenticationManagerBuilder;
import org.springframework.security.config.annotation.web.builders.HttpSecurity;
import org.springframework.security.config.annotation.web.configuration.EnableWebSecurity;
import org.springframework.security.config.annotation.web.configuration.WebSecurityConfigurerAdapter;
import org.springframework.security.core.userdetails.UserDetailsService;
import org.springframework.security.crypto.bcrypt.BCryptPasswordEncoder;
//启动Security的验证
@EnableWebSecurity
public class SecurityConfig extends WebSecurityConfigurerAdapter {


    @Autowired
    private BCryptPasswordEncoder bCryptPasswordEncoder;

    @Autowired
    private UserDetailsService userDetailsService;//引入自定义用户登录逻辑

    //配置验证用户的账号和密码
    @Override
    protected void configure(AuthenticationManagerBuilder auth) throws Exception {


    //使用内存中用户信息进行认证
		/*auth.inMemoryAuthentication()
                .withUser("zhangsan")
                .password(bCryptPasswordEncoder.encode("123"))
                .roles("ADMIN","USER") //角色
                .and()
                .withUser("lisi")
                .password(bCryptPasswordEncoder.encode("123"))
                .roles("USER"); //权限
	*/
    //使用自定义UserDetail类定义逻辑进行认证
        auth.userDetailsService(userDetailsService);
    }

    //配置访问控制
    @Override
    protected void configure(HttpSecurity http) throws Exception {


        //给请求授权
        http.authorizeRequests()
                //给登录相关的请求放行(permitAll即未登陆,定义的路径依旧不会拦截)
                .antMatchers("/login", "/login.html", "/**/*.css").permitAll()
                //访问控制(即使登陆了,访问路径需要相应的权限)
                .antMatchers("/admin/**").hasAuthority("销售管理")
                .antMatchers("/user/**").hasAuthority("采购管理")
                //其他路径进行权限验证,说白了就是拦截
                .anyRequest().authenticated()
                .and()
                //配置自定义登录
                .formLogin()
                .loginPage("/login.html") //登录页面
                .loginProcessingUrl("/login") //处理登录的url
                .successForwardUrl("/hello.html") //登录成功后跳转的url
        ;
    }

    //提供密码编码器,采用加密,加盐策略。每次加密后结果都不一样。贼安全
    @Bean
    public BCryptPasswordEncoder bCryptPasswordEncoder() {


        return new BCryptPasswordEncoder();
    }
}
三.Spring Security集成 OAuth2
- 将
OAuth2和Spring Security集成,就可以得到一套完整的安全解决方案。然后通过Spring Security OAuth2构建一个授权服务器来验证用户身份以提供access_token,并使用这个access_token来从资源服务器请求数据。
1.搭建授权服务器
1.0.授权服务器简介
搭建授权服务器最重要的是:继承AuthorizationServerConfigurerAdapter接口并在实现类上加注解@EnableAuthorizationServer标识这是一个授权服务器。
- AuthorizationServerConfigurerAdapter接口有三个方法
public class AuthorizationServerConfigurerAdapter implements AuthorizationServerConfigurer {


    //配置客户端信息,即怎么读取用户信息 是基于内存还是jdbc
	@Override
	public void configure(ClientDetailsServiceConfigurer clients) throws Exception {


	}
 	 //用来配置令牌(token)的访问端点和令牌服务(token services)。
	@Override
	public void configure(AuthorizationServerEndpointsConfigurer endpoints) throws Exception {


	}
 	//用来配置令牌端点(Token Endpoint)的安全约束。
	@Override
	public void configure(AuthorizationServerSecurityConfigurer security) throws Exception{


	}
}
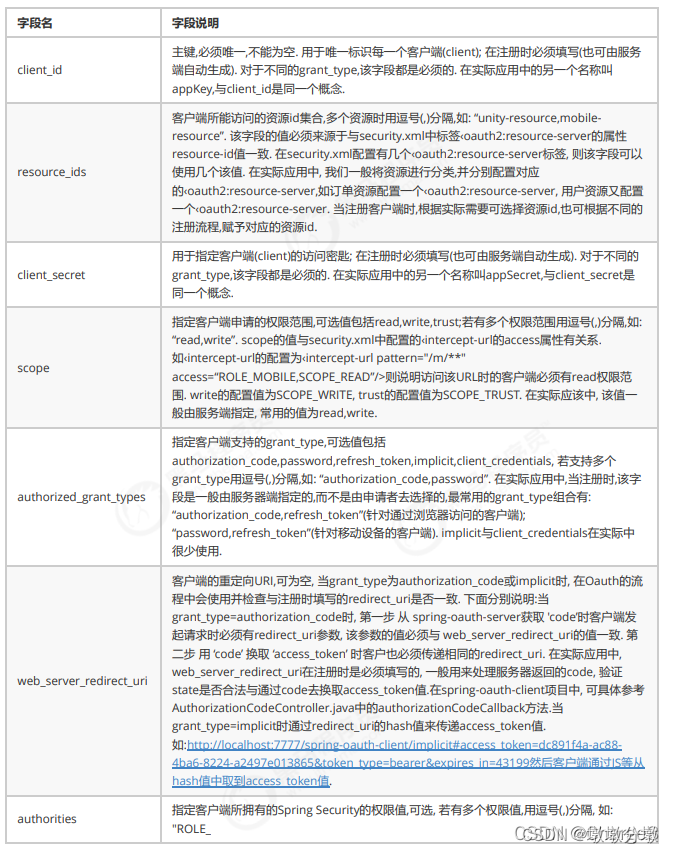
ClientDetailsServiceConfigurer:配置客户端信息
- 可以使用
内存或JDBC来实现客户端详情服务, ClientDetails有如下几个重要属性:
        clients.inMemory()
                //客户端id
                .withClient("client_1")
                //客户端secret
                .secret(passwordEncoder().encode("123456"))
                //回调地址
                .redirectUris("https://www.baidu.com/")
                /* OAuth2为我们提供了四种授权方式:
                 * 1、授权码模式(authorization code)用在客户端与服务端应用之间授权
                 * 2、简化模式(implicit)用在移动app或者web app(这些app是在用户的设备上的,如在手机上调起微信来进行认证授权)
                 * 3、密码模式(resource owner password credentials)应用直接都是受信任的(都是由一家公司开发的)
                 * 4、客户端模式(client credentials)用在应用API访问
                 */
                .authorizedGrantTypes("password", "client_credentials", "refresh_token", "authorization_code")
                //授权范围,默认为空,表示客户端拥有全部的访问范围。
                .scopes("all")
                //accessToken有效期
                .accessTokenValiditySeconds(accessTokenValiditySeconds)
                //refreshToken有效期
                .refreshTokenValiditySeconds(refreshTokenValiditySeconds);
AuthorizationServerEndpointsConfigurer:配置令牌访问端点
-
使用
@EnableAuthorizationServer注解后,应用启动后将自动生成几个Endpoint:/oauth/authorize:验证 /oauth/token:获取token /oauth/confirm_access:用户授权 /oauth/error:认证失败 /oauth/check_token:资源服务器用来校验token /oauth/token_key:如果使用JWT令牌,则公开用于令牌验证的公钥
AuthorizationServerSecurityConfigurer:用来配置令牌端点(Token Endpoint)的安全约束
	上面的/oauth/check_token和/oauth/token_key端点,他们都是用于检查令牌的,默认受保护denyAll()。
	使用tokenKeyAccess()和checkTokenAccess()方法会打开这些端点以供使用,如:
        // 允许check_token访问
        oauthServer.checkTokenAccess("permitAll()");
        // 允许表单认证
        oauthServer.allowFormAuthenticationForClients();
Token存储方式
OAuth2存储token值的方式由多种,所有的实现方式都是实现了TokenStore接口
	InMemoryTokenStore:  存储在本机内存
	JdbcTokenStore: 存储在数据库
	JwtTokenStore:  不会存储到任何介质中
	RedisTokenStore: 存储在Redis
用户(客户端)信息存储方式
内存中
数据库中
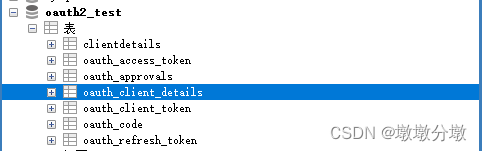
客户端信息存储到 oauth_client_details 表中,建表语句可以从如下网站找到:
spring-security-oauth/schema.sql at main · spring-attic/spring-security-oauth · GitHub
oauth_client_details :客户端账号密码、授权、回调地址等重要信息;核心表。
oauth_access_token :存储access_token。
oauth_refresh_token :存储refresh_token。
oauth_client_token :存储从服务端获取的token数据。
oauth_code :存储授权码。
oauth_approvals :存储授权成功的客户端信息。
1.1.引入依赖
<dependency>
	<groupId>org.springframework.boot</groupId>
	<artifactId>spring-boot-starter-security</artifactId>
</dependency>

<dependency>
    <groupId>org.springframework.security.oauth</groupId>
    <artifactId>spring-security-oauth2</artifactId>
    <version>2.3.4.RELEASE</version>
</dependency>
或者 引入spring cloud oauth2依赖
<dependency>
    <groupId>org.springframework.cloud</groupId>
    <artifactId>spring-cloud-starter-oauth2</artifactId>
</dependency>

<!-- spring cloud -->
<dependencyManagement>
    <dependencies>
        <dependency>
            <groupId>org.springframework.cloud</groupId>
            <artifactId>spring-cloud-dependencies</artifactId>
            <version>Hoxton.SR8</version>
            <type>pom</type>
            <scope>import</scope>
        </dependency>
    </dependencies>
</dependencyManagement>
完整如下:
<?xml version="1.0" encoding="UTF-8"?>
<project xmlns="http://maven.apache.org/POM/4.0.0" xmlns:xsi="http://www.w3.org/2001/XMLSchema-instance"
         xsi:schemaLocation="http://maven.apache.org/POM/4.0.0 https://maven.apache.org/xsd/maven-4.0.0.xsd">
    <modelVersion>4.0.0</modelVersion>

    <parent>
        <groupId>org.springframework.boot</groupId>
        <artifactId>spring-boot-starter-parent</artifactId>
        <version>2.3.2.RELEASE</version>
        <relativePath/>
    </parent>

    <groupId>com.oyjp</groupId>
    <artifactId>spring-boot-oauth2-server</artifactId>
    <version>0.0.1-SNAPSHOT</version>
    <properties>
        <java.version>1.8</java.version>
        <spring-cloud.version>Hoxton.RELEASE</spring-cloud.version>
    </properties>

    <!-- spring cloud -->
    <dependencyManagement>
        <dependencies>
            <dependency>
                <groupId>org.springframework.cloud</groupId>
                <artifactId>spring-cloud-dependencies</artifactId>
                <version>Hoxton.SR8</version>
                <type>pom</type>
                <scope>import</scope>
            </dependency>
        </dependencies>
    </dependencyManagement>


    <dependencies>
        <!-- SpringBoot整合Web组件 -->
        <dependency>
            <groupId>org.springframework.boot</groupId>
            <artifactId>spring-boot-starter-web</artifactId>
        </dependency>

        <!-->spring-boot 整合security -->
        <dependency>
            <groupId>org.springframework.boot</groupId>
            <artifactId>spring-boot-starter-security</artifactId>
        </dependency>

        <dependency>
            <groupId>org.springframework.cloud</groupId>
            <artifactId>spring-cloud-starter-oauth2</artifactId>
        </dependency>

        <!-- springboot整合freemarker -->
        <dependency>
            <groupId>org.springframework.boot</groupId>
            <artifactId>spring-boot-starter-freemarker</artifactId>
        </dependency>
    </dependencies>

    <build>
        <plugins>
            <plugin>
                <groupId>org.springframework.boot</groupId>
                <artifactId>spring-boot-maven-plugin</artifactId>
            </plugin>
        </plugins>
    </build>

</project>
1.2.application.yaml
server:
  port: 8080

spring:
  application:
    name: oauth2-center-server

logging:
  level:
    root: info
    org.springframework.security: DEBUG
1.3.Oauth2授权服务配置
具体实现
import org.springframework.context.annotation.Bean;
import org.springframework.context.annotation.Configuration;
import org.springframework.http.HttpMethod;
import org.springframework.security.authentication.AuthenticationManager;
import org.springframework.security.authentication.AuthenticationProvider;
import org.springframework.security.authentication.dao.DaoAuthenticationProvider;
import org.springframework.security.core.Authentication;
import org.springframework.security.core.AuthenticationException;
import org.springframework.security.core.userdetails.User;
import org.springframework.security.core.userdetails.UserDetailsService;
import org.springframework.security.crypto.bcrypt.BCryptPasswordEncoder;
import org.springframework.security.crypto.password.PasswordEncoder;
import org.springframework.security.oauth2.config.annotation.configurers.ClientDetailsServiceConfigurer;
import org.springframework.security.oauth2.config.annotation.web.configuration.AuthorizationServerConfigurerAdapter;
import org.springframework.security.oauth2.config.annotation.web.configuration.EnableAuthorizationServer;
import org.springframework.security.oauth2.config.annotation.web.configurers.AuthorizationServerEndpointsConfigurer;
import org.springframework.security.oauth2.config.annotation.web.configurers.AuthorizationServerSecurityConfigurer;
import org.springframework.security.provisioning.InMemoryUserDetailsManager;

//配置授权中心信息
@Configuration
@EnableAuthorizationServer
public class AuthorizationServerConfig extends AuthorizationServerConfigurerAdapter {


    /**
     * accessToken有效期 两小时
     */
    private int accessTokenValiditySeconds = 7200;

    /**
     * refreshToken有效期 两小时
     */
    private int refreshTokenValiditySeconds = 7200;

    /**
     * 添加商户信息
     * @param clients 客户端即可
     * @throws Exception 异常
     */
    @Override
    public void configure(ClientDetailsServiceConfigurer clients) throws Exception {


        clients.inMemory()
           		//配置client_id
                .withClient("client_1")
                //配置client-secret
                .secret(passwordEncoder().encode("123456"))
                //配置redirect_uri,用于授权成功后跳转
                .redirectUris("https://www.baidu.com/")
                 //配置grant_type,表示授权类型
                /* OAuth2为我们提供了四种授权方式:
                 * 1、授权码模式(authorization code)用在客户端与服务端应用之间授权
                 * 2、简化模式(implicit)用在移动app或者web app(这些app是在用户的设备上的,如在手机上调起微信来进行认证授权)
                 * 3、密码模式(resource owner password credentials)应用直接都是受信任的(都是由一家公司开发的)
                 * 4、客户端模式(client credentials)用在应用API访问
                 */
  				.authorizedGrantTypes("password", "client_credentials", "refresh_token", "authorization_code", "implicit")
                //授权范围
                .scopes("all")
                //配置访问token的有效期
                .accessTokenValiditySeconds(accessTokenValiditySeconds)
                //配置刷新token的有效期
                .refreshTokenValiditySeconds(refreshTokenValiditySeconds);
    }

    /**
     * 设置token类型
     * @param endpoints
     */
    @Override
    public void configure(AuthorizationServerEndpointsConfigurer endpoints) {


        endpoints.authenticationManager(authenticationManager())
                .allowedTokenEndpointRequestMethods(HttpMethod.GET,HttpMethod.POST); //支持GET,POST请求
        endpoints.userDetailsService(userDetailsService());
    }

    @Override
    public void configure(AuthorizationServerSecurityConfigurer oauthServer) {


        // 允许表单认证
        oauthServer.allowFormAuthenticationForClients();
        // 允许check_token访问
        oauthServer.checkTokenAccess("permitAll()");
    }

    @Bean
    AuthenticationManager authenticationManager() {


        AuthenticationManager authenticationManager = new AuthenticationManager() {


            @Override
            public Authentication authenticate(Authentication authentication) throws AuthenticationException {


                return daoAuhthenticationProvider().authenticate(authentication);
            }

        };
        return authenticationManager;
    }

    @Bean
    public AuthenticationProvider daoAuhthenticationProvider() {


        DaoAuthenticationProvider daoAuthenticationProvider = new DaoAuthenticationProvider();
        daoAuthenticationProvider.setUserDetailsService(userDetailsService());
        daoAuthenticationProvider.setHideUserNotFoundExceptions(false);
        daoAuthenticationProvider.setPasswordEncoder(passwordEncoder());
        return daoAuthenticationProvider;
    }

    /**
     * 设置添加用户信息,正常应该从数据库中读取
     * @return UserDetailsService
     */
    @Bean
    UserDetailsService userDetailsService() {


        InMemoryUserDetailsManager userDetailsService = new InMemoryUserDetailsManager();
        userDetailsService.createUser(User.withUsername("user_1").password(passwordEncoder().encode("123456"))
                .authorities("ROLE_USER").build());
        userDetailsService.createUser(User.withUsername("user_2").password(passwordEncoder().encode("1234567"))
                .authorities("ROLE_USER").build());
        return userDetailsService;
    }

    /**
     * 采用BCryptPasswordEncoder对密码进行编码
     * @return PasswordEncoder
     */
    @Bean
    PasswordEncoder passwordEncoder() {


        return new BCryptPasswordEncoder();
    }
}
1.4.SpringSecurity配置
import org.springframework.context.annotation.Bean;
import org.springframework.security.authentication.AuthenticationManager;
import org.springframework.security.config.annotation.web.builders.HttpSecurity;
import org.springframework.security.config.annotation.web.configuration.WebSecurityConfigurerAdapter;
import org.springframework.security.crypto.bcrypt.BCryptPasswordEncoder;
import org.springframework.security.crypto.password.PasswordEncoder;
import org.springframework.stereotype.Component;
/**
 *  添加Security权限配置
 */
@Component
public class SecurityConfig  extends WebSecurityConfigurerAdapter {


     /***
     * 忽略安全拦截的URL
     * @param web
     * @throws Exception
     */
    @Override
    public void configure(WebSecurity web) throws Exception {


        web.ignoring().antMatchers("/oauth/**","/login.html","/css/**","/data/**","/fonts/**","/img/**","/js/**");
    }

    /**
     *  授权中心管理器
     * @return AuthenticationManager
     * @throws Exception 异常
     */
    @Bean
    @Override
    public AuthenticationManager authenticationManagerBean() throws Exception {


        return super.authenticationManagerBean();
    }

    //@Bean
    //public PasswordEncoder passwordEncoder() {


    //    return new BCryptPasswordEncoder();
    //}

    /**
     *  拦截所有请求,使用httpBasic方式登陆
     * @param http 请求
     * @throws Exception 异常
     */
    @Override
    protected void configure(HttpSecurity http) throws Exception {


        http.authorizeRequests().antMatchers("/**").fullyAuthenticated().and().httpBasic();
    }

}
1.5.启动类
@SpringBootApplication
public class Oauth2AuthorizationCenterApplication {


    public static void main(String[] args) {


        SpringApplication.run(Oauth2AuthorizationCenterApplication.class, args);
    }
}
1.测试授权码模式
-
- 授权服务器将携带授权码code然后转发至redirect_uri=https://www.baidu.com/然
- 授权服务器将携带授权码code然后转发至redirect_uri=https://www.baidu.com/然
-
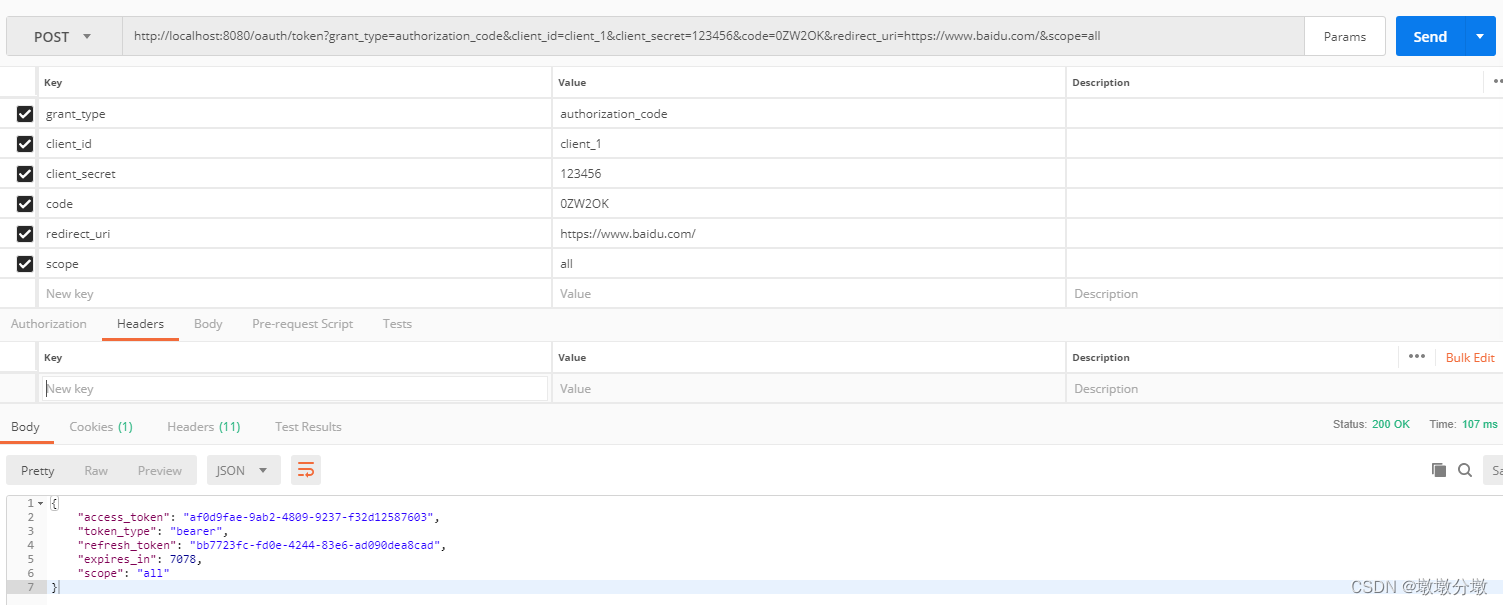
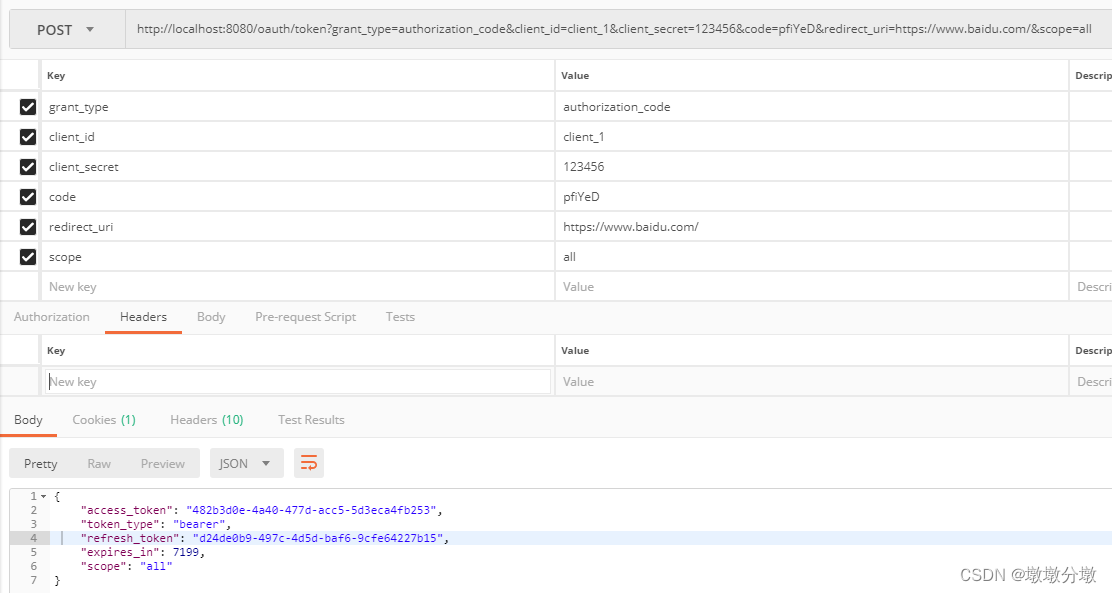
使用授权码获取accessToken
POST请求 http://localhost:8080/oauth/token?grant_type=authorization_code&client_id=client_1&client_secret=123456&code=EwaTib&redirect_uri=https://www.baidu.com/&scope=all
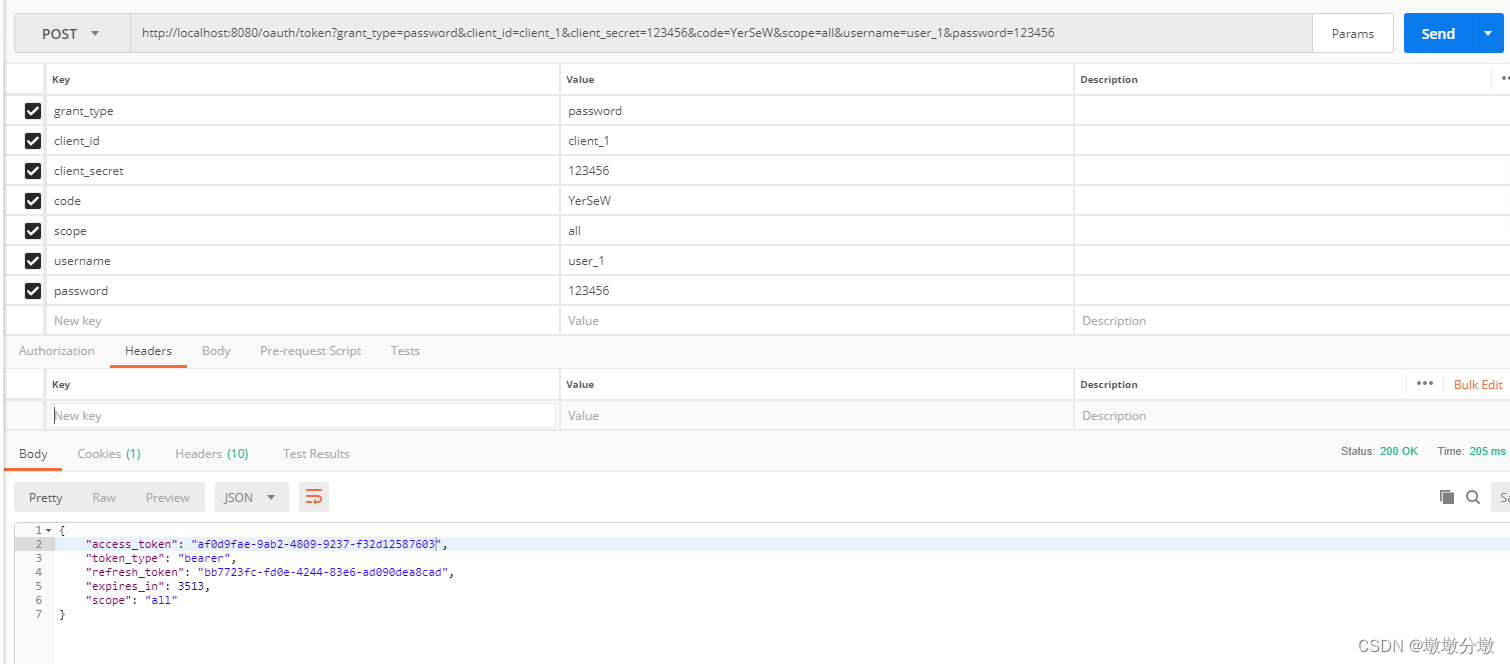
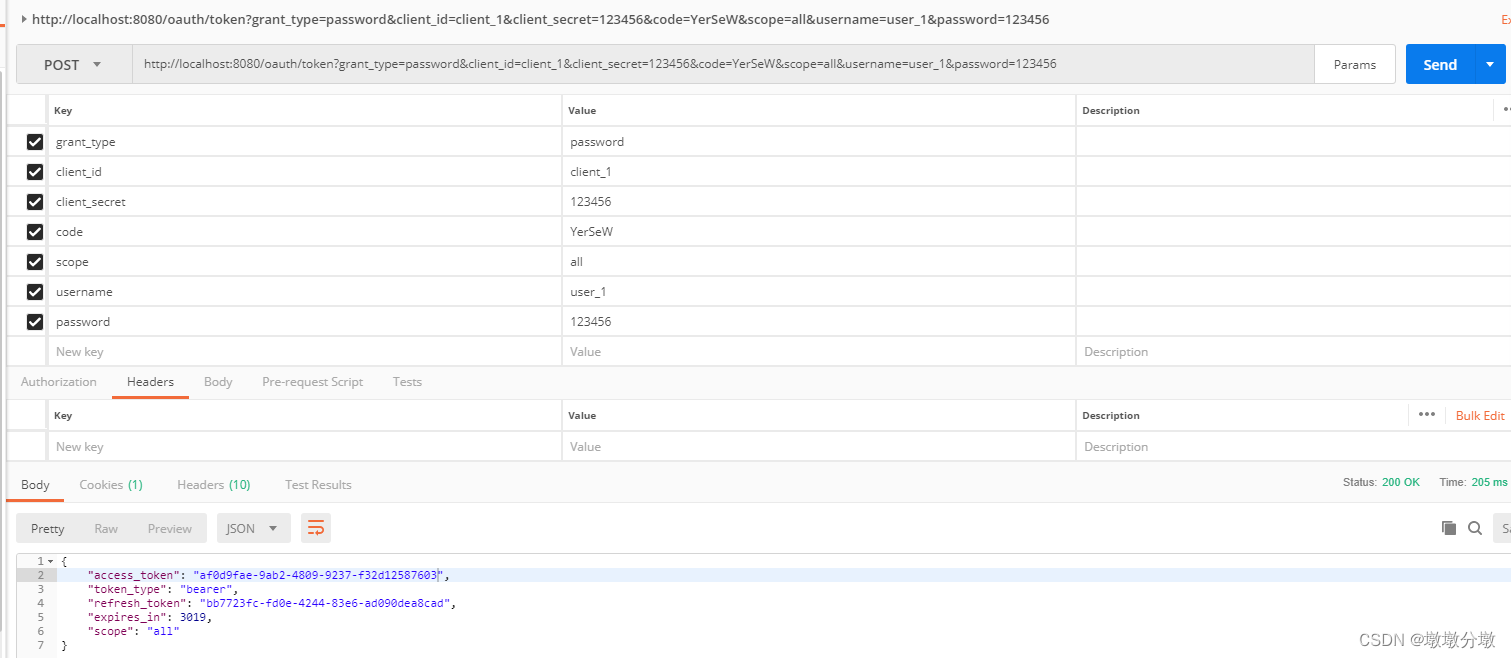
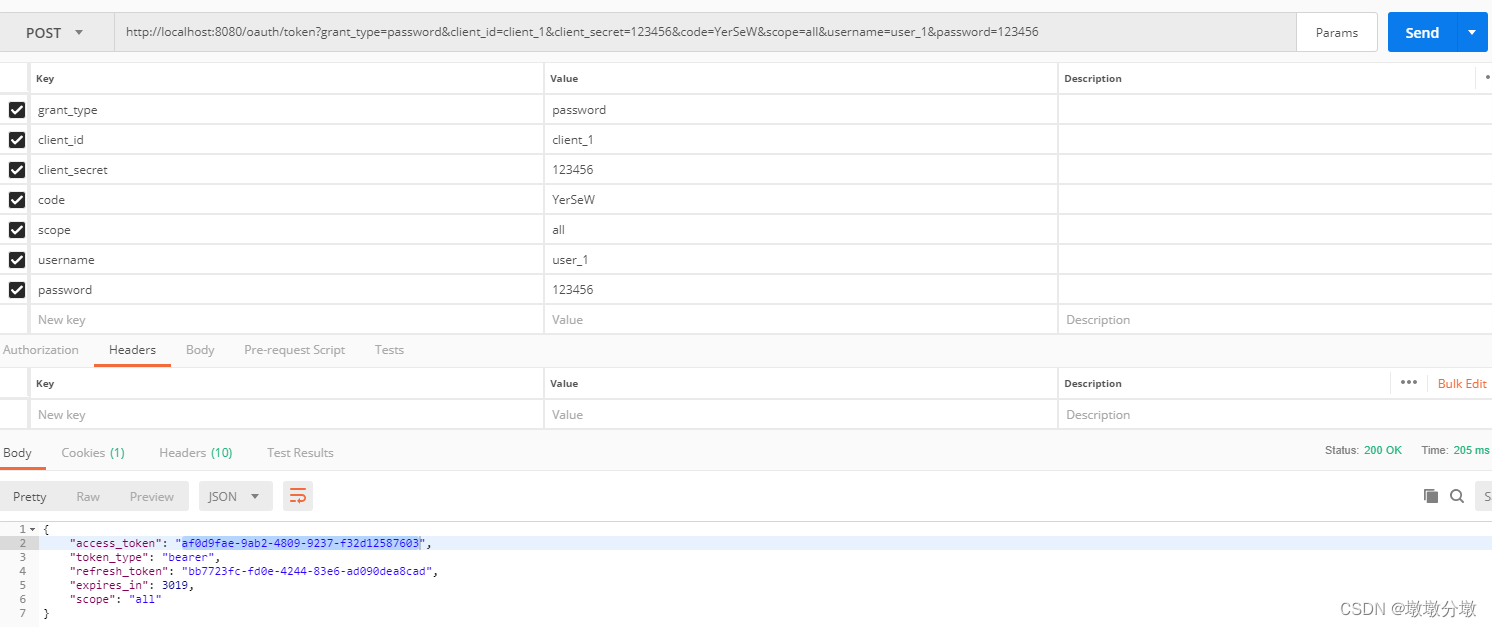
2.测试密码模式
2.搭建资源服务器
1.0.前言
搭建资源服务器最重要的是:继承ResourceServerConfigurerAdapter接口并在实现类上加注解@EnableResourceServer标识这是一个资源服务器。
-
该接口只有两个方法
public class ResourceServerConfigurerAdapter implements ResourceServerConfigurer {


 	//配置哪些可以访问,哪些不可访问,默认情况下所有不在/oauth/**下的资源都是受保护的资源
	@Override
	public void configure(HttpSecurity http) throws Exception {


		http.authorizeRequests().anyRequest().authenticated();
	}

	//它可以为资源服务器添加一个特定的属性,如resourceId,也就是说我们一个授权服务器可能对应多个资源服务器,
	//可以为每个资源服务器添加一个resourceId属性进行区分,可选,但建议使用,如果存在,auth服务器将进行验证。
	@Override
	public void configure(ResourceServerSecurityConfigurer resources) throws Exception {


	}
}
1.1.引入依赖
<?xml version="1.0" encoding="UTF-8"?>
<project xmlns="http://maven.apache.org/POM/4.0.0" xmlns:xsi="http://www.w3.org/2001/XMLSchema-instance"
         xsi:schemaLocation="http://maven.apache.org/POM/4.0.0 https://maven.apache.org/xsd/maven-4.0.0.xsd">
    <modelVersion>4.0.0</modelVersion>

    <parent>
        <groupId>org.springframework.boot</groupId>
        <artifactId>spring-boot-starter-parent</artifactId>
        <version>2.3.2.RELEASE</version>
        <relativePath/>
    </parent>

    <groupId>com.oyjp</groupId>
    <artifactId>spring-boot-oauth2-server</artifactId>
    <version>0.0.1-SNAPSHOT</version>
    <properties>
        <java.version>1.8</java.version>
        <spring-cloud.version>Hoxton.RELEASE</spring-cloud.version>
    </properties>

    <!-- spring cloud -->
    <dependencyManagement>
        <dependencies>
            <dependency>
                <groupId>org.springframework.cloud</groupId>
                <artifactId>spring-cloud-dependencies</artifactId>
                <version>Hoxton.SR8</version>
                <type>pom</type>
                <scope>import</scope>
            </dependency>
        </dependencies>
    </dependencyManagement>


    <dependencies>
        <!-- SpringBoot整合Web组件 -->
        <dependency>
            <groupId>org.springframework.boot</groupId>
            <artifactId>spring-boot-starter-web</artifactId>
        </dependency>

        <!-->spring-boot 整合security -->
        <dependency>
            <groupId>org.springframework.boot</groupId>
            <artifactId>spring-boot-starter-security</artifactId>
        </dependency>

        <dependency>
            <groupId>org.springframework.cloud</groupId>
            <artifactId>spring-cloud-starter-oauth2</artifactId>
        </dependency>

        <!-- springboot整合freemarker -->
        <dependency>
            <groupId>org.springframework.boot</groupId>
            <artifactId>spring-boot-starter-freemarker</artifactId>
        </dependency>
    </dependencies>

    <build>
        <plugins>
            <plugin>
                <groupId>org.springframework.boot</groupId>
                <artifactId>spring-boot-maven-plugin</artifactId>
            </plugin>
        </plugins>
    </build>

</project>
1.2.application.yaml
server:
  port: 8081


spring:
  application:
    name: oauth2-resource-server

security:
  oauth2:
    resource:
      ####从认证授权中心上验证token
      tokenInfoUri: http://localhost:8080/oauth/check_token
      preferTokenInfo: true
    client:
      accessTokenUri: http://localhost:8080/oauth/token
      userAuthorizationUri: http://localhost:8080/oauth/authorize
      ###appid
      clientId: client_1
      ###appSecret
      clientSecret: 123456

logging:
  level:
    root: info
    org.springframework.security: DEBUG
1.3.oauth2资源服务配置
import org.springframework.context.annotation.Configuration;
import org.springframework.security.config.annotation.web.builders.HttpSecurity;
import org.springframework.security.oauth2.config.annotation.web.configuration.EnableResourceServer;
import org.springframework.security.oauth2.config.annotation.web.configuration.ResourceServerConfigurerAdapter;

/**
 * @Description: 资源拦截配置
 */
@Configuration
@EnableResourceServer
public class ResourceServerConfiguration extends ResourceServerConfigurerAdapter {


    @Override
    public void configure(HttpSecurity http) throws Exception {


        // 对 api/order 请求进行拦截
        http.authorizeRequests().antMatchers("/api/test/**").authenticated();
    }
}
1.4.请求测试类
@RestController
@RequestMapping("/api/test")
public class TestController {


    @RequestMapping("/add")
    public String addOrder() {


        return "add success!";
    }
}
1.5.启动类开启Oauth2
import org.springframework.boot.SpringApplication;
import org.springframework.boot.autoconfigure.SpringBootApplication;
import org.springframework.boot.autoconfigure.security.oauth2.client.EnableOAuth2Sso;
@SpringBootApplication
@EnableOAuth2Sso
public class Oauth2ResourceServerApplication {


    public static void main(String[] args) {


        SpringApplication.run(Oauth2ResourceServerApplication.class, args);
    }

}
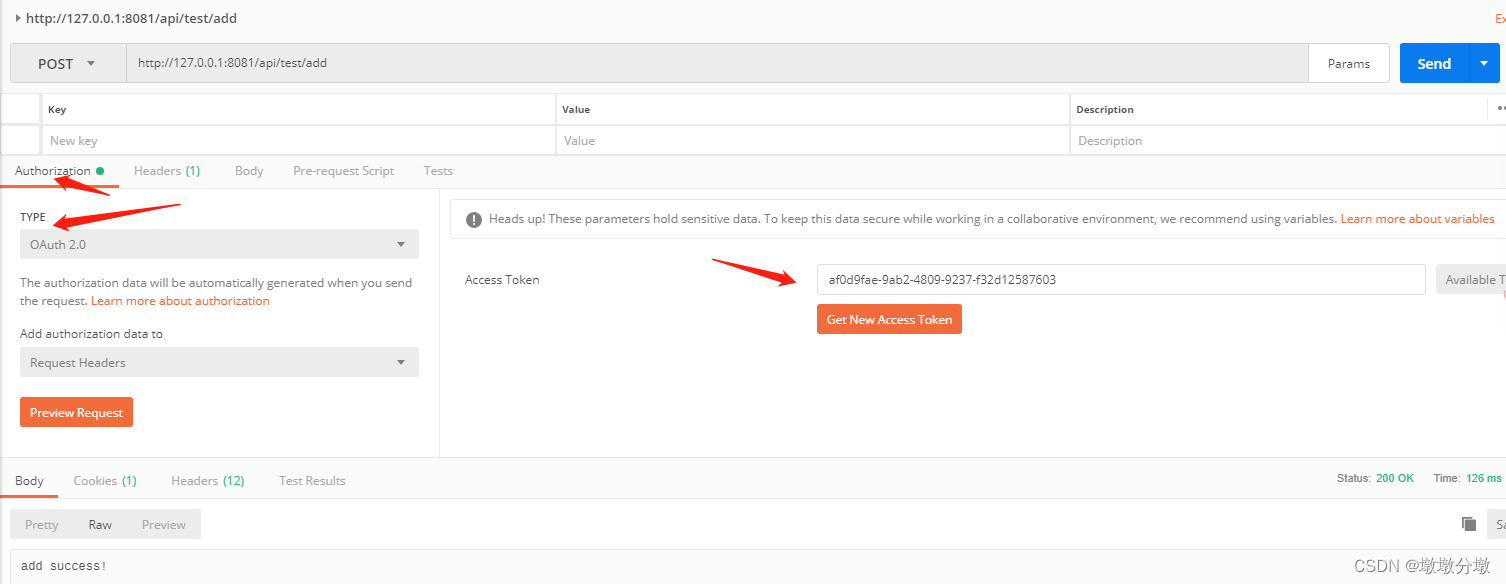
1.5.1.授权服务器和资源服务联合测试

-
先获取token(密码模式)
-
使用token访问资源服务器
3.授权服务器改成动态数据库查询的方式
1.1.下载oauth2官方建表语句
spring-security-oauth/schema.sql at main · spring-attic/spring-security-oauth · GitHub
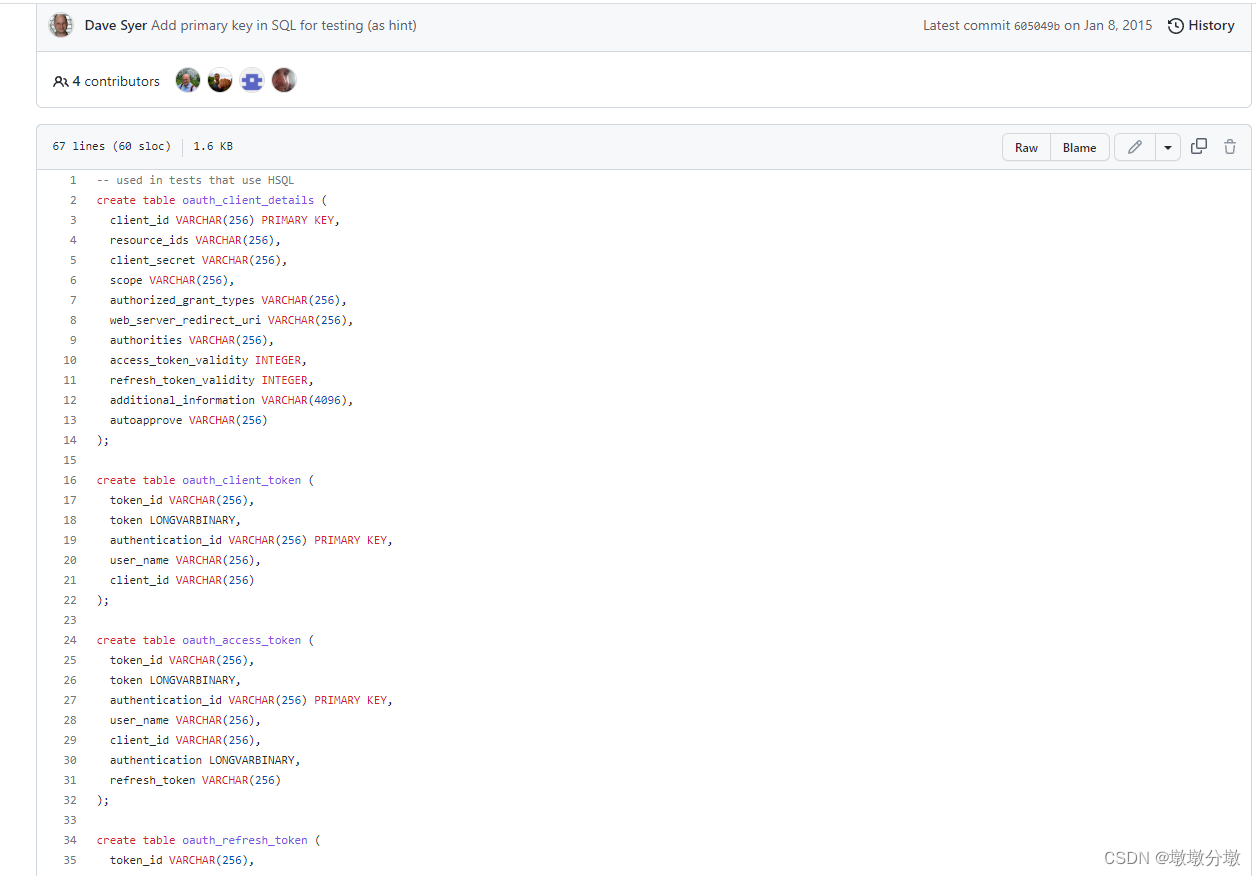
我用的是Mysql,对于上面链接里的建表语句,有某些字段为`LONGVARBINARY`类型,它对应mysql的`blob`类型,这需要改下,
另外主键是varchar(255),如果又用的utf8mb4编码,主键长度会超限制,所以这个主键长度最好也要改一下。

oauth_client_details :客户端账号密码、授权、回调地址等重要信息;核心表。
oauth_access_token :存储access_token。
oauth_refresh_token :存储refresh_token。
oauth_client_token :存储从服务端获取的token数据。
oauth_code :存储授权码。
oauth_approvals :存储授权成功的客户端信息
1.2.新增依赖
       <!-- mysql -->
        <dependency>
            <groupId>mysql</groupId>
            <artifactId>mysql-connector-java</artifactId>
        </dependency>

        <dependency>
            <groupId>org.springframework.boot</groupId>
            <artifactId>spring-boot-starter-jdbc</artifactId>
        </dependency>
1.3./修改授权服务器
1.修改配置文件
server:
  port: 8080


spring:
  application:
    name: oauth2-center-server

  datasource:
    hikari:
      connection-test-query: SELECT 1
      minimum-idle: 1
      maximum-pool-size: 5
      pool-name: dbcp1
    driver-class-name: com.mysql.cj.jdbc.Driver
    url: jdbc:mysql://localhost:3306/oauth2_test?autoReconnect=true&useSSL=false&serverTimezone=Asia/Shanghai
    username: root
    password: root


logging:
  level:
    root: info
    org.springframework.security: DEBUG
2.修改AuthorizationServerConfig
import org.springframework.beans.factory.annotation.Autowired;
import org.springframework.beans.factory.annotation.Qualifier;
import org.springframework.context.annotation.Bean;
import org.springframework.context.annotation.Configuration;
import org.springframework.http.HttpMethod;
import org.springframework.security.authentication.AuthenticationManager;
import org.springframework.security.authentication.AuthenticationProvider;
import org.springframework.security.authentication.dao.DaoAuthenticationProvider;
import org.springframework.security.core.Authentication;
import org.springframework.security.core.AuthenticationException;
import org.springframework.security.core.userdetails.User;
import org.springframework.security.core.userdetails.UserDetailsService;
import org.springframework.security.crypto.bcrypt.BCryptPasswordEncoder;
import org.springframework.security.crypto.password.PasswordEncoder;
import org.springframework.security.oauth2.config.annotation.configurers.ClientDetailsServiceConfigurer;
import org.springframework.security.oauth2.config.annotation.web.configuration.AuthorizationServerConfigurerAdapter;
import org.springframework.security.oauth2.config.annotation.web.configuration.EnableAuthorizationServer;
import org.springframework.security.oauth2.config.annotation.web.configurers.AuthorizationServerEndpointsConfigurer;
import org.springframework.security.oauth2.config.annotation.web.configurers.AuthorizationServerSecurityConfigurer;
import org.springframework.security.oauth2.provider.token.TokenStore;
import org.springframework.security.oauth2.provider.token.store.JdbcTokenStore;
import org.springframework.security.provisioning.InMemoryUserDetailsManager;
import javax.sql.DataSource;

/**
 * @Description: 配置授权中心信息
 */
@Configuration
@EnableAuthorizationServer
public class AuthorizationServerConfig extends AuthorizationServerConfigurerAdapter {


    //数据源,用于从数据库获取数据进行认证操作,测试可以从内存中获取
    @Autowired
    @Qualifier("dataSource")
    private DataSource dataSource;


    /**
     * accessToken有效期 两小时
     */
    private int accessTokenValiditySeconds = 7200;

    /**
     * refreshToken有效期 两小时
     */
    private int refreshTokenValiditySeconds = 7200;

    @Bean
    public TokenStore tokenStore() {


        // return new InMemoryTokenStore(); //使用内存中的 token store
        return new JdbcTokenStore(dataSource); /// 使用Jdbctoken store
    }


    /**
     * 添加商户信息
     *
     * @param clients 商户
     * @throws Exception 异常
     */
    @Override
    public void configure(ClientDetailsServiceConfigurer clients) throws Exception {


        clients.jdbc(dataSource)
                //测试首次运行可以指定测试数据,如果数据库中没有则不报错,如果有或者第二次运行会报错,因为数据库已经存在了,需要注释掉
                .withClient("client_1")
                //商户secret
                .secret(passwordEncoder().encode("123456"))
                //回调地址
                .redirectUris("https://www.baidu.com/")
                /* OAuth2为我们提供了四种授权方式:
                 * 1、授权码模式(authorization code)用在客户端与服务端应用之间授权
                 * 2、简化模式(implicit)用在移动app或者web app(这些app是在用户的设备上的,如在手机上调起微信来进行认证授权)
                 * 3、密码模式(resource owner password credentials)应用直接都是受信任的(都是由一家公司开发的)
                 * 4、客户端模式(client credentials)用在应用API访问
                 */
  				.authorizedGrantTypes("password", "client_credentials", "refresh_token", "authorization_code", "implicit")
                //授权范围
                .scopes("all")
                //accessToken有效期
                .accessTokenValiditySeconds(accessTokenValiditySeconds)
                //refreshToken有效期
                .refreshTokenValiditySeconds(refreshTokenValiditySeconds);
    }

    /**
     * 设置token类型
     * @param endpoints
     */
    @Override
    public void configure(AuthorizationServerEndpointsConfigurer endpoints) {


        endpoints.authenticationManager(authenticationManager())
                .allowedTokenEndpointRequestMethods(HttpMethod.GET,HttpMethod.POST);
        endpoints.userDetailsService(userDetailsService());
    }

    @Override
    public void configure(AuthorizationServerSecurityConfigurer oauthServer) {


        // 允许表单认证
        oauthServer.allowFormAuthenticationForClients();
        // 允许check_token访问
        oauthServer.checkTokenAccess("permitAll()");
    }

    @Bean
    AuthenticationManager authenticationManager() {


        AuthenticationManager authenticationManager = new AuthenticationManager() {


            @Override
            public Authentication authenticate(Authentication authentication) throws AuthenticationException {


                return daoAuhthenticationProvider().authenticate(authentication);
            }

        };
        return authenticationManager;
    }

    @Bean
    public AuthenticationProvider daoAuhthenticationProvider() {


        DaoAuthenticationProvider daoAuthenticationProvider = new DaoAuthenticationProvider();
        daoAuthenticationProvider.setUserDetailsService(userDetailsService());
        daoAuthenticationProvider.setHideUserNotFoundExceptions(false);
        daoAuthenticationProvider.setPasswordEncoder(passwordEncoder());
        return daoAuthenticationProvider;
    }

    /**
     * 设置添加用户信息,正常应该从数据库中读取
     *
     * @return UserDetailsService
     */
    @Bean
    UserDetailsService userDetailsService() {


        InMemoryUserDetailsManager userDetailsService = new InMemoryUserDetailsManager();
        userDetailsService.createUser(User.withUsername("user_1").password(passwordEncoder().encode("123456"))
                .authorities("ROLE_USER").build());
        userDetailsService.createUser(User.withUsername("user_2").password(passwordEncoder().encode("1234567"))
                .authorities("ROLE_USER").build());
        return userDetailsService;
    }

    /**
     * 设置加密方式
     *
     * @return PasswordEncoder
     */
    @Bean
    PasswordEncoder passwordEncoder() {


        return new BCryptPasswordEncoder();
    }
}
4.测试
检查数据库发现测试商户已经导入到数据库了


四.4种授权模式
OAuth2为我们提供了四种授权方式:
- 授权码模式(
authorization_code)用在客户端与服务端应用之间授权 - 简化模式(
implicit)用在移动app或者web app(这些app是在用户的设备上的,如:在手机上调起微信来进行认证授权) - 密码模式(
password)应用直接都是受信任的(都是由一家公司开发的) - 客户端模式(client_credentials)用在
应用API访问
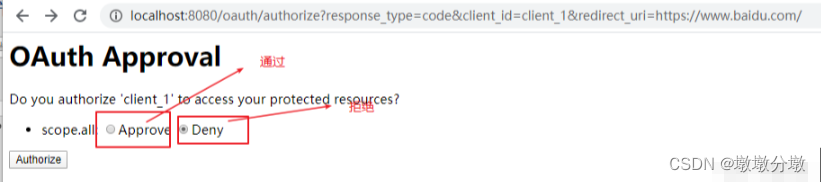
1.授权码模式
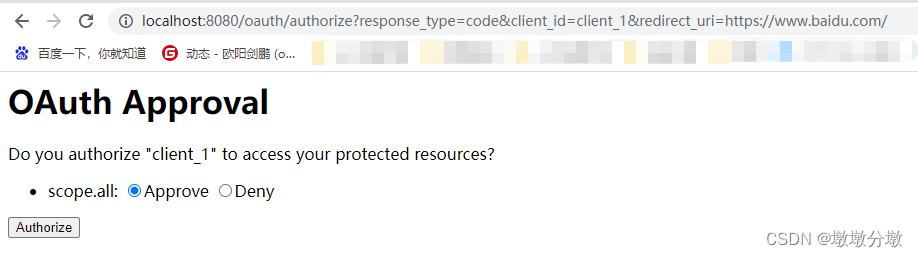
-
客户端请求第三方授权,将重定向到授权服务器,重定向时会附加客户端信息,然后客户端要求用户给予授权,如:
-
-
参数列表如下:
client_id:客户端标识。
response_code:授权码模式固定为code。
scope:客户端权限范围。
redirect_uri:跳转uri,当授权码申请成功后会跳转到此地址,并在后边带上code参数。
-
-
-
浏览器出现向授权服务器授权页面,用户同意给客户端授权。
-
授权服务器将授权码发送给客户端
通过redirect_uri携带code -
客户端拿着授权码想授权服务器申请token
-
参数列表如下:
client_id:客户端标识。
client_secret:客户端密钥。
grant_type:授权类型,填写authorization_code。
code:授权码,授权码只使用一次就失效。
redirect_uri:申请授权码时的跳转url。
-
授权服务器返回令牌(
access_token) -
客户端请求资源服务器的资源,资源服务校验令牌合法性,完成授权
-
资源服务器返回受保护资源
总结:
- 这种模式是四种模式中最安全的,一般用于client是Web服务器端应用或第三方App调用资源服务的时候,因为在这种模式中access_token不经过浏览器或者移动端的App,而是直接从服务端去交换,这样就最大限度的减少了令牌泄露的风险。
测试
-
请求认证服务获取授权码
-
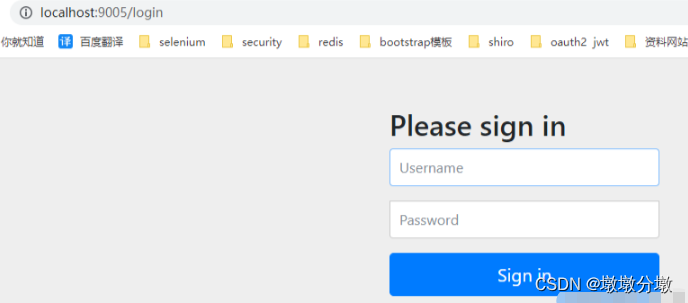
跳转到登录页面: 输入账号:user_1 密码:123456,登录进入授权页面:

-
进入授权页面
-
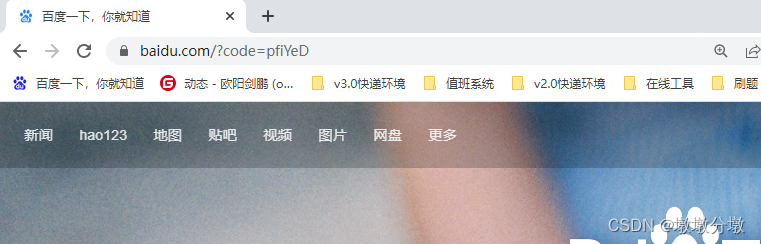
点击Authorize,确认授权后, 认证服务携带授权码跳转redirect_uri,code=pfiYeD就是返回的授权码, 每一个授权码只能使用一次
https://www.baidu.com/?code=pfiYeD
可能你会遇到返回没有refresh_token的情况,检查看下客户端配置authorizedGrantTypes是否支持refresh_token,我上面配置了才会返回,如下:
.authorizedGrantTypes("authorization_code", "client_credentials", "password", "implicit", "refresh_token")
2.密码模式
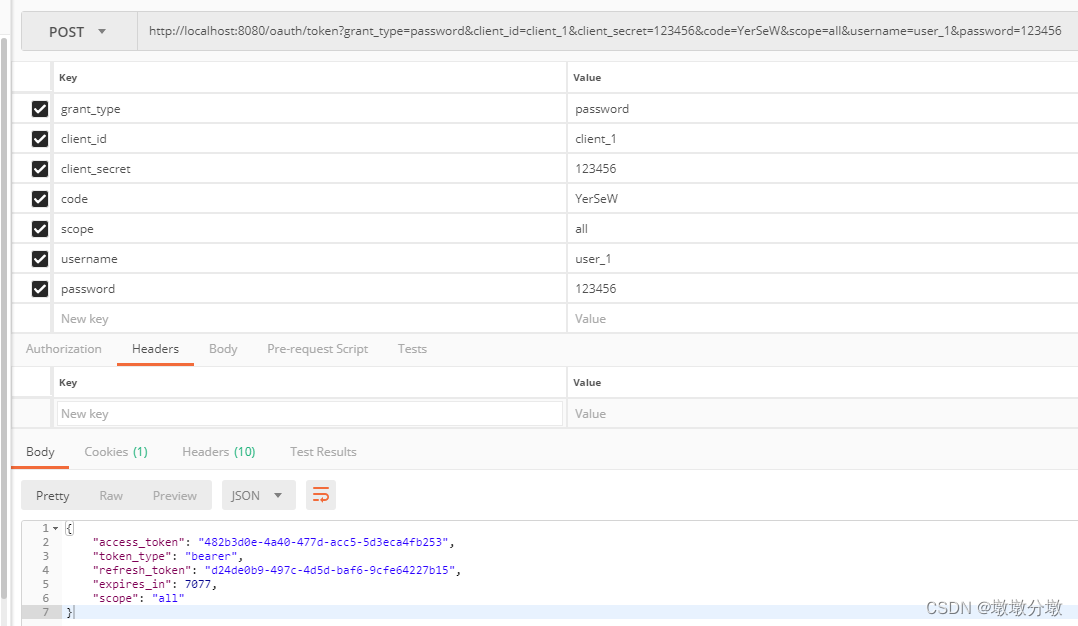
步骤一
- 资源拥有者将用户名、密码发送给客户端。
步骤二
-
客户端拿着资源拥有者的用户名、密码向授权服务器请求令牌,如下:
-
- 参数列表如下:
client_id:客户端标识。
client_secret:客户端密钥。
grant_type:授权类型,填写password。
username:资源拥有者用户名。
password:资源拥有者密码。
- 参数列表如下:
步骤三
- 授权服务器将令牌发送给client。
总结
- 这种模式十分简单,但直接将用户敏感信息泄露给了client,因此这就说明这种模式只能用于client是我们自己开发的情况下。
测试请求令牌,如下:
2.1.密码模式与授权码模式区别
-
授权码模式申请授权码的过程是
用户直接与认证服务器进行交互,然后授权结果由认证服务器告知第三方客户端,也就是不会向第三方客户端暴露服务提供商的用户密码信息。 -
密码模式,是用户将
用户密码信息交给第三方,然后由第三方向服务提供商进行认证和资源请求。- 绝大多数的服务提供商都会选择使用授权码模式,
避免自己的用户密码暴漏给第三方。所以密码模式只适用于服务提供商对第三方厂商高度信任的情况下才能使用。
- 绝大多数的服务提供商都会选择使用授权码模式,
-
客户端模式、简化模式的应用很少
3.简化模式
步骤一
-
资源拥有者打开客户端,客户端要求资源拥有者给预授权,它将浏览器重定向到授权服务器,重定向时会附加客户端的身份信息,如:
- http://localhost:8080/oauth/authorize?client_id=client_1&response_type=token&scope=all&redirect_uri=https://www.baidu.com/
- 参数同授权码模式,将response_type改为token即可。
- http://localhost:8080/oauth/authorize?client_id=client_1&response_type=token&scope=all&redirect_uri=https://www.baidu.com/
步骤二
- 浏览器出现向授权服务器授权页面,之后用户同意授权。
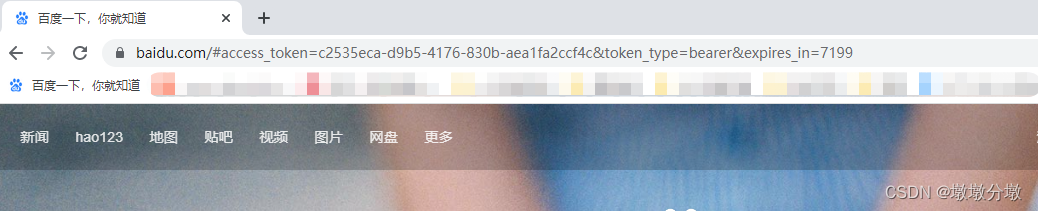
步骤三
- 授权服务器将授权码和令牌到重定向uri之后。
测试
- 输入账号:user_1 密码:123456,登录进入授权页面:
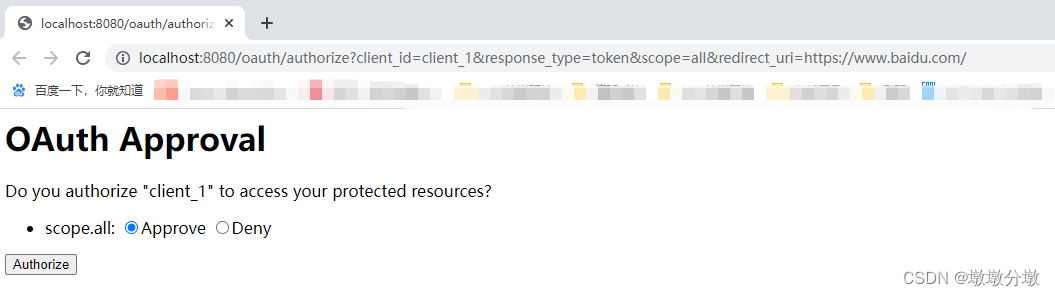
- 确认授权后,浏览器会重定向到指定的
redirect_uri路径,并将token存放在uri路径之后。
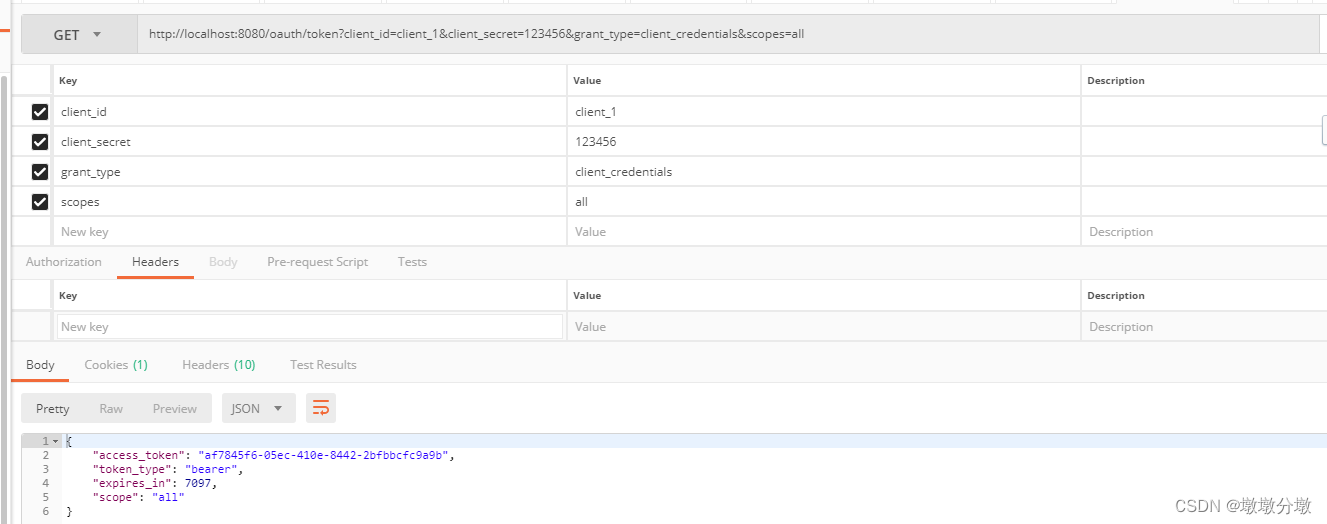
4.客户端模式
步骤一
- 客户端向授权服务器发送自己的身份信息,并请求令牌。
步骤二
-
确认客户端身份无误后,将令牌发送给client,请求如下:
-
参数列表如下:
client_id:客户端标识。
client_secret:客户端密钥。
grant_type:授权类型,填写client_credentials。
总结:
- 这种模式是最方便但最不安全的模式。因此这就要求我们对client完全信任,而client本身也是安全的,因此这种模式一般用来提供给我们完全信任的服务端使用。
测试请求令牌,如下:
五.Spring Security OAuth2集成JWT
1.生成JTW
- 修改tokenStor为JwtTokenStore
    //    //令牌持久化存储接口
    @Bean
    public TokenStore tokenStore() {


        // return new InMemoryTokenStore(); //使用内存中的 token store
        // return new JdbcTokenStore(dataSource); /// 使用Jdbctoken store
        return new JwtTokenStore(accessTokenConverter());

    }
    //jwt令牌转换器
    @Bean
    public JwtAccessTokenConverter accessTokenConverter() {


        JwtAccessTokenConverter converter = new JwtAccessTokenConverter();
        converter.setSigningKey("abc123");
        return converter;
    }
- 设置AuthorizationServerEndpointsConfigurer的
tokenStore、tokenEnhancer
   //端点设置自定义token存储,token增强
   endpoints.tokenStore(tokenStore()).tokenEnhancer(accessTokenConverter());
- 使用密码模式访问
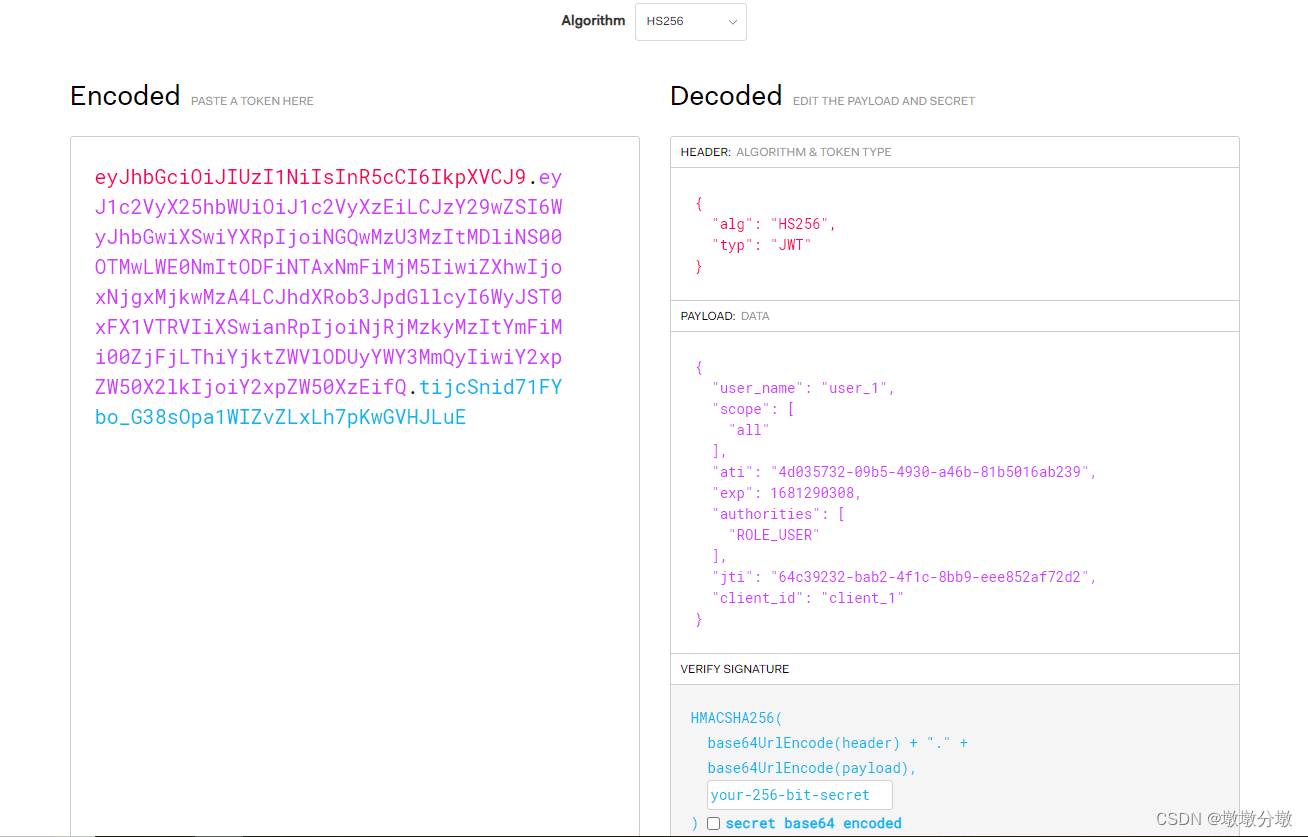
2、自定义Payload
将自定义的TokenEnhancer加入到TokenEnhancerChain中,最后设置到端点中endpoints.tokenEnhancer(tokenEnhancerChain) 。
-
授权服务器新增TokenEnhancer实现类
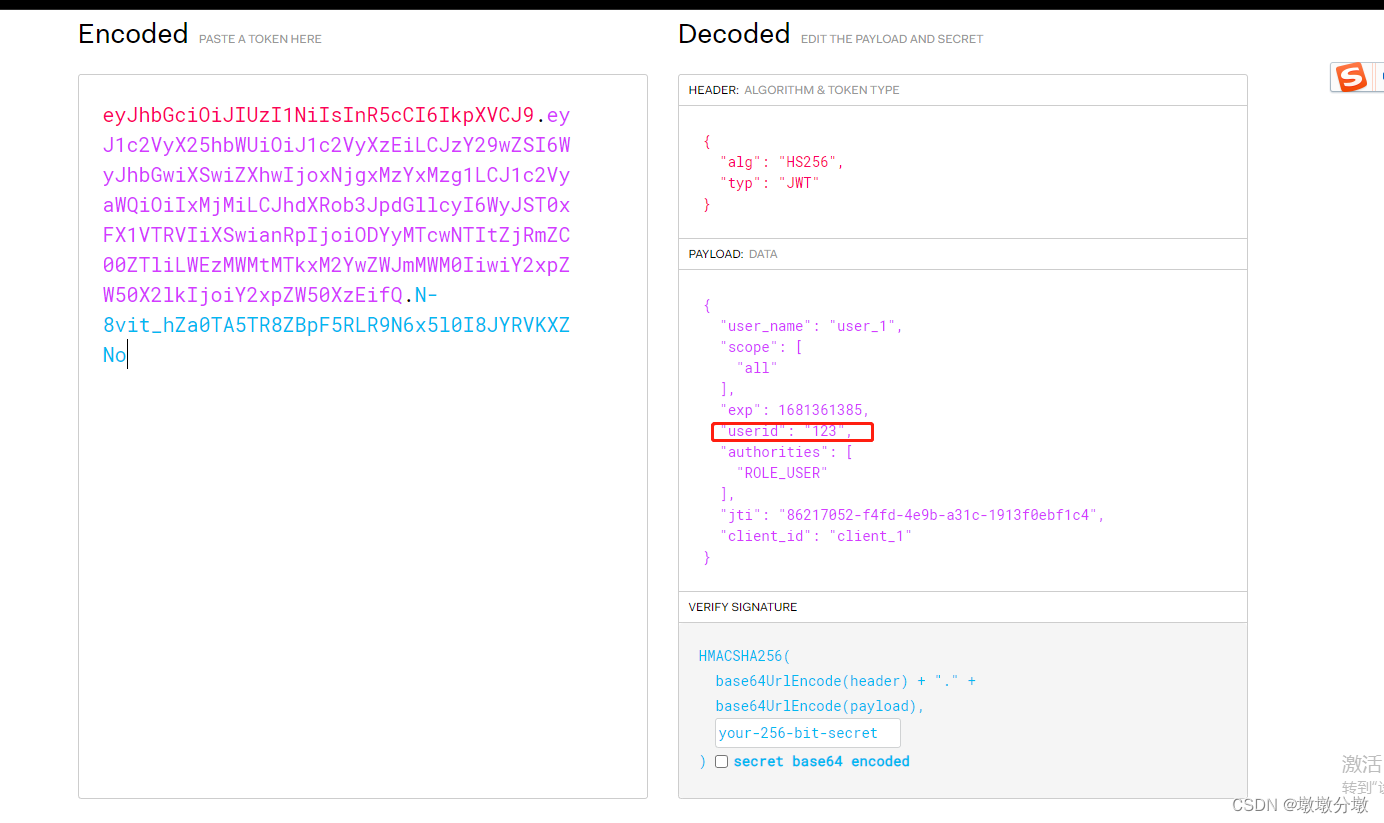
import org.springframework.security.oauth2.common.DefaultOAuth2AccessToken; import org.springframework.security.oauth2.common.OAuth2AccessToken; import org.springframework.security.oauth2.provider.OAuth2Authentication; import org.springframework.security.oauth2.provider.token.TokenEnhancer; import org.springframework.stereotype.Component; import java.util.HashMap; import java.util.Map; @Component public class CustomTokenEnhancer implements TokenEnhancer { @Override public OAuth2AccessToken enhance(OAuth2AccessToken accessToken, OAuth2Authentication authentication) { Map<String, Object> additionalInfo = new HashMap<>(16); additionalInfo.put("userid", "123"); ((DefaultOAuth2AccessToken) accessToken).setAdditionalInformation(additionalInfo); return accessToken; } } -
将tokenEnhancer注入,追加到
TokenEnhancerChain中,并设置到endponits
    /**
     * 设置token类型
     *
     * @param endpoints
     */
    @Override
    public void configure(AuthorizationServerEndpointsConfigurer endpoints) {


        endpoints.authenticationManager(authenticationManager()).allowedTokenEndpointRequestMethods(HttpMethod.GET, HttpMethod.POST);
        //用户信息
        endpoints.userDetailsService(userDetailsService());
        //自定义token存储,token增强
        //endpoints.tokenStore(tokenStore()).tokenEnhancer(accessTokenConverter());

        TokenEnhancerChain tokenEnhancerChain = new TokenEnhancerChain();
        tokenEnhancerChain.setTokenEnhancers(Arrays.asList(tokenEnhancer, accessTokenConverter()));
        endpoints.tokenEnhancer(tokenEnhancerChain);
        endpoints.tokenEnhancer(tokenEnhancer);
    }
- 使用密码模式访问