前言
随着线上项目变的日益庞大,每个项目都散落着各种配置文件,如果采用分布式的开发模式,需要的配置文件随着服务增加而不断增多。某一个基础服务信息变更,都会引起一系列的更新和重启,运维苦不堪言也容易出错。配置中心便是为解决此类问题应运而生的。
为什么要统一管理微服务配置
在微服务架构中,微服务的配置管理一般有以下需求:
- 集中管理配置。一个使用微服务架构的应用系统可能会包含成百上千个微服务,因此集中管理是非常必要的。
- 不同环境不同配置。开发、测试、预发布、生产的配置文件不同。
- 运行期间可动态调整。
- 配置修改后可自动更新。不需要重启。
Config 的介绍
Spring Cloud Config项目是一个解决分布式系统的配置管理方案。它包含了Client和Server两个部分,
Server 提供配置文件的存储、以接口的形式将配置文件的内容提供出去,Client通过接口获取数据、并依据此数据初始化自己的应用。Spring Cloud使用 git 或 svn 存放配置文件,默认情况下使用git,以git作为代码演示一遍。
快速入门
构建GIT仓库
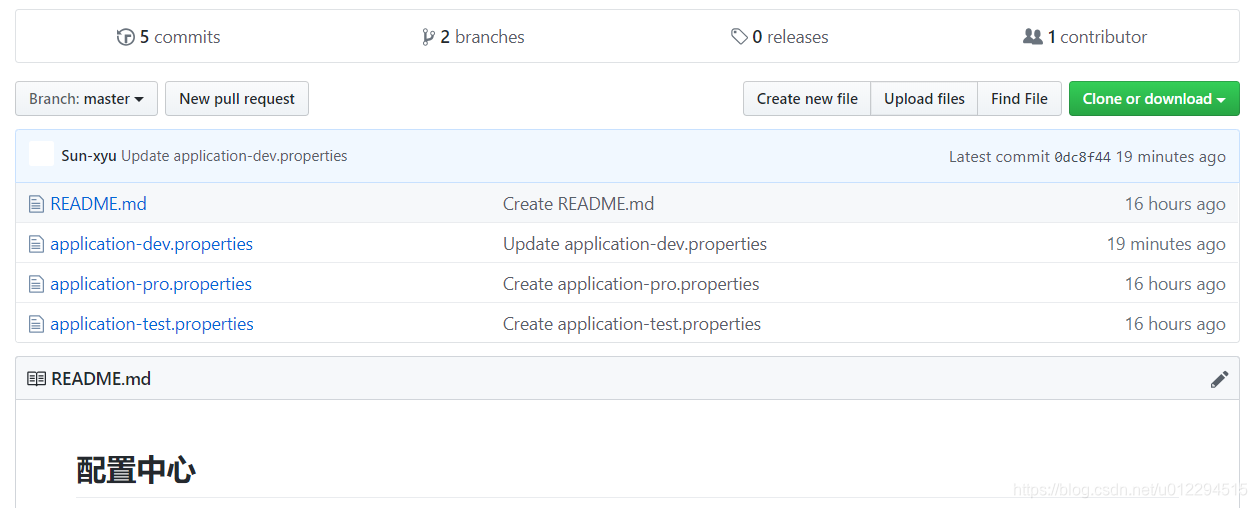
首先在github上面创建了一个文件夹config-server用来存放配置文件,为了模拟生产环境,我们创建以下三个配置文件:
// 开发环境
application-dev.properties
// 测试环境
application-test.properties
// 生产环境
application-pro.properties
并且在每个配置文件中都写了一个键值对,分别是:profile=dev-1.0、profile=test-1.0、profile=pro-1.0。
同时在另外创建一个新的分支,命名为config-server-v2.0。

Server端
-
创建一个新工程,并添加依赖
<dependency> <groupId>org.springframework.cloud</groupId> <artifactId>spring-cloud-config-server</artifactId> </dependency> -
修改启动类
Application.java,通过@EnableConfigServer声明是配置中心服务端。@SpringBootApplication @EnableConfigServer public class ConfigApplication { public static void main(String[] args) { SpringApplication.run(ConfigApplication.class, args); } } -
编写配置文件
application.ymlserver: port: 7376 spring: application: name: config cloud: config: server: git: # 配置git仓库的地址 uri: # git仓库用户名 username: # git仓库密码 password: -
启动后测试。首先我们先要测试server端是否可以读取到github上面的配置信息,直接访问:
http://localhost:7376/applicatiom/pro返回信息如下:
{


	name: "applicatiom",
	profiles: [
		"pro"
	],
	label: null,
	version: "0dc8f44a675ab935b919962e294edcd864ed6306",
	state: null,
	propertySources: [
		{


			name: "https://github.com/Sun-xyu/config-server.git/application-pro.properties",
			source: {


				profile: "pro-1.0"
			}
		}
	]
}
上述的返回的信息包含了配置文件的
位置、版本、配置文件的名称以及配置文件中的具体内容,说明server端已经成功获取了git仓库的配置信息。如果直接查看配置文件中的配置信息可访问:
http://localhost:7376/applicatiom-dev.properties,返回:profile: dev-1.0如果直接查看分支的配置文件中的配置信息可访问:
http://localhost:7376/config-server-v2.0/applicatiom-dev.properties,返回:profile: dev-2.0添加配置文件 applicatiom-dev.properties 中配置信息为:
config: this is config server dev1.0,再次在浏览器访问http://localhost:7376/applicatiom-dev.properties,返回:config: this is config server dev1.0profile: dev-1.0。说明server端会自动读取最新提交的内容 -
仓库中的配置文件会被转换成web接口,访问可以参照以下的规则:
/{application}/{profile}[/{label}]
/{application}-{profile}.yml
/{label}/{application}-{profile}.yml
/{application}-{profile}.properties
/{label}/{application}-{profile}.properties
以application-dev.properties为例子,它的application是application,profile是dev,label是master。client会根据填写的参数来选择读取对应的配置。
Client端
-
创建一个新工程,并添加依赖
<dependencies> <dependency> <groupId>org.springframework.cloud</groupId> <artifactId>spring-cloud-starter-config</artifactId> </dependency> <dependency> <groupId>org.springframework.boot</groupId> <artifactId>spring-boot-starter-web</artifactId> </dependency> </dependencies> -
创建正常启动类
Application.java。@SpringBootApplication public class ConfigclientApplication { public static void main(String[] args) { SpringApplication.run(ConfigclientApplication.class, args); } } -
编写配置文件,需要配置两个配置文件,
application.properties和bootstrap.properties
application.properties如下:server: port: 7377 spring: application: name: config-clientbootstrap.properties如下:
spring: application: # 对应config server 的配置文件的{application} name: client cloud: config: # 对应config server 地址 uri: http://localhost:7376 # 对应config server 所获取的配置文件的 {profile} profile: dev # 指定git仓库的分支,对应获取配置文件的{lable} label: master- spring.application.name:对应{application}部分
- spring.cloud.config.profile:对应{profile}部分
- spring.cloud.config.label:对应git的分支。如果配置中心使用的是本地存储,则该参数无用
- spring.cloud.config.uri:配置中心的具体地址
- spring.cloud.config.discovery.service-id:指定配置中心的service-id,便于扩展为高可用配置集群。
特别注意:上面这些与spring-cloud相关的属性必须配置在bootstrap.properties中,config部分内容才能被正确加载。因为config的相关配置会先于application.properties,而bootstrap.properties的加载也是先于application.properties。
-
编写测试类。使用@Value注解来获取server端参数的值
@RestController public class ConfigClientController { @Value("${config}") private String config; @GetMapping("/config") public String helloConfig(){ return config; } } -
测试,浏览器访问
http://localhost:7377/config,返回this is config server dev1.0。读取到了git仓库中的配置。说明已经正确的从server端获取到了参数。到此一个完整的服务端提供配置服务,客户端获取配置参数的例子就完成了。
小结
关于配置中心的例子就讲解完了。如果手动修改application-dev.properties 中配置信息为:config=this is config server dev1.0 commit again 提交到github,再次在浏览器访问http://localhost:7377/config,返回:this is config server dev1.0,说明获取的信息还是旧的参数,这是为什么呢?因为SpringBoot项目只有在启动的时候才会获取配置文件的值,修改github信息后,client端并没有在次去获取,所以导致这个问题。如何去解决这个问题呢?下回再来详细介绍。