首先我们得了解,它的作用是什么,为了在不同的微服务之间完成接口的相互调用
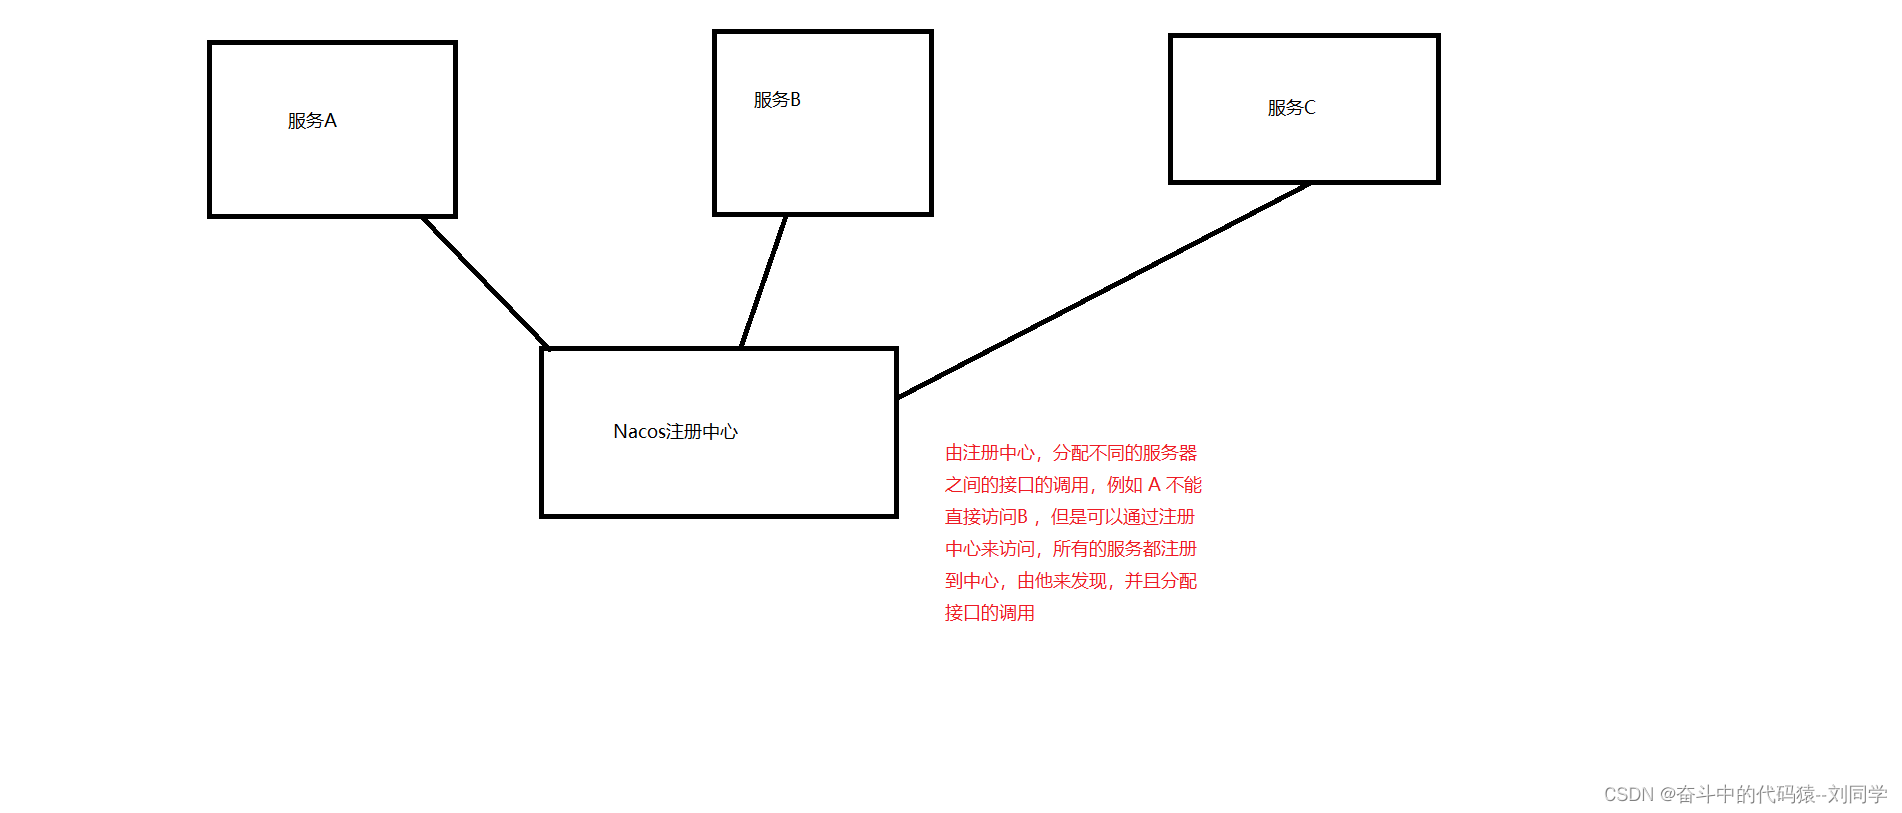
服务调用
一、运行Nacos注册中心
1、Nacos下载和安装
下载地址:https://github.com/alibaba/nacos/releases
2、Windows启动Nacos
参考:https://github.com/alibaba/nacos
解压:将下载的压缩包解压
启动:startup.cmd -m standalone
3、访问
http://localhost:8848/nacos
用户名密码:nacos/nacos
二、服务发现
首先我们创建一个springBoot项目
1、引入依赖
service-base模块中配置Nacos客户端依赖
<!--服务发现-->
<dependency>
    <groupId>com.alibaba.cloud</groupId>
    <artifactId>spring-cloud-starter-alibaba-nacos-discovery</artifactId>
</dependency>
2、添加服务配置信息
在需要注册到注册中心的微服务放入配置文件中添加配置(说人话,就是添加到每个微服务的配置文件中,让它注册到nacos服务)
#spring:
cloud:
nacos:
discovery:
server-addr: localhost:8848 # nacos服务地址
3、启动微服务
启动已注册的微服务,查看 “服务管理 => 服务列表”,可就以看到已注册的微服务

三、OpenFeign的引入到消费者端
service-base模块中配置OpenFeign的依赖(实际是在服务消费者端需要OpenFeign的依赖)
<!--服务调用-->
<dependency>
    <groupId>org.springframework.cloud</groupId>
    <artifactId>spring-cloud-starter-openfeign</artifactId>
</dependency>
2、启动类添加注解
在service-sms的启动类添加如下注解 ,表明我可以被远程调用
@EnableFeignClients
四、接口的远程调用
service-sms中添加远程调用
// @FeignClient(value = “service-core”) 表明我在哪一个服务中调用 value是服务的名字
1、CoreUserInfoClient
@FeignClient(value = "service-core")
public interface CoreUserInfoClient {


    @GetMapping("/api/core/userInfo/checkMobile/{mobile}")
    boolean checkMobile(@PathVariable String mobile);
}
五、超时控制
openfeign默认的连接超时时间为1秒,测试时很可能会出现远程调用超时错误。
可以在配置文件中添加如下配置:
feign:
client:
config:
default:
connectTimeout: 10000 #连接超时配置
readTimeout: 600000 #执行超时配置
六、可能会出现远程调用的服务,熔断了(服务器突然挂了,我还要调用这个接口)
我们采取 的熔断降级的处理,如果出现远程调用的服务,熔断了,我们在本服务中创建一个不处理该接口的实现类,返回数据返回数据给用户提示,保证,在远程接口访问不了的情况下我还可以访问本地的接口
第一步在需要远程调用的服务中引入依赖
<!--服务容错-->
<dependency>
    <groupId>com.alibaba.cloud</groupId>
    <artifactId>spring-cloud-starter-alibaba-sentinel</artifactId>
</dependency>
2、开启Sentinel支持
在service-sms的yml配置文件中开启Feign对Sentinel的支持
#开启Feign对Sentinel的支持
#feign:
  sentinel:
    enabled: true
3、创建容错类 // 如果远程调用接口不了我就调用本地的接口,给用户数据
@Service
@Slf4j
public class CoreUserInfoClientFallback implements CoreUserInfoClient {


    @Override
    public boolean checkMobile(String mobile) {


        log.error("远程调用失败,服务熔断");
        return false;
    }
}
4、指定熔断类
为OpenFeign远程调用接口添加fallback属性值没指定容错类
@FeignClient(value = "service-core", fallback = CoreUserInfoClientFallback.class)
public interface CoreUserInfoClient {
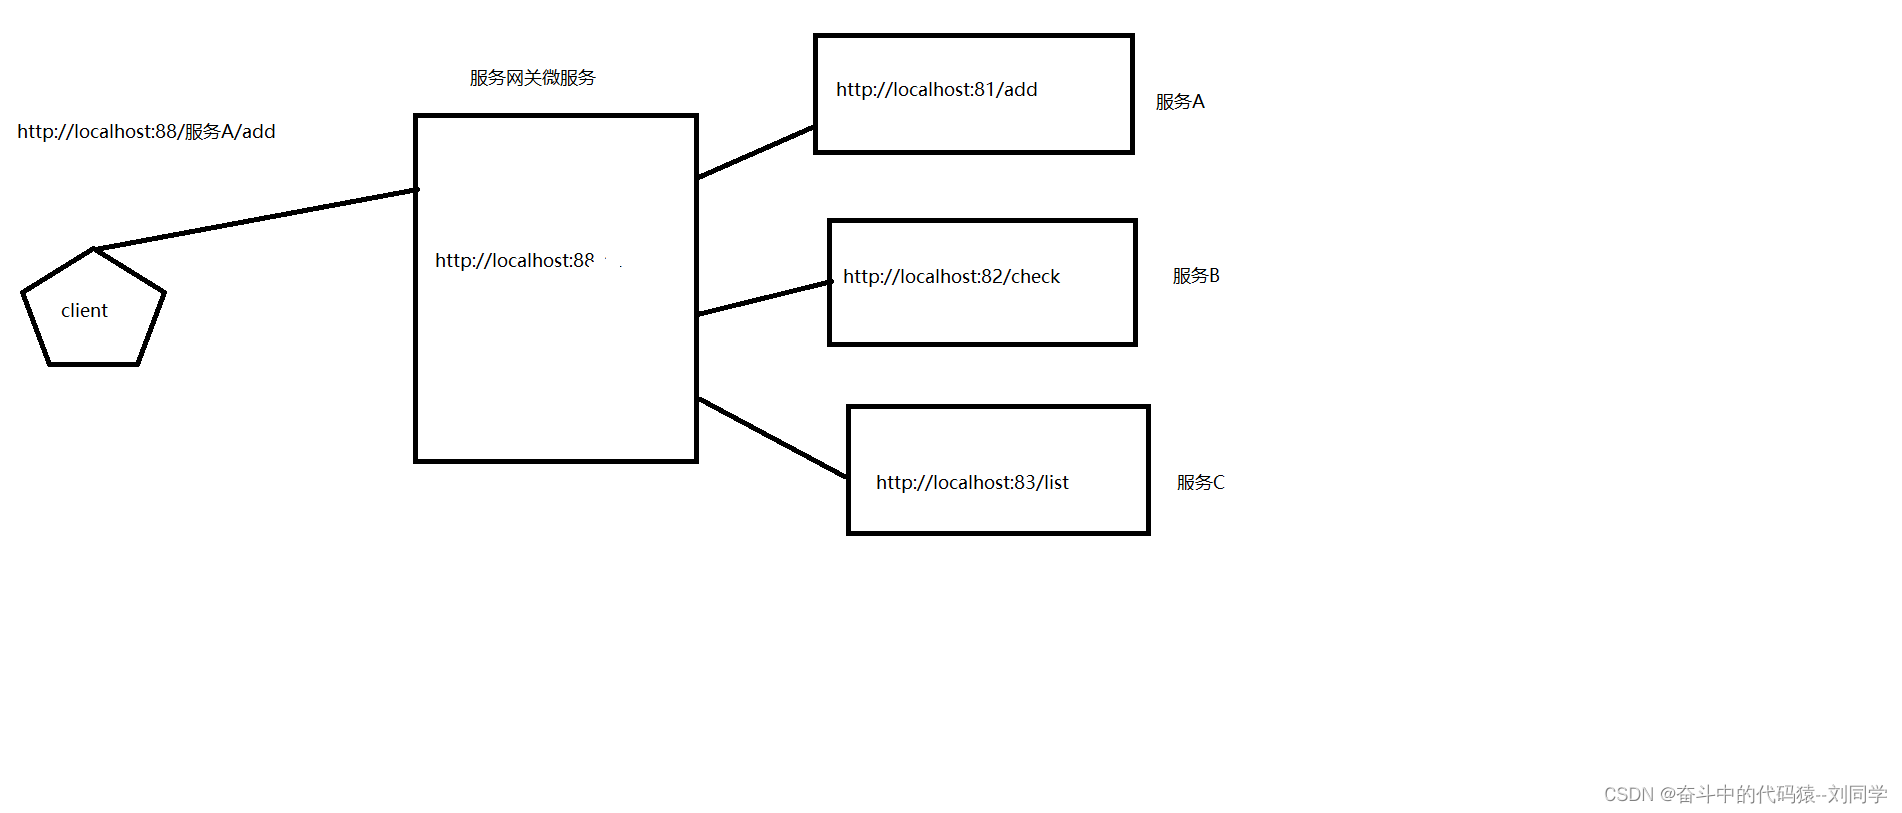
服务网关
首先我们说说它的作用:负责我可以在同一个端口下的网址,访问不同的服务器的接口
一、创建模块service-gateway
创建普通maven模块
Artifact:service-gateway
2、配置pom
在api-gateway的pom中添加如下依赖
<dependencies>
    <!-- 网关 -->
    <dependency>
        <groupId>org.springframework.cloud</groupId>
        <artifactId>spring-cloud-starter-gateway</artifactId>
    </dependency>
    <!--服务注册-->
    <dependency>
        <groupId>com.alibaba.cloud</groupId>
        <artifactId>spring-cloud-starter-alibaba-nacos-discovery</artifactId>
    </dependency>
</dependencies>
3、配置application.yml
server:
  port: 80 # 服务端口

spring:
  profiles:
    active: dev # 环境设置
  application:
    name: service-gateway # 服务名
  cloud:
    nacos:
      discovery:
        server-addr: localhost:8848 # nacos服务地址
    gateway:
      discovery:
        locator:
          enabled: true # gateway可以发现nacos中的微服务,并自动生成转发路由
4、创建启动类
@EnableDiscoveryClient 表明它是一个网关微服务
@SpringBootApplication
@EnableDiscoveryClient
public class ServiceGatewayApplication {


    public static void main(String[] args) {


        SpringApplication.run(ServiceGatewayApplication.class, args);
    }
}
5、测试自动路由转发
http://localhost/service-core/admin/core/integralGrade/list
规则:
http://Gateway_HOST:Gateway_PORT/serviceId/**
我们我们不想再调用的时候采用上述的默认方式进行网关访问,我们下面可以自己配置路由
二、路由配置
1、基本配置
application.yml文件中添加路由配置
#spring:
# cloud:
#   gateway:
      routes:
      - id: service-core
        uri: lb://service-core
        predicates:
        - Path=/*/core/**
      - id: service-sms
        uri: lb://service-sms
        predicates:
        - Path=/*/sms/**
      - id: service-oss
        uri: lb://service-oss
        predicates:
        - Path=/*/oss/**
2、测试路由转发
http://localhost/admin/core/integralGrade/list
网关配置会存在一个跨域的问题而 @CrossOrigin 是冲突的,所以不能解决跨域问题
下面我们来解决这个问题
三、跨域配置
在 api-gateway中添加跨域配置
@Configuration
public class CorsConfig {


    @Bean
    public CorsWebFilter corsFilter() {


        CorsConfiguration config = new CorsConfiguration();
        config.setAllowCredentials(true); //是否允许携带cookie
        config.addAllowedOrigin("*"); //可接受的域,是一个具体域名或者*(代表任意域名)
        config.addAllowedHeader("*"); //允许携带的头
        config.addAllowedMethod("*"); //允许访问的方式

        UrlBasedCorsConfigurationSource source = new UrlBasedCorsConfigurationSource();
        source.registerCorsConfiguration("/**", config);

        return new CorsWebFilter(source);
    }
}
2、删除后端跨域配置
删除微服务中的跨域注解 @CrossOrigin