ForkJoin
分治
ForkJoinPool线程池最大的特点就是分叉(fork)合并(join),将一个大任务拆分成多个小任务,并行执行,再结合**工作窃取模式(worksteal)**提高整体的执行效率,充分利用CPU资源。

工作窃取
工作窃取(work-stealing)是指当某个线程的任务队列中没有可执行任务的时候,从其他线程的任务队列中窃取任务来执行,以充分利用工作线程的计算能力,减少线程由于获取不到任务而造成的空闲浪费。
在ForkJoinpool中,工作任务的队列都采用双端队列Deque容器。我们知道,在通常使用队列的过程中,我们都在队尾插入,而在队头消费以实现FIFO。而为了实现工作窃取。一般我们会改成工作线程在工作队列上LIFO,而窃取其他线程的任务的时候,从队列头部取获取。示意图如下:
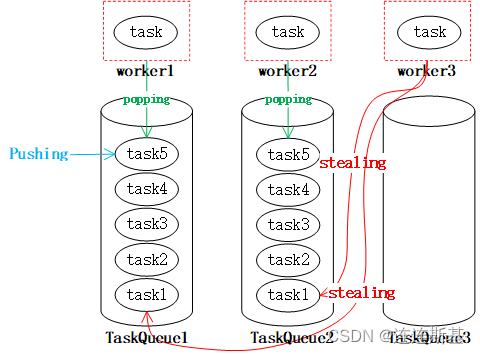
工作线程worker1、worker2以及worker3都从taskQueue的尾部popping获取task,而任务也从尾部Pushing,当worker3队列中没有任务的时候,就会从其他线程的队列中取stealing,这样就使得worker3不会由于没有任务而空闲。这就是工作窃取算法的基本原理。
可以想象,要是不使用工作窃取算法,那么我们在不断fork的过程中,可能某些worker就会一直处于join的等待中。工作窃取的思想,实际实在golang协程的底层处理中也是如此。
ForkJoinPool与ThreadPoolExecutor
ForkJoinPool和ThreadPoolExecutor都实现了Executor和ExecutorService接口,都可以通过构造函数设置线程数,threadFactory,可以查看ForkJoinPool.makeCommonPool()方法的源码查看通用线程池的构造细节。
在内部结构上我觉得两个线程池最大的区别是在工作队列的设计上,如下图
ThreadPoolExecutor:

ForkJoinPool:
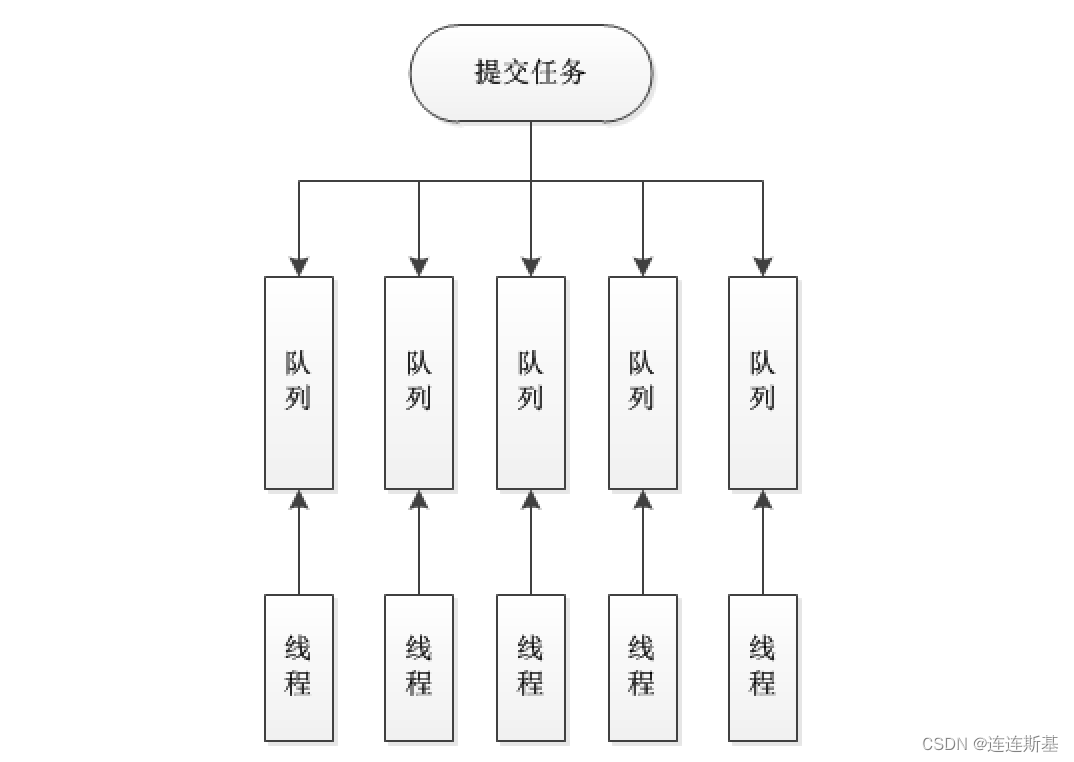
区别:
ForkJoinPool每个线程都有自己的队列
ThreadPoolExecutor共用一个队列
ForkJoinPool最适合计算密集型任务,而且最好是非阻塞任务。
使用案例
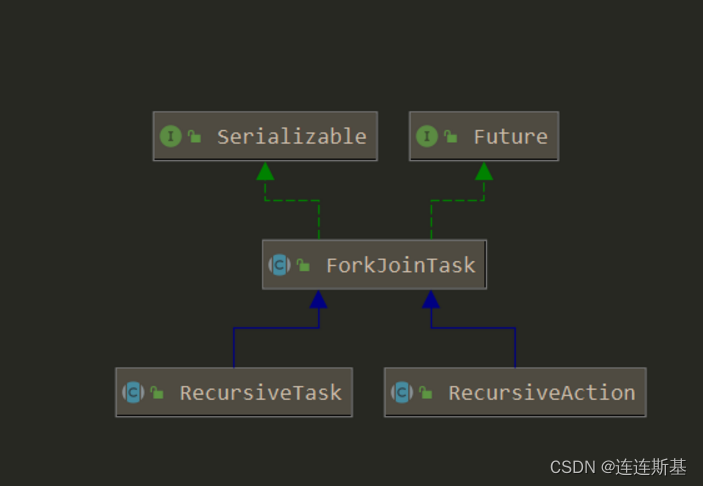
在JUC中,实现Fork-join框架有两个类,分别是ForkJoinPool以及提交的任务抽象类ForkJoinTask。对于ForkJoinTask,虽然有很多子类,但是我们在基本的使用中都是使用了带返回值的RecursiveTask和不带返回值的RecursiveAction类。
不带返回值的计算–RecursiveAction
案例:实现打印50个任务序列
- 第一步,构建要处理的printForkAction,继承自RecursiveAction:
- 第二步:重写compute()方法,Forkjoin分治的思路,体现在此,start为开始任务序号,en为结束任务序号,设置任务数阈值threshold。
- 当要处理的任务序列数,小于threshold,直接循环遍历,处理。
- 当要处理的任务序列数,大于等于threshold,将要处理的任务拆分(一般都是中分),构建两个新的printForkAction,随后
invokeAll(firstTask, secondTask);
class  printForkAction extends RecursiveAction {


    private static final int threshold = 5;
    private int start;
    private int end;

    public printForkAction(int start, int end) {


        this.start = start;
        this.end = end;
    }

    @Override
    protected void compute() {


        if (end - start < threshold) {


            for (int i = start; i < end; ++i) {


                // 业务
                System.out.println(Thread.currentThread().getName() + ":i=" + i);
            }
        } else {


            int mid = start + ((end - start) / 2);
            printForkAction firstTask = new printForkAction(start, mid);
            printForkAction secondTask = new printForkAction(mid + 1, end);
            invokeAll(firstTask, secondTask);
        }
    }
}
第三步:创建ForkJoinPool,往里边提交printForkAction。
    public static void main(String[] args) {


        ForkJoinPool pool = new ForkJoinPool();
        pool.submit(new printForkAction(1, 50));
        try {


            pool.awaitTermination(2, TimeUnit.SECONDS);
        } catch (InterruptedException e) {


            e.printStackTrace();
        }
        pool.shutdown();
    }
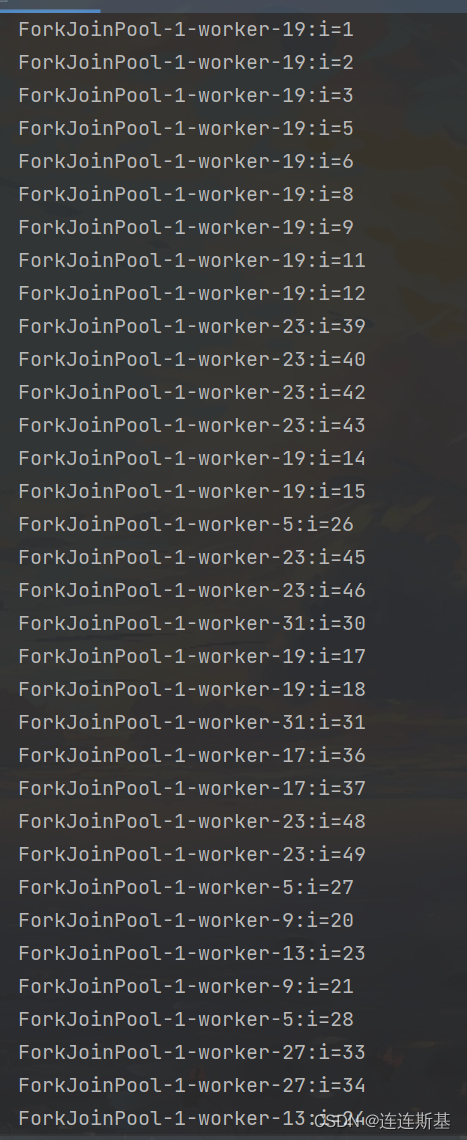
结果:实现了多个线程共同完成大于任务序列号的任务。
带返回值的计算–RecursiveTask
案例:计算1 - 1亿的和
步骤与上边类似,区别在于RecursiveTask有返回值:
- 1、继承RecursiveTask时,泛型为指定返回值类型
extends RecursiveTask<Long> - 2、
return firstTask.join() + secondTask.join();任务结果可以这里返回。 - 3、
ForkJoinTask<Long> task = pool.submit(new computeForkTask(1L, 100_000_00L));提交任务,返回一个ForkJoinTask对象,泛型任然是返回值类型 - 4、
Long ans = task.get();调用get(),获取结果。
    public static void main(String[] args) {


        ForkJoinPool pool = new ForkJoinPool();
        ForkJoinTask<Long> task = pool.submit(new computeForkTask(1L, 100_000_00L));
        try {


            System.out.println("-------");
            Long ans = task.get();
            System.out.println("-------");
            System.out.println(ans);
        } catch (Exception e) {


            e.printStackTrace();
        }
        pool.shutdown();
    }
}

class computeForkTask extends RecursiveTask<Long> {


    private Long start;
    private Long end;
    static final Long threshold = 100L;

    public computeForkTask(Long start, Long end) {


        this.start = start;
        this.end = end;
    }

    @Override
    protected Long compute() {


        Long ans = 0L;
        if (end - start < threshold) {


            for (Long i = start; i < end; ++i) {


                // 业务
                ans += i;
            }
            return  ans;
        } else {


            Long mid = start + ((end - start) / 2);
            computeForkTask firstTask = new computeForkTask(start, mid);
            computeForkTask secondTask = new computeForkTask(mid + 1, end);
            invokeAll(firstTask, secondTask);
            return firstTask.join() + secondTask.join();
        }
    }
}
Future 异步回调
Future表示一个可能还没有完成的异步任务的结果,针对这个结果可以添加Callback以便在任务执行成功或失败后作出相应的操作。
Future接口主要包括5个方法:

- get()方法可以当任务结束后返回一个结果,如果调用时,工作还没有结束,则会阻塞线程,直到任务执行完毕
- get(long timeout,TimeUnit unit)做多等待timeout的时间就会返回结果
- cancel(boolean mayInterruptIfRunning)方法可以用来停止一个任务,如果任务可以停止(通过mayInterruptIfRunning来进行判断),则可以返回true,如果任务已经完成或者已经停止,或者这个任务无法停止,则会返回false.
- isDone()方法判断当前方法是否完成
- isCancel()方法判断当前方法是否取消
烧水案例
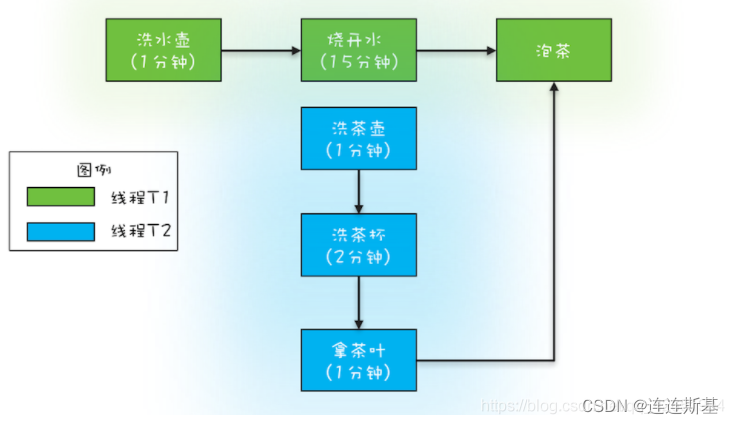
用两个线程 T1 和 T2 来完成烧水泡茶程序,T1 负责洗水壶、烧开水、泡茶这三道工序,T2 负责洗茶壶、洗茶杯、拿茶叶三道工序,其中 T1 在执行泡茶这道工序时需要等待 T2 完成拿茶叶的工序。
join实现
- A线程调用B线程的join方法,在B线程没有执行完成钱,A线程一直处于阻塞状态
- join是实例方法,需要用线程对象去调用
- 使用join线程合并线程无法获取到合并线程的返回值,即无法知道烧水线程执行的结果。只能一直阻塞等待烧水线程结束
那么我们可以构建两个线性,一个烧水,一个洗碗,将其加入(join)到主线程,然后泡茶:
public class JoinDemo {


    public static final int SLEEP_TIME = 1000;

    public static void main(String[] args) {


      Thread hThread = new Thread(() -> {


            try {


                Thread.currentThread().setName("烧水线程");
                System.out.println("洗好水壶");
                System.out.println("灌好凉水");
                System.out.println("放在火上");
                Thread.sleep(SLEEP_TIME);
            } catch (InterruptedException e) {


                e.printStackTrace();
            }
            System.out.println("水烧开了");
        });
      hThread.start();

        Thread wThread = new Thread(() -> {


            try {


                Thread.currentThread().setName("清洗线程");
                System.out.println("洗茶壶");
                System.out.println("洗茶杯");
                System.out.println("拿茶叶");
                Thread.sleep(SLEEP_TIME);
            } catch (InterruptedException e) {


                e.printStackTrace();
            }
            System.out.println("洗茶叶完成");
        });
        wThread.start();

        // 主线程 1. 合并烧水线程
        try {


            hThread.join();
            wThread.join();
            System.out.println("泡泡茶喝");
        } catch (InterruptedException e) {


            e.printStackTrace();
        }
    }
}
FutureTask实现
烧水操作和洗碗操作分别构建为callable对象,装配FutureTask,在主线程中获取FutureTask的结果:
public class FutureTaskDemo {


    public static final int SLEEP_TIME = 1000;

    public static void main(String[] args) {


        Callable<Boolean> hotWaterJob = new HotWaterJob();
        FutureTask<Boolean> hotWaterTask = new FutureTask<>(hotWaterJob);
        Thread hotWaterThread = new Thread(hotWaterTask, "烧水线程");

        Callable<Boolean> washJob = new WashJob();
        FutureTask<Boolean> washTask = new FutureTask<>(washJob);
        Thread washThread = new Thread(washTask, "清洗线程");
        hotWaterThread.start();
        washThread.start();

        try {


            Boolean hotWaterFlag = hotWaterTask.get();
            Boolean washFlag = washTask.get();
            drinkTea(hotWaterFlag, washFlag);
        } catch (Exception e) {


            e.printStackTrace();
        }
    }

    private static void drinkTea(Boolean hotWaterFlag, Boolean washFlag) {


        if (hotWaterFlag && washFlag) {


            System.out.println("喝茶");
        }
    }


    static class HotWaterJob implements Callable<Boolean> {


        @Override
        public Boolean call() throws Exception {


            try {


                Thread.currentThread().setName("烧水线程");
                System.out.println("洗好水壶");
                System.out.println("灌好凉水");
                System.out.println("放在火上");
                Thread.sleep(SLEEP_TIME);
            } catch (InterruptedException e) {


                e.printStackTrace();
                return false;
            }
            System.out.println("水烧开了");
            return true;
        }
    }

    static class WashJob implements Callable<Boolean> {


        @Override
        public Boolean call() throws Exception {


            try {


                Thread.currentThread().setName("清洗线程");
                System.out.println("洗茶壶");
                System.out.println("洗茶杯");
                System.out.println("拿茶叶");
                Thread.sleep(SLEEP_TIME);
            } catch (InterruptedException e) {


                e.printStackTrace();
                return false;
            }
            System.out.println("洗茶叶完成");
            return true;
        }
    }
}
CompletableFuture
CompletableFuture 与 FutureTask为例,同为Future的实现类。同传统的Future相比,其支持流式计算、函数式编程、完成通知、自定义异常处理等很多新的特性。由于函数式编程在java中越来越多的被使用到,熟练掌握CompletableFuture,对于更好的使用java 8后的主要新特性很重要。
为什么叫CompletableFuture?
CompletableFuture字面翻译过来,就是“可完成的Future”。同传统的Future相比较,CompletableFuture能够主动设置计算的结果值(主动终结计算过程,即completable),从而在某些场景下主动结束阻塞等待。而Future由于不能主动设置计算结果值,一旦调用get()进行阻塞等待,要么当计算结果产生,要么超时,才会返回。
下面的示例,比较简单的说明了,CompletableFuture是如何被主动完成的。在下面这段代码中,由于调用了complete方法,所以最终的打印结果是“manual test”,而不是"test"。
CompletableFuture<String> future = CompletableFuture.supplyAsync(()->{


    try{


        Thread.sleep(1000L);
        return "test";
    } catch (Exception e){


        return "failed test";
    }
});
future.complete("manual test");
System.out.println(future.join());
创建异步任务
supplyAsync
supplyAsync是创建带有返回值的异步任务。它有如下两个方法,一个是使用默认线程池(ForkJoinPool.commonPool())的方法,一个是带有自定义线程池的重载方法:
// 带返回值异步请求,默认线程池
public static <U> CompletableFuture<U> supplyAsync(Supplier<U> supplier)

// 带返回值的异步请求,可以自定义线程池
public static <U> CompletableFuture<U> supplyAsync(Supplier<U> supplier, Executor executor)
具体使用:
public static void main(String[] args) throws ExecutionException, InterruptedException {


        CompletableFuture<String> cf = CompletableFuture.supplyAsync(() -> {


            System.out.println("do something....");
            return "result";
        });

        //等待任务执行完成
        System.out.println("结果->" + cf.get());
}


public static void main(String[] args) throws ExecutionException, InterruptedException {


        // 自定义线程池
        ExecutorService executorService = Executors.newSingleThreadExecutor();
        CompletableFuture<String> cf = CompletableFuture.supplyAsync(() -> {


            System.out.println("do something....");
            return "result";
        }, executorService);

        //等待子任务执行完成
        System.out.println("结果->" + cf.get());
}
runAsync
runAsync是创建没有返回值的异步任务。它有如下两个方法,一个是使用默认线程池(ForkJoinPool.commonPool())的方法,一个是带有自定义线程池的重载方法
// 不带返回值的异步请求,默认线程池
public static CompletableFuture<Void> runAsync(Runnable runnable)

// 不带返回值的异步请求,可以自定义线程池
public static CompletableFuture<Void> runAsync(Runnable runnable, Executor executor)
具体使用:
public static void main(String[] args) throws ExecutionException, InterruptedException {


        CompletableFuture<Void> cf = CompletableFuture.runAsync(() -> {


            System.out.println("do something....");
        });

        //等待任务执行完成
        System.out.println("结果->" + cf.get());
}


public static void main(String[] args) throws ExecutionException, InterruptedException {


        // 自定义线程池
        ExecutorService executorService = Executors.newSingleThreadExecutor();
        CompletableFuture<Void> cf = CompletableFuture.runAsync(() -> {


            System.out.println("do something....");
        }, executorService);

        //等待任务执行完成
        System.out.println("结果->" + cf.get());
}
获取任务的方法
// 如果完成则返回结果,否则就抛出具体的异常
public T get() throws InterruptedException, ExecutionException

// 最大时间等待返回结果,否则就抛出具体异常
public T get(long timeout, TimeUnit unit) throws InterruptedException, ExecutionException, TimeoutException

// 完成时返回结果值,否则抛出unchecked异常。为了更好地符合通用函数形式的使用,如果完成此 CompletableFuture所涉及的计算引发异常,则此方法将引发unchecked异常并将底层异常作为其原因
public T join()

// 如果完成则返回结果值(或抛出任何遇到的异常),否则返回给定的 valueIfAbsent。
public T getNow(T valueIfAbsent)

// 如果任务没有完成,返回的值设置为给定值
public boolean complete(T value)

// 如果任务没有完成,就抛出给定异常
public boolean completeExceptionally(Throwable ex)
注意:
- join()与get()的区别:
- join()方法抛出的是uncheckException异常(即RuntimeException),不会强制开发者抛出
- get()方法抛出的是经过检查的异常,ExecutionException, InterruptedException 需要用户手动处理(抛出或者 try catch)
- complete()与getNow()的区别:
- complete() : 如果任务没有完成,将返回的值设置为给定值,提前结束。 complete()只是对结果提交结束的一种设置,并不返回任务结果。
- getNow():如果完成则返回结果值(或抛出任何遇到的异常),否则返回给定的 valueIfAbsent。
异步回调处理
1.thenApply和thenApplyAsync
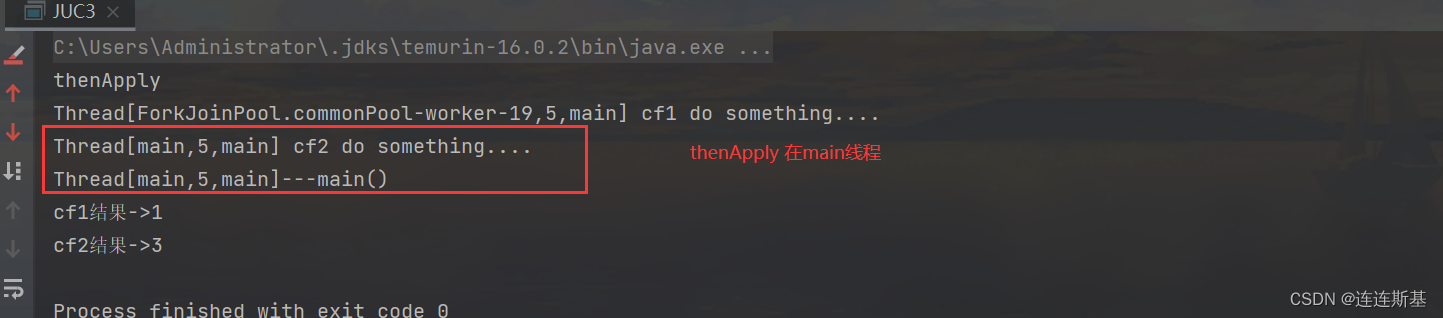
thenApply 表示某个任务执行完成后执行的动作,即回调方法,会将该任务的执行结果即方法返回值作为入参传递到回调方法中,带有返回值。
thenApply和thenApplyAsync区别在于,使用thenApply方法时子任务与父任务使用的是同一个线程,而thenApplyAsync在子任务中是另起一个线程执行任务,并且thenApplyAsync可以自定义线程池,默认的使用ForkJoinPool.commonPool()线程池。
public static void main(String[] args) throws ExecutionException, InterruptedException {


    System.out.println("thenApplyAsync");
    CompletableFuture<Integer> cf1 = CompletableFuture.supplyAsync(() -> {


        System.out.println(Thread.currentThread() + " cf1 do something....");
        return 1;
    });

    CompletableFuture<Integer> cf2 = cf1.thenApplyAsync((result) -> {


        System.out.println(Thread.currentThread() + " cf2 do something....");
        result += 2;
        return result;
    });
    System.out.println(Thread.currentThread() + "---main()");
    //等待任务1执行完成
    System.out.println("cf1结果->" + cf1.get());
    //等待任务2执行完成
    System.out.println("cf2结果->" + cf2.get());
}

public static void main(String[] args) throws ExecutionException, InterruptedException {


    System.out.println("thenApply");
    CompletableFuture<Integer> cf1 = CompletableFuture.supplyAsync(() -> {


        System.out.println(Thread.currentThread() + " cf1 do something....");
        return 1;
    });

    CompletableFuture<Integer> cf2 = cf1.thenApply((result) -> {


        System.out.println(Thread.currentThread() + " cf2 do something....");
        result += 2;
        return result;
    });
    System.out.println(Thread.currentThread() + "---main()");
    //等待任务1执行完成
    System.out.println("cf1结果->" + cf1.get());
    //等待任务2执行完成
    System.out.println("cf2结果->" + cf2.get());
}

2.thenAccept和thenAcceptAsync
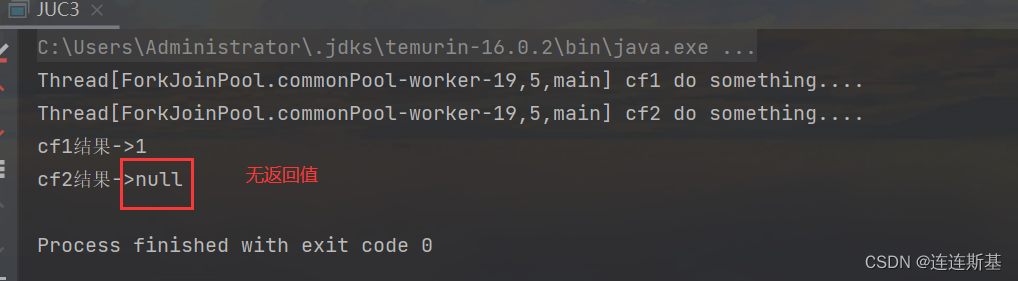
thenAccep表示某个任务执行完成后执行的动作,即回调方法,会将该任务的执行结果即方法返回值作为入参传递到回调方法中,无返回值。
thenAccept和thenAcceptAsync与thenApply和thenApplyAsync的区别在于accept无返回值,只接受有返回值的future的结果,自己本身无返回值
public static void main(String[] args) throws ExecutionException, InterruptedException {


        CompletableFuture<Integer> cf1 = CompletableFuture.supplyAsync(() -> {


            System.out.println(Thread.currentThread() + " cf1 do something....");
            return 1;
        });

        CompletableFuture<Void> cf2 = cf1.thenAccept((result) -> {


            System.out.println(Thread.currentThread() + " cf2 do something....");
        });

        //等待任务1执行完成
        System.out.println("cf1结果->" + cf1.get());
        //等待任务2执行完成
        System.out.println("cf2结果->" + cf2.get());
}


public static void main(String[] args) throws ExecutionException, InterruptedException {


        CompletableFuture<Integer> cf1 = CompletableFuture.supplyAsync(() -> {


            System.out.println(Thread.currentThread() + " cf1 do something....");
            return 1;
        });

        CompletableFuture<Void> cf2 = cf1.thenAcceptAsync((result) -> {


            System.out.println(Thread.currentThread() + " cf2 do something....");
        });

        //等待任务1执行完成
        System.out.println("cf1结果->" + cf1.get());
        //等待任务2执行完成
        System.out.println("cf2结果->" + cf2.get());
}
3.thenRun和thenRunAsync
thenRun表示某个任务执行完成后执行的动作,即回调方法,无入参,无返回值。
4、whenComplete和whenCompleteAsync
whenComplete是当某个任务执行完成后执行的回调方法,会将执行结果或者执行期间抛出的异常传递给回调方法,如果是正常执行则异常为null,回调方法对应的CompletableFuture的result和该任务一致,如果该任务正常执行,则get方法返回执行结果,如果是执行异常,则get方法抛出异常。
whenComplete 和 thenApply主要区别在于
whenComplete方法会传递异常,而thenApply不会传递异常。whenComplete也是没有返回值的
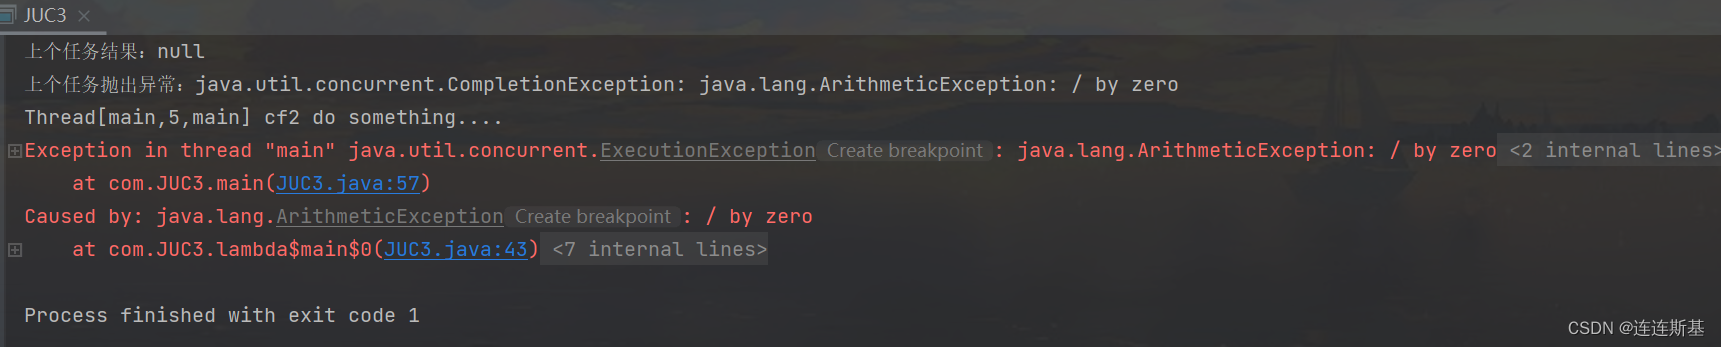
5、handle和handleAsync
跟whenComplete基本一致,区别在于handle的回调方法有返回值。
public static void main(String[] args) throws ExecutionException, InterruptedException {


        CompletableFuture<Integer> cf1 = CompletableFuture.supplyAsync(() -> {


            System.out.println(Thread.currentThread() + " cf1 do something....");
            // int a = 1/0;
            return 1;
        });

        CompletableFuture<Integer> cf2 = cf1.handle((result, e) -> {


            System.out.println(Thread.currentThread() + " cf2 do something....");
            System.out.println("上个任务结果:" + result);
            System.out.println("上个任务抛出异常:" + e);
            return result+2;
        });

        //等待任务2执行完成
        System.out.println("cf2结果->" + cf2.get());
}
多任务组合处理:thenCombine、thenAcceptBoth 和runAfterBoth
1.thenCombine、thenAcceptBoth 和runAfterBoth
这三个方法都是将两个CompletableFuture组合起来处理,只有两个任务都正常完成时,才进行下阶段任务。
区别:
- thenCombine会将两个任务的执行结果作为所提供函数的参数,且该方法有返回值;
- thenAcceptBoth同样将两个任务的执行结果作为方法入参,但是无返回值;
- runAfterBoth没有入参,也没有返回值。注意两个任务中只要有一个执行异常,则将该异常信息作为指定任务的执行结果。
public static void main(String[] args) throws ExecutionException, InterruptedException {


        CompletableFuture<Integer> cf1 = CompletableFuture.supplyAsync(() -> {


            System.out.println(Thread.currentThread() + " cf1 do something....");
            return 1;
        });

        CompletableFuture<Integer> cf2 = CompletableFuture.supplyAsync(() -> {


            System.out.println(Thread.currentThread() + " cf2 do something....");
            return 2;
        });

        CompletableFuture<Integer> cf3 = cf1.thenCombine(cf2, (a, b) -> {


            System.out.println(Thread.currentThread() + " cf3 do something....");
            return a + b;
        });

        System.out.println("cf3结果->" + cf3.get());
}

 public static void main(String[] args) throws ExecutionException, InterruptedException {


        CompletableFuture<Integer> cf1 = CompletableFuture.supplyAsync(() -> {


            System.out.println(Thread.currentThread() + " cf1 do something....");
            return 1;
        });

        CompletableFuture<Integer> cf2 = CompletableFuture.supplyAsync(() -> {


            System.out.println(Thread.currentThread() + " cf2 do something....");
            return 2;
        });

        CompletableFuture<Void> cf3 = cf1.thenAcceptBoth(cf2, (a, b) -> {


            System.out.println(Thread.currentThread() + " cf3 do something....");
            System.out.println(a + b);
        });

        System.out.println("cf3结果->" + cf3.get());
}

public static void main(String[] args) throws ExecutionException, InterruptedException {


        CompletableFuture<Integer> cf1 = CompletableFuture.supplyAsync(() -> {


            System.out.println(Thread.currentThread() + " cf1 do something....");
            return 1;
        });

        CompletableFuture<Integer> cf2 = CompletableFuture.supplyAsync(() -> {


            System.out.println(Thread.currentThread() + " cf2 do something....");
            return 2;
        });

        CompletableFuture<Void> cf3 = cf1.runAfterBoth(cf2, () -> {


            System.out.println(Thread.currentThread() + " cf3 do something....");
        });

        System.out.println("cf3结果->" + cf3.get());
}
CAS
CAS(Compare and Swap)名为比较交换, 通常是指一种原子操作: 针对一个变量,首先比较它的内存值与某个期望值是否相同,如果相同,就给它赋一个新值。 我们将原本的内存值举例为A, 期望值举例为B, 新值举例为C, CAS操作就是把A和B进行对比, 如果 A==B则将A的值替换为C; 如果A和B不相等, 那就说明有其他业务对数据A进行过修改, 于是A的值则不会更新为C.
我们通过上面的解释可以看出CAS是一种以乐观锁的思想实现的, 但是他本身却没有用到任何锁, 相对于synchronized悲观锁来说效率会高很多. Java原子类中的递增操作就通过CAS自旋实现的。
原子类
在J.U.C下的Atomic包提供了一系列的操作简单,性能高效,并能保证线程安全的类去更新基本类型变量,数组元素,引用类型以及更新对象中的字段类型。Atomic包下的这些类都是采用的是乐观锁策略去原子更新数据,在java中则是使用CAS操作具体实现。
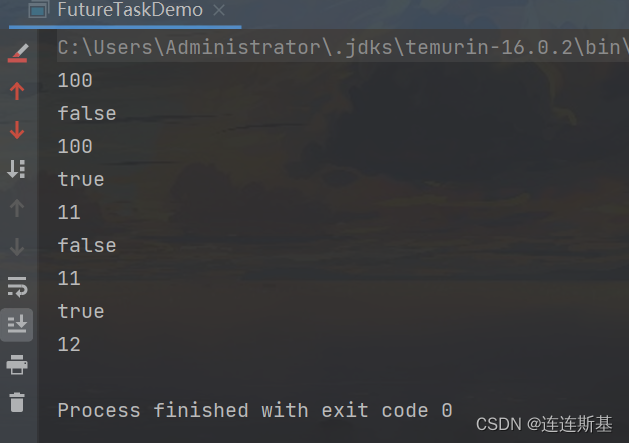
compareAndSet(V,A)
期望V,设置值为A,即仅在当前内存中原子变量a的值为V的情况,才会把变量更新为A。
AtomicInteger a = new AtomicInteger(100);
System.out.println(a.get());
System.out.println(a.compareAndSet(10, 11));
System.out.println(a.get());
System.out.println(a.compareAndSet(100, 11));
System.out.println(a.get());
System.out.println(a.compareAndSet(100, 12));
System.out.println(a.get());
System.out.println(a.compareAndSet(11, 12));
System.out.println(a.get());
结果:
其底层是调用的Unsafe类的compareAndSet()方法:

Unsafe类
Java无法直接访问底层操作系统,而是通过本地native方法来访问,但还是留了一个后门-Unsafe类,提供了一些低层次操作,如直接内存访问等,Unsafe类也提供了CAS操作的native方法:
/** 拿对象o在内存偏移offset处的对象与expected比较,如果相等,则设置o.offset=x并返回true,否则返回false */
public final native boolean compareAndSwapObject(Object o, long offset, Object expected, Object x);
/** 拿对象o在内存偏移offset处的long值与expected比较,如果相等则设置o.offset=x */
public final native boolean compareAndSwapLong(Object o, long offset, long expected, long x);
/** 拿对象o在内存偏移offset处的int值与expected比较,如果相等则设置o.offset=x */
public final native boolean compareAndSwapInt(Object o, long offset, int expected, int x);

/** 获取字段f的偏移量 */
public native long objectFieldOffset(Field f);
/** 获取静态field在对象中的偏移量 */
public native long staticFieldOffset(Field f);
原子引用解决ABA问题
CAS锁的问题,当一个线程将期望值A修改为B,然后再将B改回A,那么我们的CAS锁就失效了。
为解决这个问题,采用AtomicStampedReference,原子引用类,给变量加上一个版本号,当拿到变量时,每次修改时,版本号 + 1,仅当版本号与初始一致时,才可以修改成功,这样就规避了ABA问题。
 public static void main(String[] args) {


     AtomicStampedReference<Integer> as = new AtomicStampedReference<>(1,1000);
     new Thread(() ->{


         System.out.println("a1--" + as.getReference());
         System.out.println(as.compareAndSet(1, 2, as.getStamp(), as.getStamp() + 1));
         System.out.println("a2--" + as.getReference());
         System.out.println(as.compareAndSet(2, 1, as.getStamp(), as.getStamp() + 1));
         System.out.println("a3--" + as.getReference());
     }).start();

     new Thread(() -> {


         int stamp = as.getStamp();
         try {


             TimeUnit.SECONDS.sleep(1);
         } catch (InterruptedException e) {


             e.printStackTrace();
         }
         System.out.println("b1:" + as.compareAndSet(1, 2, stamp, stamp + 1));
         System.out.println("b1--" + as.getReference());
     }).start();
 }