Hessian矩阵在图像处理中有着广泛的应用:其中在图像分割领域,包括边缘检测、纹理分析等。
原理:
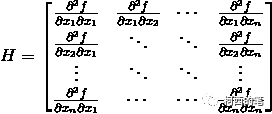
假设图像像素值关于坐标(x, y)的函数是f(x, y),那么将f(x+dx,y+dy)在f(x0, y0)处展开,得到如下式子

如果将这个式子用矩阵表示,并且舍去余项

上面等式右边的第三项中的第二个矩阵就是二维空间中的海森矩阵了。
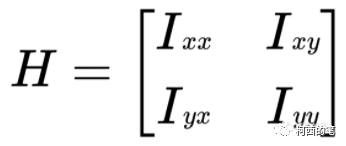
简化二维
以二维图像为例,图像中的点性结构具有各项同性,而线性结构具有各向异性。因此我们可以利用海森矩阵对图像中的线性结构进行增强,滤去点状的结构和噪声点。同样,也可以用于找出图像中的点状结构,滤除其他信息。
一般直接对数字图形进行二阶求导,但是该方法鲁棒性较差,很容易受到噪声的干扰。所以都会增加高斯函数。
应用:
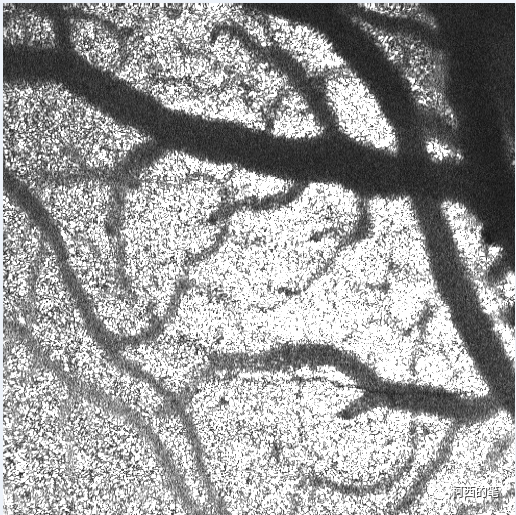
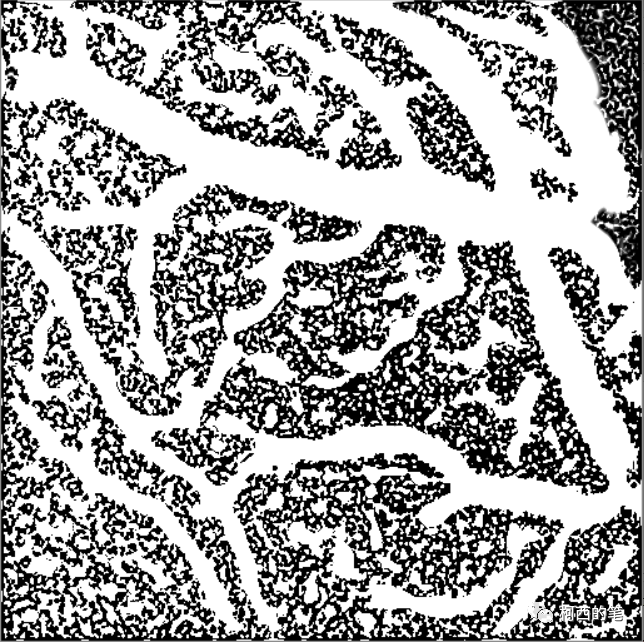
我们接下来将基于注明的Frangi滤波来进行血管增强。
def getkernel(kernel=7,sigma=1.0):
    w = kernel//2
    PI = 3.1415926

    [Y,X]= np.mgrid[-w:w+1,-w:w+1]
    xxGauKernel = (1-X**2/sigma**2)*np.exp(-1*(X**2+Y**2)/(2*sigma**2))*(-1/(2*PI*sigma**4))
    yyGauKernel = (1-Y**2/sigma**2)*np.exp(-1*(X**2+Y**2)/(2*sigma**2))*(-1/(2*PI*sigma**4))
    xyGauKernel = np.exp(-1*(X**2+Y**2)/(2*sigma**2))*((X*Y)/(2*PI*sigma**6))
    return xxGauKernel,yyGauKernel,xyGauKernel


def Hessian2Dd(image,kernel=7,sigma=1.0):
    xxGauKernel,yyGauKernel,xyGauKernel = getkernel(kernel,sigma)
    xxDerivae = cv2.filter2D(image,-1,xxGauKernel,borderType =cv2.BORDER_CONSTANT)
    yyDerivae = cv2.filter2D(image,-1,yyGauKernel,borderType =cv2.BORDER_CONSTANT)
    xyDerivae = cv2.filter2D(image,-1,xyGauKernel,borderType =cv2.BORDER_CONSTANT)
    return xxDerivae,xyDerivae,yyDerivae


def eig2image(Dxx,Dxy,Dyy):
    Dxx=np.array(Dxx,dtype=float)
    Dyy=np.array(Dyy,dtype=float)
    Dxy=np.array(Dxy,dtype=float)
    if (len(Dxx.shape)!=2):
        print("len(Dxx.shape)!=2,不是二维数组!")
        return 0
    tmp = np.sqrt( (Dxx - Dyy)**2 + 4*Dxy**2)
    v2x = 2*Dxy
    v2y = Dyy - Dxx + tmp
    mag = np.sqrt(v2x**2 + v2y**2)
    i=np.array(mag!=0)
    v2x[i==True] = v2x[i==True]/mag[i==True]
    v2y[i==True] = v2y[i==True]/mag[i==True]
    v1x = -v2y
    v1y = v2x
    mu1 = 0.5*(Dxx + Dyy + tmp)
    mu2 = 0.5*(Dxx + Dyy - tmp)
    check=abs(mu1)>abs(mu2)
    Lambda1=mu1.copy()
    Lambda1[check==True] = mu2[check==True]
    Lambda2=mu2
    Lambda2[check==True] = mu1[check==True]
    Ix=v1x
    Ix[check==True] = v2x[check==True]
    Iy=v1y
    Iy[check==True] = v2y[check==True]
    return Lambda1,Lambda2,Ix,Iy


def FrangiFilter2D(I):
    I=np.array(I,dtype=float)
    defaultoptions = {'FrangiScaleRange':(1,10), 'FrangiScaleRatio':2, 'FrangiBetaOne':0.5, 'FrangiBetaTwo':15, 'verbose':True,'BlackWhite':True};
    options=defaultoptions
    sigmas=np.arange(options['FrangiScaleRange'][0],options['FrangiScaleRange'][1],options['FrangiScaleRatio'])
    sigmas.sort()
    beta  = 2*pow(options['FrangiBetaOne'],2)
    c     = 2*pow(options['FrangiBetaTwo'],2)
    shape=(I.shape[0],I.shape[1],len(sigmas))
    ALLfiltered=np.zeros(shape)
    ALLangles  =np.zeros(shape)
    Rb=0
    S2=0
    for i in range(len(sigmas)):
        #Show progress
        if(options['verbose']):
            print('Current Frangi Filter Sigma: ',sigmas[i])
        S_round=np.round(3*sigmas[i])*2+1
        [Dxx,Dxy,Dyy] = Hessian2Dd(I,S_round,sigmas[i])
        Dxx = pow(sigmas[i],2)*Dxx
        Dxy = pow(sigmas[i],2)*Dxy
        Dyy = pow(sigmas[i],2)*Dyy

        [Lambda2,Lambda1,Ix,Iy]=eig2image(Dxx,Dxy,Dyy)

        angles = np.arctan2(Ix,Iy)

        Lambda1[Lambda1==0] = np.spacing(1)


        Rb = (Lambda2/Lambda1)**2
        S2 = Lambda1**2 + Lambda2**2

        Ifiltered = np.exp(-Rb/beta) * (np.ones(I.shape)-np.exp(-S2/c))

        if(options['BlackWhite']):
            Ifiltered[Lambda1<0]=0
        else:
            Ifiltered[Lambda1>0]=0

        ALLfiltered[:,:,i] = Ifiltered
        ALLangles[:,:,i] = angles

        if len(sigmas) > 1:
            outIm=ALLfiltered.max(2)
        else:
            outIm = (outIm.transpose()).reshape(I.shape)

    return outIm
展示测试结果:
3D版的Frangi滤波原理与2D版是一样的,本文将不再直接提供,有需求的读者可以私信我。