一、什么是 TCP 粘包和拆包
TCP 是一种基于字节流的传输层通讯协议,而字节流是没有边界的连续流,并且 TCP 底层不了解上层业务的具体含义,它会根据 TCP 缓冲区实际情况进行划分,所以一个完整的包可能被 TCP 拆分成多个包进行发送,也有可能几个小包被 TCP 合成一个大的数据包进行发送,这种就是 TCP 的粘包和拆包的问题。下面通过图解来解释下粘包和拆包。
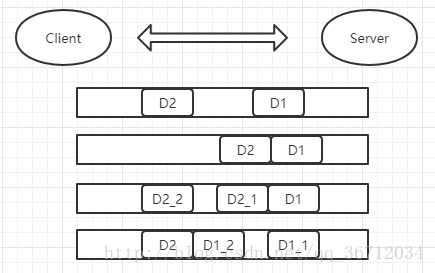
如上图:假如客户端分别发送两个数据包 D1 和 D2 给服务端,由于服务端第一次读取到的字节数是不确定的,所以可能出现以下4种情况:
1. 服务端分别接收到两个独立的数据包 D1 和 D2,没有粘包和拆包。
2. 服务端一次收到了两个数据包,D1 和 D2 粘合了,这就是所说的粘包
3. 服务端分别收到两个数据包,第一次是完整的 D1 数据包,第二次是 D2 的半包 D2_1 ,这就是拆包。
4. 服务端分别收到两个数据包,第一次是 D1 的半包 D1_1,第二次是 D1 的半包 D1_2 和 完整的 D2 。
二、TCP 粘包/拆包的异常案例
- 服务端
- DemoServerHandler
public class DemoServerHandler extends ChannelInboundHandlerAdapter {
    // 统计读取了多少次
    private int count = 0;
    /**
     * 每传入一次消息都要调用这个方法
     * @param ctx
     * @param msg
     * @throws Exception
     */
    @Override
    public void channelRead(ChannelHandlerContext ctx, Object msg) throws Exception {
        ByteBuf buf = (ByteBuf) msg;
        // 统计读了多少次
        System.out.println("服务端收到客户端传来的消息是:" + buf.toString(CharsetUtil.UTF_8) + ", count = " + count++);
        /**
         *  将数据写到 Channel 中,等到操作结束再刷新发送出去
         */
        ctx.writeAndFlush(Unpooled.copiedBuffer("Hello Client".getBytes()));
    }
    /**
     * 当前操作的最后一条消息读取后调用,也就是说一次操作可能多条消息
     * @param ctx
     * @throws Exception
     */
    @Override
    public void channelReadComplete(ChannelHandlerContext ctx) throws Exception {
    }

    /**
     * 读取操作期间发生异常调用的
     * @param ctx
     * @param cause
     * @throws Exception
     */
    @Override
    public void exceptionCaught(ChannelHandlerContext ctx, Throwable cause) throws Exception {
        cause.printStackTrace();
        // 关闭 Channel
        ctx.close();
    }
}
- DemoServer
public class DemoServer{
    private static int port = 8080;

    public static void main(String[] args) {
        // 创建 NIO 线程组,这里创建两个的原因是
        // 一个用于服务端接收客户端的连接,另外一个用于进行 SocketChannel 的网络读写
        EventLoopGroup bossGroup = new NioEventLoopGroup();
        EventLoopGroup workGroup = new NioEventLoopGroup();
        try {
            // NIO 服务端的辅助启动类
            ServerBootstrap b = new ServerBootstrap();
            b.group(bossGroup, workGroup)
                    // 设置Channel为NioServerSocketChannel,功能对应着NIO的ServerSocketChannel类
                    .channel(NioServerSocketChannel.class)
                    // 绑定处理类
                    .childHandler(new ChannelInitializer<SocketChannel>() {
                        protected void initChannel(SocketChannel ch) throws Exception {
                           ch.pipeline().addLast(new DemoServerHandler());
                        }
                    });
            // 绑定端口, 同步等待成功
            ChannelFuture f = b.bind(port).sync();
            // 等待服务端监听端口关闭
            f.channel().closeFuture().sync();
        } catch (InterruptedException e) {
            // 释放所有资源
            bossGroup.shutdownGracefully();
            workGroup.shutdownGracefully();
        }
    }
}- 客户端
- DemoClientHandler
public class DemoClientHandler extends SimpleChannelInboundHandler<ByteBuf> {
    // 统计读了多少次
    private int count = 0;
    /**
     * 与服务器建立连接后调用
     * @param ctx
     * @throws Exception
     */
    @Override
    public void channelActive(ChannelHandlerContext ctx) throws Exception {
        // 发送数据
        for (int i = 0; i < 100; i++) {
            // 写出
            ctx.writeAndFlush(Unpooled.copiedBuffer("Hello Server", CharsetUtil.UTF_8));
        }
    }

    /**
     * 接受到消息时调用
     * @param ctx
     * @param msg
     * @throws Exception
     */
    protected void channelRead0(ChannelHandlerContext ctx, ByteBuf msg) throws Exception {
        // 统计读了多少次
        System.out.println("收到服务端的信息:" + msg.toString(CharsetUtil.UTF_8) + ", count = " + count++);
    }

    /**
     * 发生异常时调用
     * @param ctx
     * @param cause
     * @throws Exception
     */
    @Override
    public void exceptionCaught(ChannelHandlerContext ctx, Throwable cause) throws Exception {
        super.exceptionCaught(ctx, cause);
        ctx.close();
    }
}
2.DemoClient
public class DemoClient {
    private static int port = 8080;
    private static String host = "127.0.0.1";

    public static void main(String[] args) {
        // 创建线程组
        EventLoopGroup group = new NioEventLoopGroup();
        // 创建客户端的启动
        try {
            Bootstrap b = new Bootstrap();
            b.group(group).channel(NioSocketChannel.class)
                    .handler(new ChannelInitializer<SocketChannel>() {
                        protected void initChannel(SocketChannel ch) throws Exception {
                            ch.pipeline().addLast(new DemoClientHandler());
                        }
                    });
            // 发起异步连接操作
            ChannelFuture f = b.connect(host, port).sync();
            // 等待客户端链路关闭
            f.channel().closeFuture().sync();
        } catch (InterruptedException e) {
            e.printStackTrace();
            group.shutdownGracefully();
        }
    }
}
上面代码跟上一篇中的代码相似,主要的改变是客户端连接后向服务端发送数据的修改, 向服务端发送100次数据
        for (int i = 0; i < 100; i++) {
            ctx.writeAndFlush(Unpooled.copiedBuffer("Hello Server", CharsetUtil.UTF_8));
        }
还有用来统计接收服务端发送回来数据的次数 count,以及对接收到服务端数据的显示
private int count = 0;protected void channelRead0(ChannelHandlerContext ctx, ByteBuf msg) throws Exception {
System.out.println("收到服务端的信息:" + msg.toString(CharsetUtil.UTF_8) + ", count = " + count++);
}而服务端的修改如下:
private int count = 0;public void channelRead(ChannelHandlerContext ctx, Object msg) throws Exception {
ByteBuf buf = (ByteBuf) msg;
System.out.println("服务端收到客户端传来的消息是:" + buf.toString(CharsetUtil.UTF_8) + ", count = " + count++);
ctx.writeAndFlush(Unpooled.copiedBuffer("Hello Client".getBytes()));
}主要增加了统计接受到客户端发送数据的次数 count,以及每次读取完后发送会一条数据给客户端。
正常来说,因为客户端发送了100条数据给服务端,而服务端也对应发回了100条数据,所以客户端和服务端应该会各打印出100条数据,但事实是如此吗?请看下面运行结果:
服务端打印输出:
服务端收到客户端传来的消息是:Hello ServerHello ServerHello ServerHello...,count = 0
服务端收到客户端传来的消息是:o ServerHello ServerHello ServerHello ServerHello...,count = 1
客户端打印输出:
收到服务端的信息:Hello ClientHello Client, count = 0如上,因为 TCP 粘包/拆包原因,导致客户端和服务端的打印输出结果不正确,所以我们必须对这个问题进行解决。
三、TCP 粘包/拆包的解决
解决粘包/拆包的方案有很多,如下:
1. 以回车符作为结束标志(LineBasedFrameDecoder + StringDecoder);
2. 使用特殊符号作为结束标志(DelimiterBasedFrameDecoder);
3. 固定每次发送数据的长度(FixedLengthFrameDecoder);
4. 比较通用,就是在消息头加字段用来保存消息的长度(主要要讲);
客户端代码修改片段(服务端也做同样的修改):
            b.group(group).channel(NioSocketChannel.class)
                    .handler(new ChannelInitializer<SocketChannel>() {
                        protected void initChannel(SocketChannel ch) throws Exception {
                            // 处理半包
                            // 65535:包最大长度
                            // 0 : 偏移量
                            // 2 : 记录数据长度的字段本身的长度
                            // 0 : 数据长度的大小调整
                            // 2 : 忽略掉多少字节
                            ch.pipeline().addLast("frameDecoder", new LengthFieldBasedFrameDecoder(65535, 0, 2, 0, 2));
                            // 增加两个字节的消息长度
                            ch.pipeline().addLast("frameEncoder", new LengthFieldPrepender(2));
                            ch.pipeline().addLast(new DemoClientHandler());
                        }
                    });
如上代码,主要多了 LengthFieldPrepender 和 LengthFieldBasedFrameDecoder 这两个类对消息进行处理,这两个类的原理以及实现到后面的文章中会有介绍,这里只做简单介绍。
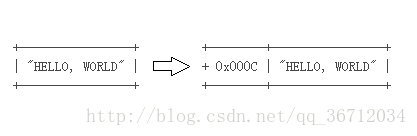
LengthFieldPrepender 在上面代码中主要是在发出的消息前面加了 2 个字节的长度的字段来记录消息的长度, 如下图:
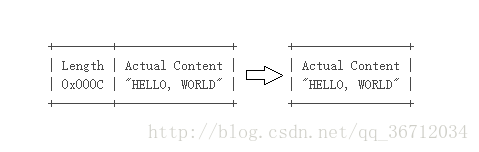
LengthFieldBasedFrameDecoder 主要是用来处理半包消息,这样接受到的消息就永远是整包,如下图:
最后来看看重新运行后的结果
服务端打印输出:
服务端收到客户端传来的消息是:Hello Server, count = 0
服务端收到客户端传来的消息是:Hello Server, count = 1
服务端收到客户端传来的消息是:Hello Server, count = 2
... 此处省略
服务端收到客户端传来的消息是:Hello Server, count = 99
客户端打印输出:
收到服务端的信息:Hello Client, count = 0
收到服务端的信息:Hello Client, count = 1
收到服务端的信息:Hello Client, count = 2
... 此处省略
收到服务端的信息:Hello Client, count = 99