python自带的有random模块,而numpy中也有random的相关功能,因此为了不造成混淆,在载入random模块的时候我们可以给它起一个别名:
import random as rnd
import numpy as np
接下来我们按照功能的逻辑作为顺序,对比着来分析python自带的random模块,和numpy模块中的random之间的异同:
生成0-9之间的一个随机整数:
rnd0 = np.random.randint(10)
rnd1 = rnd.randint(0, 9)
rnd2 = rnd.randrange(9)
rnd3 = rnd.randrange(0, 9, 1)
rnd.randint(m, n)的取值范围是[m, n],可生成m-n之间的整数,必须传入左右区间两个参数,只给一个参数会报错。
rnd.randrange(n)方法可以生成一个0-n上的随机整数。可以只传入一个参数为右区间即生成[0, n)之间的随机整数,也可以传入三个参数:左区间,右区间,步长。
而numpy中的 np.random.randint(n)的取值范围是[0, n)。
随机取5-9之间的三个整数:
rnd2 = np.random.randint(5, 10, 3)
rnd3 = np.random.randint(5, 10, (1, 3))
产生一个多维的数据,python自带的random模块是做不到的。因此我们要选用np.random.randint方法,它需要传入三个数据,左区间,右区间,以及一个描述形状的数值或元组。
rnd2是一个np.array数组。rnd2和rnd3之间的区别是rnd2产生的是一个三维列向量,而rnd3产生的是一个三维行向量。
我们也可以注意到,np.random产生的多维随机数都是np.array类型的,而自带的random模块的多位随机数都是list类型的。
生成一个0-1的随机浮点数:
rnd4 = rnd.random()
rnd5 = np.random.rand()
rnd6 = rnd.uniform(0, 1)
rnd7 = np.random.uniform(0, 1)
自带的random模块不需要任何参数,np.random.rand方法也不需要任何参数。而numpy中的random.uniform需要给定区间,rnd.uniform方法也需要设定区间范围。
生成一个1-9的随机浮点数:
rnd8 = np.random.uniform(9)
#rnd8 = np.random.uniform(1)
rnd9 = np.random.rand(1, 9)
rnd10 = rnd.uniform(1, 9)
np.random.uniform默认的左区间为1,只需给uniform一个参数9即可生成1-9之间的浮点数。因为默认左区间的存在,因此rnd8能且仅能产生一个1.0的浮点数。
rnd.uniform(m, n)可生成m-n之间的浮点数,必须传入左右区间两个参数,只给一个参数会报错。
生成一个2*3的数组,里面装着6个0-1之间的浮点数:
pythonrnd7 = np.random.uniform(0, 1, (2, 3))
rnd8 = np.random.random_sample((2, 3))
上面的两种说法等价,np.random.random_sample可以生成0-1之间的浮点数,只需给出一个描述生成的数组形状的tuple格式的数据。
而np.random.uniform方法需要传入三个数据,左区间,右区间,以及一个描述形状的元组.
生成一个符合高斯分布的随机数,和一个符合正态分布的随机数:
rnd = rnd.gauss(1, .2)
rnd = rnd.normalvariate(1, 0.2)
将返回一个符合要求的浮点数,其中两个参数一个是mu,另一个是sigma。
随机选择可迭代对象的6个元素(可重复选择),如果可能的话,将它们排列成2*3的矩阵:
str1 = 'ABCDEFGHIJKLMNOPQRSTUVWXYZ' list1 = [1, 2, 3, 4, 5, 6, 7, 8, 9, 0] rnd = np.random.choice(list1, 6) rnd = np.random.choice(list1, (2, 3)) #rnd = np.random.choice(str1, 6) rnd = rnd.choices(list1, 6) rnd = rnd.choices(str1, 6) rnd = rnd.sample(str1, 6)
np.random.choice方法可以从列表中挑选n个元素(最好是数字),然后依据传入的第二个参数进行排列组合,如果是个tuple就将tuple内的数据作为维数。
记住,自带的random模块中的方法,除了sample,和choices能返回多个随机数外,其他的都只能返回一个随机数。但凡自带的random模块返回的多个数据,格式都是list。但凡np.random中的方法返回的多个数据都是np.array类型的,而且默认的是一维列向量。
而numpy作为一个数据处理的模块,他的np.random.choice方法无法处理字符串。而rnd.choice方法的参数只要是Iterable的即可,可以是str,也可以是list。
对数据进行原地随机排列:
list1 = [1, 2, 3, 4, 5, 6, 7, 8, 9, 0] list2 = ['Spring', 'Breeze', 'Ten', 'Miles'] arr1 = np.arange(16).reshape(4, 4) #生成一个4*4的矩阵 tuple1 = tuple(list1) frozenset1 = frozenset(list1) np.random.shuffle(list1) np.random.shuffle(arr1) rnd.shuffle(list1) #rnd.shuffle(tuple1) #rnd.shuffle(frozenset1)
对于可变的数据类型,比如list,而对于静态不可变的数据,比如str, frozenset, tuple等,都不能使用shuffle方法。
而numpy中的np.random.shuffle方法不仅可以处理list,还能对np.array类型的数据进行重新排列,但是要注意的是,只能打乱矩阵的行的次序,而保持每一行中的数据的相对位置。
对数据进行原地随机排列,并且不改变原来数据:
rnd = rnd.sample(tuple1, len(tuple1))
rnd = rnd.sample(frozenset1, len(frozenset1))
rnd = np.random.permutation(list2)
arr = np.random.permutation(arr1)
自带的rnd.sample方法可以对静态的数据进行重排,返回一个列表。原理是从可迭代对象中挑选出(不重复的)k个对象进行重拍。返回排列之后的列表,而不改变原来的数据。
np.random.permutation是专门进行打乱顺序的函数,与np.random.shuffle方法对应。
我们可以从中体会到numpy与众不同的地方!
多维数组即为矩阵!生成随机数的时候可以指定数组的形状,而python自带的列表,即使是多维列表也不能按照矩阵来理解,当然也就不能像矩阵一样指定形状!
numpy主要用来进行数据计算,而不擅长处理字符串,需要对字符串进行操作最好还是选用python自带的方法或函数。
举个小例子,生成一个由A-Z, a-z, 或0-9组成的四位验证码:
vericode = ''
for i in range(4):
    rnd_veri = rnd.randint(0, 2)
    if rnd_veri == 0:
        vericode += str(rnd.randint(0, 9))
    elif rnd_veri == 1:
        vericode += chr(rnd.randint(65, 90))
    elif rnd_veri == 2:
        vericode += chr(rnd.randint(97, 122))
利用chr函数将ascii码转换成一个字符(串),(65, 90)是大写的A-Z,(97, 122)是小写的a-z。字符串之间可以用+将进行连接,要把vericode初始化为str类型,但不放入内容。
numpy
在讨论numpy的具体函数和方法之前,我要先说明一下两个问题:1,numpy中的数组和向量。2,numpy中的“多轴数组”。
维度vs轴数
numpy中里有多维数组,为了避免和线性代数中的多维数组区别开,这里暂时称之为多轴数组。
我们首先生成一个三维数组,里面存放数字0-36:
arr = np.arange(36).reshape(3, 4, 3)
我们可以将这个三轴数组看作一个立方体:每一个小立方体代表一个数字,这些数字按照一定的方式堆砌(排列组合)成一个3*4*3的立方体。三个轴分别为axis0, axis1, axis2。
那么这个reshape方法中的3个参数3,4,3到底指的是什么呢?其实,它们规定了:这个轴的方向上有几个维度!
注意,我们说的numpy中的二维数组(比如是n阶的),实际上是线性代数中的n维数组,或者称为n阶方阵。我们在python里把它叫做二维数组,并不表明这个数组在线性空间中是2阶的,而是这个数组可以在二维平面中表示出来。比如我们举的这个例子,三轴数组就不能在二维平面中表现出来,但我们可以在三维空间里将它形象化。
有了上面的解释,我们便可以知道:axis0方向上有三个维度,axis1方向上有4个维度,axis2方向上有3个维度。
从axis0的方向上看过去,一共有3个维度,每一维都是4*3的”二轴数组“。
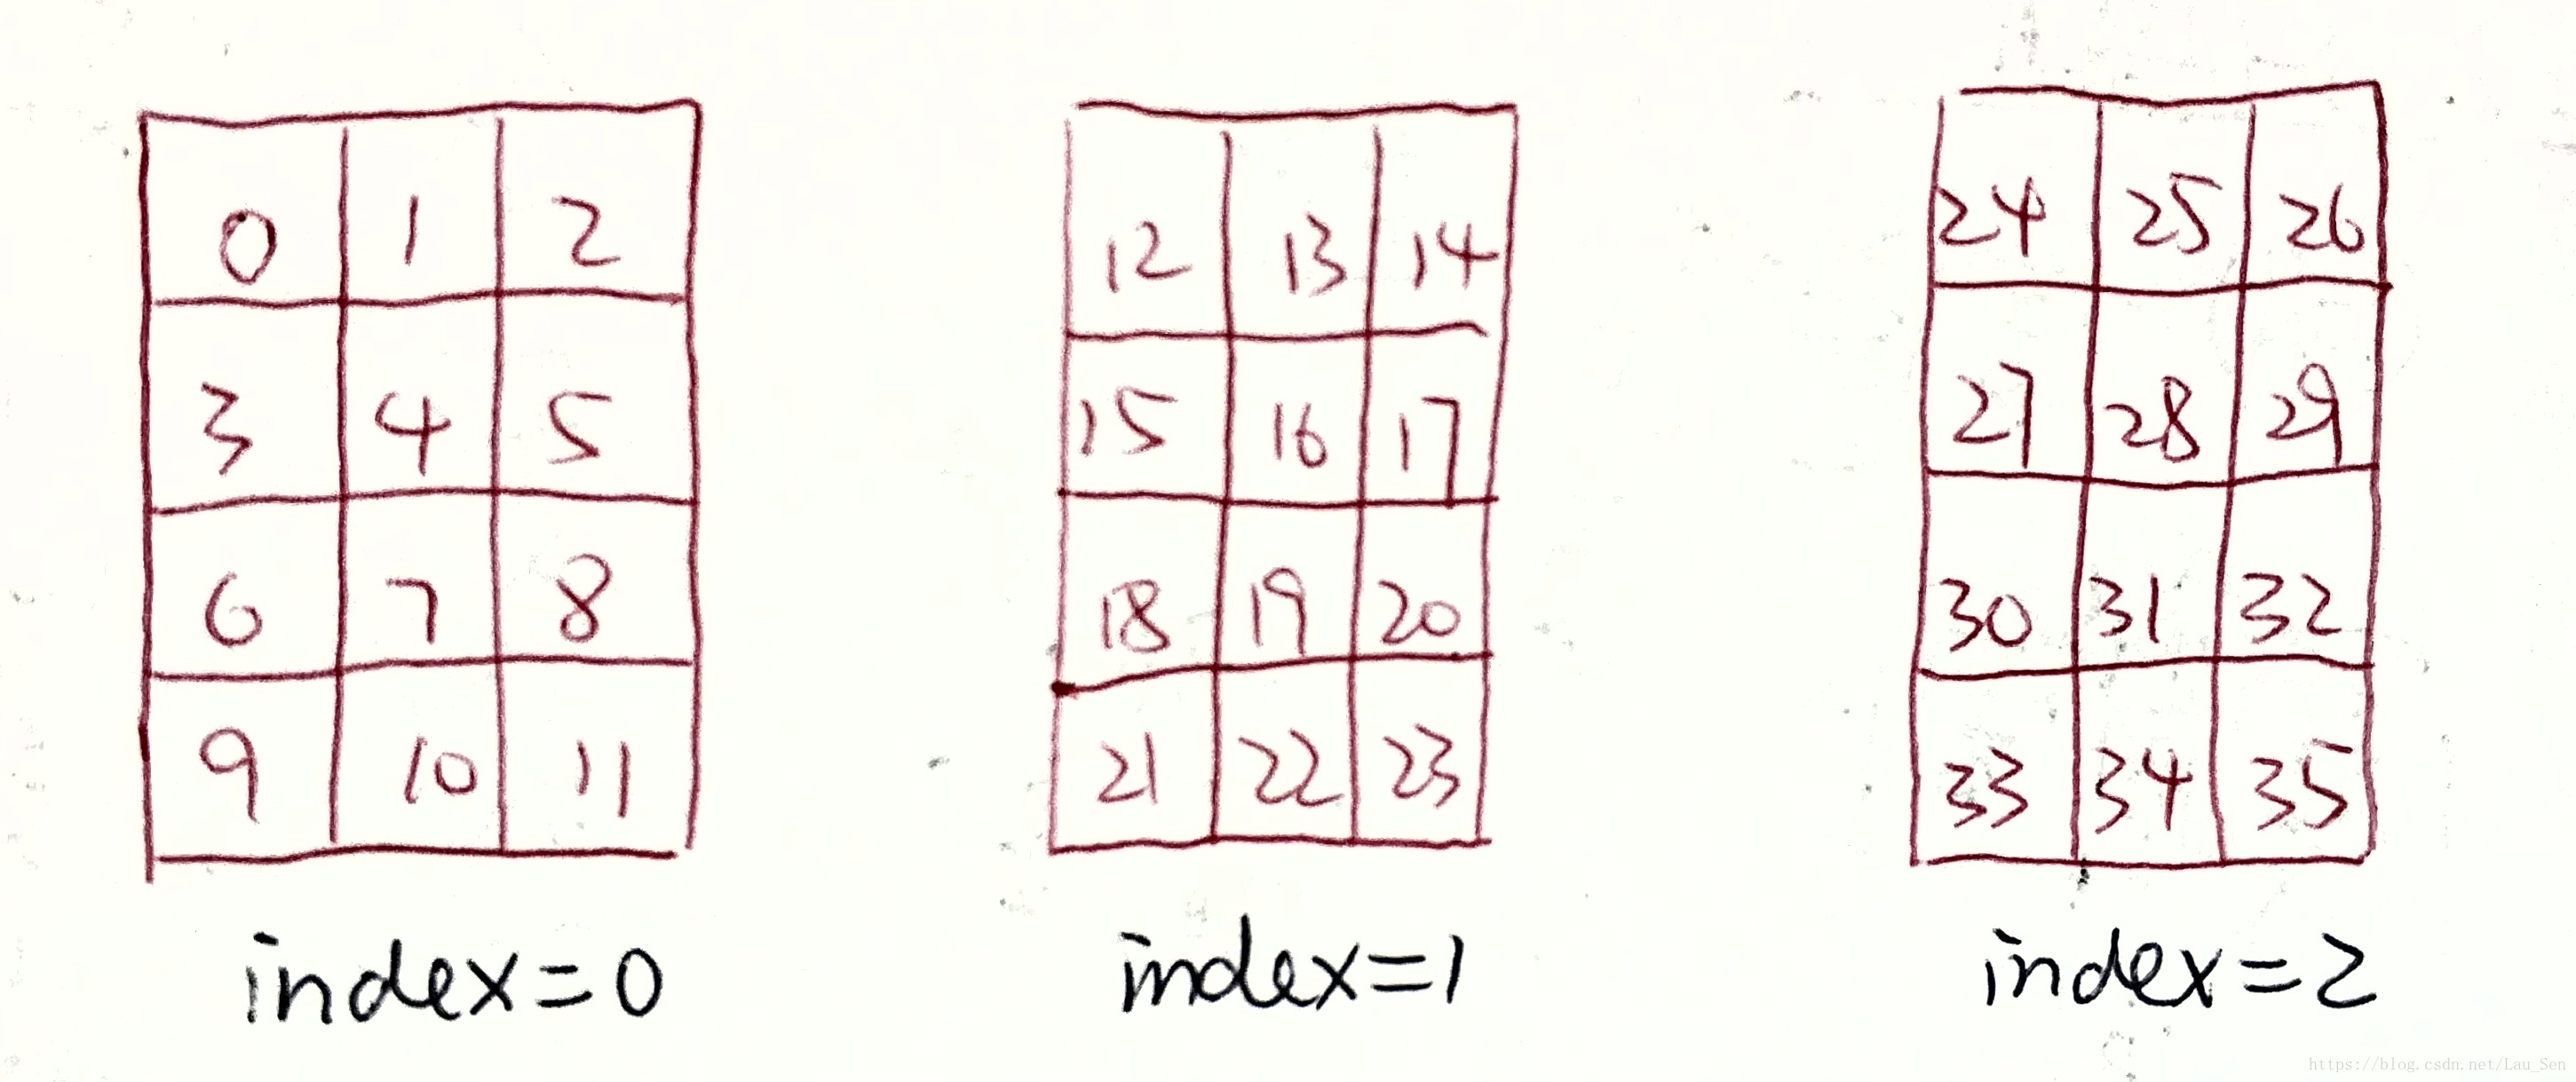
从axis1的方向上看过去,一共有4个维度,每一维都是3*3的”二轴数组“。
从axis2的方向上看过去,一共有3个维度,每一维都是3*4的”二轴数组“。

好了,其实我们只要知道python中的多维数组,和线性代数中的多维数组完全不同就可以了。我们通常还是只使用二轴数组,只要不造成歧义,表述成“二维n阶数组”也是可以的。
numpy中按轴进行的操作有很多,我们将轴的概念理解好,会对矩阵操作带来很大的方便,接下来举几个例子:
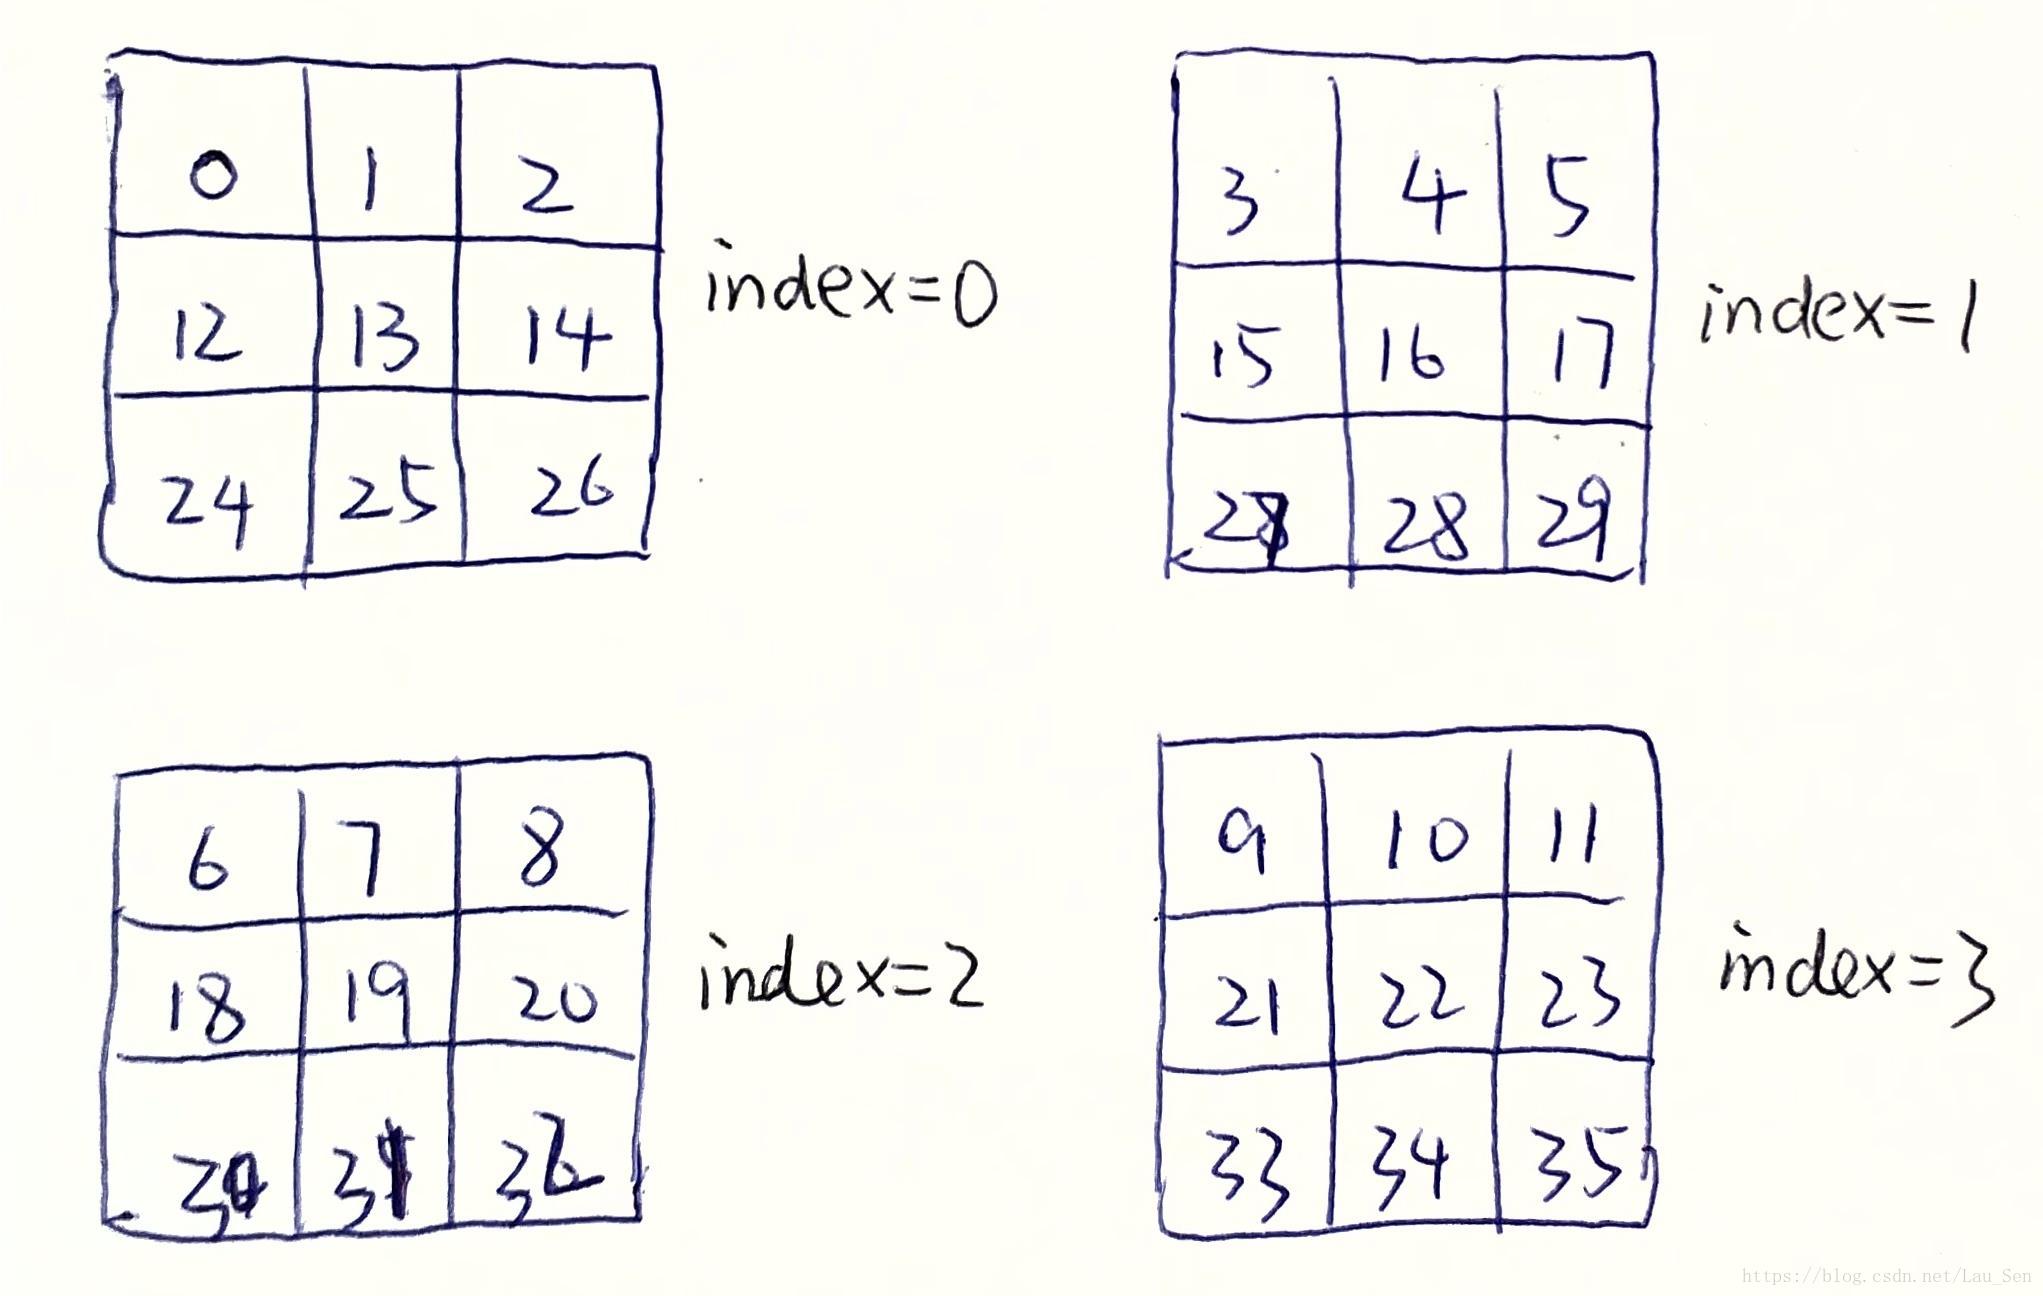
import numpy as np arr = np.arange(12).reshape(4, 3) mean0 = np.mean(arr,axis=0) #在axis0方向(向下,列方向)上操作,即对每一列求均值 mean1 = np.mean(arr,axis=1) #每一行的均值 sum0 = np.sum(arr,axis=0) #每一列的和 sum1 = np.sum(arr,axis=1) #每一行的和 min0 = arr.min(0) #每一列的最小值 min1 = arr.min(1) #每一行的最小值 max0 = arr.max(0) #每一列的最大值 min1 = arr.max(1) #每一行的最大值 mean0 Out[8]: array([4.5, 5.5, 6.5]) mean1 Out[9]: array([ 1., 4., 7., 10.]) sum0 Out[12]: array([18, 22, 26]) sum1 Out[11]: array([ 3, 12, 21, 30])
我们定义了一个4*3的矩阵。axis0方向的长度是4,axis1方向的长度是3.从axis0的方向看过去矩阵是3个4维列向量,从axis1的方向看过去是4个3维的行向量。
所以,按axis=0操作时,都是按照(axis1个)列向量操作的;按axis=1操作时都是按照(axis0个)列向量操作的;
我们按照axis0来求每个列向量平均数,得到了一个3阶数组;按照axis1来求每个行向量平均数,得到了一个4阶数组。
我们已经将arr reshape成了一个4*3的矩阵,axis0对应的轴上应该有四个维度(4行),按axis0轴求和就是将这四个维度(中的4个数据)求和,之后再按axis1的方向移动求另外三个数据的和,一共移动3次。
当然也可以简记为:axis=0是按列,axis=1是按行操作。
向量vs数组
我们用shape方法来获取一个矩阵的形状,它会会返回一个元组,还会用到T方法来进行矩阵转置。举一个简单的例子:
arr1 = np.arange(36) arr1.shape Out[14]: (36,) arr1.T.shape Out[15]: (36,)
对于arr1这个数组,转置没有效果。这说明我们有一个错误的观念:多维数组就是矩阵,一维数组就是列向量。这句话的前半句没有任何问题,但一维数组只是“一组有顺序的数”,并不是向量。你瞧它的形状是(36,),而非(36,1)。欲将其变为列向量或者行向量也简单,需要用到numpy中的expand_dims方法,需要给他两个参数,第二个是给定的轴(在这个轴的方向上增加维度)。也可以直接用matrix生成矩阵。
arr2 = np.expand_dims(arr1, axis=0) #朝着axis0的方向,即行 arr3 = np.expand_dims(arr1, axis=1) #朝着axis1的方向,即列 arr4 = np.matrix([1, 2, 3]) arr5 = np.matrix([1, 2, 3]).T arr2.shape Out[17]: (1, 36) #行向量 arr3.shape Out[18]: (36, 1) #列向量 arr4.shape Out[19]: (1, 3) #行向量 arr5.shape Out[20]: (3, 1) #列向量
除了expand_dims方法外,还有其他的构造向量的方法,我们用下面的例子做一个测试,探索一下array函数构造矩阵的原理:
test1 = np.array([0, 1, 2, 3, 4, 5, 6, 7, 8]) test2 = np.array([[0, 1, 2, 3, 4, 5, 6, 7, 8]]) test1.shape Out[25]: (9,) test2.shape Out[26]: (1, 9)
可以看出test1的方式是构造了一个数组,而test2的方式是构造了一个行向量。分析一下array构造矩阵的原理:
np.array([[#, #, #],
        [#, #, #],
        [#, #, #]])
array方法中,传入的参数是一个列表。这个列表中存在n个子列表,便构造n行的矩阵,每个子列表中有m列元素就构造m列的矩阵。所以array的维度是由传入的列表中,子列表的个数n,和子列表中的元素个数m共同确定的。
那么特例就是:子列表的个数为1,相当于构造了一个1行的矩阵,即行向量。子列表有多个,但每个子列表中元素个数为1,那么这就是一个列向量咯。
数乘vs点乘
arr1 = np.array([[1, 2, 3], [4, 5, 6], [7, 8, 9]]) arr2 = np.arange(1, 10).reshape((3, 3)) arr3 = np.eye(3) arr4 = np.matrix([1,2,3]).T arr1 + 10 Out[65]: [[11 12 13] [14 15 16] [17 18 19]] arr1 + arr4 Out[77]: matrix([[ 2, 3, 4], [ 6, 7, 8], [10, 11, 12]]) arr1*arr3 Out[66]: [[1. 0. 0.] [0. 5. 0.] [0. 0. 9.]] arr1.dot(arr3) #等同于np.dot(arr1,arr3) Out[67]: [[1. 2. 3.] [4. 5. 6.] [7. 8. 9.]] 2**arr1 Out[68]: [[ 2 4 8] [ 16 32 64] [128 256 512]] arr1**2 Out[69]: [[ 1 4 9] [16 25 36] [49 64 81]]
数与矩阵相加,即与矩阵每一个元素相加。列向量与矩阵相加,即列向量与每一列相加。
np.dot(arr1,arr3)进行的是常规的矩阵乘法,两个矩阵的形状必须遵循“前列等后行“的规则。而arr1*arr3就是对应位置的元素作乘积,需要两个矩阵的形状相同。
切片vs拷贝
我们之间已经知道列表的切片就等于浅拷贝。那么对于数组也一样吗。
myarr16 = myarr[1] myarr17 = myarr[1, 2] myarr18 = myarr[1][2] myarr19 = myarr[:, ::-1] myarr20 = myarr[::-1, ::-1] myarr21 = myarr[::-1].copy() np.may_share_memory(myarr19, myarr) Out[46]: True np.may_share_memory(myarr20, myarr) Out[47]: True np.may_share_memory(myarr21, myarr) Out[48]: False
数组的切片有两种方法,如myarr17和myarr18。为了和列表切片区分开来,习惯于用myarr18的构造方式。
用numpy中的方法may_share_memory来查看,两个数组是否共享内存,也即是否为新数组创了新内存。可以发现切片始终与原数组共享内存,而copy方法进行了内存的创建,赋值。
高级切片
array的切片的元素可以是一个列表,表示抽取除这些行,或列。
myarr22 = np.random.randint(0, 20 ,10).reshape(2, 5) myarr23 = myarr22[:, [4, 2]] myarr23 Out[54]: array([[17, 4], [ 1, 15]])
myarr22是一个2*5的矩阵,我们得到的myarr23是抽取出每一行的第5列,和第3列组成的新数组。
重新排序
myarr19 = myarr[:, ::-1]
myarr20 = myarr[::-1, ::-1]
myarr21 = myarr[::-1].copy()
其实我们利用切片就可以对数组进行逆序排列。
myarr19进行列逆序排列, 第一个:不能少。因为np是默认按行进行操作的,如果只给一个参数,如myarr21会将该切片操作应用到每一行上,即将myarr的行之间逆序。
数组没有列表的原地排序的sort方法。
array0 = np.array([[9, 8, 7, 6], [6, 5, 4, 3], [3, 2, 1, 0]]) array1 = np.sort(array0, axis=0) #朝着axis0的维度,对每一个列向量排序 array2 = np.argsort(array0, axis=0) array3 = np.sort(array0, axis=1) #朝着axis1的维度,对每一个行向量排序 array4 = np.argsort(array0, axis=1) array1 Out[50]: array([[3, 2, 1, 0], [6, 5, 4, 3], [9, 8, 7, 6]]) array2 Out[51]: array([[2, 2, 2, 2], [1, 1, 1, 1], [0, 0, 0, 0]], dtype=int64) array3 Out[52]: array([[6, 7, 8, 9], [3, 4, 5, 6], [0, 1, 2, 3]]) array4 Out[53]: array([[3, 2, 1, 0], [3, 2, 1, 0], [3, 2, 1, 0]], dtype=int64)
array2是按列排序返回顺序列表,返回矩阵中的列向量表示:原矩阵中对应列向量从小到大排列之后,对应元素在原列表中的位置。也即是array1中列向量的元素在array0中对应列向量的索引。
array4是按行排序返回顺序列表,返回矩阵中的行向量表示:原矩阵中对应行向量从小到大排列之后,对应元素在原列表中的位置。也即是array3中列向量的元素在array0中对应行向量的索引。
等差数列
等差数列有两种生成方法:
myarr3 = np.arange(1, 10, 3) myarr4 = np.linspace(9, 10, 5) myarr5 = np.linspace(9, 10, 5, endpoint = False) myarr3 Out[41]: array([1, 4, 7]) myarr4 Out[42]: array([9. , 9.25, 9.5, 9.75, 10.]) myarr5 Out[43]: array([9. , 9.2, 9.4, 9.6, 9.8])
arange(start, end(exclusive), step) 三个参数,前两个参数表示生成等差数列的区间,左闭右开。第三个参数为步长缺省值为1。
linspace(start, end, number_point) 将区间切分为number_point-1份。其实linspace还有一个默认参数 endpoint = True,缺省时置True,即左闭右闭的闭区间。np.linspace(start, end, number_point, endpoint = False) 将区间切分为number_point份,因为endpoint = False,所以与arange一样是左闭右开。
特殊矩阵
全零矩阵,全一矩阵,单位阵,对角阵,随机矩阵的创建方法:
myarr6 = np.ones((3, 4))
myarr7 = np.zeros((3, 4))
myarr8 = np.eye(4)  #eye的参数不能是远足,只能是一个数字
myarr9 = np.diag([1, 2, 3, 4])
myarr10 = np.random.rand(4, 2)
其中,ones和zeros的参数都只能是来描述矩阵的形状的元组。eye的参数只能是一个int类型数据。diag的参数一个存放着特征值的列表。
另外提一个空矩阵,只分配地址,但不存入数据
矩阵扩展
我们可以用numpy中的tile函数对数组朝指定方向进行扩展指定次数:
mylist = [7, 999, 4] array1 = np.tile(mylist, (1, 3)) array2 = np.tile(mylist, (3, 2)) array3 = np.tile(mylist, 2) array1 Out[55]: array([[ 7, 999, 4, 7, 999, 4, 7, 999, 4]]) array2 Out[56]: array([[ 7, 999, 4, 7, 999, 4], [ 7, 999, 4, 7, 999, 4], [ 7, 999, 4, 7, 999, 4]]) array3 Out[57]: array([ 7, 999, 4, 7, 999, 4])
tile(mylist, (m, n))相当于构造了一个m*n的矩阵,并将里面的每个元素填充维mylist。
hstack函数,和r_函数都是在axis0方向上合并,即合并在右边。vstack函数,和c_函数都是在axis1方向上合并,即合并在下边。
myarr1 = np.array([[ 8., 5.], [ 1., 6.]]) myarr2 = np.array([[ 1., 9.], [ 8., 5.]]) np.hstack((myarr1, myarr2)) Out[69]: array([[8., 5., 1., 9.], [1., 6., 8., 5.]]) np.c_[myarr1, myarr2] Out[73]: array([[8., 5., 1., 9.], [1., 6., 8., 5.]]) np.vstack((myarr1, myarr2)) array([[8., 5.], [1., 6.], [1., 9.], [8., 5.]]) np.r_[myarr1, myarr2] Out[72]: array([[8., 5.], [1., 6.], [1., 9.], [8., 5.]])
数据类型
myarr12 = np.array([1, 2, 3])
myarr13 = np.array([1, 2, 3, 4], dtype = 'float')
myarr14 = np.array([1., 2., 3.])
myarr15 = np.array([1+1j, 2+2j, 3+3*1j])    #numpy中的复数符号是1j,而不是j
myarr12是int32型的数组,myarr13,myarr14都是float64型的数组。我们当然也可以构造复数complex128类型的数组,比如myarr15。
矩阵大小
arr0 = np.arange(0, 12).reshape(4, 3) arr0.size Out[65]: 12 arr0.shape Out[66]: (4, 3) arr0.shape[0] Out[67]: 4 arr0.shape[1] Out[68]: 3 arr0.dtype.itemsize Out[69]: 4
生成一个4*3的矩阵,size方法获得其中元素的个数,返回一个int数据。shape方法返回一个元组(num,dim),第一个元素为行数,第二个元素为列数。
dtype.itemsize是numpy中的方法,获取数组所占用的字节数。
copy
python中的赋值方式:
mylist = [1, 2, 3, 4, 5]
mylist1 = mylist
mylist2 = mylist[:]
#mylist2 = copy.copy(mylist)
这两种赋值方式的效果相同,mylist1和mylist2中的值都是 [1, 2, 3, 4, 5]。但明显,他们的本质不同:
mylist1是在mylist这个变量名的旁边重新贴了一个变量名。也就是说mylist1是变量名mylist所指向的内存新添加的一个标签!mylist1和mylist是不同的地址但指向的是同一个内存!而mylist2是将mylist中存放的所有数据放入mylist2这个变量名所指向的内存中。产生了新的数据!
我们用list对象的pop方法来检验一下mylist1和mylist2之间的区别:
mylist.pop() print(mylist1) [1, 2, 3, 4] print(mylist2) [1, 2, 3, 4, 5] mylist1.pop() print(mylist) [1, 2, 3]
可以看出pop掉mylist中的数据,mylist1中的数据也发生了相应改变,pop掉mylist1中的数据,mylist也随之变化。而mylist2中的数据并没有发生任何变化,这也验证了我们上面的分析。
对于列表这种数据结构,mylist2 = mylist[:],等价于mylist2 = copy.copy(mylist),也即切片和copy.copy都是浅拷贝,只copy第一层数据,深层的数据仍然与原来的数据共享内存。再举一例。
import copy
numlist = [1, 2, 3, [4, 5, 6]]
#用三种方式进行拷贝
numlist1 = numlist
numlist2 = numlist[:]
numlist3 = copy.deepcopy(numlist)
此时三个列表的值均为 [1, 2, 3, [4, 5, 6]],我们删去numlist的第一个元素,观察输出结果:
numlist.pop(0)
>>>numlist
[2, 3, [4, 5, 6]]
>>>numlist1
[2, 3, [4, 5, 6]]
>>>numlist2
[1, 2, 3, [4, 5, 6]]
>>>numlist3
[1, 2, 3, [4, 5, 6]]
此时删去第一层(浅层),浅拷贝和深拷贝得到的列表内容都没有发生改变。
numlist[2].pop(0)
>>>numlist
[2, 3, [5, 6]]
>>>numlist1
[2, 3, [5, 6]]
>>>numlist2
[1, 2, 3, [5, 6]]
>>>numlist3
[1, 2, 3, [4, 5, 6]]
我们删除第二层(深层),深拷贝得到的列表不发生改变,而浅拷贝得到的列表中的子列表发生了改变!!!这说明浅拷贝得到的列表仅仅复制了表面一层,深层的数据仍和元数据共享一块内存。
联想到静态tuple不可变的原因:不可改变元组tpl中每个元素的地址指向的内容tpl[i],但如果某个元素是一个列表:比tpl[s] = [1, 2, 3],此时tpl[s]这个地址指向的是一个列表的地址,这个列表的地址是不可改变的,但这个地址指向的内容仍然是可以改变的。
为了保证我们对原始数据的修改不影响其他赋值变量的值,要记住赋值的时候不能简简单单地一个等号就以为创建了一个新的变量并赋值了。下面再举一例:
myarr = np.arange(9).reshape(3, 3) arr1 = arr1 arr2 = arr1[:, :] arr3 = copy.copy(myarr) arr4 = copy.deepcopy(myarr) np.random.shuffle(arr1) #对myarr进行行之间的打乱顺序
结果发现arr1,arr2中的数据随myarr都改变了,而arr3, arr4中的数据还是按照从左到右,从上到下的升序排列。不是说[ : ]的方法是把值赋给一个新的地址吗?怎么arr2也随之变化了呢?
这是因为‘切片=浅拷贝’这一规则是对于list这种数据结构来说的,而数据是一种更为复杂的数据结构,如果想做到修改myarr不改变 arr1的效果,我们就不能再用切片了,必须用copy方法。
其中copy()和deepcopy()都是开辟新内存,修改深层内容也不会改变浅拷贝或者深拷贝来的数组。而切片并没有开辟新的内存。对于数组来说,深拷贝和浅拷贝并没有什么区别,以后拷贝数组就用Obj.copy()方法好了。
mylist = [1, 2, 3, [4, 5, 6]] myarr = np.arange(9).reshape(3, 3) list1 = copy.deepcopy(mylist) arr1 = myarr.copy()
os
获取路径:listdir vs walk
我们如果想要打开数据集文件夹中的n个txt文档,并获取其中的摘要要怎么做呢?前面学习过python中对于文件的操作。比如:
with open('D:/#学习资料/数据挖掘实践项目/aan/papers_text/H92-1075.txt', 'rb') as data:
但是这种方法是我们给一个文件路径,它就给打开一个txt。那我们想要依次打开n个txt,就有了一个新思路:依次给它n个txt中第k个的路径,这样他就可以依次打开n个txt中第k篇了。
而该文件夹下的所有文件的路径我们可以通过os模块中的walk函数轻松获取。
import os import os.path filePaths = [] for root, dirs, files in os.walk( r"D:\MyProjects\Python\DataMining" ): for filename in files: filePaths.append(os.path.join(root, filename))
我们还可以利用os.listdir方法获取给定文件夹下的所有一级文件夹,文件的名字,比如:
filenames = os.listdir(r'C:\Users\lenovof\Desktop\Matlab作业') Out[11]: ['01 2015302045', '02 2015302045', '03 2015302045', '04 2015302045', '05 2015302045', '06 2015302045', '07 2015302045', '07 2015302045 temp', 'GUI实例程序', 'Simulink实例和上机要求', '《MATLAB的S-Function编写指导》.pdf', '第八周上机实验内容.pdf', '贾秋玲《基于MATLAB 7.X SIMULINK_STATEFLOW系统仿真、分析及设计》.pdf', '飞控作业:16个简化公式推导.pdf']
获取到的字符串,不仅有文件名,还有文件夹名,这个时候如果直接传入这些字符串,用withopen打开肯定不行。所以在当前目录下有子目录的情况下,我们倾向于使用os.walk函数。如果没有子目录的话,用listdir就更简洁啦。
与返回一个列表的os.listdir(顾名思义list)不同,os.walk函数返回的是一个生成器,每次访问会返回当前的值,并不断更新。我们来看一下他都返回了什么。
filenames2 =os.walk(r'C:\Users\lenovof\Desktop\Matlab作业') next(filenames2) Out[23]: ('C:\\Users\\lenovof\\Desktop\\Matlab作业', ['01 2015302045', '02 2015302045', '03 2015302045', '04 2015302045', '05 2015302045', '06 2015302045', '07 2015302045', '07 2015302045temp', 'GUI实例程序', 'Simulink实例和上机要求'], ['《MATLAB的S-Function编写指导》.pdf', '第八周上机实验内容.pdf', '贾秋玲《基于MATLAB 7.X SIMULINK_STATEFLOW系统仿真、分析及设计》.pdf', '飞控作业:16个简化公式推导.pdf']) next(filenames2) Out[24]: ('C:\\Users\\lenovof\\Desktop\\Matlab作业\\01 2015302045', [], ['Matlab Tesk1.docx', '飞控第二章公式推导.docx']) next(filenames2) Out[25]: ('C:\\Users\\lenovof\\Desktop\\Matlab作业\\02 2015302045', [], ['Matlab Task 2.docx', '飞控作业两道题.docx']) next(filenames2) Out[26]: ('C:\\Users\\lenovof\\Desktop\\Matlab作业\\03 2015302045', [], ['Matlab Task3.docx', 'Matlab Task3.md']) next(filenames2) Out[27]: ('C:\\Users\\lenovof\\Desktop\\Matlab作业\\04 2015302045', [], ['callcheck.m', 'calledit.m', 'Matlab Task 4.docx', 'mygui1.fig', 'mygui1.m', 'mygui11.fig', 'mygui11.m', 'mygui2.fig', 'mygui2.m', 'mygui2_2.fig', 'mygui2_2.m', 'mygui3.fig', 'mygui3.m', 'mygui4.fig', 'mygui4.m', 'mygui4_1.fig', 'mygui4_1.m', 'mygui5.fig', 'mygui5.m', 'mygui6.fig', 'mygui6.m', 'mygui7.fig', 'mygui7.m', 'mygui8.fig', 'mygui8.m', 'mygui8_2.fig', 'mygui8_2.m', 'mygui9.fig', 'mygui9.m', 'mygui_10.fig', 'mygui_10.m']) next(filenames2) Out[28]: ('C:\\Users\\lenovof\\Desktop\\Matlab作业\\05 2015302045', [], ['05 2015302045 刘森.docx', 'SimulinkTask8_1.slx', 'SimulinkTask8_2.slx', 'SimulinkTask8_3.slx', 'SimulinkTask8_4.slx', 'SimulinkTask8_5.slx', 'SimulinkTask8_6.slx', 'SimulinkTask8_7.slx'])
os.walk返回三个值root, dirs, files。root是当前访问的文件夹名,如果当前文件夹root下有子文件夹,则第二个参数dir中会显示子文件夹名,files中就是当前文件夹下所有的文件名啦。
os.walk的逻辑是,先获取当前文件夹下的所有内容(文件或者文件夹)的名字,再依次获取子文件夹中的内容的名字,此时的root就是当前子文件夹的路径。
os.path.join(path, name)函数可以将父目录和文件名,或者子目录连接起来形成一个完整的路径。
此时的filePaths中存放的就是"D:\MyProjects\Python\DataMining"这个文件夹下的所有文件的名字。我们可以利用它配合with open来打开每个文件。
for files in filepaths:
    if os.path.splitext(files)[1] == '.py':
    with open(files, 'rb') as data:
因为这个文件夹中既有python的脚本文件.py格式,也有我们想要打开的.txt格式,所以我们必须将两者加以区分,os.path.splitext(files)[1]就是一个获取文件扩展名的好方法,它将返回一个二维元组,元组的第二个元素为文件的拓展名。
mypath = 'D:\MyProjects\Python\DataMining\Bayes Classifier\Classifier.py' >>>os.path.splitext(mypath) Out[67]: ('D:\\MyProjects\\Python\\DataMining\\Bayes Classifier\\Classifier', '.py')
既然可以分离路径和扩展名,当然也可以分离路径和文件名:
mypath = 'D:\MyProjects\Python\DataMining\Bayes Classifier\Classifier.py' >>>os.path.split(mypath) Out[68]: ('D:\\MyProjects\\Python\\DataMining\\Bayes Classifier', 'Classifier.py') #去掉了文件名前的//
我们来用os.path.split和os.path.splitext来举个例子,我们需要得到所有simulink仿真文件的文件名,也即是找出所有扩展名为’.slx‘的文件的文件名:
for i in range(len(filePaths)): if os.path.splitext(filePaths[i])[-1] == '.slx': print(os.path.split(filePaths[i])[-1]) SimulinkTask8_1.slx SimulinkTask8_2.slx SimulinkTask8_3.slx SimulinkTask8_4.slx SimulinkTask8_5.slx SimulinkTask8_6.slx SimulinkTask8_7.slx InversedPendulum_simu.slx InversedPendulum_simu2.slx mfunc.slx mywork3.slx excise.slx excise1.slx level1.slx level1_2.slx mynargin.slx
还可以根据文件名找到它所在的目录,此处要用到os.path.abspath(filename)函数:
os.path.abspath('Classifier.py')
Out[72]: 'D:\\MyProjects\\Python\\TutorialExamples\\Classifier.py'
很好奇,os.path.abspath(filename)函数查找路径有区间吗?是全局查找吗?当然不是,它查找的范围就是我们最开始在os.walk(path)函数中传入的路径。
打开文件:with open
既然提到了withopen,那就顺带说一下文件打开的模式:
for files in filepaths:
    if os.path.splitext(files)[1] == '.py':
    with open(files, 'rb') as data:
其中open函数中的'rb'指的是以二进制格式只读取文件。下面的表格写出了各种模式的特点,但记这个表格太复杂,我们说几种最常用的功能就好。
只从头到尾读文件:'r'
从开头写入内容,覆盖原有内容:'r+'
从末尾追加内容:'a'
先删除原来的内容,再从开头写入内容:'w'
创建一个新文件,并打开供写入内容:'x'
| 模式 | r | r+ | w | w+ | a | a+ |
|---|---|---|---|---|---|---|
| 读 | + | + | + | + | ||
| 写 | + | + | + | + | + | |
| 删除原数据 | + | + | ||||
| 覆盖 | + | |||||
| 指针在开始 | + | + | + | + | ||
| 指针在结尾 | + | + |
#读取io test.txt文件中的内容 with open(r'D:\MyProjects\Python\TutorialExamples\io test.txt', 'r') as data: lines = [] for line in data.readlines(): lines.append(line) lines Out[82]: ['ABC;\n', 'DEFG;\n', 'HIJK;\n', 'LMN;\n', 'OPQR;\n', 'ST;\n', 'UVW;\n', 'XYZ.'] #在末尾追加内容 with open(r'D:\MyProjects\Python\TutorialExamples\io test.txt', 'a+') as data: data.write('\nabcdefghigklmnopqrstuvwxyz') with open(r'D:\MyProjects\Python\TutorialExamples\io test.txt', 'r') as data: lines = [] for line in data.readlines(): lines.append(line) lines Out[85]: ['ABC;\n', 'DEFG;\n', 'HIJK;\n', 'LMN;\n', 'OPQR;\n', 'ST;\n', 'UVW;\n', 'XYZ.\n', 'abcdefghigklmnopqrstuvwxyz'] #删除原内容再写入 with open(r'D:\MyProjects\Python\TutorialExamples\io test.txt', 'w+') as data: data.write('abcdefghigklmnopqrstuvwxyz') with open(r'D:\MyProjects\Python\TutorialExamples\io test.txt', 'r') as data: lines = [] for line in data.readlines(): lines.append(line) lines Out[91]: ['abcdefghigklmnopqrstuvwxyz'] #在开头写入内容,冲掉与原有的内容 with open(r'D:\MyProjects\Python\TutorialExamples\io test.txt', 'r+') as data: data.write('9876543210\n') with open(r'D:\MyProjects\Python\TutorialExamples\io test.txt', 'r') as data: lines = [] for line in data.readlines(): lines.append(line) lines Out[105]: ['9876543210\n', 'mnopqrstuvwxyz']
r只能读,r+可读可写,写的时候是从头开始写,并且把写入数据位置上原来的数据覆盖掉,保留未覆盖的内容。w只能写,w+可写可读,w和w+是将原有数据全部删除在开始写入内容。a,a+是在末尾追加内容。
要注意的是只有在文件关闭之后,写入内容的操作才会生效,这时候我们再次读取文件,才能获取到修改之后的内容。
我们help(open)查看一下手册:
========= =============================================================== Character Meaning --------- --------------------------------------------------------------- 'r' open for reading (default) 'w' open for writing, truncating the file first 'x' create a new file and open it for writing 'a' open for writing, appending to the end of the file if it exists 'b' binary mode 't' text mode (default) '+' open a disk file for updating (reading and writing) 'U' universal newline mode (deprecated) ========= ===============================================================
sklearn
from sklearn.cluster import KMeans
from sklearn.decomposition import PCA
tokenizer = nltk.data.load('tokenizers/punkt/english.pickle') raw_sentences = tokenizer.tokenize(news_text) sentences = [] for sent in raw_sentences: sentences.append(re.sub('[^a-zA-Z]', '', sent.lower().strip()).split())
gensim
一行代码实现文档自动摘要:
doc = ''' One senior Republican staffer said the House had become a ``tinderbox'' of intrigue. Scarborough said, ``The long distance charges in Washington offices probably are going through the roof today. Everybody's calling everybody. Everybody recognizes that something's terribly wrong with the direction of Washington Republicans when Republican governors are doing so well in New York, Massachusetts, Florida and Texas.'' And while Gingrich has not gone out of his way to identify himself with the Republican campaign's last-minute ad blitz attacking President Clinton, his caucus knows he is responsible. Gingrich has faced down an uprising before, foiling a coup attempt against him by disgruntled conservatives and some of his own leadership team in the summer of 1997. Any move to remove him remains a long-shot. But with House leadership elections now set for mid-November, Republicans said this time the dissatisfaction in their caucus had crossed ideological lines to moderates like Shays as well. ``We got shellacked,'' said Rep. Christopher Cannon, a conserative from Utah. ``We beat ourselves because we had no agenda.'' Republicans were discussing possible challenges to Gingrich, his second-in-command, Rep. Dick Armey, and other members of the senior leadership team. Some were envisioning trying to run an entire new ticket headed by Rep. Bob Livingston, the Appropriations Committee chairman from Louisiana and including Rep. Steve Largent, an Oklahoma conservative. Asked whether Tuesday's election results could cost him the speakership, Gingrich said, ``I'm not particularly concerned.'' Republicans close to him said they expected the anger to dissipate. In the Senate, where leadership races take place in early December, some Republicans were talking of mounting challenges against mid-level leadership figures. Several senators expressed particular pique toward the re-election chairman, Senator Mitch McConnell of Kentucky, who poured party dollars and much of his own time into trying to defeat the Democratic champion of campaign finance overhaul, Russell Feingold of Wisconsin. Feingold won in a close race. Some lawmakers on Wednesday approached Sen. Chuck Hagel of Nebraska to see if he would replace McConnell. Hagel confirmed he had talked to more than eight senators, and was considering whether to challenge McConnell. Hagel lambasted the Republican leadership for the election outcome. ``This is a big loss for us,'' he said. ``We squandered a very historic opportunity last night. To just break even is a loss.'' Most incumbents coasted to victory Tuesday night. But some will not be returning. Five House Republicans were defeated: Vince Snowbarger of Kansas, Bill Redmond of New Mexico, Jon Fox of Pennsylvania, Mike Pappas of New Jersey, and Rick White of Washington. One Democrat also lost his re-election bid _ Rep. Jay Johnson of Wisconsin. The new House members include 17 Republicans and at least 22 Democrats. David Wu, a Democrat was leading Molly Bordonaro, a Republican in the race for one House seat in Oregon, but the final victory announcement was not expected until Friday after absentee ballots are counted. Unlike the self-proclaimed ``revolutionaries'' of the Republican class of 1994, many of the newly elected members are career politicians who rose through the ranks of local and state government. Three of the Democrats are the sons of former lawmakers, Mark Udall of Colorado, son of Morris Udall who represented Arizona; Tom Udall of New Mexico, son of the other Udall brother, Stewart, a former Congressman and Secretary of the Interior, and Charlie Gonzalez, who o won the Texas seat of his father, Henry. ''' from gensim.summarization.summarizer import summarize summarize(doc, ratio=0.08, word_count=40) Out[38]: 'But with House leadership elections now set for mid-November, Republicans said this time the dissatisfaction in their caucus had crossed ideological lines to moderates like Shays as well.\nThe new House members include 17 Republicans and at least 22 Democrats.'
联系用gensim模块构建文档资料库的TF-IDF模型,BOW模型,以及进行相似度分析,LSI分析等,以供信息检索:
docs = [] #只读方式打开test.txt文档,其中有10行内容,每行大约是350词的一整篇文档 with open('test.txt', 'r') as data: for line in data.readlines(): docs.append(line) import nltk from gensim import corpora, models, similarities #读取停用词表 stopwords = [] with open('stopwords.txt', 'rb') as data: for line in data.readlines(): stopwords.append(str(line, encoding = "utf-8").split(' ')[0]) #分词,texts十维列表,存储分词后的每篇文挡 texts = [[word for word in nltk.word_tokenize(doc.lower()) if word not in stopwords] for doc in docs] #词干化单词库 from nltk.stem.lancaster import LancasterStemmer lstemmer = LancasterStemmer() texts_stemmed = [[lstemmer.stem(word) for word in doc] for doc in texts] dictionary = corpora.Dictionary(texts) dict2id = dictionary.token2id #构造全体文档的字典,key为单词,value为单词的编号(自动去重) #BOW词袋模型 corpus = [dictionary.doc2bow(text) for text in texts] #corpus是十维列表,每个列表中是对应文档每个单词的序号和词频,以二维元组的类型存储 #dictionary.doc2bow(text) 处理的是每个文档中单词的词频 #建立TF-IDF tfidf = models.TfidfModel(corpus) corpus_tfidf = tfidf[corpus] #列表 corpus_df = tfidf.dfs #字典 #获取当前语料库的idf #此处也可以看出tf是对于每一个文档而言的(tf_ij是词项term_i和文档doc_j的函数,统计该篇文档doc_j即可),idf是对于整个资料库的所有文档而言的(idf_i只是词项term_i的函数,对于每一篇doc都要统计) #LSI分析/SVD奇异值分解 lsi = models.LsiModel(corpus_tfidf, id2word=dictionary, num_topics=3) #将训练文档向量组成的矩阵SVD分解,奇异值代表了文档中重要的“概念”或“主题”,我们从数篇文章中抽取数个最重要的“主题”,我们以此来进行隐性语义索引,即LSI。此处的3是拍脑袋决定的。 corpus_lsi = lsi[corpus_tfidf] #此时可以看出语料库中的几个文档在我们抽取的三个“主题”中所占的比例(在这两个语义方向上的投影) index = similarities.MatrixSimilarity(lsi[corpus]) #建立文档索引 #query = "There are going to be major changes in our leadership" #摘自第4篇,其中4,5,6篇文章冗余 query = "If there is one, no one's shared it with me" #摘自第1篇文章 query_bow = dictionary.doc2bow(nltk.word_tokenize(query.lower())) query_lsi = lsi[query_bow] #利用dictionary.doc2bow为query构造BOW词袋模型 #与之前的语料库corpus一样,再进行lsi操作(映射到三维空间) sims = index[query_lsi] #凭借query的奇异值分阶得到压缩后的三个特征,与index matrix中的语料库比较计算相似度。sims是一个十维数组,对应query与格篇文章之间的相似度。 sort_sims = sorted(enumerate(sims), key=lambda item: -item[1]) #按相似度排序,显然看出quary与每篇文章主题的相似度 top3sims = sort_sims[:3] for i in range(len(top3sims)): print(i, top3sims[i])
输出结果为最相近的三篇文档:
0 (8, 0.9741274)
1 (9, 0.94149226)
2 (0, 0.9332013)
再举一个例子,利用Coursera的课程数据,主要是课程简介来做信息检索,找到给定query最相关的课程:
#读取Coursera的课程数据,注意修改编码格式 courses = [] with open('coursera_corpus', 'r', encoding="utf8") as data: for line in data.readlines(): courses.append(line.strip()) #读取停用词 stopwords = [] with open('stopwords.txt', 'rb') as data: for line in data.readlines(): stopwords.append(str(line, encoding = "utf-8").split(' ')[0]) #课程名与简介之间用制表符分隔开 courses_name = [course.split('\t')[0] for course in courses] #分词,去停用词 import nltk alltexts = [[word for word in nltk.word_tokenize(doc.lower()) if word not in stopwords] for doc in courses] #词干化 from nltk.stem.lancaster import LancasterStemmer lstemmer = LancasterStemmer() texts_stemmed = [[lstemmer.stem(word) for word in doc] for doc in alltexts] #滤除整个语料库中出现次数小于1的低频词 all_stems = sum(texts_stemmed, []) stems_once = set(stem for stem in set(all_stems) if all_stems.count(stem) == 1) texts = [[stem for stem in text if stem not in stems_once] for text in texts_stemmed] #构建资料库的词典,语料库,BOW模型,TF-IDF模型 from gensim import corpora, models, similarities dictionary = corpora.Dictionary(texts) corpus = [dictionary.doc2bow(text) for text in texts] tfidf = models.TfidfModel(corpus) corpus_tfidf = tfidf[corpus] #LSI分析,#构建相似度矩阵 lsi = models.LsiModel(corpus_tfidf, id2word=dictionary, num_topics=10) index = similarities.MatrixSimilarity(lsi[corpus]) #courses_name[210]为'Machine Learning',凭借课程简介找出与machine learning最为相关的课程 ml_course = texts[210] ml_bow = dictionary.doc2bow(ml_course) ml_lsi = lsi[ml_bow] #构建出ml_course的BOW模型,并把它用lsi方法映射到10个维度上 #求相似度,并排序,输出最为相关的前十个课程名字 sims = index[ml_lsi] sort_sims = sorted(enumerate(sims), key=lambda item: -item[1]) top10sims = sort_sims[:10] for i in range(len(top10sims)): print(i, courses_name[top10sims[i][0]])
输出十个最相关的课程:
0 Machine Learning
1 Machine Learning
2 Human-Computer Interaction
3 Probabilistic Graphical Models
4 Computational Photography
5 Computer Security
6 Computer Science 101
7 Algorithms: Design and Analysis, Part 2
8 Cryptography II
9 Computer Architecture
nltk
import nltk rawdata = '''Start with politics. Mr Xi has used his power to reassert the dominance of the Communist Party and of his own position within it. As part of a campaign against corruption, he has purged potential rivals. He has executed a sweeping reorganisation of the People’s Liberation Army (PLA), partly to ensure its loyalty to the party, and to him personally. He has imprisoned free-thinking lawyers and stamped out criticism of the party and the government in the media and online. Though people’s personal lives remain relatively free, he is creating a surveillance state to monitor discontent and deviance. ''' #读取停用词 stopwords = [] with open('stopwords.txt', 'rb') as data: for line in data.readlines(): stopwords.append(str(line, encoding = "utf-8").split(' ')[0]) #分句 sentences = [] sent_tokenizer = nltk.data.load('tokenizers/punkt/english.pickle') sentences = sent_tokenizer.tokenize(rawdata) #分词 import nltk tokens = [word for word in nltk.word_tokenize(rawdata.lower()) if word not in stopwords] #三种词干化方法:Snowball,Porter和Lancaster Snowball = nltk.stem.SnowballStemmer('english') porter = nltk.PorterStemmer() lancaster = nltk.LancastesrStemmer() stem_snowball = [lancaster.stem(t) for t in tokens] stem_porter = [porter.stem(t) for t in tokens] stem_lancaster = [lancaster.stem(t) for t in tokens] tokens_stem = stem_porter[:]
math
体会pi和无穷的表示方法:
num1 = math.pi num2 = math.pi/2 num3 = float('inf') num4 = math.atan(-math.inf) math.sin(num2) Out[10]: 1.0 num2 + num4 Out[12]: 0.0
其他常用的数学运算:
math.ceil(10.2) #向上取整,大于x的最小整數 Out[13]: 11 math.ceil(-10.2) Out[15]: -10 math.floor(10.2) #向下取整,小于x的最大整數 Out[14]: 10 math.floor(-10.2) Out[16]: -11 math.sqrt(12) #开根号 Out[17]: 3.4641016151377544 math.exp(2) #指数函数 Out[18]: 7.38905609893065 math.fabs(-2) #绝对值 Out[20]: 2.0 math.hypot(4,3) #Euclidean distance欧氏距离 Out[25]: 5.0 math.degrees(math.pi/3) #弧度转换为角度 Out[21]: 59.99999999999999 math.radians(60) #角度转换为弧度 Out[22]: 1.0471975511965976 math.log(100) #默认底为e Out[30]: 4.605170185988092 math.log(100, math.sqrt(10)) #设置底为根号10 Out[33]: 4.0 math.log10(100) Out[31]: 2.0 math.pow(3,4) #3的4次方 Out[34]: 81.0
re
import re mySent = '''The Republicans' new 223-211 majority (assuming a Democrat leading in Oregon holds on to win), with one independent, amounted to the smallest congressional majority since the Republican-controlled Congress of 1953, the last time Republicans controlled the House until they captured it again in 1994.''' regEx = re.compile('\\W*') listOfTokens = regEx.split(mySent) re.split('\w+', mySent, 10) Out[105]: Out[106]: ['', ' ', "' ", ' ', '-', ' ', ' (', ' ', ' ', ' ', ' in Oregon holds on to win), with one independent, amounted to the smallest congressional majority since the Republican-controlled Congress of 1953, the last time Republicans controlled the House until they captured it again in 1994.']
\w 匹配包括下划线的任何单词字符。等价于’[A-Za-z0-9_]’。即python的变量名。
\W 匹配任何非单词字符。等价于[^A-Za-z0-9_]。
可以设置最大匹配次数,比如re.split('\w+', mySent, 10) ,未匹配部分完整返回。
举一个案例,我之前在ANN数据集上做过一个引文推荐系统,为了获取每篇文章的摘要,需要定位出ABSTRACT和INTRODUCTION两个单词的位置(这两个单词之间就是摘要的内容)。
但是这两个单词在每篇paper里,在抓取的时候已经乱码或者出现异常,比如下面的情况:
' Abstr act ' 'Abst rac t ' '''Abs tract ''' '1. INTRODUCTION ' 'L Intr odu ction ' ' 1 Introduction ' '1 Introd uction. ' '''L. In t roduct ion '''
我们的目标是匹配出ABSTRACT和INTRODUCTION两个单词,只要写出“匹配规则”就可以了。这个时候就看得出来re模块的强大了,
pattern_ab = re.compile(r'^ ?([abstrc ABSTRC]{8,}).*(\r\n)?$')
pattern_intro = re.compile(r'^ ?([1. introducINTRODUCL]{8,}).*(\r\n)?$')
但这又会出现问题,这个pattern极其宽松,只要前八个字符是这[abstrc ABSTRC],或者[1Ll. introducINTRODUC]里面的即可。既没有规定这些字母出现的顺序,也没有规定这些字母出现的最少次数。竟然连全是空格的一行都被匹配上了!!!
所以越宽的pattern越容易匹配到不属于我们期望类别的字符串。
'abstracted'
'abst rac t ion .'
'at as a context-free'
'              '
's t ra tegy'

'conditions'
'Our initial task,'
'tion until a.'
我们来规定:ABSTRACT这几个字母(大写或小写)必须都按照在这个单词中的顺序出现且仅出现1次,每两个字母之间允许出现1个空格(当然也可以不出现)。这个单词之后到该行末尾只能出现空格,或者换行符,也即是该行有且仅有ABSTRACT一个单词!
因为论文中的ABSTACT都是独立成行的,如果不这样要求,可能会匹配到在文章的段落中且排到了一行之首的ABSTACT。INTRODUCTION我们用相同的方法处理:
pattern_ab = re.compile(r'^ *[Aa] ?[Bb] ?[Ss] ?[Tt] ?[Rr] ?[Aa] ?[Cc] ?[Tt] *(\r\n)?$')
pattern_intro = re.compile(r'^ *[1IiL]{0,2}[. ]{0,2}[Ii] ?[Nn] ?[Tt] ?[Rr] ?[Oo] ?[Dd] ?[Uu] ?[Cc] ?[Tt] ?[Ii].*(\r\n)?$')
这样匹配的准确率就上去了。
sys
time