一、链式编程
1.1.释义
链式编程,也叫级联式编程,调用对象的函数时返回一个this对象指向对象本身,达到链式效果,可以级联调用。
1.2.特点
可以通过一个方法调用多个方法,将多个方法调用链接起来,形成一条“链式”,从而提高代码的可读性。
1.2.原理
链式编程的原理是返回一个this对象,也就是返回对象本身,从而达到链式效果。
1.3.优点
编程性强、代码简洁 、可读性强。
1.4.使用条件
方法返回当前对象,即返回this;或方法支持链式调用,即返回调用该方法的对象。
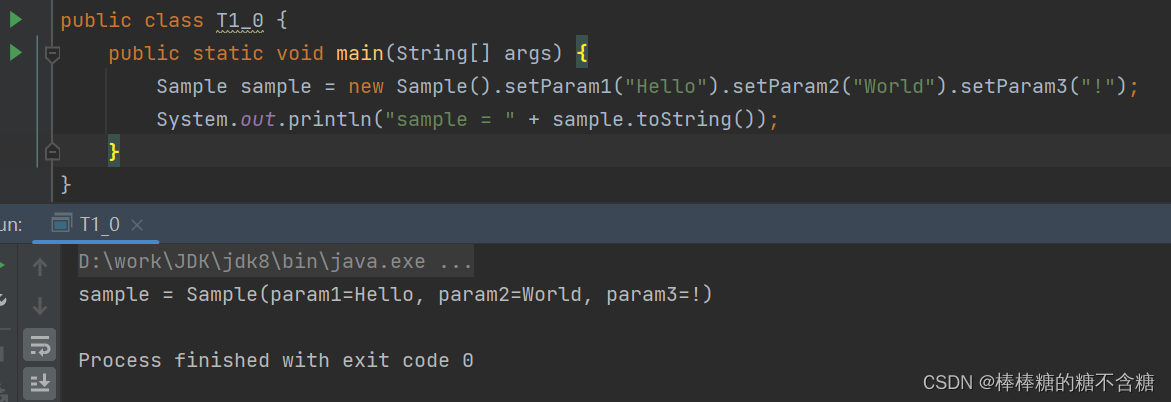
1.4.1.使用示例
import lombok.Data;

/**
 * 要实现链式编程,我们需要让setParam1()和setParam2()都返回this。
 * 当手写set方法时,无需 @Data注解
 * 在此仅为了使用 @Data的toString()
 */
@Data
public class Sample {

    private String param1;
    private String param2;
    private String param3;

    public Sample setParam1(String param1) {
        this.param1 = param1;
        return this;
    }
    public Sample setParam2(String param2) {
        this.param2 = param2;
        return this;
    }
    public Sample setParam3(String param3) {
        this.param3 = param3;
        return this;
    }
}
1.4.2.示例输出

二、String链式示例
2.1.源码

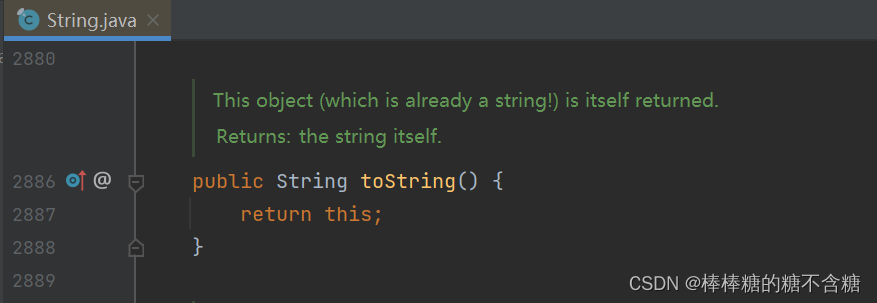
例如可以将某对象toString()转化为String后,或将String对象valueOf()赋值后,进行concat()拼接、replace()替换、substring()截取。符合的方法很多,大多数都能组装起来,使之符合链式编程。
三、StringBuffer和StringBuilder链式示例
3.1.源码

3.2.使用示例
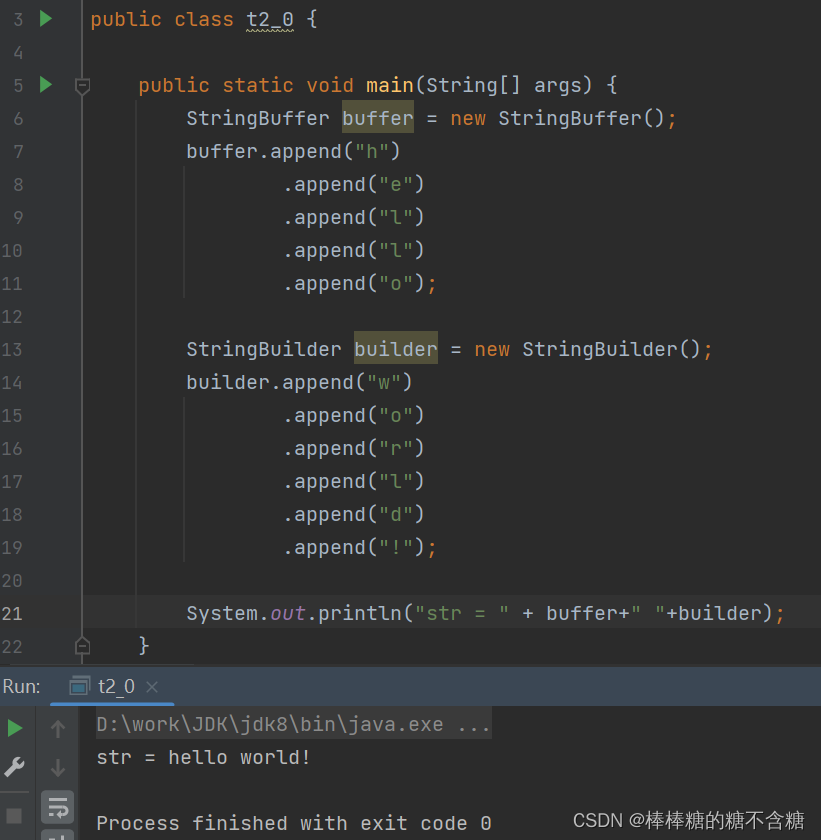
同时,Collection接口下的List的stream流,也是使用的链式编程,这里不做介绍。
四、@Accessors注解开启链式编程
4.1.源码
@Target({ElementType.TYPE, ElementType.FIELD})
@Retention(RetentionPolicy.SOURCE)
public @interface Accessors {
	/**
	 * If true, accessors will be named after the field and not include a {@code get} or {@code set}
	 * prefix. If true and {@code chain} is omitted, {@code chain} defaults to {@code true}.
	 * <strong>default: false</strong>
	 *
	 * @return Whether or not to make fluent methods (named {@code fieldName()}, not for example {@code setFieldName}).
	 */
	boolean fluent() default false;

	/**
	 * If true, setters return {@code this} instead of {@code void}.
     * 如果是true,setters方法返回{this} 而不是{void}
     *
	 * <strong>default: false</strong>, unless {@code fluent=true}, then <strong>default: true</strong>
	 *
	 * @return Whether or not setters should return themselves (chaining) or {@code void} (no chaining).
	 */
	boolean chain() default false;

	/**
	 * If present, only fields with any of the stated prefixes are given the getter/setter treatment.
	 * Note that a prefix only counts if the next character is NOT a lowercase character or the last
	 * letter of the prefix is not a letter (for instance an underscore). If multiple fields
	 * all turn into the same name when the prefix is stripped, an error will be generated.
	 *
	 * @return If you are in the habit of prefixing your fields (for example, you name them {@code fFieldName}, specify such prefixes here).
	 */
	String[] prefix() default {};
}
4.2.注解使用
@Data
@Accessors(chain = true)
public class Sample {

    private String param1;
    private String param2;
    private String param3;

}
上述代码是对1.4.1中的示例代码进行的简化,可以看出,当使用注解时,不用自己再设计具体的链式实现,注解会开启链式操作。这个注解常用在Spring中的实体类上。
同时,使用@Accessors(fluent = true)时,省略给对象赋值和取值时候得set、get前缀,可以直接用对象点出来元素,不用set。
4.3.测试
五、使用Builder模式实现Java链式编程
Builder模式是一种对象创建模式,允许我们创建一个对象,并设置其属性值。示例的Builder模式实现如下所示:
public class Sample {

    private String name;
    private String gender;
    private String age;

    private Sample(){}
    public static SampleBuilder builder() {
        return new SampleBuilder();
    }

    public static class SampleBuilder {

        private Sample sample = new Sample();

        public SampleBuilder setName(String name) {
            sample.name = name;
            return this;
        }

        public SampleBuilder setGender(String gender) {
            sample.gender = gender;
            return this;
        }
        public SampleBuilder setAge(String age) {
            sample.age = age;
            return this;
        }

        public Sample build() {
            return sample;
        }
    }
}
在上面的代码示例中,我们首先创建了一个Sample类。为了实现Builder模式,我们还创建了一个SampleBuilder类。SampleBuilder类中有两个with方法,分别用于设置name属性、gender属性和age属性。它们都返回SampleBuilder对象,这样就可以实现链式调用。在参数设置完成后,我们通过build方法创建Sample对象。使用Builder模式进行链式编程的示例如下:

在上面的示例中,我们通过Sample.builder()创建了SampleBuilder对象,并使用其中的set方法设置参数。在设置完成后,我们通过build方法创建了Sample对象。
上面这就是一个最简单的builder链式编程,简单在于,能成链能赋值,仅此而已。但如果需要取值,需要对参数校验,这个类就不够用了,需要补充更多的规定,这就抛砖引玉的引出了Java重要设计模式之一的建造者模式。
六、Builder(建造者)设计模式
6.1.实用范围
当创建复杂对象的算法应该独立于该对象的组成部分以及它们的装配方式时。
当构造过程必须允许被构造的对象有不同表示时。
6.2.角色
在这样的设计模式中,有以下几个角色:
1 builder:为创建一个产品对象的各个部件指定抽象接口。
2 ConcreteBuilder:实现Builder的接口以构造和装配该产品的各个部件,定义并明确它所创建的表示,并提供一个检索产品的接口。
3 Director:构造一个使用Builder接口的对象。
4 Product:表示被构造的复杂对象。ConcreteBuilder创建该产品的内部表示并定义它的装配过程,包含定义组成部件的类,包括将这些部件装配成最终产品的接口。
6.3.Builder 模式创建步骤
1)在类中,创建一个静态内部类,包含外部类的全部属性;
2)在内部类中,为每一个属性进行赋值;
3)内部类中创建 build 方法,返回外部类对象
4)在外部类中创建静态 builder方法,返回内部类对象
6.4.残次品示例
public class Sample {

    //Sample 类的属性都是不可变的。所有的属性都添加了final修饰符,在构造方法中设置了值。
    private final String name;
    private final String gender;
    private final Double age;
    //对外只提供getters方法。
    public String getName() {
        return name;
    }
    public String getGender() {
        return gender;
    }
    public Double getAge() {
        return age;
    }
    //Sample 类的构造方法是私有的。也就是说调用者不能直接创建User对象。
    private Sample(SampleBuilder builder){
        this.name = builder.name;
        this.gender = builder.gender;
        this.age = builder.age;
    }
    public static class SampleBuilder {
        private String name;
        private String gender;
        private Double age;
        public SampleBuilder SampleBuilder(){
            return new SampleBuilder();
        }

        public SampleBuilder setName(String name) {
            this.name = name;
            return this;
        }

        public SampleBuilder setGender(String gender) {
            this.gender = gender;
            return this;
        }
        public SampleBuilder setAge(Double age) {
            this.age = age;
            return this;
        }

        public Sample build() {
            //添加参数校验
            Sample sample = new Sample(this);
            if (sample.getAge() < 0 || sample.getAge() > 125){
                throw new IllegalStateException("Age out of range:" + sample.getAge());
            }
            if (!("男".equals(sample.getGender()) || "女".equals(sample.getGender()))){
                throw new IllegalStateException("Error Gender Input:" + sample.getGender());
            }
            return sample;
        }
    }
}

可以看到,基本链式编程形成,同时参数也会进行校验,符合要求。但之所以叫残次品,是因为这只是build链式开发,但说设计模式,明显“德不配位”。
6.5.简单示例
6.5.1.示例目录

6.5.2.各层代码
建造者模式核心作用也就是优点,就是对复杂对象(特指某几个对象组合而成的对象)的创建,抽出来单独实现,对于用户使用这类复杂对象是提供了方便,同时,这也在复杂对象的部分创建与整体组装之间搭了一座桥,实现了部分和整体组装的解耦。
建造者模式主要是用在复杂对象上的,对于简单对象,就毫无用武之地。但在此还是需要一些简单的对象,来帮助了解建造者模式。
Animal: 设置抽象属性
package com.test5;

public class Animal {
    //名字
    private String name;
    //时速
    private Long speed;

    public String getName() {
        return name;
    }

    public void setName(String name) {
        this.name = name;
    }

    public Long getSpeed() {
        return speed;
    }

    public void setSpeed(Long speed) {
        this.speed = speed;
    }
}
AnimalBuilder :
package com.test5;

public interface AnimalBuilder {
    void buildName();
    void buildSpeed();

    Animal builderAnimal();
}
AnimalDirector :
package com.test5;

public class AnimalDirector {
    public Animal constructAnimal(AnimalBuilder pb) {
        pb.buildName();
        pb.buildSpeed();
        return pb.builderAnimal();
    }
}
Eagle :创建角色1
package com.test5;

public class Eagle extends Animal{
}
EagleBuilder :建造角色1
package com.test5;

public class EagleBuilder implements AnimalBuilder{

    Animal animal;

    public EagleBuilder(){
        animal = new Animal();
    }

   public void buildName(){
        animal.setName("雄鹰");
   }

   public void buildSpeed(){
        animal.setSpeed(80L);
   }

    public Animal builderAnimal(){
        return animal;
   }
}
Rabbit :创建角色2
package com.test5;

public class Rabbit extends Animal{
}
RabbitBuilder :建造角色2
package com.test5;

public class RabbitBuilder implements AnimalBuilder{

    Animal animal;

    public RabbitBuilder(){
        animal = new Animal();
    }

   public void buildName(){
        animal.setName("兔子");
   }

   public void buildSpeed(){
        animal.setSpeed(70L);
   }

    public Animal builderAnimal(){
        return animal;
   }
}
每次添加新角色时,只需要新添加一个角色,然后为它添加一个建造,这样后面就可以使用了。
测试:
package com.test5;

public class test {

    public static void main(String[] args) {

        AnimalDirector director = new AnimalDirector();

        Animal eagle = director.constructAnimal(new EagleBuilder());
        System.out.println(eagle.getName()+"的时速为:"+eagle.getSpeed());

        Animal rabbit = director.constructAnimal(new RabbitBuilder());
        System.out.println(rabbit.getName()+"的时速为:"+rabbit.getSpeed());

    }
}
结果示例:
雄鹰的时速为:80
兔子的时速为:70