组件是什么
vue组件就是一个个独立的小型的ui模块,整个大型的系统就是由一个个小型的UI模块拼接而成的
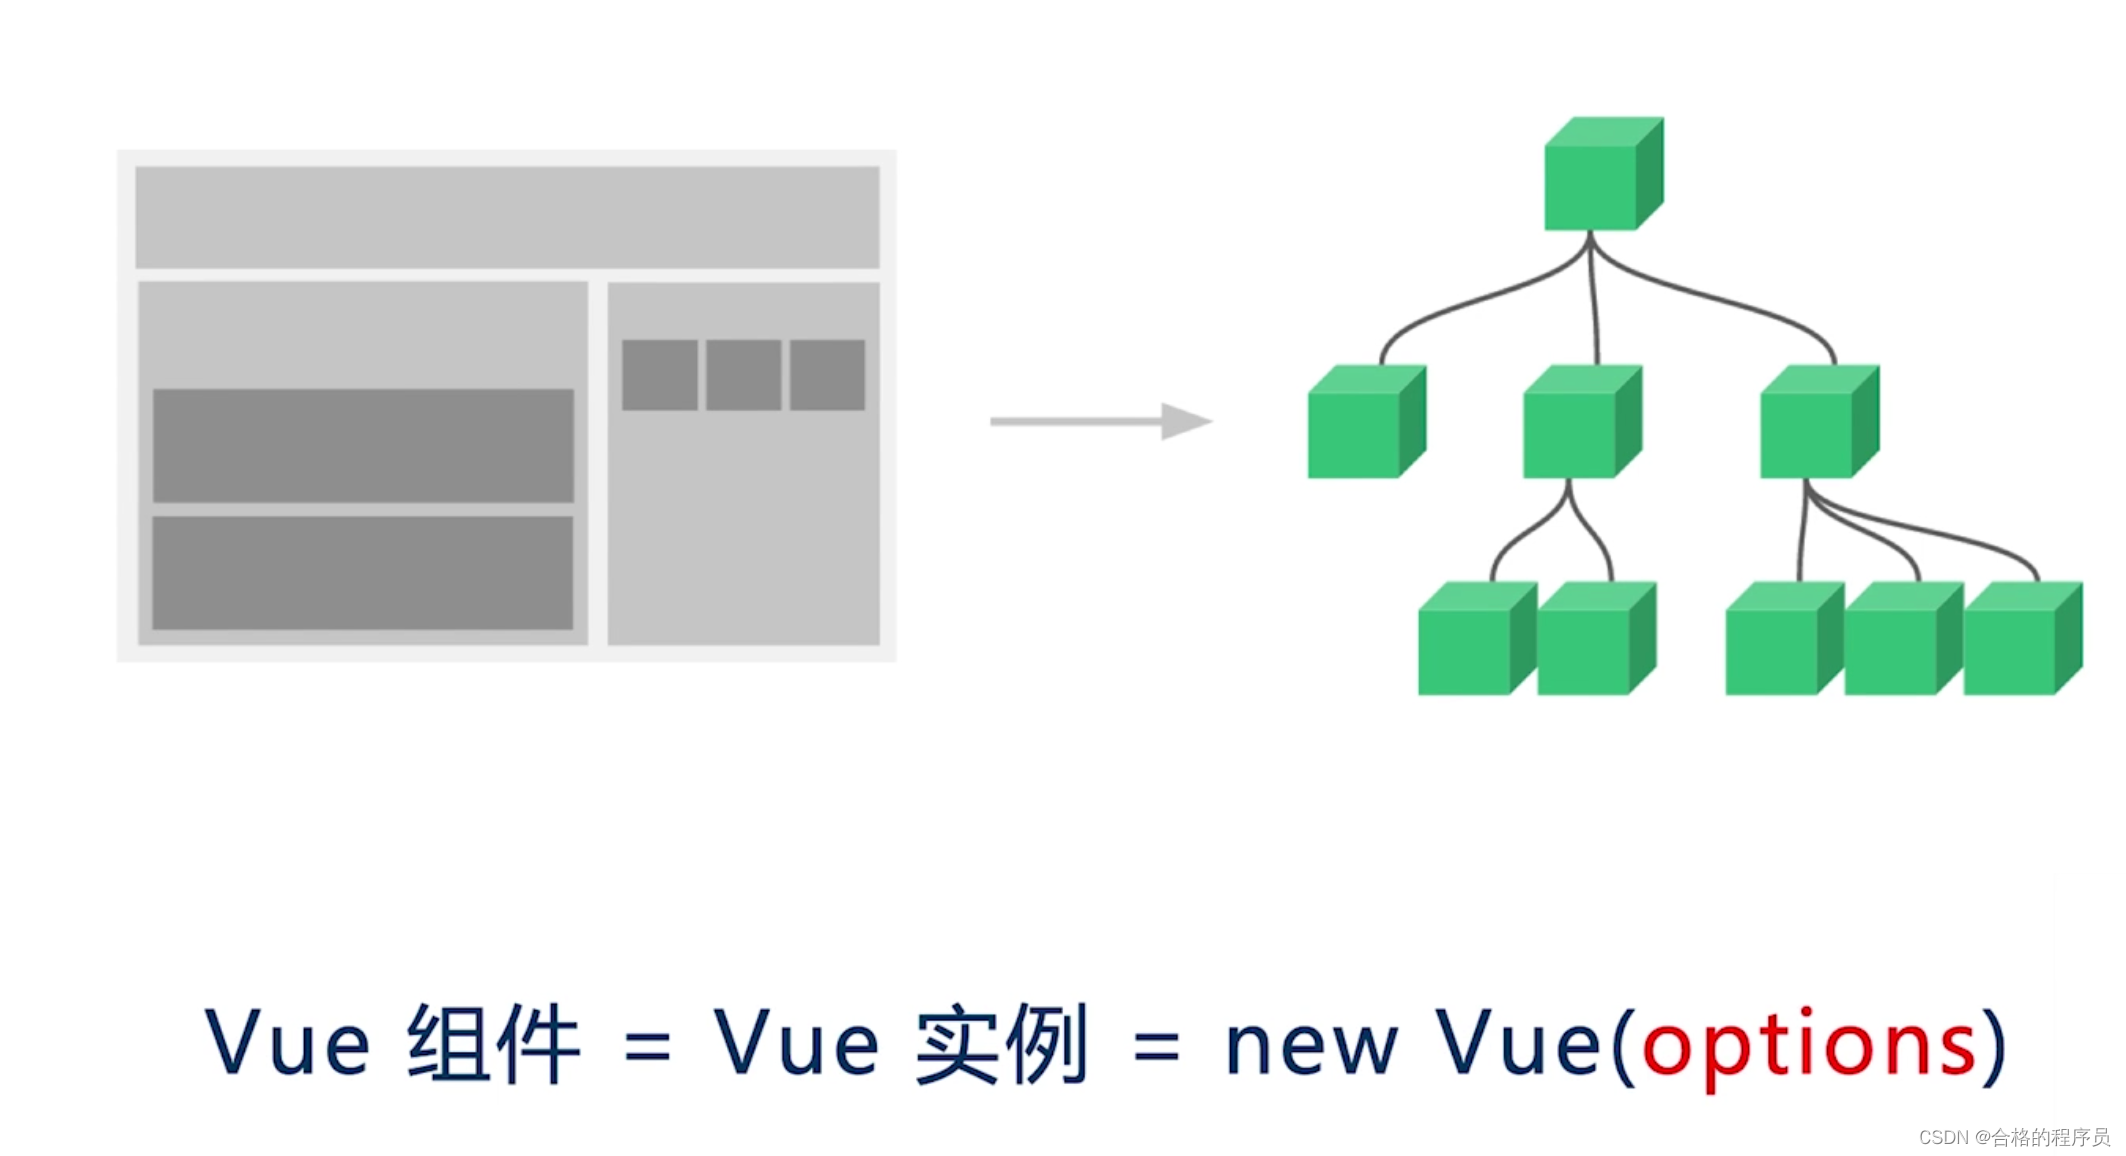
vue组件就是vue实例,通过new Vue函数来创建的一个vue实例,不同的组件只不过是options的不同,我们基本百分之90的开发工作都是围绕options的配置来进行的
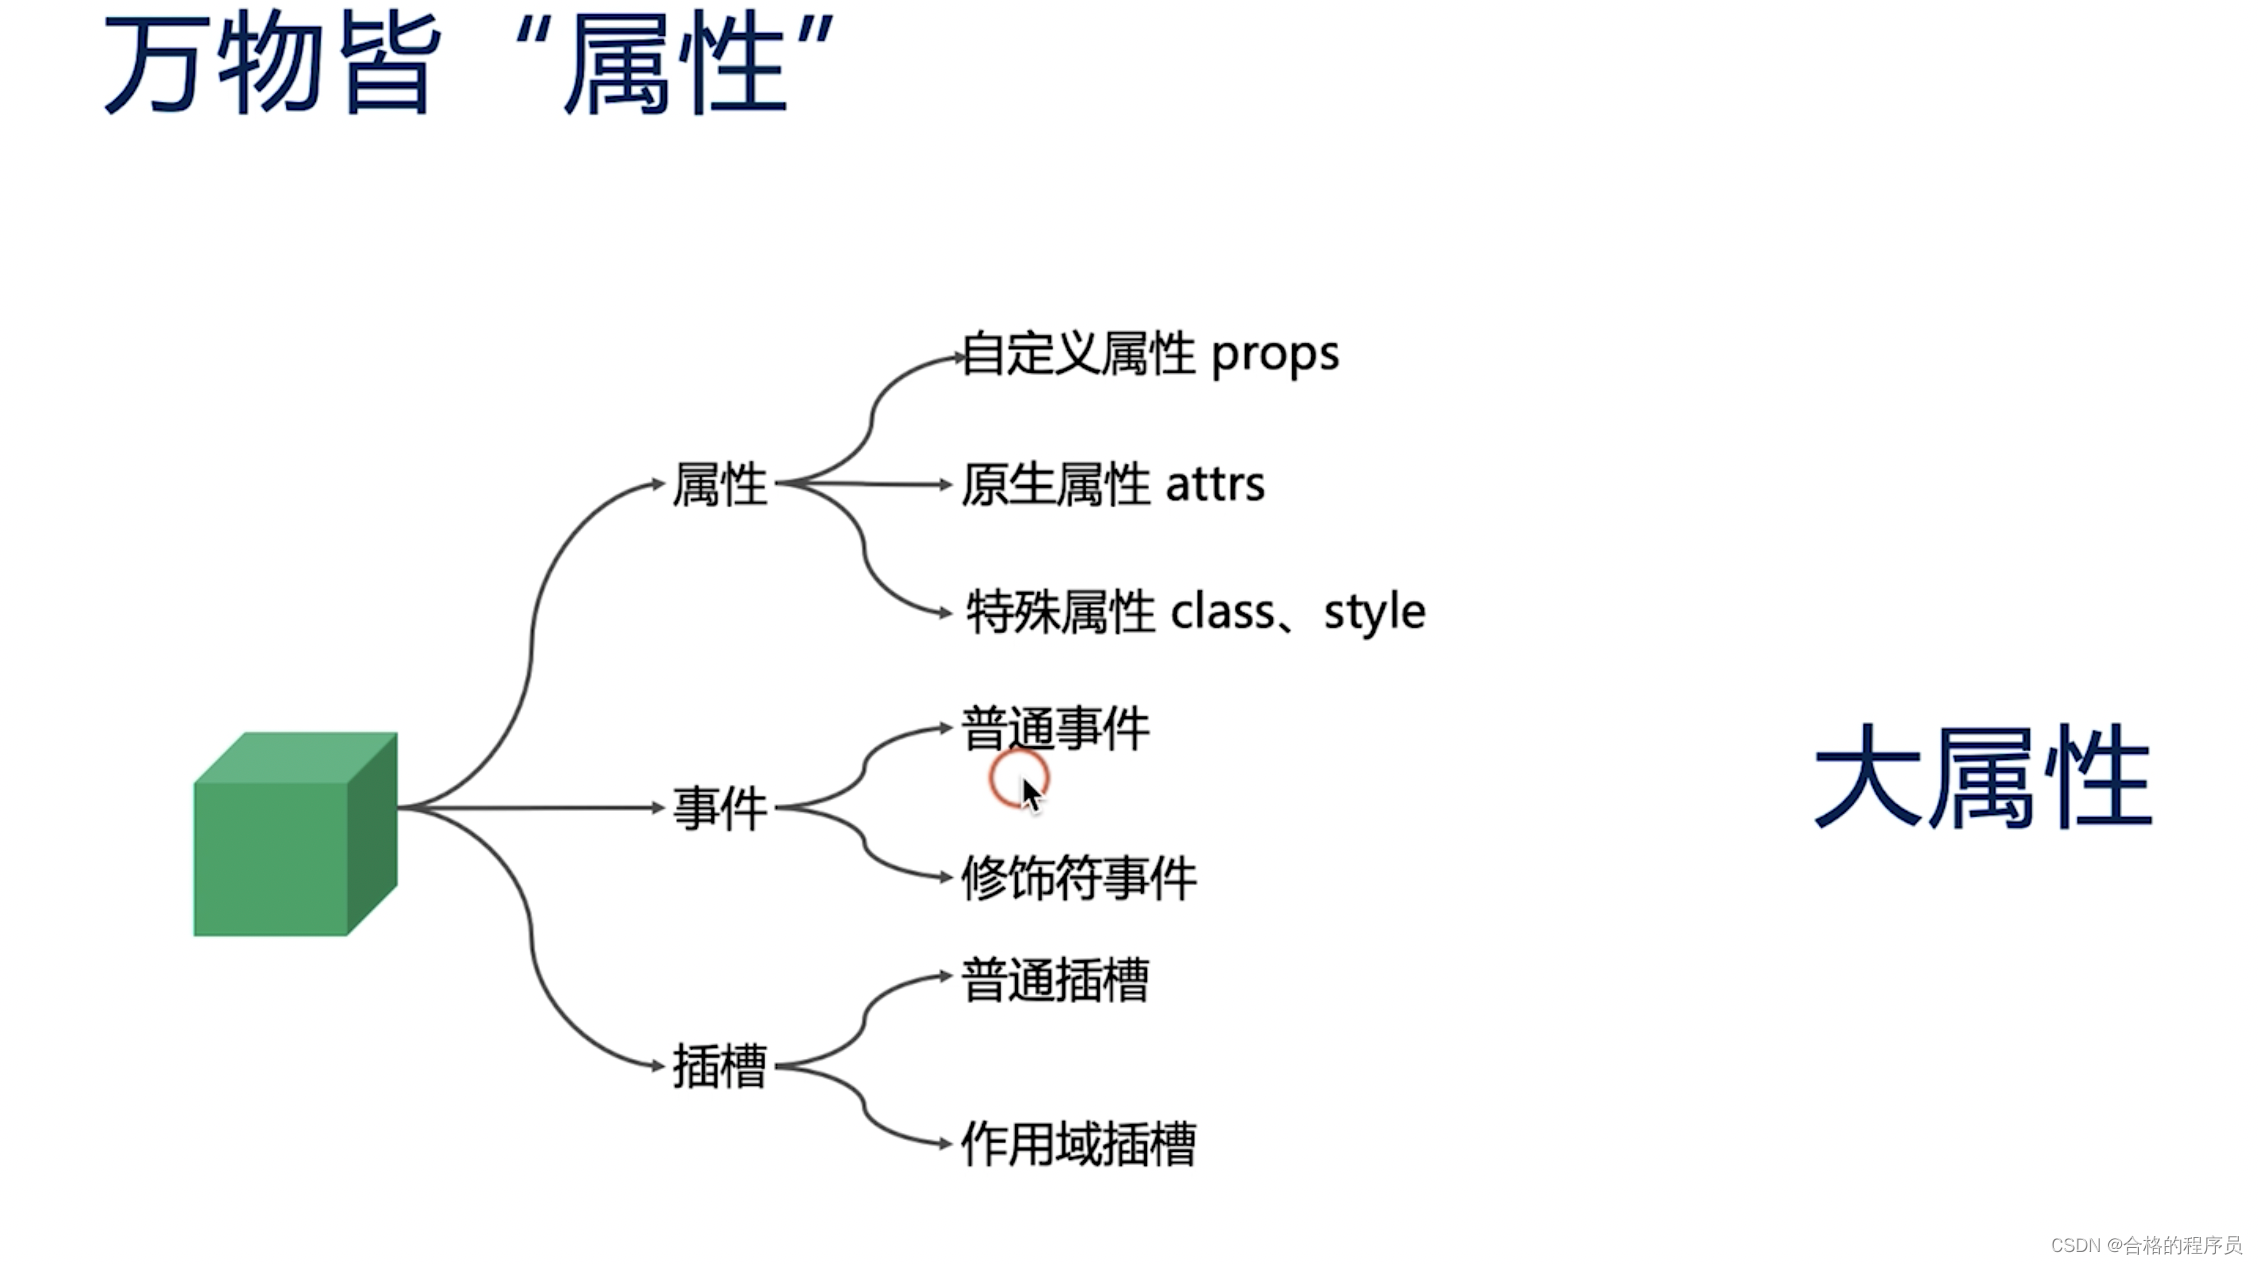
三大核心概念
属性、事件、插槽
属性
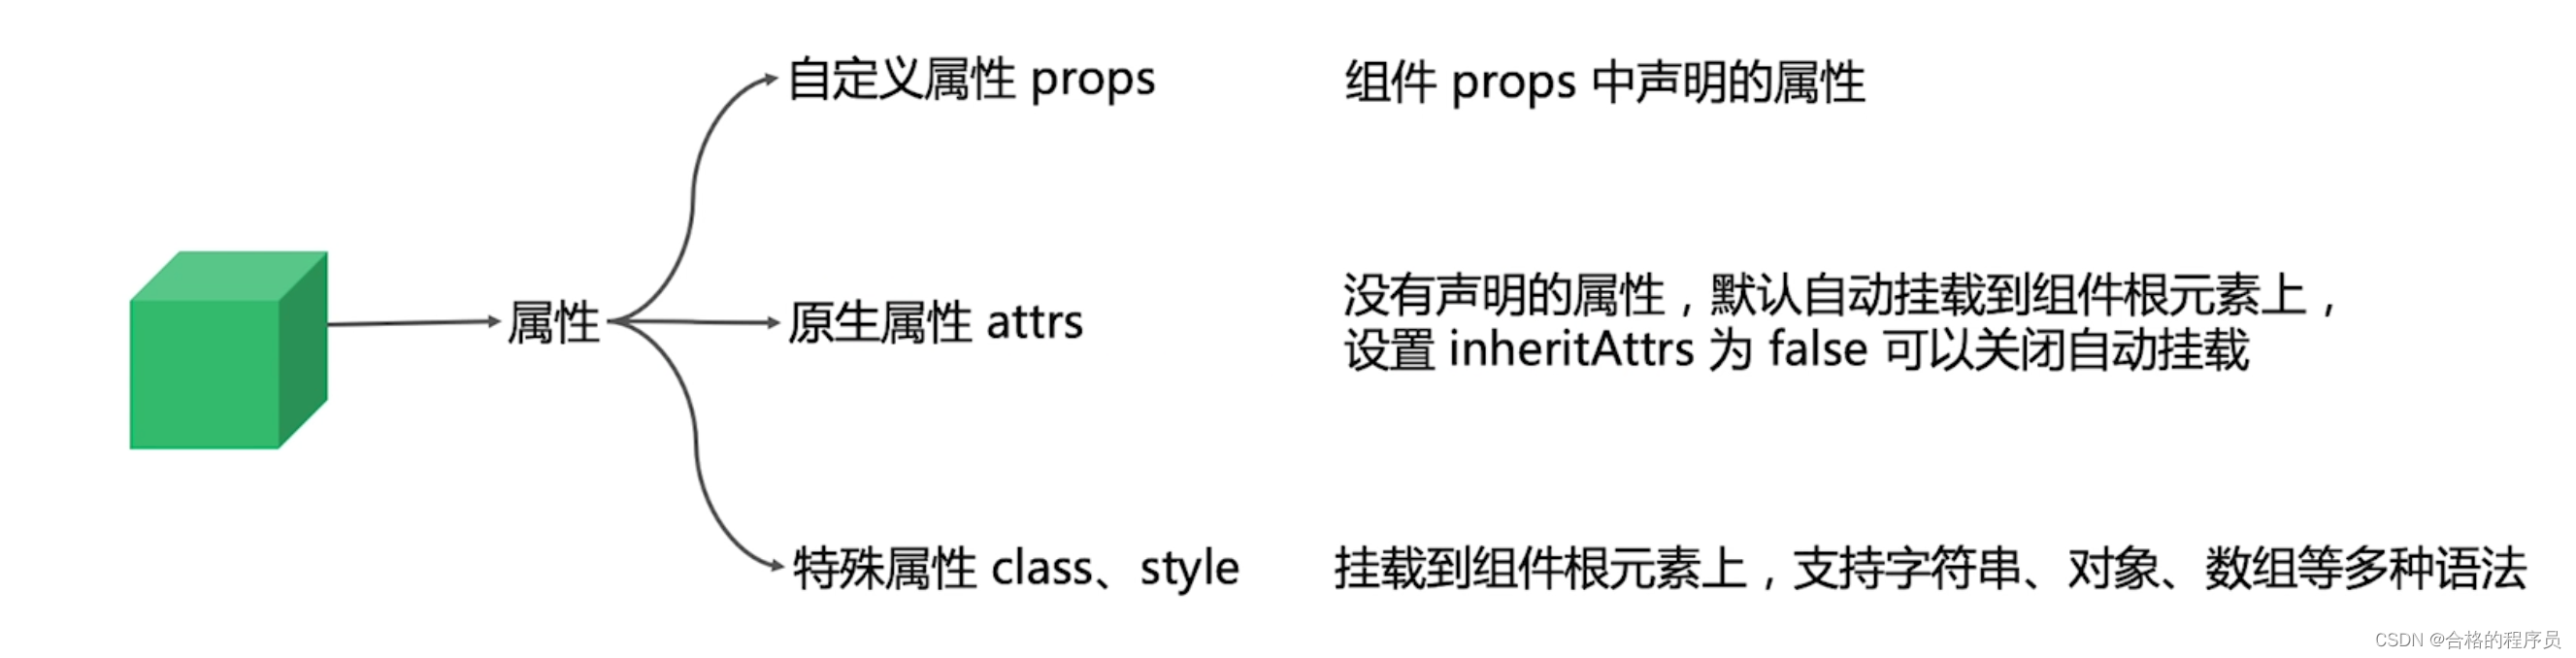
属性例子:
export default {
	name: "PropsDemo",
	// 不推荐使用这种做法,不利于维护
	// props: ['name', 'type', 'list', 'isVisible'],
	// 建议使用下面的做法来声明属性(使用对象的形式声明)
	props: {
		name: String,
		type: {
			validator: function(type) {
				// 这个值必须匹配以下字符串中的一个
				return ['success', 'warning', 'danger'].includes(value);
			}
		},
		list: {
			type: Array,
			// 对象或数组默认值必须从一个工厂获取
			default: () => []
		},
		isVisible: {
			type: boolean,
			default: false
		},
		// 不建议使用onChange来命名,会和语法冲突
		onChange: {
			type: Function,
			default: () => {}
		}
	}
}
属性使用方法
Props.vue文件内容如下:
<template>
    <div>
        name: {

   { name }}
        <br>
        type: {

   { type }}
        <br>
        list: {

   { list }}
        <br>
        isVisible: {

   { isVisible }}
        <br>
        <button @click="handleClick">change type</button>
    </div>
</template>

<script>
export default {
    name: 'PropsDemo',
    // 自动挂载属性
    inheritAttrs: false,
    props: {
        name: String,
        type: {
            validator: function(value) {
                return ["success", "warning", "danger"].includes(value);
            }
        },
        list: {
            type: Array,
            default: () => []
        },
        isVisible: {
            type: Boolean,
            default: false
        },
        onChild: {
            type: Function,
            default: () => {}
        }
    },
    methods: {
        handleClick() {
            // 不可以这么做,会报错, 因为我们的属性是单向数据流的,不允许在子组件内更改父组件传递过来的值
            // this.type = "warning";
            console.log("触发")
            console.log("子组件的type是:")
            console.log(this.type)
            this.onChild(123)
        }
    }
}
</script>
App.vue文件使用如下:
<div>
    <Props
          name="Hello Vue!"
          :type="type"
          :is-visible="false"
          :on-child="handlePropChange"
          title="属性Demo"
          class="test1"
          :class="['test2']"
          :style="{ marginTop: '20px' }"
          style="margin-top: 10px;"
        />
  </div>

<script>
import Props from './components/Props.vue';

export default {
  name: 'App',
  components: {
    TodoItem,
    Props,
    // Event
  },
  data() {
    return {
      msg: "hello geek!",
      info: '',
      list: [],
      type: "success",
      name: "事件名"
    }
  },
  methods: {
    handleClick() {
        if (this.info != '') {
            this.list.push(this.info)
            this.info = ''
        }
    },
    handlePropChange(param) {
      console.log(param)
      console.log("父组件")
      if (this.type === "success") {
        this.type = "warning"
      } else {
        this.type = "success"
      }
      console.log("父组件的type")
      console.log(this.type)
    },
    handleEventChange() {

    }
  }
}
</script>
子组件中对属性进行了封装,全部在Props中,当父组件使用时,通过:属性名称的方式进行引用和赋值
子组件定义了一个函数的属性:onChild,在父组件使用这个属性时,也是和使用普通组件一样的方式,对onChild进行赋值,只不过赋的是函数,是的,函数也是作为参数来存在
此函数可以接收参数,是否接收参数,接收什么参数,取决于子组件对此函数的定义,可以看到子组件中有一个 handleClick方法,方法内部对onChild进行了调用,并传递参数123,当父组件的handlePropChange方法在接收函数时,也定义了一个参数用来接收(param):
handlePropChange(param) {
      console.log(param)
      console.log("父组件")
      if (this.type === "success") {
        this.type = "warning"
      } else {
        this.type = "success"
      }
      console.log("父组件的type")
      console.log(this.type)
    }
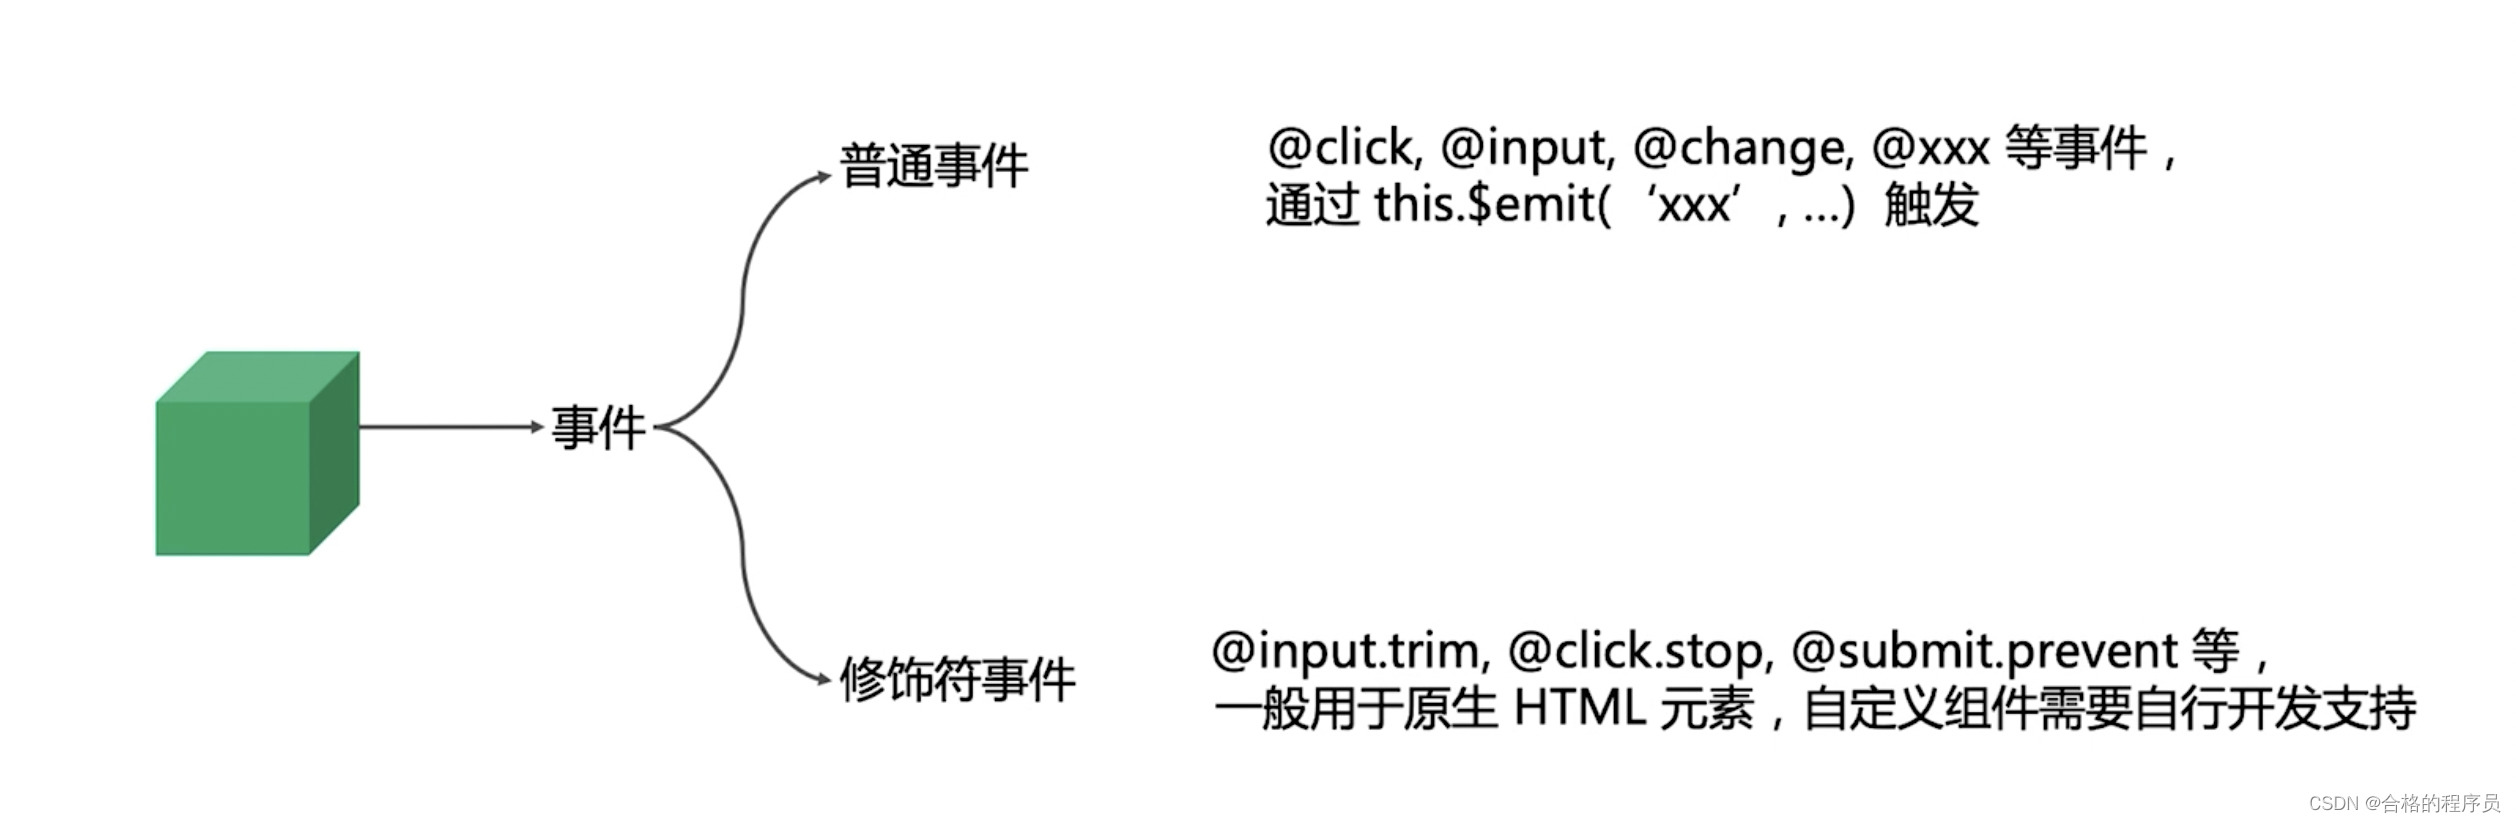
事件
定义 Even.vue文件
<template>
    <div>
        name: {

   { name || '--' }}
        <br>
        <input :value="name" @change="handleChange">
        <br/>
        <br/>
        <div @click="handleDivClick">
            <button @click="handleClick">重制成功</button>
            <button @click.stop="handleClick">重制失败</button>
        </div>
    </div>
</template>

<script>
export default {
    name: 'EventDemo',
    props: {
        name: {
            type: String
        }
    },
    methods: {
        handleChange(e) {
            console.log("改变1")
            this.$emit('change', e.target.value)
            console.log("改变2")
            console.log(e.target.value)
        },
        handleDivClick() {
            console.log("清空")
            this.$emit('change', '')
        },
        handleClick() {
            // 无论做什么都会失败!
            // e.stopPropagation();
        }
    }
}
</script>
父组件引用方法:
<Event :name="eventName"  @change="handleEventChange"/>

// 导入
import Event from './components/Event.vue';

// 方法定义
handleEventChange(param) {
  console.log("父组件接收到change事件")
  if (param?.target?.value) {
    this.eventName = param?.target?.value
    console.log(param?.target?.value)
  } else {
    this.eventName = ""
  }
}
子组件定义方法: handleChange,通过this.$emit('change', e.target.value),调用change方法,传递当前输入框的值作为参数
父组件通过handleEventChange函数进行接收,并声明一个参数:param,通过param中的param?.target?.value来获取传递的参数值
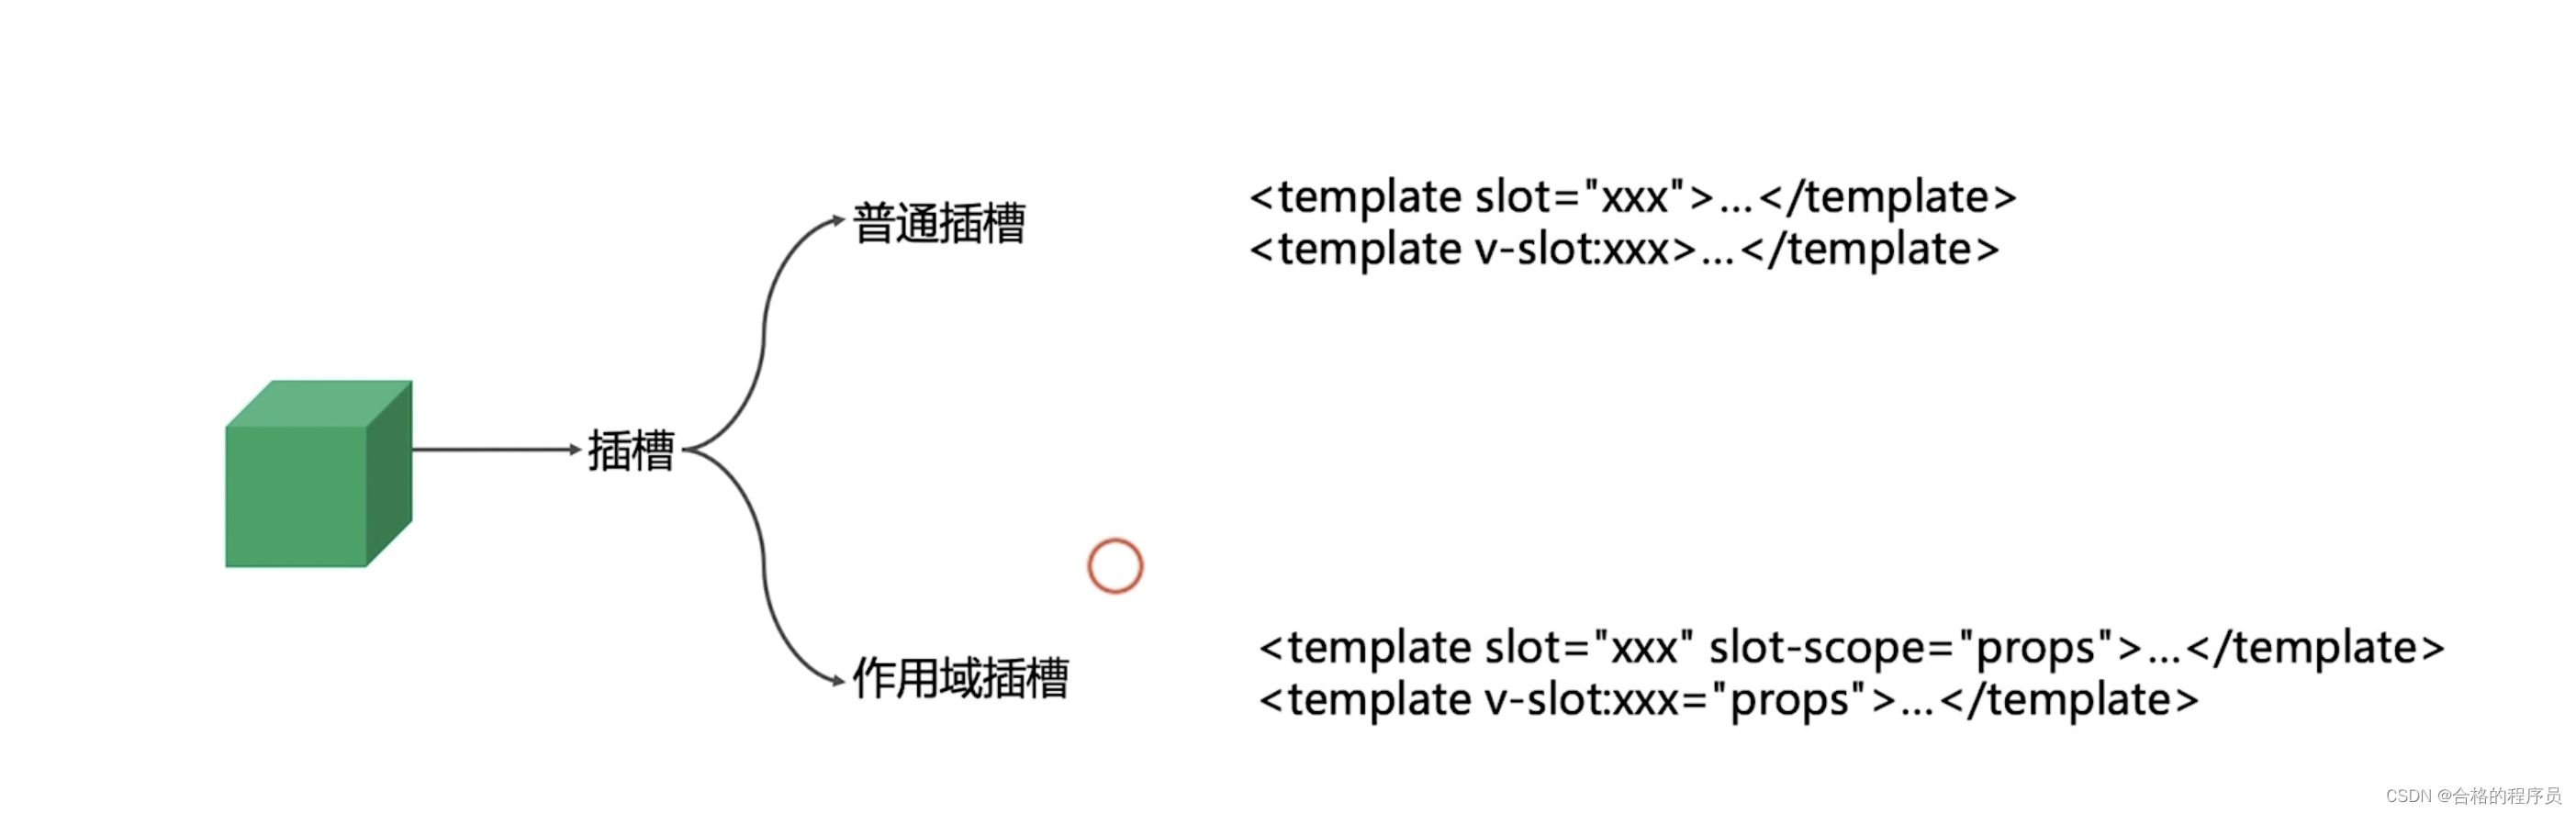
插槽
组件文件夹内新建文件:Slot.vue
<template>
    <div>
        <slot />
        <slot name="title" />
        <slot name="item" v-bind="{ value: 'vue' }" />
    </div>
</template>
<script>
export default {
    name: "SlotDemo"
}
</script>
父组件引用部分:
<SlotDemo>
  <template v-slot:title>
    <p>title slot1</p>
    <p>title slot2</p>
  </template>
  <template v-slot:item="props">
    <p>item slot-scope {

   { props }}</p>
  </template>
</SlotDemo>

// js引用
import SlotDemo from './components/Slot.vue';
子组件通过定义name="title"的插槽、name="item"的插槽,父组件通过v-slot:title和v-slot:item="props"来引用子组件定义的插槽
总结