拓扑结构
现有两台主机,它们具有两个网口分别接入到不同网络中。
- 主机A:
- eth0:处于
10.0.1.2/24网段 - eth1: 处于
192.168.1.100/24网段
- eth0:处于
- 主机B:
- eth0:处于
10.0.2.3/24网段 - eth1: 处于
192.168.2.200/24网段
- eth0:处于
主机A、B通过eth0 网口连接的网络可以相互访问,现在需要连通两台主机的两个局域网络使 192.168.1.0/24 与 192.168.2.0/24 互通。

Linux IPIP隧道
由于主机A、B 的 eth0网口连接的网络中间跨越了多个路由,因此无法直接配置该网络中的路由来实现两个网络互通的效果。
因此我们需要在A、B之间建立一条隧道,通过隧道传输两个网络的数据包。

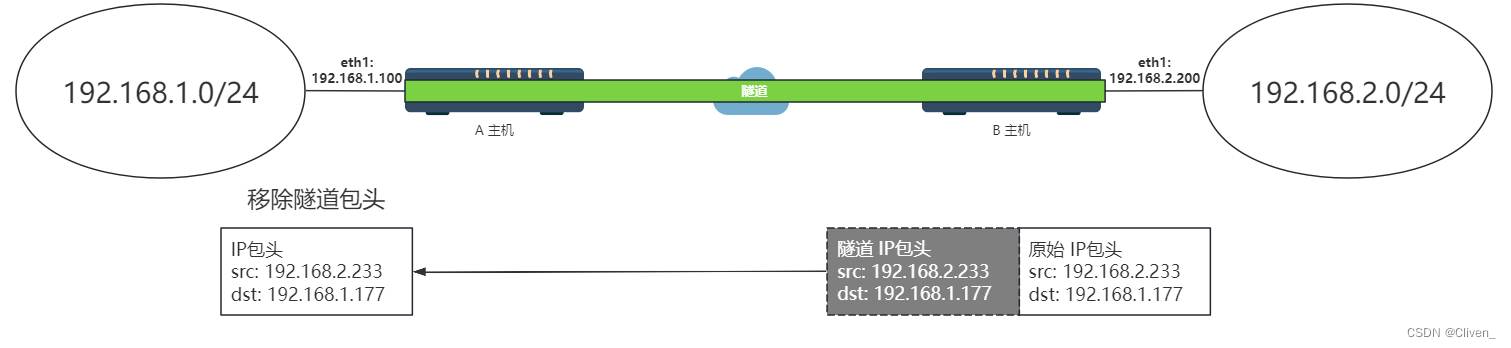
最简单的隧道就是IP隧道:
- 在要传输的IP数据包上在额外添加一个用于隧道传输的包头。
- 对端主机接受到来自于隧道IP数据包后,主动移除隧道包头。
- 移除后IP包重新投入到隧道目的地网络。
- 反之亦然。
如下所示:
配置
下面配置需要在两个主机上都配置
Linux 内核自带了 ipip隧道模块,首先加载模块到内核:
sudo modprobe ipip
打开IPv4的转发:
sudo sysctl -w net.ipv4.ip_forward=1
注意:动态加载的模块重启后不会自动加载,需要通过启动脚本方式加载。
主机个网口配置如下:
主机A配置
步骤如下:
- 创建IPIP类型隧道,设置隧道的 起点IP(
local) 和 目的地IP(remote)。- 起点:
eth0 10.0.1.2 - 重点:
eth0 10.0.2.2
- 起点:
- 启动虚拟网卡。
- 在虚拟网卡上 配置 到 目的网络(
192.168.2.0/24) 的路由。
ip tunnel add mytunnel mode ipip remote 10.0.2.2 local 10.0.1.2 ttl 64
ip link set mytunnel up
ip route add 192.168.2.0/24 dev mytunnel
主机B配置
步骤如下:
- 创建IPIP类型隧道,设置隧道的 起点IP(
local) 和 目的地IP(remote)。- 起点:
eth0 10.0.2.2 - 重点:
eth0 10.0.1.2
- 起点:
- 启动虚拟网卡。
- 在虚拟网卡上 配置 到 目的网络(
192.168.2.0/24) 的路由。
ip tunnel add mytunnel mode ipip remote 10.0.1.2 local 10.0.2.2 ttl 64
ip link set mytunnel up
ip route add 192.168.1.0/24 dev mytunnel
连通性测试
在主机A上PING 主机B 的目的网络
ping 192.168.2.100
若无法PING通,请检查防火墙策略是否有配置DENY 或 DROP。
你可以通过
iptables -F快速清除所有策略来完成测试。
配置持久化
上述配置在系统重启后将无效,因此我们需要在开机时重新执行配置内容对系统进行配置。
这里使用Systemd开机脚本的方式实现,下面以 主机A 的配置讲解如何实现。
创建开机配置脚本config_tunnel.sh
mkdir -p /etc/tunnel_cfg/
vi /etc/tunnel_cfg/config_tunnel.sh
config_tunnel.sh内容如下:
#!/bin/bash

modprobe ipip

ip tunnel add mytunnel mode ipip remote 10.0.2.2 local 10.0.1.2 ttl 64
ip link set mytunnel up
ip route add 192.168.2.0/24 dev mytunnel
创建systemd服务文件config_tunnel.service
vi /etc/tunnel_cfg/config_tunnel.service
config_tunnel.service内容如下:
[Unit]
Description=my ipip tunnel.
After=network.target

[Service]
Type=oneshot
RemainAfterExit=yes
ExecStart=/etc/tunnel_cfg/config_tunnel.sh

[Install]
WantedBy=multi-user.target
将配置复制至系统目录,重新加载,并设置开机启动:
cp /etc/tunnel_cfg/config_tunnel.service /usr/lib/systemd/system/

systemctl daemon-reload
systemctl enable config_tunnel.service
运行脚本检查状态
systemctl start config_tunnel.service
systemctl status config_tunnel.service
查看路由以及隧道
route -n
ip tunnel show
参考文献
[1]. Linux ipip隧道技术测试一(双主机、双网卡) . olivee . 2020 . http://www.asznl.com/post/81