众所周知,java生成报表的工具jfree,能生成各种图表图形,可是今天说的是要生成一个表格形式的报表。
其实这也简单,表格首推excel文档,只要模板确定,数据填充不是问题,excel操作不是问题,要咋样就来咋样啊!
但是产品说了,要能直观查看,能直接转发的表格报表,报表生成完之后你要微信模板消息通知我,你特么让我在微信里还要下载个excel文档再打开再转发吗?用户体验有木有!反人类操作有木有!
。。。。。。
那我把报表做成一张图片,把这一批次的图片生成到一个html页面上,您模板消息点开就是这个网页,报表一字排开,双击读图浏览,长按转发朋友朋友圈,怎么样啊?
做出来我看看先,报表大概长这么个样子:
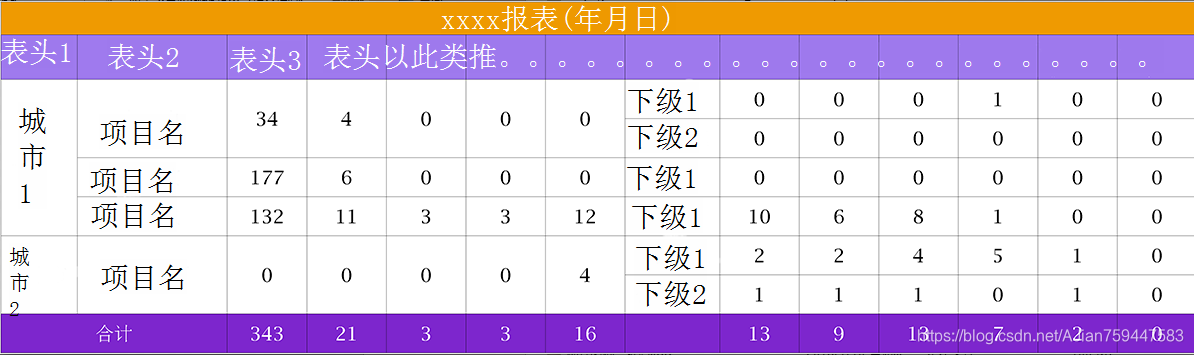 特别说明:下级1、下级2处并不止有2个下级,有的项目有5个甚至更多个下级,有的项目1个下级都没有!合计下面还有一行小字,对报表中的各项表头做基本的解释,报表表头隔几个月可能要增减,大体模板基本固定为这个样子。。。
这个需求吧,我就开始琢磨:以前有同事做过这样子类似报表的,只是做完这个就离职了,相互之间还不太熟悉呢,翻出原来的代码来看,哇塞,1200多行代码,其中生成报表图片的方法就有600多行,看了代码,直呼了然了然,怪不得离职!
原来的做法,是逐项逐项的计算距离,定好文字的xy坐标,用Graphics2D进行依次绘制,一个位置与一个位置之间的坐标点只有逻辑关联,比如现在要在表头6之前加入一个表头,让原来只有11列的表格变成12列,那原来的代码从表头6开始之后的所有文字、边框的坐标点全部都要拿计算器重新计算一遍,这显然是很恐怖的!
根据这个思路,,我开始用面向对象的方法来考虑,一个报表由若干个表格组成,一个表格有上下左右四条边,有背景颜色、中间的内容有字体颜色、有字体大小、字体位置坐标,于是有如下实体属性(不要纠结访问修饰符):
    public String text="",text1=text,text2="";//表格内容较宽时要换成两行显示
    public Font font = new Font("宋体", Font.BOLD, 58);
    public Color fontColor=Color.BLACK;
    public Color backgroundColor=Color.WHITE;
    public Color borderColor=Color.black;
    public int fontX,fontY,fontX2,fontY2;//表格内容换行时两行文字的各自XY轴坐标
    public int borderX=0,borderY=0,borderWidth,borderHeight;
    public int gridX,gridY,gridWidth,gridHeight;
    public int orginWidth,orginHeight;//当前表格原点距离坐标原点的宽度和高度
看起来棒棒哒,于是开始做表格标题:
/**
     * 得到表格标题grid对象
     * @param tableName
     * @param gridWith
     * @param gridHeight
     * @return
     */
    public static XXXXTableGridBean getInstanceForTableName(String tableName,int gridWith,int gridHeight){
        XXXXTableGridBean bean = new XXXXTableGridBean();
        bean.text = tableName;
        bean.font = new Font("宋体", Font.BOLD, 70);
        bean.fontColor = Color.WHITE;
        FontMetrics fm = new JLabel().getFontMetrics(bean.font);
        bean.fontX = (gridWith - fm.stringWidth(tableName))/2;//文字居中
        bean.fontY = 70;
        bean.backgroundColor = new Color(238, 154, 0);
        bean.gridX=bean.gridY=0;
        bean.gridWidth=gridWith;
        bean.gridHeight=gridHeight;
        bean.borderWidth=bean.gridWidth;
        bean.borderHeight=bean.gridHeight;
        bean.orginWidth = bean.gridWidth;
        bean.orginHeight = bean.gridHeight;
        return bean;
    }
做完标题又做表头:
/**
     * 得到表头grid对象
     * @param title
     * @param tableNameGridBean
     * @param preTitleGridBean
     * @param gridX
     * @param gridY
     * @param gridWidth
     * @param gridHeight
     * @return
     */
    public static XXXXTableGridBean getInstanceForTableTitle(String title,
            XXXXTableGridBean tableNameGridBean,XXXXTableGridBean preTitleGridBean,
            int gridX, int gridY, int gridWidth, int gridHeight) {
        XXXXTableGridBean bean = new XXXXTableGridBean();
        bean.text = title;
        bean.backgroundColor = new Color(159, 121, 238);
        bean.gridX=gridX;
        bean.gridY=gridY;
        bean.gridWidth=gridWidth;
        bean.gridHeight=gridHeight;
        bean.borderX=gridX;
        bean.borderY=gridY;
        bean.borderWidth=bean.gridWidth;
        bean.borderHeight=bean.gridHeight;
        bean.orginWidth = preTitleGridBean.orginWidth+preTitleGridBean.gridWidth;
        bean.orginHeight = tableNameGridBean.gridHeight;
        bean.fontColor = Color.WHITE;
        FontMetrics fm = new JLabel().getFontMetrics(bean.font);
        int fontWidth = fm.stringWidth(title);
        if(fontWidth>gridWidth){//文字宽度超过表格宽度,则换行文字
            bean.text1 = bean.text.substring(0,4);
            bean.text2 = bean.text.replace(bean.text1,"").trim();
            fontWidth = fm.stringWidth(bean.text1);
            bean.fontX = bean.orginWidth+((bean.gridWidth - fontWidth)/2);//文字居中
            bean.fontY = tableNameGridBean.gridHeight+80;
            bean.fontX2 = bean.fontX;
            bean.fontY2 =  bean.fontY + 60;
        }else{
            bean.fontX = bean.orginWidth+((bean.gridWidth - fontWidth)/2);//文字居中
            bean.fontY = tableNameGridBean.gridHeight+80;
        }
        return bean;
    }
也还行,表头也顺利生成,于是做表格内容,注意,这里开始有第一个跨行的表格出现,而具体跨多少行,是由参数里面的数据条数动态决定的:
public static XXXXTableGridBean getInstanceForTableContentGrid_FirstRowSpan(String val,List<XXXXDTO> allCityInfos,XXXXDTO nowCityInfo){
        XXXXTableGridBean bean = new XXXXTableGridBean();
        bean.text = val;
        int index = allCityInfos.indexOf(nowCityInfo);
        int projectSize=0;
        for(int i=0;i<index;i++){
            projectSize += allCityInfos.get(i).getProjectInfoDTOList().size();
        }
        int topHeight = nameGridHeight+titleGridHeight+projectSize*contentGridHeight;
        bean.borderX=0;
        bean.borderY=topHeight;
        bean.borderWidth=GridBeanConfigs[0].getWidth();
        bean.borderHeight=nowCityInfo.getProjectInfoDTOList().size()*contentGridHeight;
        bean.gridX=bean.borderX;
        bean.gridY=bean.borderY;
        bean.gridWidth=bean.borderWidth;
        bean.gridHeight=bean.borderHeight;
        bean.orginWidth=bean.gridWidth;
        bean.orginHeight=topHeight;
        FontMetrics fm = new JLabel().getFontMetrics(bean.font);
        int fontWidth = fm.stringWidth(bean.text);
        bean.fontX = (bean.orginWidth-fontWidth)/2;
        bean.fontY = bean.orginHeight+(bean.borderHeight-bean.font.getSize())/2+bean.font.getSize();
        return bean;
    }
然后第二个跨行格出现,这里的跨行数也是由参数中的数据条数动态决定的:
public static XXXXTableGridBean getInstanceForTableContentGrid_GridContent(String val,XXXXTableGridBean preGridBean,
            int gridWidth,int gridHeight,int currentLineNumber,int allSubLineNumber,int nowSubLineNumber){
        XXXXTableGridBean bean = new XXXXTableGridBean();
        bean.text = val;
        bean.font =  new Font("宋体", Font.BOLD, 58/allSubLineNumber*nowSubLineNumber);
        bean.gridWidth=gridWidth;
        bean.gridHeight=gridHeight/allSubLineNumber*nowSubLineNumber;
        bean.borderWidth=bean.gridWidth;
        bean.borderHeight=bean.gridHeight/allSubLineNumber*nowSubLineNumber;
        if(preGridBean==null){
            bean.orginWidth=GridBeanConfigs[0].getWidth();
            bean.orginHeight=nameGridHeight+titleGridHeight+((currentLineNumber-1)*contentGridHeight)/allSubLineNumber*nowSubLineNumber;
        }else{
            bean.orginWidth = preGridBean.orginWidth+preGridBean.gridWidth;
            bean.orginHeight = preGridBean.orginHeight;
        }
        bean.gridX=bean.orginWidth;
        bean.gridY=bean.orginHeight;
        bean.borderX=bean.gridX;
        bean.borderY=bean.gridY;
        FontMetrics fm = new JLabel().getFontMetrics(bean.font);
        bean.fontX = bean.orginWidth+((bean.gridWidth - fm.stringWidth(val))/2);//文字居中
        bean.fontY = bean.orginHeight+bean.font.getSize()+30/allSubLineNumber*nowSubLineNumber;
        return bean;
    }
做到这,我已经呼吸急促头昏眼花了,赶紧用听诊器听了一下心跳!

我感觉这累死累活的不靠谱,这图画到后期,脑汁完全不够用,以后维护也是一大难题,扩展性或许是比原来高了一点点,但是优势不明显,半斤八两,代码量一上去就很头大了,就不能有其他解决方案吗?
我于是带着这个问题在睡梦中沉思,主要是想:既然报表要方便扩展易于变化,那最简单的就是做成excel,excel能不能动态设置跨行呢?可以,excel能不能在服务端打开以后自动截个图呢?不知道,但是excel倒是可以转存为图片,操作excel需要借助poi或者jxl,转存图片需要借助aspose-cells包,这篇文章有介绍:https://www.cnblogs.com/abc8023/p/9336513.html
还是觉得麻烦,表格这东西最熟悉的莫过于html的table标签,有没有可能把做好的html转存为图片呢?嘿,还真有:
基于Java内置浏览器DJNativeSwing的实现(https://blog.csdn.net/ltllml44/article/details/72910295)
基于qt的qtjambi包的shi(https://blog.csdn.net/redlevin/article/details/80145963)
基于Html2Image包的实现(https://www.cnblogs.com/zxf330301/p/5666592.html)
简直像突然感觉打开了新世界的大门!
综合对比下来,决定采用Html2Image尝试一下:
首先构造好数据,根据数据生成好html模板页面(这里采用jsp):
<%@ taglib prefix="c" uri="http://java.sun.com/jsp/jstl/core" %>
<%@ taglib prefix="fn" uri="http://java.sun.com/jsp/jstl/functions" %>
<%@ page contentType="text/html;charset=UTF-8" language="java" %>
<html>
<head>
<style type="text/css">
html,body{margin:0px;padding:0px;}
table{width:3680px;font-size:58px;border-top:1px solid black;border-left:1px solid black;text-align: center;}
table td, table th{height:120px;border-right:1px solid black; border-bottom:1px solid black;line-height:58px;text-align: center;}
table td{font-size: 58px;text-align: center;}
</style>
</head>
<body>
<table cellpadding="0" cellspacing="0">
<tr>
<th colspan="14" style="height:100px;line-height: 100px;background-color:#EF9A01;color:white;font-size:70px;">XXX报表(${dto.provinceName})${dto.dayText}</th>
</tr>
<tr style="height: 170px;background-color: #9F7AEE;color:white;">
<th width="220">表头</th>
<th width="520">表头</th>
<th width="240">表头</th>
<th width="240">表头</th>
<th width="240">表头</th>
<th width="240">表头</th>
<th width="240">表头</th>
<th width="300">表头</th>
<th width="240">表头</th>
<th width="240">表头</th>
<th width="240">表头</th>
<th width="240">表头</th>
<th width="240">表头</th>
<th width="240">表头</th>
</tr>
<c:forEach items="${dto.dxxxDTOs}" var="d" varStatus="dStatus">
<c:set var="preCityGridIndex" value="-1" />
<c:set var="preProjectGridIndex" value="-1" />
<c:forEach items="${d.projectInfoDTOList}" var="project" varStatus="pStatus">
<c:forEach items="${project.childXXXDTOS}" var="c">
<tr>
<c:if test="${dStatus.index!=preCityGridIndex}">
<td rowspan="${d.cityRowSpanCount}">${d.downtownName}</td>
</c:if>
<c:if test="${pStatus.index!=preProjectGridIndex}">
<td rowspan="${fn:length(project.childXXXDTOS)}">${project.item0}</td>
<td rowspan="${fn:length(project.childXXXDTOS)}">${project.item1}</td>
<td rowspan="${fn:length(project.childXXXDTOS)}">${project.item2}</td>
<td rowspan="${fn:length(project.childXXXDTOS)}">${project.item3}</td>
<td rowspan="${fn:length(project.childXXXDTOS)}">${project.item4}</td>
<td rowspan="${fn:length(project.childXXXDTOS)}">${project.item5}</td>
</c:if>
<td >${c.childName}</td>
<td >${c.childxx}</td>
<td >${c.childxx}</td>
<td >${c.childxx}</td>
<td >${c.childxx}</td>
<td >${c.childxx}</td>
<td >${c.childxx}</td>
</tr>
<c:set var="preCityGridIndex" value="${dStatus.index}" />
<c:set var="preProjectGridIndex" value="${pStatus.index}" />
</c:forEach>
</c:forEach>
</c:forEach>
<tr style="height: 120px;background-color:#7D26CD;color:white;line-height: 58px;">
<td colspan="2">合计</td>
<c:forEach items="${dto.totalCountList}" var="n" varStatus="nStatus">
<c:if test="${nStatus.index == 5}">
<td> </td>
</c:if>
<c:if test="${nStatus.index != 5}">
<td>${n}</td>
</c:if>
</c:forEach>
</tr>
</table>
</body>
</html>
然后用Html2Image生成图片:
加入jar包:
<dependency>
	<groupId>com.github.xuwei-k</groupId>
	<artifactId>html2image</artifactId>
	<version>0.1.0</version>
</dependency>
生成图片:
private void html2Image(String configId,String imageID, String province, String templateWebURL) {
        HtmlImageGenerator generator = new HtmlImageGenerator();
        generator.loadUrl(templateWebURL);
        try {
            Thread.sleep(3000);
        } catch (InterruptedException e) {
            e.printStackTrace();
        }
        generator.getBufferedImage();
        try {
            Thread.sleep(2000);
        } catch (InterruptedException e) {
            e.printStackTrace();
        }

        String entryKey = chineseCharToPinYin(province);
        if (StringUtil.isEmpty(entryKey)) {
            entryKey = String.valueOf(Math.random());
        }
        entryKey += imageID;
        imageFilePath = Constant.XXXFilePath
                .replace("{day}", DateUtil.formatNoLineDate(new Date()))
                .replace("{daily_configId}", configId)
                + "img/";
        File imgFile = new File(imageFilePath);
        if (!imgFile.exists()) {
            imgFile.mkdirs();
        }
        generator.saveAsImage(imageFilePath + entryKey + ".png"); //经试验,在win7本地生成jpg图片整体背景色会发红,生成png则正常
    }
这里要注意:在win7本地生成jpg图片整体背景色会发红,生成png则正常,具体何故不知。
ok,到这里图片文件轻松搞定,再加上生成html文件代码、发送微信模板消息通知代码,前前后后总共约500行代码,关键是这种方式以后扩展很方便,轻松修改html模板页面,图片生成则和图片模板完全解耦,维护方便有木有!
此记,以查!