目录
7、现在需要在R3-R5-R6和R4-R7-R8这两个部分进行MGRE的搭建
DS VPN实验
实验图拓扑:

1、首先为所有接口配置ip地址、回环地址:
[R1]int gi 0/0/0
[R1-GigabitEthernet0/0/0]ip add 100.1.12.1 24
[R1]ip route-static 0.0.0.0 0 100.1.12.2

[R2]int g1/0/0
[R2-GigabitEthernet1/0/0]ip address 100.1.23.1 24
[R2-GigabitEthernet1/0/0]int gi 0/0/0
[R2-GigabitEthernet0/0/0]ip add 100.1.12.2 24
[R2-GigabitEthernet0/0/0]in gi 0/0/2
[R2-GigabitEthernet0/0/2]ip add 100.1.24.1 24
[R2-GigabitEthernet0/0/2]int gi 2/0/0
[R2-GigabitEthernet2/0/0]ip add 100.1.26.1 24
[R2-GigabitEthernet2/0/0]int gi 3/0/0
[R2-GigabitEthernet3/0/0]ip add 100.1.27.1 24
[R2-GigabitEthernet3/0/0]int gi 4/0/0
[R2-GigabitEthernet4/0/0]ip add 100.1.28.1 24
[R2-GigabitEthernet4/0/0]int gi 1/0/0
[R2-GigabitEthernet1/0/0]ip add 100.1.25.1 24
[R2-GigabitEthernet1/0/0]int gi 0/0/1
[R2-GigabitEthernet0/0/1]ip add 100.1.23.1 24
[R2-GigabitEthernet0/0/1]int lo0
[R2-LoopBack0]ip add 10.2.2.2 24

[R3]int gi 0/0/0
[R3-GigabitEthernet0/0/0]ip add 100.1.23.2 24
[R3-LoopBack0]ip add 10.3.3.3 24
[R4]int gi 0/0/0
[R4-GigabitEthernet0/0/0]ip add 100.1.24.2 24
[R4-GigabitEthernet0/0/0]int lo0
[R4-LoopBack0]ip add 10.4.4.4 24
[R5]int gi 0/0/0
[R5-GigabitEthernet0/0/0]ip add 100.1.25.2 24
[R5-GigabitEthernet0/0/0]int lo0
[R5-LoopBack0]ip add 10.5.5.5 24
[R6]int gi 0/0/0
[R6-GigabitEthernet0/0/0]ip add 100.1.26.2 24
[R6-GigabitEthernet0/0/0]int lo0
[R6-LoopBack0]ip add 10.6.6.6 24
[R7]int gi0/0/0
[R7-GigabitEthernet0/0/0]ip add 100.1.27.2 24
[R7-GigabitEthernet0/0/0]int lo0
[R7-LoopBack0]ip add 10.7.7.7 24
[R8-GigabitEthernet0/0/0]ip add 100.1.28.2 24
[R8-GigabitEthernet0/0/0]int lo0
[R8-LoopBack0]ip add 10.8.8.8 24
2、为3-8这些设备配置一条缺省指向R2
[R3]ip route-static 0.0.0.0 0 100.1.23.1
[R4]ip route-static 0.0.0.0 0 100.1.24.1
[R5]ip route-static 0.0.0.0 0 100.1.25.1
[R6]ip route-static 0.0.0.0 0 100.1.26.1
[R7]ip route-static 0.0.0.0 0 100.1.27.1
[R8]ip route-static 0.0.0.0 0 100.1.28.1
3、在R1-R3-R4这三个设备之间搭建MGRE
R1(中心站点):
[R1]int tunnel 0/0/0
[R1-Tunnel0/0/0]tunnel-protocol gre p2mp
[R1-Tunnel0/0/0]source g0/0/0
[R1-Tunnel0/0/0]ip add 10.0.0.1 24
[R1-Tunnel0/0/0]nhrp  network-id 100
[R1-Tunnel0/0/0]nhrp authentication cipher 123456 #nhrp 接口认证
[R1-Tunnel0/0/0]nhrp entry  multicast dynamic
[R1-Tunnel0/0/0]gre key 1 #grekey加强安全性
R3:
[R3]int Tunnel 0/0/0
[R3-Tunnel0/0/0]tunnel-protocol gre p2mp
[R3-Tunnel0/0/0]source g0/0/0
[R3-Tunnel0/0/0]gre key 1
[R3-Tunnel0/0/0]ip add 10.0.0.3 24
[R3-Tunnel0/0/0]nhrp  network-id 100
[R3-Tunnel0/0/0]nhrp entry 10.0.0.1 100.1.12.1 register
[R3-Tunnel0/0/0]nhrp authentication cipher 123456
R4:
[R4]int tu0/0/0
[R4-Tunnel0/0/0]tunnel-protocol gre  p2mp
[R4-Tunnel0/0/0]source gi0/0/0
[R4-Tunnel0/0/0]gre key 1
[R4-Tunnel0/0/0]ip add 10.0.0.4 24
[R4-Tunnel0/0/0]nhrp network-id 100
[R4-Tunnel0/0/0]nhrp entry 10.0.0.1 100.1.12.1 register
[R4-Tunnel0/0/0]nhrp authentication cipher 123456
可以在R1上查看注册信息:

4、配置OSPF让各个主机之间可以进行通信
R1:
[R1]ospf 1 router-id  1.1.1.1
[R1-ospf-1-area-0.0.0.0]network  10.0.0.0 0.255.255.255
R3:
[R3]ospf 1 ro
[R3]ospf 1 router-id  3.3.3.3
[R3-ospf-1] area 0.0.0.0
[R3-ospf-1-area-0.0.0.0]  network 10.0.0.0 0.255.255.255
R4:
[R4]ospf 1 router-id  4.4.4.4
[R4-ospf-1] area 0.0.0.0
[R4-ospf-1-area-0.0.0.0]  network 10.0.0.0 0.255.255.255
5、修改隧道接口的网络类型为p2mp
[R1]int tu0/0/0
[R1-Tunnel0/0/0]ospf network-type p2mp
[R3]int t0/0/0
[R3-Tunnel0/0/0]ospf network-type p2mp
[R4]int Tunnel 0/0/0
[R4-Tunnel0/0/0]ospf network-type p2mp
6、在R1上开启重定向、在R3、R4上配置最短
[R1-Tunnel0/0/0]nhrp redirect
[R3-Tunnel0/0/0]nhrp shortcut
[R4-Tunnel0/0/0]nhrp  shortcut
这时候可以使用trace 10.0.0.4查看访问的路径;

注:这里可以看出来访问路径已经不是先去10.0.0.1,而是直接去访问10.0.0.4
7、现在需要在R3-R5-R6和R4-R7-R8这两个部分进行MGRE的搭建
R3(中心站点):
[R3]int t0/0/0
[R3-Tunnel0/0/0]nhrp entry multicast dynamic
[R3-Tunnel0/0/0]nhrp  redirect
R5:
[R5]int Tunnel 0/0/0
[R5-Tunnel0/0/0]tunnel-protocol gre p2mp
[R5-Tunnel0/0/0]source gi0/0/0
[R5-Tunnel0/0/0]gre  key  1
[R5-Tunnel0/0/0]ip address  10.0.0.5 24
[R5-Tunnel0/0/0]nhrp network-id 100
[R5-Tunnel0/0/0]nhrp authentication cipher 123456
[R5-Tunnel0/0/0]nhrp entry 10.0.0.3 100.1.23.2 register
[R5-Tunnel0/0/0]nhrp shortcut
[R5-Tunnel0/0/0]ospf network-type p2mp
[R5]ospf 1 router-id 5.5.5.5
[R5-ospf-1-area-0.0.0.0]network 10.0.0.0 0.255.255.255
R6:
[R6]int Tunnel 0/0/0
[R6-Tunnel0/0/0] tunnel-protocol gre p2mp
[R6-Tunnel0/0/0] gre key 1
[R6-Tunnel0/0/0] ospf network-type p2mp
[R6-Tunnel0/0/0] nhrp shortcut
[R6-Tunnel0/0/0] nhrp network-id 100
[R6-Tunnel0/0/0] nhrp entry 10.0.0.3 100.1.23.2 register
[R6-Tunnel0/0/0]nhrp authentication cipher 123456
[R6-Tunnel0/0/0]ip add 10.0.0.6 24
[R6]ospf 1 router-id  6.6.6.6
[R6-ospf-1-area-0.0.0.0]network  10.0.0.0 0.255.255.255
R4(中心站点:)
[R4-Tunnel0/0/0]nhrp entry multicast dynamic
[R4-Tunnel0/0/0]nhrp redirect
R7:
[R7]int t0/0/0
[R7-Tunnel0/0/0]tunnel-protocol gre p2mp
[R7-Tunnel0/0/0]source gi0/0/0
[R7-Tunnel0/0/0]gre key 1
[R7-Tunnel0/0/0]ip add 10.0.0.7 24
[R7-Tunnel0/0/0]nhrp network-id 100
[R7-Tunnel0/0/0]nhrp authentication cipher 123456
[R7-Tunnel0/0/0]nhrp  entry 10.0.0.4 100.1.24.2 register
[R7-Tunnel0/0/0]nhrp shortcut
[R7]ospf 1 router-id 7.7.7.7
[R7-ospf-1]area 0
[R7-ospf-1-area-0.0.0.0]network 10.0.0.0 0.255.255.255
[R7-ospf-1-area-0.0.0.0]int tu0/0/0
[R7-Tunnel0/0/0]ospf network-type p2mp
R8:
[R8]int Tunnel 0/0/0
[R8-Tunnel0/0/0] ip address 10.0.0.7 255.255.255.0
[R8-Tunnel0/0/0] tunnel-protocol gre p2mp
[R8-Tunnel0/0/0] source GigabitEthernet0/0/0
[R8-Tunnel0/0/0] gre key 1
[R8-Tunnel0/0/0] ospf network-type p2mp
[R8-Tunnel0/0/0] nhrp authentication cipher %$%${"@cGFyLlVmL@4G,4=J.,.2n%$%$
[R8-Tunnel0/0/0] nhrp shortcut
[R8-Tunnel0/0/0] nhrp network-id 100
[R8-Tunnel0/0/0] nhrp entry 10.0.0.4 100.1.24.2 register
[R8-Tunnel0/0/0]nhrp authentication cipher 123456
[R8-Tunnel0/0/0]ip add 10.0.0.8 24
[R8-Tunnel0/0/0]q
[R8]ospf 1 router-id 8.8.8.8
[R8-ospf-1]area 0
[R8-ospf-1-area-0.0.0.0]network 10.0.0.0 0.255.255.255
这时候可以尝试在R6上tracertR7:
8、现在就可以配置IPSEC了
R3:
[R3]ike proposal 1
[R3-ike-proposal-1]authentication-method pre-share
[R3-ike-proposal-1]encryption-algorithm aes-cbc-128
[R3-ike-proposal-1]dh group5
[R3-ike-proposal-1]authentication-algorithm md5

[R3]ike peer dsvpn v1
[R3-ike-peer-dsvpn]exchange-mode aggressive
[R3-ike-peer-dsvpn]pre-shared-key cipher 123456
[R3-ike-peer-dsvpn]ike-proposal 1
[R3-ike-peer-dsvpn]remote-name dsvpn
[R3]ike local-name dsvpn

[R3]ipsec proposal dsvpn
[R3-ipsec-proposal-dsvpn]transform ah-esp
[R3-ipsec-proposal-dsvpn]encapsulation-mode transport
[R3-ipsec-proposal-dsvpn]ah authentication-algorithm sha1
[R3-ipsec-proposal-dsvpn]esp encryption-algorithm aes-128
[R3-ipsec-proposal-dsvpn]esp authentication-algorithm md5

[R3]ipsec profile dsvpn
[R3-ipsec-profile-dsvpn]ike-peer dsvpn
[R3-ipsec-profile-dsvpn]proposal dsvpn
[R3-ipsec-profile-dsvpn]q

[R3]in tu0/0/0
[R3-Tunnel0/0/0]ipsec profile dsvpn
注:其他设备的配置与R3相同,这里就不再赘述
查看R3和R4的ospf邻居表:

9、测试

然后可以抓包查看: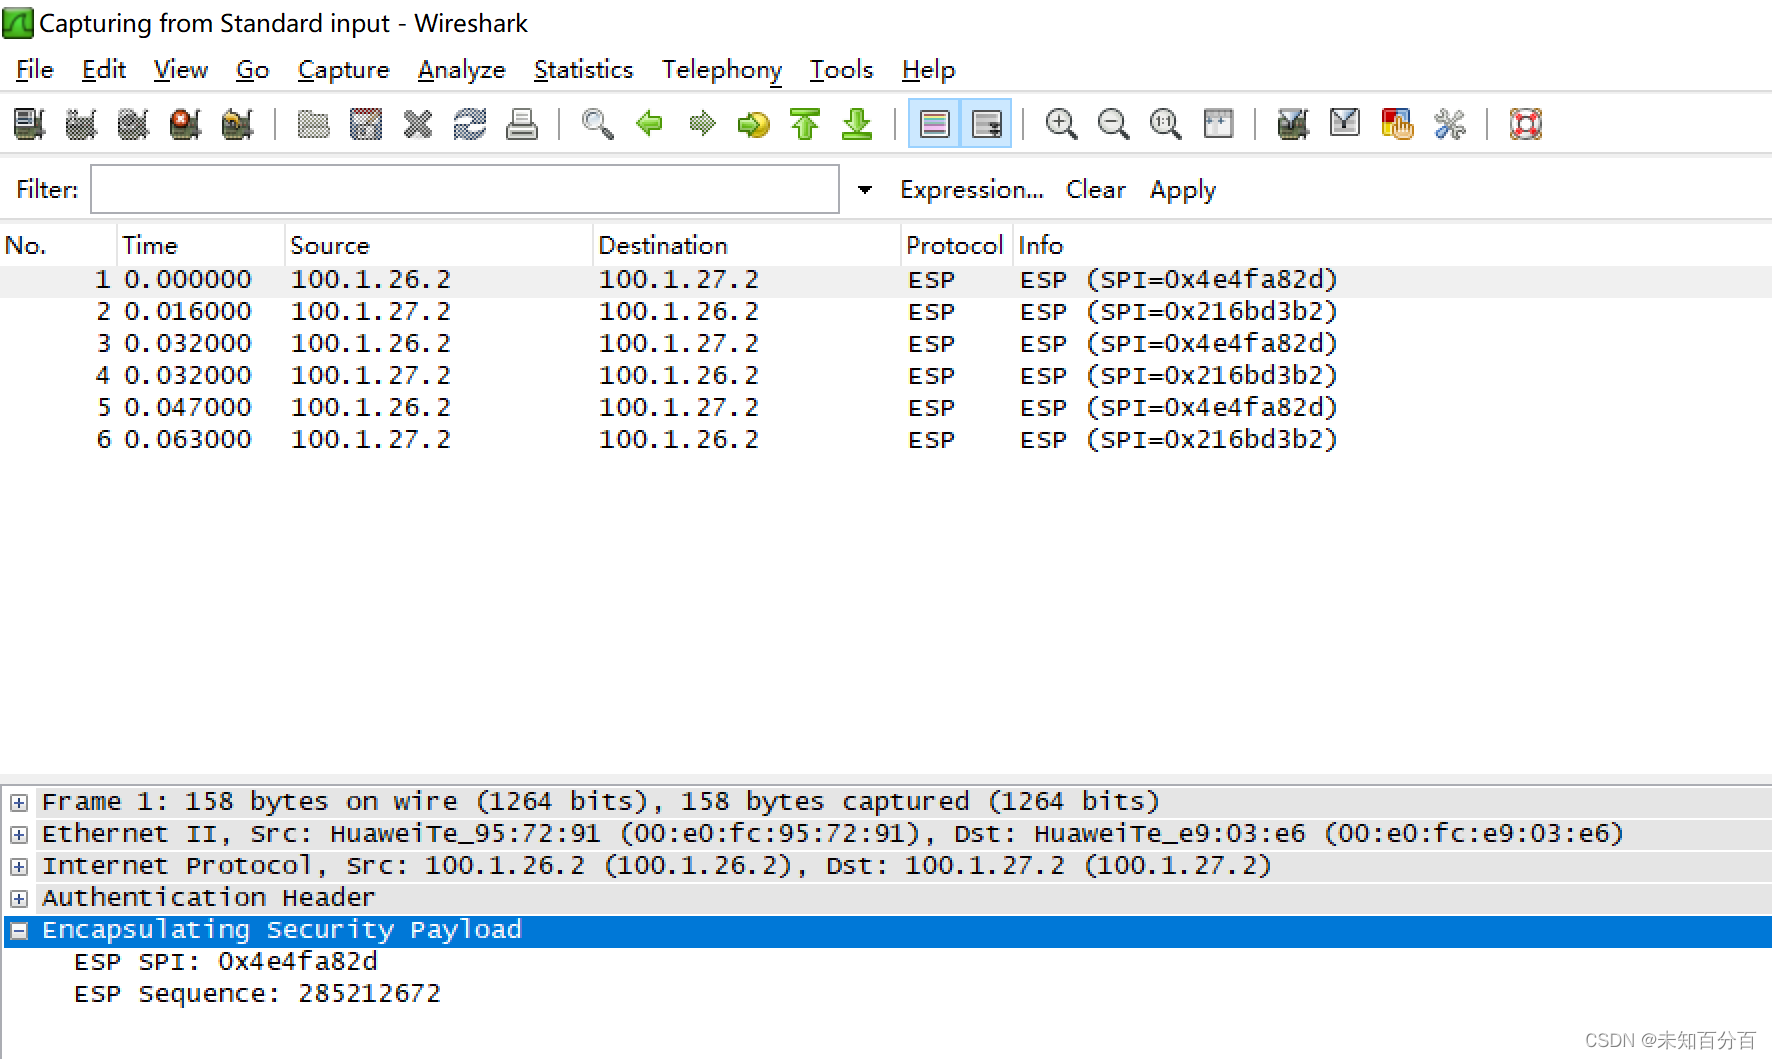
从抓包的结果可以看出现在传输的数据已经被加密了