目录
4.2、iview table 升级 vue3 render 写法
这个会不间断的更新,欢迎大家一起讨论
如果没有vue2基础的可以先看下vue2 网址
如果没有了解vue2 和vue3 的区别的可以先看下我整理的这个区别vue3和vue2的区别并且如何升级 (对于vue2有基础的)_侧耳倾听...的博客-CSDN博客
或者看下vue3官网 vue3 官网
目录结构如下

一、vue3
1.2、main.js中引用组件
vue2.x 写法
import Vue from 'vue'
import App from './App.vue'
import router from './router'
import store from './store'
import ViewUI from 'view-design';
import 'view-design/dist/styles/iview.css';
import UrlPath from "./axiosConfig/path"

Vue.prototype.GlobalUrl = UrlPath;

Vue.use(ViewUI);

new Vue({
  router,
  store,
  render: h => h(App)
}).$mount('#app')
vue3.x 写法
import { createApp } from 'vue'
import App from './App.vue'
import router from './router'
import store from './store'

const Vue = createApp(App)

import ViewUIPlus from "view-ui-plus"
import "view-ui-plus/dist/styles/viewuiplus.css"
import UrlPath from "./axiosConfig/path"

Vue.config.globalProperties.GlobalUrl = UrlPath;

Vue.use(store).use(router).use(ViewUIPlus).mount('#app')
修改的地方
import Vue from 'vue' import { createApp } from 'vue'
const Vue = createApp(App)Vue.prototype 改成 Vue.config.globalProperties
二、vue3 router修改
vue2.x 写法
import Vue from 'vue'
import VueRouter from 'vue-router'
import Home from '../views/Home.vue'
export default new VueRouter({
  linkExactActiveClass: "active",
  mode: 'history',
  base: process.env.VUE_APP_URL_BASE_PATH,
  routes: [
    {
      path: '/',
      redirect: '/versionManagement',
      component: Home,
      children: [
        {
          path: '/versionManagement',
          name: 'versionManagement',
          component: () => import('@/views/versionManagement/versionManagement.vue'),
          meta: {
            title: '版本管理',
            parentId: "versionManagement",
          },
        },
      ]
    },
  ]
})
vue3.x 写法
import { createRouter, createWebHistory } from 'vue-router'
import Home from '../views/Home.vue'
const routes = [
  {
    path: '/',
    redirect: '/versionManagement',
    component: Home,
    children: [
      {
        path: '/versionManagement',
        name: 'versionManagement',
        component: () => import(`@/views/versionManagement/versionManagement.vue`),
        meta: {
          title: '版本管理',
          parentId: "versionManagement",
        },
      },
    ]
  },
]
const router = createRouter({
  history: createWebHistory(process.env.VUE_APP_URL_BASE_PATH),
  linkExactActiveClass: "active",
  routes
})

export default router
修改的地方
1、
import VueRouter from 'vue-router'改成
import { createRouter, createWebHistory } from 'vue-router'2、
history 就是之前的mode
history => createWebHistory、
hash => createWebHashHistory、
memory =>createMemoryHistory
例如
 mode: 'history',
  base: process.env.VUE_APP_URL_BASE_PATH,
const router = createRouter({
history: createWebHistory(process.env.VUE_APP_URL_BASE_PATH),
linkExactActiveClass: "active",
routes
})3、base 可以直接在createWebHistory(base)
三、vue3 vuex 中引用
3.1 vue3配置vuex
store/index.js
import { createStore } from 'vuex'
import state from './state'
import mutations from './mutations'
import modules from './modules'
import getters from './getter'


export default createStore({
    state,
    getters,
    mutations,
    modules,
})
store/state.js 和vue2中一样
export default{
    datasetData: null,
}
store/mutations.js 和vue2中一样
export default {
    setDatasetData: function (state, value) {
        state.datasetData = value;
    },
}
store/getter.js 和vue2中一样
export default {
    getDatasetData: state => state.datasetData,
}
3.2 vue3.x 存取 vuex中的值
在vue2.中
取值

import { mapGetters, mapMutations } from "vuex";

methods: {
    ...mapGetters(["getCodeTreeData"]),
}

let codeTreeData = this.getCodeTreeData()


存值

this.$store.commit("setCodeTreeData", _treeData);
在vue3.x 中
取值

let codeTreeData = this.$store.getters.getCodeTreeData

存值

this.$store.commit("setCodeTreeData", _treeData);
区别在于vue 2.x中用到mapGetters
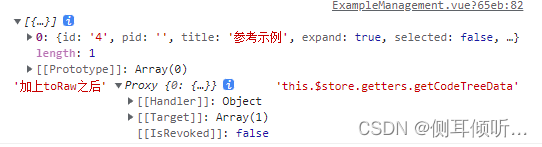
3.3、在vue3中查看vuex中的数据会显示Proxy
当我们打印 展示酱紫的时候,表慌,他只是vue3 的一个语法糖

如果我们要查看他的数据
第一种方法 可以引用他的 toRaw 后查看
import { toRaw } from "@vue/reactivity";
toRaw(this.$store.getters.getCodeTreeData)
注意:第二种方法,会产生复制,脱离之前的数据,
//第二种获取target值的方式,通过json序列化之后可获取值
JSON.parse(JSON.stringify(this.$store.getters.getCodeTreeData))
四、view-ui-plus在vue3中的改法
4.1、iview Model 升级 vue3 写法
vue2.x 版本写法
<Modal :value="modal2" width="500" draggable sticky :mask="false">
      <p slot="header">
        <span> {

   { keyTitle }} </span>
      </p>

      <div slot="footer">
        <Button @click="modal2 = false">取消</Button>
        <Button type="primary" @click="SubmitForm('formItems')">确定</Button>
      </div>
    </Modal>
  </div>
vue3.x 版本写法
<Modal v-model="modal2" width="500" draggable sticky :mask="false">
      <template #header>
        <p>
          <span> {

   { keyTitle }} </span>
        </p>
      </template>


      <template #footer>
        <div>
          <Button @click="modal2 = false">取消</Button>
          <Button type="primary" @click="SubmitForm('formItems')">确定</Button>
        </div>
      </template>
    </Modal>
修改的地方
1、:value改成v-model
2、slot 插槽,要在template 上
4.2、iview table 升级 vue3 render 写法
vue2.x 写法
{
                    title: "更新内容",
                    key: "content",
                    align: "left",
                    render: (h, params) => {
                        return h("div", [
                            h("span", {
                                domProps: {
                                    innerHTML: params.row.content,
                                },
                            }),
                        ]);
                    },
                },
                {
                    title: "操作",
                    key: "action",
                    align: "center",
                    width: 140,
                    render: (h, params) => {
                        return h("div", [
                            h("Icon", {
                                props: {
                                    size: "20",
                                    type: "ios-create",
                                },
                                style: {
                                    marginRight: "5px",
                                    cursor: "pointer",
                                },
                                on: {
                                    click: () => {
                                        this.jumpDetail(params.row);
                                    },
                                },
                            }),

                        ]);
                    },
                },
vue3.x 写法
{
          title: "更新内容",
          key: "content",
          align: "left",
          render: (h, params) => {
            return h("div", [
              h("span", {
                innerHTML: params.row.content,
              }),
            ]);
          },
        },
        {
          title: "操作",
          key: "action",
          align: "center",
          width: 140,
          render: (h, params) => {
            return h("div", [
              h(
                "i",
                {
                  class: "ivu-icon ivu-icon-ios-create",
                  style: {
                    marginRight: "5px",
                    fontSize: "20px",
                    cursor: "pointer",
                  },
                  onClick: () => {
                    this.jumpDetail(params.row);
                  },
                },
                {
                  default() {
                    return "";
                  },
                }
              ),

            ]);
          },
        },
{
title: "操作",
key: "action",
align: "center",
width: 80,
render: (h, params) => {
return h("div", [
h(
"div",
{
class: "ivu-btn ivu-btn-default ivu-btn-small ivu-btn-ghost",
style: {
marginRight: "5px",
cursor: "pointer",
},
onClick: () => {
this.sendMail(params.row);
},
},
{
default() {
return "发送邮件";
},
}
),
]);
},
},修改的地方
1、当类型是innerHTML 是,不在使用
domProps: { innerHTML: params.row.content, }, 而是直接 innerHTML: params.row.content,
2、vue3 使用table 展示操作icon
h后不在用他的Icon 而直接使用class(这个大家可以讨论其他的写法)
4.3、iview CheckBox
vue2.x
<Checkbox :value="getIsPublic" @on-change="getCheckboxStatus">设置为公共代码</Checkbox>vue3.x
<Checkbox v-model="getIsPublic" @on-change="getCheckboxStatus">设置为公共代码</Checkbox>区别 :value改成v-model
五、vue3 使用中文版的monaco- editor
注意版本的配置
npm install [email protected] --save
npm install [email protected] --save


使用
<template>
  <div :style="myEditorStyle" ref="pieMyEditor" style="height: 100%">
    <div style="height: 100%; width: 100%" ref="pieMyContainer"></div>
  </div>
</template>
<script>
import { setLocaleData } from "monaco-editor-nls";
import zh_CN from "monaco-editor-nls/locale/zh-hans";
setLocaleData(zh_CN);
const monaco = require("monaco-editor/esm/vs/editor/editor.api");

export default {
  props: {
    codes: {
      type: String,
      default: "",
    },
    language: {
      type: String,
      default: "javascript",
    },
  },
  data() {
    return {
      theme: "vs",
      fontSize: 14,
      suggestionsList: [],
      myEditorStyle: {},
      minimapEnabled: false,
    };
  },
  beforeUnmount() {
    // 销毁编辑器
    this.monacoEditor.dispose();
  },
  mounted() {
    this.initEditor();
  },
  methods: {
    initEditor() {
      this.$refs.pieMyContainer.innerHTML = "";
      this.monacoEditor = monaco.editor.create(this.$refs.pieMyContainer, {
        value: this.codes,
        language: this.language,
        theme: this.theme, //vs, hc-black, or vs-dark
        fontSize: this.fontSize,
        selectOnLineNumbers: true,
        roundedSelection: false,
        cursorStyle: "line", //光标样式
        glyphMargin: true, //字形边缘
        useTabStops: false,
        autoIndent: false, //自动布局
        quickSuggestionsDelay: 500, //代码提示延时
        folding: true, // 是否折叠
        foldingHighlight: true, // 折叠等高线
        foldingStrategy: "indentation", // 折叠方式  auto | indentation
        showFoldingControls: "always", // 是否一直显示折叠 always | mouseover
        disableLayerHinting: true, // 等宽优化
        emptySelectionClipboard: false, // 空选择剪切板
        selectionClipboard: false, // 选择剪切板
        automaticLayout: true, // 自动布局
        codeLens: false, // 代码镜头
        scrollBeyondLastLine: false, // 滚动完最后一行后再滚动一屏幕
        colorDecorators: true, // 颜色装饰器
        accessibilitySupport: "off", // 辅助功能支持  "auto" | "off" | "on"
        lineNumbers: "on", // 行号 取值: "on" | "off" | "relative" | "interval" | function
        lineNumbersMinChars: 5, // 行号最小字符   number
        enableSplitViewResizing: false,
        readOnly: false, //是否只读  取值 true | false
        minimap: { enabled: true },
      });
      this.monacoEditor.onDidChangeModelContent((event) => {
        //编辑器内容change事件
        this.$emit("onCodeChange", this.monacoEditor.getValue(), event);
      });
      this.$emit("onMounted", this.monacoEditor); //编辑器创建完成回调
      window.monacoEditor = this.monacoEditor;
      this.monacoEditor.addCommand(
        monaco.KeyMod.CtrlCmd | monaco.KeyCode.KEY_S,
        () => {
          this.$emit("onSaveCode");
        }
      );
      this.monacoEditor.addCommand(
        monaco.KeyMod.WinCtrl | monaco.KeyCode.KEY_S,
        () => {
          this.$emit("onSaveCode");
        }
      );
    },
    getSuggestions() {
      this.suggestionsList.length = 0;
      pieAPI.forEach((item) => {
        if (item.length > 0) {
          this.getSuggestionsList(item);
        }
      });
    },
    getSuggestionsList(item) {
      item.forEach((ele) => {
        this.suggestionsList.push({
          label: ele.name,
          kind: monaco.languages.CompletionItemKind.Function,
          insertText: ele.name,
          insertTextRules:
            monaco.languages.CompletionItemInsertTextRule.InsertAsSnippet,
          detail: ele.description ? ele.description : ele.name,
        });

        if (ele.children && ele.children.length > 0) {
          this.getSuggestionsList(ele.children);
        }
      });
    },
  },
};
</script>
<style scoped>
</style>
在vue.config.js 中配置
注意:一定要注意 monaco-editor 的版本,要不然跑不起来
const MonacoWebpackPlugin = require('monaco-editor-esm-webpack-plugin');

 plugins: [
                    new MonacoWebpackPlugin({
                        output: './static/js/monaco-editor',
                        languages: ['javascript', 'css']
                    })
                ]