Fabric网络搭建好,合约部署好,接下来就是和合约交互。
我们上一章节中部署了官方给的fabcar合约项目,这里我们还是以这套合约为例做简单的交互介绍。
首先,fabcar的chaincode地址:https://github.com/hyperledger/fabric-samples/tree/main/chaincode/fabcar/javascript
部署的方法上一章节介绍过,使用deployCC即可。
这里我们假设已经部署好了fabcar的合约。
接下来我们直接开始对合约进行操作,也就是调用合约里面的方法。
新建项目
首先我们使用npm创建一个node项目,npm init,在package.json加入3个包:
{


  "name": "fabcar",
  "version": "1.0.0",
  "description": "FabCar application implemented in JavaScript",
  "engineStrict": true,
  "author": "Hyperledger",
  "license": "Apache-2.0",
  "dependencies": {


    "app-root-path": "^3.0.0",
    "fabric-ca-client": "^2.2.4",
    "fabric-network": "^2.2.4"
  }
}
说明下,fabric-network用于合约交互,里面有很重要的contract对象可以操作合约。fabric-ca-client用于fabric网络层面的一些交互,可以注册用户等。
注册Admin用户
const FabricCAServices = require('fabric-ca-client');
const {

     Wallets } = require('fabric-network');
const ROOT = require('app-root-path');
const ccp = require(`${

      ROOT}/organizations/peerOrganizations/org1.example.com/connection-org1.json`);
const walletPath = `${

      ROOT}/wallet`;

async function main() {


    try {


        // Create a new CA client for interacting with the CA.
        const caInfo = ccp.certificateAuthorities['ca.org1.example.com'];
        const caTLSCACerts = caInfo.tlsCACerts.pem;
        const ca = new FabricCAServices(
            caInfo.url,
            {

     trustedRoots: caTLSCACerts, verify: false },
            caInfo.caName
        );
        // Create a new file system based wallet for managing identities.
        const wallet = await Wallets.newFileSystemWallet(walletPath);
        // Enroll the admin user, and import the new identity into the wallet.
        const enrollment = await ca.enroll({


            enrollmentID: 'admin',
            enrollmentSecret: 'adminpw',
        });
        const x509Identity = {


            credentials: {


                certificate: enrollment.certificate,
                privateKey: enrollment.key.toBytes(),
            },
            mspId: 'Org1MSP',
            type: 'X.509',
        };
        await wallet.put('admin', x509Identity);
        console.log('Successfully enrolled admin user');
    } catch (e) {


        console.error(e);
    }
}

main();
这里我们注意到,需要引用一些外部文件,首先项目目录下创建一个wallet目录,存储用户钱包,也就是私钥,用于之后交互时的签名权。另外一个就是引入连接节点的配置文件,这个文件在organization下,我们必须要把第一章中用cryptogen生成的那个organization目录全部复制过来,注意是全部,否则会报错,可能是有什么关联引用吧。
注册普通用户
上面已经注册了admin用户,所以可以用admin用户再注册普通用户了,如下:
const {

     Wallets } = require('fabric-network');
const FabricCAServices = require('fabric-ca-client');
const ROOT = require('app-root-path');
const ccp = require(`${

      ROOT}/organizations/peerOrganizations/org1.example.com/connection-org1.json`);
const walletPath = `${

      ROOT}/wallet`;

async function main() {


    try {


        // Create a new CA client for interacting with the CA.
        const caURL = ccp.certificateAuthorities['ca.org1.example.com'].url;
        const ca = new FabricCAServices(caURL);
        const wallet = await Wallets.newFileSystemWallet(walletPath);
        const adminIdentity = await wallet.get('admin');
        const provider = wallet
            .getProviderRegistry()
            .getProvider(adminIdentity.type);
        const adminUser = await provider.getUserContext(adminIdentity, 'admin');

        // Register the user, enroll the user, and import the new identity into the wallet.
        const secret = await ca.register(
            {


                affiliation: 'org1.department1',
                enrollmentID: 'appUser',
                role: 'client',
            },
            adminUser
        );
        const enrollment = await ca.enroll({


            enrollmentID: 'appUser',
            enrollmentSecret: secret,
        });
        const x509Identity = {


            credentials: {


                certificate: enrollment.certificate,
                privateKey: enrollment.key.toBytes(),
            },
            mspId: 'Org1MSP',
            type: 'X.509',
        };
        await wallet.put('appUser', x509Identity);
        console.log('Successfully registeredd');
    } catch (error) {


        console.error(error);
    }
}

main();
合约读写
const {
Gateway, Wallets } = require('fabric-network');
const ROOT = require('app-root-path');
const walletPath = `${
ROOT}/wallet`;
const ccp = require(`${
ROOT}/organizations/peerOrganizations/org1.example.com/connection-org1.json`);
let conf = null;
let contract = null;
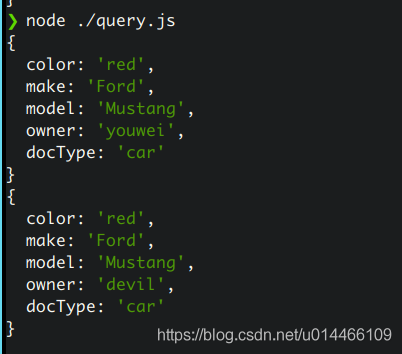
async function query() {
const res = await contract.evaluateTransaction('queryCar', 'CAR1');
console.log(JSON.parse(res.toString()));
}
async function change(name) {
await contract.submitTransaction('changeCarOwner', 'CAR1', name);
}
async function main() {
try {
// load the network configuration
const wallet = await Wallets.newFileSystemWallet(walletPath);
conf = {
wallet,
identity: 'appUser',
discovery: {
enabled: true, asLocalhost: true },
};
const gateway = new Gateway();
await gateway.connect(ccp, conf);
const network = await gateway.getNetwork('mychannel');
contract = network.getContract('fabcar');
await query();
await change('devil');
await query();
await gateway.disconnect();
} catch (error) {
console.error(error);
}
}
main();
对应输出结果: