文章目录
一、前言
- 官网下载: EasyUI框架 、 JQuery下载
- 引入easyUI和jquery的js文件,将这些文件放到项目中,并且在jsp页面中引入就行
- easyUI是把组件拿出来,定义并绑定到DOM元素上。跟后台交互的,需要将后台response的数据按照easyUI API需要的格式进行转换
二、引入使用easyUI
- 在使用的时候需要将easyUI对应的js文件和样式css文件引入
- 引入js文件的顺序不要搞反了,有的童鞋经常会发现我引入了js文件为什么会报一些莫名奇妙的问题,最多的应该就是未定义undefined,其实大多时候都是js文件引入顺序的问题。我们知道网页在加载我们的index页面的时候,会从上往下以此加载,那么有一些js文件依赖jquery文件,顺序搞错了的话,将会先加载其他的js,最后再加载jquery,这就导致出现上述未定义的问题,所以要注意引入的顺序
<!-- 引入依赖jquery -->
<script type="text/javascript" src="js/jquery-1.7.2.min.js"></script>
<!-- 引入easyUI js文件 -->
<script type="text/javascript" src="js/jquery-easyui-1.5.3/jquery.easyui.min.js"></script>
<!-- 引入EasyUI的样式文件-->
<link rel="stylesheet" href="js/jquery-easyui-1.5.3/themes/default/easyui.css" type="text/css"/>
<!-- 引入EasyUI的图标样式文件-->
<link rel="stylesheet" href="js/jquery-easyui-1.5.3/themes/icon.css" type="text/css"/>
三、用法
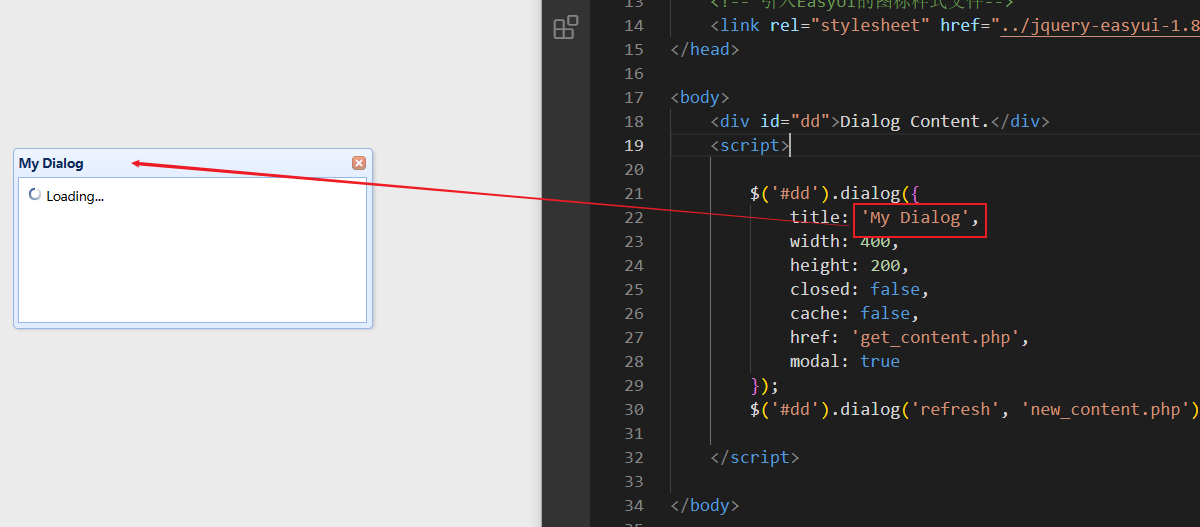
3.1 Dialog(对话框窗口)
3.1.1 示例1
<!DOCTYPE html>
<html lang="en">

<head>
    <meta charset="UTF-8">
    <meta name="viewport" content="width=device-width, initial-scale=1.0">
    <title>Document</title>
    <script type="text/javascript" src="../js/jquery-1.7.2/jquery.min.js"></script>
    <!-- 引入easyUI js文件 -->
    <script type="text/javascript" src="../jquery-easyui-1.8.6/jquery.easyui.min.js"></script>
    <!-- 引入EasyUI的样式文件-->
    <link rel="stylesheet" href="../jquery-easyui-1.8.6/themes/default/easyui.css" type="text/css" />
    <!-- 引入EasyUI的图标样式文件-->
    <link rel="stylesheet" href="../jquery-easyui-1.8.6/themes/icon.css" type="text/css" />
</head>

<body>
    <div id="dd">Dialog Content.</div>
    <script>

        $('#dd').dialog({


            title: 'My Dialog',
            width: 400,
            height: 200,
            closed: false,
            cache: false,
            href: 'get_content.php',
            modal: true
        });
        $('#dd').dialog('refresh', 'new_content.php');

    </script>

</body>

</html>
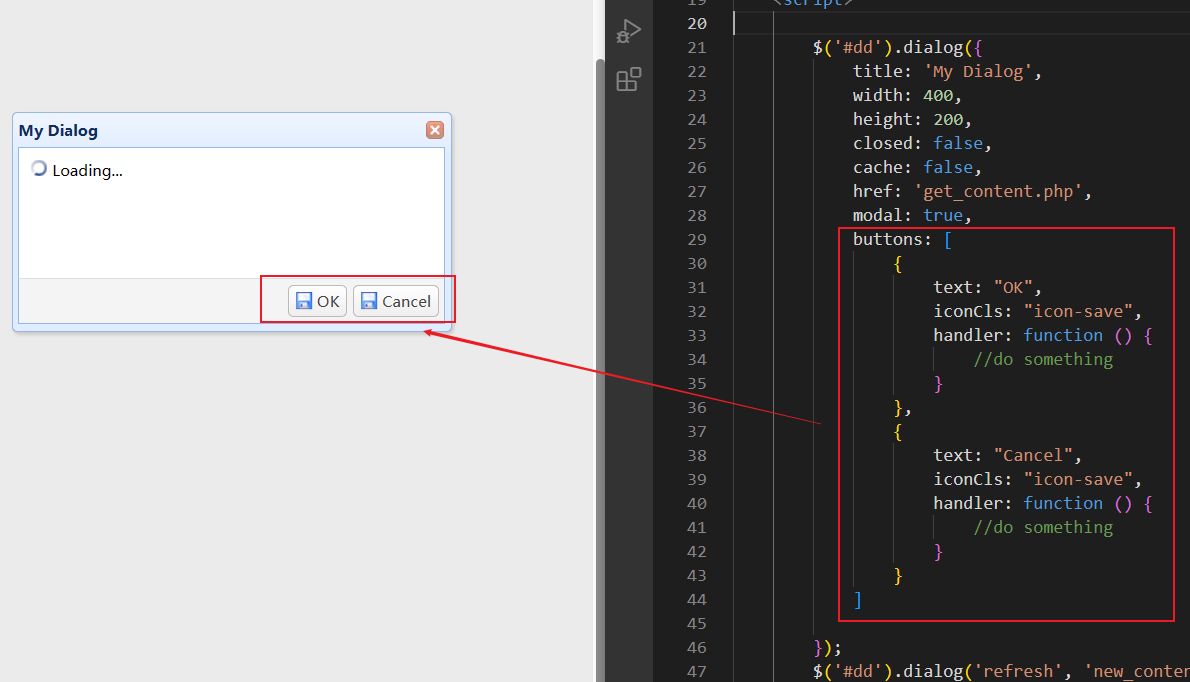
3.1.2 示例2
<!DOCTYPE html>
<html lang="en">

<head>
    <meta charset="UTF-8">
    <meta name="viewport" content="width=device-width, initial-scale=1.0">
    <title>Document</title>
    <script type="text/javascript" src="../js/jquery-1.7.2/jquery.min.js"></script>
    <!-- 引入easyUI js文件 -->
    <script type="text/javascript" src="../jquery-easyui-1.8.6/jquery.easyui.min.js"></script>
    <!-- 引入EasyUI的样式文件-->
    <link rel="stylesheet" href="../jquery-easyui-1.8.6/themes/default/easyui.css" type="text/css" />
    <!-- 引入EasyUI的图标样式文件-->
    <link rel="stylesheet" href="../jquery-easyui-1.8.6/themes/icon.css" type="text/css" />
</head>

<body>
    <div id="dd">Dialog Content.</div>
    <script>

        $('#dd').dialog({


            title: 'My Dialog',
            width: 400,
            height: 200,
            closed: false,
            cache: false,
            href: 'get_content.php',
            modal: true,
            buttons: [
                {


                    text: "OK",
                    iconCls: "icon-save",
                    handler: function () {


                        //do something
                    }
                },
                {


                    text: "Cancel",
                    iconCls: "icon-save",
                    handler: function () {


                        //do something
                    }
                }
            ]

        });
        $('#dd').dialog('refresh', 'new_content.php');

    </script>

</body>

</html>
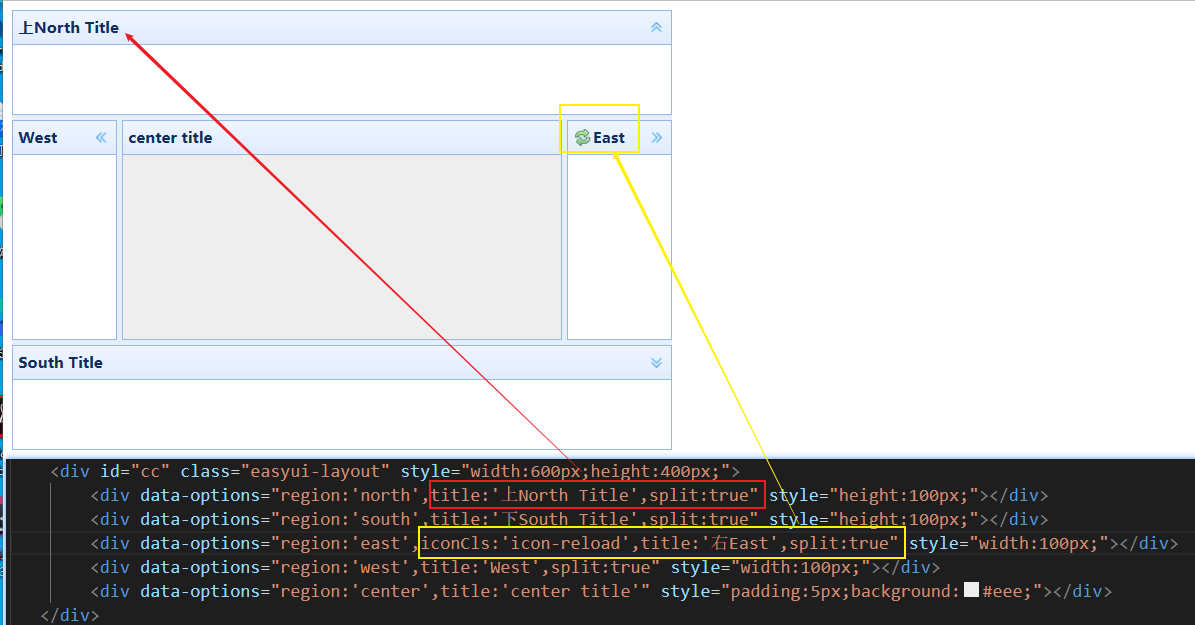
3.2 Layout(布局)
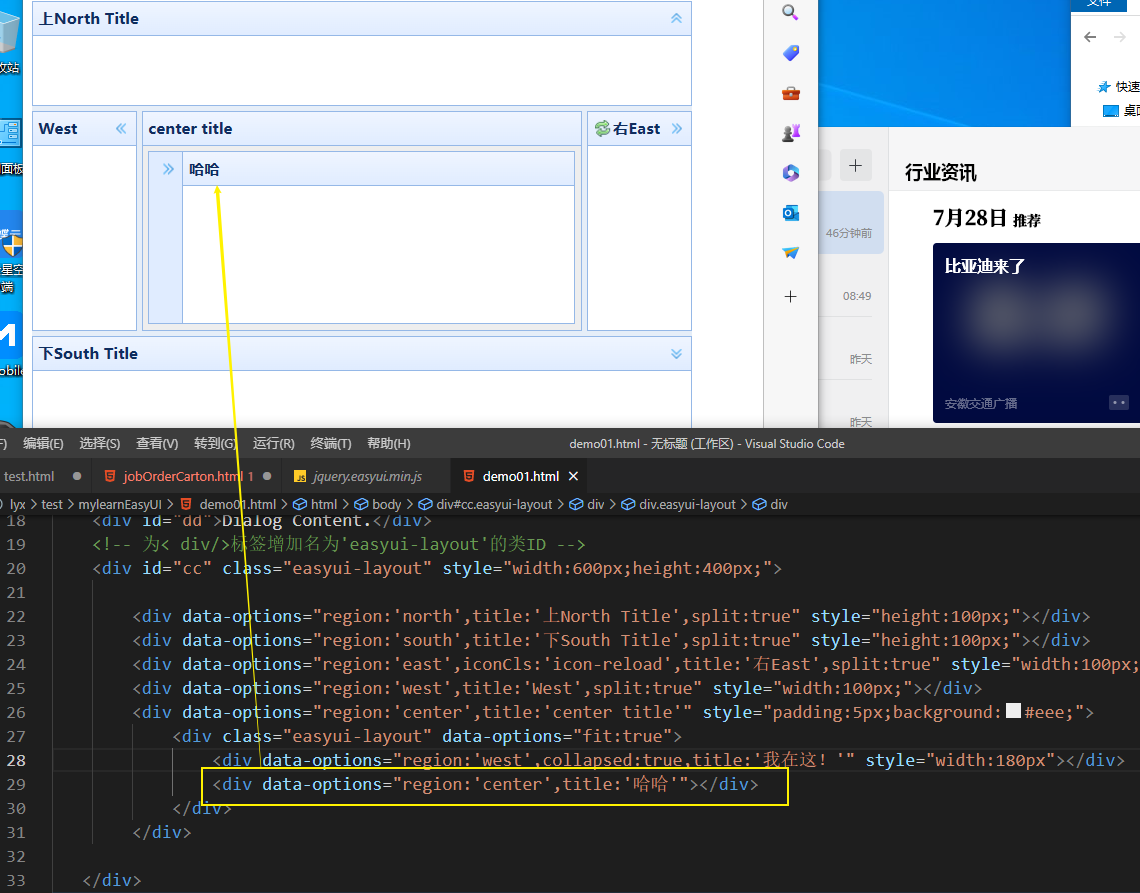
3.2.1 示例1——通过标签创建布局
为< div/>标签增加名为’easyui-layout’的类ID
代码如下:
<!-- 为<div/>增加名为'easyui-layout'的类名 -->
<div id="cc" class="easyui-layout" style="width:600px;height:400px;">
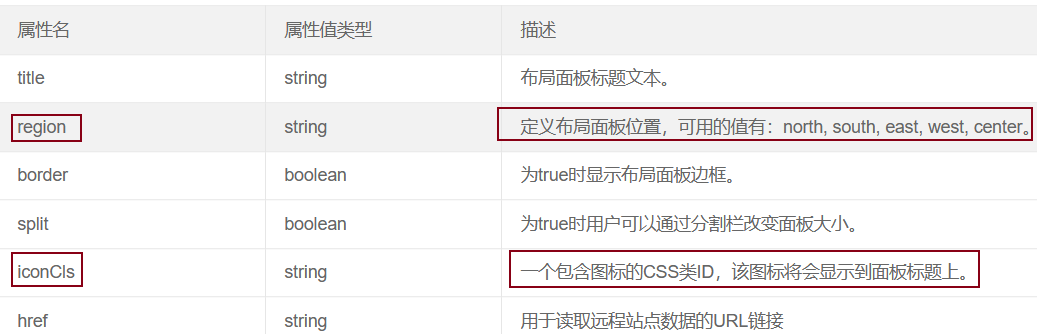
<div data-options="region:'north',title:'上North Title',split:true" style="height:100px;"></div>
<div data-options="region:'south',title:'下South Title',split:true" style="height:100px;"></div>
<div data-options="region:'east',iconCls:'icon-reload',title:'右East',split:true" style="width:100px;"></div>
<div data-options="region:'west',title:'West',split:true" style="width:100px;"></div>
<div data-options="region:'center',title:'center title'" style="padding:5px;background:#eee;"></div>
</div>
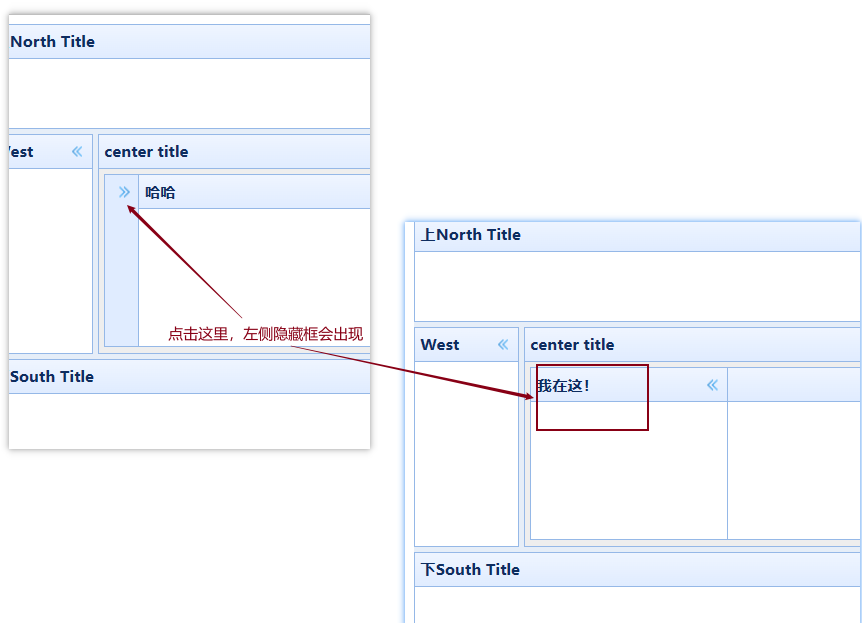
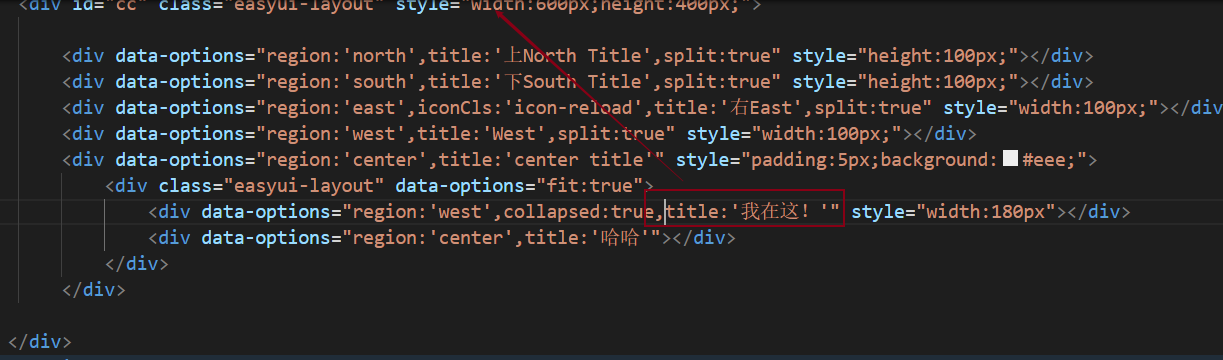
3.2.2 示例2—— 创建嵌套布局
嵌套在内部的布局面板的左侧(西面)面板是折叠的
3.3 DateBox(日期输入框)
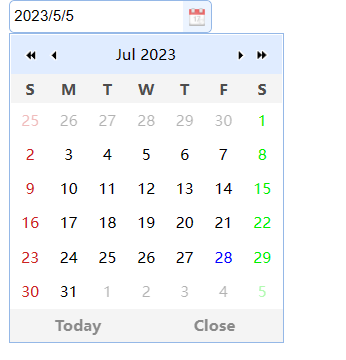
3.3.1 示例1——使用标签创建日期输入框
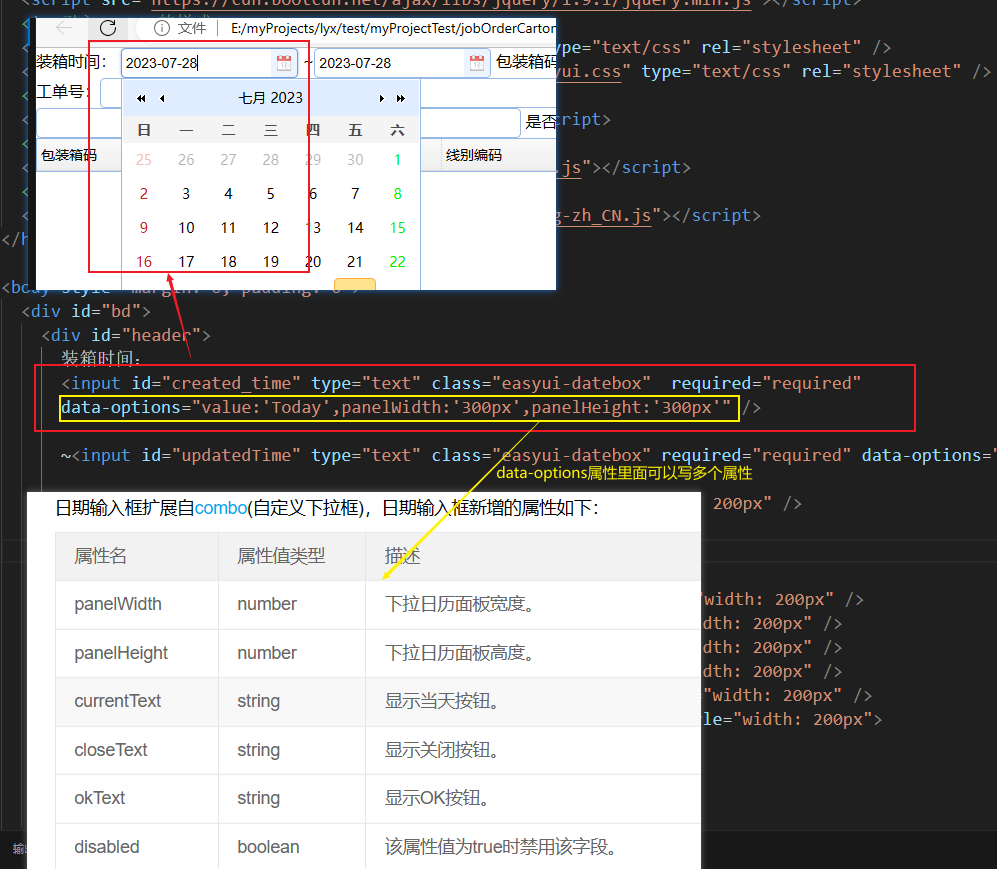
      <input id="created_time" type="text" class="easyui-datebox"
      required="required"
      data-options="value:'Today',panelWidth:'300px',panelHeight:'300px'" />
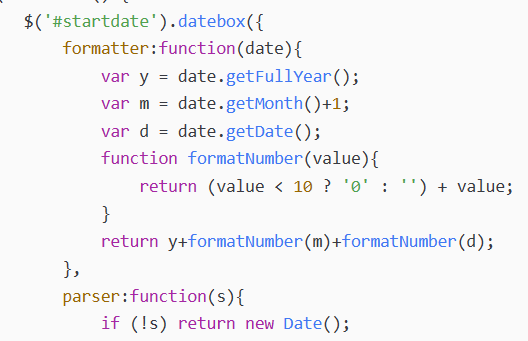
3.3.2 示例2——使用JavaScript创建日期输入框,格式化日期
注意日期的格式
y/m/d的格式需要自己设置:formatter属性

示例1如下:
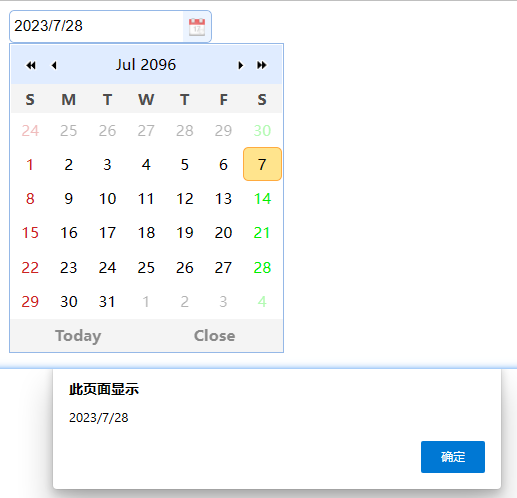
示例2如下:
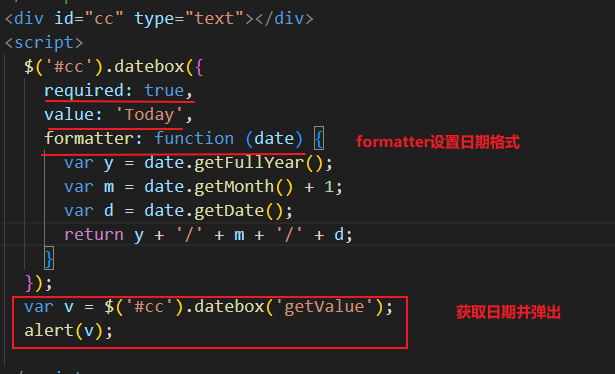
<div id="cc" type="text"></div>
  <script>
    $('#cc').datebox({


      required: true,
      value: 'Today',
      formatter: function (date) {


        var y = date.getFullYear();
        var m = date.getMonth() + 1;
        var d = date.getDate();
        return y + '/' + m + '/' + d;
      }
    });
    var v = $('#cc').datebox('getValue');
    alert(v);

  </script>
3.4 Pagination(分页)
点击进入:EasyUI官方文档 ,可以查看分页标签的属性,方法和事件。
3.4.1 示例1
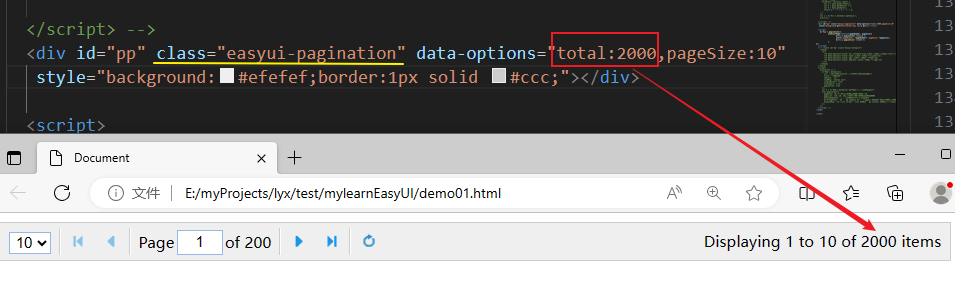
代码和运行结果如下:
可以看到data-options中定义的属性total、pageSize的运行结果
<div id="pp" class="easyui-pagination" data-options="total:2000,pageSize:10" style="background:#efefef;border:1px solid #ccc;"></div>
3.4.2 示例2
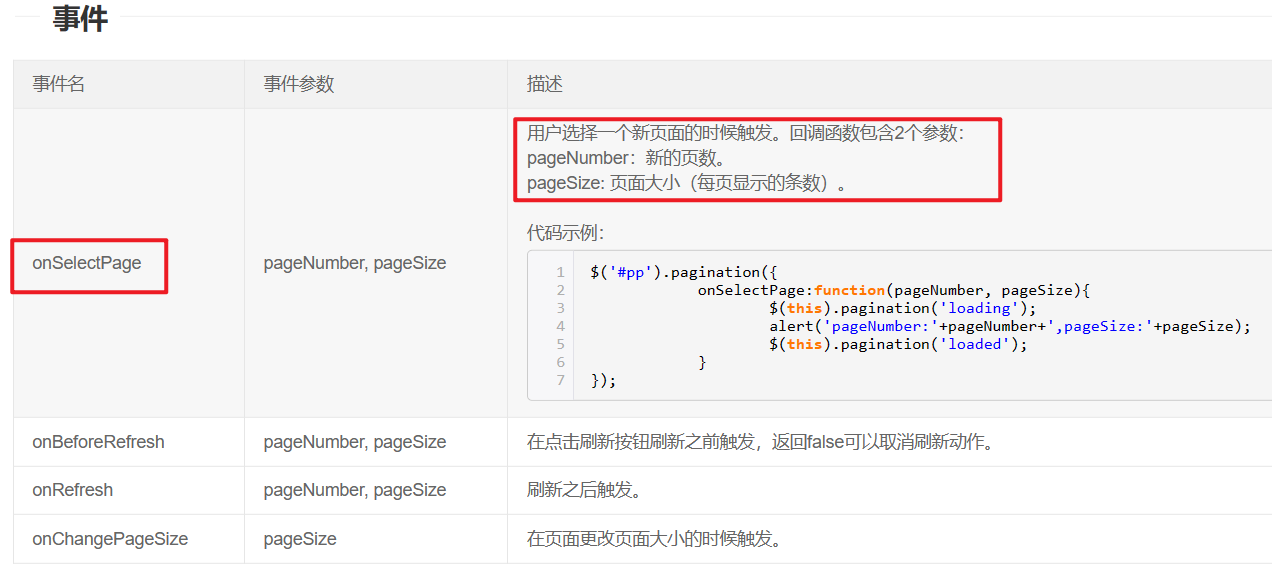
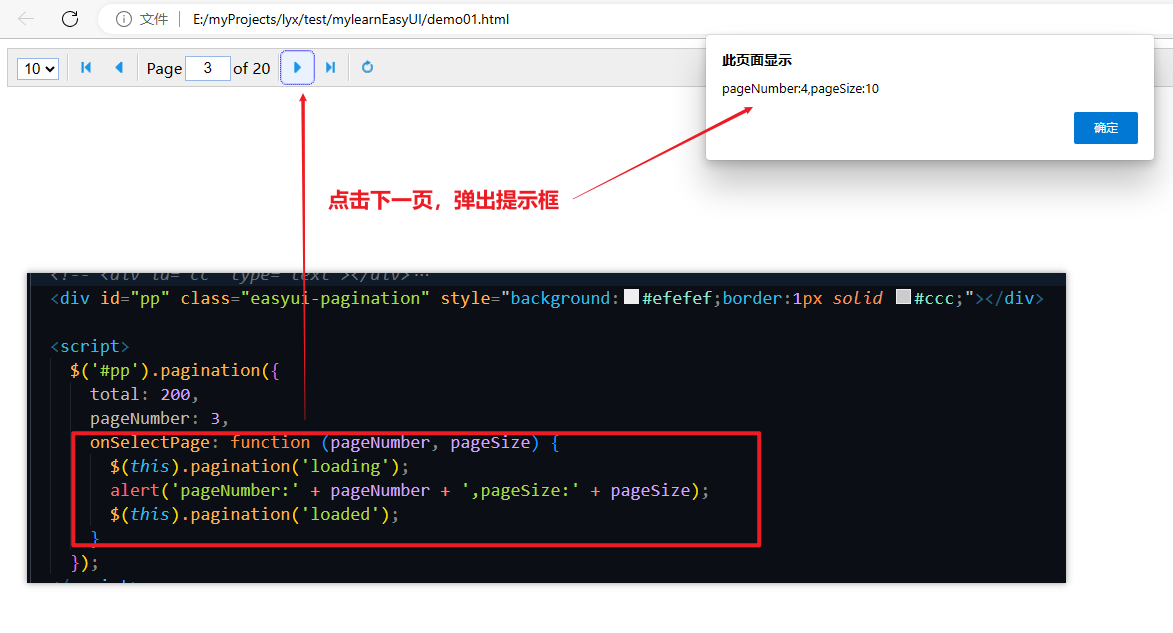
代码和运行结果如下:当点击时,弹出当前的pageNumber值和pageSize值。
  <div id="pp" class="easyui-pagination" style="background:#efefef;border:1px solid #ccc;"></div>

  <script>
    $('#pp').pagination({


      total: 200,
      pageNumber: 3,
      onSelectPage: function (pageNumber, pageSize) {


        $(this).pagination('loading');
        alert('pageNumber:' + pageNumber + ',pageSize:' + pageSize);
        $(this).pagination('loaded');
      }
    });
  </script>
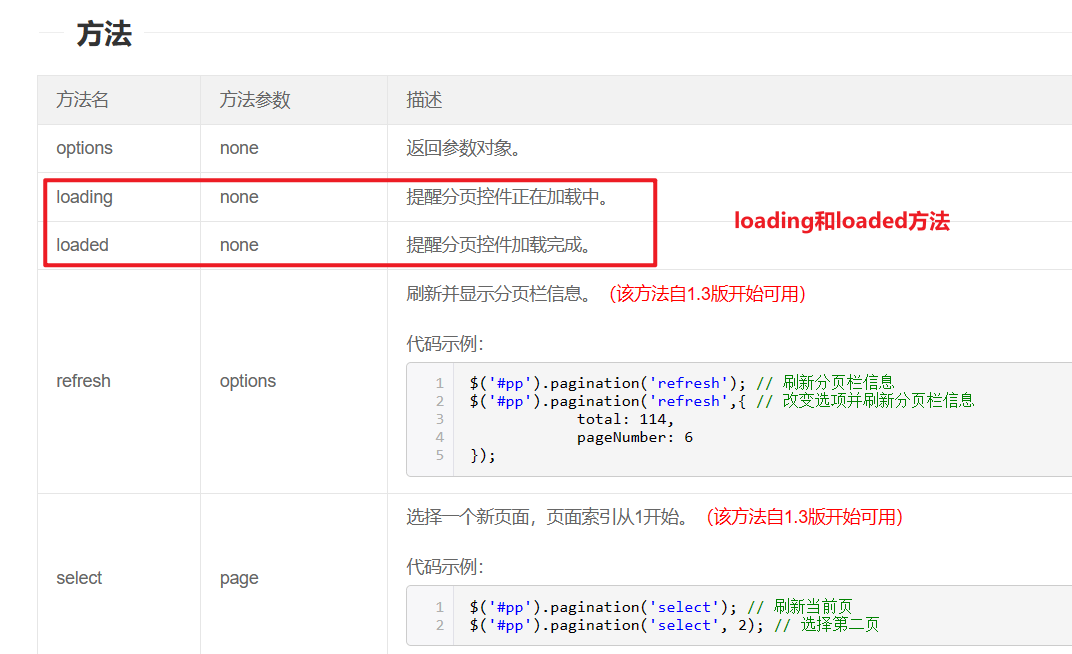
上面代码中的
$(this).pagination(‘loading’)
3.4.3 示例3
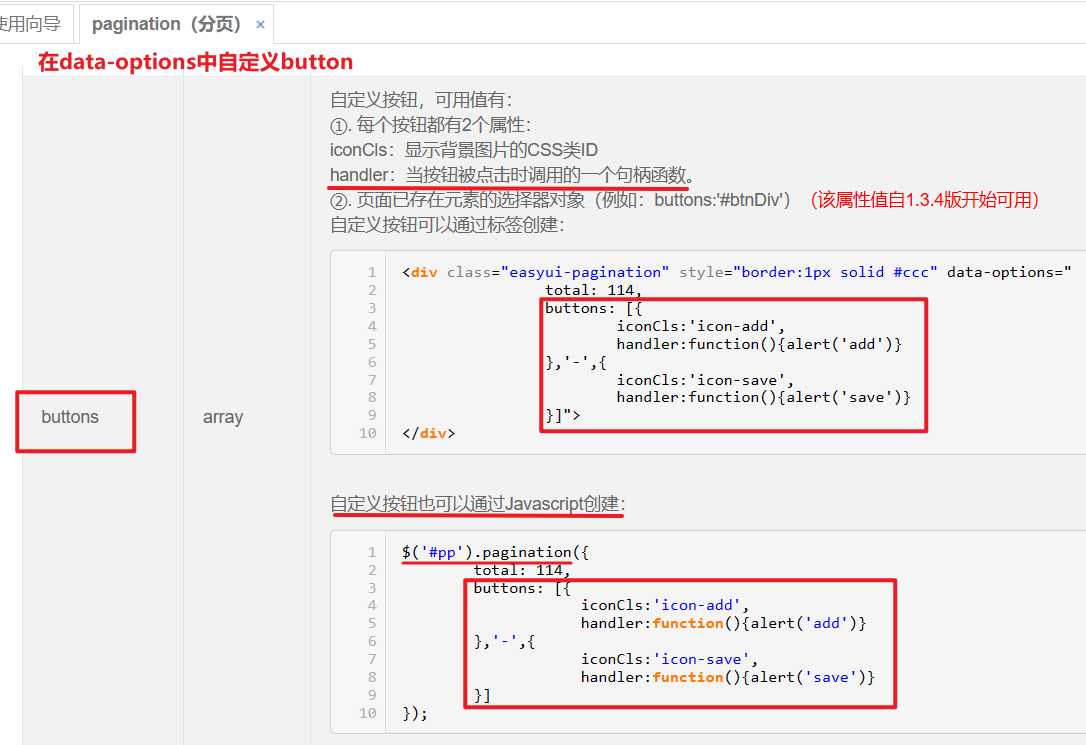
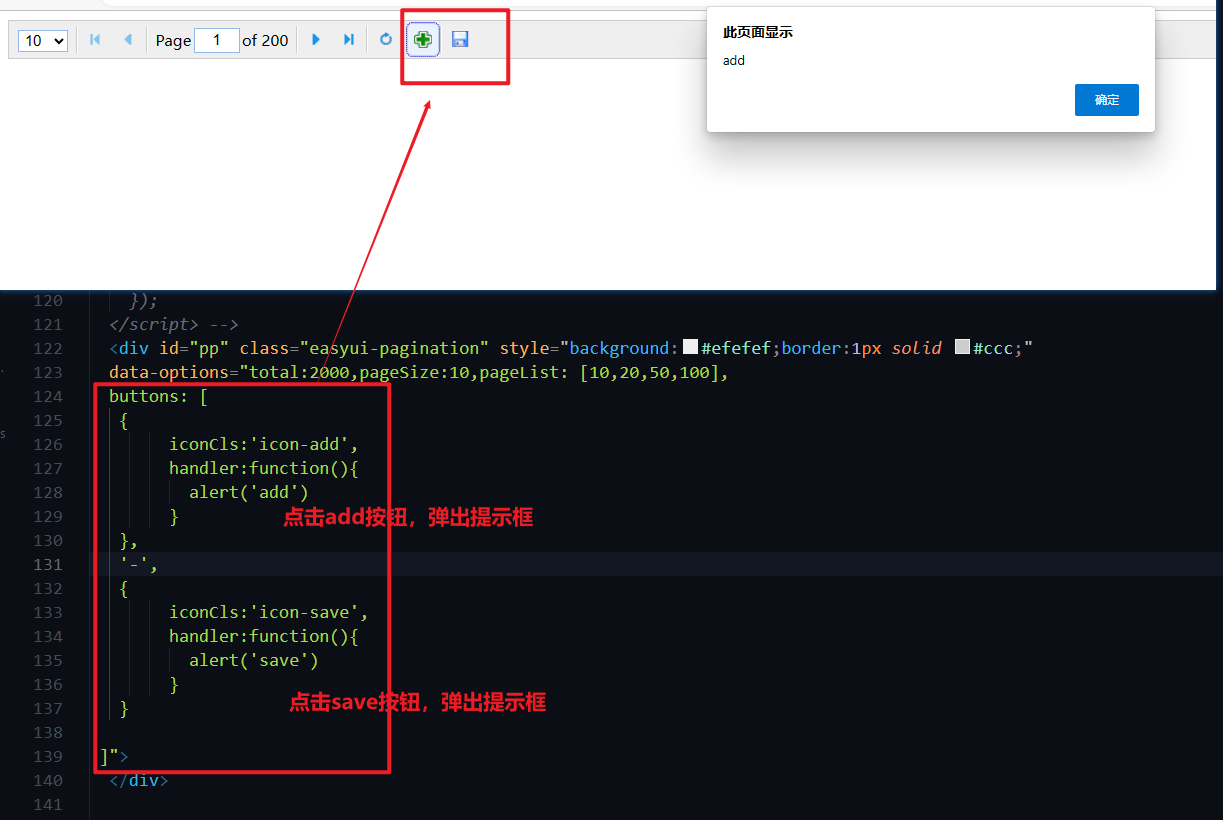
<div id="pp" class="easyui-pagination" style="background:#efefef;border:1px solid #ccc;"
  data-options="total:2000,pageSize:10,pageList: [10,20,50,100],
  buttons: [
   {
        iconCls:'icon-add',
        handler:function(){
          alert('add')
        }
   },
   '-',
   {
        iconCls:'icon-save',
        handler:function(){
          alert('save')
        }
   }
  ]">
</div>
3.4.4 示例4

<!DOCTYPE html>
<html xmlns:th="http://www.thymeleaf.org">
<head>
    <meta http-equiv="Content-Type" content="text/html;charset=utf-8" />
    <meta http-equiv="X-UA-Compatible" content="IE=8,IE=9,IE=10" />
    <title>人员管理</title>
    <link rel="stylesheet" type="text/css" th:href="@{easyui/themes/default/easyui.css}" />
    <link rel="stylesheet" type="text/css" th:href="@{easyui/themes/icon.css}" />
    <script type="text/javascript" th:src="@{jquery/jquery-1.8.0.min.js}"></script>
    <script type="text/javascript" th:src="@{easyui/jquery.easyui.min.js}"></script>
</head>
ui/jquery.easyui.min.js}"></script>
</head>
<body>
    <table id="dg" class="easyui-datagrid">
        <thead>
        <tr>
            <th data-options="field:'id',sortable:true,width:'120px',hidden:true"></th>
            <th data-options="field:'name',width:'150px'">登录名</th>
            <th data-options="field:'age',width:'150px'">年龄</th>
            <th data-options="field:'address',width:'150px'">住址</th>
        </tr>
        </thead>
    </table>
</body>
<script>
    $(function(){


        $('#dg').datagrid({


            url: '/searchPersonList',//后台返回数据的请求url
            title: "用户管理",
            idField: 'id',
            loadMsg: 'please wait',
            singleSelect: true,
            rownumbers: true,
            pagination: true
        });
        var p = $('#dg').datagrid('getPager'); //获取page对象
        $(p).pagination({


            pageSize: 10,//每页显示的记录条数,默认为10
            pageList: [10,20,30],//可以设置每页记录条数的列表
            beforePageText: '第',//页数文本框前显示的文字
            afterPageText: '页    共 {pages} 页',  //pages为默认的参数吗,代表总页数
            displayMsg: '当前显示 {from} - {to} 条记录   共 {total} 条记录'// from,to , total均为默认参数名,from, to 代表现在是总记录中的第几条到第几条,tatal代表总记录数
        });
    });

</script>
</html>