前言
braft-editor的使用文档说明:BraftEditor · 语雀
笔者本次实现的最终效果图:

具体实现
一、默认编辑器
- 安装:
方法一:npm:npm install braft-editor --save
方法二:yarn:yarn add braft-editor
- 导入braft-editor相关:
import BraftEditor from "braft-editor";
import "braft-editor/dist/index.css";
import { ContentUtils } from "braft-utils";- 为BraftEditor创建初始值:
  const [editorState, setEditorState] = useState(
    BraftEditor.createEditorState(null)
);- 使用BraftEditor:
const handleChange = (editorState) => {
    setEditorState(editorState);
};

<BraftEditor
    contentStyle={

   { height: "400px" }}
    style={

   { border: "1px solid #cecece" }}
    value={editorState}
    onChange={handleChange}
/>至此,我们已经可以使用默认的braft-editor编辑器了。如果想要取出富文本部分,使用editorState.toHTML()即可。
二、个性化设置
在上述代码中,笔者没有设置braft-editor的任何配置项,但braft-editor在属性 · 语雀中提供了很多配置,例如:
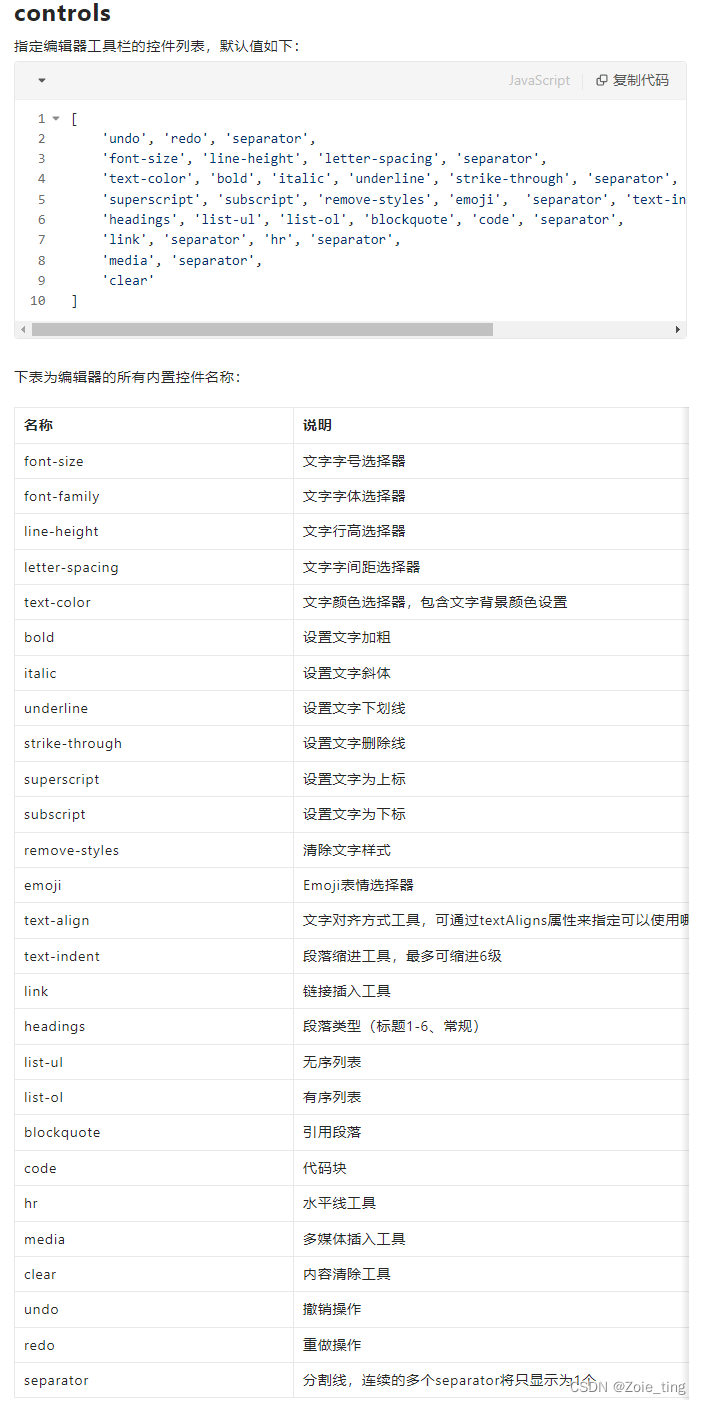
显然笔者用不到这么多,只需要其中的一部分:
controls={[
    "undo","redo","separator","font-size","line-height",
    "letter-spacing","separator","text-color","bold","italic",
    "underline","separator","superscript","subscript","remove-styles",
    "separator","text-indent","text-align","separator","headings",
    "list-ul","list-ol","separator","link","separator"
]}
默认可选字号:


但是笔者也不需要这么多,设置fontSize:fontSizes={[12, 14, 16, 18, 20]}
其他的配置也是同样:
controls={[
    "undo","redo","separator","font-size","line-height",
    "letter-spacing","separator","text-color","bold","italic",
    "underline","separator","superscript","subscript","remove-styles",
    "separator","text-indent","text-align","separator","headings",
    "list-ul","list-ol","separator","link","separator"
]}
fontSizes={[12, 14, 16, 18, 20]}
lineHeights={[1, 1.2, 1.5]}
letterSpacings={[1, 2, 3]}
至此,已经对功能、字号、行号、字符间距进行了设置。
但是笔者希望可以上传图片到富文本区域,因此还需要进一步设置。
三、上传图片
方法一:使用media。在controls中加入media,达到上传图片的目的,此时通过editorState.toHTML()会拿到图片的base64格式。
方法二:使用extendControls,在工具栏中增加一个完全自定义的React组件。
  const extendControlsContent = [
    {
      key: "antd-uploader",
      type: "component",
      component: (
        <Upload
          accept="*"
          showUploadList={false}
          action="https://xxx"
          onChange={(info) => {

          }}
        >
          <button
            type="button"
            className="control-item button upload-button"
            data-title="插入图片"
          >
            上传图片
          </button>
        </Upload>
      ),
    },
  ];

//...

 extendControls={extendControlsContent}

//...
在onChange中处理拿到的图片链接,因为笔者这里写在form表单中,所以写成:
          onChange={(info) => {
            if (info?.file?.response?.code === "1") {
              form.setFieldsValue({
                ...form.getFieldsValue(),
                Content: ContentUtils.insertMedias(
                  form.getFieldsValue().Content,
                  [
                    {
                      type: "IMAGE",
                      url: "http://xxx/" + info?.file?.response?.url,
                    },
                  ]
                ),
              });
            }
}}此时,在编辑器中上传图片,通过editorState.toHTML()会拿到图片在服务器上的url。
四、文字链接自动补全https
为编辑器中的文字加超链接,填入链接地址时,例如百度:https://www.baidu.com/,很多人可能只写www.baidu.com,这样无法链接过去,所以需要补全https。
braft-editor提供了许多hooks,这里笔者需要使用toggle-link(在设置文字链接前执行的钩子函数)。
  const hooks = {
    "toggle-link": ({ href, target }) => {
      href = href.indexOf("http") === 0 ? href : `https://${href}`;
      return { href, target };
    },
  };

//...

hooks={hooks}

//...
总结
本文主要介绍braft-editor在React结合ant design中的使用,包括文字、图片、超链接等处理,如有建议,欢迎指教~