一、__call__()
在Flask app启动后,一旦uwsgi收到来自web server的请求,就会调用后端app,其实此时就是调用app的__call__(environ,start_response).
flask.py:
def __call__(self, environ, start_response):
        return self.wsgi_app(environ, start_response)
二、wsgi_app()
当http请求从server发送过来的时候,他会启动__call__功能,这时候就启动了最关键的wsgi_app(environ,start_response)函数。
fask.py:
def wsgi_app(self, environ, start_response):

        with self.request_context(environ):  #2.1,把环境变量入栈
            rv = self.preprocess_request()   #2.2,请求前的处理操作,主要执行一些函数,主要是准备工作。
            if rv is None:   #请求前如果没有需要做的事情,就会进入到请求分发
                rv = self.dispatch_request()  #2.3 进行请求分发
            response = self.make_response(rv)  #2.4 返回一个response_class的实例对象,也就是可以接受environ和start_reponse两个参数的对象
            response = self.process_response(response)  #2.5 进行请求后的处理操作,只要是执行一些函数,和preprocesses_request()类似,主要是清理工作。
            return response(environ, start_response)   #2.6 对web server(uwsgi)进行正式回应
2.1 环境变量入栈
通过with上下文管理,生成request请求对象和请求上下文环境,并入栈。
执行如下代码块:
   def request_context(self, environ):

        return _RequestContext(self, environ) #调用_RequestContext()类
2.1.1 调用_RequestContext()类
首先 会执行__enter__()函数,执行_request_ctx_stack的push方法,把环境变量进行入栈操作。
注意:_request_ctx_stack = LocalStack()
#请求上下文初始化
class _RequestContext(object):

    def __init__(self, app, environ):
        self.app = app
        self.url_adapter = app.url_map.bind_to_environ(environ)
        self.request = app.request_class(environ)
        self.session = app.open_session(self.request)
        self.g = _RequestGlobals()
        self.flashes = None
'''
调用with的时候就会执行
'''
    def __enter__(self):
        _request_ctx_stack.push(self)

'''
with进行上下文管理的例子:
with离开后就会执行自定义上下文管理
class Diycontextor:
    def __init__(self,name,mode):
        self.name = name
        self.mode = mode

    def __enter__(self):
        print "Hi enter here!!"
        self.filehander = open(self.name,self.mode)
        return self.filehander

    def __exit__(self,*para):
        print "Hi exit here"
        self.filehander.close()

with Diycontextor('py_ana.py','r') as f:
    for i in f:
        print i
'''
    def __exit__(self, exc_type, exc_value, tb):

        if tb is None or not self.app.debug:
            _request_ctx_stack.pop()
这一步最主要的是LocalStack类。
class LocalStack(object):

    """This class works similar to a :class:`Local` but keeps a stack
    of objects instead.  This is best explained with an example::
LocalStack类似于Local类,但是它保持了一个栈功能。它能够将对象入栈、出栈,如下:

        >>> ls = LocalStack()
        >>> ls.push(42)
        >>> ls.top
        42
        >>> ls.push(23)
        >>> ls.top
        23
        >>> ls.pop()
        23
        >>> ls.top
        42

    They can be force released by using a :class:`LocalManager` or with
    the :func:`release_local` function but the correct way is to pop the
    item from the stack after using.  When the stack is empty it will
    no longer be bound to the current context (and as such released).
入栈的对象可以通过LocalManage类进行强制释放,或者通过函数release_local函数。但是,正确的姿势是通过pop函数把他们出栈。
当栈为空时,它不再弹出上下文对象,这样就完全释放了。

    By calling the stack without arguments it returns a proxy that resolves to
    the topmost item on the stack.
通过调用调用无参数的stack,返回一个proxy。
从LocalStack的说明可以得知这几个事情:
1、LocalStack是一个类似Local的类,但是它具备栈的功能,能够让对象入栈、出栈以及销毁对象。
2、可以通过LocalManager类进行强制释放对象。
由引申出两个类:Local类和Localmanager类
Local类用于添加、存储、或删除上下文变量。
LocalManager类:由于Local对象不能管理自己,所以通过LocalManager类用来管理Local对象。
我们再回到wsgi_app函数中的2.2步骤:
2.2 preprocess_request
preprocess_request()方法,主要是进行flask的hook钩子, before_request功能的实现,也就是在真正发生请求之前,有些准备工作需要提前做。比如,连接数据库。
代码如下:
   def preprocess_request(self):

        for func in self.before_request_funcs:
            rv = func()
            if rv is not None:
                return rv
它会执行preprocess_request列表里面的每个函数。执行完成后,他会进入到dispatch_request方法。
2.3 dispatch_request
'''
分发请求
1、获取endpoint和values,即请求url和参数
2、调用视图函数view_functions[endpoint](**values)
3、处理异常错误
'''
    def dispatch_request(self):

        try:
            endpoint, values = self.match_request()
            return self.view_functions[endpoint](**values)
        except HTTPException, e:
            handler = self.error_handlers.get(e.code)
            if handler is None:
                return e
            return handler(e)
        except Exception, e:
            handler = self.error_handlers.get(500)
            if self.debug or handler is None:
                raise
            return handler(e)
进入dispatch_request()后,先执行match_request(),match_request()定义如下:
    def match_request(self):
        rv = _request_ctx_stack.top.url_adapter.match()
        request.endpoint, request.view_args = rv
        return rv
注意:函数里面的url_adapter。
self.url_adapter = app.url_map.bind_to_environ(environ),其实他使一个Map()对象,Map()对象位于werkzeug.routing模块,用于处理routeing。
从函数可以看出,它会返回一个元组(endpoint,view_args)
endpoint:是一个url
view_args:是url的参数
例如:
>>> m = Map([
        ...     Rule('/', endpoint='index'),
        ...     Rule('/downloads/', endpoint='downloads/index'),
        ...     Rule('/downloads/<int:id>', endpoint='downloads/show')
        ... ])
        >>> urls = m.bind("example.com", "/")
        >>> urls.match("/", "GET")
        ('index', {})
        >>> urls.match("/downloads/42")
        ('downloads/show', {'id': 42})
match_request()执行完成后,此时已经获取到了url和url里面包含的参数的信息。接着进入视图函数的执行:view_functions()
在Flask app启动一节我们知道,view_functions()是一个字典,类似view_functions = {'hello_world':hello_world},当我们执行
self.view_functions[endpoint](**values)
就相当于执行了hello_wold(**values),即自行了视图函数。也就是我们最开始app里面的hello_world视图函数:
@app.route('/hello')
def hello_world():
    return 'Hello World!'
这时就会返回'Hello World!‘如果有异常,则返回异常内容。
至此,就完成了dispatch_request(),请求分发工作。这时,我们再次回到wsgi_app中的2.4步:response = self.make_response(rv)
2.4 make_response
def make_response(self, rv):
    """Converts the return value from a view function to a real
    response object that is an instance of :attr:`response_class`.

    The following types are allowd for `rv`:

    ======================= ===========================================
    :attr:`response_class`  the object is returned unchanged
    :class:`str`            a response object is created with the
                            string as body
    :class:`unicode`        a response object is created with the
                            string encoded to utf-8 as body
    :class:`tuple`          the response object is created with the
                            contents of the tuple as arguments
    a WSGI function         the function is called as WSGI application
                            and buffered as response object
    ======================= ===========================================

    :param rv: the return value from the view function
    """
    if isinstance(rv, self.response_class):
        return rv
    if isinstance(rv, basestring):
        return self.response_class(rv)
    if isinstance(rv, tuple):
        return self.response_class(*rv)
    return self.response_class.force_type(rv, request.environ)
通过make_response函数,将刚才取得的 rv 生成响应,重新赋值response
2.5 process_response
再通过process_response功能主要是处理一个after_request的功能,比如你在请求后,要把数据库连接关闭等动作,和上面提到的before_request对应和类似。
def after_request(self, f):
        self.after_request_funcs.append(f)
        return f
之后再进行request_finished.send的处理,也是和socket处理有关,暂时不详细深入。之后返回新的response对象。
这里特别需要注意的是,make_response函数是一个非常重要的函数,他的作用是返回一个response_class的实例对象,也就是可以接受environ和start_reponse两个参数的对象
当所有清理工作完成后,就会进入response(environ, start_response)函数,进行正式回应。
2.6 response(environ, start_response)
最后进入response()函数,说response函数之前,我们先来看看response函数的由来:
response = self.make_response(rv)
response = self.process_response(response)
2.6.1 response=make_response()
而make_response的返回值为:return self.response_class.force_type(rv, request.environ)
其中的response_class = Response,而Response最终来自werkzeug.
werkzeug import Response as ResponseBase
@classmethod
    def force_type(cls, response, environ=None):
"""Enforce that the WSGI response is a response object of the current
        type.  Werkzeug will use the :class:`BaseResponse` internally in many
        situations like the exceptions.  If you call :meth:`get_response` on an
        exception you will get back a regular :class:`BaseResponse` object, even
        if you are using a custom subclass.

        This method can enforce a given response type, and it will also
        convert arbitrary WSGI callables into response objects if an environ
        is provided::

            # convert a Werkzeug response object into an instance of the
            # MyResponseClass subclass.
            response = MyResponseClass.force_type(response)

            # convert any WSGI application into a response object
            response = MyResponseClass.force_type(response, environ)

        This is especially useful if you want to post-process responses in
        the main dispatcher and use functionality provided by your subclass.

        Keep in mind that this will modify response objects in place if
        possible!
从上面可以知道,force_type()是一个类方法,强制使当前对象成为一个WSGI的reponse对象。
2.6.2 response = self.process_response(response)
def process_response(self, response):

        session = _request_ctx_stack.top.session
        if session is not None:
            self.save_session(session, response)
        for handler in self.after_request_funcs:
            response = handler(response)
        return response
process_response()执行了2个操作:
1、保存会话
2、执行请求后的函数列表中每一个函数,并返回response对象
最后response函数会加上environ, start_response的参数并返回给uwsgi(web服务器),再由uwsgi返回给nginx,nignx返回给浏览器,最终我们看到的内容显示出来。
至此,一个HTTP从请求到响应的流程就完毕了.
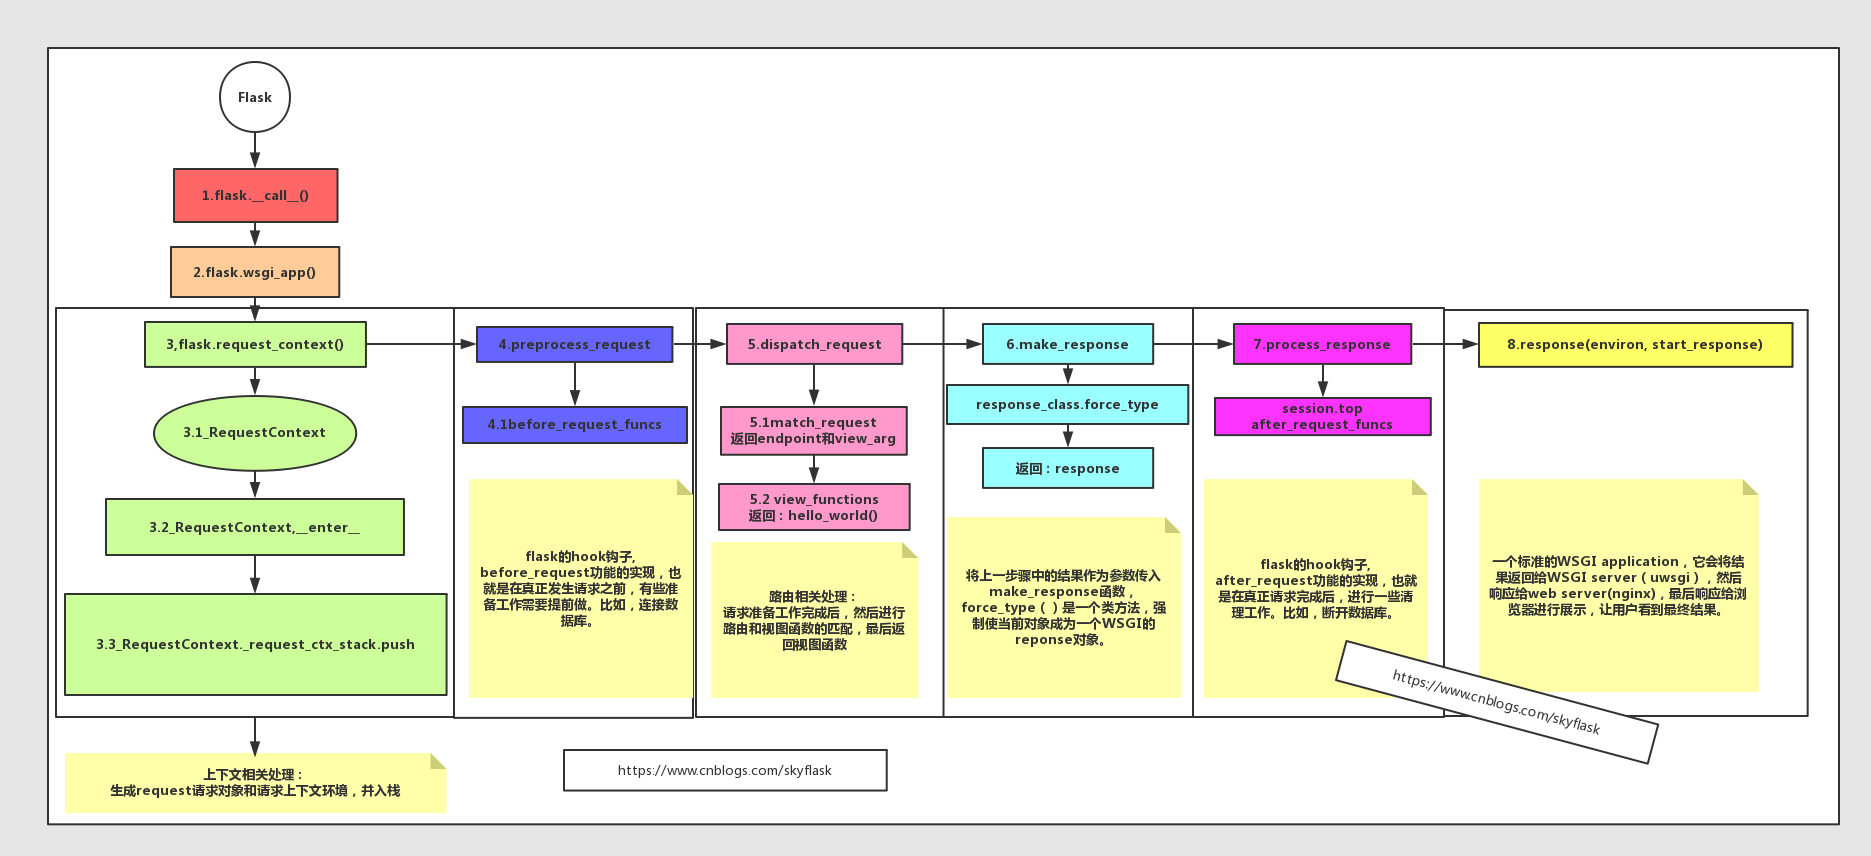
三、总结
总的来说,一个流程的关键步骤可以简单归结如下: