11、MyBatis的注解使用方式
12、mybatis的参数传递
12.1、一个普通数据类型
12.2、多个普通数据类型
12.3、传递一个Map对象作为参数
12.4、一个Pojo数据类型
12.5、多个Pojo数据类型
12.6、模糊查询
12.7、#{}和${}的区别
12.7.2、MySQL的字符串拼接,concat函数实现官方推荐)
13、自定义结果集<resultMap></resultMap>
13.1、<resultMap>的作用
13.2、创建一对一数据库表
13.3、创建实体对象
13.4、一对一 级联属性 使用
13.4.2、<association /> 嵌套结果集映射配置(取代result的级联映射)
13.5、延迟加载
13.5.1、<association /> 定义分步查询使用延迟加载
13.6、多对一、一对多的使用示例
13.6.1、创建一对多数据库
13.6.2、<collection/> 一对多,立即加载
13.6.3、一对多,赖加载(需要创建副表接口和Mapper.xml)
13.6.4、双向关联
11、MyBatis的注解使用方式(主要使用xml)
public interface UserMapper {

	@SelectKey(before = false, statement = "select last_insert_id()", keyProperty = "id", resultType = Integer.class)
	@Insert(value = "insert into t_user(`last_name`,`sex`) values(#{lastName},#{sex})")
	public int saveUser(User user);

	@Select(value = "select id,last_name lastName,sex from t_user where id = #{id}")
	public User queryUserById(int id);

	@Select(value = "select id,last_name lastName,sex from t_user")
	public List<User> queryUsers();

	@Delete(value = "delete from t_user where id = #{id}")
	public int deleteUserById(int id);

	@Update(value = "update t_user set last_name = #{lastName},sex = #{sex} where id = #{id}")
	public int updateUser(User user);

}
测试方法就是传统的测试方法,不贴了
12、mybatis的参数传递
12.1、一个普通数据类型
推荐使用#{变量名}(优先) 或 #{value}
方法:
public User queryUserById(int id);
在xml中传递参数值的使用方法:
<!-- 	public User queryUserById(int id); -->
	<select id="queryUserById" resultType="com.tcent.pojo.User">
		select `id`,`last_name` lastName,`sex` from t_user where id = #{id}
	</select>
12.2、多个普通数据类型
在方法的参数是多个普通数据类型的情况,传递的参数的方式是使用#{ param1 }、#{param2} ……或0,1
第一个参数使用#{param1}传递
第二个参数使用#{param2}传递
第三个参数使用#{param3}传递
……
第N个,参数使用#{paramN}传递
代码方法是:
public List<User> queryUsersByNameAndSex(String name, int sex);
在xml中传递参数值的使用方法:
<!-- 	public List<User> queryUsersByNameAndSex(String name, int sex); -->
	<select id="queryUsersByNameAndSex" resultType="com.tcent.pojo.User">
		select `id`,`last_name` lastName,`sex` from t_user where last_name like #{param1} and sex = #{param2}
	</select>
@Param注解命名参数
代码中:
public List<User> queryUsersByNameAndSex(@Param("name") String name,
			@Param("sex") int sex);

在xml中传递参数如下:
	<select id="queryUsersByNameAndSex" resultType="com.tcent.pojo.User">
		select `id`,`last_name` lastName,`sex` from t_user where last_name like #{name} and sex = #{sex}
	</select>
12.3、传递一个Map对象作为参数
当代码中以map做为参数值传递。
Map<String, Object>param = new HashMap<String, Object>();
param.put("name", "%bbb%");
param.put("sex", 1);
那么在xml中配置的时候,以#{mapKey}的方式输出参数值。
代码:
public List<User> queryUsersByMap(Map<String, Object> param);
xml中如何输入map中参数的值:
<!-- 	public List<User> queryUsersByMap(Map<String, Object> param);  -->
	<select id="queryUsersByMap" resultType="com.tcent.pojo.User">
		select `id`,`last_name` lastName,`sex` from t_user where last_name like #{name} and sex = #{sex}
	</select>
12.4、一个Pojo数据类型
如果传入的参数是pojo数据类型(javaBean对象)。那么在xml中使用#{属性名}
代码中:
public List<User> queryUsersByUser(User user);
在xml配置文件中:
<!-- 		public List<User> queryUsersByUser(User user); -->
	<select id="queryUsersByUser" resultType="com.tcent.pojo.User">
		select `id`,`last_name` lastName,`sex` from t_user where last_name like #{lastName} and sex = #{sex}
	</select>
12.5、多个Pojo数据类型
如果参数是传入多个pojo对象。
第一个pojo对象,使用 param1表示
要输出第一个pojo对象的属性#{ param1.property }
第二个pojo对象,使用param2表示
要输出第一个pojo对象的属性#{ param2.property }
代码:
public List<User> queryUsersByUsers(User name, User sex);
在xml中的配置是:
<!-- 		public List<User> queryUsersByUsers(User name, User sex); -->
	<select id="queryUsersByUsers" resultType="com.tcent.pojo.User">
		select `id`,`last_name` lastName,`sex` from t_user where last_name like #{param1.lastName} and sex = #{param2.sex}
	</select>
12.6、模糊查询
需求:现在要根据用户名查询用户对象。 也就是希望查询如下: select * from t_user where user_name like '%张%'
12.7、#{}和${}的区别
#{} 是占位符 ?
xml中的配置:
select `id`,`last_name` lastName,`sex` from t_user where last_name like #{name}
解析后的sql语句是:
select `id`,`last_name` lastName,`sex` from t_user where last_name like ?
${} 是原样输出参数的值。然后做字符串的拼接操作。
xml中的配置:
select `id`,`last_name` lastName,`sex` from t_user where last_name like '${name}'
解析后的sql语句是:
select `id`,`last_name` lastName,`sex` from t_user where last_name like '%bbbb%'

12.7.2、MySQL的字符串拼接,concat函数实现官方推荐)
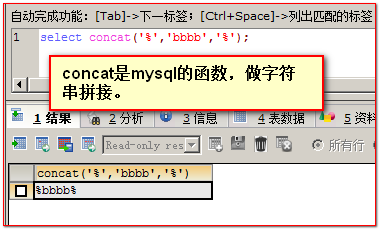
代码中:
public List<User> queryUsersByName(@Param("name")String name);
xml中的配置推荐:
<select id="queryUsersByName" resultType="com.tcent.pojo.User">
		select `id`,`last_name` lastName,`sex` from t_user where last_name like concat('%',#{name},'%')
	</select>
13、自定义结果集<resultMap></resultMap>
13.1、<resultMap>的作用。
原来我们查询都是返回一个简单的JavaBean对象。我们可以直接使用ResultType定义返回在的类型。
但是如果我们查询的结果返回在的JavaBean中,又包含一个javaBean(association),
或者包含一个javaBean对象的集合(collection)。
那么这个时候,只能使用ResultMap来自定义返回的结果。
13.2、创建一对一数据库表
## 一对一数据表
## 创建锁表
create table t_lock(
	`id` int primary key auto_increment,
	`name` varchar(50)
);


## 创建钥匙表
create table t_key(
	`id` int primary key auto_increment,
	`name` varchar(50),
	`lock_id` int ,
	foreign key(`lock_id`) references t_lock(`id`)
);


## 插入初始化数据
insert into t_lock(`name`) values('阿里巴巴');
insert into t_lock(`name`) values('华为');
insert into t_lock(`name`) values('联想');

insert into t_key(`name`,`lock_id`) values('马云',1);
insert into t_key(`name`,`lock_id`) values('任正非',2);
insert into t_key(`name`,`lock_id`) values('柳传志',3);
13.3、创建实体对象
锁实体Bean
public class Lock {

	private int id;
private String name;

钥匙实体Bean

public class Key {

	private int id;
	private String name;
	private Lock lock;
13.4、一对一 级联属性 使用
(1)、第一次
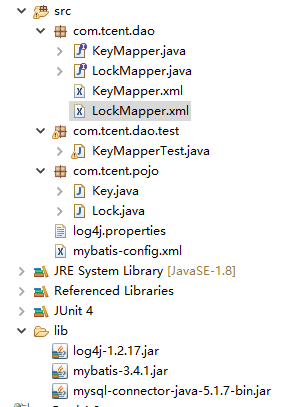
创建KeyMapper接口:
public interface KeyMapper {

	public Key queryKeyByIdForSample(int id);

}
创建KeyMapper.xml配置文件:
<?xml version="1.0" encoding="UTF-8" ?>
<!DOCTYPE mapper
  PUBLIC "-//mybatis.org//DTD Mapper 3.0//EN"
  "http://mybatis.org/dtd/mybatis-3-mapper.dtd">
<!--
	namespace 属性一般情况下。
		一种定义规则:
			一种是使用对应的javaBean的全类名
			一种是使用Mapper接口的全类名
 -->

<mapper namespace="com.tcent.dao.KeyMapper">
 	<select id="queryKeyByIdForSimple" resultType="com.tcent.pojo.Key">
 		select id ,name,lock_id lock1 from t_key where id = #{id}
 	</select>
</mapper>
测试类:
@Test
	public void testQueryKeyByIdForSimple() throws IOException {
		SqlSessionFactory sqlSessionFactory = new SqlSessionFactoryBuilder()
				.build(Resources.getResourceAsStream("mybatis-config.xml"));
		SqlSession session = sqlSessionFactory.openSession();
		KeyMapper mapper = session.getMapper(KeyMapper.class);
		Key key = mapper.queryKeyByIdForSimple(1);
		System.out.println(key);
	}
测试结果:

从结果看到lock显示null,说明我们用resultType这种查询都是返回一个简单的JavaBean对象,(我们可以直接使用ResultType定义返回的类型)
但是如果我们查询的结果返回的JavaBean中,又包含一个javaBean,或者包含一个javaBean对象的集合。
那么这个时候,只能使用ResultMap来自定义返回的结果。
所以用resultMap进行测试,其他地方都不做修改
(2)、第二次
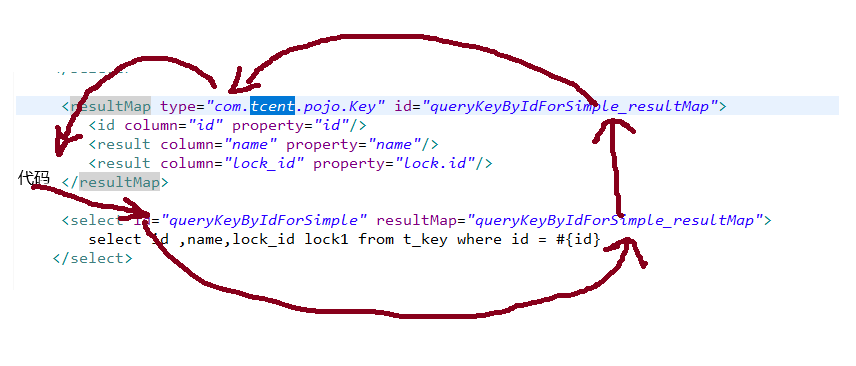
修改KeyMapper.xml配置文件:
 <resultMap type="com.tcent.pojo.Key" id="queryKeyByIdForSimple_resultMap">
	 	<id column="id" property="id"/>
	 	<result column="name" property="name"/>
	 	<result column="lock_id" property="lock.id"/>
	 </resultMap>

	 <select id="queryKeyByIdForSimple" resultMap="queryKeyByIdForSimple_resultMap">
 		select id ,name,lock_id  from t_key where id = #{id}
 	</select>
这里说明以下:我之前的查询lock_id随便起了个别名,但测试结果和第一次的简单查询一样,之后我把别名去掉,就获得了下面该有的结果。
测试结果:

代码和xml文件的调用示意图:
(3) 、第三次
解释:
column表示数据库表的字段名,property表示与之对应的JavaBean对象的属性名
resultMap 标签中:
id专门用来映射id主键列
result标签映射非主键列
resultMap标签可以自定义结果集。定义成你需要的bean对象的结果
type属性表示当前这个ResultMap会封装什么对象返回
id属性定义一个唯一的标识,方便别人使用
由于上一中方法只能返回被关联表的主键结果(副表的),得不到副表的name值,所以需要result Map中 的级联映射,并且为了区分主副表的name不同,这里给副表的name取了别名:lock_name
修改KeyMapper.xml配置文件:
<!-- 由于上一中方法只能返回被关联表的主键结果(副表的),得不到副表的name值,所以需要result Map中 的级联映射-->
 	<!-- column表示数据库表的字段名,property表示与之对应的JavaBean对象的属性名 -->
	 <resultMap type="com.tcent.pojo.Key" id="queryKeyByIdForSimple_resultMap">
		 <!-- id专门用来映射id主键列 -->
	 	<id column="id" property="id"/>
	 	<!-- result标签映射非主键列-->
	 	<result column="name" property="name"/>
	 	<!-- 级联映射 -->
	 	<result column="lock_id" property="lock.id"/>
	 	<result column="lock_name" property="lock.name"/>

	 </resultMap>

	 <select id="queryKeyByIdForSimple" resultMap="queryKeyByIdForSimple_resultMap">
 		select t_key.*,t_lock.name lock_name
 		from
 			t_key left join t_lock
 		on
 			t_key.lock_id = t_lock.id
 		where
 			t_key.id=#{id}

 	</select>
测试结果:

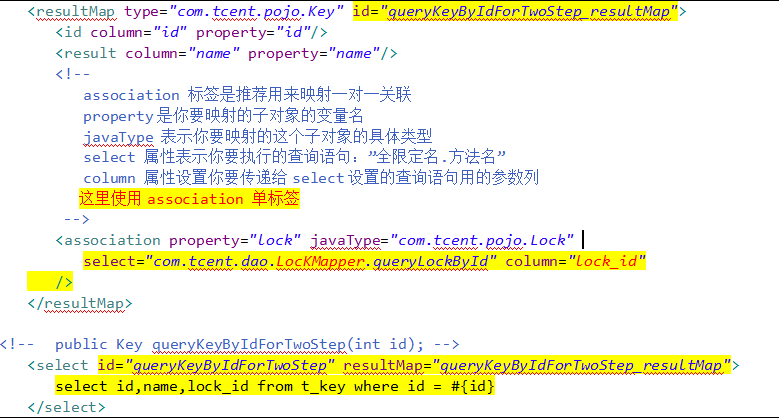
13.4.2、<association /> 嵌套结果集映射配置(取代result的级联映射)
前三次的方法官方都不推荐使用,官方推荐使用第四种,因为<association /> 功能更强大,主要可用定义分步查询
(4)、第四次
修改KeyMapper.xml配置文件:
<resultMap type="com.tcent.pojo.Key" id="queryKeyByIdForSample_resultMap">
		<!-- id专门用来映射id主键列-->
		<id column="id" property="id"/>
		<!-- result标签映射非主键列-->
		<result column="name" property="name"/>
		<!-- association 标签专门 映射Bean对象中的子对象(一个Bean)
				专门用来配置一对一标签
		 -->
		<association property="lock" javaType="com.tcent.pojo.Lock">
			<!-- 把数据库表中的lock_id列	注入	--→到lock属性对象中的id属性值 -->
			<id column="lock_id" property="id"/>
			<!-- 把查询的lock_name列的值给lock子对象中的name属性 -->
			<result column="lock_name" property="name"/>
		</association>
	</resultMap>
测试结果:

这里的四次方法只改了配置文件 其他都没变化
总的代码粘出来:
<?xml version="1.0" encoding="UTF-8" ?>
<!DOCTYPE mapper
  PUBLIC "-//mybatis.org//DTD Mapper 3.0//EN"
  "http://mybatis.org/dtd/mybatis-3-mapper.dtd">
<!--
	namespace 属性一般情况下。
		一种定义规则:
			一种是使用对流的javaBean的全类名
			一种是使用Mapper接口的全类名
 -->
<mapper namespace="com.tcent.dao.KeyMapper">
<!-- 1、 	<select id="queryKeyByIdForSimple" resultType="com.tcent.pojo.Key"> -->
<!--  		select id ,name,lock_id lock1 from t_key where id = #{id} -->
<!--    	</select> -->

<!-- 2、	<resultMap type="com.tcent.pojo.Key" id="queryKeyByIdForSimple_resultMap"> -->
<!-- 	 	<id column="id" property="id"/> -->
<!-- 	 	<result column="name" property="name"/> -->
<!-- 	 	<result column="lock_id" property="lock.id"/>	   -->
<!-- 	   </resultMap> -->

<!-- 	    <select id="queryKeyByIdForSimple" resultMap="queryKeyByIdForSimple_resultMap"> -->
<!--  		select id ,name,lock_id  from t_key where id = #{id} -->
<!--  	    </select> -->
<!-- 3、	<resultMap type="com.tcent.pojo.Key" id="queryKeyByIdForSimple_resultMap"> -->
<!-- 	 	<id column="id" property="id"/> -->
<!-- 	 	<result column="name" property="name"/> -->
<!-- 	 	<result column="lock_id" property="lock.id"/> -->
<!-- 	 	<result column="lock_name" property="lock.name"/> -->
<!-- 	   </resultMap> -->
<!-- 	  <select id="queryKeyByIdForSimple" resultMap="queryKeyByIdForSimple_resultMap"> -->
<!--  		select t_key.*,t_lock.name lock_name -->
<!--  		from  -->
<!--  			t_key left join t_lock -->
<!--  		on -->
<!--  			t_key.lock_id = t_lock.id -->
<!--  		where -->
<!--  			t_key.id=#{id} -->
<!--  	</select> -->
<!-- 4、	 <resultMap type="com.tcent.pojo.Key" id="queryKeyByIdForSimple_resultMap"> -->
<!-- 		 <!-- id专门用来映射id主键列 --> -->
<!-- 	 	<id column="id" property="id"/> -->
<!-- 	 	<!-- result标签映射非主键列--> -->
<!-- 	 	<result column="name" property="name"/> -->
<!-- 	 	<!-- 级联映射 --> -->
<!-- 	 	<association property="lock" javaType="com.tcent.pojo.Lock"> -->
<!-- 	 		<id column="lock_id" property="id"/> -->
<!-- 	 		<result column="lock_name" property="name"/> -->
<!-- 	 	</association> -->
<!-- 	 </resultMap> -->
<!-- 	 <select id="queryKeyByIdForSimple" resultMap="queryKeyByIdForSimple_resultMap"> -->
<!--  		select t_key.*,t_lock.name lock_name -->
<!--  		from  -->
<!--  			t_key left join t_lock -->
<!--  		on -->
<!--  			t_key.lock_id = t_lock.id -->
<!--  		where -->
<!--  			t_key.id=#{id} -->
<!--  	</select> -->
</mapper>
13.5、延迟加载
延迟加载在一定程序上可以减少很多没有必要的查询。给数据库服务器提升性能上的优化。
要启用延迟加载,需要在mybatis-config.xml配置文件中,添加如下两个全局的settings配置。
<!-- 打开延迟加载的开关 -->
       <setting name="lazyLoadingEnabled" value="true" />
       <!-- 将积极加载改为消极加载  按需加载 -->
<setting name="aggressiveLazyLoading" value="false"/>
懒加载功能,mybatis3.2.8版本,需要同时引入两个jar包,我使用的版本是mybatis3.4.1版本,不需要导包,包会在后面给出的
13.5.1、<association /> 定义分步查询使用延迟加载
在KeyMapper接口中创建一个分步查询方法:
/*
	 * 一开始我只需要使用key表的信息,所以我只查key表的信息。
	 * <br/>
	 * 当我们需要用到key对象对应的Lock对象的信息的时候。我再查Lock的信息
	 *
	 */
	public Key queryKeyByIdForTwoStep(int id);
再创建LockMapper接口:
public interface LocKMapper {
	public Lock queryLockById(int lockId);
}
mybatis-config.xml配置文件中:
<settings>
			<!-- 打开延迟加载的开关 -->
	       <setting name="lazyLoadingEnabled" value="true" />
	       <!-- 将积极加载改为消极加载  按需加载 -->
			<setting name="aggressiveLazyLoading" value="false"/>
</settings>
在keyMapper.xml配置文件中使用第四种association,并做修改 (黄色字底背景):
<resultMap type="com.tcent.pojo.Key" id="queryKeyByIdForTwoStep_resultMap">
		<id column="id" property="id"/>
		<result column="name" property="name"/>
		<!--
			association 标签是推荐用来映射一对一关联
			property是你要映射的子对象的变量名
			javaType 表示你要映射的这个子对象的具体类型
			select 属性表示你要执行的查询语句:”全限定名.方法名”
			column 属性设置你要传递给select设置的查询语句用的参数列
这里使用association 单标签
		 -->
		<association property="lock" javaType="com.tcent.pojo.Lock"
			select="com.tcent.dao.LocKMapper.queryLockById" column="lock_id"
		/>
	</resultMap>

<!-- 	public Key queryKeyByIdForTwoStep(int id); -->
	<select id="queryKeyByIdForTwoStep" resultMap="queryKeyByIdForTwoStep_resultMap">
		select id,name,lock_id from t_key where id = #{id}
	</select>
注意:注释不能嵌套<!-- <!-- -->-->
创建LockMapper.xml配置文件内容如下:
<!-- 	public Lock queryLockById(int lockId);
id = #{id}占位符由keyMapper.xml中的column给出
-->
	<select id="queryLockById" resultType="com.tcent.pojo.Lock">
		select id,name from t_lock where id = #{id}
	</select>
测试结果:
只输出:System.out.println("只想使用key的属性值,就会只执行一次查询语句在一张表中:"+key.getName());

输出:System.out.println("只想使用key的属性值,就会只执行一次查询语句在一张表中:"+key.getName());
System.out.println("也想使用lock的属性值,就会执行两次查询语句在两张表中"+key.getLock());

目录结构示意图:
<association property="lock" javaType="com.tcent.pojo.Lock">
javaType:映射Bean对象中的子对象(另一个Bean)所属的全类名
Property:映射Bean对象中的子对象
13.6、多对一、一对多的使用示例
13.6.1、创建一对多数据库
## 一对多数据表
## 创建班级表
create table t_clazz(
	`id` int primary key auto_increment,
	`name` varchar(50)
);

## 插入班级信息
insert into t_clazz(`name`) values('高三28班');
insert into t_clazz(`name`) values('高三34班');
insert into t_clazz(`name`) values('高三20班');
insert into t_clazz(`name`) values('高三32班');

## 创建学生表
create table t_student(
	`id` int primary key auto_increment,
	`name` varchar(50),
	`clazz_id` int,
	foreign key(`clazz_id`) references t_clazz(`id`)
);

## 插入班级信息
insert into t_student(`name`,`clazz_id`) values('孟小贤',1);
insert into t_student(`name`,`clazz_id`) values('李小想',1);
insert into t_student(`name`,`clazz_id`) values('徐小鹏',1);
insert into t_student(`name`,`clazz_id`) values('张小磊',2);
insert into t_student(`name`,`clazz_id`) values('彭小梁',2);
insert into t_student(`name`,`clazz_id`) values('小强',3);
创建实体Bean对象:
学生
public class Student {

	private int id;
	private String name;

班级
public class Clazz {

	private int id;
	private String name;
	private List<Student> stuList;
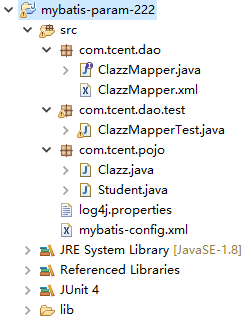
一个Java项目:mybatis的简单目录结构
13.6.2、<collection/> 一对多,立即加载
创建ClazzMapper接口
public interface ClazzMapper {

	public Clazz queryClazzByIdForSample(int id);

}
编写ClazzMapper.xml配置文件:
<resultMap type="com.tcent.pojo.Clazz" id="queryClazzByIdForSample_resultMap">
		<id column="id" property="id"/>
		<result column="name" property="name"/>
		<!--
			collection 标签专门用来映射集合属性
				property	表示你要映射的集合属性名是什么
		 -->
		<collection property="stuList" ofType="com.tcent.pojo.Student">
			<id column="stu_id" property="id"/>
			<result column="stu_name" property="name"/>
		</collection>
	</resultMap>

<!-- 	public Clazz queryClazzByIdForSample(int id); -->
	<select id="queryClazzByIdForSample" resultMap="queryClazzByIdForSample_resultMap">
		select
			t_clazz.*,t_student.id stu_id,t_student.name stu_name
		from
			t_clazz left join t_student
		on
			t_clazz.id = t_student.clazz_id
		where
			t_clazz.id = #{id}
	</select>
测试代码:
@Test
	public void testQueryClazzByIdForSimple() throws IOException {
		SqlSessionFactory sqlSessionFactory = new  SqlSessionFactoryBuilder().build(Resources.getResourceAsStream("mybatis-config.xml"));
		SqlSession session = sqlSessionFactory.openSession();
		ClazzMapper mapper = session.getMapper(ClazzMapper.class);
		System.out.println(mapper.queryClazzByIdForSimple(1));
	}
测试结果:

立即加载:创建一个对应的pojo,只需要在查询语句 的时候查询字段并起 别名,并在collection 中指定对应的类型即可,其他不需要配置任何有关副表的数据代码。
13.6.3、一对多,赖加载(需要创建副表接口和Mapper.xml)
再创建一个StudentMapper接口
public interface StudentMapper {
	public List<Student> queryStudentsByClazzId(int clazzId);
}
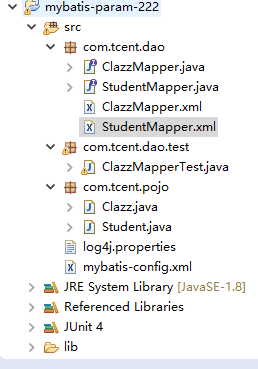
目录结构:
创建副表简单的查询语句:StudentMapper.xml配置文件:
<!-- 	public List<Student> queryStudentsByClazzId(int clazzId); -->
	<select id="queryStudentsByClazzId" resultType="com.tcent.pojo.Student">
		select id,name from t_student where clazz_id = #{clazzid}
	</select>
在ClazzMapper接口中添加一个新方法来实现懒加载
/**
	 * 	我要分两次查询,
	 * 一次只查常用数据,班级信息<br/>
	 * 当我需要使用学生信息的时候。再查询一次<br/>
	 * 还要用到懒加载
	 */
	public Clazz queryClazzByIdForTwoStepLazy(int id);
在ClazzMapper.xml中进行重新配置queryClazzByIdForTwoStepLazy方法对应的查询语句与结果集:并做修改 (黄色字底背景):
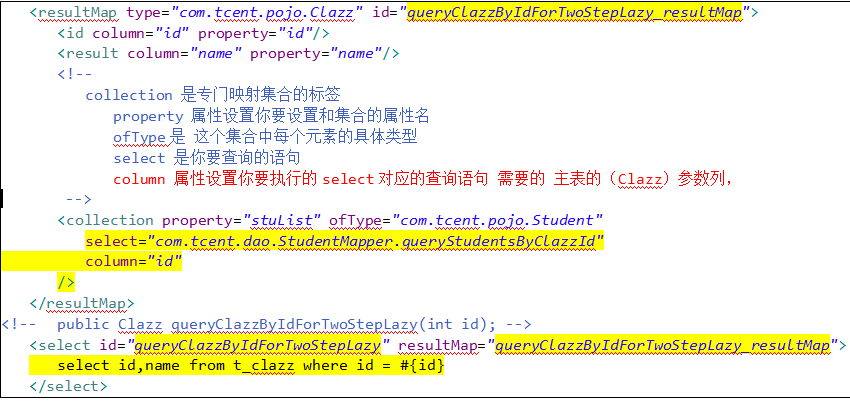
<resultMap type="com.tcent.pojo.Clazz" id="queryClazzByIdForTwoStepLazy_resultMap">
		<id column="id" property="id"/>
		<result column="name" property="name"/>
		<!--
			collection 是专门映射集合的标签
				property 属性设置你要设置和集合的属性名
				ofType是 这个集合中每个元素的具体类型
				select 是你要查询的语句
				column 属性设置你要执行的select对应的查询语句 需要的 主表的(Clazz)参数列,
也就是根据现在的表的id值去查询副表,产生关联关系
		 -->
		<collection property="stuList" ofType="com.tcent.pojo.Student"
			select="com.tcent.dao.StudentMapper.queryStudentsByClazzId"
			column="id"
		/>
	</resultMap>
<!-- 	public Clazz queryClazzByIdForTwoStepLazy(int id); -->
	<select id="queryClazzByIdForTwoStepLazy" resultMap="queryClazzByIdForTwoStepLazy_resultMap">
		select id,name from t_clazz where id = #{id}
	</select>
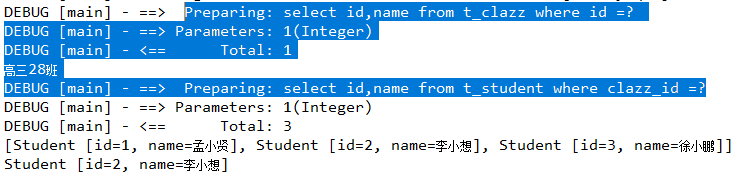
测试代码:
@Test
	public void testQueryClazzByIdFor2Step() throws IOException {
		SqlSessionFactory sqlSessionFactory = new  SqlSessionFactoryBuilder().build(Resources.getResourceAsStream("mybatis-config.xml"));
		SqlSession session = sqlSessionFactory.openSession();
		ClazzMapper mapper = session.getMapper(ClazzMapper.class);
		 Clazz clazz = mapper.queryClazzByIdFor2Step(1);
		 System.out.println(clazz.getName());
		 System.out.println(clazz.getStuList());
		 System.out.println(clazz.getStuList().get(1));
	}
测试结果:System.out.println(clazz.getName());

测试结果: System.out.println(clazz.getStuList());
System.out.println(clazz.getStuList().get(1));
13.6.4、双向关联
注意点:双向关联实体类中都要互含对方的bean对象或含bean对象的list集合,所以要加上private Clazz clazz;
2、两边都要用select中resultMap,没有主副表了,所以没有resultType标签
3、双向关联两边都是懒加载,所以都是简单的查询语句和单向懒加载的副表一样
4、但为了终止死循环,必须要有一个名义上的副表使用association,主表还是collection集合标签
public class Student {

	private int id;
	private String name;
	private Clazz clazz;
这里Student又添加了一个clazz属性,以便双向关联,但相对于Student被关联的Clazz就变成了副表了,而且只是Student 的一个简单JavaBean对象,所以在resultMap中使用association 和javaType标签属性
在StudentMapper接口中也添加一个懒加载的方法:
public List<Student> queryStudentByClazzIdForLazy(int clazzId);
然后在StudentMapper.xml配置文件中
<resultMap type="com.tcent.pojo.Student" id="queryStudentByClazzIdForLazy_resultMap">
		<id column="id" property="id"/>
		<result column="name" property="name"/>
		<!-- association标签是专门用来映射单个子对象的标签 -->
		<association property="clazz" javaType="com.tcent.pojo.Clazz"
			select="com.tcent.dao.ClazzMapper.queryClazzByIdForTwoStepLazy"
			column="clazz_id"
		/>
	</resultMap>
<!-- public List<Student> queryStudentByClazzIdForLazy(int clazzId); -->
	<select id="queryStudentByClazzIdForLazy" resultMap="queryStudentByClazzIdForLazy_resultMap">
		select id,name,clazz_id from t_student where clazz_id = #{clazzId}
	</select>
还需要修改原来懒加载查询班级里,懒加载学生的select属性
<resultMap type="com.tcent.pojo.Clazz" id="queryClazzByIdForTwoStepLazy_resultMap">
		<id column="id" property="id"/>
		<result column="name" property="name"/>
		<!--
			collection 是专门映射集合的标签
				property 属性设置你要设置和集合的属性名
				ofType是 这个集合中每个元素的具体类型
				select 是你要查询的语句
				column 属性设置你要执行的select对应的查询语句需要的参数列
		 -->
		<collection property="stuList" ofType="com.atguigu.pojo.Student"
			select="com.tcent.dao.StudentMapper.queryStudentByClazzIdForLazy"
			column="id"
		/>
	</resultMap>
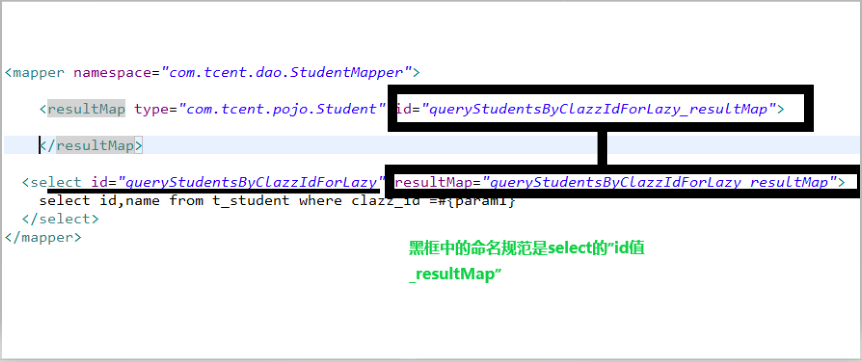
黑框中的命名规范是select的”id值_resultMap”
双向关联会有死循环出现!
如何防止双向关联呢?
1、不要调用toString方法
2、在你需要终止关联的时候,最后一次查询使用resultType
死循环的测试结果:System.out.println(clazz.getStuList());

总结:
<association /> 一对一 立即加载 :
<association property="lock" javaType="com.tcent.pojo.Lock"
一对一,延迟加载
javaType 表示你要映射的这个子对象的具体类型
<collection/> 一对多,立即加载:
<collectionproperty="stuList"ofType="com.atguigu.pojo.Student">
collection 标签专门用来映射集合属性
property表示你要映射的集合属性名是什么
一对多,延迟加载
ofType是 这个集合中每个元素的具体类型(即副表全类名)
立即加载(不需要副表的xml文件和接口方法,只需要bean实体类)
延迟/懒加载(需要副表的xml文件和接口方法,xml文件只是简单的select语句)
双向关联(需要副表的xml文件和接口方法,两个xml文件都要resultMap标签,主表collection副表association)
懒加载要在mybatis-config的核心配置文件中添加
<settings>
<!-- 打开延迟加载的开关 -->
<setting name="lazyLoadingEnabled" value="true" />
<!-- 将积极加载改为消极加载 按需加载 -->
<setting name="aggressiveLazyLoading" value="false"/>
</settings>
双向关联
注意点:双向关联实体类中都要互含对方的bean对象或含bean对象的list集合,所以要加上private Clazz clazz;
2、两边都要用select中resultMap,没有主副表了,所以没有resultType标签
3、双向关联两边都是懒加载,所以都是简单的查询语句和单向懒加载的副表一样
4、但为了终止死循环,必须要有一个名义上的副表使用association,主表还是collection集合标签
第二次查询没有结果输出,并且Junit测试包错
由于我是高版本的mybatis,所以没有导包,所以我把包和项目分开上传