一、装饰器模式(Decorator Pattern)
1、概念
装饰器模式(Decorator Pattern)允许向一个现有的对象添加新的功能,同时又不改变其结构。这种类型的设计模式属于结构型模式,它是作为现有的类的一个包装。这种模式创建了一个装饰类,用来包装原有的类,并在保持类方法签名完整性的前提下,提供了额外的功能。
2、简介
意图:动态地给一个对象添加一些额外的职责。就增加功能来说,装饰器模式相比生成子类更为灵活。
主要解决:一般的,我们为了扩展一个类经常使用继承方式实现,由于继承为类引入静态特征,并且随着扩展功能的增多,子类会很膨胀。
何时使用:在不想增加很多子类的情况下扩展类。
应用实例:
(1)、孙悟空有 72 变,当他变成"庙宇"后,他的根本还是一只猴子,但是他又有了庙宇的功能。
(2)、不论一幅画有没有画框都可以挂在墙上,但是通常都是有画框的,并且实际上是画框被挂在墙上。在挂在墙上之前,画可以被蒙上玻璃,装到框子里;这时画、玻璃和画框形成了一个物体。
优点:装饰类和被装饰类可以独立发展,不会相互耦合,装饰模式是继承的一个替代模式,装饰模式可以动态扩展一个实现类的功能。
缺点:多层装饰比较复杂。
使用场景:
(1)、扩展一个类的功能。
(2)、动态增加功能,动态撤销。
注意事项:可代替继承。
3、实例
我们将创建一个 Shape 接口和实现了 Shape 接口的实体类。然后我们创建一个实现了 Shape 接口的抽象装饰类 ShapeDecorator,并把 Shape 对象作为它的实例变量。RedShapeDecorator 是实现了 ShapeDecorator 的实体类。演示类 DecoratorPatternDemo,我们的演示类使用 RedShapeDecorator 来装饰 Shape 对象。

(1)、创建一个接口Shape
public interface Shape {
   void draw();
}
(2)、创建接口的实现类
public class Rectangle implements Shape {

   @Override
   public void draw() {
      System.out.println("Shape: Rectangle");
   }
}
public class Circle implements Shape {

   @Override
   public void draw() {
      System.out.println("Shape: Circle");
   }
}
(3)、创建实现了 Shape 接口的抽象装饰类 ShapeDecorator
public abstract class ShapeDecorator implements Shape {
   protected Shape decoratedShape;

   public ShapeDecorator(Shape decoratedShape){
      this.decoratedShape = decoratedShape;
   }

   public void draw(){
      decoratedShape.draw();
   }
}
(4)、创建扩展了 ShapeDecorator 类的实体装饰类 RedShapeDecorator 。
public class RedShapeDecorator extends ShapeDecorator {

   public RedShapeDecorator(Shape decoratedShape) {
      super(decoratedShape);
   }

   @Override
   public void draw() {
      decoratedShape.draw();
      setRedBorder(decoratedShape);
   }

   private void setRedBorder(Shape decoratedShape){
      System.out.println("Border Color: Red");
   }
}
(5)、使用 RedShapeDecorator 来装饰 Shape 对象。
public class DecoratorPatternDemo {
   public static void main(String[] args) {

      Shape circle = new Circle();

      Shape redCircle = new RedShapeDecorator(new Circle());

      Shape redRectangle = new RedShapeDecorator(new Rectangle());
      System.out.println("Circle with normal border");
      circle.draw();

      System.out.println("\nCircle of red border");
      redCircle.draw();

      System.out.println("\nRectangle of red border");
      redRectangle.draw();
   }
}
(6)、演示结果
 1 Circle with normal border
 2 Shape: Circle
 3
 4 Circle of red border
 5 Shape: Circle
 6 Border Color: Red
 7
 8 Rectangle of red border
 9 Shape: Rectangle
10 Border Color: Red
二、外观模式(Facade Pattern)
1、概念
外观模式(Facade Pattern)隐藏系统的复杂性,并向客户端提供了一个客户端可以访问系统的接口。这种类型的设计模式属于结构型模式,它向现有的系统添加一个接口,来隐藏系统的复杂性。这种模式涉及到一个单一的类,该类提供了客户端请求的简化方法和对现有系统类方法的委托调用。
2、简介
意图:为子系统中的一组接口提供一个一致的界面,外观模式定义了一个高层接口,这个接口使得这一子系统更加容易使用。
主要解决:降低访问复杂系统的内部子系统时的复杂度,简化客户端与之相应的接口。
何时使用:
(1)、客户端不需要知道系统内部的复杂联系,整个系统只需提供一个"接待员"即可。
(2)、定义系统的入口。
如何解决:客户端不与系统耦合,外观类与系统耦合。
关键代码:在客户端和复杂系统之间再加一层,这一层将调用顺序、依赖关系等处理好。
应用实例:
(1)、去医院看病,可能要去挂号、门诊、划价、取药,让患者或患者家属觉得很复杂,如果有提供接待人员,只让接待人员来处理,就很方便。
(2)、JAVA 的三层开发模式。
优点:
(1)、减少系统相互依赖。
(2)、提高灵活性。
(3)、提高了安全性。
缺点:不符合开闭原则,如果要改东西很麻烦,继承重写都不合适。
使用场景:
(1)、为复杂的模块或子系统提供外界访问的模块。
(2)、子系统相对独立。
(3)、预防低水平人员带来的风险。
注意事项:在层次化结构中,可以使用外观模式定义系统中每一层的入口。
3、实例
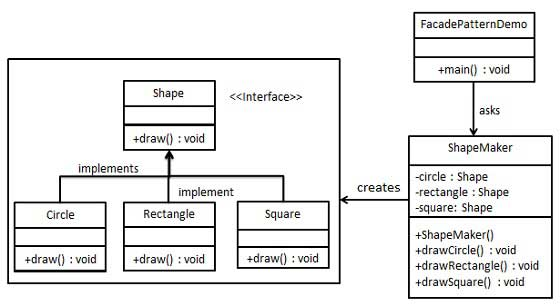
我们将创建一个 Shape 接口和实现了 Shape 接口的实体类。下一步是定义一个外观类 ShapeMaker。ShapeMaker 类使用实体类来代表用户对这些类的调用。演示类 FacadePatternDemo,我们的演示类使用 ShapeMaker 类来显示结果。
(1)、创建接口 Shape 。
public interface Shape {
   void draw();
}
(2)、创建实现了 Shape 接口的实现类。
public class Rectangle implements Shape {

   @Override
   public void draw() {
      System.out.println("Rectangle::draw()");
   }
}
public class Square implements Shape {

   @Override
   public void draw() {
      System.out.println("Square::draw()");
   }
}
public class Circle implements Shape {

   @Override
   public void draw() {
      System.out.println("Circle::draw()");
   }
}
(3)、创建一个外观类 ShapeMaker 。
public class ShapeMaker {
   private Shape circle;
   private Shape rectangle;
   private Shape square;

   public ShapeMaker() {
      circle = new Circle();
      rectangle = new Rectangle();
      square = new Square();
   }

   public void drawCircle(){
      circle.draw();
   }
   public void drawRectangle(){
      rectangle.draw();
   }
   public void drawSquare(){
      square.draw();
   }
}
(4)、使用外观类画出各种形状。
public class FacadePatternDemo {
   public static void main(String[] args) {
      ShapeMaker shapeMaker = new ShapeMaker();

      shapeMaker.drawCircle();
      shapeMaker.drawRectangle();
      shapeMaker.drawSquare();
   }
}
(5)、演示结果
1 Circle::draw()
2 Rectangle::draw()
3 Square::draw()
三、享元模式(Flyweight Pattern)
1、概念
享元模式(Flyweight Pattern)主要用于减少创建对象的数量,以减少内存占用和提高性能。这种类型的设计模式属于结构型模式,它提供了减少对象数量从而改善应用所需的对象结构的方式。享元模式尝试重用现有的同类对象,如果未找到匹配的对象,则创建新对象。
2、简介
意图:运用共享技术有效地支持大量细粒度的对象。
主要解决:在有大量对象时,有可能会造成内存溢出,我们把其中共同的部分抽象出来,如果有相同的业务请求,直接返回在内存中已有的对象,避免重新创建。
何时使用:
(1)、系统中有大量对象。
(2)、这些对象消耗大量内存。
(3)、这些对象的状态大部分可以外部化。
(4)、这些对象可以按照内蕴状态分为很多组,当把外蕴对象从对象中剔除出来时,每一组对象都可以用一个对象来代替。
(5)、系统不依赖于这些对象身份,这些对象是不可分辨的。
如何解决:用唯一标识码判断,如果在内存中有,则返回这个唯一标识码所标识的对象。
关键代码:用 HashMap 存储这些对象。
优点:大大减少对象的创建,降低系统的内存,使效率提高。
缺点:提高了系统的复杂度,需要分离出外部状态和内部状态,而且外部状态具有固有化的性质,不应该随着内部状态的变化而变化,否则会造成系统的混乱。
注意事项:
(1)、注意划分外部状态和内部状态,否则可能会引起线程安全问题。
(2)、这些类必须有一个工厂对象加以控制。
3、实例
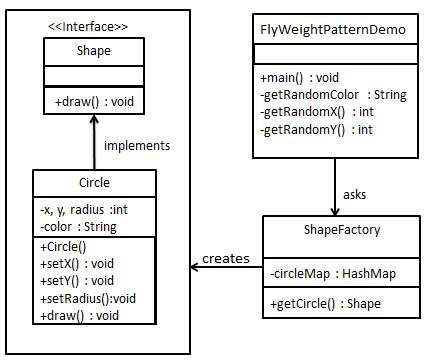
我们将创建一个 Shape 接口和实现了 Shape 接口的实体类 Circle。下一步是定义工厂类 ShapeFactory。ShapeFactory 有一个 Circle 的 HashMap,其中键名为 Circle 对象的颜色。无论何时接收到请求,都会创建一个特定颜色的圆。ShapeFactory 检查它的 HashMap 中的 circle 对象,如果找到 Circle 对象,则返回该对象,否则将创建一个存储在 hashmap 中以备后续使用的新对象,并把该对象返回到客户端。FlyWeightPatternDemo,我们的演示类使用 ShapeFactory 来获取 Shape 对象。它将向 ShapeFactory 传递信息(red / green / blue/ black / white),以便获取它所需对象的颜色。
(1)、创建一个接口 Shape。
public interface Shape {
   void draw();
}
(2)、创建接口的实体类。
public class Circle implements Shape {
   private String color;
   private int x;
   private int y;
   private int radius;

   public Circle(String color){
      this.color = color;
   }

   public void setX(int x) {
      this.x = x;
   }

   public void setY(int y) {
      this.y = y;
   }

   public void setRadius(int radius) {
      this.radius = radius;
   }

   @Override
   public void draw() {
      System.out.println("Circle: Draw() [Color : " + color
         +", x : " + x +", y :" + y +", radius :" + radius);
   }
}
(3)、创建一个工厂 ShapeFactory ,生成基于给定信息的实体类的对象。
import java.util.HashMap;

public class ShapeFactory {
   private static final HashMap<String, Shape> circleMap = new HashMap<>();

   public static Shape getCircle(String color) {
      Circle circle = (Circle)circleMap.get(color);

      if(circle == null) {
         circle = new Circle(color);
         circleMap.put(color, circle);
         System.out.println("Creating circle of color : " + color);
      }
      return circle;
   }
}
(4)、使用该工厂,通过传递颜色信息来获取实体类的对象。
public class FlyweightPatternDemo {
   private static final String colors[] =
      { "Red", "Green", "Blue", "White", "Black" };
   public static void main(String[] args) {

      for(int i=0; i < 20; ++i) {
         Circle circle =
            (Circle)ShapeFactory.getCircle(getRandomColor());
         circle.setX(getRandomX());
         circle.setY(getRandomY());
         circle.setRadius(100);
         circle.draw();
      }
   }
   private static String getRandomColor() {
      return colors[(int)(Math.random()*colors.length)];
   }
   private static int getRandomX() {
      return (int)(Math.random()*100 );
   }
   private static int getRandomY() {
      return (int)(Math.random()*100);
   }
}
(5)、演示结果
 1 Creating circle of color : Black
 2 Circle: Draw() [Color : Black, x : 36, y :71, radius :100
 3 Creating circle of color : Green
 4 Circle: Draw() [Color : Green, x : 27, y :27, radius :100
 5 Creating circle of color : White
 6 Circle: Draw() [Color : White, x : 64, y :10, radius :100
 7 Creating circle of color : Red
 8 Circle: Draw() [Color : Red, x : 15, y :44, radius :100
 9 Circle: Draw() [Color : Green, x : 19, y :10, radius :100
10 Circle: Draw() [Color : Green, x : 94, y :32, radius :100
11 Circle: Draw() [Color : White, x : 69, y :98, radius :100
12 Creating circle of color : Blue
13 Circle: Draw() [Color : Blue, x : 13, y :4, radius :100
14 Circle: Draw() [Color : Green, x : 21, y :21, radius :100
15 Circle: Draw() [Color : Blue, x : 55, y :86, radius :100
16 Circle: Draw() [Color : White, x : 90, y :70, radius :100
17 Circle: Draw() [Color : Green, x : 78, y :3, radius :100
18 Circle: Draw() [Color : Green, x : 64, y :89, radius :100
19 Circle: Draw() [Color : Blue, x : 3, y :91, radius :100
20 Circle: Draw() [Color : Blue, x : 62, y :82, radius :100
21 Circle: Draw() [Color : Green, x : 97, y :61, radius :100
22 Circle: Draw() [Color : Green, x : 86, y :12, radius :100
23 Circle: Draw() [Color : Green, x : 38, y :93, radius :100
24 Circle: Draw() [Color : Red, x : 76, y :82, radius :100
25 Circle: Draw() [Color : Blue, x : 95, y :82, radius :100
四、代理模式(Proxy Pattern)
1、概念
在代理模式(Proxy Pattern)中,一个类代表另一个类的功能。这种类型的设计模式属于结构型模式。在代理模式中,我们创建具有现有对象的对象,以便向外界提供功能接口。
2、简介
意图:为其他对象提供一种代理以控制对这个对象的访问。
主要解决:在直接访问对象时带来的问题,比如说:要访问的对象在远程的机器上。在面向对象系统中,有些对象由于某些原因(比如对象创建开销很大,或者某些操作需要安全控制,或者需要进程外的访问),直接访问会给使用者或者系统结构带来很多麻烦,我们可以在访问此对象时加上一个对此对象的访问层。
如何解决:增加中间层。
关键代码:实现与被代理类组合。
应用实例:
(1)、Windows 里面的快捷方式。
(2)、买火车票不一定在火车站买,也可以去代售点。
(3)、一张支票或银行存单是账户中资金的代理。支票在市场交易中用来代替现金,并提供对签发人账号上资金的控制。
(4)、spring aop。
优点:
(1)、职责清晰。
(2)、高扩展性。
(3)、智能化。
缺点:
(1)、由于在客户端和真实主题之间增加了代理对象,因此有些类型的代理模式可能会造成请求的处理速度变慢。
(2)、实现代理模式需要额外的工作,有些代理模式的实现非常复杂。
使用场景:按职责来划分,通常有以下使用场景:
(1)、远程代理。
(2)、虚拟代理。
(3)、Copy-on-Write 代理。
(4)、保护(Protect or Access)代理。
(5)、Cache代理。
(6)、防火墙(Firewall)代理。
(7)、同步化(Synchronization)代理。
(8)、智能引用(Smart Reference)代理。
注意事项:
(1)、和适配器模式的区别:适配器模式主要改变所考虑对象的接口,而代理模式不能改变所代理类的接口。
(2)、和装饰器模式的区别:装饰器模式为了增强功能,而代理模式是为了加以控制。
3、实例
我们将创建一个 Image 接口和实现了 Image 接口的实体类。ProxyImage 是一个代理类,减少 RealImage 对象加载的内存占用。ProxyPatternDemo,我们的演示类使用 ProxyImage 来获取要加载的 Image 对象,并按照需求进行显示。

(1)、创建接口。
public interface Image {
   void display();
}
(2)、创建接口的实现类。
public class RealImage implements Image {

   private String fileName;

   public RealImage(String fileName){
      this.fileName = fileName;
      loadFromDisk(fileName);
   }

   @Override
   public void display() {
      System.out.println("Displaying " + fileName);
   }

   private void loadFromDisk(String fileName){
      System.out.println("Loading " + fileName);
   }
}
public class ProxyImage implements Image{

   private RealImage realImage;
   private String fileName;

   public ProxyImage(String fileName){
      this.fileName = fileName;
   }

   @Override
   public void display() {
      if(realImage == null){
         realImage = new RealImage(fileName);
      }
      realImage.display();
   }
}
(3)、当被请求时,使用 ProxyImage 来获取 RealImage 类的对象。
public class ProxyPatternDemo {

   public static void main(String[] args) {
      Image image = new ProxyImage("test_10mb.jpg");

      //图像将从磁盘加载
      image.display();
      System.out.println("");
      //图像将不再从磁盘加载
      image.display();
   }
}
(4)、演示结果
1 Loading test_10mb.jpg
2 Displaying test_10mb.jpg
3
4 Displaying test_10mb.jpg
结构型模式的讲解到此也就结束了,如有问题,还望各位大佬指正。