我们先来看看网易云音乐导航栏指示器是什么样的。
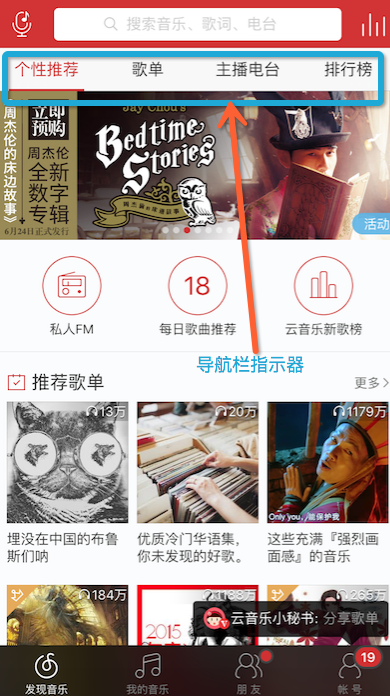
箭头指向的蓝色框就是导航指示器,点击之后下面的view会跟着移动,每个button下面还有个小红线跟着。这个效果其实不难实现,我们先来分析分析。
在iOS里好像没看到有指示器这么个控件,所以,指示器应该是我们自己添加到view上的代码实现的。我们先来看看这个4个分类,我们发现个性推荐、歌单、主播电台和排行榜都能点击,那我们首先想到的就是button,那button下面那个红线是什么呢?我认为可以是图片,也可以是个view的背景,只不过这个view很小,只有一两个像素那么高。那承载这4个button的背景是什么呢?我觉得UIView比较适,因为既能放button,自身又能设置背景。如果你觉得是UIImageView的话,我觉得也没什么错。那么我就用button和UIView来实现这个指示器。
Step 1 - 创建工程
我们先创建一个SingleView的工程,为了方便,我们直接在storyboard中Embed In一个NavigationController(选中storyboard,然后点击Xcode顶部控制栏的Editor -> Embed In -> Navigation Controller)。点击运行,我们就创建了一个有导航栏的View了。
Step 2 - 创建指示器的View
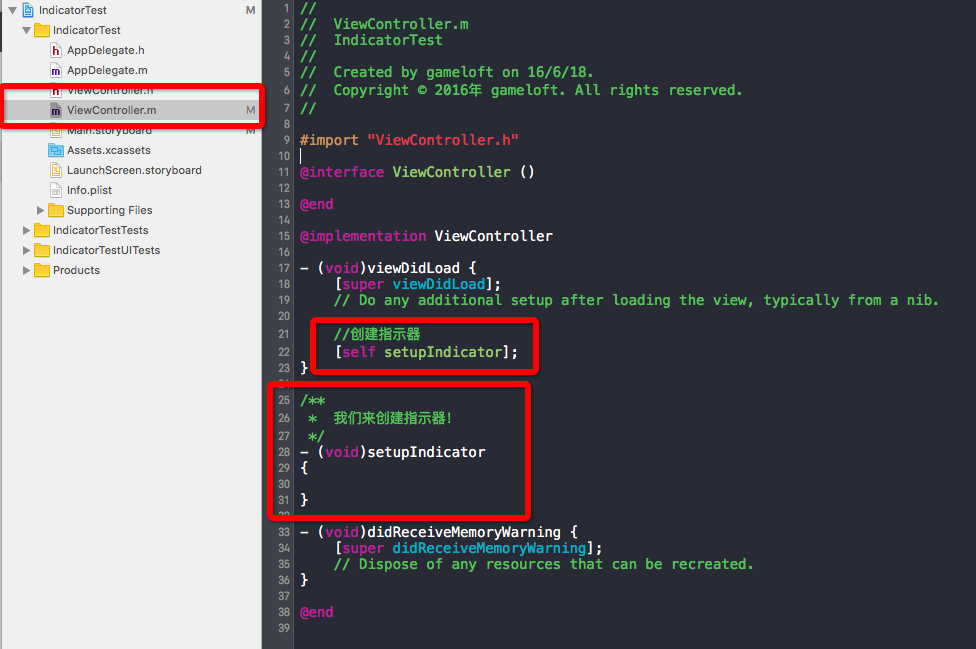
点击ViewController.m,我们开始添加指示器!我们写一个名为setupIndicator的方法来创建并初始化指示器,然后在viewDidLoad函数中调用setupIndicator 方法,从而避免在viewDidLoad 方法中添加过多的代码。
接下来,我们就在setupIndicator 方法中创建一个UIView,并设置好我们需要的属性。我们先创建一个UIView,并设置它的frame,然后用个weak的属性保存这个UIView。看看网易云音乐的指示器我们可以知道,我们需要指示器紧挨着顶部的导航栏,所以indicator的Y值就是顶部导航拦的高度加上电池状态栏的高度,X值不用说,必须是0啊,高度我们暂定一个35,宽度为屏幕宽度。获取顶部导航拦的高度和电池状态栏的高度可以用下面的代码:
self.navigationController.navigationBar.bounds.size.height +
[UIApplication sharedApplication].statusBarFrame.size.height
因为这段代码太长,我用宏代替,方便使用:
#define NAVIGATEHEIGHT self.navigationController.navigationBar.bounds.size.height + \
[UIApplication sharedApplication].statusBarFrame.size.height
/**
* 我们来创建指示器!
*/
- (void)setupIndicator
{
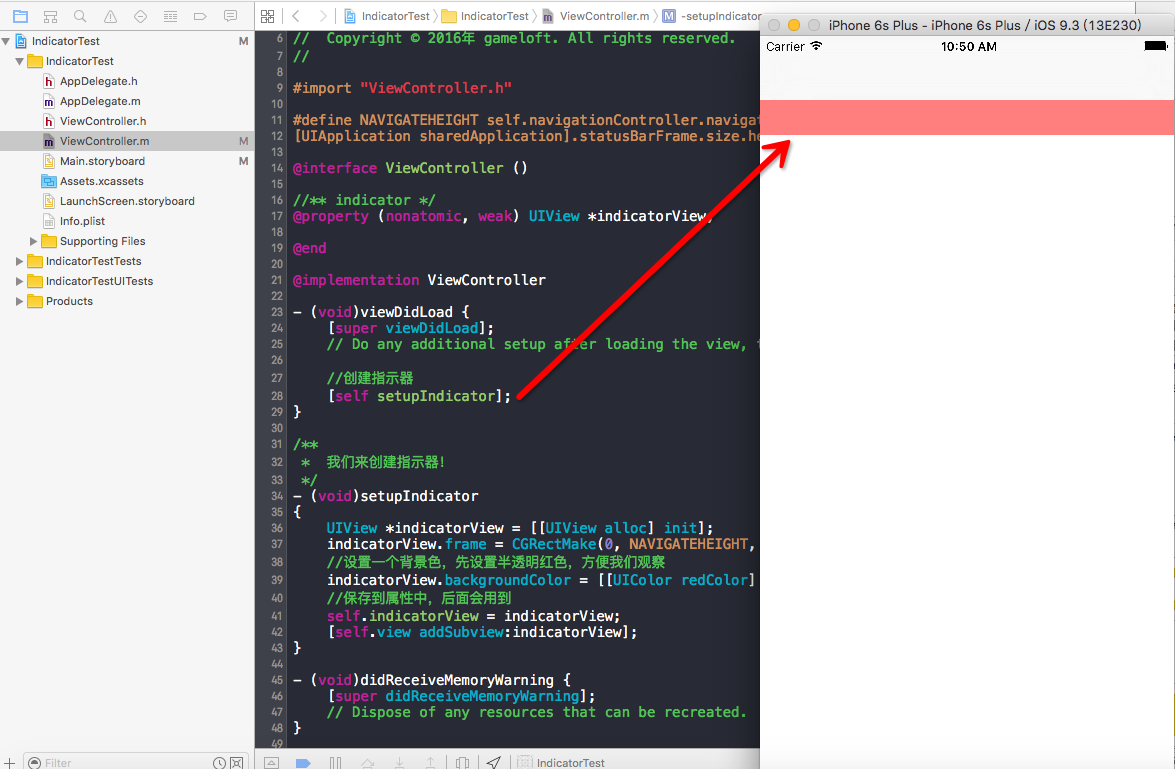
UIView *indicatorView = [[UIView alloc] init];
indicatorView.frame = CGRectMake(0, NAVIGATEHEIGHT, self.view.bounds.size.width, 35);
//设置一个背景色,先设置半透明红色,方便我们观察
indicatorView.backgroundColor = [[UIColor redColor] colorWithAlphaComponent:0.5];
[self.view addSubview:indicatorView];
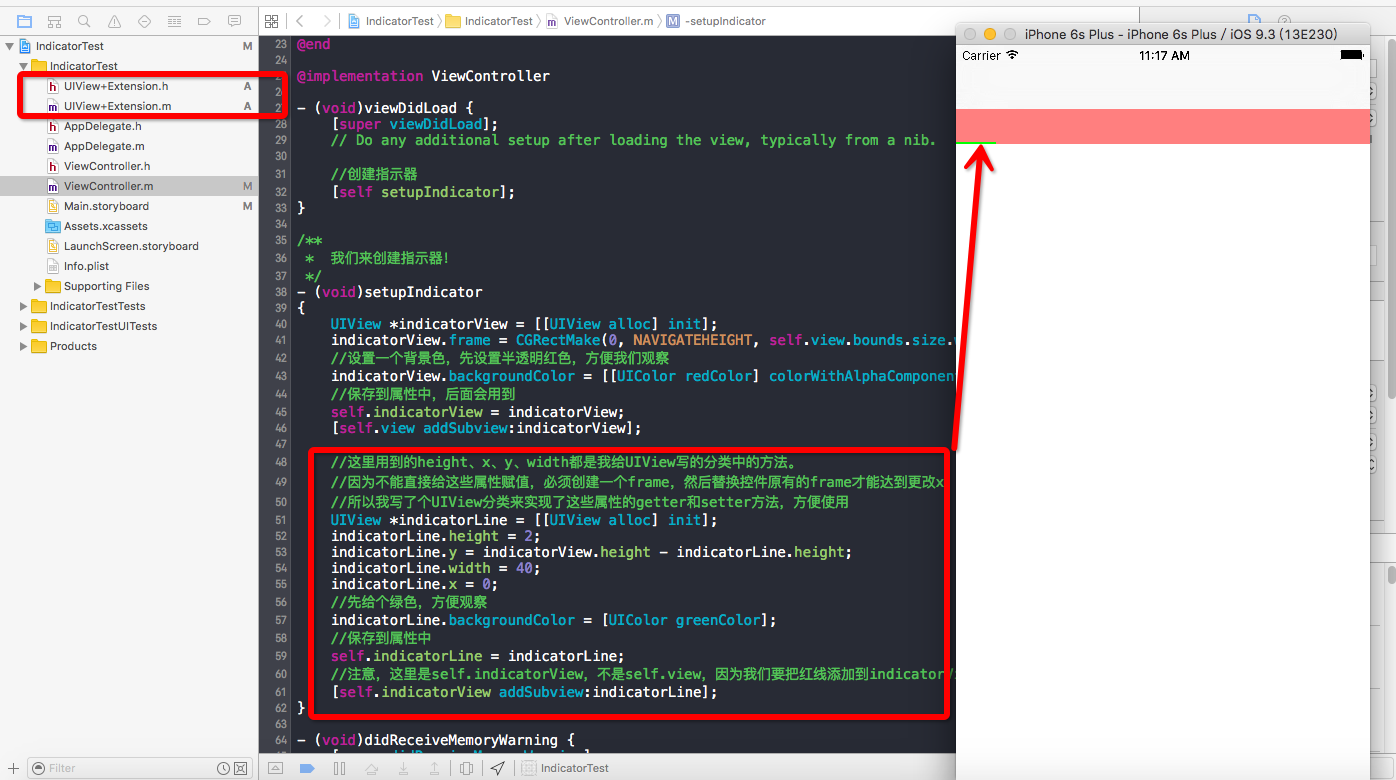
}这样,我们就有了一个指示器背景!
Step 3 - 创建底部红线
创建好View后,我们来添加底部红线。之前说过,底部红线我也用UIView来实现。那么我们先添加一个UIView,然后设置它的frame。这个红线首先高度我们来个2,因为它是条线,细线!X暂时为0,宽度暂时为40。因为红线是紧挨着Indicator的底部,所以红线的Y值为Indicator的高度减去红线的高度。下面我们来看看代码:
/**
 *  我们来创建指示器!
 */
- (void)setupIndicator
{
    UIView *indicatorView = [[UIView alloc] init];
    indicatorView.frame = CGRectMake(0, NAVIGATEHEIGHT, self.view.bounds.size.width, 35);
    //设置一个背景色,先设置半透明红色,方便我们观察
    indicatorView.backgroundColor = [[UIColor redColor] colorWithAlphaComponent:0.5];
    //保存到属性中,后面会用到
    self.indicatorView = indicatorView;
    [self.view addSubview:indicatorView];

    //这里用到的height、x、y、width都是我给UIView写的分类中的方法。
    //因为不能直接给这些属性赋值,必须创建一个frame,然后替换控件原有的frame才能达到更改x,y,宽高等属性的目的
    //所以我写了个UIView的分类来实现了这些属性的getter和setter方法,方便使用
    UIView *indicatorLine = [[UIView alloc] init];
    indicatorLine.height = 2;
    indicatorLine.y = indicatorView.height - indicatorLine.height;
    indicatorLine.width = 40;
    indicatorLine.x = 0;
    //先给个绿色,方便观察
    indicatorLine.backgroundColor = [UIColor greenColor];
    //保存到属性中
    self.indicatorLine = indicatorLine;
    //注意,这里是self.indicatorView,不是self.view,因为我们要把红线添加到indicatorView里
    [self.indicatorView addSubview:indicatorLine];
}
看看效果:
Step 4 创建Button
现在我们可以考虑考虑创建Button的事了。就以网易云音乐为例,我们也创建4个button。不过实际使用中,其实可以根据你button对应的view的数量来确定创建多少个button。因为这4个button是布满了Indicator的,所以button的宽度就是1/4Indicator的宽度,高度为Indicator的高度,Y值为0,X值是N(0 ~ 3)倍的button宽度。关于button的title呢,一般都会使用button对应的viewController的title,我们这里就弄个数组保存下titile,同时button点击前和点击后title颜色不同,所以也要设置title不同状态对应不同颜色。代码如下:
//添加4个button
    NSArray *titles = @[@"个性推荐", @"歌单", @"主播电台", @"排行榜"];
    CGFloat buttonHeight = indicatorView.height;
    CGFloat buttonWidth = indicatorView.width / 4;
    CGFloat buttonY = 0;
    NSUInteger count = 4;

    for (int i = 0; i < count; ++i) {
        UIButton *btn = [UIButton buttonWithType:UIButtonTypeCustom];
        [btn setTitle:titles[i] forState:UIControlStateNormal];
        [btn setTitleColor:[UIColor blackColor] forState:UIControlStateNormal];
        [btn setTitleColor:[UIColor redColor] forState:UIControlStateHighlighted];
        btn.frame = CGRectMake(buttonWidth * i, buttonY, buttonWidth, buttonHeight);
        [self.indicatorView addSubview:btn];
    }
效果如图:
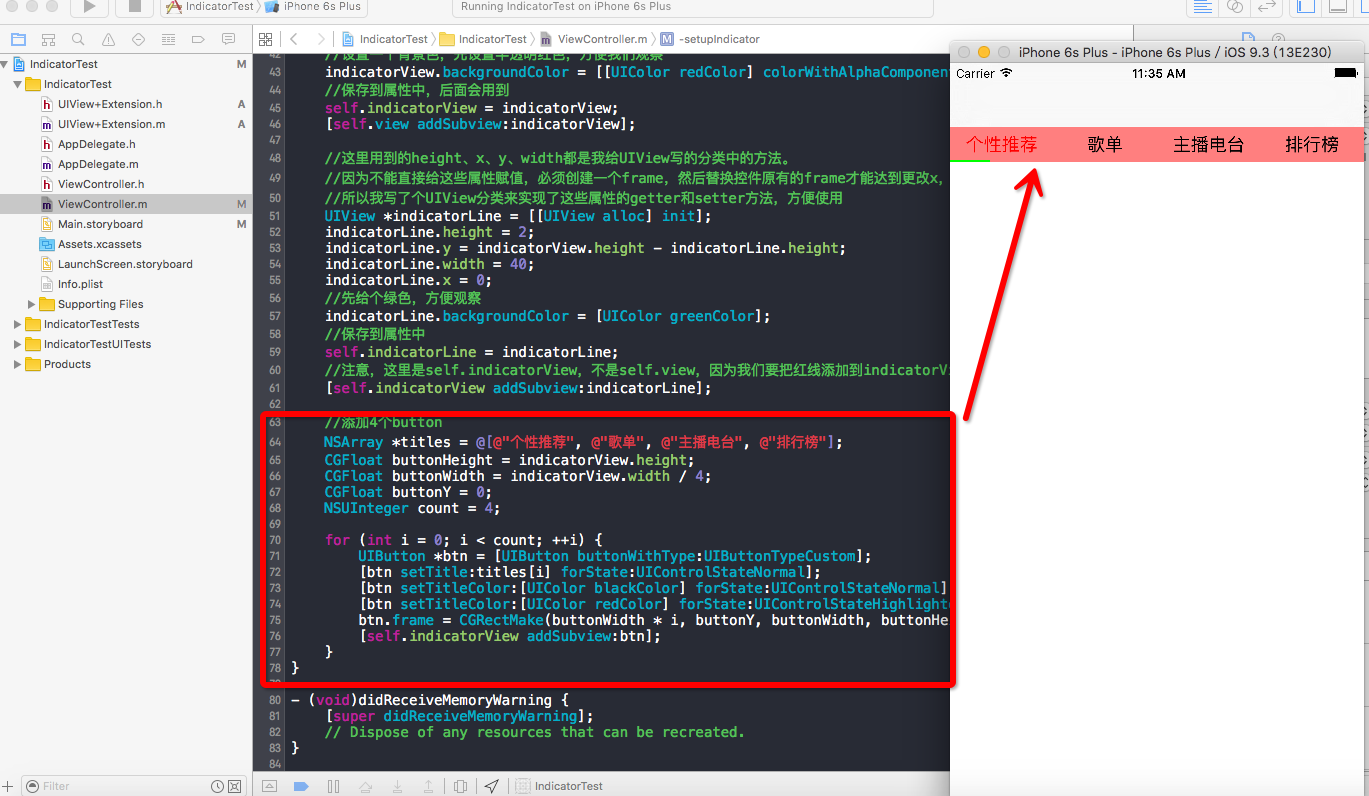
虽然有点儿丑,但是我们基本实现了这个指示器。不过,我们还有问题要解决。第一,这个指示器很丑。第二,底部的线与button没有对齐,而且不会跟着button移动。第三,网易云音乐中的指示器点击后button的title会一直为红色,我们的只是点击的一瞬间为红色,而后变回黑色。下面我们来看看怎么解决。
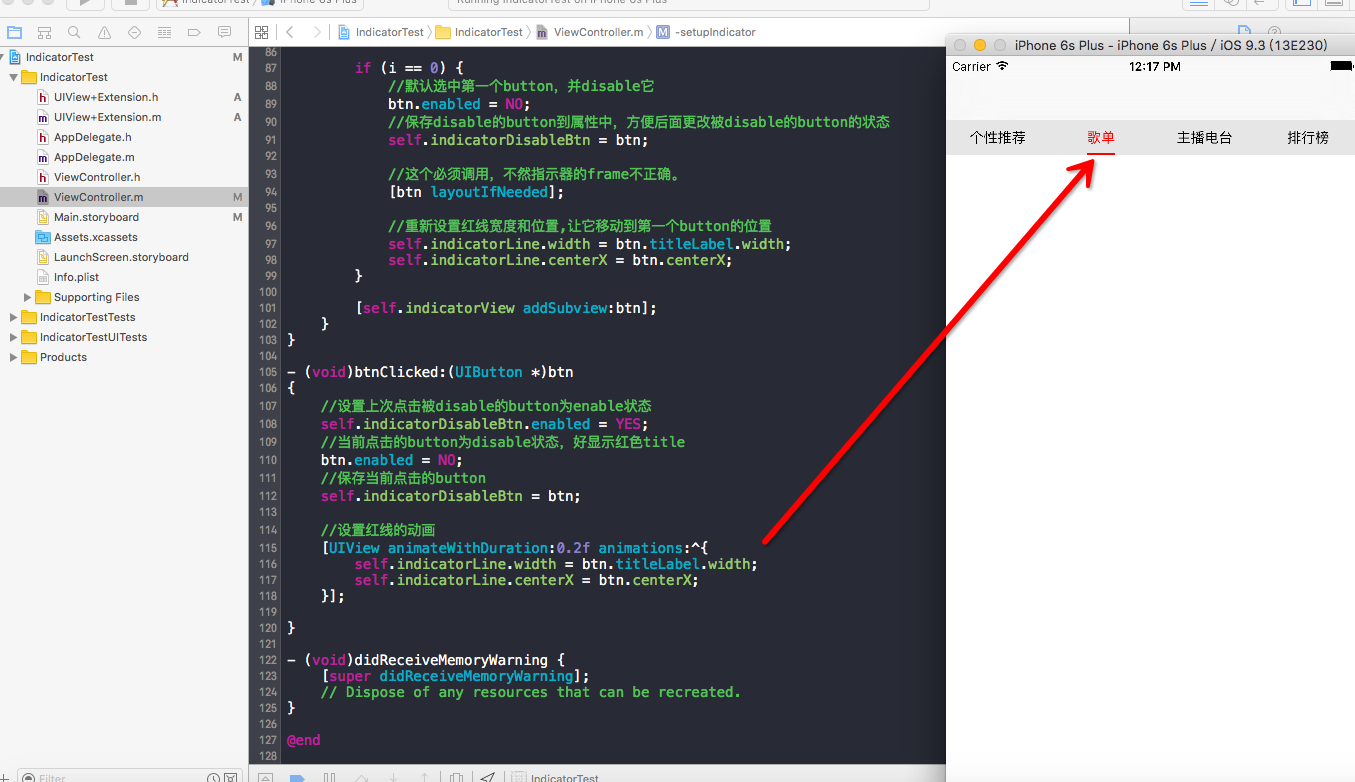
Step 5 - 细节问题处理
1.指示器很丑,我们可以设置下titile的字体及大小。
2.底部的线没有对齐button,而且没跟着button移动,那么我们可以重新设置下底部红线的位置,并在button点击时添加底部红线的动画,让它跟着button走。
3.要让button点击后title改变颜色,并且一次只能点击一个button,并使其title改变颜色,点击另一个button后,上次点击的button的title颜色要变回黑色,这就需要我们来设置button不同情况下的状态。因为只有被点击的button的title改变颜色,其余不变,那么我们可以让点击后的button变为disable状态,只让disable状态的button改变title颜色,然后在button点击时更改上次点击的button状态就解决问题。下面的代码解决了这3个问题:
/**
 *  我们来创建指示器!
 */
- (void)setupIndicator
{
    UIView *indicatorView = [[UIView alloc] init];
    indicatorView.frame = CGRectMake(0, NAVIGATEHEIGHT, self.view.bounds.size.width, 35);
    //设置一个背景色
    indicatorView.backgroundColor = [[UIColor grayColor] colorWithAlphaComponent:0.2];
    //保存到属性中,后面会用到
    self.indicatorView = indicatorView;
    [self.view addSubview:indicatorView];

    //这里用到的height、x、y、width都是我给UIView写的分类中的方法。
    //因为不能直接给这些属性赋值,必须创建一个frame,然后替换控件原有的frame才能达到更改x,y,宽高等属性的目的
    //所以我写了个UIView分类来实现了这些属性的getter和setter方法,方便使用
    UIView *indicatorLine = [[UIView alloc] init];
    indicatorLine.height = 2;
    indicatorLine.y = indicatorView.height - indicatorLine.height;
    indicatorLine.width = 40;
    indicatorLine.x = 0;
    //设置背景色
    indicatorLine.backgroundColor = [UIColor redColor];
    //保存到属性中
    self.indicatorLine = indicatorLine;
    //注意,这里是self.indicatorView,不是self.view,因为我们要把红线添加到indicatorView里
    [self.indicatorView addSubview:indicatorLine];

    //添加4个button
    NSArray *titles = @[@"个性推荐", @"歌单", @"主播电台", @"排行榜"];
    CGFloat buttonHeight = indicatorView.height;
    CGFloat buttonWidth = indicatorView.width / 4;
    CGFloat buttonY = 0;
    NSUInteger count = 4;

    for (int i = 0; i < count; ++i) {
        UIButton *btn = [UIButton buttonWithType:UIButtonTypeCustom];
        [btn setTitle:titles[i] forState:UIControlStateNormal];
        //正常状态下title为黑色
        [btn setTitleColor:[UIColor blackColor] forState:UIControlStateNormal];
        ////这里注意要使用Disable状态,防止button被选中后(selected)一直是红色,导致所有button变红
        //后面会设置button的disable状态来调整button中文字的颜色
        [btn setTitleColor:[UIColor redColor] forState:UIControlStateDisabled];
        btn.frame = CGRectMake(buttonWidth * i, buttonY, buttonWidth, buttonHeight);
        //修改字体
        btn.titleLabel.font = [UIFont systemFontOfSize:14];
        //button 添加响应事件
        [btn addTarget:self action:@selector(btnClicked:) forControlEvents:UIControlEventTouchUpInside];

        if (i == 0) {
            //默认选中第一个button,并disable它
            btn.enabled = NO;
            //保存disable的button到属性中,方便后面更改被disable的button的状态
            self.indicatorDisableBtn = btn;

            //这个必须调用,不然指示器的frame不正确。
            [btn layoutIfNeeded];

            //重新设置红线宽度和位置,让它移动到第一个button的位置
            self.indicatorLine.width = btn.titleLabel.width;
            self.indicatorLine.centerX = btn.centerX;
        }

        [self.indicatorView addSubview:btn];
    }
}

- (void)btnClicked:(UIButton *)btn
{
    //设置上次点击被disable的button为enable状态
    self.indicatorDisableBtn.enabled = YES;
    //当前点击的button为disable状态,好显示红色title
    btn.enabled = NO;
    //保存当前点击的button
    self.indicatorDisableBtn = btn;

    //设置红线的动画
    [UIView animateWithDuration:0.2f animations:^{
        self.indicatorLine.width = btn.titleLabel.width;
        self.indicatorLine.centerX = btn.centerX;
    }];

}
看看最终效果:

我们初步实现了指示器,但是光有指示器没它对应的view那就是不完整的指示器!下一篇文章我们讨论下指示器与其对应的view如何实现交互。