在学习JNI的过程中 使用NDK配置编译环境时报了一个异常:
Error:Execution failed for task ':app:compileDebugNdk'.
> Error: Flag android.useDeprecatedNdk is no longer supported and will be removed in the next version of Android Studio.  Please switch to a supported build system
Consider using CMake or ndk-build integration. For more information, go to:
https://d.android.com/r/studio-ui/add-native-code.html#ndkCompile
To get started, you can use the sample ndk-build script the Android
plugin generated for you at:
D:\Workspace\Android\workselect\JNI\app\build\intermediates\ndk\debug\Android.mk
Alternatively, you can use the experimental plugin:
https://developer.android.com/r/tools/experimental-plugin.html
To continue using the deprecated NDK compile for another 60 days, set
android.deprecatedNdkCompileLease=1529135472909 in gradle.properties
1>使用Android SDK下载工具 CMake & LLDB大概意思是:android.useDeprecatedNdk不再支持了
让使用CMake or ndk-build
考虑使用CMake或ndk构建集成。要了解更多信息,请访问:首先,您可以使用Android的ndk构建脚本示例插件为您生成:
/Users/apple/Desktop/AndroidJNITest/app/build/intermediates/ndk/debug/Android.mk
或者,你可以使用实验插件:
https://developer.android.com/r/tools/experimental-plugin.html
继续使用已弃用的NDK编译60天,设置 在gradle.properties
android.deprecatedNdkCompileLease = 1512283120054原来在gradle3.0以上以前这种方法不在支持经过一番学习 我使用了CMake解决了这个问题:
2>在 app 工程下的 build.gradle 文件中添加节点
//配置Cmake运行参数,在defaultconfig节点下配置
defaultConfig{
	externalNativeBuild {
		cmake {
			cppFlags "-frtti -fexceptions"
		}
	}
}
//关联CMake的程序清单文件,path 指向cmake文件路径,此处为项目工程根目录下。
externalNativeBuild {
	cmake {
		path "CMakeLists.txt"
	}
}
3>在与build.gradle同目录下建立文件 CMakeLists.txt 添加以下内容:
# For more information about using CMake with Android Studio, read the
# documentation: https://d.android.com/studio/projects/add-native-code.html
# Sets the minimum version of CMake required to build the native library.
#CMakeLists.txt
cmake_minimum_required(VERSION 3.4.1)
# Creates and names a library, sets it as either STATIC
# or SHARED, and provides the relative paths to its source code.
# You can define multiple libraries, and CMake builds them for you.
# Gradle automatically packages shared libraries with your APK.
add_library( # Sets the name of the library.
    # 设置so文件名称.
    myso
    # Sets the library as a shared library.
    SHARED
    # 设置这个so文件为共享.
    # Provides a relative path to your source file(s).
    # 设置c文件的目录
    src/main/jni/hello.c)
#Searches for a specified prebuilt library and stores the path as a
#variable. Because CMake includes system libraries in the search path by
#default, you only need to specify the name of the public NDK library
#you want to add. CMake verifies that the library exists before
#completing its build.
find_library( # Sets the name of the path variable.
    log-lib
    # Specifies the name of the NDK library that
    # you want CMake to locate.
    log )
#Specifies libraries CMake should link to your target library. You
#can link multiple libraries, such as libraries you define in this
#build script, prebuilt third-party libraries, or system libraries.
target_link_libraries( # Specifies the target library.
    # 指定依赖库.
    myso
    # Links the target library to the log library
    # included in the NDK.关联日志记录库文件,在ndk目录中
    ${log-lib} )
4>编写java类
在与MainActivity同目录下新建java类
在与MainActivity同目录下新建java类
 package com.project.pulis.jni;
 public class JNI {
      static{
          System.loadLibrary("myso");//在静态代码块中设置so库
     }
      public native String sayHello();
 }
5>生成头文件
使用Terminal工具输入以下指令
cd app\src\main\java
app为工程名字
再输入指令 javah com.project.pulis.jni.JNI
javah 全类名
成功后会在同目录生产 全类名.h 的头文件
6>编写C代码
再main文件下新建jni文件夹,并把5>中的头文件放入
新建.c文件 :
7>rebuild-project ---> make-porject
8>成功了会生成如下文件

9>实验结果再 MainActivity 添加代码
使用Terminal工具输入以下指令
cd app\src\main\java
app为工程名字
再输入指令 javah com.project.pulis.jni.JNI
javah 全类名
成功后会在同目录生产 全类名.h 的头文件
6>编写C代码
再main文件下新建jni文件夹,并把5>中的头文件放入
新建.c文件 :
#include "com_project_pulis_jni_JNI.h"//导入头文件
	//实现头文件里的代码
	JNIEXPORT jstring JNICALL Java_com_project_pulis_jni_JNI_sayHello
  	(JNIEnv *env, jobject jobj){
    		return (*env)->NewStringUTF(env,"HelloFrom JNI!");
	}
7>rebuild-project ---> make-porject
8>成功了会生成如下文件
9>实验结果再 MainActivity 添加代码
public class MainActivity extends AppCompatActivity {
    private TextView textView;
    @Override
    protected void onCreate(Bundle savedInstanceState) {
        super.onCreate(savedInstanceState);
        setContentView(R.layout.activity_main);
        textView=findViewById(R.id.text);
        JNI jni=new JNI();
        String hello=jni.sayHello();
        textView.setText(hello);
    }
}
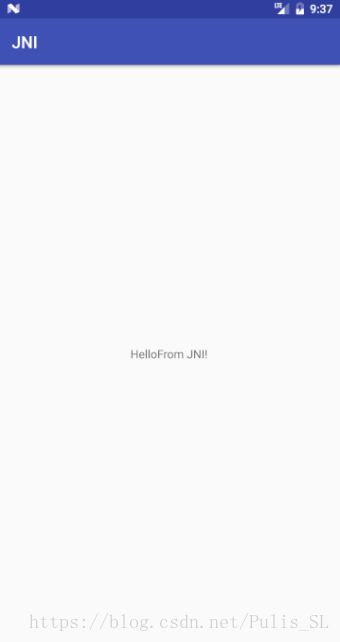
运行结果: