1.(cv :: normalize)范数归一化
归一化就是要把需要处理的数据经过处理后(通过某种算法)限制在你需要的一定范围内。
CV_EXPORTS_W void normalize( InputArray src, InputOutputArray dst, double alpha = 1, double beta = 0,
                             int norm_type = NORM_L2, int dtype = -1, InputArray mask = noArray());
- src:原始数组(向量)或者矩阵(将其展开当作数组).
- dst:归一化后的结果
- alpha:要归一化的范数值 或者为范围归一化的下边界
- beta:范围归一化的的下边界,在范数归一化时不会使用
- norm_type:归一化类型,有NORM_INF(无穷范数),NORM_L1(1范数),NORM_INFL2(2范数),NORM_MINMAX(范围归一化)
- dtype:为负值时,输出数据类型和输入数据类型一致,否则 和src通道一致,depth =CV_MAT_DEPTH(dtype).
- mask:可选的MASK
1.1.归一化选择的数学公式类型介绍(norm_type)
这个函数提供了四种归一化方式,可根据需要选择以下四个参数,下面重点说下这四种归一化方式。
- NORM_MINMAX: 数组的数值被平移或缩放到一个指定的范围,线性归一化。

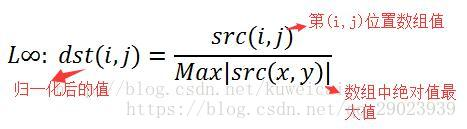
- NORM_INF: 归一化数组的(切比雪夫距离)L∞范数(绝对值的最大值)
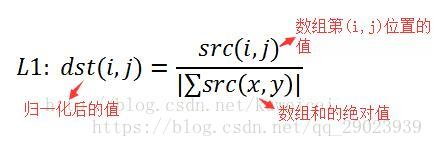
- NORM_L1 : 归一化数组的(曼哈顿距离)L1-范数(绝对值的和)
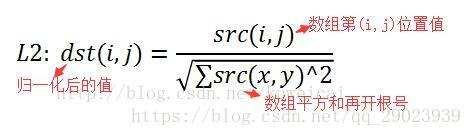
- NORM_L2: 归一化数组的(欧几里德距离)L2-范数
举例说明:
src={10, 23, 71}
NORM_L1 运算后得到: dst={0.096, 0.221, 0.683}
NORM_INF 运算后得到: dst={0.141, 0.324, 1}
NORM_L2 运算后得到: dst={0.133, 0.307, 0.947}
NORM_MINMAX 运算得到: dst={0, 0.377, 1}
//程序DEMO流程:
//读取图片--》判断并显示图片--》转换为灰度图--》转换为浮点数类型数组--》四种归一化方式
//1)scale and shift by NORM_MINMAX
//2)scale and shift by NORM_INF
//3)scale and shift by NORM_L1
//4)scale and shift by NORM_L2
//--》归一化的范围设置为1.0 - 0
//--》不同的归一化方式结果出来要乘以对应的数值
//--》将结果转换为CV_8UC1
//--》显示图片

#include"opencv2\opencv.hpp"
#include"iostream"

using namespace std;
using namespace cv;

int main(int argc, char** argv)
{


    Mat src = imread("../data/test2.jpg");
    if (src.empty())
    {


        printf("Could not load image...\n");
        return -1;
    }
    imshow("srcImg", src);

    Mat src_gray, src_gray_f;
    cvtColor(src, src_gray, COLOR_RGB2GRAY);//转换为灰度图
    src_gray.convertTo(src_gray_f, CV_32F);//转换为浮点数类型数组

    //scale and shift by NORM_MINMAX
    Mat dst = Mat::zeros(src_gray.size(), CV_32FC1);
    normalize(src_gray_f, dst, 1.0, 0, NORM_MINMAX);
    Mat result = dst * 255;
    result.convertTo(dst, CV_8UC1);
    imshow("NORM_MINMAX", dst);

    //scale and shift by NORM_INF
    normalize(src_gray_f, dst, 1.0, 0, NORM_INF);
    result = dst * 255;
    result.convertTo(dst, CV_8UC1);
    imshow("NORM_INF", dst);

    //scale and shift by NORM_L1
    normalize(src_gray_f, dst, 1.0, 0, NORM_L1);
    result = dst * 100000000;
    result.convertTo(dst, CV_8UC1);
    imshow("NORM_L1", dst);

    //scale and shift by NORM_L2
    normalize(src_gray_f, dst, 1.0, 0, NORM_L2);
    result = dst * 10000;
    result.convertTo(dst, CV_8UC1);
    imshow("NORM_L2", dst);

    waitKey(0);
    return 0;
}
执行结果:

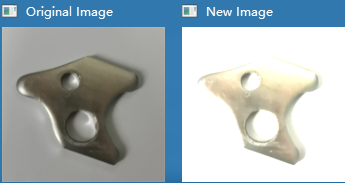
2.改变图像的对比度和亮度:g(i,j)=α⋅f(i,j)+β
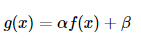
new_image(i,j) = alpha*image(i,j) + beta
#include <opencv2/core/core.hpp>
#include <opencv2/highgui/highgui.hpp>
#include <iostream>
using namespace std;
using namespace cv;
double alpha; /**< 控制对比度 */
int beta;    /**< 控制亮度 */
int main(int argc, char** argv)
{


    // 读入用户提供的图像
    Mat image = imread("../data/test2.jpg");
    Mat new_image = Mat::zeros(image.size(), image.type()); //初始像素值等于零,与原始图像相同的大小和类型
    // 初始化
    cout << " Basic Linear Transforms " << endl;
    cout << "-------------------------" << endl;
    cout << "* Enter the alpha value 输入alpha值:[1.0-3.0]: ";
    cin >> alpha;
    cout << "* Enter the beta value 输入beta值:[0-100]: ";
    cin >> beta;
    //要执行我们将访问图像中的每个像素。由于我们使用BGR图像,
    //我们将每像素(B,G和R)有三个值,因此我们也将分别访问它们
    // 执行运算 new_image(i,j) = alpha*image(i,j) + beta
    for (int y = 0; y < image.rows; y++)
    {


        for (int x = 0; x < image.cols; x++)
        {


            for (int c = 0; c < 3; c++)
            {


                new_image.at<Vec3b>(y, x)[c] = saturate_cast<uchar>(alpha * (image.at<Vec3b>(y, x)[c]) + beta);
            }
        }
    }
    namedWindow("Original Image", 1);// 创建窗口
    namedWindow("New Image", 1);// 创建窗口
    imshow("Original Image", image);// 显示图像
    imshow("New Image", new_image);// 显示改变后图像
    waitKey();// 等待用户按键
    return 0;
}
2.1.(cv :: src.convertTo)缩放并转换到另外一种数据类型
我们可以不用 for 循环来访问每个像素,而是直接采用下面这个命令:
src.convertTo(dst, type, scale, shift)
- src:img参数为图像数据来源,其类型为Mat。
- dst:目的矩阵;
- type:需要的输出矩阵类型,或者更明确的,是输出矩阵的深度,如果是负值(常用-1)则输出矩阵和输入矩阵类型相同;
- scale:比例因子;
- shift:将输入数组元素按比例缩放后添加的值;
#include <opencv2/core/core.hpp>
#include <opencv2/highgui/highgui.hpp>
#include <iostream>
using namespace std;
using namespace cv;
double alpha; /**< 控制对比度 */
int beta;    /**< 控制亮度 */
int main(int argc, char** argv)
{


    // 读入用户提供的图像
    Mat image = imread("../data/test3.jpg");
    Mat new_image = Mat::zeros(image.size(), image.type()); //初始像素值等于零,与原始图像相同的大小和类型
    // 初始化
    cout << " Basic Linear Transforms " << endl;
    cout << "-------------------------" << endl;
    cout << "* Enter the alpha value 输入alpha值:[1.0-3.0]: ";
    cin >> alpha;
    cout << "* Enter the beta value 输入beta值:[0-100]: ";
    cin >> beta;
    // 执行运算 new_image(i,j) = alpha*image(i,j) + beta
    //我们可以不用 for 循环来访问每个像素,而是直接采用下面这个命令:
    image.convertTo(new_image, -1, alpha, beta);
    namedWindow("Original Image", 1);// 创建窗口
    namedWindow("New Image", 1);// 创建窗口
    imshow("Original Image", image);// 显示图像
    imshow("New Image", new_image);// 显示改变后图像
    waitKey();// 等待用户按键
    return 0;
}
以上两种方法的执行结果:
 Basic Linear Transforms
-------------------------
* Enter the alpha value 输入alpha值:[1.0-3.0]: 2.2
* Enter the beta value 输入beta值:[0-100]: 50
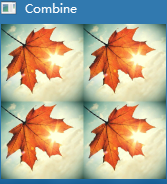
3.(cv :: hconcat)和(cv :: vconcat)图像拼接函数
#include <iostream>
#include <core/core.hpp>
#include <opencv2/imgproc/imgproc.hpp>
#include <opencv2/highgui/highgui.hpp>
using namespace std;
using namespace cv;
int main()
{


	Mat combine, combine1, combine2;
	Mat a = imread("../data/test2.jpg");
	Mat b = imread("../data/test2.jpg");
	Mat c = imread("../data/test2.jpg");
	Mat d = imread("../data/test2.jpg");
	hconcat(a, b, combine1);	//水平拼接
	hconcat(c, d, combine2);	//水平拼接
	vconcat(combine1, combine2, combine);	//垂直拼接
	namedWindow("Combine", WINDOW_AUTOSIZE);
	imshow("Combine", combine);
	waitKey(0);
	system("pause");
	return 0;
}
执行结果:
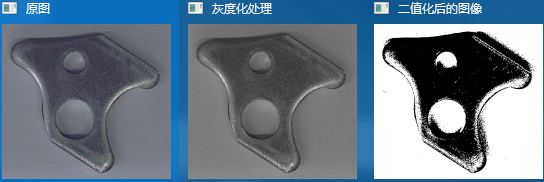
4.图像二值化
图像的二值化就是将图像上的像素点的灰度值设置为0或255,这样将使整个图像呈现出明显的黑白效果。在数字图像处理中,二值图像占有非常重要的地位,图像的二值化使图像中数据量大为减少,从而能凸显出目标的轮廓。
4.1.(cv :: threshold)图像二值化
double threshold( InputArray src,OutputArray dst,double threshold,double maxval,int type );
- src:原始数组,可以是Mat类型。
- dst:输出数组,必须与 src 的类型一致。
- threshold:阈值
- maxval:使用 CV_THRESH_BINARY 和 CV_THRESH_BINARY_INV 的最大值。
- type:阈值类型
type=CV_THRESH_BINARY:如果 src(x,y)>threshold ,dst(x,y) = max_value; 否则,dst(x,y)=0;
type=CV_THRESH_BINARY_INV:如果 src(x,y)>threshold,dst(x,y) = 0; 否则,dst(x,y) = max_value.
type=CV_THRESH_TRUNC:如果 src(x,y)>threshold,dst(x,y) = max_value; 否则dst(x,y) = src(x,y).
type=CV_THRESH_TOZERO:如果src(x,y)>threshold,dst(x,y) = src(x,y) ; 否则 dst(x,y) = 0。
type=CV_THRESH_TOZERO_INV:如果 src(x,y)>threshold,dst(x,y) = 0 ; 否则dst(x,y) = src(x,y).
#include "opencv2/imgproc/imgproc.hpp"
#include "opencv2/highgui/highgui.hpp"
using namespace cv;
using namespace std;
int main()
{


	//定义变量
	Mat img = imread("./image/test3.jpg");
	imshow("原图", img);
	//灰度化处理
	cvtColor(img, img, COLOR_BGR2GRAY);
	imshow("灰度化处理", img);
	// 转为二值图
	threshold(img, img, 100, 255, THRESH_BINARY);
	//adaptiveThreshold(img, img, 255, ADAPTIVE_THRESH_MEAN_C, THRESH_BINARY, 45, 10);
	imshow("二值化后的图像", img);
	waitKey(0);
	return 0;
}
执行结果:
4.2.自定义图像二值化
这个语句的意思是,如果阈值小于100,那么中间为真,即像素值小于70的为1,大于70的为0;如果阈值大于100,那么右边为真,即像素值大于70的为1,小于70的为0.
#include "opencv2/imgproc/imgproc.hpp"
#include "opencv2/highgui/highgui.hpp"
using namespace cv;
using namespace std;
void main()
{


	Mat img;
	int threshval = 170;//设定阈值
	Mat result;
	Mat bw = img;
	img = imread("./image/test6.jpg", 0);
	imshow("原图", img);
	bw = threshval < 100 ? (img < 70) : (img > 70);//二值化
	imshow("二值化后的图像", bw);
	waitKey(0);
}
执行结果:
