一. vuex的基础使用
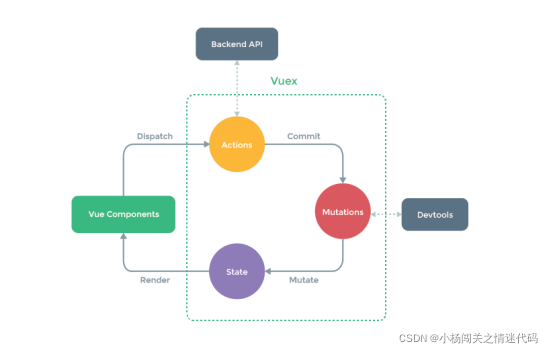
**vuex的流程图**
下面是实际项目中使用 vuex
新建store文件夹 ---- index.js
基础使用代码:
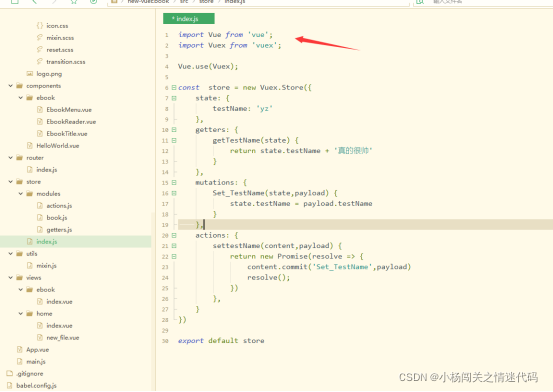
首先需要 引入vue ,vuex 并 使用 vuex
import Vue from 'vue';
import Vuex from 'vuex';

Vue.use(Vuex);
vuex核心概念 :
state
state: {


	testName: 'yz'
},
那么我们获取testName的值 需要通过
console.log(this.$store.state.testName)
// 输出值 yz
注意: 这里只能读而不能写入, 即 通过state 只能去获取testName的值 ,而不能修改 testName
getters (对state的值做处理)
getters : {


    getTestName(state) {


        return state.testName + '真的很帅'
    }
}
获取 getTestName
console.log(this.$store.getters.getTestName)
// 输出值 yz + '真的很帅'
mutations
修改state中的值,即写数据
mutations : {


    // vue文档建议 payload负荷最好为一个对象
    Set_TestName(state,payload) {


        state.testName  = payload.testName
    }
}
// commit 修改 state中的值
this.$store.commit('Set_TestName',{


    testName: '鸣人'
})

console.log(this.$store.state.testName)
// 输出 鸣人
actions
actions 和 mutations 很像, 不过actions中可以写入异步的逻辑, 然后去调用 mutations 的方法
actions : {


    settestName(content,payload) {


        return new Promise(resolve => {


             content.commit('Set_TestName',payload)
             resolve()
        })
    }
}
// 通过actions 修改值
this.$store.dispatch('settestName', {


    testName: '佐助'
})

console.log(this.$store.state.testName)
// 输出 佐助
二. map辅助函数的使用
通过第一小节的学习, vuex的基本使用, 即读,写数据 已经可以实现 。
然而不难发现 我们去获取和修改值 的代码是比较复杂的
// 获取值
this.$store.state.testName

// 修改值
this.$store.dispatch('settestName', {


    testName: '佐助'
})
那么为了减少我们的代码量,更方便的读取和修改vuex的值 ,我们可以引入vuex中的map函数
state 对应 mapState
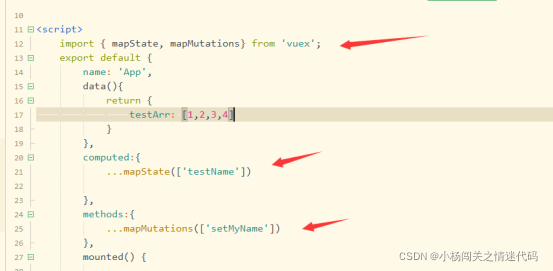
import {

     mapState } from 'vuex';
// 在计算属性中混入

computed:{


    ...mapState(['testName'])
}
// 在使用了 mapState 之后 我们获取值
this.testName // yz
getters 对应 mapGetters
和mapState 使用方法相同 在computed 中混入
computed:{


    ...mapGetters([
        'getTestName',
    ]),
}
// 在使用了 mapGetters 之后 我们获取值
this.getTestName // yz真的很帅
mutations 对应 mapMutations
和 mapState ,mapGetters 不同 ,需要混入在方法 methods 中
methods: {


    ...mapMutations([
        'Set_TestName'
    ])
}
// 在使用了 mapMutations 之后 我们修改值
this.Set_TestName({


    testName: '鸣人'
})
// 此时 testName 的值 变为 鸣人
actions 对应 mapActions
需要混入在方法 methods 中
methods: {


    ...mapActions([
        'settestName'
    ])
}
// 在使用了 mapActions 之后 我们修改值
this.settestName({


    testName: '佐助'
})
// 此时 testName 的值 变为 佐助
三. vuex modules
我们想象这样一个场景 ,当我们的项目比较大 ,模块比较多, 如果把所有的模块的vuex 都放在 store文件夹下面的index.js 文件中 , 这样index.js 的内容将变得难以维护 。 为了 解决这个问题,我们使用 modules 。
比如此时有一个图书 book 模块
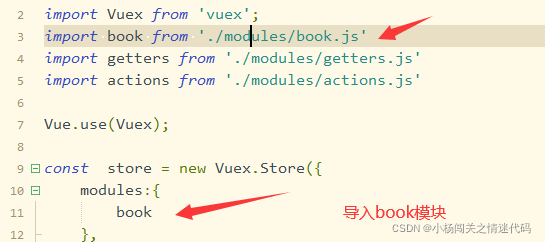
book.js 中 就存放 book 模块相关的vuex
const book = {


	state: {


		fileName: undefined,
		menuVisble: false
	},
	getters:{


	},
	mutations:{


		SET_FileName(state,payload) {


			state.fileName = payload.fileName
		},
		SET_MenuVisble(state,payload) {


			state.menuVisble = payload.menuVisble
		}
	}
}

export default book
这样就实现了模块化代码。
此时 我们如果要去获取 book 模块的 fileName
需要通过
this.$store.state.book.fileName    // 正确

直接通过 this.$store.state.fileName 获取不到值   // 错误
因为数据层级的改变 我们获取数据又变得困难
(此时 map函数 直接获取值 也获取不到 this.fileName // 错误)
为了解决这个问题 我们使用 js
getter.js
const book = {


	fileName : state => state.book.fileName,
	menuVisble : state => state.book.menuVisble,
}

export default book
在 store index.js 中 导入getter.js
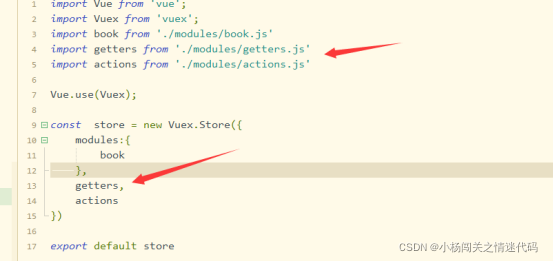
在混入mapGetters,mapState,并且导入getters.js之后,可以简单的获取到 book 模块下 的 state的值
this.fileName // 此时正确输出
四.mixin混入
经过以上几步 , 我们这时 想获取 和 修改 book模块的值 就变得比较简单
在导入 和混入 mapGetters, mapActions 之后
this.fileName  // 获取 book 模块下的 fileName
this.setfilename({

       // 异步 修改 book 模块下 的fileName
    fileName:' 三国演义'
})
但是这样的使用还有一个不足之处,那么就是需要在每一个需要vuex数据的组件中,在计算属性或方法写入混入 。当需要使用的vuex数据较多时
computed:{


	...mapGetters([
		'fileName',
		'menuVisble',
               'xx1',
               'xx2',
               'xx3',
               ...
	]),
}
如果需要在每一个需要使用vuex的组件中,都需要写入这样的代码,是难以维护的。 所以我们使用mixin 机制,在一个地方统一去维护
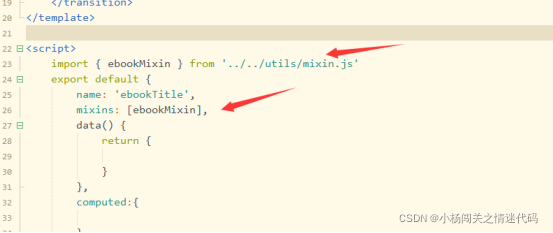
新建mixin.js (统一在mixin.js 维护数据)
import {

     mapGetters, mapActions } from 'vuex';

export const ebookMixin = {


	computed:{


		...mapGetters([
			'fileName',
			'menuVisble',
                    'xx1',
                    'xx2',
                   'xx3',
                   ...
		]),
	},
	methods: {


		...mapActions([
			'setmenuVisble',
			'setfilename',
		]),
	}
}
在组件中使用 mixins
// 此时也能简单获取和修改值
this.fileName  // 获取 book 模块下的 fileName
this.setfilename({

       // 异步 修改 book 模块下 的fileName
    fileName:' 三国演义'
})
至此 我们只需要在mixin.js 去维护map函数,在每一个需要使用vuex数据的组件中 import mixin.js,并
mixins即可。