原生插件开发问题记录
component 文件
下面是以扫码为例,写好的一个原生插件。创建插件工程的步骤就不在细讲了。下面是简单的配置步骤截图。
iOS 代码
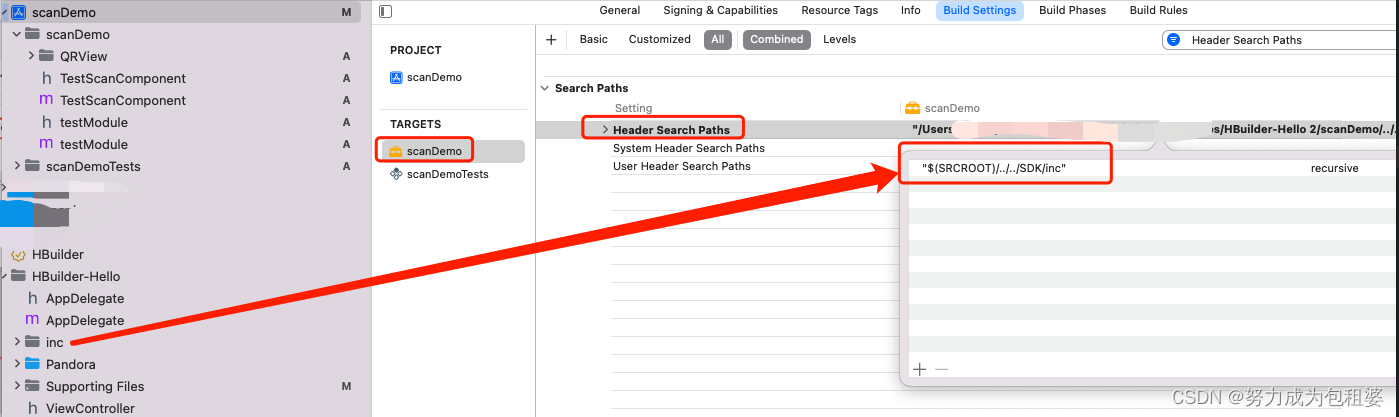
插件工程配置截图
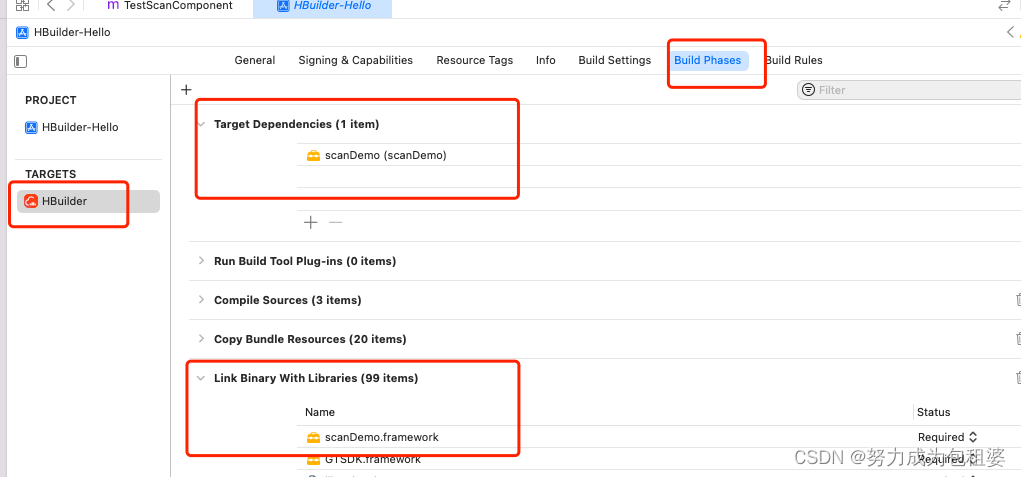
主工程文件配置截图
原生开发
在插件项目新建一个view。名称为TestScanComponent,首字母一定要大写
.h文件里面引入DCUniComponent
#import <UIKit/UIKit.h>
#import "DCUniComponent.h"

@interface TestScanComponent : DCUniComponent

@end
.m文件
#import "TestScanComponent.h"
#import "DCUniConvert.h"
#import <AVFoundation/AVFoundation.h>
#import "QRView.h"  // 扫码边框样式 第三方  非必写。


@interface TestScanComponent ()<AVCaptureMetadataOutputObjectsDelegate,QRViewDelegate>
{


    NSString * strFlash;
}
@property (nonatomic, strong) AVCaptureSession *captureSession;
@property (nonatomic, strong) AVCaptureVideoPreviewLayer *videoPreviewLayer;
@property (nonatomic, strong) NSArray *supportedBarcodeTypes; // 扫码类型


@end

@implementation TestScanComponent

- (void)viewWillLoad{


    [self startScanning];
}
- (void)viewDidLoad {


    self.supportedBarcodeTypes = @[AVMetadataObjectTypeQRCode,
                                   AVMetadataObjectTypeUPCECode,
                                   AVMetadataObjectTypeCode39Code,
                                   AVMetadataObjectTypeCode39Mod43Code,
                                   AVMetadataObjectTypeCode93Code,
                                   AVMetadataObjectTypeCode128Code,
                                   AVMetadataObjectTypeEAN8Code,
                                   AVMetadataObjectTypeEAN13Code,
                                   AVMetadataObjectTypeAztecCode,
                                   AVMetadataObjectTypePDF417Code,
                                   AVMetadataObjectTypeInterleaved2of5Code,
                                   AVMetadataObjectTypeITF14Code,
                                   AVMetadataObjectTypeDataMatrixCode];

    AVCaptureDevice *captureDevice = [AVCaptureDevice defaultDeviceWithMediaType:AVMediaTypeVideo];
    NSError *error;
    AVCaptureDeviceInput *input = [AVCaptureDeviceInput deviceInputWithDevice:captureDevice error:&error];

    if (!input) {


        NSLog(@"%@", [error localizedDescription]);
        return;
    }

    self.captureSession = [[AVCaptureSession alloc] init];
    [self.captureSession addInput:input];

    AVCaptureMetadataOutput *captureMetadataOutput = [[AVCaptureMetadataOutput alloc] init];
    [self.captureSession addOutput:captureMetadataOutput];

    dispatch_queue_t dispatchQueue;
    dispatchQueue = dispatch_queue_create("myQueue", NULL);
    [captureMetadataOutput setMetadataObjectsDelegate:self queue:dispatchQueue];
    [captureMetadataOutput setMetadataObjectTypes:self.supportedBarcodeTypes];

    self.videoPreviewLayer = [[AVCaptureVideoPreviewLayer alloc] initWithSession:self.captureSession];
    [self.videoPreviewLayer setVideoGravity:AVLayerVideoGravityResizeAspectFill];
    [self.videoPreviewLayer setFrame:self.view.layer.bounds];
    [self.view.layer addSublayer:self.videoPreviewLayer];

    [self.captureSession startRunning];

    ///*
    // 动画
    CGRect screenRect = self.view.bounds;
    QRView *qrRectView = [[QRView alloc] initWithFrame:screenRect];
    qrRectView.transparentArea = CGSizeMake(200, 200);
    qrRectView.backgroundColor = [UIColor clearColor];
    qrRectView.center = CGPointMake(self.view.frame.size.width / 2, self.view.frame.size.height / 2);
    qrRectView.delegate = self;
    [self.view addSubview:qrRectView];


    //修正扫描区域
    CGFloat screenHeight = self.view.frame.size.height;
    CGFloat screenWidth = self.view.frame.size.width;
    CGRect cropRect = CGRectMake((screenWidth - qrRectView.transparentArea.width) / 2,
                                 (screenHeight - qrRectView.transparentArea.height) / 2,
                                 qrRectView.transparentArea.width,
                                 qrRectView.transparentArea.height);

    [captureMetadataOutput setRectOfInterest:CGRectMake(cropRect.origin.y / screenHeight,
                                          cropRect.origin.x / screenWidth,
                                          cropRect.size.height / screenHeight,
                                          cropRect.size.width / screenWidth)];
    //*/
}
- (void)viewDidUnload{


    [self stopScanning];
}

#pragma mark - 开关手电筒
UNI_EXPORT_METHOD(@selector(setFlash:))
-(void)setFlash:(NSDictionary *)option{


    strFlash = [NSString stringWithFormat:@"%@",[option objectForKey:@"value"]];
    if([strFlash isEqualToString:@"1"]){


        [self turnOnTorch];
    }else{


        [self turnOffTorch];
    }
}
// 前端调用方法 打开手电筒
UNI_EXPORT_METHOD(@selector(turnOnTorch))
- (void)turnOnTorch {


    AVCaptureDevice *device = [AVCaptureDevice defaultDeviceWithMediaType:AVMediaTypeVideo];

    if (device && [device hasTorch] && [device isTorchAvailable] && [device isTorchModeSupported:AVCaptureTorchModeOn]) {


        NSError *error;
        [device lockForConfiguration:&error];

        if (!error) {


            [device setTorchMode:AVCaptureTorchModeOn];
            [device unlockForConfiguration];
        } else {


            NSLog(@"Failed to turn on the torch: %@", error.localizedDescription);
        }
    }
}
// 前端调用 关闭手电筒
UNI_EXPORT_METHOD(@selector(turnOffTorch))
- (void)turnOffTorch {


    AVCaptureDevice *device = [AVCaptureDevice defaultDeviceWithMediaType:AVMediaTypeVideo];

    if (device && [device hasTorch] && [device isTorchAvailable] && [device isTorchModeSupported:AVCaptureTorchModeOff]) {


        NSError *error;
        [device lockForConfiguration:&error];

        if (!error) {


            [device setTorchMode:AVCaptureTorchModeOff];
            [device unlockForConfiguration];
        } else {


            NSLog(@"Failed to turn off the torch: %@", error.localizedDescription);
        }
    }
}
#pragma mark - 开始 停止扫码
// 前端调用 开始扫码
UNI_EXPORT_METHOD(@selector(startScanning))
- (void)startScanning {


    if (![self.captureSession isRunning]) {


        [self.captureSession startRunning];
    }
}
// 前端调用 停止扫码
UNI_EXPORT_METHOD(@selector(stopScanning))
- (void)stopScanning {


    if ([self.captureSession isRunning]) {


        [self.captureSession stopRunning];
    }
}
#pragma mark - scan delegate
- (void)captureOutput:(AVCaptureOutput *)captureOutput didOutputMetadataObjects:(NSArray *)metadataObjects fromConnection:(AVCaptureConnection *)connection {


    NSString *stringValue;

    if (metadataObjects.count >0) {


        AVMetadataMachineReadableCodeObject *metadataObj = [metadataObjects objectAtIndex:0];
        stringValue = metadataObj.stringValue;
        [self stopScanning]; // 停止扫码

        dispatch_async(dispatch_get_main_queue(), ^{


            // 向前端发送事件,params 为传给前端的数据 注:数据最外层为 NSDictionary 格式,需要以 "detail" 作为 key 值
            [self fireEvent:@"scanLoaded" params:@{

    @"detail":@{

    @"data":stringValue}} domChanges:nil];
        });

        dispatch_after(dispatch_time(DISPATCH_TIME_NOW, (int64_t)(3.0 * NSEC_PER_SEC)), dispatch_get_main_queue(), ^{


            // 在这里写需要延迟执行的任务代码
            [self startScanning];

        });
    }


}

@end
iOS端通过宏 UNI_EXPORT_METHOD 将异步方法暴露给 js 端
// 前端调用
// 开启关闭闪光灯
UNI_EXPORT_METHOD(@selector(setFlash:))
-(void)setFlash:(NSDictionary *)option
// 开始扫码
UNI_EXPORT_METHOD(@selector(startScanning))
-(void)startScanning
// 停止扫码
UNI_EXPORT_METHOD(@selector(stopScanning))
-(void)stopScanning
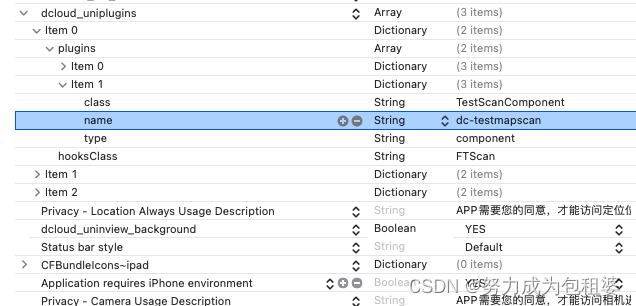
plist配置截图,注意class和类文件名保持一致,name一定要保证唯一性。
到此为止,原生插件iOS端的代码已经完成了。下面就需要uni代码使用了。
uniapp代码使用插件
注意component类型的功能在uniapp里面只能在nvue文件使用。
<template>
<view class="page">
<view>
<!-- 直接使用插件 -->
<dc-testmapscan ref='mycomponent' style="width:100%;height:400px" @scanLoaded="onMapLoaded"></dc-testmapscan>
</view>
<view class="font-box">
<text :class="flash ? 'shandian icon ziconfont':'jingyongshandian icon ziconfont' "
@click="toFlash">{
{flash ? "":""}}</text>
</view>
</view>
</template>
<script>
import fontFace from '@/common/utils/iconfont.js' // nvue文件icon的引入
import permision from "@/common/utils/permission.js" // 权限引入
export default {
components: {
},
data() {
return {
// 闪光灯
flash: false,
topHeight: 60,
}
},
onShow() {
// #ifdef APP-PLUS
this.scanplus();
// #endif
},
onHide() {
this.$refs.mycomponent.stopScanning();
},
created() {
const domModule = weex.requireModule("dom");
domModule.addRule('fontFace', fontFace)
// https://ask.dcloud.net.cn/question/113657
const uniDomModule = uni.requireNativePlugin('dom')
uniDomModule.addRule('fontFace', fontFace);
},
mounted() {
this.countTopBar()
sunmiScan.bindService()
},
destroyed() {
sunmiScan.clean()
},
methods: {
// 获取到条码内容
onMapLoaded:function(e) {
// 原生端传递的数据保存在 e.detail 中
console.log('map loaded:',JSON.stringify(e.detail))
var vcode = JSON.stringify(e.detail);
// 在这里处理获取到的条码内容
},
/**
* 计算顶部DOM元素节点
*/
async countTopBar() {
var that = this;
const topBar = await this.$getComponentsDom('#navBar');
this.topHeight = topBar.height
// #ifdef APP-PLUS
//这里判断一下设备及版本。
if(uni.getSystemInfoSync().platform=='android' && sunmiScan.getScannerModel().code > 100){
}else{
this.scanplus();
}
// #endif
},
// #ifdef APP-PLUS
async checkPermission(code) {
let status = permision.isIOS ? await permision.requestIOS('camera') :
await permision.requestAndroid('android.permission.CAMERA');
if (status === null || status === 1) {
status = 1;
} else {
uni.showModal({
content: "需要相机权限",
confirmText: "设置",
success: function(res) {
if (res.confirm) {
permision.gotoAppSetting();
}
}
})
}
return status;
},
// #endif
async scanplus() {
var that = this
let status = await this.checkPermission();
if (status !== 1) {
return;
}
this.$refs.mycomponent.startScanning();
},
/**
* 开启/关闭闪光灯
* */
toFlash: function() {
this.flash = !this.flash
this.$refs.mycomponent.setFlash({
'value':this.flash});
},
/**
* 返回上一级页面
*/
toBack() {
uni.navigateBack({
delta: 1
})
},
}
}
</script>
<style>
@font-face {
font-family: ziconfont;
src: url('https://at.alicdn.com/t/font_865816_17gjspmmrkti.ttf') format('truetype');
}
.page {
position: relative;
}
.font-box{
/* position: absolute; */
/* left: 0;
right: 0; */
display: flex;
align-items: center;
justify-content: center;
/* z-index: 100; */
flex-direction: column;
/* width: 100%; */
margin-top: 30rpx;
}
.shandian {
background-color: #FD5022;
}
.jingyongshandian {
background-color: #ddd;
}
.icon {
text-align: center;
line-height: 60rpx;
color: #fff;
font-size: 32rpx;
width: 160rpx;
height: 60rpx;
margin-bottom: 20rpx;
border-radius: 80rpx;
font-family: ziconfont;
}
.font {
color: #999;
margin-bottom: 20rpx;
font-size: 24rpx
}
.font-red {
color: #FD5022;
font-size: 24rpx;
text-decoration: underline;
}
.ziconfont {
font-family: ziconfont;
}
</style>
前端使用的js方法
<dc-testmapscan ref=‘mycomponent’ style=“width:100%;height:400px”
@scanLoaded=“onMapLoaded”> </ dc-testmapscan>this.$refs.mycomponent.startScanning();
this.$refs.mycomponent.setFlash({‘value’:this.flash});
this.$refs.mycomponent.stopScanning();
onMapLoaded:function(e) {
// 处理获取到的条码内容
}
至此uniapp的代码已经完成。将uniapp生成本地打包资源。
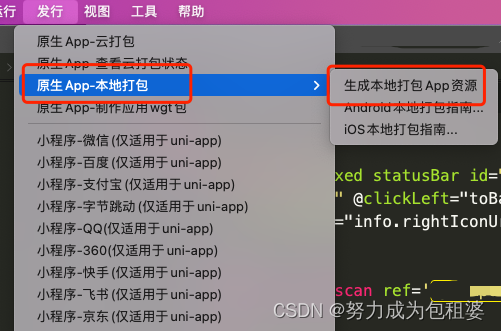
iOS基座联调
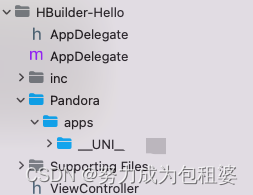
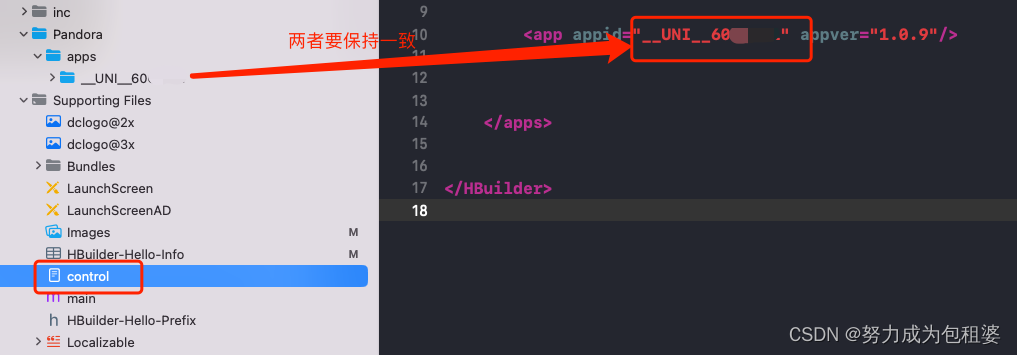
将生成的资源包拿出来,放到iOS原生插件开发的主工程文件里面。
连接手机进行真机调试,如果没有问题就可以进行下一步了。这里联调是检验功能是否能够正常运行。
iOS 基座打包
真机联调没有问题之后,就可以进行打ipa包给测试了。
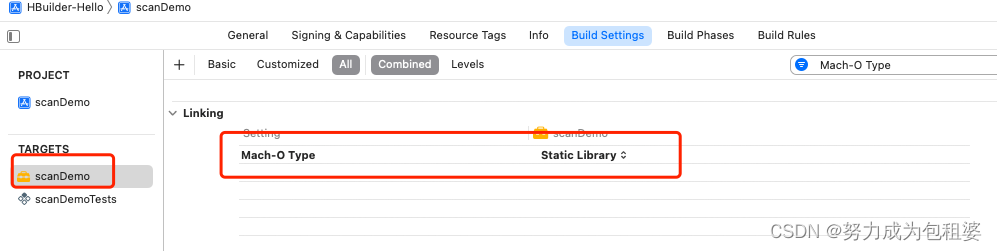
注意:插件工程必须导出生成.framework 或 .a库文件。
否则生成的ipa包里面使用的插件的页面就会闪退。
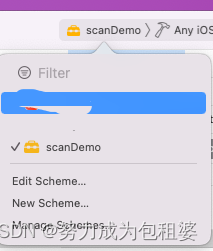
选中插件工程,将编译工程选择为插件工程scanDemo
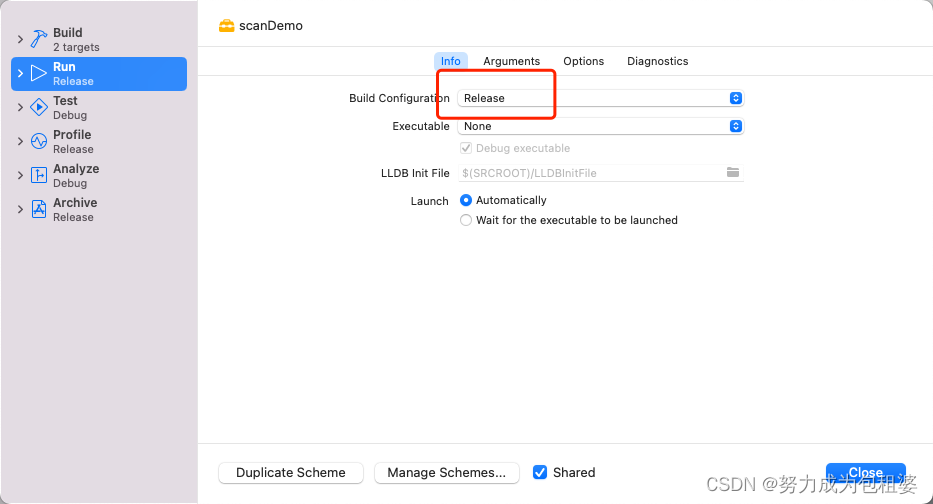
选择Edit Scheme,将Run->Info->Build Configuration切换到Release,然后点击Close关闭弹窗
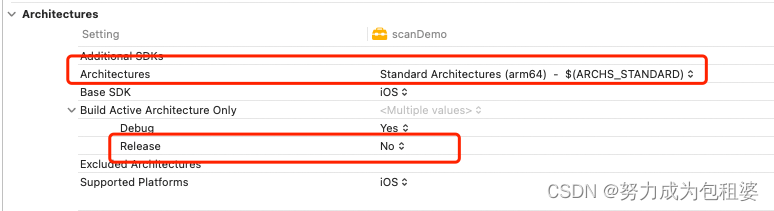
Build Active Architecture Only->Release 为 No
Valid Architectures 中至少包含 arm64(一般保持工程默认配置即可)
这一块基本上都是默认的配置,不太需要更改。
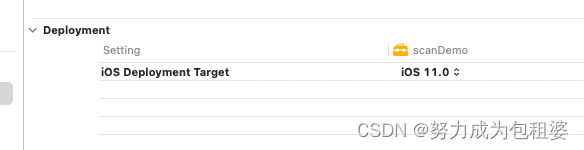
在iOS Deployment Target中选中最低支持的 iOS 版本,建议选择 iOS11.0
然后点击运行按钮或 Command + B 编译运行工程
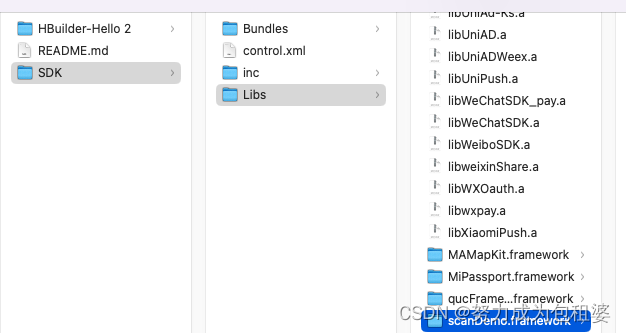
编译完成后,点击顶部菜单 Product > Show Build Folder in Finder 打开编译后的路径,Products>Release-iphoneos>scanDemo.framework 中的库就是编译后的插件库文件;
将该库文件复制粘贴到项目的SDK-Libs里面
之后iOS打包ipa,调用插件就正常了。
我刚开始的时候没有导出这个scanDemo.framework包。基座打包给测试的ipa包里面的扫码功能页面就一直白屏闪退,并且相机权限手机设置里面也没有显示。
之后将插件导出scanDemo.framework包,放到framework里面再次打包就正常了。