{% %}是Jinja2中的控制语句,{{ }}是Jinja2中的变量,{# #}是注释。
一、条件控制结构
根据值,选择不同的语句执行 ,从而获得不同的响应字符串。
<!DOCTYPE html>
<html lang="en">
<head>
    <meta charset="UTF-8">
    <title>Hello Sample</title>
</head>
<body>
{% if name %}
    <h1>Hello {{ name }}{{ name }} can you hear me !</h1>
{% else %}
    <h1>Hello World!</h1>
{% endif %}

</body>
</html>
二、循环控制语句
control.html
<!DOCTYPE html>
<html lang="en">
<head>
    <meta charset="UTF-8">
    <title>Control Test</title>
</head>
<body>
<ul>
    {% for comment in comments %}
        <li>{{ comment }}</li>
    {% endfor %}

</ul>

</body>
</html>
test.py
@app.route('/control')
def control():
    logging.info('control func is running')
    d = {
        'a':1,
        'b':2,
        'c':3
    }
    l = list(range(1,10))
    print(d,l)
    return render_template('control.html',comments=l)
三、宏
宏类似常规编程语言中的函数。它们用于把常用行为作为可重用的函数,取代 手动重复的工作。 例子:
{% macro input(name, value='', type='text', size=20) -%}
    <input type="{{ type }}" name="{{ name }}" value="{{
        value|e }}" size="{{ size }}">
{%- endmacro %}
在命名空间中,宏之后可以像函数一样调用:
<p>{{ input('username') }}</p>
<p>{{ input('password', type='password') }}</p>
如果宏在不同的模板中定义,你需要首先使用 import
{% from 'base/macro/submit.macro' import test %}
例子:
<!DOCTYPE html>
<html lang="en">
<head>
    <meta charset="UTF-8">
    <title>Control Test</title>
</head>
<body>
{% macro render_comment(comment) %}         #定义一个宏,相当于定义一个函数
    <li>{{ comment }}</li>                    #宏名:render_comment,形参comment,使用形参{{ comment }}
{% endmacro %}
<ul>
    {% for comment in comments %}
        {{ render_comment(comment) }}        #使用宏{{ render_comment(comment) }},这里comment是实参
    {% endfor %}
</ul>

</body>
</html>
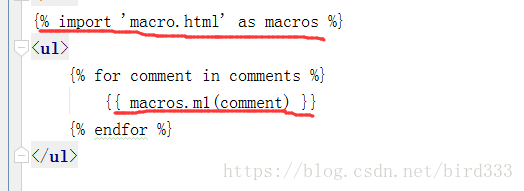
为重复使用宏,可将宏保存在单独的html文件中。
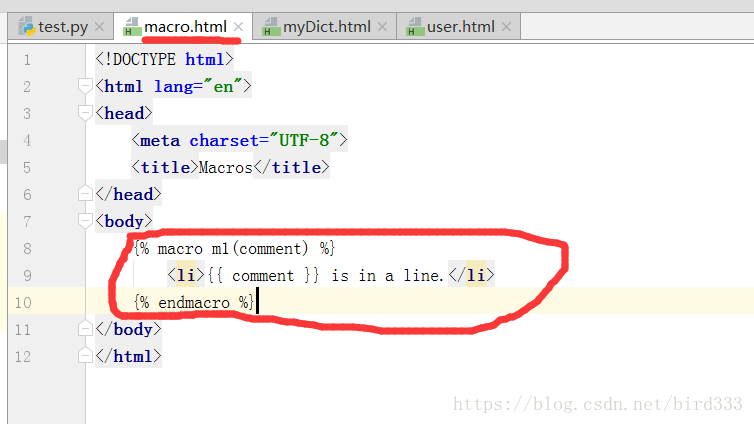
在单独的macro.html中定义了一个宏m1.
在control.html中引入macro.html文件(起了别名macros),再通过macros.m1使用macro.html文件中定义的宏。
四、模板继承和使用Bootstrap
有一个基模板base.html,和一个衍生模板child.html。模板继承的核心是:base.html(基模板)中定义哪些块(block)应当被替换,child.html(继承模板)中 定义替换成什么内容。
例如:下面这个例子,从bootstrap/base.html中继承了templates/base.html,又从templates/base.html继承了templates/user.html。
<!-- templates/base.html -->
{% extends "bootstrap/base.html" %}                 <!--继承自base.html。-->

{% block title %}Flasky{% endblock %}                <!-- 标题块(block)-->

{%block navbar %}                                    <!-- 导航条块(block)-->
<div class="navbar navbar-inverse" role="navigation">
    <div class="container">
        <div class="navbar-header">
            <button type="button" class="navbar-toggle"
                    data-toggle="collapse" data-target=".navbar-collapse">
                <span class="sr-only">Toggle navigation</span>
                <span class="icon-bar"></span>                      <!--定义文档中的节-->
                <span class="icon-bar"></span>
                <span class="icon-bar"></span>
            </button>
            <a class="navbar-brand" href="/">Flasky</a>             <!--定义锚-->
        </div>
        <div class="navbar-collapse collapse">
            <ul class="nav navbar-nav">
                <li><a href="/">Home</a> </li>
            </ul>
        </div>
    </div>
</div>
{% endblock %}

{% block content %}                                                <!--正文块(block)-->
<div class="container">
    {% block page_content %}{% endblock %}
</div>
{% endblock %}
templdates/base.html继承自bootstrap/base.html,定义了三个块(block):标题块,导航条块,正文块。对应位置如下图:

最后,404.html再继承templdates/base.html。生成可以用于最后显示的html文档。404.html是自定义的一个404错误页面。
{% extends "base.html" %}

{% block title %}Flasky- Page not Found{% endblock %}            <!--重定义了block title,替换了base.html中的block title,下同-->

{% block page_content %}
<div class="page-header">
    <h1>Not Found</h1>
</div>
{% endblock %}