前言
NanoDet-Plus是超快速、高精度的轻量级无锚物体检测模型,github项目文件。可以在移动设备上实时检测。其主要特点是- 超轻量:模型文件仅980KB(INT8)、1.8MB(FP16)
- 超快:移动
ARM CPU上97fps(10.23ms) - 高精度:高达34.3 mAP val @0.5:0.95,并且在
CPU上仍然实时 - 训练友好:
GPU内存成本比其他模型低得多。 在GTX1060 6G上可设置batch_size=80 - 易于部署:支持各种后端,包括ncnn、MNN 和 OpenVINO。还提供基于ncnn推理框架的Android demo
NanoDet是一种FCOS风格的单阶段无锚目标检测模型,使用广义焦点损失作为分类和回归损失。在NanoDet-Plus中使用了新的标签分配策略,具有简单的分配指导模块(AGM)和动态软标签分配器(DSLA),以解决轻量级模型训练中的最佳标签分配问题。还引入了一个名为Ghost-PAN的轻量特征金字塔来增强多层特征融合。这些改进将之前NanoDet在COCO数据集上的检测精度提高了7 mAP。

-
关于
NanoDet-Plus模型框架的详细介绍可以参考文档,NanoDet模型框架的详细介绍可以参考文档 -
本文主要讲解如何训练
NanoDet-Plus模型,将训练好的模型转换为onnx格式,并使用onnxruntime进行推理
环境配置
- 本文使用的环境为云
GPU,基础镜像选择Python版本3.8,PyTorch版本1.13.1,Cuda版本11.7.0。GPU型号P4-8G - 一般云
GPU环境会提供学术镜像加速,在使用git克隆项目时记得打开,使用完以后关闭。以下命令均在命令行窗口执行
git clone https://github.com/RangiLyu/nanodet.git
cd nanodet

pip install -r requirements.txt
python setup.py develop
- 如果上述代码无报错,说明环境配置完成,接下来在项目文件夹下创建文件夹
data,用于存放训练数据
mkdir data
- 将图像文件放置于
./data/images下,注释文件放置于./data/ann下,注释文件有两个,分别是trainval.json、test.json,需要注意的是注释文件格式一定要是``coco`格式,怎么转换可以看我之前写的文章,里面有很详细的讲。
模型训练
配置文件解析
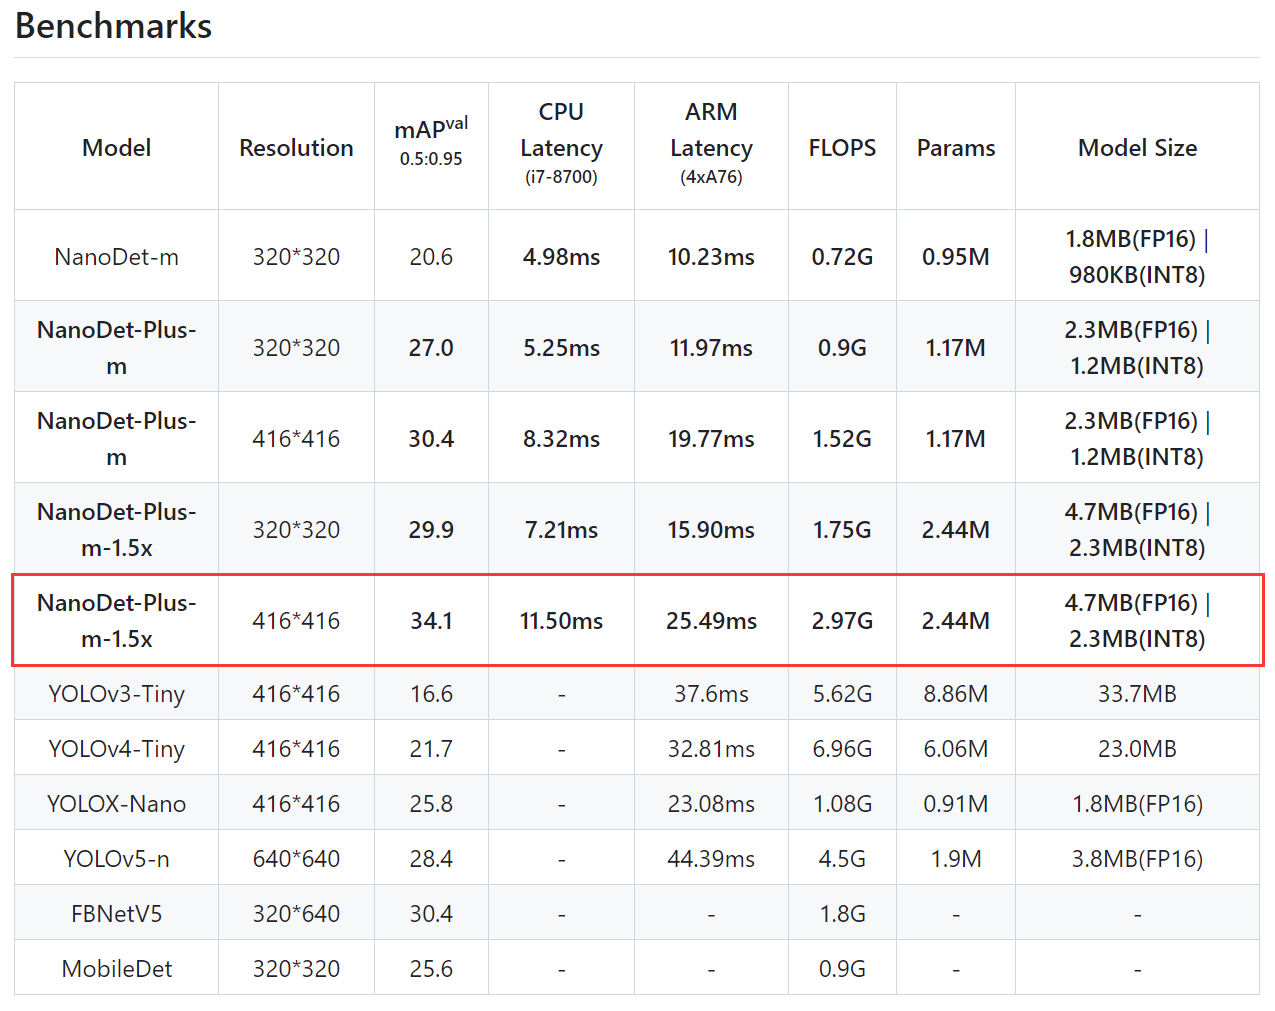
- 首先我们要找到我们想要微调的模型,打开项目文件夹中
README.md文档,可以看到在Benchmarks中有很多选项。 - 这里我们直接微调表中精度最高的模型NanoDet-Plus-m-1.5x,精度达到34.1 mAP val @0.5:0.95
-
进入
config文件夹,可以看到nanodet-plus-m-1.5x_416.yml文件,这就是模型配置文件。 -
下面我们对配置文件的各部分及参数做详细说明
Saving path
save_dir: workspace/nanodet-plus-m-1.5x_416
save_dir为保存日志和模型的位置。如果路径不存在,NanoDet-Plus将创建它。
Model
model:
    arch:
        name: NanoDetPlus
        backbone: xxx
        fpn: xxx
        head: xxx
        aux_head: xxx
大多数检测模型架构可以分为 3 个部分:backbone(主干)、head(任务头)和它们之间的fpn(连接器,例如 FPN、BiFPN、PAN)
Weight averaging
weight_averager:
  name: ExpMovingAverager
  decay: 0.9998
NanoDet-Plus支持EMA等权重平均法
Backbone
backbone:
    name: ShuffleNetV2
    model_size: 1.5x
    out_stages: [2,3,4]
    activation: LeakyReLU
NanoDet使用ShuffleNetV2作为骨干。可以修改model_size(模型大小)、out_stages(输出特征级别)和activation(激活函数)。- 此外,
NanoDet-Plus还提供其他轻量级主干网,如GhostNet和MobileNetV2。您还可以通过将其导入到nanodet/model/backbone/__init__.py中来添加骨干网络。
FPN
fpn:
    name: GhostPAN
    in_channels: [176, 352, 704]
    out_channels: 128
    kernel_size: 5
    num_extra_level: 1
    use_depthwise: True
    activation: LeakyReLU
NanoDet-Plus使用GhostPAN作为连接器。in_channels:从主干提取的特征图通道列表。out_channels:输出特征图通道。
Head
head:
    name: NanoDetPlusHead
    num_classes: 80
    input_channel: 128
    feat_channels: 128
    stacked_convs: 2
    kernel_size: 5
    strides: [8, 16, 32, 64]
    activation: LeakyReLU
    reg_max: 7
    norm_cfg:
      type: BN
    loss:
      loss_qfl:
        name: QualityFocalLoss
        use_sigmoid: True
        beta: 2.0
        loss_weight: 1.0
      loss_dfl:
        name: DistributionFocalLoss
        loss_weight: 0.25
      loss_bbox:
        name: GIoULoss
        loss_weight: 2.0
name: 任务头类名num_classes: 分类数量input_channel:输入特征图通道feat_channels:任务头转换的通道stacked_convs:一个任务头使用多少个转换块kernel_size:卷积核大小strides:每个特征图级别的下采样步长activation:激活函数reg_max:每级lrtb距离的最大值norm_cfg:归一化层设置loss:调整损失函数和权重
Auxiliary head
aux_head:
    name: SimpleConvHead
    num_classes: 80
    input_channel: 256
    feat_channels: 256
    stacked_convs: 4
    strides: [8, 16, 32, 64]
    activation: LeakyReLU
    reg_max: 7
Auxiliary head(辅助层)仅在训练期间起作用,参数含义与Head一致
Data
data:
    train:
    	name: CocoDataset
    	img_path: coco/train2017
    	ann_path: coco/annotations/instances_train2017.json
    	input_size: [416,416] #[w,h]
    	keep_ratio: False
    	pipeline:
            ...
	val:
        ...
- 在
data中,需要设置训练和验证数据集。name:数据集格式名称。您可以在nanodet/data/dataset中创建自己的数据集格式。input_size:[宽度,高度],keep_ratio:调整输入大小时是否保持原始图像比例,pipeline:数据预处理和增强管道
Device
device:
    gpu_ids: [0]
    workers_per_gpu: 10
    batchsize_per_gpu: 96
    precision: 32
gpu_ids:CUDA设备ID,对于多GPU训练,设置为 [0、1、2…]workers_per_gpu:每个GPU有多少个数据加载器进程batchsize_per_gpu:每个GPU在一个batch中处理的图像数量precision:训练精度,默认值 32 表示FP32训练。设置为 16 可启用AMP训练
Schedule
schedule:
  optimizer:
    name: AdamW
    lr: 0.001
    weight_decay: 0.05
  warmup:
    name: linear
    steps: 500
    ratio: 0.0001
  total_epochs: 300
  lr_schedule:
    name: CosineAnnealingLR
    T_max: 300
    eta_min: 0.00005
  val_intervals: 10
 grad_clip: 35
-
optimizer:支持pytorch提供的所有优化器。 -
lr:遵循论文Accurate, Large Minibatch SGD: Training ImageNet in 1 Hour中的线性缩放规则根据batch_size调整lr -
warmup:训练前预热网络。支持constant,exp以及linear三种类型的预热。 -
total_epochs:训练的总epoch -
lr_schedule:学习率变化策略 -
val_intervals:训练期间评估间隔epoch -
grad_clip:梯度裁剪
Evaluator
evaluator:
  name: CocoDetectionEvaluator
  save_key: mAP
- 目前仅支持
coco eval。save_key:最佳模型的指标。支持mAP、AP50、AP75
Class names
- 用于可视化时标注
修改配置文件
- 将
nanodet-plus-m-1.5x_416.yml文件中的配置文件复制,然后根据任务需求进行更改,最后将其写入config文件夹中的nanodet-plus-m_416_animal.yml文件中 - 主要修改的地方有:
model模块下head的num_classes,aux_head的num_classes。data模块下的图片路径、注释文件路径。device模块下的batchsize_per_gpu。schedule模块下的lr(根据batch_size进行线性缩放)。total_epochs总epoch数。log模块下的interval日志输出iter间隔。class_names分类标签。 - 以下代码在jupyter notebook中运行,若直接创建新文件,只要两个
"""中间的内容
config_animal = """
save_dir: workspace/nanodet-plus-m-1.5x_416
model:
  weight_averager:
    name: ExpMovingAverager
    decay: 0.9998
  arch:
    name: NanoDetPlus
    detach_epoch: 10
    backbone:
      name: ShuffleNetV2
      model_size: 1.5x
      out_stages: [2,3,4]
      activation: LeakyReLU
    fpn:
      name: GhostPAN
      in_channels: [176, 352, 704]
      out_channels: 128
      kernel_size: 5
      num_extra_level: 1
      use_depthwise: True
      activation: LeakyReLU
    head:
      name: NanoDetPlusHead
      # 分类数,需要修改
      num_classes: 2
      input_channel: 128
      feat_channels: 128
      stacked_convs: 2
      kernel_size: 5
      strides: [8, 16, 32, 64]
      activation: LeakyReLU
      reg_max: 7
      norm_cfg:
        type: BN
      loss:
        loss_qfl:
          name: QualityFocalLoss
          use_sigmoid: True
          beta: 2.0
          loss_weight: 1.0
        loss_dfl:
          name: DistributionFocalLoss
          loss_weight: 0.25
        loss_bbox:
          name: GIoULoss
          loss_weight: 2.0
    # Auxiliary head, only use in training time.
    aux_head:
      name: SimpleConvHead
      # 分类数需要更改
      num_classes: 2
      input_channel: 256
      feat_channels: 256
      stacked_convs: 4
      strides: [8, 16, 32, 64]
      activation: LeakyReLU
      reg_max: 7
data:
  train:
    name: CocoDataset
    # 训练集图片路径、注释文件路径
    img_path: data/images
    ann_path: data/annotations/trainval.json
    input_size: [416,416] #[w,h]
    keep_ratio: False
    pipeline:
      perspective: 0.0
      scale: [0.6, 1.4]
      stretch: [[0.8, 1.2], [0.8, 1.2]]
      rotation: 0
      shear: 0
      translate: 0.2
      flip: 0.5
      brightness: 0.2
      contrast: [0.6, 1.4]
      saturation: [0.5, 1.2]
      normalize: [[103.53, 116.28, 123.675], [57.375, 57.12, 58.395]]
  val:
    name: CocoDataset
    # 验证集图片路径、注释文件路径
    img_path: data/images
    ann_path: data/annotations/test.json
    input_size: [416,416] #[w,h]
    keep_ratio: False
    pipeline:
      normalize: [[103.53, 116.28, 123.675], [57.375, 57.12, 58.395]]
device:
  gpu_ids: [0]
  workers_per_gpu: 2
  batchsize_per_gpu: 96
  precision: 32 # set to 16 to use AMP training
schedule:
  optimizer:
    name: AdamW
    # 学习率等比例缩放
    lr: 0.001
    weight_decay: 0.05
  warmup:
  # 学习率预热step
    name: linear
    steps: 500
    ratio: 0.0001
  # 总epochs
  total_epochs: 300
  lr_schedule:
    name: CosineAnnealingLR
    T_max: 300
    eta_min: 0.00005
  # 验证间隔epoch
  val_intervals: 5
# 梯度修剪
grad_clip: 35
evaluator:
  name: CocoDetectionEvaluator
  # 最优指标
  save_key: mAP
# 日志输出iter间隔
log:
  interval: 20

# 分类名,需要与标准文件中的id顺序一直
class_names: ['cat', 'dog']
"""

#------------------------------------------------------
config=f'./config/nanodet-plus-m_416_animal.yml'
with open(config, 'w') as f:
    f.write(config_animal)
启动训练
- 本节代码均在命令行窗口中运行
python tools/train.py ./config/nanodet-plus-m_416_animal.yml
- 由于训练日志太长,这里就不展示了,这一步只要不报错,等待训练结束即可。
save_dir目录下的model_best文件夹中 - 训练结束以后可以使用
TensorBoard对训练过程进行可视化
cd workspace/nanodet-plus-m-1.5x_416
tensorboard --logdir ./
pytorch推理
- 本节代码均在jupyter notebook环境中运行
- 导入一些必要的包
import os
import cv2
import torch
os.environ["CUDA_DEVICE_ORDER"]="PCI_BUS_ID"
os.environ["CUDA_VISIBLE_DEVICES"]="0"

device = torch.device('cuda')
torch.backends.cudnn.enabled = True
torch.backends.cudnn.benchmark = True
- 明确配置文件、模型权重、测试图片路径
from nanodet.util import cfg, load_config, Logger
config_path = 'config/nanodet-plus-m_416_animal.yml'
model_path = 'workspace/nanodet-plus-m-1.5x_416/model_best/nanodet_model_best.pth'
image_path = 'data/images/00001.png'
load_config(cfg, config_path)
logger = Logger(-1, use_tensorboard=False)
- 构建推理器,并进行推理
from demo.demo import Predictor
predictor = Predictor(cfg, model_path, logger, device=device)
meta, res = predictor.inference(image_path)
输出:
model size is  1.5x
init weights...
Finish initialize NanoDet-Plus Head.
forward time: 0.030s | decode time: 0.006s |
- 可视化推理结果
from nanodet.util import overlay_bbox_cv

from IPython.display import display
from PIL import Image

def cv2_imshow(a, convert_bgr_to_rgb=True):
    a = a.clip(0, 255).astype('uint8')
    if convert_bgr_to_rgb and a.ndim == 3:
        if a.shape[2] == 4:
            a = cv2.cvtColor(a, cv2.COLOR_BGRA2RGBA)
        else:
            a = cv2.cvtColor(a, cv2.COLOR_BGR2RGB)
    display(Image.fromarray(a))
result = overlay_bbox_cv(meta['raw_img'][0], res[0], ['cracked','complete'], score_thresh=0.35)
imshow_scale = 1.0
cv2_imshow(cv2.resize(result, None, fx=imshow_scale, fy=imshow_scale))
ONNXRuntime部署
- 注:本节所有代码均在命令行窗口中运行
模型导出ONNX
- 导出
onnx模型,运行tools/export_onnx.py脚本就可以快速转换,运行完成后会在项目文件夹下生成nanodet.onnx文件。 - 我们将精度最高的模型权重进行转换
python tools/export_onnx.py --cfg_path ./config/nanodet-plus-m_416_animal.yml --model_path workspace/nanodet-plus-m-1.5x_416/model_best/nanodet_model_best.pth
ONNX模型推理
- 因为模型转换为
ONNX后输出结果发生了很大变化,并且有点不那么好理解,这里放一篇博客,里面对输出结果做了很详细的说明,用opencv部署nanodet目标检测 - 该博主在
github上发布了使用OpenCV部署NanoDet-Plus,包含C++和Python两个版本的程序。使用ONNXRuntime部署NanoDet-Plus,包含C++和Python两个版本的程序。项目地址 - 打开项目主页,下载
onnxruntime/main.py文件到项目文件夹下,打开文件,修改部分代码
import cv2
import numpy as np
import argparse
import onnxruntime as ort
import math


class my_nanodet():
    def __init__(self, model_pb_path, prob_threshold=0.4, iou_threshold=0.3):
        self.classes = ['cat', 'dog']
        self.num_classes = len(self.classes)
        self.prob_threshold = prob_threshold
        self.iou_threshold = iou_threshold
        ### normalize: [[103.53, 116.28, 123.675], [57.375, 57.12, 58.395]]
        self.mean = np.array([103.53, 116.28, 123.675], dtype=np.float32).reshape(1, 1, 3)
        self.std = np.array([57.375, 57.12, 58.395], dtype=np.float32).reshape(1, 1, 3)
        so = ort.SessionOptions()
        so.log_severity_level = 3
        self.net = ort.InferenceSession(model_pb_path, so)
        self.input_shape = (self.net.get_inputs()[0].shape[2], self.net.get_inputs()[0].shape[3])
        self.reg_max = int((self.net.get_outputs()[0].shape[-1] - self.num_classes) / 4) - 1
        self.project = np.arange(self.reg_max + 1)
        self.strides = (8, 16, 32, 64)
        self.mlvl_anchors = []
        for i in range(len(self.strides)):
            anchors = self._make_grid(
                (math.ceil(self.input_shape[0] / self.strides[i]), math.ceil(self.input_shape[1] / self.strides[i])),
                self.strides[i])
            self.mlvl_anchors.append(anchors)
        self.keep_ratio = False

    def _make_grid(self, featmap_size, stride):
        feat_h, feat_w = featmap_size
        shift_x = np.arange(0, feat_w) * stride
        shift_y = np.arange(0, feat_h) * stride
        xv, yv = np.meshgrid(shift_x, shift_y)
        xv = xv.flatten()
        yv = yv.flatten()
        return np.stack((xv, yv), axis=-1)
        # cx = xv + 0.5 * (stride - 1)
        # cy = yv + 0.5 * (stride - 1)
        # return np.stack((cx, cy), axis=-1)

    def softmax(self, x, axis=1):
        x_exp = np.exp(x)
        # 如果是列向量,则axis=0
        x_sum = np.sum(x_exp, axis=axis, keepdims=True)
        s = x_exp / x_sum
        return s

    def _normalize(self, img):
        img = img.astype(np.float32)
        # img = (img / 255.0 - self.mean / 255.0) / (self.std / 255.0)
        img = (img - self.mean) / (self.std)
        return img

    def resize_image(self, srcimg, keep_ratio=True):
        top, left, newh, neww = 0, 0, self.input_shape[0], self.input_shape[1]
        if keep_ratio and srcimg.shape[0] != srcimg.shape[1]:
            hw_scale = srcimg.shape[0] / srcimg.shape[1]
            if hw_scale > 1:
                newh, neww = self.input_shape[0], int(self.input_shape[1] / hw_scale)
                img = cv2.resize(srcimg, (neww, newh), interpolation=cv2.INTER_AREA)
                left = int((self.input_shape[1] - neww) * 0.5)
                img = cv2.copyMakeBorder(img, 0, 0, left, self.input_shape[1] - neww - left, cv2.BORDER_CONSTANT,
                                         value=0)  # add border
            else:
                newh, neww = int(self.input_shape[0] * hw_scale), self.input_shape[1]
                img = cv2.resize(srcimg, (neww, newh), interpolation=cv2.INTER_AREA)
                top = int((self.input_shape[0] - newh) * 0.5)
                img = cv2.copyMakeBorder(img, top, self.input_shape[0] - newh - top, 0, 0, cv2.BORDER_CONSTANT, value=0)
        else:
            img = cv2.resize(srcimg, self.input_shape, interpolation=cv2.INTER_AREA)
        return img, newh, neww, top, left

    def post_process(self, preds, scale_factor=1, rescale=False):
        mlvl_bboxes = []
        mlvl_scores = []
        ind = 0
        for stride, anchors in zip(self.strides, self.mlvl_anchors):
            cls_score, bbox_pred = preds[ind:(ind + anchors.shape[0]), :self.num_classes], preds[ind:(ind + anchors.shape[0]), self.num_classes:]
            ind += anchors.shape[0]
            bbox_pred = self.softmax(bbox_pred.reshape(-1, self.reg_max + 1), axis=1)
            # bbox_pred = np.sum(bbox_pred * np.expand_dims(self.project, axis=0), axis=1).reshape((-1, 4))
            bbox_pred = np.dot(bbox_pred, self.project).reshape(-1, 4)
            bbox_pred *= stride

            # nms_pre = cfg.get('nms_pre', -1)
            nms_pre = 1000
            if nms_pre > 0 and cls_score.shape[0] > nms_pre:
                max_scores = cls_score.max(axis=1)
                topk_inds = max_scores.argsort()[::-1][0:nms_pre]
                anchors = anchors[topk_inds, :]
                bbox_pred = bbox_pred[topk_inds, :]
                cls_score = cls_score[topk_inds, :]

            bboxes = self.distance2bbox(anchors, bbox_pred, max_shape=self.input_shape)
            mlvl_bboxes.append(bboxes)
            mlvl_scores.append(cls_score)

        mlvl_bboxes = np.concatenate(mlvl_bboxes, axis=0)
        if rescale:
            mlvl_bboxes /= scale_factor
        mlvl_scores = np.concatenate(mlvl_scores, axis=0)

        bboxes_wh = mlvl_bboxes.copy()
        bboxes_wh[:, 2:4] = bboxes_wh[:, 2:4] - bboxes_wh[:, 0:2]  ####xywh
        classIds = np.argmax(mlvl_scores, axis=1)
        confidences = np.max(mlvl_scores, axis=1)  ####max_class_confidence

        indices = cv2.dnn.NMSBoxes(bboxes_wh.tolist(), confidences.tolist(), self.prob_threshold,
                                   self.iou_threshold).flatten()
        if len(indices) > 0:
            mlvl_bboxes = mlvl_bboxes[indices]
            confidences = confidences[indices]
            classIds = classIds[indices]
            return mlvl_bboxes, confidences, classIds
        else:
            print('nothing detect')
            return np.array([]), np.array([]), np.array([])

    def distance2bbox(self, points, distance, max_shape=None):
        x1 = points[:, 0] - distance[:, 0]
        y1 = points[:, 1] - distance[:, 1]
        x2 = points[:, 0] + distance[:, 2]
        y2 = points[:, 1] + distance[:, 3]
        if max_shape is not None:
            x1 = np.clip(x1, 0, max_shape[1])
            y1 = np.clip(y1, 0, max_shape[0])
            x2 = np.clip(x2, 0, max_shape[1])
            y2 = np.clip(y2, 0, max_shape[0])
        return np.stack([x1, y1, x2, y2], axis=-1)

    def detect(self, srcimg):
        img, newh, neww, top, left = self.resize_image(srcimg, keep_ratio=self.keep_ratio)
        img = self._normalize(img)
        blob = np.expand_dims(np.transpose(img, (2, 0, 1)), axis=0)

        outs = self.net.run(None, {

    self.net.get_inputs()[0].name: blob})[0].squeeze(axis=0)
        det_bboxes, det_conf, det_classid = self.post_process(outs)

        # results = []
        ratioh, ratiow = srcimg.shape[0] / newh, srcimg.shape[1] / neww
        for i in range(det_bboxes.shape[0]):
            xmin, ymin, xmax, ymax = max(int((det_bboxes[i, 0] - left) * ratiow), 0), max(
                int((det_bboxes[i, 1] - top) * ratioh), 0), min(
                int((det_bboxes[i, 2] - left) * ratiow), srcimg.shape[1]), min(int((det_bboxes[i, 3] - top) * ratioh),
                                                                               srcimg.shape[0])
            # results.append((xmin, ymin, xmax, ymax, self.classes[det_classid[i]], det_conf[i]))
            cv2.rectangle(srcimg, (xmin, ymin), (xmax, ymax), (0, 0, 255), thickness=1)
            print(self.classes[det_classid[i]] + ': ' + str(round(det_conf[i], 3)))
            cv2.putText(srcimg, self.classes[det_classid[i]] + ': ' + str(round(det_conf[i], 3)), (xmin, ymin - 10),
                        cv2.FONT_HERSHEY_SIMPLEX, 0.5, (0, 255, 0), thickness=1)
        cv2.imwrite('result.jpg', srcimg)
        return srcimg


if __name__ == '__main__':
    parser = argparse.ArgumentParser()
    parser.add_argument('--imgpath', type=str, default='imgs/person.jpg', help="image path")
    parser.add_argument('--modelpath', type=str, default='onnxmodel/nanodet-plus-m_320.onnx', help="onnx filepath")
    parser.add_argument('--confThreshold', default=0.4, type=float, help='class confidence')
    parser.add_argument('--nmsThreshold', default=0.6, type=float, help='nms iou thresh')
    args = parser.parse_args()

    srcimg = cv2.imread(args.imgpath)
    net = my_nanodet(args.modelpath, args.classfile, prob_threshold=args.confThreshold, iou_threshold=args.nmsThreshold)
    srcimg = net.detect(srcimg)
- 修改的地方有:删除了
classfile参数,改为直接手动输入self.classes = ['cat', 'dog']。删除modelpath参数中的choices键。因为是在命令行窗口中运行,所以删除cv2.namedWindow操作。取消注释cv2.imwrite('result.jpg', srcimg)推理完成生成可视化图片。 - 修改完成一定要记得保存文件后再关闭文件,否则修改无效,会报错
imgpath参数设定为需要推理的照片,modelpath为我们自己导出的ONNX模型nanodet.onnx
python main.py --imgpath ./data/images/00001.png --modelpath nanodet.onnx
- 运行完成后会在项目文件夹下生成
result.jpg文件
onnx转ncnn
- 可以使用在线转换方法,转换完成后会生成
.bin和.param两个文件,即转换成功 .bin文件中存储的是模型的权重文件,.param文件中存储的模型架构信息