Yolov8_obb(prob loss) 基于anchor_free的旋转框目标检测
效果好于yolov5,并能在小数据集上大幅度超越v5的结果,不过针对不同的数据集需要进行一些调参.
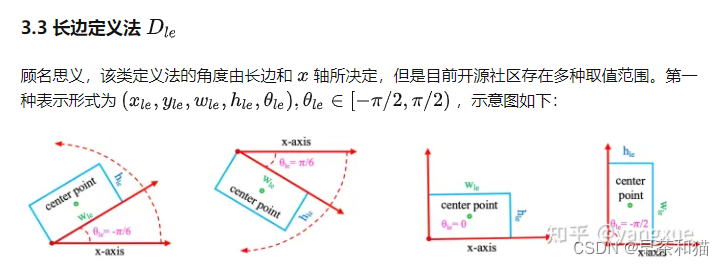
一、 旋转框的转换和定义
dota的四个角点格式的数据转化成(x, y, w, h, theta)的格式,通过cv2.minAreaRect()获取框的中心点(x,y),宽高(w,h),以及角度angle,angle∈ [0, 90],将角度映射成pi,由于存在w>h和h>w两种形式,统一设置成长边为h,短边为w,旋转的theta角度映射到 [-pi/2, pi/2]范围内。即长边表示法
具体角度表示的一些方法请参考https://zhuanlan.zhihu.com/p/459018810
相关代码实现
    poly = np.float32(poly.reshape(4, 2))
    (x, y), (w, h), angle = cv2.minAreaRect(poly) # θ ∈ [0, 90]
    angle = -angle # θ ∈ [-90, 0]
    theta = angle / 180 * pi # 转为pi制
    # trans opencv format to longedge format θ ∈ [-pi/2, pi/2]
    if w != max(w, h):
        w, h = h, w
        theta += pi/2
    rboxes.append([x, y, w, h, theta])
将预测的结果重新投影到图片上,需要将(x, y, w, h, theta)格式重新转换成四个角点坐标的格式。
        center, w, h, theta = obboxes[:,:, :2], obboxes[:,:, 2:3], obboxes[:,:, 3:4], obboxes[:,:, 4:5]

        Cos, Sin = torch.cos(theta), torch.sin(theta)


        vector1 = torch.cat(
            (w/2 * Cos, -w/2 * Sin), dim=-1)
        vector2 = torch.cat(
            (-h/2 * Sin, -h/2 * Cos), dim=-1)
        point1 = center + vector1 + vector2
        point2 = center + vector1 - vector2
        point3 = center - vector1 - vector2
        point4 = center - vector1 + vector2
        order = obboxes.shape[:-1]
        return torch.cat(
            (point2, point3, point4,point1), dim=-1).reshape(*order, 4,2)
转换过程如图所示:
