目录
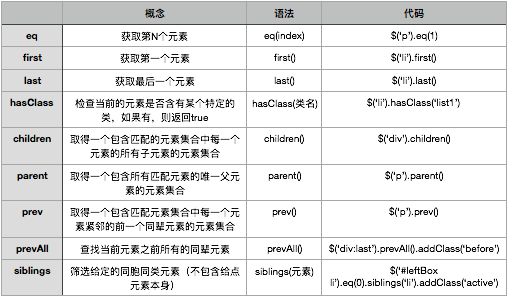
| 一、jquery常用筛选方法 |
以下为jquery的常用筛选方法:
代码示例如下:
<!DOCTYPE html>
<html lang="en">
<head>
    <meta charset="UTF-8">
    <title>筛选方法</title>
    <style type="text/css">
        li.active {
            font-size: 50px;
        }
    </style>
</head>
<body>
<ul>
    <li class="danger">1</li>
    <li><a href="#">luffy</a></li>
    <li class="danger">3</li>
    <li>4</li>
    <a href="#"> 百度</a>
    <a href="#" id="anchor">百度</a>
</ul>

</body>
<script src="jquery-3.3.1.js"></script>
<script type="text/javascript">
    $(function () {
        console.log($('li'));  // 输出:jQuery.fn.init(4)   类似数组的索引

        // jQuery的遍历方法:.each()
        // $('li').each(function (index,ele) {   // 索引,对象
        $('ul').children().each(function (index, ele) {
            console.log(ele);   // <li class="danger">1</li> : js的dom对象
            console.log(index);   // 0  : index

            // 判断当前匹配元素里是否有这个类名
            var isDanger = $(this).hasClass('danger');
            if (isDanger) {
                $(this).css('color','red');
            } else {
                $(this).css('font-size','20px');
            }
        })

        // children()
        console.log($('ul').children());
        console.log($('li'));   // 同上
        console.log($('ul').children('.danger'));

        // parent()
        console.log($('li').parent()); // jQuery.fn.init [ul, prevObject:...

        // last() 最后一个元素   prev:前一个元素
        console.log($('li').last().prev());  // jQuery.fn.init [li.danger
        console.log($('li').last().prevAll());

        // silbings:筛选给定的同胞同类元素(不包括给定元素本身)
        console.log($('li').siblings('li'));
        console.log($('#anchor').siblings('a'));  // jQuery.fn.init [a, prevObject..

        // 鼠标指向的li标签变大,移走后变小的选项卡效果
        $('li').hover(function () {
            $(this).addClass('active').siblings('li').removeClass('active');
        })
    })
</script>
</html>
| 二、应用筛选方法实现选项卡 |
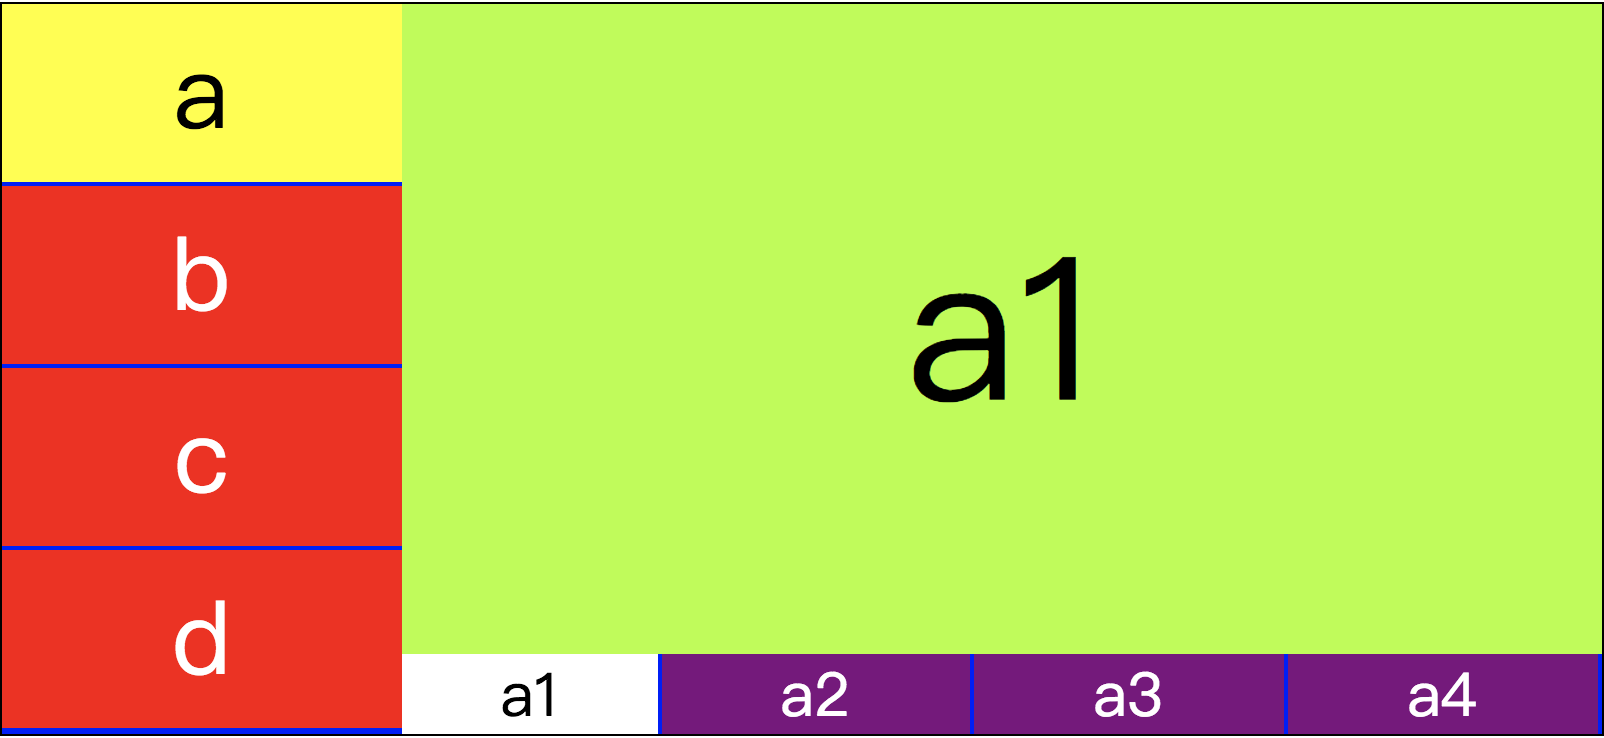
选项卡这种效果在网页中应用非常多,效果如下图所示:
示例代码如下所示:


<!DOCTYPE html>
<html>
    <head>
        <meta charset="UTF-8">
        <title></title>
        <style type="text/css">
            *{padding: 0;margin: 0;}
            ul{
                list-style: none;
            }
            /*清除浮动产生的问题
            浮动产生的原因:父级元素没有填充高度以及填充的时候父级撑不开,导致子级元素浮动*/
            #box:after{   /*伪类选择器*/
                content: "";
                display: block;
                clear: both;  /* 盒子左右两边都不浮动 */
            }
            #box{width: 800px;border: 1px solid black;margin: 20px auto;background: blue;}
            #leftBox{width: 200px;float: left;}
            #leftBox li{width: 200px;height: 89px;background: red;margin-bottom: 2px;color: white;font: 50px/89px "黑体";  text-align: center;}
            #rightBox div{display: none;float: left; width: 600px;}
            #rightBox p{width:100%;height: 325px;font: 100px/325px "黑体";text-align: center;background: greenyellow }
            /* font:100px/325px; 代表font-size:100px;line-height:325px;  垂直居中*/
            /*text-align:center; 代表中心对齐*/


            /*父元素设置display:table使它成为一个块级表格元素
             * 子元素设置display:table-cell使子元素成为表格单元格,就好比是在表格中一样*/
            #rightBox ul{width: 600px;display: table;}
            #rightBox li{display: table-cell;background: purple;height: 40px;border-right: 2px solid blue;font: 30px/40px "黑体";text-align: center;color: white;}

            #leftBox .active{background: yellow;color: black;}
            #rightBox .active{background: white;color: black;}

        </style>
    </head>
    <body>
        <div id="box">
            <ul id="leftBox">
                <li>a</li>
                <li>b</li>
                <li>c</li>
                <li>d</li>
            </ul>
            <div id="rightBox">
                <div style="display: block">
                    <p>a1</p>
                    <ul>
                        <li class="active">a1</li>
                        <li>a2</li>
                        <li>a3</li>
                        <li>a4</li>
                    </ul>
                </div>
                <div>
                    <p>b1</p>
                    <ul>
                        <li class="active">b1</li>
                        <li>b2</li>
                        <li>b3</li>
                        <li>b4</li>
                    </ul>
                </div>
                <div>
                    <p>c1</p>
                    <ul>
                        <li class="active">c1</li>
                        <li>c2</li>
                        <li>c3</li>
                        <li>c4</li>
                        <li>c5</li>
                        <li>c6</li>
                    </ul>
                </div>
                <div>
                    <p>d1</p>
                    <ul>
                        <li class="active">d1</li>
                        <li>d2</li>
                        <li>d3</li>
                        <li>d4</li>
                    </ul>
                </div>
            </div>
        </div>

    </body>
    <script src="jquery-3.3.1.js"></script>
    <script type="text/javascript">
        $(function(){
            //鼠标移入的时候
            $('#leftBox li').mouseover(function(){
                //修改自己的样式   siblings:选到本身以外其他兄弟元素,去除active类对应的样式
                $(this).addClass('active').siblings('li').removeClass('active');

                //修改右边的div
                console.log($(this).index()); // 利用$(this).index()取当前对象的索引,输出:0\1\2\3
                // eq(index):获取第N个元素的筛选方法  show\hide方法控制元素显示隐藏
                $('#rightBox div').eq($(this).index()).show().siblings('div').hide();

            })

            $('#rightBox li').click(function(){
                $(this).addClass('active').siblings('li').removeClass('active');

                var liValue  = $(this).html();  // 得到对应<li>标签的值

                // 找到li元素的父元素的前一个元素————<p>  给<p>设置html值
                $(this).parent().prev().html(liValue);
            })

        })

    </script>
</html>
1、使用:after伪元素解决经典清除浮动的问题
浮动产生的原因:父级元素没有填充高度以及填充的时候父级撑不开,导致子级元素浮动
#box:after{   /*伪类选择器*/
    content: "";
    display: block;
    clear: both;  /* 盒子左右两边都不浮动 */
}
2、注意font:100px/325px; 这种特殊写法
#rightBox p{width:100%;height: 325px;font: 100px/325px "黑体";text-align: center;background: greenyellow }
/* font:100px/325px;代表  font-size:100px;  line-height:325px;  垂直居中*/
/*text-align:center; 代表中心对齐*/
3、display: table; 和 display: table-cell;
/*父元素设置display:table使它成为一个块级表格元素
 * 子元素设置display:table-cell使子元素成为表格单元格,就好比是在表格中一样*/
#rightBox ul{width: 600px;display: table;}
#rightBox li{display: table-cell;background: purple;height: 40px;border-right: 2px solid blue;font: 30px/40px "黑体";text-align: center;color: white;}
4、$(this).index()可以得到当前对象的索引。两边的元素可以通过索引和eq()方法进行联动:
// eq(index):获取第N个元素的筛选方法  show\hide方法控制元素显示隐藏
$('#rightBox div').eq($(this).index()).show().siblings('div').hide();
5、选项卡实现原理:监听鼠标移入事件,触发事件后选到当前被移入的元素,用addClass添加类以此来添加样式,再用siblings选到其他兄弟元素,去除类以此来去除样式。
$(function(){
    //鼠标移入的时候
    $('#leftBox li').mouseover(function(){
        //修改自己的样式   siblings:选到本身以外其他兄弟元素,去除active类对应的样式
        $(this).addClass('active').siblings('li').removeClass('active');

        //修改右边的div
        console.log($(this).index()); // 利用$(this).index()取当前对象的索引,输出:0\1\2\3
        // eq(index):获取第N个元素的筛选方法  show\hide方法控制元素显示隐藏
        $('#rightBox div').eq($(this).index()).show().siblings('div').hide();
    })

    $('#rightBox li').click(function(){
        $(this).addClass('active').siblings('li').removeClass('active');

        var liValue  = $(this).html();  // 得到对应<li>标签的值
        // 找到li元素的父元素的前一个元素————<p>  给<p>设置html值
        $(this).parent().prev().html(liValue);
    })
})
6、类似的点击右下方按钮,切换显示内容。是通过parent()方法找到当前元素的父级元素ul,再通过prev()方法定位到元素p,再通过html()方法赋值,修改显示内容。
var liValue  = $(this).html();  // 得到对应<li>标签的值

// 找到li元素的父元素的前一个元素————<p>  给<p>设置html值
$(this).parent().prev().html(liValue);