Notification 通知用于悬浮出现在页面角落,显示全局的通知提醒消息。
一、自定义html页面
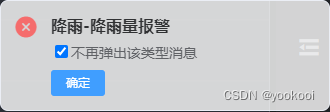
element-ui官方文档中说明Notification 通知组件的message 属性支持传入 HTML 片段,但是示例只展示了简单的html片段,通常不能满足开发中的更深入需要,比如我需要把通知弹框添加按钮、复选框,尤其是按钮还会绑定点击事件,这时就不能用示例的html片段;
应该使用VNode,通过使用它可以实例化不同类型的VNode实例。VNode的兼容性强,因为是 JS 对象,不管 node 还是,浏览器,都可以统一操作,从而获得了服务端渲染、原生渲染、手写渲染函数等能力。
//使用VNode创建一个勾选框
const checkbox = h('input', {
            attrs: {
                type: 'checkbox',
                checked: this.checked
            },
            domProps: {
                checked: this.checked
            },
            on: {
                change: (event) => {
                    this.$store.state.showWarning = event.target.checked
                }
            }
        })
        const label = h('label', {
            style:{
                margin:"10% 0 0 0 ",
            }
        }, [
            checkbox,
            `不再弹出该类型消息`
        ])
        //定义确认按钮
        const button = h('el-button', {
            props:{
                type:'primary',
                size:"mini"
            },
            on: {
            //为按钮绑定点击事件
                click: ()=>{
                    this. closeWarn(obj)
                }

            },
            style:{
                border:"none",
                textAlign:"center",
                // width:"20%",
                margin:"5% 0 0 0 ",
            }
        }, '确定')
        const br = h('br')
        //定义通知弹窗
        const notification = this.$notify({
            type:this.warnType,
            title: this.warn.msg,
            dangerouslyUseHTMLString: true,
            offset:50,
            message:h('div', {
                style:{
                    width:"100%"
                },
            }, [
                label,
                br,
                button
            ]),
            duration: 0,
            //自定义类名
             customClass:`warnNotify`,
            showClose: false,

        });
二、自定义按钮以关闭弹框
我们定义了一个按钮,期望通过点击按钮来删除当前点击确定的弹框;
调用 Notification 或 this.$notify 会返回当前 Notification 的实例。如果需要手动关闭实例,可以调用它的 close 方法。
methods中关闭弹窗的方法:
方法为当弹框为多个时,通过close方法,点击确定按钮以删除对应的弹框
closeWarn(obj) { // 点击确认,关闭弹框,并且删除数组中对应的项
    this.notifyList.forEach((item, index) => {
                  //满足以下条件时关闭弹框
                  if (item.id === obj.id && item.flag===obj.flag) {
                      item.notification.close(); // 关闭弹框
                      indices.push(index); // 存储需要删除的索引
                      // 删除对应的项
                      // indices.reverse().forEach((index) => {
                      this.notifyList.splice(index, 1);
                      this.notifyArr.splice(index,1)
                  }
              });
}
三、自定义通知弹框的样式
这里做简单展示修改一下弹框的背景透明度;
在上面我们给通知弹框赋予了一个类名即
  //自定义类名
             customClass:`warnNotify`,
在<style></style>中为该类进行样式设计,修改为想要展示的样式。
.warnNotify{
    background: rgba(255, 255, 255, 0.8) !important;
}
需要注意的是,在当前的vue组件中style不能设置为scoped局部样式,因为添加的消息弹层div不在当前组件下面,也不在APP.vue的div下面,它的div标签和app.vue平级,并且要用!important对样式加权至最高权重!
至此,element-ui中Notification 通知自定义样式、按钮及点击事件完成。