这篇文章主要介绍了python小程序代码50 到100行,具有一定借鉴价值,需要的朋友可以参考下。希望大家阅读完这篇文章后大有收获,下面让小编带着大家一起了解一下。
目录
1.生成漂亮的樱花树
参考来源
效果如下:(动态画图)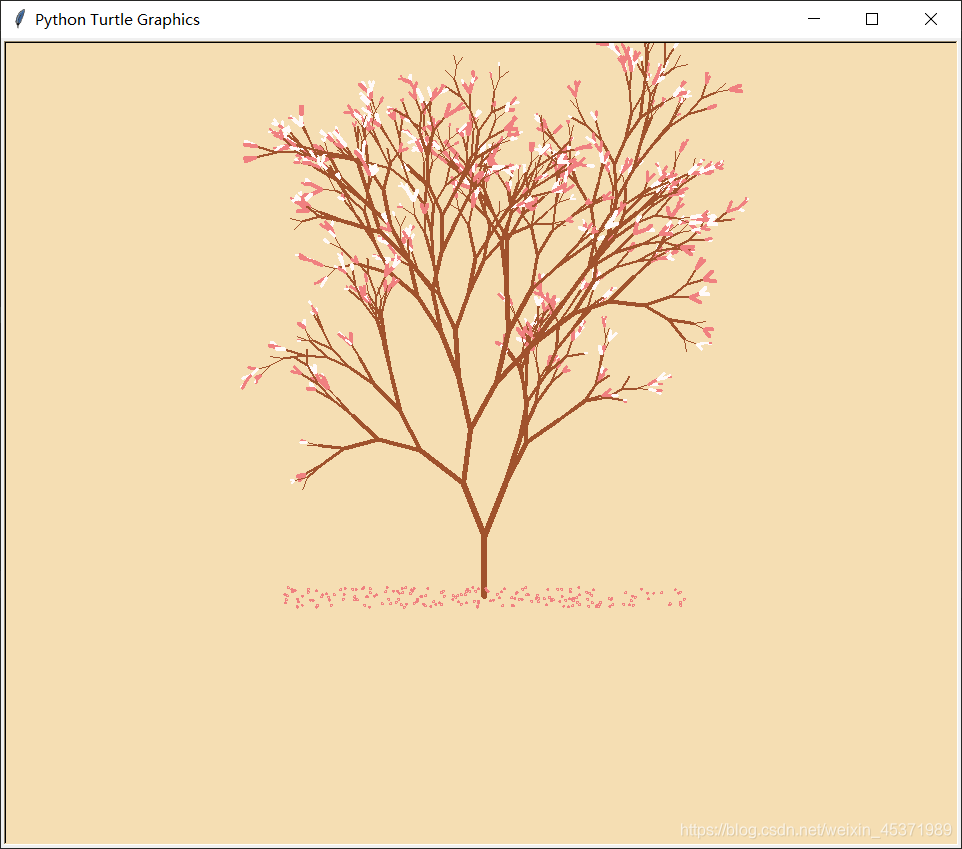
代码如下:
import turtle as T
import random
import time

# 画樱花的躯干(60,t)
def Tree(branch, t):
    time.sleep(0.0005)
    if branch > 3:
        if 8 <= branch <= 12:
            if random.randint(0, 2) == 0:
                t.color('snow')  # 白
            else:
                t.color('lightcoral')  # 淡珊瑚色
            t.pensize(branch / 3)
        elif branch < 8:
            if random.randint(0, 1) == 0:
                t.color('snow')
            else:
                t.color('lightcoral')  # 淡珊瑚色
            t.pensize(branch / 2)
        else:
            t.color('sienna')  # 赭(zhě)色
            t.pensize(branch / 10)  # 6
        t.forward(branch)
        a = 1.5 * random.random()
        t.right(20 * a)
        b = 1.5 * random.random()
        Tree(branch - 10 * b, t)
        t.left(40 * a)
        Tree(branch - 10 * b, t)
        t.right(20 * a)
        t.up()
        t.backward(branch)
        t.down()

# 掉落的花瓣
def Petal(m, t):
    for i in range(m):
        a = 200 - 400 * random.random()
        b = 10 - 20 * random.random()
        t.up()
        t.forward(b)
        t.left(90)
        t.forward(a)
        t.down()
        t.color('lightcoral')  # 淡珊瑚色
        t.circle(1)
        t.up()
        t.backward(a)
        t.right(90)
        t.backward(b)

# 绘图区域
t = T.Turtle()
# 画布大小
w = T.Screen()
t.hideturtle()  # 隐藏画笔
t.getscreen().tracer(5, 0)
w.screensize(bg='wheat')  # wheat小麦
t.left(90)
t.up()
t.backward(150)
t.down()
t.color('sienna')
# 画樱花的躯干
Tree(60, t)
# 掉落的花瓣
Petal(200, t)
w.exitonclick()
2.绝美的静态樱花树
效果图如下: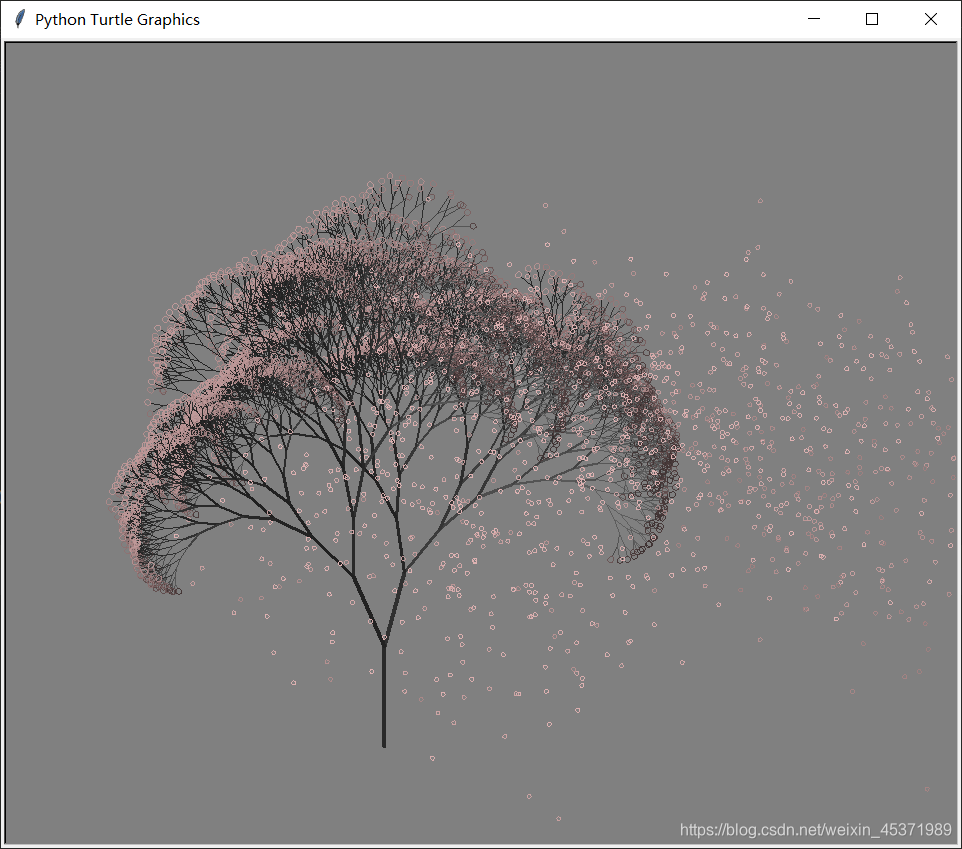
代码如下:
from turtle import *
from random import *
from math import *

def tree(n,l):
    pd()#下笔
    #阴影效果
    t = cos(radians(heading()+45))/8+0.25
    pencolor(t,t,t)
    pensize(n/3)
    forward(l)#画树枝

    if n>0:
        b = random()*15+10 #右分支偏转角度
        c = random()*15+10 #左分支偏转角度
        d = l*(random()*0.25+0.7) #下一个分支的长度
        #右转一定角度,画右分支
        right(b)
        tree(n-1,d)
        #左转一定角度,画左分支
        left(b+c)
        tree(n-1,d)
        #转回来
        right(c)
    else:
        #画叶子
        right(90)
        n=cos(radians(heading()-45))/4+0.5
        pencolor(n,n*0.8,n*0.8)
        circle(3)
        left(90)
        #添加0.3倍的飘落叶子
        if(random()>0.7):
            pu()
            #飘落
            t = heading()
            an = -40 +random()*40
            setheading(an)
            dis = int(800*random()*0.5 + 400*random()*0.3 + 200*random()*0.2)
            forward(dis)
            setheading(t)
            #画叶子
            pd()
            right(90)
            n = cos(radians(heading()-45))/4+0.5
            pencolor(n*0.5+0.5,0.4+n*0.4,0.4+n*0.4)
            circle(2)
            left(90)
            pu()
            #返回
            t=heading()
            setheading(an)
            backward(dis)
            setheading(t)
    pu()
    backward(l)#退回

bgcolor(0.5,0.5,0.5)#背景色
ht()#隐藏turtle
speed(0)#速度 1-10渐进,0 最快
tracer(0,0)
pu()#抬笔
backward(100)
left(90)#左转90度
pu()#抬笔
backward(300)#后退300
tree(12,100)#递归7层
done()
3.魔法少女小圆动漫形象
参考来源
效果图如下: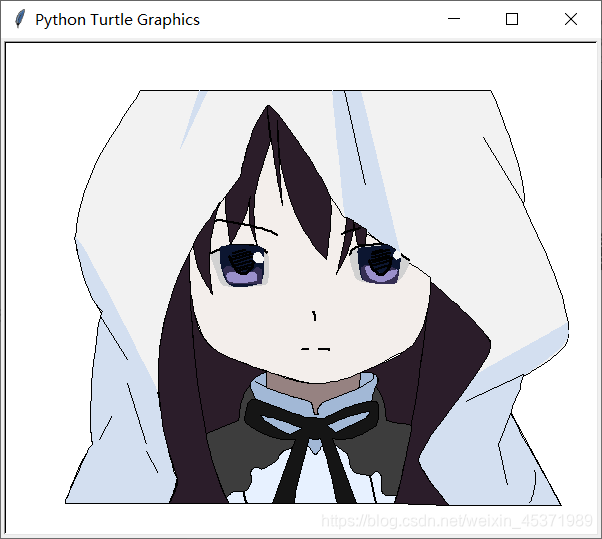
代码如下:
import turtle as te
import time
WriteStep = 15  # 贝塞尔函数的取样次数
Speed = 5
Width = 600  # 界面宽度
Height = 500  # 界面高度
Xh = 0  # 记录前一个贝塞尔函数的手柄
Yh = 0


def Bezier(p1, p2, t):  # 一阶贝塞尔函数
    return p1 * (1 - t) + p2 * t


def Bezier_2(x1, y1, x2, y2, x3, y3):  # 二阶贝塞尔函数
    te.goto(x1, y1)
    te.pendown()
    for t in range(0, WriteStep + 1):
        x = Bezier(Bezier(x1, x2, t / WriteStep),
                   Bezier(x2, x3, t / WriteStep), t / WriteStep)
        y = Bezier(Bezier(y1, y2, t / WriteStep),
                   Bezier(y2, y3, t / WriteStep), t / WriteStep)
        te.goto(x, y)
    te.penup()


def Bezier_3(x1, y1, x2, y2, x3, y3, x4, y4):  # 三阶贝塞尔函数
    x1 = -Width / 2 + x1
    y1 = Height / 2 - y1
    x2 = -Width / 2 + x2
    y2 = Height / 2 - y2
    x3 = -Width / 2 + x3
    y3 = Height / 2 - y3
    x4 = -Width / 2 + x4
    y4 = Height / 2 - y4  # 坐标变换
    te.goto(x1, y1)
    te.pendown()
    for t in range(0, WriteStep + 1):
        x = Bezier(Bezier(Bezier(x1, x2, t / WriteStep), Bezier(x2, x3, t / WriteStep), t / WriteStep),
                   Bezier(Bezier(x2, x3, t / WriteStep), Bezier(x3, x4, t / WriteStep), t / WriteStep), t / WriteStep)
        y = Bezier(Bezier(Bezier(y1, y2, t / WriteStep), Bezier(y2, y3, t / WriteStep), t / WriteStep),
                   Bezier(Bezier(y2, y3, t / WriteStep), Bezier(y3, y4, t / WriteStep), t / WriteStep), t / WriteStep)
        te.goto(x, y)
    te.penup()


def Moveto(x, y):  # 移动到svg坐标下(x,y)
    te.penup()
    te.goto(-Width / 2 + x, Height / 2 - y)


def line(x1, y1, x2, y2):  # 连接svg坐标下两点
    te.penup()
    te.goto(-Width / 2 + x1, Height / 2 - y1)
    te.pendown()
    te.goto(-Width / 2 + x2, Height / 2 - y2)
    te.penup()


def lineto(dx, dy):  # 连接当前点和相对坐标(dx,dy)的点
    te.pendown()
    te.goto(te.xcor() + dx, te.ycor() - dy)
    te.penup()


def Lineto(x, y):  # 连接当前点和svg坐标下(x,y)
    te.pendown()
    te.goto(-Width / 2 + x, Height / 2 - y)
    te.penup()


def Horizontal(x):  # 做到svg坐标下横坐标为x的水平线
    te.pendown()
    te.setx(x - Width / 2)
    te.penup()


def horizontal(dx):  # 做到相对横坐标为dx的水平线
    te.seth(0)
    te.pendown()
    te.fd(dx)
    te.penup()


def vertical(dy):  # 做到相对纵坐标为dy的垂直线
    te.seth(-90)
    te.pendown()
    te.fd(dy)
    te.penup()
    te.seth(0)


def polyline(x1, y1, x2, y2, x3, y3):  # 做svg坐标下的折线
    te.penup()
    te.goto(-Width / 2 + x1, Height / 2 - y1)
    te.pendown()
    te.goto(-Width / 2 + x2, Height / 2 - y2)
    te.goto(-Width / 2 + x3, Height / 2 - y3)
    te.penup()


def Curveto(x1, y1, x2, y2, x, y):  # 三阶贝塞尔曲线到(x,y)
    te.penup()
    X_now = te.xcor() + Width / 2
    Y_now = Height / 2 - te.ycor()
    Bezier_3(X_now, Y_now, x1, y1, x2, y2, x, y)
    global Xh
    global Yh
    Xh = x - x2
    Yh = y - y2


def curveto_r(x1, y1, x2, y2, x, y):  # 三阶贝塞尔曲线到相对坐标(x,y)
    te.penup()
    X_now = te.xcor() + Width / 2
    Y_now = Height / 2 - te.ycor()
    Bezier_3(X_now, Y_now, X_now + x1, Y_now + y1,
             X_now + x2, Y_now + y2, X_now + x, Y_now + y)
    global Xh
    global Yh
    Xh = x - x2
    Yh = y - y2


def Smooth(x2, y2, x, y):  # 平滑三阶贝塞尔曲线到(x,y)
    global Xh
    global Yh
    te.penup()
    X_now = te.xcor() + Width / 2
    Y_now = Height / 2 - te.ycor()
    Bezier_3(X_now, Y_now, X_now + Xh, Y_now + Yh, x2, y2, x, y)
    Xh = x - x2
    Yh = y - y2


def smooth_r(x2, y2, x, y):  # 平滑三阶贝塞尔曲线到相对坐标(x,y)
    global Xh
    global Yh
    te.penup()
    X_now = te.xcor() + Width / 2
    Y_now = Height / 2 - te.ycor()
    Bezier_3(X_now, Y_now, X_now + Xh, Y_now + Yh,
             X_now + x2, Y_now + y2, X_now + x, Y_now + y)
    Xh = x - x2
    Yh = y - y2

te.tracer(10)
te.setup(Width, Height, 0, 0)
te.pensize(1)
te.speed(Speed)
te.penup()

# 图层_2
time.sleep(20)
te.color("black", "#F2F2F2")  # 外套
Moveto(61, 462)
te.begin_fill()
smooth_r(12, -41, 27, -58)
curveto_r(-6, -36, 6, -118, 9, -132)
curveto_r(-15, -27, -23, -51, -26, -74)
curveto_r(4, -66, 38, -105, 65, -149)
Horizontal(486)
curveto_r(12, 24, 40, 99, 33, 114)
curveto_r(39, 82, 55, 129, 39, 144)
smooth_r(-31, 23, -39, 28)
smooth_r(-12, 37, -12, 37)
lineto(50, 92)
Horizontal(445)
smooth_r(-29, -38, -31, -46)
smooth_r(78, -107, 72, -119)
Smooth(355, 178, 340, 176)
Smooth(272, 63, 264, 64)
smooth_r(-29, 67, -27, 73)
Curveto(99, 292, 174, 428, 173, 439)
smooth_r(-8, 23, -8, 23)
Lineto(61, 462)
te.end_fill()

Moveto(60.5, 461.5)  # 阴影
te.color("black", "#D3DFF0")
te.begin_fill()
curveto_r(0, 0, 17, -42, 27, -59)
curveto_r(-6, -33, 6, -128, 10, -133)
curveto_r(-15, -10, -27, -66, -27.285, -75)
te.pencolor("#D3DFF0")
curveto_r(12.285, 11, 82.963, 156, 82.963, 156)
te.pencolor("black")
smooth_r(12.322, 75, 19.322, 86)
curveto_r(-1, 11, -8, 25, -8, 25)
Horizontal(60.5)
te.end_fill()

Moveto(444.5, 464)
te.begin_fill()
curveto_r(0, 0, -29, -36, -31, -46)
smooth_r(53.59, -82.337, 53.59, -82.337)
te.pencolor("#D3DFF0")
smooth_r(86.41, -47.663, 96.072, -54.85)
Curveto(563.5, 297.5, 570.5, 299.5, 518.5, 334)
te.pencolor("black")
curveto_r(-2, 16, -12, 33, -12, 37)
smooth_r(50, 92, 50, 93)
Horizontal(444.5)
te.end_fill()

Moveto(195, 49)
te.begin_fill()
te.pencolor("#D3DFF0")
polyline(195, 49, 175.5, 106.5, 202.522, 49)
te.pencolor("black")
Horizontal(195)
te.pencolor("#D3DFF0")
te.end_fill()

Moveto(327.997, 49)
te.begin_fill()
te.pencolor("#D3DFF0")
curveto_r(0, 0, 11.503, 121.087, 13.503, 128.087)
curveto_r(11, 2, 54, 37, 54, 37)
lineto(-40, -165.087)
te.pencolor("black")
Horizontal(327.997)
te.pencolor("#D3DFF0")
te.end_fill()

te.pencolor("black")
line(94.5, 397.5, 107.5, 373.5)  # 皱纹
line(122.5, 317.5, 95.875, 274.699)
line(122.5, 341.5, 141.5, 402.5)
line(141.5, 409.5, 153.5, 431.5)
# line(328,47.712,344,175.977)
line(340.023, 49, 360.5, 144)
# line(353.5,47.5,395.5,208.5)
line(478.5, 95.5, 518.5, 161.5)
line(518.5, 332.5, 460.5, 359.5)
polyline(506.5, 369.5, 493.5, 402.5, 502.5, 443.5)
Moveto(530, 429)
curveto_r(4, 16, -5, 33, -5, 33)

# 图层_3
te.color("black", "#2b1d2a")  # 外套内侧
Moveto(225, 462)
te.begin_fill()
Horizontal(165)
smooth_r(9, -15, 8, -25)
curveto_r(-47, -126, 6, -212, 12, -225)
Curveto(185, 305, 202, 428, 225, 462)
Lineto(225, 462)
te.end_fill()

Moveto(390, 462)
te.begin_fill()
curveto_r(10, -23, 34, -180, 35, -222)  # !!!227
curveto_r(7, 4, 54, 45, 61, 61)  # 61
smooth_r(-73, 101, -72, 118)
curveto_r(5, 15, 31, 46, 31, 45)
Lineto(390, 462)
te.end_fill()
# 图层_4
te.color("black", "#2b1d29")  # 外套内侧
Moveto(225, 462)
te.begin_fill()
curveto_r(-28, -50, -40, -166, -40, -250)
curveto_r(6, 51, -6, 87, 45, 106)
smooth_r(64, 27, 89, 24)
smooth_r(49, -18, 56, -20)
smooth_r(50, -10, 51, -85)
curveto_r(0, 29, -25, 201, -36, 225)
Lineto(225, 462)
te.end_fill()
# 图层_5
te.color("black", "#3D3D3D")  # 衣服
Moveto(225, 462)
te.begin_fill()
curveto_r(-5, -5, -22, -53, -23, -70)
lineto(32, -13)
curveto_r(3, -25, 6, -28, 12, -36)
smooth_r(13, -12, 16, -12)
vertical(-2)
curveto_r(45, 20, 64, 14, 94, 1)
vertical(2)
curveto_r(8, -2, 15, 2, 17, 4)
smooth_r(0, 6, -2, 9)
curveto_r(10, 10, 10, 29, 11, 33)
smooth_r(23, 4, 25, 6)
smooth_r(-17, 83, -17, 78)
Lineto(225, 462)
te.end_fill()
# 图层_6
te.color("black", "#968281")  # 脖子
Moveto(262, 329)
te.begin_fill()
vertical(17)
curveto_r(1, 2, 44, 14, 45, 15)
smooth_r(3, 12, 3, 12)
horizontal(3)
vertical(-5)
curveto_r(1, -3, 4, -6, 5, -7)
lineto(36, -14)
curveto_r(1, -1, 3, -16, 2, -17)
Curveto(318, 348, 296, 344, 262, 329)
te.end_fill()
# 图层_8
te.color("black", "#E7F1FF")  # 白色褶皱
Moveto(225, 462)
te.begin_fill()
lineto(-3, -5)  # -3,-3,-3,-5
curveto_r(0, -2, 4, -4, 5, -6)
smooth_r(16, 3, 19, -8)
smooth_r(0, -7, 0, -11)
smooth_r(5, -8, 9, -5)
smooth_r(19, -8, 19, -11)
smooth_r(6, -7, 6, -7)
smooth_r(7, -2, 9, -4)
lineto(41, -2)
lineto(12, 9)
smooth_r(3, 15, 7, 18)
smooth_r(15, 4, 17, 4)
smooth_r(4, -4, 6, -4)
smooth_r(6, 4, 5, 9)
smooth_r(0, 9, 0, 9)
smooth_r(1, 7, 7, 6)
smooth_r(8, 0, 8, 0)
lineto(-2, 8)
Lineto(225, 462)
te.end_fill()

te.pensize(2)
Moveto(240, 450)
smooth_r(0, 9, 3, 12)
Moveto(372, 462)
curveto_r(-2, -4, -5, -29, -7, -28)
te.pensize(1)
# 图层_7
te.color("black", "#A2B8D6")  # 衣领
Moveto(262, 331)
te.begin_fill()
curveto_r(0, 8, -1, 13, 0, 15)
smooth_r(43, 14, 45, 15)
lineto(3, 12)
horizontal(3)
smooth_r(-1, -3, 0, -5)
lineto(5, -7)
lineto(36, -14)
curveto_r(1, -1, 2, -12, 2, -15)
smooth_r(25, -2, 15, 13)
curveto_r(-2, 4, -7, 29, -7, 32)
smooth_r(-35, 19, -41, 22)
smooth_r(-9, 14, -12, 14)
smooth_r(-7, -12, -14, -15)
curveto_r(-19, -2, -41, -25, -41, -25)
smooth_r(-10, -26, -10, -30)
Smooth(255, 332, 262, 331)
te.end_fill()

Moveto(262, 346)
lineto(-12, -6)
Moveto(369, 333)
curveto_r(2, 4, -6, 10, -15, 14)
# 图层_9
te.color("black", "#151515")  # 领结
Moveto(247, 358)
te.begin_fill()
curveto_r(-5, 3, -8, 20, -6, 23)
curveto_r(25, 21, 50, 17, 50, 17)
lineto(-23, 64)
horizontal(22)
smooth_r(1, -13, 2, -16)
lineto(13, -50)
curveto_r(2, 2, 7, 3, 10, 1)
smooth_r(18, 65, 18, 65)
horizontal(19)
lineto(-24, -65)
curveto_r(21, 5, 39, -10, 44, -13)
curveto_r(5, -20, 1, -21, 0, -24)
curveto_r(-18, -2, -49, 15, -52, 17)
smooth_r(-11, -3, -15, -1)
Smooth(252, 356, 247, 358)
te.end_fill()
# 图层_10
te.color("black", "#A2B8D6")  # 衣领(透过领结)
Moveto(297, 387)
te.begin_fill()
lineto(-11, 6)
curveto_r(-1, 0, -20, -7, -30, -19)
Curveto(259, 373, 297, 385, 297, 387)
te.end_fill()

Moveto(323, 384)
te.begin_fill()
lineto(8, 7)
lineto(30, -14)
curveto_r(1, -1, 5, -6, 4, -7)
Smooth(329, 379, 323, 384)
te.end_fill()
# 图层_11
te.color("black", "#F3EEEB")  # 脸
Moveto(185, 212)
te.begin_fill()
curveto_r(4, -9, 46, -77, 52, -75)
curveto_r(-2, -17, 19, -68, 27, -73)
curveto_r(16, 15, 71, 108, 76, 112)
smooth_r(76, 53, 86, 60)
curveto_r(0, 65, -27, 75, -31, 76)
curveto_r(-50, 28, -70, 30, -85, 30)
smooth_r(-77, -22, -86, -26)
Curveto(180, 302, 186, 228, 185, 212)
te.end_fill()
# 图层_12
te.color("black", "#2B1D29")  # 头发
Moveto(189, 202)
te.begin_fill()
curveto_r(-1, 22, 19, 51, 19, 51)
smooth_r(-10, -42, 7, -92)
Curveto(212, 168, 196, 189, 189, 202)
te.end_fill()

Moveto(221, 155)
te.begin_fill()
curveto_r(-2, 6, 5, 48, 5, 48)
smooth_r(18, -28, 20, -48)
curveto_r(-5, 24, 4, 43, 7, 50)
curveto_r(-10, -49, 3, -72, 13, -106)
curveto_r(-2, -7, -3, -32, -3, -35)
curveto_r(-17, 18, -27, 71, -27, 71)
Lineto(221, 155)
te.end_fill()

Moveto(264, 64)
te.begin_fill()
curveto_r(-4, 5, 14, 100, 14, 100)
smooth_r(-6, -79, -5, -85)
curveto_r(0, 98, 49, 139, 49, 139)
smooth_r(8, -50, 3, -65)
Smooth(272, 64, 264, 64)
te.end_fill()

Moveto(342, 176)
te.begin_fill()
curveto_r(-1, 27, -10, 57, -10, 57)
smooth_r(20, -33, 17, -54)
Lineto(342, 176)
te.end_fill()

te.penup()
te.begin_fill()
polyline(349, 180, 353, 203, 361, 203)
polyline(361, 203, 362, 188, 349, 180)
te.end_fill()
# 图层_13
te.pensize(2)
Moveto(210, 180)  # 眉毛
curveto_r(5, -4, 63, 9, 63, 14)
Moveto(338, 193)
curveto_r(0, -3, 18, -6, 18, -6)
te.pensize(1)
# 图层_14
te.color("black", "#D1D1D1")  # 眼睛1
te.pensize(2)
Moveto(206, 212)
te.begin_fill()
lineto(15, -7)
curveto_r(4, -1, 26, -2, 30, 0)
smooth_r(10, 3, 12, 7)
te.pencolor("#D1D1D1")
te.pensize(1)
smooth_r(2, 27, -1, 30)
smooth_r(-39, 5, -44, 1)
Smooth(206, 212, 206, 212)
te.end_fill()

Moveto(384, 204)
te.begin_fill()
te.pencolor("black")
te.pensize(2)
curveto_r(-3, -1, -18, -1, -28, 1)
smooth_r(-9, 6, -10, 9)
te.pencolor("#D1D1D1")
te.pensize(1)
smooth_r(3, 18, 6, 23)
smooth_r(38, 6, 40, 4)
smooth_r(10, -9, 13, -22)
te.pencolor("black")
te.pensize(2)
Lineto(384, 204)
te.end_fill()
# 图层_15
te.color("#0C1631", "#0C1631")  # 眼睛2
te.pensize(1)
Moveto(216, 206)
te.begin_fill()
curveto_r(-1, 5, 0, 26, 7, 35)
smooth_r(30, 2, 33, 0)
smooth_r(5, -31, 2, -34)
Smooth(219, 203, 216, 206)
te.end_fill()

Moveto(354, 207)
te.begin_fill()
curveto_r(-2, 1, 2, 29, 4, 31)
smooth_r(30, 3, 33, 1)
smooth_r(6, -24, 4, -27)
lineto(-11, -8)
Curveto(382, 204, 357, 206, 354, 207)
te.end_fill()

# 图层_17
te.color("#F5F5F5", "#F5F5F5")  # 眼睛3
Moveto(253, 211)
te.begin_fill()
curveto_r(-3, 0, -8, 8, 1, 10)
Smooth(258, 210, 253, 211)
te.end_fill()

Moveto(392, 209)
te.begin_fill()
lineto(4, 3)
vertical(4)
lineto(-4, 2)
Curveto(386, 214, 392, 209, 392, 209)
te.end_fill()
# 图层_18
te.color("#352F53", "#352F53")  # 眼睛4
Moveto(219, 229)
te.begin_fill()
smooth_r(2, -5, 6, -4)
smooth_r(18, 13, 27, 1)
curveto_r(3, 0, 5, 3, 5, 3)
vertical(13)
Horizontal(224)
Lineto(219, 229)
te.end_fill()

Moveto(357, 227)
te.begin_fill()
smooth_r(4, -6, 10, -2)
smooth_r(10, 13, 19, 1)
curveto_r(6, 0, 8, 6, 8, 6)
lineto(-2, 9)
curveto_r(-12, 3, -29, 0, -32, -2)
Smooth(357, 227, 357, 227)
te.end_fill()

# 图层_19
te.color("#9A90CB", "#9A90CB")  # 眼睛5
Moveto(227, 231)
te.begin_fill()
curveto_r(-6, 0, -5, 5, -3, 8)
smooth_r(24, 2, 27, 0)
smooth_r(0, -8, -1, -8)
Smooth(234, 231, 227, 231)
te.end_fill()

Moveto(361, 227)
te.begin_fill()
curveto_r(2, 18, 26, 14, 30, 6)
smooth_r(-1, -3, -2, -4)
smooth_r(-15, 9, -24, -4)
Curveto(363, 224, 361, 225, 361, 227)
te.end_fill()

# 图层_16
te.pencolor("black")  # 眼睛(线条)
te.pensize(3)
# Moveto(206,213)
# lineto(14,-8)
# curveto_r(3,-1,30,0,33,1)
# lineto(10,6)
Moveto(225, 215)
curveto_r(10, 28, 22, 16, 24, 6)
Moveto(365, 219)
curveto_r(4, 14, 18, 24, 22, -3)
te.pensize(2)
line(240.5, 207.5, 227.5, 211.5)
line(245.5, 209.5, 227.5, 214.5)
line(247.5, 211.5, 227.5, 217.5)
line(247.5, 214.5, 229.5, 220.5)
line(247.5, 218.5, 230.5, 223.5)
line(246.5, 222.5, 232.5, 226.5)
line(244.5, 225.5, 234.5, 228.5)

line(377.5, 207.5, 367.5, 210.5)
line(384.5, 207.5, 366.5, 212.5)
line(385.5, 210.5, 366.5, 215.5)
line(384.5, 213.5, 366.5, 218.5)
line(384.5, 215.5, 367.5, 220.5)
line(384.5, 218.5, 368.5, 223.5)
# line(383.5,220.5,368.5,225.5)
line(382.5, 223.5, 370.5, 227.5)
# line(381.5,226.5,373.5,229.5)
# 图层_20
te.pencolor("black")
Moveto(309, 270)  # 鼻子、嘴
curveto_r(0, 0, 4, 7, 1, 9)
line(296.5, 307.5, 303.5, 307.5)
Moveto(315, 307)
smooth_r(10, -1, 10, 2)

te.penup()
te.hideturtle()
te.update()
te.done()
4.利用python播放本地mp3音乐
需要先安装Pygame模块
pip install
以周董的晴天为例PYTHON库“IMITATION”。。
代码如下:
from pygame import mixer
import time
mixer.init()
while(1):
    mixer.music.load('D:\music\周杰伦 - 晴天.mp3')
    mixer.music.play()
    time.sleep(270) #四分半钟
    mixer.music.stop()
5.利用python弹奏天空之城
参考来源
另外网上还有python生成钢琴音色以及相应的曲子,可惜本人缺乏音乐相关的知识,只会听。。。
from winsound import Beep
from playsound import playsound
def sound():
    Beep(880, 250)

    Beep(988, 250)

    Beep(523 * 2, 600)

    Beep(988, 300)

    Beep(523 * 2, 600)

    Beep(659 * 2, 600)

    Beep(988, 1000)

    Beep(659, 250)

    Beep(659, 250)

    Beep(880, 600)

    Beep(784, 300)

    Beep(880, 600)

    Beep(523 * 2, 600)

    Beep(784, 1000)

    Beep(659, 600)

    Beep(698, 800)

    Beep(659, 300)

    Beep(698, 600)

    Beep(523 * 2, 600)

    Beep(659, 980)

    Beep(523 * 2, 250)

    Beep(523 * 2, 250)

    Beep(523 * 2, 250)

    Beep(988, 600)

    Beep(739, 300)

    Beep(739, 600)

    Beep(988, 600)

    Beep(988, 1000)
# 天空之城
while 1:
    sound()
6.手绘风格的图表模块
该模块为cutecharts
最终生成HTML网页文件,打开即为所绘的图表。
示例如下: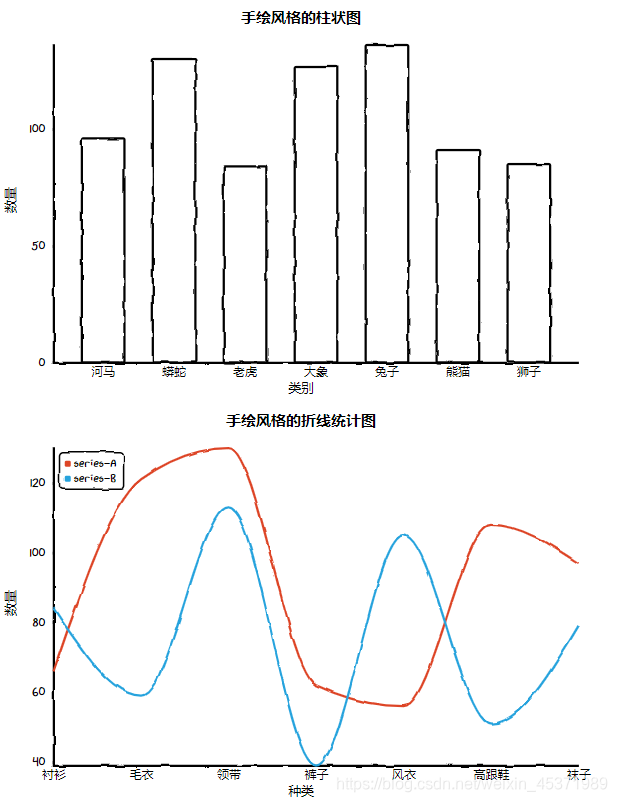
代码如下:
from cutecharts.charts import Pie
from cutecharts.components import Page
from cutecharts.faker import Faker


def pie_base() -> Pie:
    chart = Pie("Pie-基本示例")
    chart.set_options(labels=Faker.choose())
    chart.add_series(Faker.values())
    return chart


pie_base().render()


def pie_legend_font():
    chart = Pie("Pie-Legend")
    chart.set_options(
        labels=Faker.choose(),
        legend_pos="upRight",
        font_family='"Times New Roman",Georgia,Serif;',
    )
    chart.add_series(Faker.values())
    return chart


def pie_radius():
    chart = Pie("Pie-Radius")
    chart.set_options(labels=Faker.choose(), inner_radius=0)
    chart.add_series(Faker.values())
    return chart


page = Page()
page.add(pie_base(), pie_legend_font(), pie_radius())
page.render('饼状图')
7. 雨落在地面的动态图
参考来源
需要在cmd或者python idle中运行才能看到动态效果,因为它是不断刷新的,而在pycharm看不到。
效果图如下: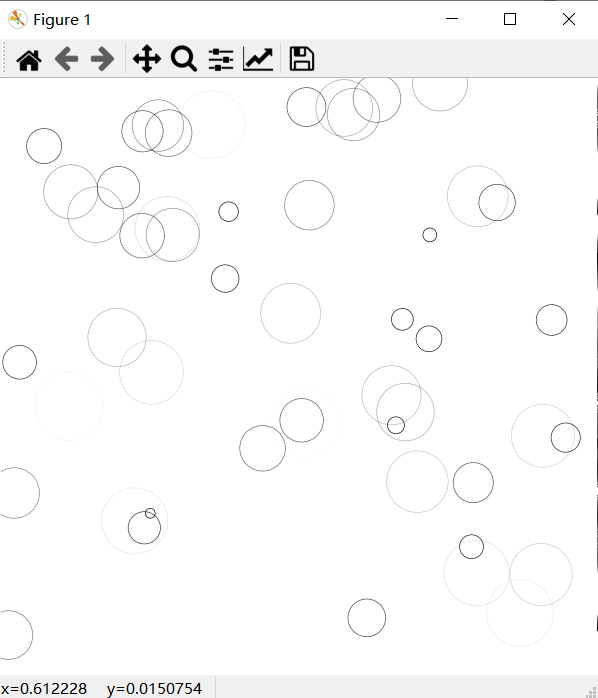
'''
注:这个程序只能在cmd中通过当前目录下python test1.py来运行才能实时显示
'''

import numpy as np
import matplotlib.pyplot as plt
from matplotlib import animation

# New figure with white background
fig = plt.figure(figsize=(6, 6), facecolor='white')

# New axis over the whole figure, no frame and a 1:1 aspect ratio
ax = fig.add_axes([0, 0, 1, 1], frameon=False, aspect=1)

# Number of ring
n = 50
size_min = 50
size_max = 50 ** 2

# Ring position
pos = np.random.uniform(0, 1, (n, 2))

# Ring colors
color = np.ones((n, 4)) * (0, 0, 0, 1)
# Alpha color channel geos from 0(transparent) to 1(opaque)
color[:, 3] = np.linspace(0, 1, n)

# Ring sizes
size = np.linspace(size_min, size_max, n)

# Scatter plot
scat = ax.scatter(pos[:, 0], pos[:, 1], s=size, lw=0.5, edgecolors=color, facecolors='None')

# Ensure limits are [0,1] and remove ticks
ax.set_xlim(0, 1), ax.set_xticks([])
ax.set_ylim(0, 1), ax.set_yticks([])


def update(frame):
    global pos, color, size

    # Every ring is made more transparnt
    color[:, 3] = np.maximum(0, color[:, 3] - 1.0 / n)

    # Each ring is made larger
    size += (size_max - size_min) / n

    # Reset specific ring
    i = frame % 50
    pos[i] = np.random.uniform(0, 1, 2)
    size[i] = size_min
    color[i, 3] = 1

    # Update scatter object
    scat.set_edgecolors(color)
    scat.set_sizes(size)
    scat.set_offsets(pos)

    # Return the modified object
    return scat,


anim = animation.FuncAnimation(fig, update, interval=10, blit=True, frames=200)
# plt.savefig('fig.png',bbox_inches='tight')
# plt.subplot(111)
plt.show()
8. python实现黑客帝国的代码雨
参考来源
需要安装pygame模块
1. 数字雨
效果图如下: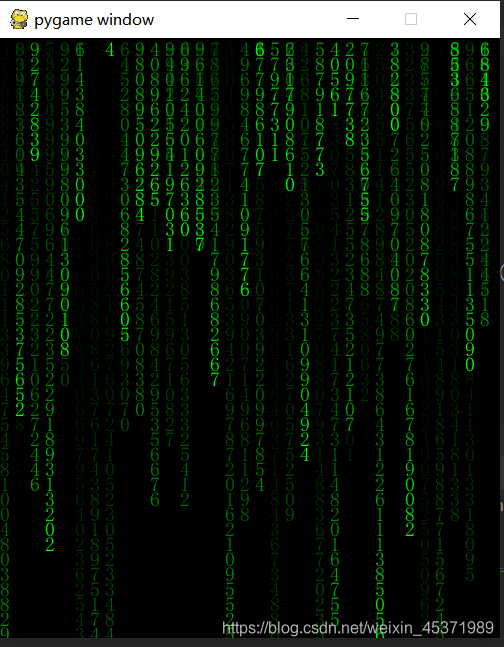
代码如下:
import numpy as np
import random
import pygame

FONT_PX = 15
pygame.init()
winSur = pygame.display.set_mode((500, 600))
font = pygame.font.SysFont('fangsong', 20)
bg_suface = pygame.Surface((500, 600), flags=pygame.SRCALPHA)
pygame.Surface.convert(bg_suface)
bg_suface.fill(pygame.Color(0, 0, 0, 13))
winSur.fill((0, 0, 0))
# 数字
texts = [font.render(str(i), True, (0, 255, 0)) for i in range(10)]
colums = int(500 / FONT_PX)
drops = [0 for i in range(colums)]
while True:
    for event in pygame.event.get():
        if event.type == pygame.QUIT:
            exit()
    pygame.time.delay(33)
    winSur.blit(bg_suface, (0, 0))
    for i in range(len(drops)):
        text = random.choice(texts)
        winSur.blit(text, (i * FONT_PX, drops[i] * FONT_PX))
        drops[i] += 1
        if drops[i] * 10 > 600 or random.random() > 0.95:
            drops[i] = 0
    pygame.display.flip()
2. 字母雨
效果图如下: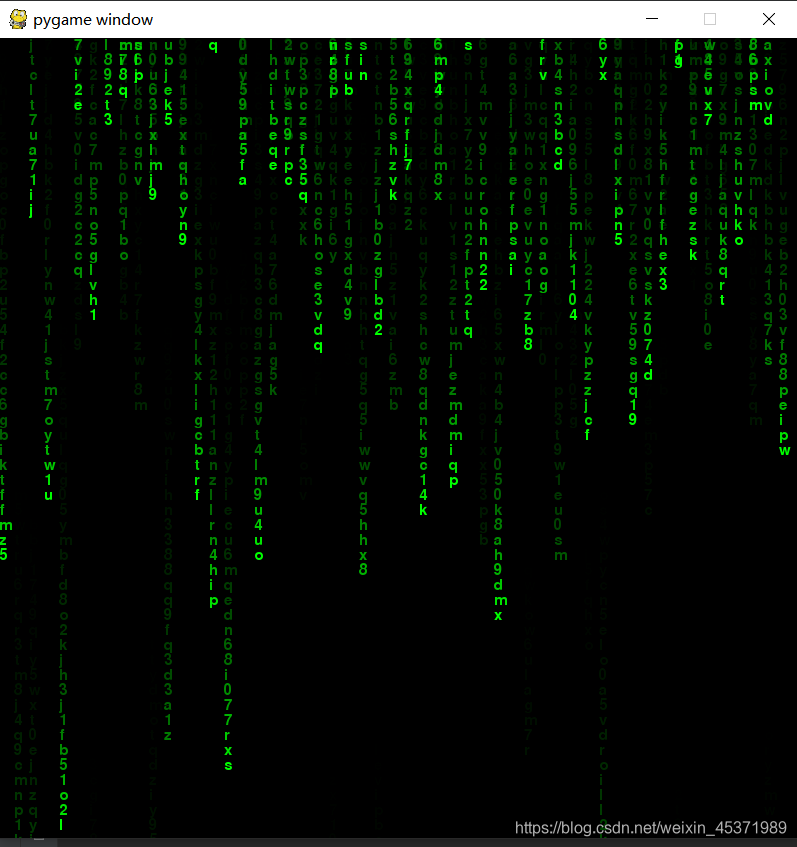
代码如下:
import numpy as np
import random
import pygame

PANEL_width = 800
PANEL_highly = 800
FONT_PX = 15
pygame.init()
# 创建一个窗口
winSur = pygame.display.set_mode((PANEL_width, PANEL_highly))
font = pygame.font.SysFont('123.ttf', 22)
bg_suface = pygame.Surface((PANEL_width, PANEL_highly), flags=pygame.SRCALPHA)
pygame.Surface.convert(bg_suface)
bg_suface.fill(pygame.Color(0, 0, 0, 28))
winSur.fill((0, 0, 0))
letter = ['q', 'w', 'e', 'r', 't', 'y', 'u', 'i', 'o', 'p', 'a', 's', 'd', 'f', 'g', 'h', 'j', 'k', 'l', 'z', 'x', 'c',
          'v', 'b', 'n', 'm', '0', '1', '2', '3', '4', '5', '6', '7', '8', '9']
texts = [
    font.render(str(letter[i]), True, (0, 255, 0)) for i in range(36)
]
# 按窗口的宽度来计算可以在画板上放几列坐标并生成一个列表
column = int(PANEL_width / FONT_PX)
drops = [0 for i in range(column)]
while True:
    # 从队列中获取事件
    for event in pygame.event.get():
        if event.type == pygame.QUIT:
            exit()
        elif event.type == pygame.KEYDOWN:
            chang = pygame.key.get_pressed()
            if (chang[32]):
                exit()
    # 暂停给定的毫秒数
    pygame.time.delay(30)
    # 重新编辑图像
    winSur.blit(bg_suface, (0, 0))
    for i in range(len(drops)):
        text = random.choice(texts)
        # 重新编辑每个坐标点的图像
        winSur.blit(text, (i * FONT_PX, drops[i] * FONT_PX))
        drops[i] += 1
        if drops[i] * 10 > PANEL_highly or random.random() > 0.95:
            drops[i] = 0
    pygame.display.flip()
9. 价值一个亿的人工智能核心代码
while True:
    print(input('').replace('吗', '').replace('?', '!'))
示例:
10. 用python在Excel画一幅像素画
效果图:
需要安装pypiwin32库和opencv库:
pip install pypiwin32
pip install opencv-python
另外需要先创建一个excel表格,尽量将格子调整为一个正方形
参考来源: 链接.
代码如下:
# 用python在excel上画一幅像素画
import win32com.client
from ctypes.wintypes import RGB
import cv2

#color_total用于存储RGB颜色
color_total=[]
#img_file为你要画的图片的名称,图片放在于.py同一个文件目录下 用绝对路径会报错(我也不知道为啥)
img_file='C:\\Users\\LQL\\Desktop\\star.jpg'
#读取图片文件
img_a=cv2.imread(img_file)
 # cv2默认为BGR顺序,将顺序转为RGB
img_color = cv2.cvtColor(img_a, cv2.COLOR_BGR2RGB)
#返回height,width,以及通道数,因为不用所以省略掉
h, l, _ = img_a.shape
#打印图片总行数和列数,即竖向有多少像素,横向有多少像素
print('行数%d,列数%d' % (h, l))
#将颜色数据添加到color_total中,颜色数据方面采集完成
for i in img_color:
    color_total.append(i)

#Win32#打开EXCEL
excel = win32com.client.DispatchEx('Excel.Application')
#要处理的excel文件路径#out.file是文件  绝对路径
WinBook = excel.Workbooks.Open('C:\\Users\\LQL\\Desktop\\draw.xlsx')
 #要处理的excel页
WinSheet = WinBook.Worksheets('Sheet1')
#设置单元格颜色
#excel中[1,1]代表的是第一行第一列的单元格,而数组中[0][0]代表的是第一行一列
#其中color_total[x-1][y-1][0]对应的是第x行第y列图像R的值 color_total[x-1][y-1][1]代表G color_total[x-1][y-1][2]代表B
for x in range(1, h):
    for y in range(1, l):
        WinSheet.Cells(x, y).Interior.Color = RGB(color_total[x-1][y-1][0],color_total[x-1][y-1][1],color_total[x-1][y-1][2])
        #打印正在进行描绘的像素的位置
        print(x, y)
#保存
WinBook.save
#关闭
WinBook.close
11. 利用face_recognition模块给人物图片美颜
图一乐,美颜效果惨不忍睹。。
效果图:
参考来源: 链接.
需要PIL库和face_recognition库,face_recognition库貌似比较难装。。
代码如下:
# -*- coding: utf-8 -*-
from PIL import Image, ImageDraw
import face_recognition

# 将jpg文件加载到numpy数组中
image = face_recognition.load_image_file("./resource/尔康.jpg")

# 查找图像中所有面部的所有面部特征
face_landmarks_list = face_recognition.face_landmarks(image)

for face_landmarks in face_landmarks_list:
    pil_image = Image.fromarray(image)
    d = ImageDraw.Draw(pil_image, 'RGBA')
    # 让眉毛变成了一场噩梦
    d.polygon(face_landmarks['left_eyebrow'], fill=(68, 54, 39, 128))
    d.polygon(face_landmarks['right_eyebrow'], fill=(68, 54, 39, 128))
    d.line(face_landmarks['left_eyebrow'], fill=(68, 54, 39, 150), width=5)
    d.line(face_landmarks['right_eyebrow'], fill=(68, 54, 39, 150), width=5)

    # 光泽的嘴唇
    d.polygon(face_landmarks['top_lip'], fill=(150, 0, 0, 128))
    d.polygon(face_landmarks['bottom_lip'], fill=(150, 0, 0, 128))
    d.line(face_landmarks['top_lip'], fill=(150, 0, 0, 64), width=8)
    d.line(face_landmarks['bottom_lip'], fill=(150, 0, 0, 64), width=8)

    # 闪耀眼睛
    d.polygon(face_landmarks['left_eye'], fill=(255, 255, 255, 30))
    d.polygon(face_landmarks['right_eye'], fill=(255, 255, 255, 30))
    # 涂一些眼线
    d.line(face_landmarks['left_eye'] + [face_landmarks['left_eye'][0]], fill=(0, 0, 0, 110), width=6)
    d.line(face_landmarks['right_eye'] + [face_landmarks['right_eye'][0]], fill=(0, 0, 0, 110), width=6)

    pil_image.show()
12. 将视频转化为字符视频
需要在命令行下运行,并且视频转化需要一定时间。。
效果如下: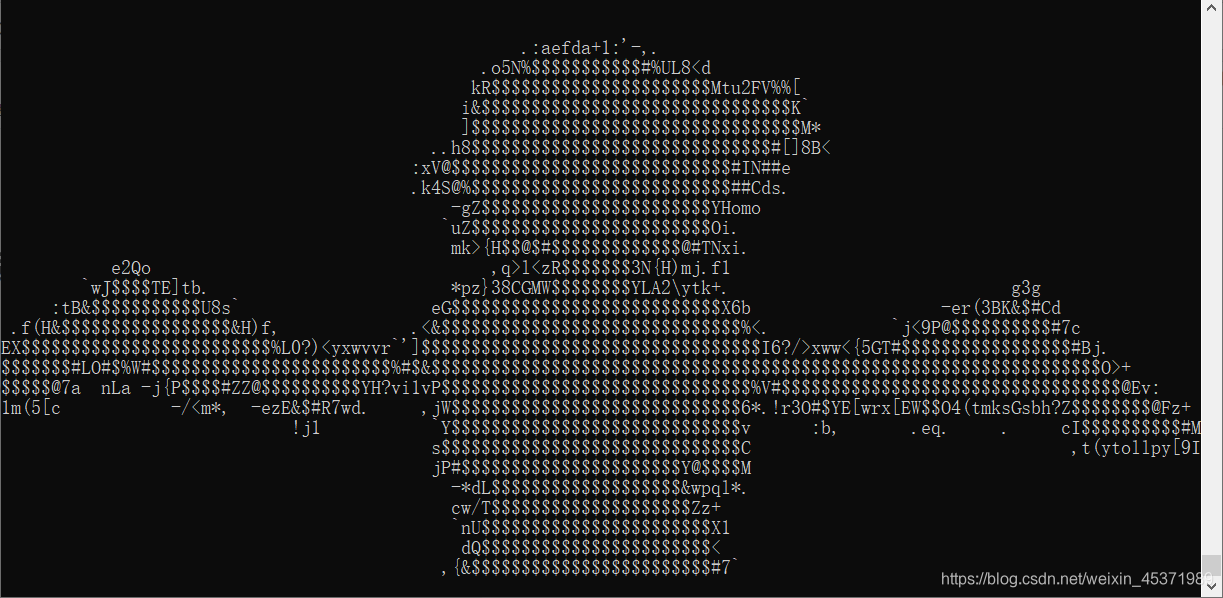
代码如下:
import sys
import os
import time
import threading
import cv2
import pyprind

# 图片转字符画的原理:首先将图片转为灰度图,每个像素都只有亮度信息(用 0~255 表示)。
# 然后我们构建一个有限字符集合,其中的每一个字符都与一段亮度范围对应,
# 我们便可以根据此对应关系以及像素的亮度信息把每一个像素用对应的字符表示,这样字符画就形成了。
# 用法如下:直接拖动程序和视频(去掉双引号之类的)
# python3 video2charvideo.py video.mp4 -e

# luminance 亮度
class CharFrame:

    # ascii_char = "$@B%8&WM#*oahkbdpqwmZO0QLCJUYXzcvunxrjft/\|()1{}[]?-_+~<>i!lI;:,\"^`'. "
    pixels = " .,-'`:!1+*abcdefghijklmnopqrstuvwxyz<>()\/{}[]?234567890ABCDEFGHIJKLMNOPQRSTUVWXYZ%&@#$"
    ascii_char = pixels[::-1]
    # 像素映射到字符
    def pixelToChar(self, luminance):
        return self.ascii_char[int(luminance/256*len(self.ascii_char))]

    # 将普通帧转为 ASCII 字符帧
    def convert(self, img, limitSize=-1, fill=False, wrap=False):
        if limitSize != -1 and (img.shape[0] > limitSize[1] or img.shape[1] > limitSize[0]):
            img = cv2.resize(img, limitSize, interpolation=cv2.INTER_AREA)
        ascii_frame = ''
        blank = ''
        if fill:
            blank += ' '*(limitSize[0]-img.shape[1])
        if wrap:
            blank += '\n'
        for i in range(img.shape[0]):
            for j in range(img.shape[1]):
                ascii_frame += self.pixelToChar(img[i,j])
            ascii_frame += blank
        return ascii_frame


class I2Char(CharFrame):

    result = None

    def __init__(self, path, limitSize=-1, fill=False, wrap=False):
        self.genCharImage(path, limitSize, fill, wrap)

    def genCharImage(self, path, limitSize=-1, fill=False, wrap=False):
        img = cv2.imread(path, cv2.IMREAD_GRAYSCALE)
        if img is None:
            return
        self.result = self.convert(img, limitSize, fill, wrap)

    def show(self, stream = 2):
        if self.result is None:
            return
        if stream == 1 and os.isatty(sys.stdout.fileno()):
            self.streamOut = sys.stdout.write
            self.streamFlush = sys.stdout.flush
        elif stream == 2 and os.isatty(sys.stderr.fileno()):
            self.streamOut = sys.stderr.write
            self.streamFlush = sys.stderr.flush
        elif hasattr(stream, 'write'):
            self.streamOut = stream.write
            self.streamFlush = stream.flush
        self.streamOut(self.result)
        self.streamFlush()
        self.streamOut('\n')


class V2Char(CharFrame):

    charVideo = []
    timeInterval = 0.033

    def __init__(self, path):
        if path.endswith('txt'):
            self.load(path)
        else:
            self.genCharVideo(path)

    def genCharVideo(self, filepath):
        self.charVideo = []
        cap = cv2.VideoCapture(filepath)
        self.timeInterval = round(1/cap.get(5), 3)
        nf = int(cap.get(7))
        print('Generate char video, please wait...')
        for i in pyprind.prog_bar(range(nf)):
            rawFrame = cv2.cvtColor(cap.read()[1], cv2.COLOR_BGR2GRAY)
            frame = self.convert(rawFrame, os.get_terminal_size(), fill=True)
            self.charVideo.append(frame)
        cap.release()

    def export(self, filepath):
        if not self.charVideo:
            return
        with open(filepath,'w') as f:
            for frame in self.charVideo:
                # 加一个换行符用以分隔每一帧
                f.write(frame + '\n')

    def load(self, filepath):
        self.charVideo = []
        # 一行即为一帧
        for i in  open(filepath):
            self.charVideo.append(i[:-1])

    def play(self, stream = 1):
        # Bug:
        # 光标定位转义编码不兼容 Windows
        if not self.charVideo:
            return
        if stream == 1 and os.isatty(sys.stdout.fileno()):
            self.streamOut = sys.stdout.write
            self.streamFlush = sys.stdout.flush
        elif stream == 2 and os.isatty(sys.stderr.fileno()):
            self.streamOut = sys.stderr.write
            self.streamFlush = sys.stderr.flush
        elif hasattr(stream, 'write'):
            self.streamOut = stream.write
            self.streamFlush = stream.flush
        breakflag = False

        def getChar():
            nonlocal breakflag
            try:
                # 若系统为 windows 则直接调用 msvcrt.getch()
                import msvcrt
            except ImportError:
                import termios, tty
                # 获得标准输入的文件描述符
                fd = sys.stdin.fileno()
                # 保存标准输入的属性
                old_settings = termios.tcgetattr(fd)
                try:
                    # 设置标准输入为原始模式
                    tty.setraw(sys.stdin.fileno())
                    # 读取一个字符
                    ch = sys.stdin.read(1)
                finally:
                    # 恢复标准输入为原来的属性
                    termios.tcsetattr(fd, termios.TCSADRAIN, old_settings)
                if ch:
                    breakflag = True
            else:
                if msvcrt.getch():
                    breakflag = True

        # 创建线程
        getchar = threading.Thread(target=getChar)
        # 设置为守护线程
        getchar.daemon = True
        # 启动守护线程
        getchar.start()
        # 输出的字符画行数
        rows = len(self.charVideo[0])//os.get_terminal_size()[0]
        for frame in self.charVideo:
            # 接收到输入则退出循环
            if breakflag:
                break
            self.streamOut(frame)
            self.streamFlush()
            time.sleep(self.timeInterval)
            # 共 rows 行,光标上移 rows-1 行回到开始处
            self.streamOut('\033[{}A\r'.format(rows-1))
        # 光标下移 rows-1 行到最后一行,清空最后一行
        self.streamOut('\033[{}B\033[K'.format(rows-1))
        # 清空最后一帧的所有行(从倒数第二行起)
        for i in range(rows-1):
            # 光标上移一行
            self.streamOut('\033[1A')
            # 清空光标所在行
            self.streamOut('\r\033[K')
        if breakflag:
            self.streamOut('User interrupt!\n')
        else:
            self.streamOut('Finished!\n')

if __name__ == '__main__':
    import argparse
    # 设置命令行参数
    parser = argparse.ArgumentParser()
    parser.add_argument('file',
                        help='Video file or charvideo file')
    parser.add_argument('-e', '--export', nargs = '?', const = 'charvideo.txt',
                        help='Export charvideo file')
    # 获取参数
    args = parser.parse_args()
    v2char = V2Char(args.file)
    if args.export:
        v2char.export(args.export)
    v2char.play()
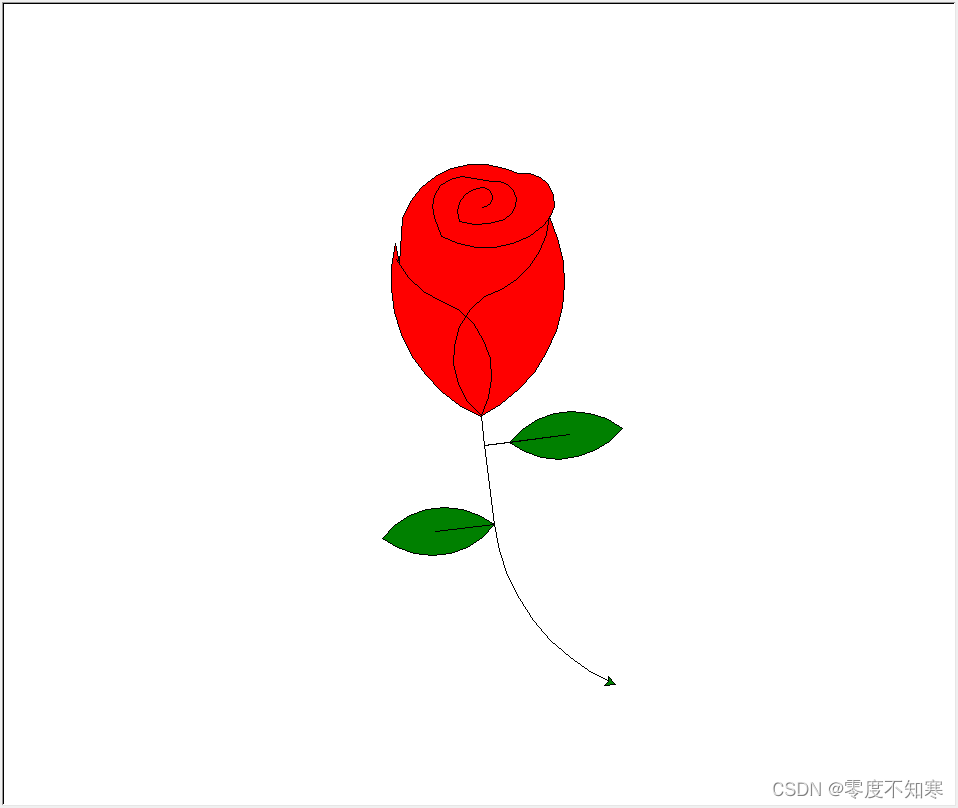
13.turtle画图系列
python利用turtle模块画一些有意思的图,比如玫瑰、前面的樱花树等都有,目前一共9个代码,虽简单但有趣。
参考来源(github)